Go Back
- 2 cups sushi rice - 2 ½ cups water - 1 teaspoon salt - 1 tablespoon rice vinegar - 1 tablespoon sugar - 1 chicken breast, cooked and shredded - 2 tablespoons soy sauce - 1 teaspoon sesame oil - 1 green onion, finely chopped - 1 sheet nori (seaweed), cut into strips - Optional: sesame seeds for garnish Chicken onigiri is a simple dish that packs a lot of flavor. To start, you need sushi rice. This rice is sticky and perfect for holding its shape. You also need water to cook the rice. Salt adds a bit of flavor. Rice vinegar and sugar give the rice a nice tangy taste. Next, you need chicken. Cook and shred one chicken breast. This will be your filling. Soy sauce adds a savory taste. Sesame oil gives a nice nutty flavor. Finely chopped green onion adds freshness. Don't forget about nori. This seaweed wraps around the onigiri and adds another layer of flavor. Optional sesame seeds can sprinkle on top for a crunchy finish. Each ingredient plays a role in making your chicken onigiri tasty and satisfying. {{ingredient_image_2}} Rinsing the sushi rice Start by rinsing 2 cups of sushi rice. Use a fine-mesh strainer under cold water. Keep rinsing until the water runs clear. This step removes excess starch, making the rice fluffy. Cooking methods (rice cooker vs stovetop) You can cook the rice in two ways. For a rice cooker, add the rinsed rice and 2 ½ cups of water. Follow your cooker’s instructions. For stovetop, combine the rice and water in a pot with 1 teaspoon of salt. Bring it to a boil, then cover and reduce the heat. Let it simmer for about 18 minutes. Seasoning the rice After cooking, mix 1 tablespoon of rice vinegar and 1 tablespoon of sugar in a small bowl. Once the rice is ready, transfer it to a large bowl. Gently fold in the vinegar mix. Use a wooden paddle to avoid mashing the rice. Allow it to cool slightly. Cooking and shredding the chicken If you don’t have cooked chicken, you can boil a chicken breast. Once it’s cooked, let it cool, then shred it using two forks or your hands. Mixing the chicken with sauces In a separate bowl, add the shredded chicken. Mix in 2 tablespoons of soy sauce and 1 teaspoon of sesame oil. Add finely chopped green onion for extra flavor. Stir well until the chicken is coated. Shaping techniques (triangle, oval) To shape the onigiri, dampen your hands with water. Take about 1/3 cup of seasoned rice. Flatten it into a small disc in your palm. Place a spoonful of the chicken filling in the center. Assembling the onigiri Carefully fold the rice around the filling. Shape it into a triangle or an oval. Repeat this with the remaining rice and filling until all are shaped. How to wrap with nori Take a strip of nori and wrap it around the base of each onigiri. This adds flavor and a handy way to hold it. Serving suggestions Serve the onigiri as a snack or a meal. Enjoy them with pickled vegetables for a nice touch. You can even sprinkle sesame seeds on top for added crunch. Rinsing the sushi rice is key. This step removes extra starch. If you skip it, your rice will be sticky. Rinse until the water runs clear. This ensures a fluffy texture. Cooking time matters too. Use a rice cooker for ease. If cooking on the stove, bring water to a boil. Cover and reduce heat. Let it simmer for about 18 minutes. Check for tenderness at the end. Cooling the rice helps too. After cooking, transfer it to a large bowl. Gently fold in rice vinegar and sugar. This adds flavor and helps the rice cool. Let it sit at room temperature. You can change the chicken filling for different flavors. Tofu works well for a vegetarian option. Ground beef or shredded pork is also tasty. To enhance the flavor, add spices or herbs. Try garlic powder or ginger for a kick. Chopped cilantro or basil adds freshness. Mix these into your filling for extra taste. Prevent sticking by wetting your hands. Dampen them slightly before forming the onigiri. This keeps the rice from clinging to your fingers. For storage, place onigiri in an airtight container. This helps keep them fresh. If you plan to eat later, wrap them in plastic wrap. Keep them in the fridge for up to three days. If you want to save them longer, consider freezing. Let them thaw in the fridge overnight when ready to eat. Pro Tips Rinse the Rice: Always rinse sushi rice thoroughly until the water runs clear to achieve a fluffy texture. Perfect Shaping: Wet your hands while forming the onigiri to prevent the rice from sticking to your skin. Flavor Boost: Add a little more soy sauce and sesame oil to the chicken filling for an extra flavor kick. Storage Tips: Keep onigiri wrapped in nori in an airtight container in the fridge for up to 2 days for freshness. {{image_4}} You can customize chicken onigiri with many fillings. For vegetarian options, try using avocado or tofu. These ingredients add a creamy texture and taste. Other popular fillings include salmon and pickled vegetables. Salmon gives a rich flavor, while pickled veggies add a tangy crunch. Explore different fillings to match your taste. Onigiri can come in various shapes. The common triangle shape is easy to make and holds the filling well. However, you can also form them into ovals or balls. Each shape has its own cultural meaning. For uniform shapes, use molds. These molds make onigiri look neat and professional. You can adjust the seasonings to fit your local taste. Some people like spicy onigiri, adding chili flakes or spicy sauce. Others prefer a sweet touch, using a bit of honey or sugar. Garnishes like sesame seeds or chopped herbs can add texture and flavor. Experiment with different seasonings to find your favorite. Store leftover onigiri in the fridge. Use an airtight container. This keeps them fresh. You can also wrap them tightly in plastic wrap. If you want to freeze onigiri, wrap each one well. Use freezer bags to avoid freezer burn. This method helps maintain taste and texture. Onigiri lasts about 3 days in the fridge. In the freezer, they can last up to a month. Always check for signs of spoilage. Look for an off smell or visible mold. If the rice feels hard or dry, it's time to toss it. You can reheat onigiri in the microwave. Place them on a plate and cover with a damp paper towel. Heat for about 30 seconds. For stovetop reheating, place them in a pan with a little water. Cover and heat on low. Keep an eye on them to avoid burning. This helps keep the rice soft and fluffy. Onigiri is a Japanese rice ball filled with tasty ingredients. It often has a triangle or oval shape. This dish is popular for snacks and lunches. Onigiri holds cultural meaning in Japan. People often enjoy it during picnics or festivals. It shows care and love in food preparation. Yes, you can use regular rice, but it changes the texture. Sushi rice is sticky and short-grained. It helps the onigiri hold its shape better. Regular rice might not stick as well. If you use it, make sure to cook it properly. To make onigiri vegan, use plant-based fillings. Try tofu, avocado, or pickled vegetables as fillings. You can also use mushrooms for a savory touch. Replace the chicken with a mix of soy sauce, sesame oil, and veggies. This keeps the flavors rich and satisfying. Onigiri is a great meal prep choice. It stores well and is easy to make in batches. You can fill them with different flavors to keep things interesting. They are easy to grab for lunch or snacks. Just wrap them in nori for added flavor and fun! In this post, we explored how to make delicious onigiri, starting with key ingredients and simple steps. I shared tips for perfecting rice texture and offered various filling options. We discussed creative shapes and how to store leftovers effectively. Onigiri is not only tasty but also flexible for your dietary needs. I hope you feel inspired to try making these rice balls at home. Happy cooking!

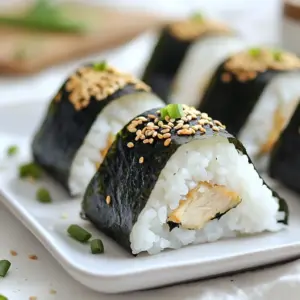
Savory Chicken Onigiri Delight

These savory chicken onigiri make for a delicious snack, hearty lunch, or perfect picnic treat! Serve them with a side of pickled vegetables for an authentic touch. Enjoy!
Course Main Course
Cuisine Japanese
Servings 4
Calories 250 kcal

Ingredients
  

  • 2 cups sushi rice
  • 2.5 cups water
  • 1 teaspoon salt
  • 1 tablespoon rice vinegar
  • 1 tablespoon sugar
  • 1 chicken breast cooked and shredded
  • 2 tablespoons soy sauce
  • 1 teaspoon sesame oil
  • 1 green onion finely chopped
  • 1 sheet nori (seaweed), cut into strips
  • sesame seeds for garnish (optional)

Instructions
 

  • Prepare the Rice: Start by rinsing the sushi rice in a fine-mesh strainer under cold running water. Continue rinsing until the water runs clear, removing excess starch for a perfect, fluffy texture.
  • Cook the Rice: In a rice cooker or a medium-sized pot, combine the rinsed rice with 2 ½ cups of water. Add 1 teaspoon of salt for flavor. If using a rice cooker, follow the manufacturer's instructions. If cooking on the stovetop, bring the mixture to a boil, then cover and lower the heat. Let it simmer for about 18 minutes, or until all the water is absorbed and the rice is tender.
  • Season the Rice: In a small bowl, whisk together the rice vinegar and sugar until the sugar dissolves completely. Once the rice is cooked, transfer it to a large mixing bowl. Gently fold in the vinegar mixture using a wooden paddle or spatula, taking care not to mash the rice. Allow it to cool slightly at room temperature.
  • Prepare the Chicken Filling: In a separate bowl, combine the shredded chicken with soy sauce, sesame oil, and finely chopped green onion. Mix well until the chicken is evenly coated in the flavorful sauce.
  • Form the Onigiri: Dampen your hands slightly with water to prevent sticking. Take approximately 1/3 cup of the seasoned sushi rice and flatten it into a small disc in your palm. Spoon a portion of the chicken filling into the center of the rice disc. Carefully fold the rice around the filling, shaping it into a triangle or oval. Repeat this process with the remaining rice and filling until all are shaped.
  • Wrap with Nori: Take a strip of nori and wrap it around the base of each onigiri, providing both flavor and a convenient handle. For an added touch, sprinkle sesame seeds over the onigiri for a delightful crunch.

Notes

Optional: sesame seeds for garnish.
Keyword chicken, Japanese cuisine, onigiri, snack