Go Back
- 2 cups all-purpose flour - 1/2 cup granulated sugar - 2 teaspoons baking powder - 1/2 teaspoon baking soda - 1/2 teaspoon salt - 1/2 teaspoon ground cinnamon - 1/4 cup unsalted butter, melted - 3/4 cup buttermilk - 1 large egg - 1 teaspoon vanilla extract - Oil for frying - 1/2 cup maple syrup - 1 teaspoon pure vanilla extract (for glaze) - 1/2 teaspoon ground cinnamon (optional for glaze) These simple ingredients come together to create a delightful treat. The flour, sugar, and spices give the donut holes their classic flavor. The combination of baking powder and baking soda helps them rise and become fluffy. Buttermilk adds a nice tang, while the melted butter keeps them moist. For the glaze, maple syrup is key. It provides that sweet, rich flavor that pairs perfectly with the donut holes. The optional vanilla extract and cinnamon enhance the glaze, making it even more special. Each ingredient plays a vital role, so be sure to measure accurately for the best results. - Mixing dry ingredients: In a large bowl, add 2 cups of flour, 1/2 cup of sugar, 2 teaspoons of baking powder, 1/2 teaspoon of baking soda, 1/2 teaspoon of salt, and 1/2 teaspoon of ground cinnamon. Whisk these together until well combined. - Combining wet ingredients: In a separate bowl, mix 1/4 cup of melted butter, 3/4 cup of buttermilk, 1 egg, and 1 teaspoon of vanilla extract. Stir until smooth and all ingredients blend well. - Techniques for rolling dough into balls: Lightly flour your hands. Pinch off small pieces of dough, about the size of a golf ball. Roll these pieces into smooth balls. - Importance of flouring hands: Flour helps prevent sticking. This way, you can shape the dough easily without mess. - Heating oil to the right temperature: In a pot, heat 2 inches of oil to 350°F (175°C). Use a thermometer for accuracy. - Tips for frying in batches for even cooking: Fry the dough balls in small batches. This keeps the temperature steady and cooks them evenly. - Heating the glaze mixture: In a small saucepan over low heat, mix 1/2 cup of maple syrup with 1 teaspoon of vanilla extract. Stir gently until warmed. - Incorporating optional cinnamon for flavor enhancement: If you like, add 1/2 teaspoon of ground cinnamon. This gives the glaze a warm, rich flavor. - Proper technique for dipping: Once the donut holes are cool, dip each one into the warm glaze. Let any extra glaze drip off. - Tips for allowing glaze to set: Place the glazed donut holes on a wire rack or plate. Let them sit for about 10 minutes to allow the glaze to set. To get the best donut holes, avoid overmixing the dough. When you mix too much, they can turn out tough. Stir just until you see no dry flour. The dough should feel slightly sticky, which is good! Make sure the oil is at the right temperature. Heat it to 350°F (175°C). If it’s too cold, the holes will absorb oil and become greasy. If too hot, they will burn outside and stay raw inside. A good thermometer helps you keep track. You can add fun spices to boost the flavor. Ground nutmeg or cardamom can make your donut holes more exciting. A little vanilla extract in the dough adds sweetness, too. Think about toppings! You can sprinkle powdered sugar or add colorful sprinkles. They make your donut holes look festive and fun. Try pairing them with coffee or hot chocolate for a cozy treat. One big mistake is overcrowding the frying pan. Fry in small batches to let them cook evenly. If you add too many, they will stick together and cook poorly. Another tip is to let the donut holes cool before glazing. If they are too hot, the glaze will melt away. Let them rest for a few minutes to get that nice, thick glaze. {{image_2}} You can change the flavor of your maple glazed donut holes in fun ways. One easy way is to add a chocolate or peanut butter glaze. Just melt chocolate or mix peanut butter into the glaze. This adds a rich taste. You can also create unique flavors by mixing in fruit purees or nuts. For example, add mashed bananas or crushed walnuts to the dough for a twist. These small changes can make your donut holes special and tasty. If you need gluten-free or dairy-free donut holes, there are simple swaps. For gluten-free, use almond flour or a gluten-free flour blend. This will help keep the same texture. For dairy-free, substitute buttermilk with almond milk plus a splash of vinegar. You might need to adjust the frying time. Keep an eye on them as they cook. This ensures they don’t brown too fast while cooking. Making mini donut holes is a fun idea for bite-sized treats. Just roll the dough into smaller balls, about half the size of golf balls. This way, you can enjoy them in one bite! When frying, cook them for about 1-2 minutes. Check often to make sure they do not burn. These mini treats are perfect for parties or sharing with friends. To keep leftover donut holes fresh, place them in an airtight container. This helps keep them soft. You can store them at room temperature for up to two days. If you want to keep them longer, follow these tips: - Avoiding sogginess after frying: Let the donut holes cool on a wire rack. This helps air circulate around them. Do not cover them until they cool completely. Covering them too soon can trap moisture, making them soggy. If you want to enjoy your maple glazed donut holes later, freezing is a great option. Here’s how to do it: - How to freeze donut holes for later enjoyment: Once cooled, place the donut holes in a single layer on a baking sheet. Freeze them for about an hour. After they are firm, transfer them to a freezer bag. This prevents sticking and keeps them fresh. - Proper thawing methods for best texture: To thaw, take the donut holes out of the freezer. Leave them in the fridge overnight or on the counter for a few hours. This keeps their texture nice. Avoid using a microwave, as it can make them tough. When you want to enjoy your frozen donut holes, reheating them carefully is key: - Best methods for reheating without losing quality: Preheat your oven to 350°F (175°C). Place the donut holes on a baking sheet and heat for about 5-7 minutes. This warms them up without drying them out. - Serving suggestions post-reheating: For extra flavor, you can dip them in more maple glaze after reheating. You can also sprinkle some extra cinnamon on top for a delightful touch. Enjoy these warm and fresh for the best experience! Maple glazed donut holes taste best fresh. They can last about 1 to 2 days at room temperature. Store them in an airtight container to keep them soft. If you want them to last longer, refrigerate them. They can stay good for about a week in the fridge. Just remember, they may lose some of their fluffy texture. Yes, you can make the dough ahead of time! Mix the dry and wet ingredients as per the recipe. Then, wrap the dough tightly in plastic wrap. Store it in the fridge for up to 24 hours. When you’re ready to fry, let the dough warm up for about 15 minutes. This helps in rolling the dough into balls. Donut holes are smaller and rounder than regular donuts. They are made from the dough that is cut out from the center of a donut. The texture is often denser since they cook faster. Regular donuts can have more toppings and fillings. Both are delicious, but donut holes are fun bite-sized treats! Making donut holes at home is fun and rewarding. We covered key ingredients, step-by-step instructions, and tips for that perfect texture. You learned how to create delicious maple glazed treats and even explore variations for every taste. Remember to store leftovers properly and enjoy them later! These easy tips will help you avoid common mistakes and make the most of your donut holes. Get ready to impress friends and family with your tasty, homemade treats. Happy frying and glazing!

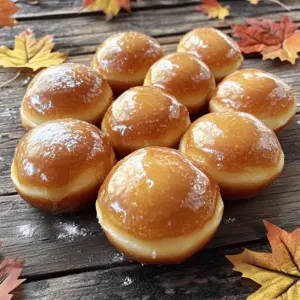
Maple Glazed Donut Holes

Indulge in the ultimate treat with these irresistible maple glazed donut holes! This easy recipe combines simple ingredients for a delightful dessert that's perfect for any occasion. You'll love the warm, fluffy donut holes drizzled with a sweet maple glaze. Ready in just 50 minutes, these baked bites are a must-try! Click now to explore the full recipe and bring a taste of maple goodness to your kitchen!

Ingredients
  

2 cups all-purpose flour

1/2 cup granulated sugar

2 teaspoons baking powder

1/2 teaspoon baking soda

1/2 teaspoon salt

1/2 teaspoon ground cinnamon

1/4 cup unsalted butter, melted

3/4 cup buttermilk (or milk with 1 tablespoon vinegar added)

1 large egg

1 teaspoon vanilla extract

Oil for frying (vegetable or canola)

1/2 cup maple syrup

1 teaspoon pure vanilla extract (for glaze)

1/2 teaspoon ground cinnamon (for glaze, optional)

Instructions
 

Prepare the Dough: In a large bowl, whisk together the flour, sugar, baking powder, baking soda, salt, and ground cinnamon. In another bowl, mix the melted butter, buttermilk, egg, and vanilla extract until well combined.

    Combine Mixtures: Pour the wet ingredients into the dry ingredient bowl. Stir until just combined; do not overmix. The dough will be slightly sticky.

      Shape the Donut Holes: Lightly flour your hands and pinch off small pieces of dough, rolling them into balls about the size of a golf ball. Place them on a floured surface.

        Heat the Oil: In a heavy pot or deep fryer, heat 2 inches of oil to 350°F (175°C).

          Fry the Donut Holes: Working in batches, gently drop the dough balls into the hot oil. Fry for 2-3 minutes, turning occasionally, until they puff up and turn golden brown. Remove them with a slotted spoon and drain on paper towels.

            Prepare the Maple Glaze: In a small saucepan over low heat, combine the maple syrup, vanilla extract, and optional ground cinnamon. Stir until warmed and mixed well.

              Glaze the Donut Holes: Once the donut holes are slightly cooled, dip them into the warm maple glaze, allowing any excess glaze to drip off.

                Let Set and Serve: Place the glazed donut holes on a wire rack or plate until the glaze sets slightly, about 10 minutes.

                  Prep Time: 20 minutes | Total Time: 50 minutes | Servings: About 24 donut holes