If you’re craving a sweet treat that’s easy to make and packed with flavor, you’ve landed in the right spot! My Salted Caramel Biscoff Cheesecake Cups are a delightful mix of creamy cheesecake and crunchy cookie layers. Trust me, these cups will impress your friends and satisfy your sweet tooth. Get ready to learn how to whip up this tempting dessert that you’ll want to enjoy again and again!
Ingredients
List of Ingredients
To make your Salted Caramel Biscoff Cheesecake Cups, gather these simple items:
– 200g Biscoff cookies (crushed)
– 100g unsalted butter (melted)
– 400g cream cheese (softened)
– 100g powdered sugar
– 1 teaspoon vanilla extract
– 200ml heavy whipping cream
– 100g salted caramel sauce (plus extra for drizzling)
– A pinch of sea salt
– Biscoff cookies (for garnish)
Optional Ingredients for Customization
You can tweak your cheesecake cups to fit your taste. Here are some ideas:
– Add a splash of coffee to the cream cheese mix for a mocha flavor.
– Swap Biscoff cookies with Oreos for a chocolate twist.
– Mix in some crushed nuts for a crunchy texture.
Suggested Substitutions
If you need to switch out ingredients, here are some great options:
– Use gluten-free cookies instead of Biscoff for a gluten-free dessert.
– Replace heavy cream with coconut cream for a dairy-free option.
– Instead of powdered sugar, use maple syrup for a natural sweetener.
These ingredients create a rich and creamy dessert that is sure to impress.
Step-by-Step Instructions
Preparation of Cookie Crust
To start, gather your Biscoff cookies and melted butter. In a medium bowl, mix the crushed cookies with the butter. Stir until it looks like wet sand. This mixture will form the base of our cheesecake cups. Take your serving cups or small jars and divide the cookie mix evenly into them. Press it down firmly to create a nice, sturdy crust. Then, set the cups aside in the refrigerator to chill while you make the cheesecake filling.
Making the Cheesecake Mixture
Now, let’s make the creamy cheesecake layer. In a large mixing bowl, beat the softened cream cheese. Add the powdered sugar and vanilla extract, mixing until smooth and creamy. This step is key for a delightful texture. In another bowl, whip the heavy cream until soft peaks form. This adds fluffiness to your cheesecake. Gently fold the whipped cream into the cream cheese mixture. Be careful not to deflate the cream. Finally, add the salted caramel sauce and a pinch of sea salt. Fold this in until it’s well mixed, creating a rich, sweet flavor.
Assembly of Cheesecake Cups
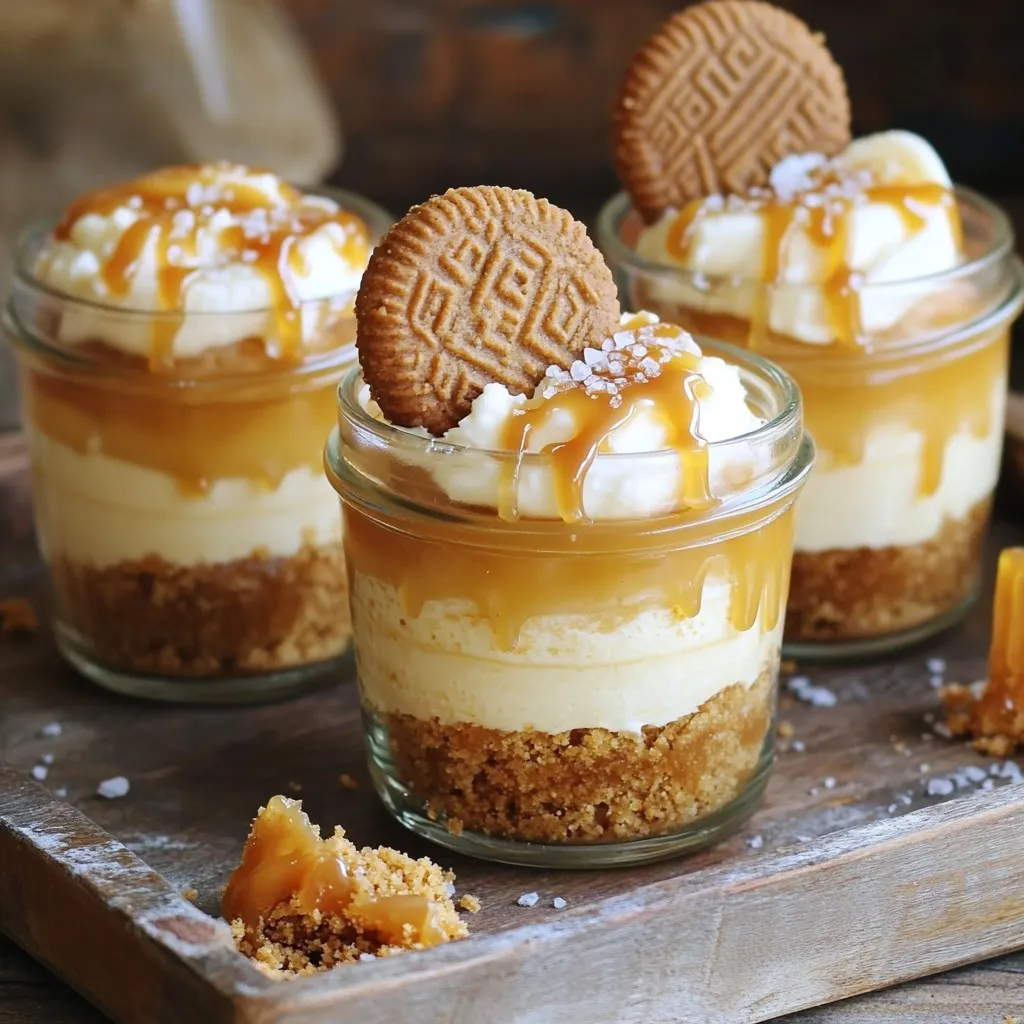
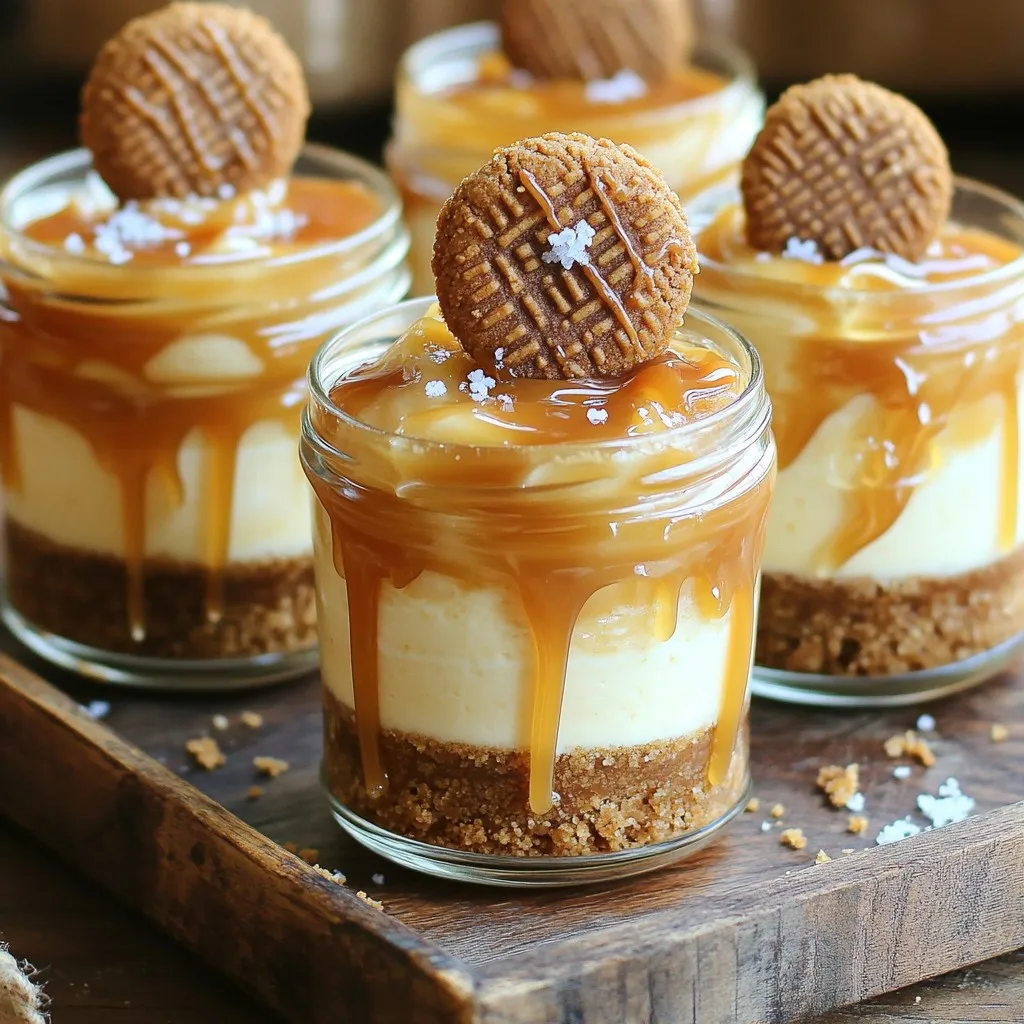
Now it’s time to assemble! Spoon or pipe the cheesecake mixture on top of the chilled cookie crust in each cup. Fill them all the way to the top for a stunning look. Drizzle some extra salted caramel sauce over each layer. A tiny pinch of sea salt adds that perfect touch. To finish, garnish each cup with a Biscoff cookie on top. Chill your cups in the refrigerator for at least two hours. This helps everything set perfectly and makes them easy to serve later. Enjoy your delicious salted caramel Biscoff cheesecake cups!
Tips & Tricks
How to Achieve the Perfect Whipped Cream
To make great whipped cream, start with cold tools. Use a chilled bowl and beaters. This helps the cream whip faster. Pour the heavy cream into your bowl. Beat it until soft peaks form. This means it holds its shape but is still fluffy. Don’t overbeat it. If you do, it turns into butter! Gently fold the whipped cream into your cheesecake mix. This keeps it light and airy.
Classroom for Flavor Variation
You can change up the flavors in your cheesecake cups. Try using different cookies for the crust. Ginger snaps or Oreos work well. You can also switch the caramel sauce for chocolate sauce. Add a pinch of espresso powder for a coffee kick. Want a fruity twist? Fold in some crushed berries or lemon zest. These small changes can create a new dessert experience.
Presentation Tips for Serving
Make your cheesecake cups look stunning! Use clear cups or jars to show off the layers. Drizzle extra salted caramel sauce on top right before serving. Sprinkle crushed Biscoff cookies for crunch and style. You can even add a fresh berry for color. Arrange the cups on a decorative tray. This makes your dessert look even more inviting. Serve chilled for the best taste!
Variations
Alternative Cookie Choices
You can swap Biscoff cookies for other types. Try Oreo cookies for a chocolate twist. Graham crackers add a classic touch. You can also use digestive biscuits for a different flavor. Each cookie brings its special taste to the cheesecake cups. Experiment with what you love most!
Different Toppings
Toppings can change how your cheesecake cups look and taste. Use fresh fruit like strawberries or raspberries for a fruity kick. Shaved chocolate adds richness and a nice visual. You could also sprinkle crushed nuts for a crunchy texture. Each topping makes your dessert unique!
Healthier Ingredient Options
If you’re looking for lighter options, you can make some swaps. Use low-fat cream cheese to cut down on calories. Greek yogurt can also replace cream cheese for a tangy twist. Opt for a sugar substitute in place of powdered sugar. These swaps keep the flavor while making it healthier!
Storage Info
Best Practices for Storing Cheesecake Cups
To keep your cheesecake cups fresh, store them in the fridge. Use airtight containers to prevent any odors from getting in. If you have leftover cheesecake cups, cover them with plastic wrap or a lid. This keeps the flavor and texture intact. Remember to chill them until you’re ready to serve. It’s best to eat them within a few days for the best taste.
Freezing Instructions
You can freeze the cheesecake cups if you want to save them for later. First, make sure they are fully chilled. Then, wrap each cup tightly in plastic wrap. After that, place them in a freezer-safe bag or container. This will help prevent freezer burn. When you’re ready to eat them, thaw them in the fridge overnight. Avoid microwaving to keep the texture smooth.
Shelf Life of Cheesecake Cups
These cheesecake cups can last in the fridge for about 4 to 5 days. If you freeze them, they can last up to 2 months. Just remember that the longer they sit, the texture might change slightly. To enjoy the best flavor and creaminess, try to eat them sooner rather than later.
FAQs
Can I make these cheesecake cups ahead of time?
Yes, you can make these cheesecake cups ahead of time. They taste even better after chilling. I recommend making them a day before serving. This gives the flavors time to blend. After you prepare them, cover each cup and place them in the fridge. They will stay fresh and delicious for up to three days.
How do I know if the cheesecake mixture is ready?
You know the cheesecake mixture is ready when it is smooth and creamy. First, mix the cream cheese, powdered sugar, and vanilla extract until there are no lumps. Then, fold in the whipped cream gently. It should look light and fluffy. If it holds its shape when you spoon it, you are good to go!
What can I serve with the Salted Caramel Biscoff Cheesecake Cups?
You can serve these cheesecake cups with a variety of tasty options. Try fresh berries like strawberries or raspberries for a fruity contrast. A dollop of whipped cream also adds a nice touch. You could even pair them with some extra Biscoff cookies for crunch. Each bite will be a delightful mix of flavors!
You learned how to make delicious cheesecake cups step by step. We covered key ingredients and helpful tips. You can customize your dessert with different flavors and toppings. Remember to follow the storage tips for the best taste. These cheesecake cups are great for sharing or special occasions. Enjoy creating your tasty dessert masterpiece!
