Get ready to indulge in No-Bake Biscoff Pumpkin Cheesecake Bites! These treats blend creamy pumpkin goodness with the unique flavor of Biscoff cookies. Perfect for any occasion, they are easy to make and require no baking. Whether you’re a dessert novice or a pro, you’ll love the simple steps I share. Let’s dive into the tasty world of these delightful bites that will impress everyone!
Ingredients
Detailed ingredient list
To make No-Bake Biscoff Pumpkin Cheesecake Bites, you will need:
– 1 cup Biscoff cookies, crushed
– 1/2 cup unsalted butter, melted
– 1 cup cream cheese, softened
– 1 cup pumpkin puree
– 1/2 cup powdered sugar
– 1 teaspoon vanilla extract
– 1 teaspoon pumpkin pie spice
– A pinch of salt
– Extra Biscoff cookies for garnish
These ingredients create a sweet, creamy treat that is both rich and light.
Measurement conversions for different servings
If you want to make more or fewer bites, adjust the recipe as follows:
– For 6 bites: Halve all the ingredients.
– For 18 bites: Multiply by 1.5.
– For 24 bites: Double all the ingredients.
This way, you can fit your needs for any gathering or snack time.
Ingredient substitutions
You might not have all the ingredients. Here are some easy swaps:
– Biscoff cookies: Use graham crackers or Oreos for the crust.
– Cream cheese: Substitute with mascarpone cheese for a different flavor.
– Pumpkin puree: Use sweet potato puree if you cannot find pumpkin.
– Powdered sugar: Brown sugar works as a sweet alternative.
These substitutions keep the spirit of the recipe while allowing for personal tastes.
Step-by-Step Instructions
Preparation of the crust
First, you need to make the crust. Grab 1 cup of crushed Biscoff cookies. You can use a food processor or a rolling pin to crush them. Next, melt 1/2 cup of unsalted butter. Mix the crushed cookies and melted butter in a bowl. Stir until it looks like wet sand.
Now, take mini muffin tins or silicone molds. Press the cookie mixture firmly into the bottom of each mold. This forms a solid base. Place the molds in the refrigerator. Let them chill while you make the filling.
Making the creamy filling
Now it’s time for the filling. In a large bowl, beat 1 cup of softened cream cheese. Make sure it’s smooth and creamy. Then, add 1 cup of pumpkin puree. This gives the cheesecake its fall flavor.
Next, mix in 1/2 cup of powdered sugar. Add 1 teaspoon of vanilla extract and 1 teaspoon of pumpkin pie spice. Don’t forget a pinch of salt. Mix everything until well combined. The filling should be thick and smooth.
Assembly and chilling process
Take the crusts out of the fridge. Carefully fill each mold with the pumpkin cream cheese mixture. Smooth the tops with a spatula. Make sure each bite looks nice and even.
Now, return the filled molds to the refrigerator. Let them chill for at least 2-3 hours. This helps the cheesecake bites set. Once they are firm, gently pop them out of the molds.
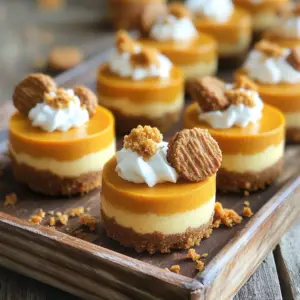
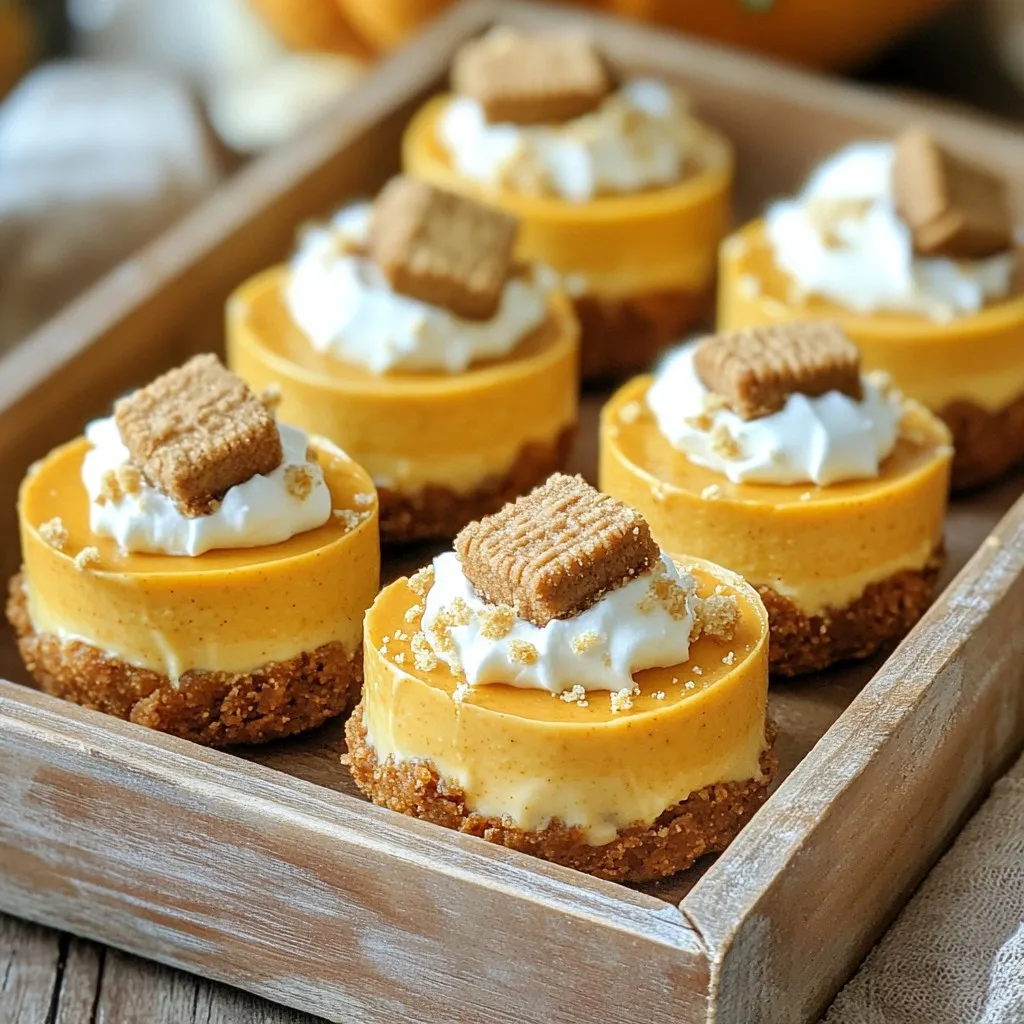
For a final touch, crumble extra Biscoff cookies on top or add whipped cream. These bites look great and taste even better!
Tips & Tricks
How to achieve the perfect texture
To get a smooth cheesecake bite, ensure your cream cheese is very soft. This makes mixing easy. If it is too cold, it will be lumpy. Also, mix the batter well. You want it creamy and free of lumps. For a light texture, fold in your ingredients gently. This keeps air in.
Avoiding common mistakes
One common mistake is not chilling long enough. These bites need 2-3 hours to set properly. If you skip this step, they might fall apart. Also, don’t overpack the crust. Press it just enough to hold together. Too much pressure can make it hard instead of crunchy.
Serving suggestions for optimal presentation
For a beautiful presentation, use mini muffin liners. They add color and make serving easy. Top each bite with a sprinkle of crushed Biscoff cookies. This adds a nice crunch. A dollop of whipped cream also looks great. It invites everyone to take a bite!
Variations
Flavor variations
You can change the flavor of your cheesecake bites. Adding chocolate gives a rich taste. Melt some dark chocolate and swirl it into the filling. It pairs well with pumpkin. You can also add nuts for a crunchy texture. Chopped pecans or walnuts work great. They add flavor and a fun bite.
Dietary alterations
Want a vegan option? Use vegan cream cheese and coconut butter. Replace pumpkin puree with a nut-based cream for a unique twist. For a gluten-free version, look for gluten-free Biscoff cookies. This way, everyone can enjoy them without worry.
Seasonal variations
Seasonal spices can change the vibe of your bites. In winter, add nutmeg or cloves for warmth. In spring, you might try lemon zest for brightness. Toppings can also vary. Use fresh berries in the summer or a drizzle of caramel in the fall. Each season brings its own flair. Experiment and find your favorite!
Storage Info
Best practices for storing cheesecake bites
To keep your no-bake Biscoff pumpkin cheesecake bites fresh, store them in an airtight container. This helps avoid any fridge odors. You can place parchment paper between layers to prevent sticking. Always refrigerate them as soon as they are set.
How long they last in the refrigerator
These delightful bites last for about 5 to 7 days in the fridge. After that, they may lose their taste or texture. I recommend enjoying them within the first few days for the best flavor.
Freezing and thawing instructions
You can freeze these cheesecake bites if you want to save some for later. Place them in a single layer on a baking sheet until firm. Then, transfer them to an airtight container or freezer bag. They can last up to 2 months in the freezer. When you’re ready to enjoy, thaw them in the fridge overnight. Avoid thawing at room temperature to keep them creamy.
FAQs
Can I make these cheesecake bites in advance?
Yes, you can make these cheesecake bites ahead of time. They chill well in the fridge. Prepare them a day or two before your event. Just store them in an airtight container. This keeps them fresh and tasty.
What can I use if I don’t have pumpkin puree?
If you lack pumpkin puree, use sweet potato puree instead. It has a similar taste and texture. You can also use applesauce for a different flavor. Both options work well in this recipe.
How do I know when they are fully set?
Check if the cheesecake bites are firm to the touch. They should not feel soft or wobbly. After chilling for 2-3 hours, they are ready. If unsure, let them chill longer for extra firmness.
This blog post covered how to create tasty cheesecake bites. We explored ingredients, conversions, and substitutions. I shared step-by-step instructions for the crust and filling. I offered tips for the perfect texture and ways to avoid mistakes. We discussed flavor variations and dietary options, plus storage tips for freshness.
Remember these pointers to enjoy your cheesecake bites fully. You can have fun with flavors and make them to fit your needs. Each bite can be special and satisfying. Enjoy your time creating and tasting!