Herb & Garlic Swirl Rolls Freshly Baked Delight

WANT TO SAVE THIS RECIPE?

Are you ready to bake something special? Herb & Garlic Swirl Rolls are a game-changer for your meals. Their warm, rich flavors will make your kitchen smell amazing. I’ll guide you through each step, from mixing the dough to baking it to perfect golden brown. With easy tips and tasty variations, you’ll master these delightful rolls in no time. Let’s dive in and create a fresh, baked treat that everyone will love!

Ingredients

Main Ingredients for Herb & Garlic Swirl Rolls

To make these delightful rolls, gather the following main ingredients:

– 3 ½ cups all-purpose flour

– 1 packet (2 ¼ teaspoons) active dry yeast

– 1 cup warm milk (110°F / 43°C)

– ¼ cup granulated sugar

– ½ teaspoon salt

– 1 large egg

– ¼ cup unsalted butter, melted

– 4 cloves garlic, minced

– ¼ cup fresh parsley, finely chopped

– ½ teaspoon dried oregano

– ½ teaspoon dried thyme

These ingredients form the base of our rolls, giving them that soft texture and rich flavor.

Optional Ingredients and Variations

You can add a few optional items for extra flavor or texture. Consider these:

– ½ cup shredded mozzarella cheese

– Olive oil for brushing

The mozzarella adds a creamy touch inside the rolls. You can also play around with different herbs or spices based on your taste.

Equipment Needed

Before you start, make sure you have the right tools. Here’s what you need:

– Large mixing bowl

– Small bowl

– Whisk or fork

– Rolling pin

– Baking dish

– Kitchen towel

– Oven

Having these items ready will help you make the process smooth and fun. For the full recipe, you can check the detailed instructions.

Step-by-Step Instructions

Preparing the Dough

Start by dissolving the yeast in warm milk. Use a small bowl and let it sit for about five minutes. You want it frothy. In a large bowl, combine flour, sugar, and salt. Make a well in the center. Add the yeast mixture, melted butter, and egg. Mix everything until a dough forms.

Kneading and First Rise

Now, transfer the dough to a floured surface. Knead it for about seven to ten minutes. You should feel it become smooth and elastic. Place the dough in a greased bowl and cover it with a kitchen towel. Let it rise in a warm spot for one hour. It should double in size.

Making the Herb & Garlic Filling

In a separate bowl, mix minced garlic, chopped parsley, oregano, and thyme. If you like cheese, add shredded mozzarella. This mixture will give the rolls their tasty flavor. Set it aside while the dough rises.

Shaping the Rolls

Once the dough has risen, punch it down to release the air. Roll it out into a rectangle, about 12 by 18 inches, on a floured surface. Brush a thin layer of olive oil over the dough. Spread the herb and garlic mixture evenly on top.

Second Rise and Baking

Starting from one long edge, roll the dough tightly into a log. Slice the log into 12 equal pieces. Place these in a greased baking dish, cut side up. Cover the dish with a towel again. Let the rolls rise for another 30 minutes. Preheat your oven to 350°F (175°C). Bake the rolls for 20 to 25 minutes. They should turn golden brown on top. For a shiny finish, brush the tops with olive oil when they come out. Enjoy your freshly baked Herb & Garlic Swirl Rolls! Check out the Full Recipe for more details.

Tips & Tricks

Perfecting the Dough Consistency

To make great rolls, you need the right dough. Start with warm milk and yeast. The milk should feel warm, not hot. This warms the yeast and helps it bloom. You want a sticky dough, but not too wet. Knead until smooth and elastic. If it’s too sticky, add a little more flour. Always measure your flour accurately. Use a kitchen scale for best results.

Achieving the Ideal Bake

Baking is key to these rolls. Preheat your oven to 350°F (175°C) before baking. This helps the rolls rise and bake evenly. Keep an eye on them around the 20-minute mark. They should turn golden brown on top. If they brown too fast, cover them with foil. This protects the tops while the insides cook through.

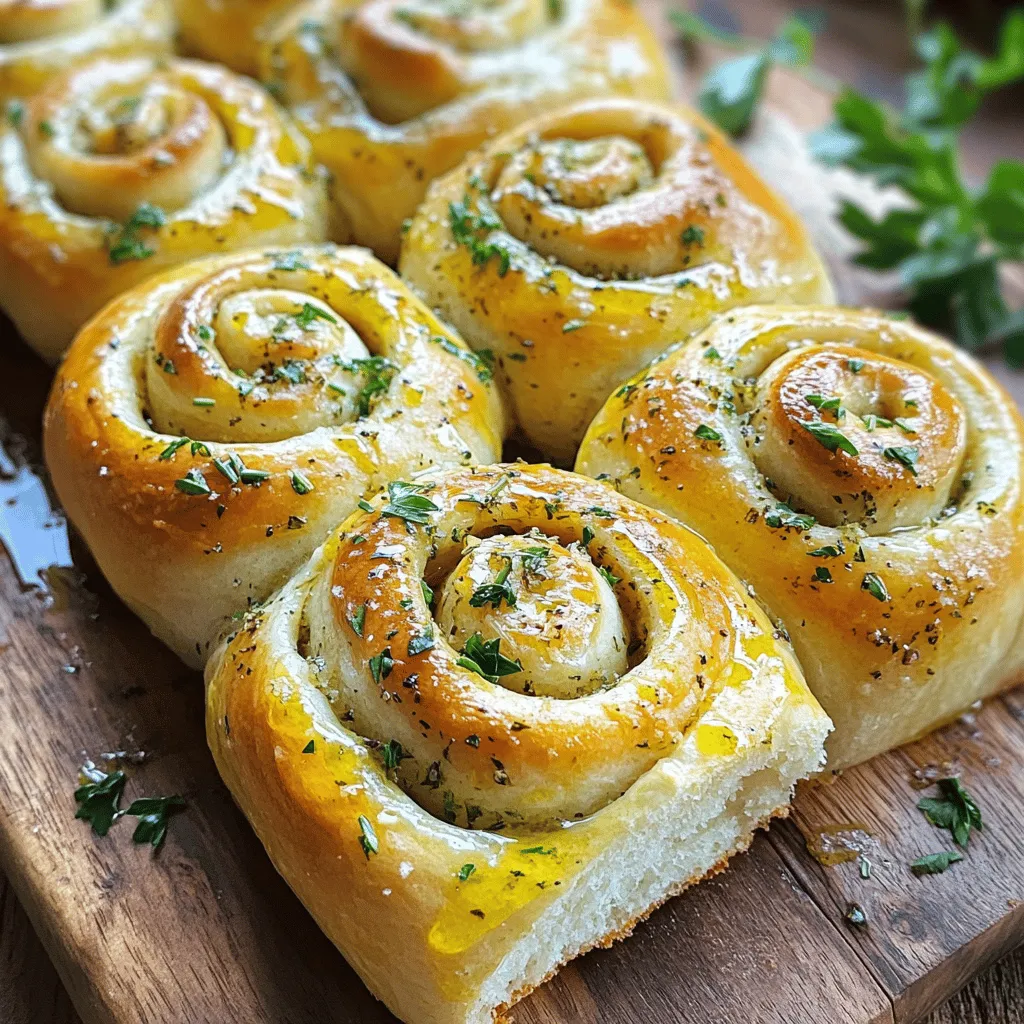
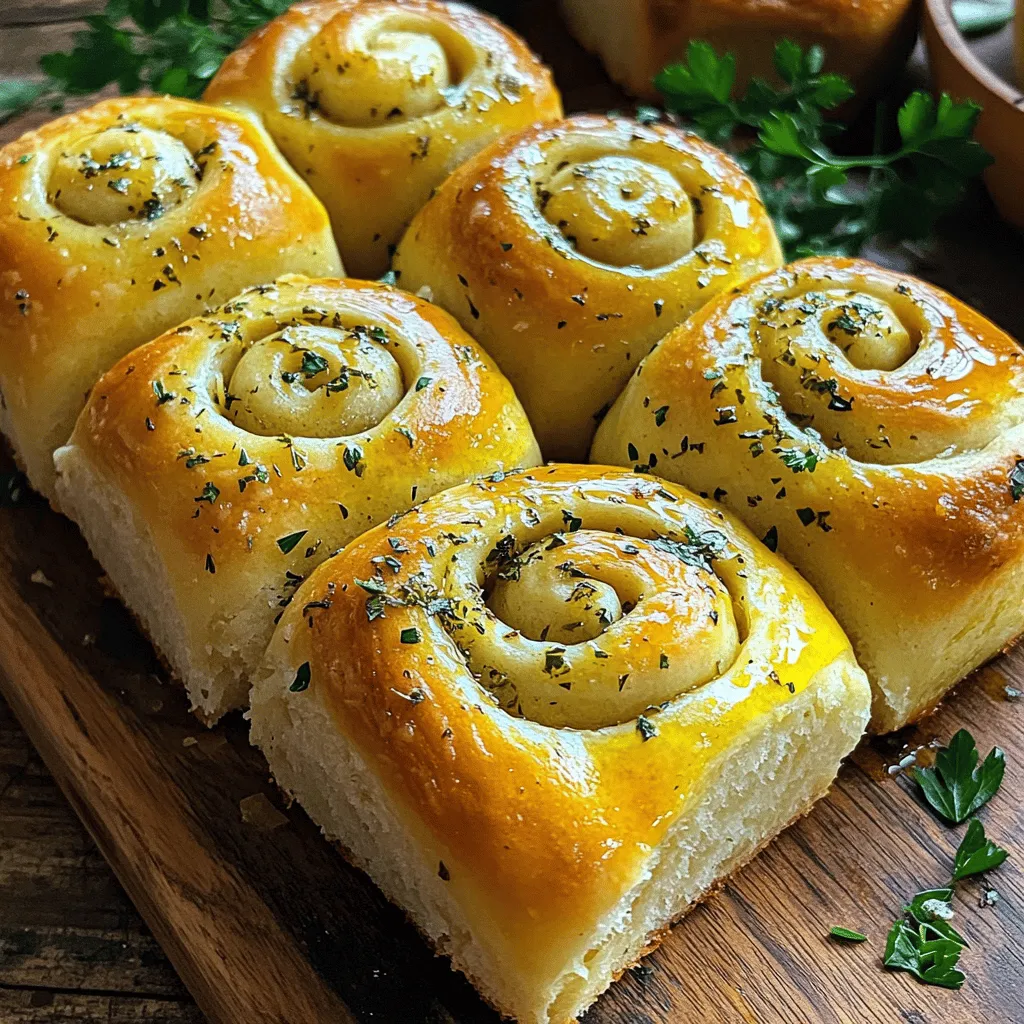
Serving and Presentation Suggestions

Serve your rolls warm for the best flavor. Place them on a rustic wooden board. Drizzle with olive oil and sprinkle chopped herbs on top. This adds color and freshness. For a fun twist, pair them with a dip. You can use olive oil mixed with balsamic vinegar. Enjoy these rolls with friends and family. They will love the warmth and flavor. For the full recipe, check out the detailed instructions above.

Variations

Herb & Garlic Roll Variations

You can mix up the herbs in these rolls for fun flavors. Try basil, chives, or rosemary. Each herb brings its own taste. You can also add spinach or sun-dried tomatoes for a twist. These simple changes keep the rolls fresh and exciting.

Cheese Additions and Flavors

Cheese can make these rolls even better. Mozzarella is a classic choice, but you can also use sharp cheddar or creamy goat cheese. Each cheese gives a different flavor. You can layer cheese inside the rolls or sprinkle it on top before baking. This adds a nice, cheesy crust.

Gluten-Free or Vegan Alternatives

If you need gluten-free rolls, use a gluten-free flour mix. Make sure it includes xanthan gum for the right texture. For vegan options, swap the egg with flaxseed meal mixed with water. You can also use plant-based milk and vegan butter. These changes let everyone enjoy these tasty rolls.

For the complete recipe, check the Full Recipe section.

Storage Info

Storing Leftover Rolls

To keep your Herb & Garlic Swirl Rolls fresh, store them in an airtight container. Place a piece of parchment paper between the rolls. This keeps them from sticking together. You can keep them at room temperature for up to two days. If you want to keep them longer, the fridge can help, but it may dry them out.

Reheating Tips

When you’re ready to enjoy your leftover rolls, reheating is key. Preheat your oven to 350°F (175°C). Place the rolls on a baking sheet. Cover them with foil to keep moisture in. Heat for about 10-15 minutes. You can also microwave them for 20-30 seconds. Just be careful not to overheat, or they will become tough.

Freezing Herb & Garlic Swirl Rolls

Freezing is a great way to save your rolls for later. Start by letting them cool completely. Then, wrap each roll tightly in plastic wrap. Place them in a freezer-safe bag or container. You can freeze them for up to three months. When you’re ready to eat them, let them thaw in the fridge overnight, then reheat as mentioned above. Enjoy your freshly baked delight any time!

FAQs

How do I know when the dough is properly risen?

You know the dough has risen enough when it doubles in size. To check, poke it gently with your finger. If the dough springs back slowly, it’s ready. If it doesn’t spring back, let it rise for a few more minutes. A warm place helps the dough rise nicely.

Can I use dried herbs instead of fresh?

Yes, you can use dried herbs. Just remember that dried herbs are stronger. Use about one-third of the amount of fresh herbs. This means if the recipe calls for ¼ cup fresh parsley, use about 1 tablespoon of dried parsley. Adjust to your taste as you mix the filling.

What can I serve with Herb & Garlic Swirl Rolls?

These rolls pair well with many dishes. Try them with soups or salads for a hearty meal. They also make a great side for pasta or grilled meats. For a simple snack, serve them with olive oil and balsamic vinegar for dipping.

How do I make these rolls ahead of time?

To make rolls ahead of time, prepare the dough and filling as usual. After shaping the rolls, place them in the baking dish. Cover and refrigerate for up to 24 hours. When ready to bake, let them rise at room temperature for about 30 minutes before baking. You can find the Full Recipe for more details.

In this blog post, we learned how to make Herb & Garlic Swirl Rolls. We covered the ingredients, step-by-step instructions, useful tips, and fun variations. You can transform these rolls to fit your taste or diet. Whether you go for classic or mix in cheese, the choice is yours. Remember to store leftovers well for later enjoyment. I hope you feel inspired to bake your own rolls and share with friends! Happy baking!

To make these delightful rolls, gather the following main ingredients: - 3 ½ cups all-purpose flour - 1 packet (2 ¼ teaspoons) active dry yeast - 1 cup warm milk (110°F / 43°C) - ¼ cup granulated sugar - ½ teaspoon salt - 1 large egg - ¼ cup unsalted butter, melted - 4 cloves garlic, minced - ¼ cup fresh parsley, finely chopped - ½ teaspoon dried oregano - ½ teaspoon dried thyme These ingredients form the base of our rolls, giving them that soft texture and rich flavor. You can add a few optional items for extra flavor or texture. Consider these: - ½ cup shredded mozzarella cheese - Olive oil for brushing The mozzarella adds a creamy touch inside the rolls. You can also play around with different herbs or spices based on your taste. Before you start, make sure you have the right tools. Here’s what you need: - Large mixing bowl - Small bowl - Whisk or fork - Rolling pin - Baking dish - Kitchen towel - Oven Having these items ready will help you make the process smooth and fun. For the full recipe, you can check the detailed instructions. Start by dissolving the yeast in warm milk. Use a small bowl and let it sit for about five minutes. You want it frothy. In a large bowl, combine flour, sugar, and salt. Make a well in the center. Add the yeast mixture, melted butter, and egg. Mix everything until a dough forms. Now, transfer the dough to a floured surface. Knead it for about seven to ten minutes. You should feel it become smooth and elastic. Place the dough in a greased bowl and cover it with a kitchen towel. Let it rise in a warm spot for one hour. It should double in size. In a separate bowl, mix minced garlic, chopped parsley, oregano, and thyme. If you like cheese, add shredded mozzarella. This mixture will give the rolls their tasty flavor. Set it aside while the dough rises. Once the dough has risen, punch it down to release the air. Roll it out into a rectangle, about 12 by 18 inches, on a floured surface. Brush a thin layer of olive oil over the dough. Spread the herb and garlic mixture evenly on top. Starting from one long edge, roll the dough tightly into a log. Slice the log into 12 equal pieces. Place these in a greased baking dish, cut side up. Cover the dish with a towel again. Let the rolls rise for another 30 minutes. Preheat your oven to 350°F (175°C). Bake the rolls for 20 to 25 minutes. They should turn golden brown on top. For a shiny finish, brush the tops with olive oil when they come out. Enjoy your freshly baked Herb & Garlic Swirl Rolls! Check out the Full Recipe for more details. To make great rolls, you need the right dough. Start with warm milk and yeast. The milk should feel warm, not hot. This warms the yeast and helps it bloom. You want a sticky dough, but not too wet. Knead until smooth and elastic. If it's too sticky, add a little more flour. Always measure your flour accurately. Use a kitchen scale for best results. Baking is key to these rolls. Preheat your oven to 350°F (175°C) before baking. This helps the rolls rise and bake evenly. Keep an eye on them around the 20-minute mark. They should turn golden brown on top. If they brown too fast, cover them with foil. This protects the tops while the insides cook through. Serve your rolls warm for the best flavor. Place them on a rustic wooden board. Drizzle with olive oil and sprinkle chopped herbs on top. This adds color and freshness. For a fun twist, pair them with a dip. You can use olive oil mixed with balsamic vinegar. Enjoy these rolls with friends and family. They will love the warmth and flavor. For the full recipe, check out the detailed instructions above. {{image_2}} You can mix up the herbs in these rolls for fun flavors. Try basil, chives, or rosemary. Each herb brings its own taste. You can also add spinach or sun-dried tomatoes for a twist. These simple changes keep the rolls fresh and exciting. Cheese can make these rolls even better. Mozzarella is a classic choice, but you can also use sharp cheddar or creamy goat cheese. Each cheese gives a different flavor. You can layer cheese inside the rolls or sprinkle it on top before baking. This adds a nice, cheesy crust. If you need gluten-free rolls, use a gluten-free flour mix. Make sure it includes xanthan gum for the right texture. For vegan options, swap the egg with flaxseed meal mixed with water. You can also use plant-based milk and vegan butter. These changes let everyone enjoy these tasty rolls. For the complete recipe, check the Full Recipe section. To keep your Herb & Garlic Swirl Rolls fresh, store them in an airtight container. Place a piece of parchment paper between the rolls. This keeps them from sticking together. You can keep them at room temperature for up to two days. If you want to keep them longer, the fridge can help, but it may dry them out. When you're ready to enjoy your leftover rolls, reheating is key. Preheat your oven to 350°F (175°C). Place the rolls on a baking sheet. Cover them with foil to keep moisture in. Heat for about 10-15 minutes. You can also microwave them for 20-30 seconds. Just be careful not to overheat, or they will become tough. Freezing is a great way to save your rolls for later. Start by letting them cool completely. Then, wrap each roll tightly in plastic wrap. Place them in a freezer-safe bag or container. You can freeze them for up to three months. When you're ready to eat them, let them thaw in the fridge overnight, then reheat as mentioned above. Enjoy your freshly baked delight any time! You know the dough has risen enough when it doubles in size. To check, poke it gently with your finger. If the dough springs back slowly, it’s ready. If it doesn’t spring back, let it rise for a few more minutes. A warm place helps the dough rise nicely. Yes, you can use dried herbs. Just remember that dried herbs are stronger. Use about one-third of the amount of fresh herbs. This means if the recipe calls for ¼ cup fresh parsley, use about 1 tablespoon of dried parsley. Adjust to your taste as you mix the filling. These rolls pair well with many dishes. Try them with soups or salads for a hearty meal. They also make a great side for pasta or grilled meats. For a simple snack, serve them with olive oil and balsamic vinegar for dipping. To make rolls ahead of time, prepare the dough and filling as usual. After shaping the rolls, place them in the baking dish. Cover and refrigerate for up to 24 hours. When ready to bake, let them rise at room temperature for about 30 minutes before baking. You can find the Full Recipe for more details. In this blog post, we learned how to make Herb & Garlic Swirl Rolls. We covered the ingredients, step-by-step instructions, useful tips, and fun variations. You can transform these rolls to fit your taste or diet. Whether you go for classic or mix in cheese, the choice is yours. Remember to store leftovers well for later enjoyment. I hope you feel inspired to bake your own rolls and share with friends! Happy baking!

Herb & Garlic Swirl Rolls

Indulge in the deliciousness of Herb & Garlic Swirl Rolls that are perfect for any occasion! These rolls are easy to make and bursting with flavor from the fresh herbs and garlic. Follow our simple step-by-step recipe to create these warm, mouthwatering treats that will impress your family and friends. Don't wait to enjoy this irresistible bread experience—click through for the full recipe and bring the aroma of fresh baked rolls to your kitchen today!

Ingredients
  

3 ½ cups all-purpose flour

1 packet (2 ¼ teaspoons) active dry yeast

1 cup warm milk (110°F / 43°C)

¼ cup granulated sugar

½ teaspoon salt

1 large egg

¼ cup unsalted butter, melted

4 cloves garlic, minced

¼ cup fresh parsley, finely chopped

½ teaspoon dried oregano

½ teaspoon dried thyme

½ cup shredded mozzarella cheese (optional)

Olive oil for brushing

Instructions
 

Prepare the Dough: In a small bowl, dissolve the yeast in warm milk and let it sit for about 5 minutes, until frothy. In a large mixing bowl, combine flour, sugar, and salt. Create a well in the center and add the yeast mixture, melted butter, and egg. Mix until a dough forms.

    Knead the Dough: Transfer the dough to a floured surface and knead for about 7-10 minutes, until smooth and elastic. Place the kneaded dough in a greased bowl, cover with a kitchen towel, and let rise in a warm place for 1 hour, or until it doubles in size.

      Prepare the Herb & Garlic Filling: In a separate bowl, mix the minced garlic, chopped parsley, oregano, thyme, and mozzarella cheese (if using). Set aside.

        Shape the Rolls: Once the dough has risen, punch it down and roll it out into a rectangle on a floured surface (about 12x18 inches). Brush a thin layer of olive oil over the dough, then spread the herb and garlic mixture evenly across the surface of the dough.

          Roll and Slice: Starting from one of the long edges, tightly roll the dough into a log. Slice the log into 12 equal pieces and place them in a greased baking dish, cut side up.

            Second Rise: Cover the dish with a towel and let the rolls rise for another 30 minutes.

              Bake: Preheat the oven to 350°F (175°C). Bake the rolls for 20-25 minutes or until golden brown on top.

                Finish and Serve: Remove from the oven and brush the tops with additional olive oil for a shiny finish. Let cool slightly before serving.

                  Prep Time: 30 mins | Total Time: 2 hrs | Servings: 12 rolls

                    - Presentation Tips: Serve the rolls warm on a rustic wooden board, drizzled with extra olive oil and a sprinkle of fresh herbs for an inviting touch.

                      WANT TO SAVE THIS RECIPE?