Craving a simple yet delicious snack? Grilled cheese roll-ups are the answer! These tasty bites are easy to make and perfect for any meal. You just need a few basic ingredients and some creativity. I’ll guide you through the steps, tips, and fun variations. Whether you want a classic comfort dish or a new twist, this blog post is for you. Let’s dive into the gooey goodness of grilled cheese roll-ups!
Ingredients
Main Ingredients
– 8 slices of white bread
– 8 slices of cheddar cheese
– 4 tablespoons cream cheese, softened
– 4 tablespoons butter, softened
Seasoning and Add-ons
– 1 tablespoon garlic powder
– 1 teaspoon dried herbs (oregano or basil)
– Optional: crushed red pepper flakes
Grilled cheese roll-ups are simple and fun to make. You need basic ingredients that you might already have at home. Start with 8 slices of white bread. This bread works well because it gets soft and toasty. Next, grab 8 slices of cheddar cheese. Cheddar melts perfectly, adding that gooey goodness we love.
Now, let’s add a bit of creaminess. You will need 4 tablespoons of softened cream cheese. This will help bind the flavors and give a rich taste. You also need 4 tablespoons of softened butter. This buttery goodness will help achieve that golden crust when grilling.
To boost the flavor, we use 1 tablespoon of garlic powder. This gives a nice kick without overpowering. Adding 1 teaspoon of dried herbs like oregano or basil adds a fresh touch. If you like some heat, consider optional crushed red pepper flakes.
These ingredients come together to create a delicious comfort food treat. You can follow the Full Recipe for step-by-step guidance on how to prepare these tasty roll-ups.
Step-by-Step Instructions
Preparation Steps
Preparing the Bread
To start, you need to flatten the bread. Take your 8 slices of white bread and use a rolling pin. Roll each slice gently to make them thin. This step helps the bread roll up easily.
Mixing the Cream Cheese Spread
Next, we will make the cream cheese spread. In a small bowl, combine 4 tablespoons of softened cream cheese with 1 tablespoon of garlic powder and 1 teaspoon of dried herbs. Mix well until smooth. This spread adds great flavor to your roll-ups.
Assembling and Grilling
Adding Cheese and Rolling Up
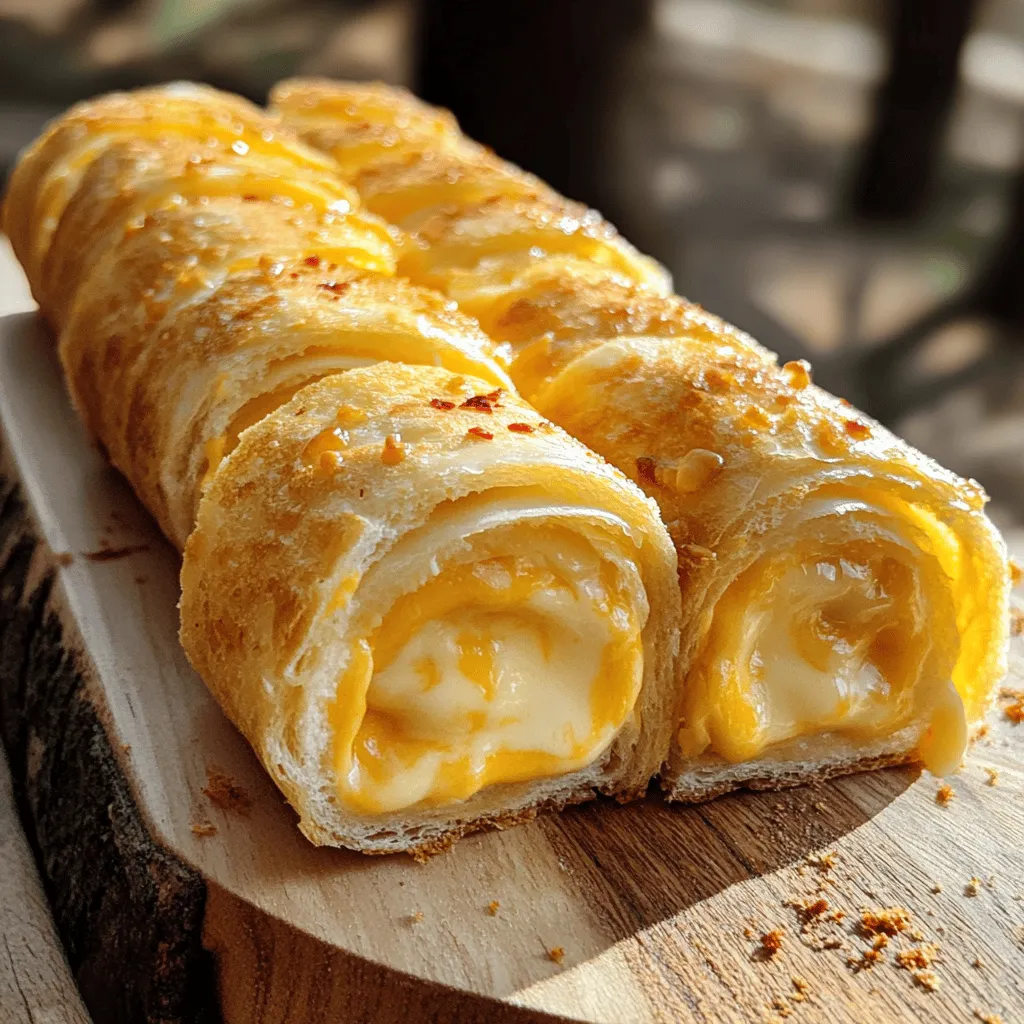
Now, it’s time to build your roll-ups. Spread the cream cheese mixture on one side of each flattened bread slice. Place a slice of cheddar cheese on top. After that, roll each slice tightly from one end to the other, sealing in the cheese.
Prepping for the Skillet
To get ready for grilling, mix 4 tablespoons of softened butter with a pinch of crushed red pepper flakes in a shallow dish. Spread this mixture generously on the outside of each rolled-up sandwich. This will give the roll-ups a crispy golden crust.
Cooking the Roll-Ups
Grilling Tips
Heat a non-stick skillet over medium heat. Place the roll-ups seam-side down in the skillet. Cook them for about 2-3 minutes on each side. Watch them closely to avoid burning.
Achieving the Perfect Crisp
To get that perfect crisp, don’t rush the cooking. Let each side cook until golden brown. If you want extra crunch, press down gently with a spatula while cooking. Once done, let them cool for a minute before slicing into thirds. Enjoy your delicious grilled cheese roll-ups!
Tips & Tricks
Achieving the Best Flavor
For the best taste, think about using herbs. Dried oregano or basil adds a nice touch. Mix them into your cream cheese for a burst of flavor. You can also try adding garlic powder for a stronger kick. This simple step makes your roll-ups more special.
Grilling Techniques
Choosing the right skillet matters. A non-stick skillet works best for grilling. It helps prevent sticking and burns. Use medium heat to cook your roll-ups. This temperature ensures they get golden brown without burning. Check them often to get that perfect crisp.
Presentation Suggestions
Once cooked, think about how to plate them. Slice your roll-ups into thirds and fan them out on a plate. This makes them look fun and inviting. Pair with a tasty dipping sauce. Tomato soup or ranch dressing are great options. They add a twist and make your meal even more enjoyable.

Variations
Cheese Alternatives
Using Different Cheese Types
You can switch up the cheese to match your taste. Try mozzarella for a stretchy, gooey texture. Pepper jack adds a nice kick with its spices. You might also enjoy gouda for its rich, smoky flavor. Each cheese brings a unique taste to your roll-ups.
Vegan Cheese Options
If you want a vegan twist, there are great cheese options. Look for brands that melt well, like cashew or almond-based cheese. These options keep the cheesy goodness while staying plant-based. Just spread them on the bread as you would with regular cheese.
Additional Fillings
Adding Vegetables (spinach, peppers)
You can make your roll-ups even more tasty by adding veggies. Spinach is a great choice; it adds color and nutrition. Bell peppers give a sweet crunch. Just chop them finely and sprinkle them in before rolling up. This makes your dish more wholesome and delicious.
Meaty Additions (ham, turkey)
For a heartier meal, add some protein. Thin slices of ham or turkey fit perfectly. They add flavor and make your roll-ups filling. Place a slice on top of the cheese before you roll it up. This extra layer will make your comfort food even better.
Dietary Modifications
Gluten-Free Bread Options
If you need gluten-free options, many brands now make gluten-free bread. Look for soft, thick slices that will hold the fillings well. This way, everyone can enjoy grilled cheese roll-ups without worry.
Low-Fat Cream Cheese Choices
For a lighter version, use low-fat cream cheese. It still gives a rich flavor but with fewer calories. You can also mix in some herbs or spices for extra taste. This is a simple way to enjoy a classic dish while watching your health.
Storage Info
Short-Term Storage
How do I store leftovers? After enjoying your grilled cheese roll-ups, let them cool. Place any leftovers in an airtight container. This helps keep them fresh and tasty. Store them in the fridge for up to three days.
How can I keep them fresh in the fridge? To keep roll-ups fresh, use parchment paper between layers. This prevents sticking and sogginess. Make sure the container is sealed tightly to lock in moisture.
Long-Term Storage
Can I freeze roll-ups for later use? Yes! Grilled cheese roll-ups freeze well. Make sure they are completely cool. Wrap each roll-up tightly in plastic wrap. Then place them in a freezer bag. You can store them for up to three months.
What are the best reheating tips for roll-ups? To reheat, take the roll-ups out of the freezer. Let them thaw in the fridge overnight. For reheating, use a skillet over medium heat. Cook each side for about 3-4 minutes until warm and crispy. Enjoy them like they are fresh!
FAQs
Common Questions
How do I make grilled cheese roll-ups without cream cheese?
You can use butter or mayonnaise instead of cream cheese. Spread a thin layer on the bread. This will help the cheese stick. You can also add a bit of mustard for tang.
Can I use whole wheat bread for this recipe?
Yes, whole wheat bread works well. It gives a nutty flavor and adds fiber. Just make sure it’s soft enough to roll.
Cooking and Serving
What dips go well with grilled cheese roll-ups?
These roll-ups pair great with tomato soup. You can also try ranch dressing or marinara sauce. They add extra flavor and fun.
How long do grilled cheese roll-ups last in the fridge?
Grilled cheese roll-ups last about three days in the fridge. Store them in an airtight container to keep them fresh.
Nutritional Information
How many calories are in grilled cheese roll-ups?
Each roll-up has about 150 calories. This can vary with the type of bread and cheese used.
Are grilled cheese roll-ups suitable for kids?
Yes, grilled cheese roll-ups are kid-friendly. They are fun to eat and easy to make. Kids love the cheesy goodness! For the full recipe, check out the details above.
In this article, we explored how to make delicious grilled cheese roll-ups. We covered key ingredients and the step-by-step process for preparing, assembling, and grilling. We also shared tips for flavor enhancement, grilling techniques, and presentation ideas.
Remember, these roll-ups are easy to customize. You can change the cheese, add veggies, or alter the spices. Enjoy these fun snacks fresh or store for later. Get creative and make them your own!
