WANT TO SAVE THIS RECIPE?
Are you ready to make a tasty meal with little effort? My Cheesy Garlic Chicken Wraps combine savory flavors and crispy textures in a fun, easy dish. With simple ingredients and quick steps, you can delight your taste buds in no time. Whether you’re cooking for family or looking for a satisfying lunch, these wraps will become a favorite. Let’s dive into this simple and flavorful recipe that anyone can master!
Why I Love This Recipe
- Quick and Easy: This recipe is perfect for busy weeknights, taking just 15 minutes to prep and 25 minutes total to enjoy a delicious meal.
- Cheesy Goodness: With a combination of mozzarella and cream cheese, each bite is rich, creamy, and utterly satisfying.
- Customizable: You can easily modify the filling by adding your favorite vegetables or proteins, making it a versatile dish for all tastes.
- Great for Dipping: These wraps pair beautifully with salsas or guacamole, adding an extra layer of flavor to your meal.
Ingredients
Main Ingredients for Cheesy Garlic Chicken Wraps
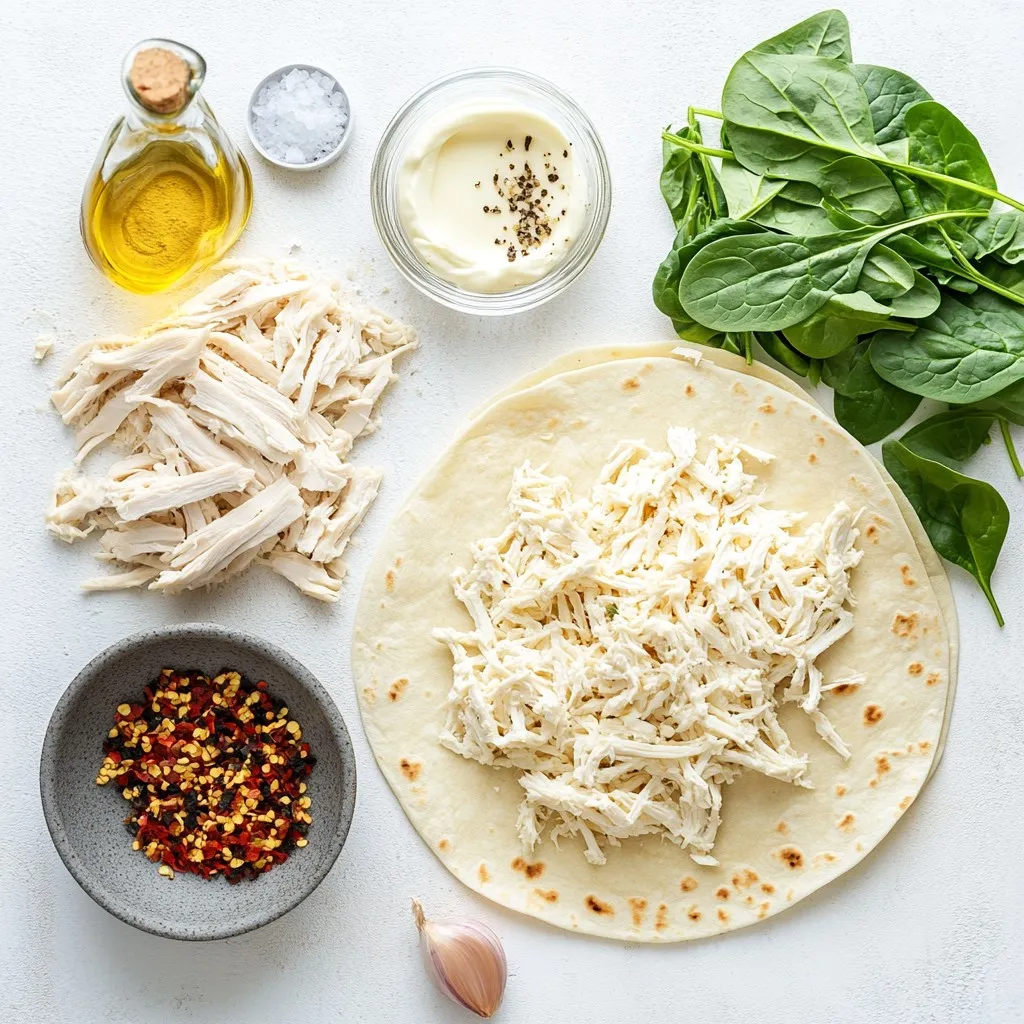
– 2 cups cooked chicken, shredded
– 1 cup shredded mozzarella cheese
– 1/2 cup cream cheese, softened
– 1 clove garlic, minced
– 1 tablespoon fresh parsley, chopped (or 1 teaspoon dried parsley)
– 4 large tortillas (flour or whole wheat)
– 1 cup fresh spinach leaves
– Salt and black pepper to taste
– Olive oil, for brushing
These main ingredients come together to create a tasty and cheesy filling. The combination of chicken and cheese makes it rich and satisfying. The garlic adds a bold flavor, while the parsley gives it a fresh touch.
Optional Ingredients for Added Flavor
– 1/4 teaspoon red pepper flakes (optional, for a spicy kick)
Want to spice things up? Red pepper flakes give your wraps a nice heat. Adjust the amount based on your taste. Feel free to add other spices too, like cumin or paprika.
Cooking Tools You Will Need
– Medium mixing bowl
– Skillet
– Clean surface or cutting board
– Spatula
– Knife for slicing
Having the right tools makes cooking easier. A mixing bowl helps combine your ingredients well. A skillet is crucial for that golden, crispy finish. Use a knife to slice the wraps for easy serving.
Step-by-Step Instructions
Preparing the Cheesy Chicken Filling
Start by gathering your ingredients. You need cooked chicken, mozzarella cheese, cream cheese, minced garlic, and parsley. In a medium bowl, mix the shredded chicken with the mozzarella, cream cheese, garlic, and parsley. Stir until everything is combined. Season with salt, black pepper, and red pepper flakes if you want some heat. This filling is rich and creamy, and it will add great taste to your wraps.
Wrapping the Tortillas Properly
Lay a tortilla flat on a clean surface. Spoon a good amount of the cheesy chicken filling into the center. Make sure to leave about an inch around the edges. Next, add a small handful of fresh spinach leaves on top. Fold the sides of the tortilla inward. Then, roll the tortilla tightly from the bottom up. This keeps the filling secure as you wrap. Repeat this for the other tortillas until all the filling is used.
Cooking and Achieving the Perfect Crispiness
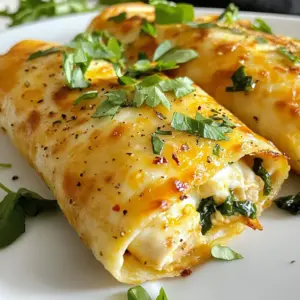
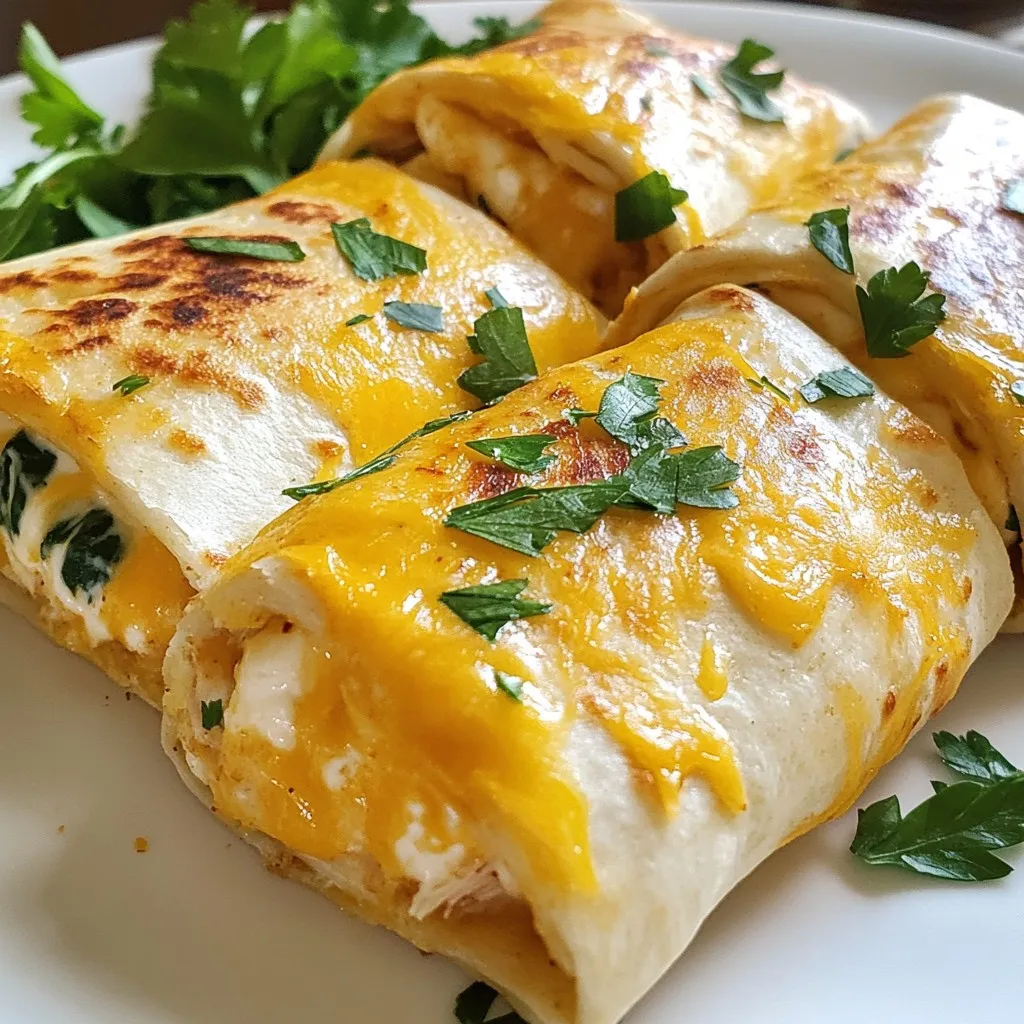
Heat a skillet over medium heat. Brush the outside of each wrap with olive oil. This will help them get nice and crispy. Place the wraps seam-side down in the hot skillet. Cook for about 3-4 minutes on each side. You want them golden brown and the cheese inside to melt. Once done, take them out and let them cool slightly. Slice each wrap in half for easy serving. Enjoy your cheesy garlic chicken wraps!
Tips & Tricks
Tips for the Best Flavor and Texture
To get the best flavor in your wraps, use fresh herbs. Fresh parsley adds a bright taste. Mix in minced garlic for a punch of flavor. Using a mix of mozzarella and cream cheese gives a creamy texture. Adjust the salt and pepper to fit your taste. If you like spice, add red pepper flakes. They give a nice kick!
How to Avoid Soggy Wraps
To keep your wraps crispy, avoid overfilling them. Leave some space at the edges. This helps when you roll them up. Brush the outside of your wraps with olive oil. This creates a nice barrier against moisture. Also, cook them on medium heat. This helps them crisp up without burning.
Suggestions for Even Cooking
When cooking the wraps, place them seam-side down first. This keeps them closed while cooking. Cook each side for 3-4 minutes until golden brown. If you have a large skillet, cook in batches. It helps to keep the heat even. Don’t rush the process; let the cheese melt fully for the best taste!
Pro Tips
- Use Rotisserie Chicken: For a quicker option, use store-bought rotisserie chicken. It’s flavorful and saves you time on cooking.
- Customize Your Cheese: Feel free to mix different cheeses like cheddar or pepper jack for a unique flavor twist in your wraps.
- Experiment with Vegetables: Add bell peppers, onions, or mushrooms to the filling for extra texture and nutrition.
- Serve with Dips: Pair these wraps with zesty salsa, creamy guacamole, or ranch dressing for added flavor.
Variations
Spicy Cheesy Garlic Chicken Wraps
To make spicy cheesy garlic chicken wraps, add red pepper flakes. Just a pinch gives a nice heat. You can also mix in some hot sauce to the chicken filling. If you want more spice, you might try jalapeños. These spicy wraps are perfect for those who love a kick in their meal.
Vegetarian Option for Cheesy Wraps
For a vegetarian option, swap the chicken for cooked mushrooms or zucchini. You can also use beans like black beans or chickpeas. Mix in the same cheesy filling with garlic and herbs. This way, you keep the creamy texture and flavor, but it’s veggie-friendly. Don’t forget to add some extra veggies for crunch!
Different Tortilla Choices
The type of tortilla you use can change your wraps. Flour tortillas are soft and popular, but whole wheat adds fiber. You can also try corn tortillas for a gluten-free option. If you want something fun, use spinach or tomato tortillas for color. Each type brings its own taste and texture to your wraps.
Storage Info
How to Store Leftover Cheesy Garlic Chicken Wraps
Store your leftover wraps in an airtight container. Keep them in the fridge for up to three days. Make sure they cool down before sealing. This helps keep them fresh. Avoid stacking them to prevent sogginess.
Reheating Tips for Optimal Taste
To reheat, use a skillet over medium heat. This method keeps the wraps crispy. Heat each side for about three minutes. You can also use the oven. Preheat it to 350°F (175°C) and bake for 10-15 minutes. Cover with foil for best results.
Freezing Guidance for Longer Storage
If you want to freeze the wraps, do it before cooking. Wrap each one in plastic wrap, then place them in a freezer bag. They can last up to three months. When ready to eat, thaw in the fridge overnight. Cook as usual for a quick meal.
FAQs
Can I use rotisserie chicken for this recipe?
Yes, you can use rotisserie chicken. It saves time and adds great flavor. Just shred the chicken before mixing it with the other ingredients. This makes your wraps even easier to prepare.
What can I use instead of cream cheese?
If you need a substitute for cream cheese, try Greek yogurt. It has a similar texture and adds a nice tang. You can also use cottage cheese or a dairy-free cream cheese if you prefer.
How can I make this recipe dairy-free?
To make this dish dairy-free, use dairy-free cheese. You can also replace cream cheese with cashew cream or a plant-based yogurt. This allows everyone to enjoy the wrap without dairy.
Is this recipe suitable for meal prep?
Yes, these wraps are great for meal prep! You can make them ahead of time and store them in the fridge. Just reheat them when you’re ready to eat. This makes lunch or dinner quick and easy.
In this blog post, we covered how to make cheesy garlic chicken wraps. We discussed the key and optional ingredients, the cooking tools you need, and provided easy step-by-step instructions. I shared tips to enhance flavor and avoid sogginess. You also learned about tasty variations and how to store leftovers.
Now, you’re ready to enjoy your wraps. Experiment with flavors to make it your own. Happy cookin
Cheesy Garlic Chicken Wraps
Delicious wraps filled with cheesy chicken, garlic, and fresh spinach, perfect for a quick meal.
Course Main Course
Cuisine American
Servings 4
Calories 350 kcal
- 2 cups cooked chicken, shredded
- 1 cup shredded mozzarella cheese
- 0.5 cup cream cheese, softened
- 1 clove garlic, minced
- 1 tablespoon fresh parsley, chopped
- 4 large tortillas (flour or whole wheat)
- 1 cup fresh spinach leaves
- 0.25 teaspoon red pepper flakes (optional)
- to taste salt
- to taste black pepper
- as needed olive oil, for brushing
In a medium mixing bowl, combine the shredded chicken, mozzarella cheese, softened cream cheese, minced garlic, and chopped parsley. Stir the mixture until all ingredients are thoroughly combined and evenly distributed. Season the mixture with salt, black pepper, and red pepper flakes for added spice, if desired.
Place a tortilla flat on a clean surface or cutting board. Spoon a generous amount of the cheesy chicken filling into the center of the tortilla, ensuring to leave about 1 inch of empty space around the edges for easy wrapping.
Layer a small handful of fresh spinach leaves on top of the cheesy chicken mixture for added freshness and color.
Carefully fold the two sides of the tortilla inward, and then begin rolling the tortilla tightly from the bottom up toward the top, securing the filling inside as you go. Repeat this wrapping process with the remaining tortillas and filling.
Heat a skillet over medium heat. Lightly brush the outside of each wrap with olive oil for a perfectly crisp finish while cooking.
Place the prepared wraps seam-side down in the hot skillet. Allow them to cook for approximately 3-4 minutes on each side, or until they are golden brown and the cheese inside is melted and gooey.
Once cooked, remove the wraps from the skillet and set them aside to cool slightly before slicing each wrap in half diagonally for easy serving.
Serve with salsa or guacamole for dipping.
Keyword cheesy, chicken, easy, garlic, wraps
WANT TO SAVE THIS RECIPE?