Salads
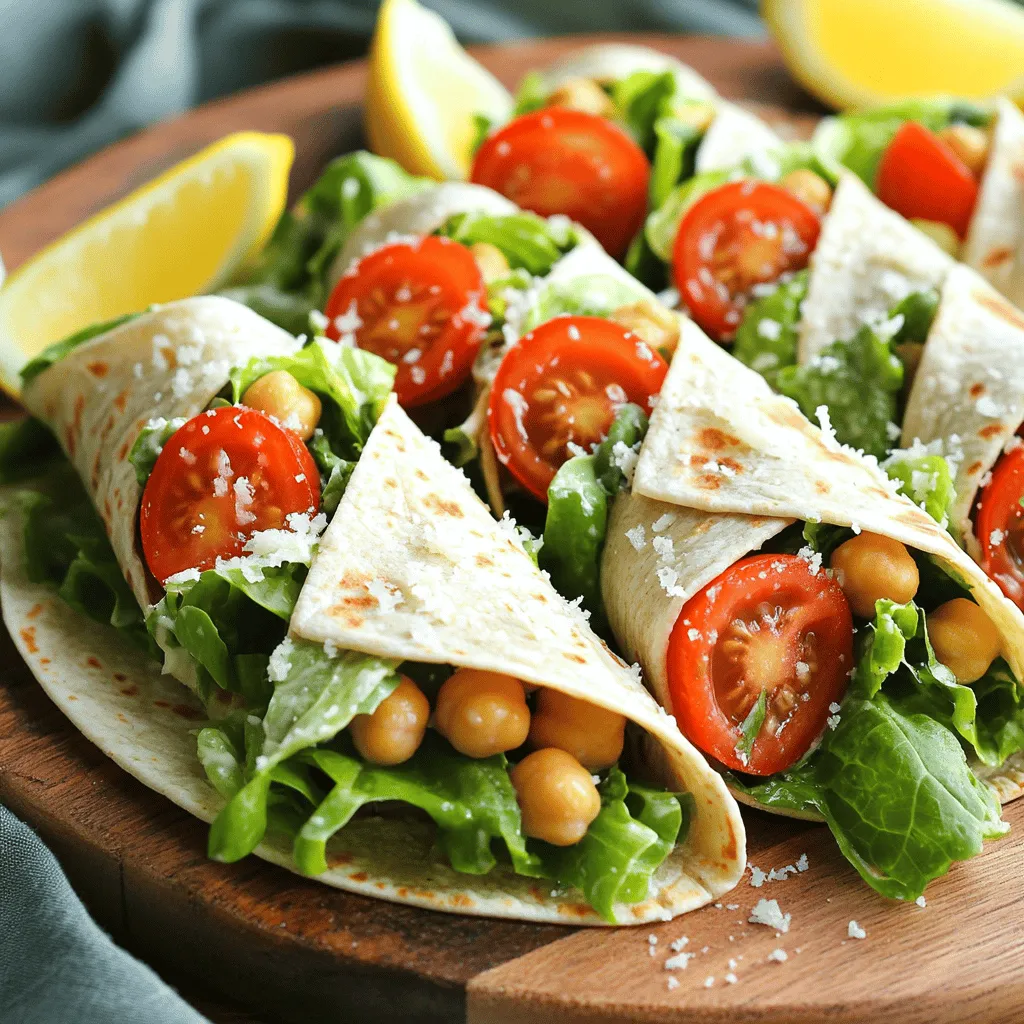
Chickpea Caesar Salad Wraps Flavorful and Healthy Meal
Looking for a tasty and healthy meal idea? Try Chickpea Caesar Salad Wraps! Packed with protein, fresh veggies, and creamy dressing, these wraps are a
![To make a tasty burger bowl, you need these main ingredients: - 1 lb ground beef or plant-based ground meat - 1 teaspoon garlic powder - 1 teaspoon onion powder - Salt and pepper to taste - 4 cups of mixed salad greens - 1 cup cherry tomatoes, halved - 1 cup cucumber, diced - ½ cup pickles, sliced - ½ cup shredded cheddar cheese - ¼ cup red onion, thinly sliced - ¼ cup mustard or your favorite burger sauce - ¼ cup ketchup (optional) - 1 avocado, sliced (optional) I love using ground beef for a classic flavor, but plant-based meat works great too. Garlic and onion powder add depth to the meat, so don’t skip them! Fresh salad greens form the base of the bowl, while the veggies add color and crunch. You can add some fun toppings to boost the flavor: - Crispy bacon bits - Jalapeños for heat - Sliced green onions - Crumbled feta or blue cheese - Fresh herbs like cilantro or parsley These toppings can transform your burger bowl. Bacon adds crunch, while jalapeños bring the spice. Fresh herbs brighten up the dish. To round out the meal, consider these tasty sides: - Sweet potato fries - Garlic bread - Coleslaw - Quinoa salad - A light soup These sides add variety and can make your meal feel more complete. Sweet potato fries are a great match, and coleslaw offers a nice crunch. For the full recipe, check out the details above! Start with 1 pound of ground meat, either beef or plant-based. In a bowl, mix the meat with 1 teaspoon of garlic powder and 1 teaspoon of onion powder. Add salt and pepper to taste. Use your hands to form the mixture into burger patties. Make them about one inch thick for even cooking. Heat a skillet over medium-high heat. Once hot, cook the patties for 4 to 5 minutes on each side. Make sure they are browned and cooked through. If you like them more well-done, leave them a bit longer. After cooking, let the patties rest for a couple of minutes before slicing them into strips. To build your burger bowl, grab a large serving bowl or individual bowls. Place 4 cups of mixed salad greens at the bottom. Next, add your toppings. Start with 1 cup of halved cherry tomatoes and 1 cup of diced cucumber. Then, layer on ½ cup of sliced pickles, ½ cup of shredded cheddar cheese, and ¼ cup of thinly sliced red onion. Now, take the burger strips and place them on top of the salad mix. For extra creaminess, add slices of avocado if you want. Finally, drizzle ¼ cup of mustard or your favorite burger sauce over the top. You can also add ¼ cup of ketchup if you like it sweeter. To ensure your burger patties cook evenly, make sure your skillet is hot before adding the patties. This helps to sear the outside while keeping the inside juicy. Use a meat thermometer if you want to be precise. For beef, aim for 160°F. For plant-based options, follow the package instructions for cooking times. Another tip is to avoid pressing down on the patties while they cook. This releases juices and can make them dry. Let the patties rest after cooking; this keeps them juicy. Now, you’re ready to enjoy a delicious bowl packed with flavor! For the full recipe, check out [Full Recipe]. To boost the taste of your burger bowls, start with quality meat. Grass-fed beef has great flavor. If you prefer plant-based meat, choose a brand that mimics beef well. Use spices like garlic powder and onion powder for depth. Don't skip salt and pepper; they bring out the flavors. Adding fresh herbs like parsley or cilantro can make a big difference. You can also mix in some Worcestershire sauce for an extra kick. A beautiful bowl makes your meal more exciting. Start with a colorful base of mixed salad greens. Layer the ingredients neatly for a great look. Place the sliced burger on top, and arrange the toppings around it. Use bright cherry tomatoes and green cucumber for color. A sprinkle of shredded cheese adds a nice touch. Drizzle your sauce on top right before serving for a finished look. If you use avocado, slice it neatly for a creamy finish. One mistake is overcooking the burger patties. This can make them dry. Aim for a nice sear on both sides, but keep them juicy inside. Another issue is using too little seasoning. Make sure to season well to enhance flavor. Avoid overcrowding the bowl. Each ingredient should shine without being lost. Lastly, don't forget the sauce. A good sauce can tie all the flavors together. For more details, check the Full Recipe for guidance. {{image_2}} Keto burger bowls are low-carb and packed with flavor. Use ground beef or turkey for the protein. Instead of salad greens, use cauliflower rice or zucchini noodles. They add a nice touch and keep the carbs low. Top with cheese, avocado, and your favorite keto sauce. This way, you keep your meal satisfying without breaking your diet. For a veggie take, swap meat for black beans or lentils. Use the same spices to keep flavors bold. You can also try chickpea patties or grilled portobello mushrooms. For toppings, add fresh veggies, nuts, or seeds. Consider a drizzle of tahini or a vegan burger sauce for extra zest. These options keep your burger bowls hearty and healthy. Explore fun flavors by mixing in unique ingredients. How about adding pineapple salsa for a sweet twist? Or try kimchi for a spicy kick. You can also use different cheeses, like feta or goat cheese, for a rich taste. Experiment with sauces, too. A tangy barbecue or zesty chimichurri sauce can elevate your bowl. Feel free to get creative and find what you love! For full instructions, check the Full Recipe. After a tasty meal, you might have some burger bowls left. To store them, place the leftover ingredients in separate airtight containers. Keep the salad greens separate from the warm beef or plant-based meat. This helps keep everything fresh. Store them in the fridge for up to three days. If the salad wilts, it won't taste as good. When you’re ready to enjoy your leftovers, heat the cooked meat in a skillet on medium heat. Stir it until it's warm throughout. This should take about five minutes. Avoid microwaving it, as this can make the meat tough. Keep the salad greens cold and fresh. Add them to your bowl after the meat is hot. You can freeze the cooked meat for later use. Place it in a freezer-safe bag or container. Make sure to remove all the air to avoid freezer burn. You can store it for up to three months. When you want to eat it, thaw it in the fridge overnight. Reheat as described above. However, I do not recommend freezing the salad ingredients. They can become soggy after thawing. For best flavor, prepare the salad fresh each time. You can use many options instead of ground beef. Try ground turkey or chicken for a leaner choice. Plant-based meats, like lentils or beans, are great too. You can also use mushrooms for a hearty texture. Tofu or tempeh works well for a vegan option. Each choice gives a new flavor to your bowl. Yes, Burger Bowls can be very healthy! You control the ingredients, which helps you avoid unhealthy fats. Adding fresh veggies boosts vitamins and fiber. You can also choose leaner proteins to cut calories. By making smart choices, you can enjoy a tasty and nutritious meal. Absolutely! You can prep many parts ahead. Cook the burger patties and store them in the fridge. Chop the veggies and keep them separate. Just assemble the bowls when you’re ready to eat. This saves time and makes meals easy during busy days. The best sauces for Burger Bowls include mustard and ketchup. You can also use mayo or ranch dressing for creaminess. Barbecue sauce adds a nice smoky flavor. Try sriracha for a spicy kick. Each sauce brings a unique taste to your burger bowl. To make a gluten-free Burger Bowl, choose gluten-free sauces. Use fresh veggies and gluten-free buns if desired. Check all labels to ensure no hidden gluten. This way, you can enjoy your meal without worry. It's just as tasty as the classic version! Burger bowls are a great way to enjoy your favorite flavors. We discussed the main ingredients and tasty optional toppings. You learned how to prepare burger patties and assemble your bowl for maximum flavor. I shared tips to enhance taste and avoid common mistakes. Plus, you discovered variations like keto and vegan options. Remember, burger bowls are fun and easy to make. Play with your ingredients and find your perfect combination. Enjoy your meal and happy cooking!](https://therecipehatch.com/wp-content/uploads/2025/06/d79ec15c-0b8a-4f9d-b26a-7c06ea1b0808.webp)
Burger Bowls Packed with Flavorful Ingredients
Are you ready to elevate your meal game? Burger bowls are the perfect blend of delicious and easy! Packed with flavorful ingredients, they offer a
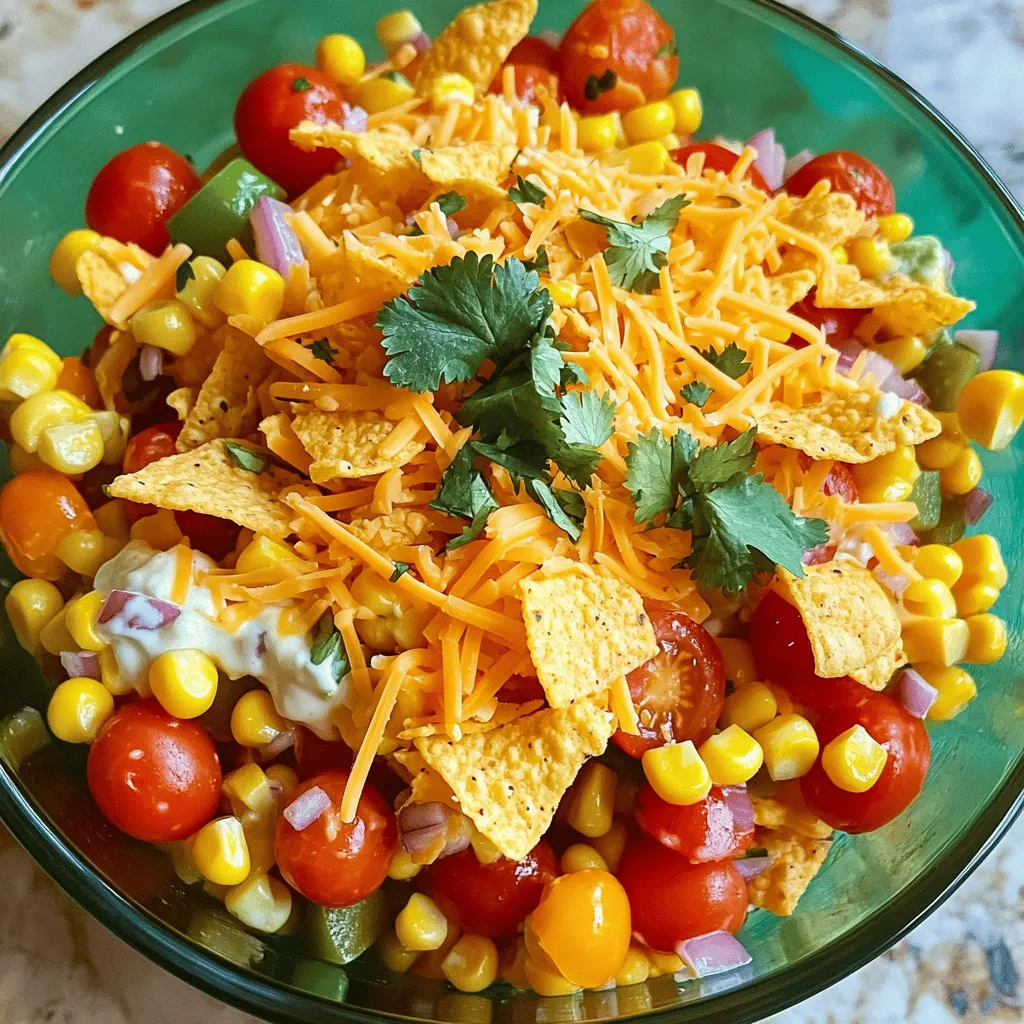
Easy Frito Corn Salad Quick and Tasty Recipe
Looking for a quick and tasty dish that everyone will love? My Easy Frito Corn Salad is the perfect choice! This fun and colorful salad
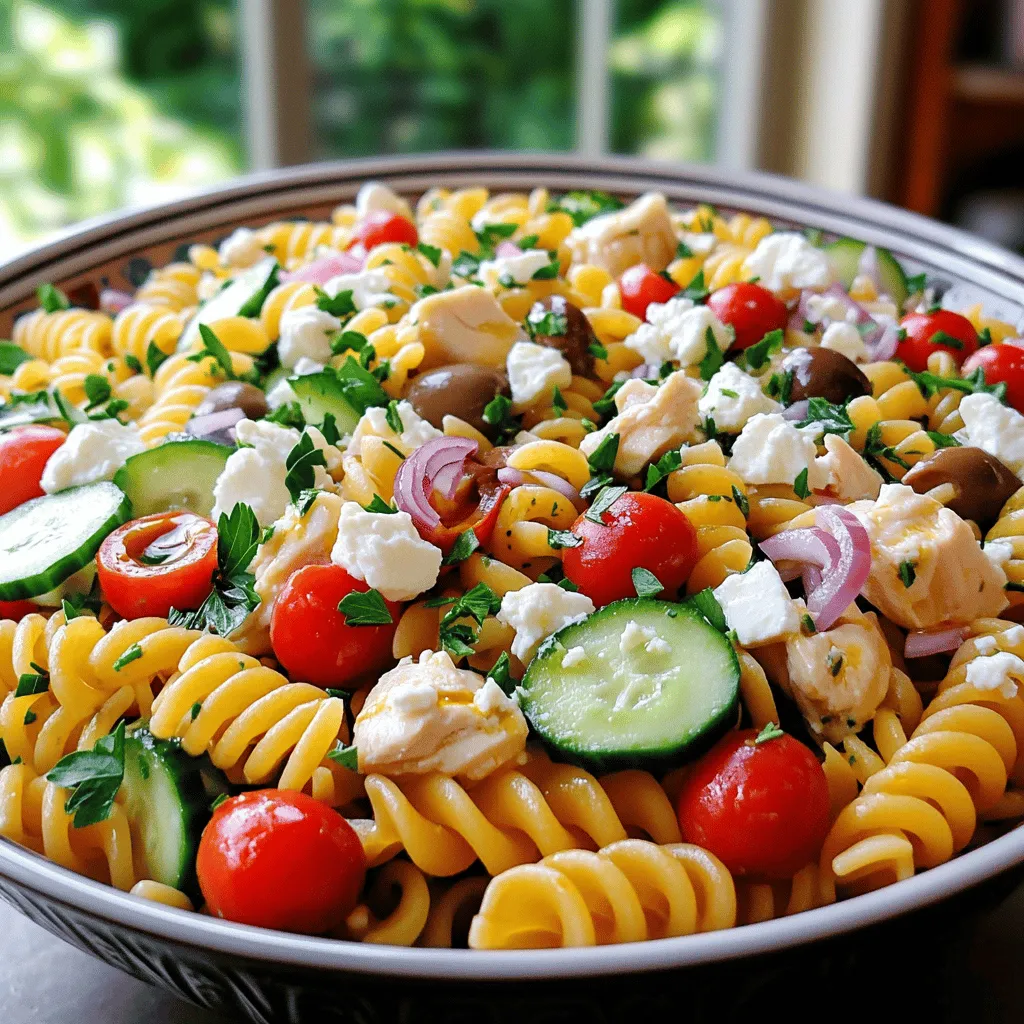
Mediterranean Chicken Pasta Salad Fresh and Tasty Meal
Looking for a fresh and tasty meal that’s quick to whip up? Mediterranean Chicken Pasta Salad is your answer! This vibrant dish bursts with flavor
![To create a vibrant Rainbow Orzo Salad, gather these key ingredients: - 1 cup orzo pasta - 1 cup cherry tomatoes, halved - 1 cup cucumber, diced - 1 bell pepper (any color), diced - 1 cup corn kernels (fresh or frozen) - 1/2 cup red onion, finely chopped - 1/4 cup Kalamata olives, sliced (optional) - 1/4 cup feta cheese, crumbled - 1/4 cup fresh parsley, chopped - 1/4 cup olive oil - 2 tablespoons lemon juice - 1 teaspoon honey - Salt and pepper to taste These ingredients bring color and flavor to the dish. The orzo pasta serves as a base, while the fresh vegetables add crunch. Each component plays a role in making the salad lively and delicious. You can customize your Rainbow Orzo Salad with these optional ingredients: - Avocado, diced - Spinach or arugula - Peas or green beans - Sun-dried tomatoes - Grilled chicken or shrimp for protein Feel free to mix and match. Adding different ingredients lets you create a salad that fits your taste. To make your Rainbow Orzo Salad, use these tools: - A large pot for boiling the orzo - A colander for draining the pasta - A large mixing bowl for combining ingredients - A whisk for making the dressing - A knife and cutting board for chopping veggies Having the right tools makes cooking easier. These items help you prepare your salad quickly and efficiently. For a detailed guide, check the Full Recipe. To start, fill a pot with water and add salt. Bring the water to a boil. Once boiling, add 1 cup of orzo pasta. Cook the orzo for about 8-10 minutes until it's al dente. Stir occasionally to avoid sticking. After cooking, drain the orzo in a colander. Rinse it under cold water to cool it down. This step helps keep the pasta firm and fresh. Next, grab your veggies. You will need 1 cup of cherry tomatoes, halved, and 1 cup of cucumber, diced. Dice one bell pepper of your choice. If you love sweetness, corn adds great flavor, so use 1 cup of corn kernels. Finely chop 1/2 cup of red onion. If you like olives, slice 1/4 cup of Kalamata olives. These colorful veggies will make your salad vibrant and fresh. In a large mixing bowl, combine the cooked orzo, cherry tomatoes, cucumber, bell pepper, corn, red onion, and olives if you chose to add them. In a small bowl, whisk together 1/4 cup of olive oil, 2 tablespoons of lemon juice, 1 teaspoon of honey, salt, and pepper to taste. Pour this dressing over the salad mix. Toss gently to coat all the ingredients well. Finally, add 1/4 cup of crumbled feta cheese and 1/4 cup of chopped parsley. Toss again but be careful not to break the feta. Let the salad sit for at least 15 minutes before serving. This waiting time lets the flavors mix beautifully. For the full recipe, check the details above. To get the best texture in your salad, use al dente orzo. This means it should be firm when you bite into it. Cooking it just right makes a big difference. Rinse the orzo in cold water after cooking. This cools it down and stops the cooking. It also helps the orzo stay separate and not clump together. Herbs and spices add great taste to your Rainbow Orzo Salad. Fresh parsley is a must. It gives a bright flavor and adds color. You can also try adding basil or mint for a twist. A sprinkle of garlic powder or onion powder can boost flavor too. You want a balance of tastes, so don’t go overboard. Start with small amounts and taste as you go. Presentation matters when serving your salad. Use a large, colorful bowl to show off the vibrant ingredients. You can layer the salad in mason jars for individual servings. This way, each jar is a mini masterpiece. Top the salad with extra feta cheese and a sprinkle of parsley. This makes it look fresh and inviting. For added flair, you can serve it with lemon wedges on the side. For the complete recipe, check out the Full Recipe section. {{image_2}} You can change this salad with the seasons. In spring, add peas or asparagus. In summer, use ripe tomatoes and fresh herbs. Fall brings squash or roasted Brussels sprouts. In winter, try roasted root vegetables like carrots or beets. Each season inspires new flavors. This keeps the dish fresh and fun. If you have allergies or special diets, you can swap ingredients easily. For a gluten-free version, use gluten-free orzo or another gluten-free grain. If you avoid dairy, skip the feta or use a dairy-free cheese. You can also replace honey with maple syrup for a vegan option. Tailoring the salad makes it suit your needs. To make this salad more filling, add protein. Grilled chicken or shrimp work well. For a vegetarian option, add chickpeas or black beans. Tofu or tempeh are great for vegans. These proteins boost nutrition and make the salad a complete meal. Enjoy the flavor and texture they bring. For the complete recipe, check out the [Full Recipe]. To keep your Rainbow Orzo Salad fresh, store it in an airtight container. This keeps moisture in and air out. Make sure to cool the salad to room temperature before sealing. This helps prevent sogginess. You can layer the salad in the container. Place heavier items like tomatoes on the bottom. This way, they won't crush lighter ingredients like feta. You can enjoy this salad cold or at room temperature. If you prefer it warm, gently reheat it in a pan over low heat. Add a splash of olive oil to keep it moist. Stir it well to ensure even heating. If you want to serve it cold, simply take it out of the fridge and enjoy. The flavors will taste great even after a few hours. Your Rainbow Orzo Salad will last about three days in the fridge. After that, the veggies may lose their crunch. Always check for any off smells or changes in texture. If it looks or smells bad, toss it out. For longer storage, consider freezing the salad. However, some ingredients may change texture after thawing. For the best taste, enjoy it fresh! Yes, you can make Rainbow Orzo Salad ahead of time. It tastes great after chilling in the fridge. Prepare the salad a few hours before serving. If you want it fresher, make it the night before. Just keep it in an airtight container. The salad stays fresh for about three days in the fridge. After that, the veggies may lose crunch. The flavors also blend better after sitting. If you notice any wilted veggies, it’s best to toss those out. Always check for freshness before eating. Rainbow Orzo Salad pairs well with many foods. You can serve it with grilled chicken or fish. It also goes great with a slice of crusty bread. For a light meal, enjoy it with a side of soup. The salad adds color and fun to any plate. You learned how to make a tasty Rainbow Orzo Salad. We covered key ingredients, step-by-step instructions, and tips to boost flavor. You can customize it in many ways to fit your taste. Storing leftovers is easy, too. Just follow the tips for freshness. Enjoy making this salad at home. It’s fun, colorful, and full of great taste!](https://therecipehatch.com/wp-content/uploads/2025/06/5e766a43-682e-4967-bcef-b54936fb6675.webp)
Rainbow Orzo Salad Fresh and Colorful Dish
Are you ready for a dish that is as vibrant as it is tasty? Rainbow Orzo Salad is a fresh and colorful meal that bursts
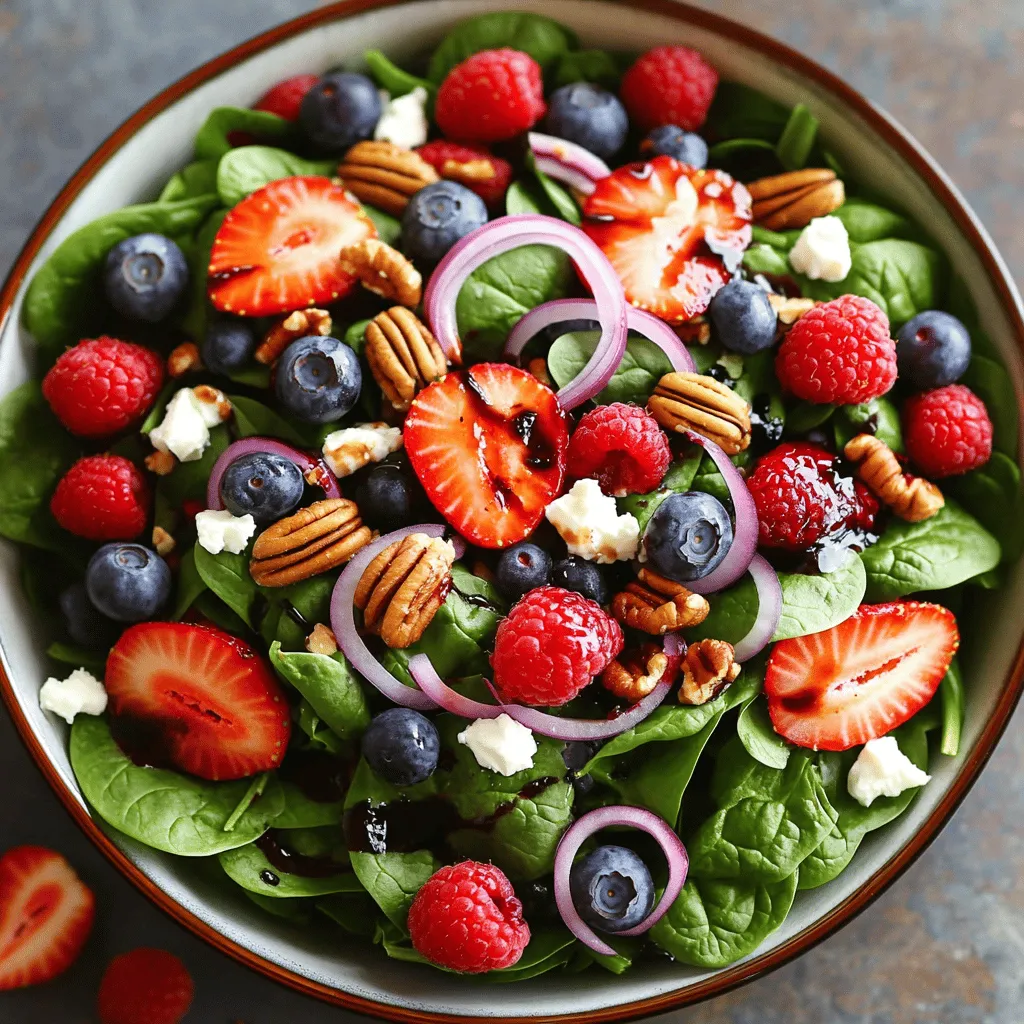
Berry Spinach Salad with Pecans Fresh and Tasty Dish
Looking for a fresh and tasty dish that’s bursting with flavor? You’ve found it! This Berry Spinach Salad with Pecans combines crispy spinach, sweet berries,
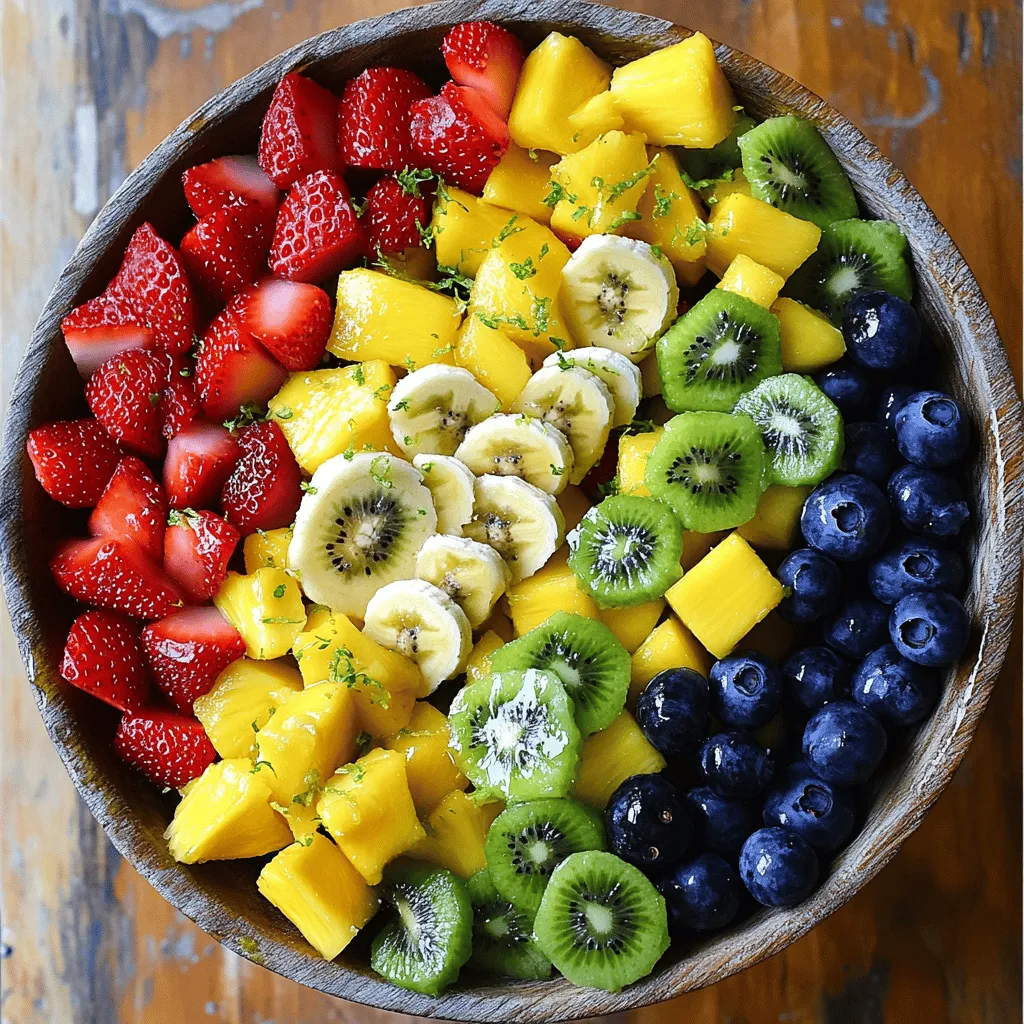
Fruit Salad with Honey Lime Dressing Delightful Treat
Welcome to a delightful journey of flavors with my Fruit Salad with Honey Lime Dressing! This fresh and vibrant salad bursts with ripe fruits and
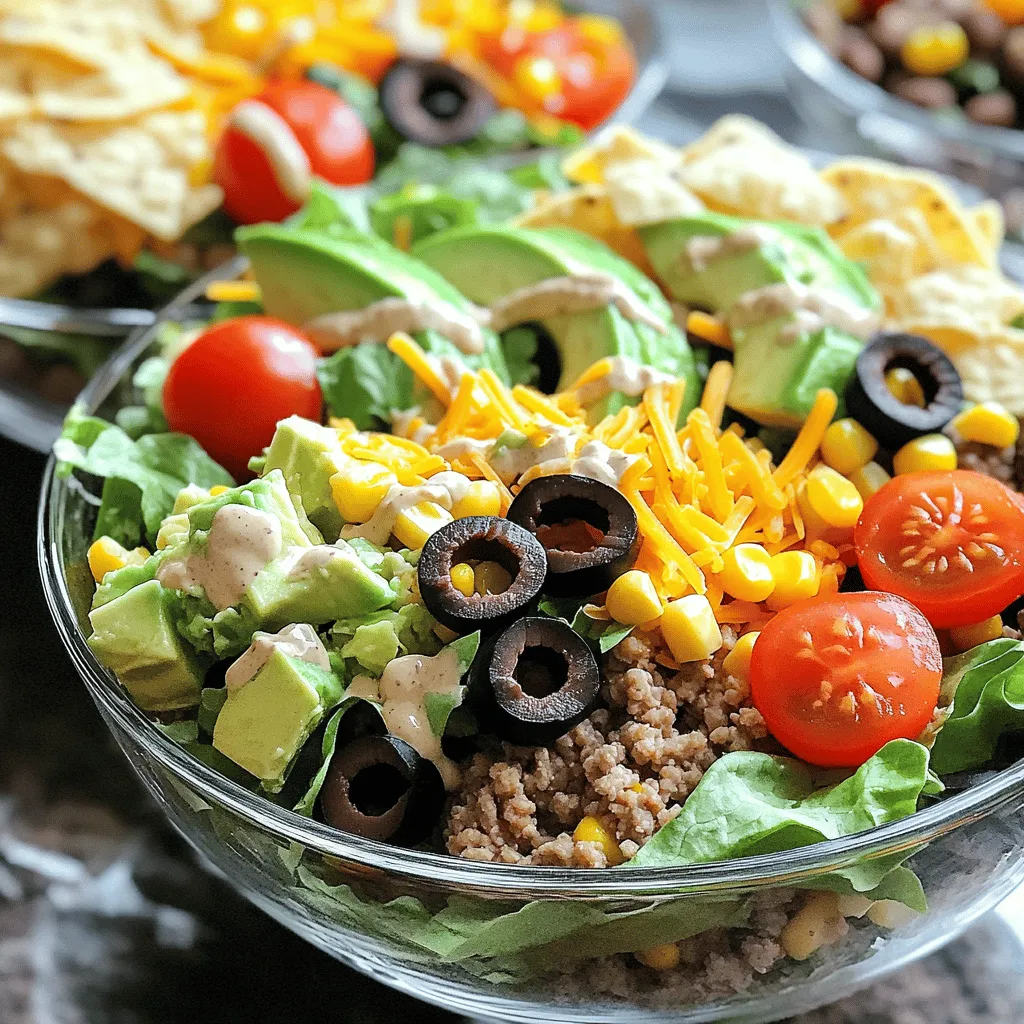
Taco Salad with Chipotle Ranch Dressing Delight
Looking for a fresh twist on Taco Night? This Taco Salad with Chipotle Ranch Dressing combines bold flavors with crunchy textures. I’ll guide you through

30-Minute Strawberry Spinach Salad Simple and Fresh
Are you looking for a fresh, tasty salad that comes together in just 30 minutes? This Strawberry Spinach Salad pairs sweet berries with crisp greens
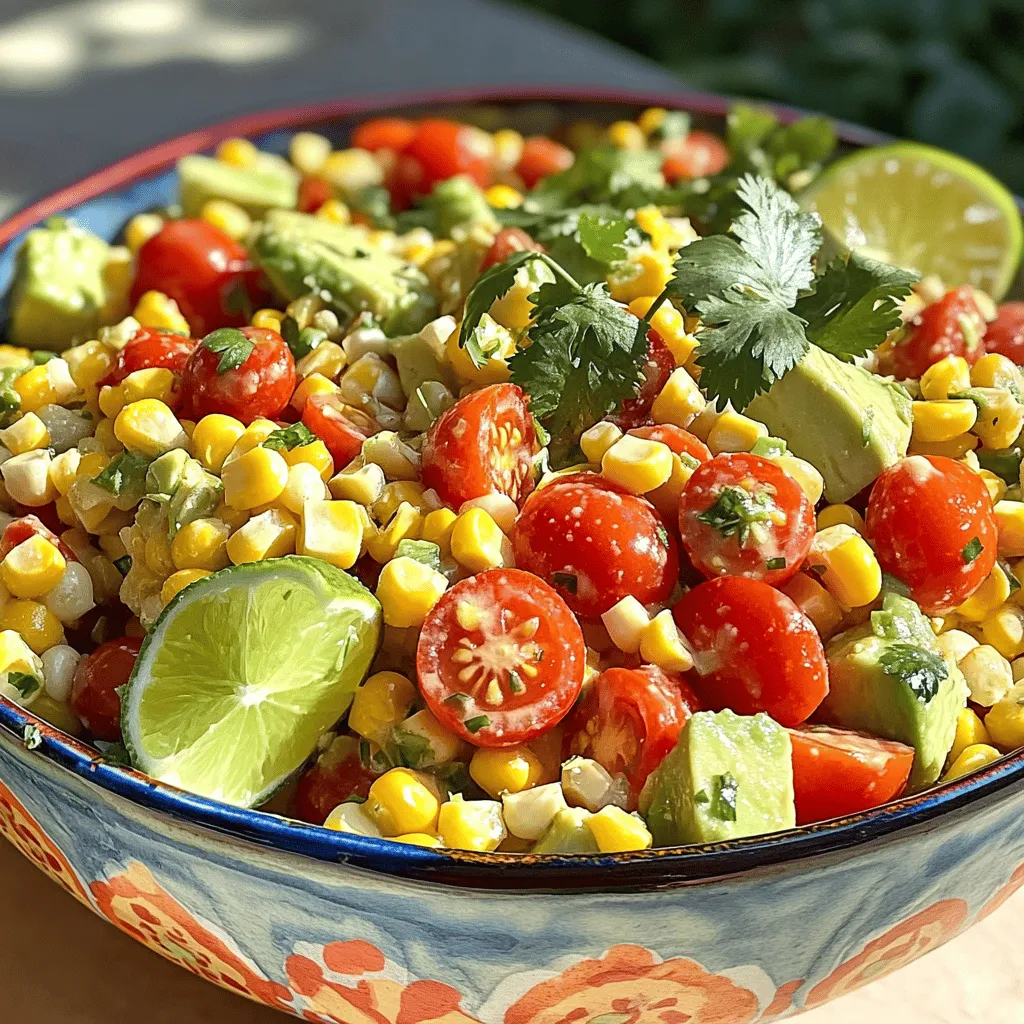
Summer Corn Salad Fresh and Flavorful Delight
Get ready to enjoy summer with my fresh and flavorful Summer Corn Salad! This vibrant dish bursts with sweet corn, colorful veggies, and a zesty