Dinner

To make a tasty pizza grilled cheese, gather these key items: - 2 slices of sourdough bread - 2 tablespoons pizza sauce - 1 cup shredded mozzarella cheese - 1/4 cup chopped pepperoni or your favorite topping - 1/2 teaspoon dried oregano - 1/4 teaspoon garlic powder - 2 tablespoons unsalted butter - Fresh basil leaves for garnish (optional) These ingredients create a delicious mix of flavors and textures. The sourdough bread gives you a crispy crust. The mozzarella cheese melts beautifully and hugs your toppings. Feel free to jazz up your pizza grilled cheese with these fun add-ins: - Sliced bell peppers - Mushrooms - Olives - Spinach - Cooked sausage - Fresh tomatoes These options let you customize your sandwich. You can create new flavors each time you make it. You will need a few tools to make the pizza grilled cheese: - A non-stick skillet - A spatula - A butter knife These basic kitchen items help you cook your sandwich evenly and flip it with ease. {{ingredient_image_1}} 1. Start by gathering your ingredients. You need: - 2 slices of sourdough bread - 2 tablespoons pizza sauce - 1 cup shredded mozzarella cheese - 1/4 cup chopped pepperoni (or your favorite topping) - 1/2 teaspoon dried oregano - 1/4 teaspoon garlic powder - 2 tablespoons unsalted butter - Fresh basil leaves for garnish (optional) 2. Preheat your skillet over medium heat. This ensures your sandwich cooks evenly. 3. Spread 1 tablespoon of butter on one side of each slice of bread. This helps in crisping the bread. 1. Place one slice of bread, butter side down, on the skillet. 2. On the unbuttered side, spread 1 tablespoon of pizza sauce. This adds flavor to your sandwich. 3. Sprinkle half of the mozzarella cheese over the sauce. This will help hold the toppings. 4. Add the chopped pepperoni, oregano, and garlic powder. This enhances the taste. 5. Top with the remaining mozzarella cheese. This ensures a cheesy goodness. 6. Place the second slice of bread, unbuttered side facing the cheese. 7. Cook for about 3-4 minutes. Look for a golden brown color on the bottom. The cheese should start to melt. 8. Carefully flip the sandwich with a spatula. Cook the other side for another 3-4 minutes. Wait for it to be golden brown and the cheese fully melted. - Use a sturdy spatula for easy flipping. - Gently lift one side before flipping. This prevents a messy situation. - If you struggle, press down lightly on the sandwich. This helps it cook evenly. - Practice makes perfect! Don't worry if it takes a couple of tries. To get cheese that melts just right, use fresh mozzarella. Shredded cheese melts better than slices. Make sure your skillet is hot before you start cooking. Cook on medium heat for even melting. If you want extra gooey cheese, cover the skillet with a lid. This traps heat and helps the cheese melt faster. I love sourdough for its crunch and flavor. It holds up well with all the toppings. You could also try thick-cut white or whole grain. These choices give a nice texture and taste. Avoid soft breads like sandwich bread. They can get soggy and fall apart. Spices can take your pizza grilled cheese to the next level. Dried oregano adds a nice pizza taste. Garlic powder gives it a savory kick. You can also add crushed red pepper for heat. Fresh basil leaves make a great garnish and add freshness. Mix and match these flavors to find your favorite! Pro Tips Use Fresh Ingredients: Using fresh mozzarella and quality pizza sauce will enhance the flavors and overall taste of your grilled cheese. Butter It Right: Make sure to use softened butter for easy spreading on the bread; this ensures an even toast and golden crust. Customize Your Toppings: Feel free to add other toppings like bell peppers, olives, or mushrooms to create your perfect pizza grilled cheese. Cook Low and Slow: Keeping the heat at medium ensures that the cheese melts thoroughly without burning the bread. {{image_2}} You can make a tasty vegetarian pizza grilled cheese. Swap out pepperoni for veggies. Try bell peppers, mushrooms, or olives. You can add spinach for a fresh touch. Use the same amount of mozzarella cheese. This keeps the gooey texture we all love. Add a sprinkle of crushed red pepper for heat. If you need a gluten-free option, choose gluten-free bread. Many stores sell good gluten-free slices. Make sure to check the label for any allergens. The rest of the recipe stays the same. You will still enjoy a cheesy, melty flavor. No one will miss the gluten! Get creative with your toppings! You can use different meats like grilled chicken or bacon. Try barbecue sauce instead of pizza sauce for a twist. Add fresh herbs like basil or chives for extra flavor. Experiment with different cheeses such as cheddar or provolone. Each choice brings a new taste to your grilled cheese. To keep your leftover pizza grilled cheese fresh, wrap it tightly in plastic wrap. You can also place it in an airtight container. Make sure to store it in the fridge. It stays good for up to three days. This way, you enjoy a tasty meal later without losing flavor. When you want to eat your leftover pizza grilled cheese, heat it in a skillet. Set the skillet to medium heat. Cook for about 2-3 minutes on each side. This method helps the cheese melt again and keeps the bread crispy. You can also use a microwave, but the bread may get soft. If you prefer a crunchy texture, stick with the skillet. If you want to save your pizza grilled cheese for later, freezing works great. Wrap each sandwich in plastic wrap, then place it in a freezer bag. Squeeze out the air to prevent freezer burn. You can freeze it for up to one month. When ready to eat, thaw it in the fridge overnight before reheating. This keeps your meal delicious and easy to prepare. Yes, you can use different cheeses! Try cheddar, provolone, or gouda. Each cheese gives a unique taste. Mix and match to find your favorite. Just remember, mozzarella melts best for that gooey texture you crave. You can use olive oil instead. Just brush a little oil on the bread. You can also use cooking spray for a lighter option. This will still give you a nice crisp while keeping it healthier. Some great sides include a salad or soup. A fresh green salad adds crunch and color. Tomato soup is a classic choice too. It complements the flavors of the pizza grilled cheese well. You could also serve it with potato chips for a fun crunch. This blog post covered how to make a pizza grilled cheese. We explored essential ingredients, add-ins, and the tools you'll need. I shared simple steps for preparation, cooking, and flipping the sandwich. I offered tips for melted cheese and the best bread to use. You also learned about vegetarian options, storing leftovers, and reheating methods. In the end, you have the tools to create delicious pizza grilled cheese that suits your tastes. Enjoy experimenting with toppings and flavors!
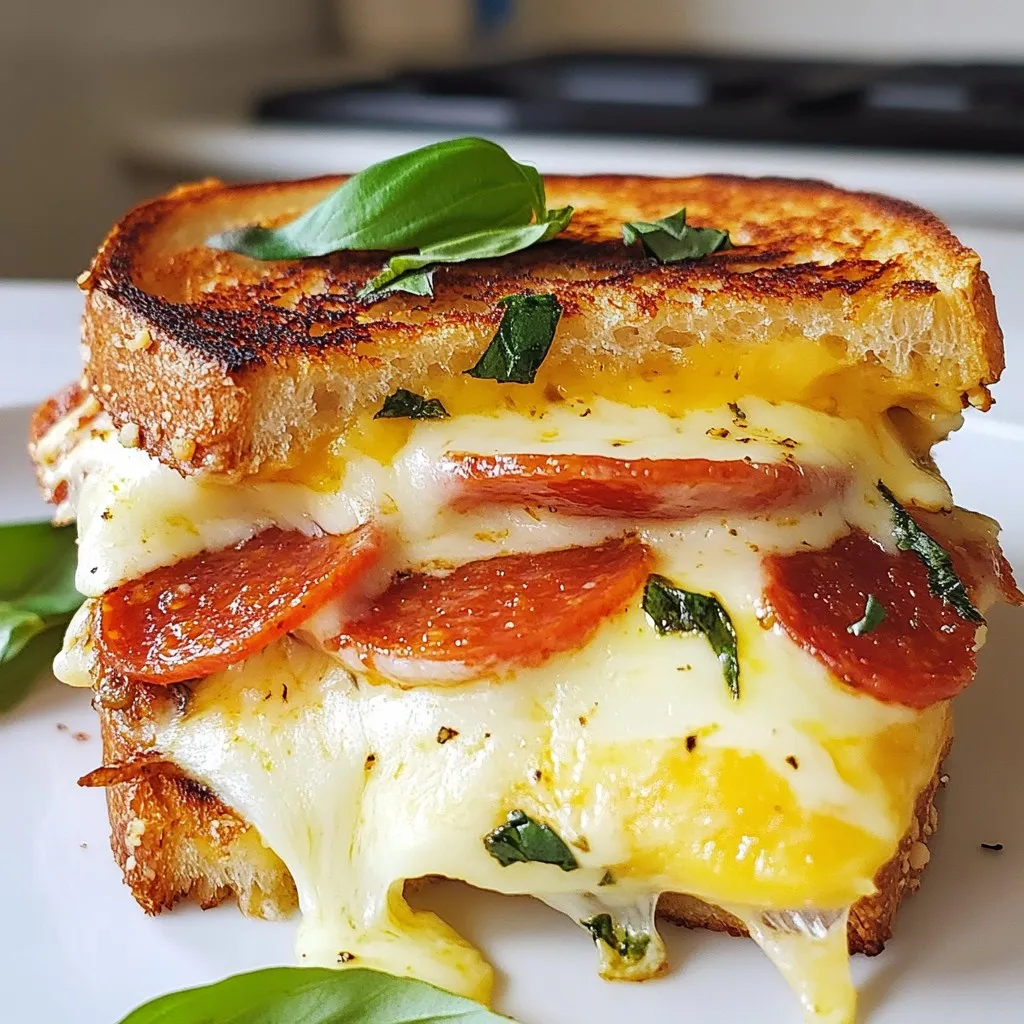
Pizza Grilled Cheese Delight for the Perfect Meal
Get ready for a mouth-watering treat! The Pizza Grilled Cheese Delight combines two beloved favorites into one amazing meal. You’ll discover easy steps and simple
- 1 pound ground chicken - 1 tablespoon olive oil - 1 small onion, finely chopped - 2 cloves garlic, minced - 1 teaspoon ground cumin - 1 teaspoon chili powder - Salt and pepper to taste - 12 small corn tortillas - 1 cup shredded cheddar cheese - 1 cup lettuce, shredded - 1 cup tomatoes, diced - ½ cup sour cream - Fresh cilantro, chopped, for garnish To create these mini baked chicken tacos, you need a mix of simple ingredients. Ground chicken provides the base. Olive oil, onion, and garlic add flavor. Cumin and chili powder bring warmth and spice. Corn tortillas form the taco shells, while cheese, lettuce, tomatoes, and sour cream add freshness and creaminess. - Avocado, sliced - Jalapeños, sliced - Black beans, rinsed and drained - Salsa or hot sauce for serving Feel free to customize your mini tacos! Adding avocado makes them creamy. Sliced jalapeños add heat. Black beans boost protein and fiber. You can also serve with salsa or hot sauce for extra flavor. Each mini baked chicken taco is about 200 calories. This includes healthy protein and good fats. The tacos also provide important vitamins from the veggies. Adjust ingredients for a healthier version. Use leaner meat or skip the cheese if desired. Enjoy these tasty tacos as a balanced meal! {{ingredient_image_2}} Start by gathering your ingredients. You will need: - 1 pound ground chicken - 1 tablespoon olive oil - 1 small onion, finely chopped - 2 cloves garlic, minced - 1 teaspoon ground cumin - 1 teaspoon chili powder - Salt and pepper to taste - 12 small corn tortillas - 1 cup shredded cheddar cheese - 1 cup lettuce, shredded - 1 cup tomatoes, diced - ½ cup sour cream - Fresh cilantro, chopped, for garnish Make sure to measure everything out. This will help you stay organized. Heat a large skillet on medium heat. Add the olive oil and let it shimmer. Next, add the chopped onion and minced garlic. Sauté them for 3-4 minutes. The onion should become soft and fragrant. Now, add the ground chicken. Use a spatula to break it up. Cook for 5-7 minutes until it turns brown and no longer pink. Then, mix in cumin, chili powder, salt, and pepper. Stir well to coat the chicken evenly. Remove the skillet from heat and let it cool a bit. To soften the corn tortillas, wrap them in a damp paper towel. Microwave them for about 30 seconds. This makes them soft and easy to work with. Next, lightly grease a muffin tin. Take one tortilla and press it gently into a muffin cup. This forms the taco shell shape. Repeat this with all the tortillas. Now, spoon the chicken mixture into each tortilla cup. Fill them generously. Top each one with shredded cheddar cheese for that melty goodness. Place the muffin tin in a preheated oven set to 375°F (190°C). Bake for 15-20 minutes. The tortillas should become crispy, and the cheese should melt and bubble. Once baked, remove the taco cups from the oven. Let them cool for a few minutes. Carefully lift each taco out of the muffin tin. Use a fork or your fingers to prevent breakage. Serve the warm taco cups with shredded lettuce, diced tomatoes, sour cream, and chopped cilantro. Enjoy this fun and tasty treat! For mini baked chicken tacos, small corn tortillas are the best choice. They hold their shape well and add a nice crunch. Look for fresh tortillas at your local store or try making them at home. Fresh, soft tortillas will give you a great base. If they are too thick, they may not crisp up nicely. To prevent soggy taco cups, make sure to bake them long enough. A crispy shell holds the filling better. Use a damp paper towel to warm the tortillas before shaping them. This helps them stay pliable without absorbing too much moisture. Also, let the taco cups cool for a few minutes before serving. This keeps them crisp. Baking mini tacos at 375°F for 15-20 minutes is key. Check them at 15 minutes to see if they are golden. Every oven heats a bit differently, so keep an eye on them. You want the cheese to be melted and bubbly, but not burnt. If they need more time, add a few minutes. This ensures a perfect bake every time. Pro Tips Fresh Ingredients: Always use fresh vegetables and herbs for the best flavor and texture in your tacos. Customize Your Fillings: Feel free to mix in other proteins or vegetables to suit your taste. Black beans or corn can add extra flavor and nutrition. Cheese Choices: Experiment with different types of cheese, such as Monterey Jack or pepper jack, for added flavor and spice. Make Ahead: Prepare the chicken filling in advance and store it in the fridge for up to 2 days. Assemble and bake when ready to serve. {{image_4}} To add heat, mix in jalapeños or hot sauce. You can also use spicy taco seasoning. This gives your chicken a kick that many will enjoy. Try adding diced serrano peppers to the filling. The extra spice brings a new flavor to your tacos. Adjust the spice level to fit your taste. Keep in mind, you can always add more heat, but it’s hard to take it away. Swap the chicken for black beans or lentils for a vegetarian option. Use the same spices to keep the flavor strong. Add corn, bell peppers, or zucchini for extra texture. These tasty veggies make great filling and keep the dish colorful. You can also use cheese made from plants if you want a dairy-free version. Everyone can enjoy these tacos! Toppings can make your tacos shine. Consider using fresh avocado or guacamole for creaminess. You can also add pickled onions for a tangy bite. Salsa adds freshness and flavor, while fresh lime juice brightens everything. Don't forget about the classic toppings, like sour cream and cilantro. Feel free to mix and match to find your favorite combo! To store your leftover taco cups, let them cool first. Place them in an airtight container. They will last for about 3 days in the fridge. If you want them to last longer, freezing is a great option. When you're ready to enjoy your leftover taco cups, preheat your oven to 350°F (175°C). Place the taco cups on a baking sheet. Heat them for about 10-15 minutes. This will make them warm and crispy again. You can also microwave them for about 1-2 minutes, but they may lose some crunch. To freeze the taco cups, wrap each one in plastic wrap. Then, place them in a freezer-safe bag or container. They can be frozen for up to 3 months. When you’re ready to eat them, thaw them in the fridge overnight before reheating. This keeps them tasty and fresh! Yes, you can use other meats. Ground turkey or beef works well. You can even try shredded chicken. Just make sure to cook it fully. Each option gives a unique flavor. To make mini baked chicken tacos gluten-free, use corn tortillas. They are naturally gluten-free. Always check the label to be sure. Also, avoid any sauces that contain gluten. These tacos pair well with rice or beans. A fresh salad or guacamole adds nice flavor too. You can also serve with chips and salsa for a crunchy treat. Yes, you can prepare the filling ahead of time. Just store it in the fridge. It stays good for up to three days. When ready, simply fill the taco cups and bake. This blog post covered all you need to make tasty mini baked chicken tacos. We looked at key and optional ingredients, plus the nutrition facts. The step-by-step guide helped you prepare everything right. Tips helped ensure your taco cups stay crisp. Variations showed you can try different flavors. Lastly, we discussed storage and reheating to keep them fresh. Now, you can create these fun tacos at home with ease. Enjoy making them and share with friends!
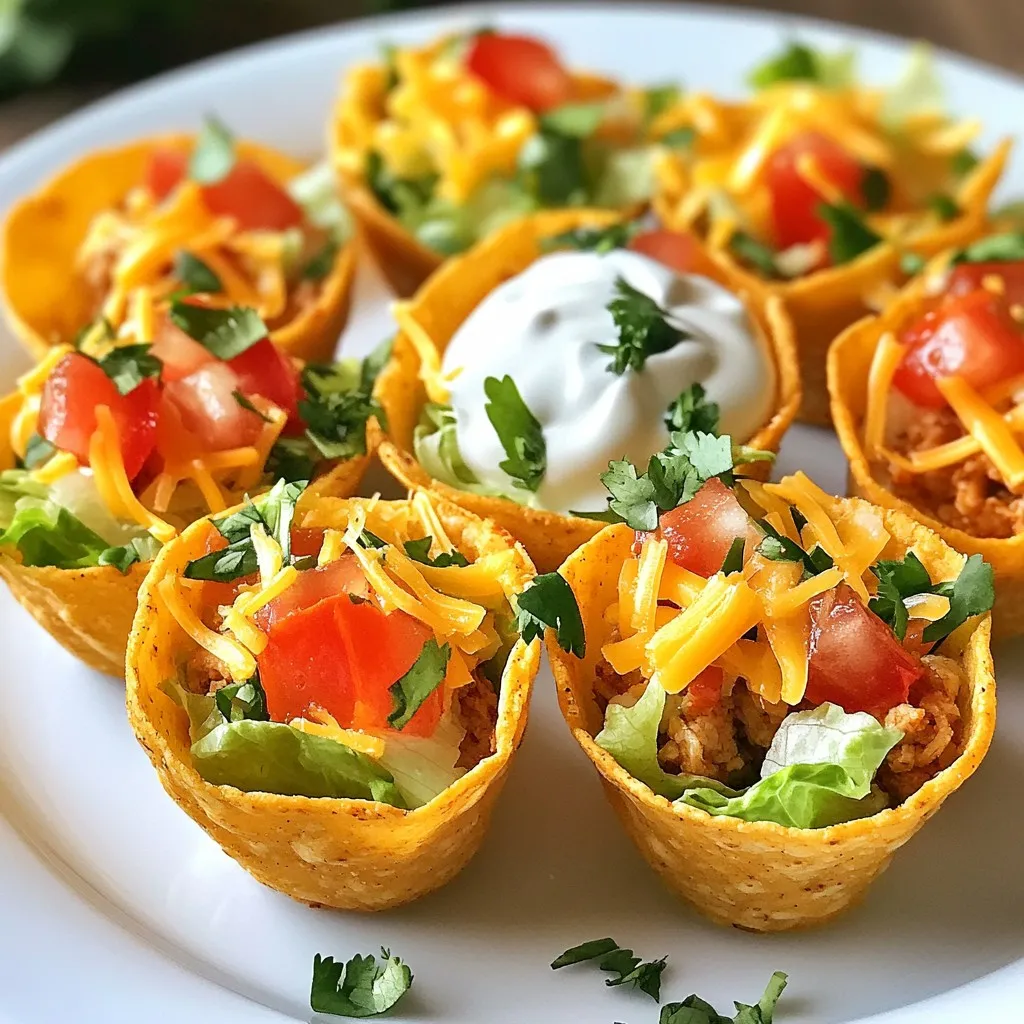
Mini Baked Chicken Tacos Quick and Tasty Treat
Looking for a quick and tasty treat? Mini baked chicken tacos are the answer! With crunchy shells and savory filling, they are a hit for
- 12 oz cheese tortellini - 1 lb boneless, skinless chicken breasts - 2 tablespoons olive oil - 3 cloves garlic, minced - 1 cup heavy cream - 1 cup grated Parmesan cheese - 1 cup fresh spinach, chopped - Fresh parsley, chopped {{ingredient_image_1}} To start, grab a large pot and fill it with water. Add a few pinches of salt to the water. Turn the heat to high and wait until it boils. Once the water bubbles, add in the cheese tortellini. Cook the tortellini for about 3-5 minutes. You want it to be al dente, which means it should still have a little bite. When done, drain the tortellini and set it aside. Next, take a large skillet and put it on medium heat. Pour in 2 tablespoons of olive oil and let it heat up. Once hot, add the diced chicken. Season it with salt, pepper, and 1 teaspoon of Italian seasoning. Cook the chicken for about 6-8 minutes. It should turn golden brown and be fully cooked. This step gives the chicken a nice flavor. Now, reduce the heat to low. Pour in 1 cup of heavy cream, stirring well to mix it with the chicken. Gradually add 1 cup of grated Parmesan cheese, stirring continuously. You want the cheese to melt fully and create a creamy sauce. Keep stirring until you reach a smooth consistency. It’s time to bring everything together! Add the cooked tortellini and 1 cup of chopped fresh spinach to the skillet. Toss everything gently so the spinach wilts and the tortellini gets coated in the creamy sauce. Make sure every piece is covered well for the best flavor. To avoid overcooking tortellini, follow these steps. First, bring a large pot of salted water to a boil. This adds flavor. Once boiling, add the cheese tortellini. Watch the time closely. Cook them for about 3-5 minutes. Check for doneness a minute early. You want them al dente, firm but not hard. Drain them right away to stop the cooking. Rinse briefly under cold water if needed. This helps them stay perfect for your creamy dish. To boost the flavor of your dish, consider adding some spices. A pinch of red pepper flakes can add some heat. Try fresh basil or oregano for a garden taste. You can also mix in some lemon zest for brightness. These flavors pair well with the creamy sauce. Feel free to experiment. Each spice can change the dish in fun ways! When serving Creamy Parmesan Chicken Tortellini, think about the best sides. A fresh green salad works well. Use a light vinaigrette to balance the creaminess. You might also serve it with garlic bread. The crunchy bread complements the soft tortellini. For a heartier meal, add steamed vegetables. Broccoli or green beans are great choices. They add color and nutrients. Enjoy your meal with family and friends! Pro Tips Cook Tortellini Al Dente: Ensure you cook the tortellini just until al dente for the best texture, as it will continue to cook slightly when added to the sauce. Use Fresh Garlic: Freshly minced garlic will provide a more aromatic flavor than pre-minced garlic, enhancing the overall taste of the dish. Adjust Creaminess: If you prefer a lighter sauce, you can substitute half of the heavy cream with chicken broth, which will still keep the dish flavorful. Season Gradually: Taste the dish as you go and adjust the seasoning gradually. This ensures you achieve the perfect balance of flavors without over-seasoning. {{image_2}} You can change up the recipe with different pasta types. If you can’t find cheese tortellini, try using ravioli or fettuccine. These options still hold the creamy sauce well. Just adjust the cooking time based on the pasta you choose. You might also want to swap proteins. Instead of chicken, use diced turkey or shrimp. Both options cook quickly and soak up the sauce nicely. For a vegetarian twist, use mushrooms or tofu. They add great texture and flavor to the dish. To make this dish lighter, use half-and-half instead of heavy cream. This change cuts down on calories but keeps a creamy texture. You can also use reduced-fat Parmesan cheese for less fat. If you need a dairy-free version, try coconut cream instead of heavy cream. It adds a unique flavor and creamy feel. Use nutritional yeast for a cheesy taste without dairy. Adding seasonal vegetables can enhance the recipe. In spring, toss in fresh asparagus or peas. Both add color and crunch. In summer, consider cherry tomatoes or zucchini. They bring a burst of freshness. In fall, you might add roasted butternut squash for a sweet touch. In winter, kale or Brussels sprouts can provide heartiness. These changes keep your dish exciting and vibrant all year round. To keep your Creamy Parmesan Chicken Tortellini fresh, store leftovers in an airtight container. Let the dish cool down to room temperature first. Refrigerate it within two hours after cooking. Properly stored, it will last for up to three days. Make sure to label containers with the date for easy tracking. To reheat the tortellini without losing its creaminess, use a skillet over low heat. Add a splash of milk or cream while warming. This keeps the sauce smooth and creamy. Stir gently to combine everything well. You can also use the microwave, but cover the bowl to prevent drying out. Heat in short intervals, stirring often. If you want to freeze this dish, first cool it completely. Use a freezer-safe container for storage. It’s best to freeze in individual portions for easy meals later. This dish can be frozen for up to three months. To thaw, place it in the fridge overnight before reheating. Avoid refreezing after thawing to maintain quality. To make this dish gluten-free, swap the cheese tortellini for gluten-free tortellini. You can find this option at most grocery stores. Check the label to ensure it fits your needs. If you cannot find gluten-free tortellini, you can use gluten-free pasta, like penne or fusilli. Cook it according to the package instructions. The rest of the recipe remains the same. Yes, you can prepare this dish in advance. Cook the tortellini and chicken as directed. Once you make the creamy sauce, allow it to cool. Store the chicken, tortellini, and sauce separately in the fridge. When ready to eat, reheat everything together in a skillet. Add a splash of cream if it seems thick. I recommend serving this dish with a simple green salad. A fresh Caesar salad pairs nicely, too. Garlic bread makes a tasty side that everyone loves. You can also add sautéed vegetables for extra nutrition. Consider steamed broccoli or roasted asparagus. These sides complement the creamy flavors well. This recipe covers all you need for Creamy Parmesan Chicken Tortellini. We explored key ingredients like cheese tortellini, chicken, and a rich cream sauce. I shared step-by-step instructions to make cooking easy and fun. You learned tips to enhance flavors and ways to adjust the dish for your diet. Storing and reheating leftovers was also explained for your convenience. Now, you're ready to impress at your next meal with this creamy delight. Enjoy the flavors and make it your own!
Creamy Parmesan Chicken Tortellini Delightful Recipe
Are you ready to impress your family or friends with a delicious meal? This Creamy Parmesan Chicken Tortellini recipe is an easy way to create
To make Creamy Pepperoncini Chicken Skillet, you need simple yet flavorful ingredients. Here’s what you will need: - 4 boneless, skinless chicken breasts - 1 tablespoon extra virgin olive oil - Sea salt and freshly ground black pepper, to taste - 1 cup sliced pepperoncini peppers (jarred, drained) - 1 cup low-sodium chicken broth - 1 cup heavy whipping cream - 1 tablespoon garlic, finely minced - 1 teaspoon onion powder - 1 teaspoon dried Italian seasoning - 1 cup shredded mozzarella cheese - Fresh parsley, chopped, for garnish These ingredients create a rich and creamy dish that bursts with flavor. The chicken absorbs the tanginess of the pepperoncini, while the cream adds a smooth touch. The garlic and seasonings round out the taste, making each bite a delight. Don’t skip the fresh parsley; it adds a nice pop of color and freshness to the dish. {{ingredient_image_2}} Start by seasoning the chicken breasts. Use sea salt and black pepper on both sides. This adds flavor and helps the chicken taste great. Next, heat the olive oil in a large skillet over medium heat. You want the oil to shimmer before adding the chicken. Place the chicken in the skillet carefully. Sear it for 5-7 minutes on each side. The chicken should turn golden brown and reach an internal temperature of 165°F. This step keeps the chicken juicy. When done, remove the chicken and set it aside. Now, let's make the sauce. In the same skillet, add minced garlic. Sauté it for about 30 seconds until fragrant. Be careful not to burn it, as burnt garlic can ruin the flavor. Pour in the chicken broth next. Bring it to a gentle simmer. Use a wooden spoon to scrape up the tasty bits stuck to the bottom. This adds depth to your sauce. After that, stir in the heavy cream, sliced pepperoncini peppers, onion powder, and Italian seasoning. Mix everything well and let it simmer for 3-4 minutes. You want the sauce to thicken slightly. Once the sauce is ready, return the chicken to the skillet. Spoon some sauce over each piece of chicken. Then, sprinkle the shredded mozzarella cheese on top. Cover the skillet with a lid and cook for another 3-4 minutes. The cheese should melt and bubble, creating a beautiful dish. Finally, remove the skillet from heat. Garnish with freshly chopped parsley before serving. This adds a nice touch and brightens up the dish. Enjoy your creamy pepperoncini chicken skillet! To get juicy chicken, start with even cooking. Season both sides of the chicken breasts with sea salt and black pepper. Heat your skillet with olive oil until it shimmers. Sear the chicken for 5-7 minutes on each side. This gives it a nice golden crust. Always check the internal temperature. It should reach 165°F to be safe and tender. To avoid dry chicken, do not overcook it. Use a meat thermometer for the best results. Let the chicken rest for a few minutes after cooking. This helps keep the juices inside. For the best sauce thickness, let it simmer gently. After adding the chicken broth, stir well. The browned bits from the skillet add great flavor. When you mix in the cream and peppers, let it cook for 3-4 minutes. This time allows it to thicken just right. Adjust the flavors to suit your taste. If you want more spice, add more pepperoncini. You can also mix in a pinch of salt or herbs. Taste as you go for the best results. Garnishing makes your dish pop. Use freshly chopped parsley for a bright touch. Add extra slices of pepperoncini for color and flavor. Serve the skillet straight from the pan. For side dishes, crusty garlic bread pairs well. A light, crisp salad also balances the meal. These options make your creamy chicken skillet shine on any table. Enjoy your delicious creation! Pro Tips Use Fresh Ingredients: Always opt for fresh chicken and high-quality cream for the best flavor and texture in your dish. Adjust Spice Levels: If you prefer a milder dish, reduce the amount of pepperoncini or remove the seeds before adding them to the skillet. Let It Rest: Allow the chicken to rest for a few minutes after cooking to keep it juicy and tender before slicing. Pairing Suggestions: Serve with a side of garlic bread or over a bed of pasta to soak up the delicious creamy sauce! {{image_4}} You can change the cheese or cream in this dish. Try using cream cheese or Greek yogurt. Both options add a creamy texture with a unique taste. For cheese, swap mozzarella for provolone or gouda. These swaps give you different flavors but keep the dish creamy and rich. You can also change the pepperoncini. Instead, use banana peppers for a milder flavor. If you want more heat, jalapeños are an option. Just remember, they will change the dish's taste. Adding veggies makes this dish even better. You can include bell peppers or mushrooms for extra flavor. Carrots and zucchini also blend well in this recipe. They add color and crunch while making your meal healthier. Incorporating greens like spinach or kale boosts nutrition. Just add them to the sauce near the end of cooking. They will wilt nicely and add a fresh taste to the dish. If you want more heat, add red pepper flakes or cayenne pepper. Start with a small amount, then taste and adjust. You can also try smoked paprika for a different flavor. Experiment with herbs, too. Fresh basil or thyme can add new layers to the dish. Don’t be afraid to mix and match spices to find the flavor you love! To store leftovers, place them in an airtight container. Let the dish cool to room temperature first. This will keep it fresh for up to three days. Use glass or BPA-free plastic containers for best results. To reheat without drying out, use a skillet over low heat. Stir the dish gently to warm it evenly. You can also use the microwave. Heat in short bursts, stirring in between. Aim for about 1-2 minutes in the microwave. Yes, you can freeze this dish! To prepare for freezing, let it cool completely. Transfer it to a freezer-safe container or a resealable bag. Label it with the date and use it within three months for the best taste. You can use several options if you need a substitute for heavy cream. Here are a few: - Half-and-half: This is a mix of milk and cream. It works well but is less rich. - Coconut cream: This adds a nice flavor. It’s great for dairy-free meals. - Greek yogurt: This makes a thicker sauce. Mix it with milk for a creamier texture. - Silken tofu: Blend it until smooth. It’s a good vegan option. Each of these substitutes will change the taste a bit. Choose based on your dish and preference. Leftovers from this creamy pepperoncini chicken skillet will last about 3 to 4 days in the fridge. To store them best: - Place the chicken in an airtight container. - Make sure to cool it down before sealing. - Label the container with the date. This way, you can enjoy your meal again without worry! Yes, you can prepare this dish ahead of time! Here are some tips for meal prep: - Cook the chicken and sauce but don’t add the cheese. - Store the chicken and sauce in the fridge in separate containers. - When ready to serve, reheat the chicken and sauce together. To reheat effectively: - Use a skillet over low heat to warm it up slowly. - Stir in the cheese when nearly hot. This keeps everything creamy. - Avoid the microwave if possible, as it can dry out the chicken. This recipe combines simple ingredients to create delicious chicken. You learned to sear chicken properly and make a rich sauce. I shared tips to ensure your chicken stays juicy. You can experiment with different ingredients and flavors to personalize your meal. Finally, remember to store leftovers well to enjoy later. Simple tweaks can elevate your dish to the next level. Happy cooking!
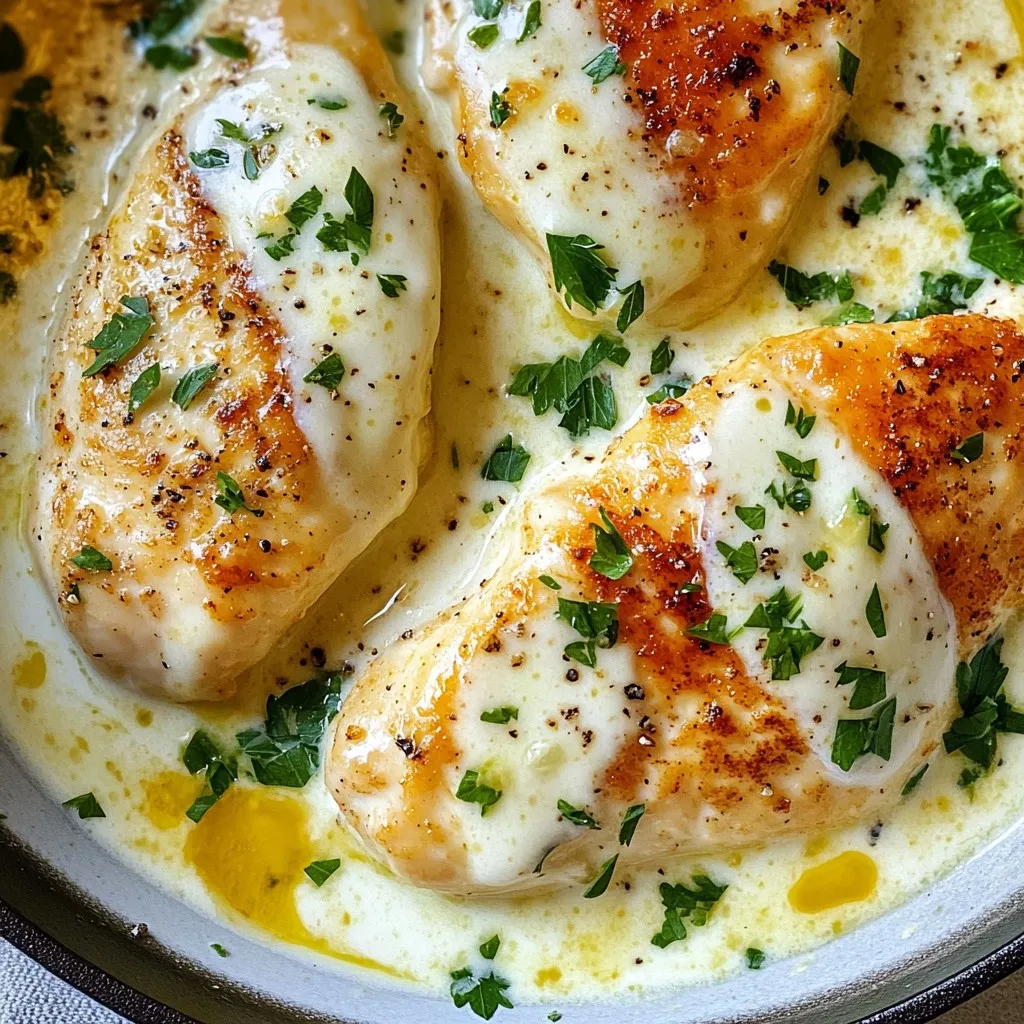
Creamy Pepperoncini Chicken Skillet Savory Delight
Welcome to a taste sensation! Today, I’m sharing my Creamy Pepperoncini Chicken Skillet. This dish is a savory delight that combines tender chicken with tangy
The cheesy meatloaf is simple to make. Here’s what you need: - 1 lb ground beef - 1 cup breadcrumbs - 1 small onion, finely chopped - 2 cloves garlic, minced - 1 cup shredded cheddar cheese - 1/2 cup milk - 1 large egg - 1 tablespoon Worcestershire sauce - 1 teaspoon dried Italian herbs - 1/2 teaspoon salt - 1/4 teaspoon black pepper Each ingredient adds flavor and texture. The ground beef gives it a hearty base. The breadcrumbs help bind everything together, while cheese makes it rich and gooey. Mashed potatoes are a classic side. To make them, gather these items: - 4 large potatoes, peeled and cubed - 1/2 cup sour cream - 3 tablespoons butter The potatoes create a creamy and fluffy mash. Sour cream adds a nice tang. Butter enhances the flavor and texture, making them irresistible. You can add a few extras to elevate your dish: - Chives for garnish (optional) Chives bring a fresh taste and color. You can sprinkle them on top for a lovely finish. Feel free to add more herbs or spices based on your taste! {{ingredient_image_1}} First, set your oven to 350°F (175°C). This step is key for even cooking. Make sure it fully heats up before you put in the meatloaf. In a large bowl, mix together the ground beef, breadcrumbs, chopped onion, and minced garlic. Add the shredded cheddar cheese, milk, egg, Worcestershire sauce, dried Italian herbs, salt, and black pepper. Use your hands or a spoon to stir everything until just combined. Don’t overmix! That can make the meatloaf tough. Now, transfer the meat mixture into a greased loaf pan. Press it down evenly to shape it. Bake it in your preheated oven for 60-70 minutes. Check that it reaches an internal temperature of 160°F (70°C). This ensures your meatloaf is safe to eat and juicy. While the meatloaf bakes, take 4 large potatoes, peel, and cube them. Place the cubes in a pot of salted water. Bring the pot to a boil. Cook the potatoes for 15-20 minutes, until they are tender. Once cooked, drain them well. In the same pot, mash the drained potatoes with 1/2 cup sour cream and 3 tablespoons butter. Mix until creamy. Add salt and pepper to taste. When the meatloaf is done, let it rest for 10 minutes before slicing. Serve the meatloaf with a generous scoop of mashed potatoes. For a pop of color, you can garnish with chopped chives if you like. To boost the flavor of your meatloaf, add fresh herbs like parsley or thyme. You can also try using different cheeses such as mozzarella for a milder taste. A splash of hot sauce can give it a nice kick too. Another tip is to sauté the onions and garlic before mixing them in. This step softens the flavors and adds richness. For creamy mashed potatoes, use starchy potatoes like Russets. Boil them until tender, but don't overcook. Drain them well to avoid watery potatoes. When mashing, add sour cream and butter for creaminess. For extra fluffiness, use a ricer instead of a masher. Adjust the salt and pepper for taste, and mix until smooth but not gummy. One common mistake is overmixing the meatloaf. This makes it tough instead of tender. Another is undercooking the potatoes. They should be fork-tender before mashing. Don't forget to let the meatloaf rest after baking. This helps keep the juices in, making it moist. Lastly, always taste your mashed potatoes before serving to ensure they’re well-seasoned. Pro Tips Use Fresh Ingredients: Fresh herbs and vegetables enhance the flavor of your meatloaf. Opt for fresh garlic and finely chopped onions for the best results. Let it Rest: Allow the meatloaf to rest for at least 10 minutes after baking. This helps retain the juices, making it more flavorful and easier to slice. Customize Your Cheese: While cheddar is delicious, feel free to experiment with different cheeses like mozzarella or pepper jack for a unique flavor twist. Perfect Mashed Potatoes: For extra creamy mashed potatoes, use a potato ricer or food mill instead of a traditional masher. This will create a smooth texture without lumps. {{image_2}} If you want a lighter meal, try ground turkey or chicken. These meats have less fat than ground beef. You can also use lean beef for a healthier choice. If you want more flavor, add herbs or spices. This helps keep the dish tasty without extra fat. To change up your meatloaf, think about add-ins. You can include diced bell peppers or mushrooms for extra veggies. For spice lovers, add jalapeños or hot sauce. You can also switch the cheese! Try mozzarella for a gooey texture or feta for a tangy taste. For toppings, think about a sweet BBQ sauce or a rich gravy. These can add flavor and texture to your meatloaf. Mashed potatoes don’t have to be plain. You can mix in garlic for a savory kick. Try adding roasted garlic for a deeper taste. If you like herbs, mix in fresh parsley or rosemary. For a cheesy twist, add more cheddar or even cream cheese. Want something different? Try sour cream or Greek yogurt for tanginess. You can even add roasted veggies like cauliflower or carrots for a colorful side. Store leftover meatloaf in an airtight container. This keeps it fresh and tasty. Make sure to let it cool first. Then, you can place it in the fridge. It will last up to four days. If you want to save it longer, consider freezing it. Wrap it tightly in plastic wrap and foil. It can stay in the freezer for up to three months. When you are ready to eat it, just thaw it in the fridge overnight. To store mashed potatoes, let them cool down first. Put them in a sealed container. They can stay fresh in the fridge for about three days. If you want to keep them longer, you can freeze them. Place the mashed potatoes in a freezer-safe bag. Press out the air before sealing. They can last up to two months in the freezer. To use frozen mashed potatoes, just thaw in the fridge overnight. When reheating meatloaf, use the oven for the best taste. Preheat it to 350°F (175°C). Place the meatloaf in a baking dish. Add a splash of broth or water to keep it moist. Cover it with foil and heat for about 20 minutes. For mashed potatoes, you can use the microwave. Add a little milk or butter to revive the creaminess. Heat them in short bursts, stirring often. This way, you keep the flavor and texture just right. It takes about 60 to 70 minutes to cook cheesy meatloaf in the oven. You should set your oven to 350°F (175°C). The meatloaf needs time to cook through and get a nice, firm texture. Yes, you can freeze cheesy meatloaf and mashed potatoes. Wrap the meatloaf tightly in plastic wrap and place it in an airtight container. Mash the potatoes and store them in a separate container. They can keep in the freezer for about three months. You can serve meatloaf and mashed potatoes with many sides. Some great options include steamed green beans, roasted vegetables, or a fresh garden salad. Pick what you like to make your meal more fun. Yes, you can make meatloaf without breadcrumbs. You can substitute breadcrumbs with oats, crushed crackers, or even cooked rice. Each option adds a different texture and flavor to your meatloaf. You can check if the meatloaf is done by using a meat thermometer. It should read 160°F (70°C) inside. If you don't have a thermometer, cut into the middle. The meat should be brown, not pink, and the juices should run clear. This blog post covered the key ingredients for a cheesy meatloaf and creamy mashed potatoes. You learned step-by-step how to prepare and bake these comfort food favorites. I shared tips for flavor and texture, plus variations for healthier options. Storing your leftovers properly ensures you can enjoy your meal later. With this guide, you now have the tools to impress anyone with your cooking skills. Enjoy crafting these dishes with confidence, and make each meal a memorable one.
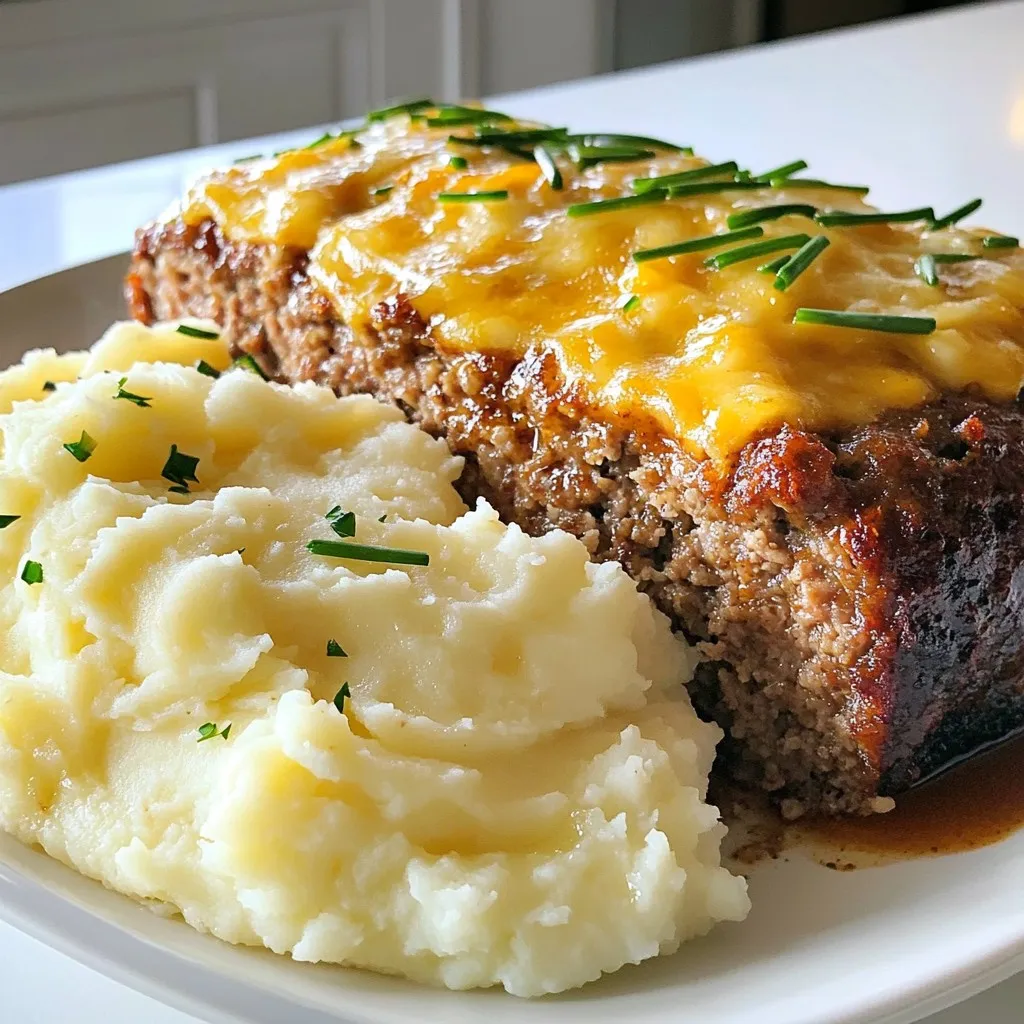
Cheesy Meatloaf and Mashed Potatoes Simple Recipe
Are you ready to make the ultimate comfort food? My cheesy meatloaf and mashed potatoes recipe is simple, delicious, and great for any night. This
- 4 large round bread boules (single-serving size) - 2 cups cooked chicken breast, shredded - 2 cups fettuccine pasta (or pasta of choice) - 1 cup heavy cream - 1 cup grated Parmesan cheese - 2 tablespoons butter In this dish, the main ingredients create a rich and hearty meal. The bread boules hold everything together and add a nice crunch. The chicken gives protein, while the fettuccine adds comfort. Heavy cream and Parmesan cheese form the creamy Alfredo sauce that ties it all together. - 1/2 teaspoon nutmeg (optional, for extra flavor) - Fresh parsley, chopped (for garnish) Nutmeg can add a warm touch to the Alfredo sauce. It gives a hint of spice that enhances the dish. Fresh parsley brightens up the presentation and adds freshness to each bite. You can skip these if you prefer, but they can elevate your meal. - 2 cloves garlic, minced - Salt and pepper to taste Garlic is essential for flavor in this recipe. It adds a savory note that complements the creaminess. Salt and pepper season the dish perfectly. Adjust them to your taste, so every bite is just right. {{ingredient_image_1}} 1. Preheat your oven to 375°F (190°C). This step is key for cooking the bread evenly. 2. Take your large round bread boules. Cut the tops off each one. Save these tops for later. 3. Carefully hollow out the insides of the boules. Leave about a 1-inch border. This gives you space for the filling. 1. In a large skillet, add 2 tablespoons of butter. Heat it over medium. 2. Once the butter melts, add 2 cloves of minced garlic. Sauté for about 1-2 minutes. You want it fragrant but not brown. 3. Pour in 1 cup of heavy cream. Bring it to a gentle simmer. Stir often. 4. Add in 1 cup of grated Parmesan cheese. Stir until it melts into the sauce. For extra flavor, you can also mix in 1/2 teaspoon of nutmeg. Season it all with salt and pepper to taste. 1. Add 2 cups of shredded cooked chicken to the skillet. Mix well until coated with the Alfredo sauce. 2. Stir in 2 cups of cooked fettuccine pasta. Ensure it blends evenly with the chicken and sauce. 3. Take your hollowed bread boules and fill each one with the chicken Alfredo mixture. Pack it lightly to keep it stable. 4. Place the filled boules on a baking sheet. Bake them in the preheated oven for 15-20 minutes. Look for a golden, crispy finish. 5. Once done, take them out of the oven. You can garnish with chopped parsley. If you like, put the tops back on the boules for a nice touch. How to achieve a thick Alfredo sauce To make a thick Alfredo sauce, use heavy cream. Heat it gently and stir in grated Parmesan cheese. Keep stirring until it melts. If you want it thicker, let it simmer longer. Adding a bit of nutmeg also enhances the flavor. Ideal pasta cooking time Cook fettuccine for about 8-10 minutes. It should be al dente, meaning it’s firm but not hard. Drain it well and toss it with a bit of olive oil to prevent sticking. Serving suggestions for added flair Serve your Chicken Alfredo bread bowls on a wooden board. This gives a rustic look. Add a small salad to brighten up the dish. Drizzle leftover Alfredo sauce around the board for a nice touch. Garnishing ideas with parsley and cheese Top each bread bowl with fresh parsley. This adds color and freshness. You can also sprinkle extra grated Parmesan on top for more flavor and a nice look. Overcooking the pasta Don’t let the pasta cook too long. It can become mushy when mixed with the sauce. Remember, it will cook a bit more while baking in the bread bowls. Not properly hollowing the bread Make sure to hollow out the bread boules carefully. Leave about a 1-inch border. If you don’t, the bowls may break or won’t hold enough filling. Pro Tips Use Day-Old Bread: Stale bread holds up better when filled, preventing sogginess. Customize Your Fillings: Feel free to mix in vegetables like spinach or mushrooms for added flavor and nutrients. Make it Cheesy: For an even creamier sauce, add extra cheese like mozzarella or cream cheese to the Alfredo mix. Garnish Creatively: Add a sprinkle of red pepper flakes or lemon zest for a pop of color and additional flavor. {{image_2}} You can switch out the chicken for other proteins. Shrimp works well and adds a nice twist. You can also use tofu or seitan for a vegetarian choice. This keeps the dish flavorful and fun. For cheese, feel free to experiment. Mozzarella gives a stretchy bite, while gouda adds a smoky taste. Mixing cheeses can create a unique flavor. Always go with what you enjoy. Adding vegetables can boost the nutrition and taste. Spinach, broccoli, or bell peppers fit well in this dish. Sauté them with garlic before mixing them into the sauce. This brings color and texture. Herbs and spices can change the flavor profile too. Try adding fresh basil or thyme for a fragrant touch. A pinch of red pepper flakes adds heat and excitement. Don't be afraid to get creative! You can serve the bread bowls as a main dish or a side. If you make smaller bowls, they work great alongside soups or salads. This makes them perfect for gatherings or family dinners. Pairing with salads adds freshness. A crisp Caesar or a tangy arugula salad brings balance. The greens cut through the richness of the Alfredo sauce. This creates a well-rounded meal that you and your guests will love. To store leftover Chicken Alfredo Bread Bowls, let them cool down first. Place each filled bread bowl in an airtight container. You can also wrap them in plastic wrap. Keep them in the fridge for up to three days. This keeps the bread from getting too soggy. When you're ready to eat, just reheat them. Yes, you can freeze Chicken Alfredo Bread Bowls! To do this, follow these steps. First, let the bowls cool completely. Wrap each bowl tightly in plastic wrap. Then, place them in a freezer bag. They can stay in the freezer for up to a month. When you want to eat them, thaw in the fridge overnight before reheating. For the best taste, reheat your Chicken Alfredo Bread Bowls in the oven. Preheat your oven to 350°F (175°C). Place the bowls on a baking sheet and cover them with foil. Heat for about 15-20 minutes. This method keeps the bread crispy and warms the filling evenly. You can also use a microwave, but the bread may become soft. Enjoy your warm and tasty dish! To make Chicken Alfredo from scratch, you start by melting butter in a skillet. Add minced garlic and let it cook for a minute. Then, pour in heavy cream and bring it to a gentle simmer. Stir in grated Parmesan cheese. Keep stirring until it melts and thickens. Finally, season with salt and pepper to your taste. This homemade sauce is rich and creamy, perfect for your bread bowls. You can use store-bought Alfredo sauce if you need a quick option. The pros are that it saves time and effort, making weeknight meals easier. However, the cons include less control over flavor and texture. Often, pre-made sauces have preservatives, which may affect taste. If you choose this route, look for high-quality brands for the best flavor. For a balanced meal, pair your Chicken Alfredo Bread Bowls with a fresh salad. A simple green salad with mixed greens and a light vinaigrette works well. You can also serve steamed veggies like broccoli or green beans for added nutrition. These sides complement the creamy, rich flavors of the Alfredo sauce and make your meal more vibrant. This article walked you through making delicious Chicken Alfredo Bread Bowls. We covered ingredients like bread boules, chicken, and fettuccine. You learned to prepare the sauce and bake everything together. I shared tips to avoid common mistakes and how to store leftovers. Now, you can enjoy a fun and tasty meal with your family or friends. Feel free to get creative by adding your favorite ingredients. Cooking should be enjoyable, so don’t hesitate to make this recipe your own!
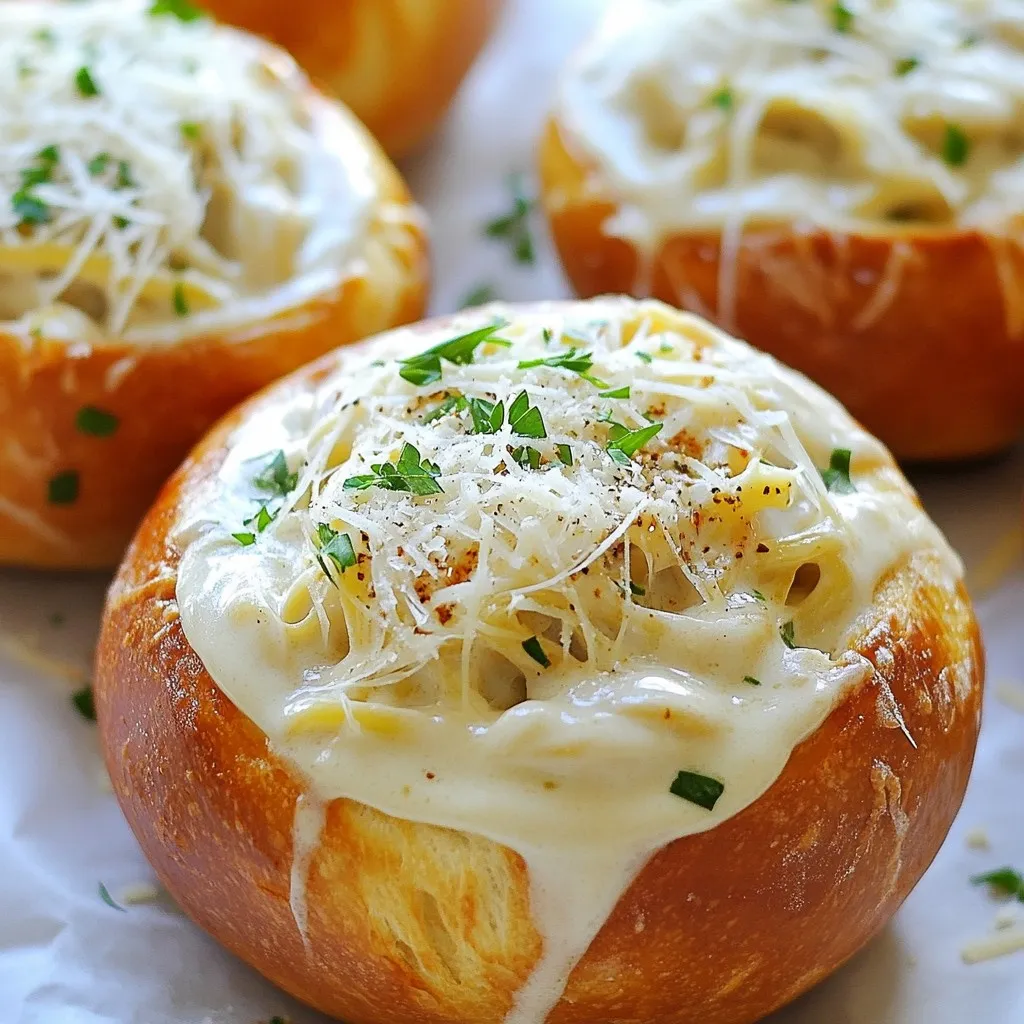
Chicken Alfredo Bread Bowls Flavorful Comfort Dish
If you crave a warm, hearty meal, Chicken Alfredo Bread Bowls are the perfect fit. Imagine creamy Alfredo sauce mixed with pasta and tender chicken,
- 2 boneless, skinless chicken breasts - 1 cup cornstarch - 1/2 cup mayonnaise - 2 tablespoons sweet chili sauce - 1 tablespoon sriracha (adjust to taste) - 1 tablespoon soy sauce - 1 tablespoon rice vinegar - 1 teaspoon garlic powder - 2 cups cooked jasmine rice - 1 cucumber, thinly sliced - 1 cup shredded carrots - 1/4 cup chopped green onions - Sesame seeds for garnish - Fresh cilantro for garnish - Salt and pepper to taste For the best flavors, use fresh ingredients. Fresh chicken gives a juicy bite. Choose ripe cucumbers for crunch. When picking carrots, look for vibrant colors. High-quality mayonnaise enhances the sauce's creaminess. Use good sriracha for a real kick. Fresh cilantro brightens the bowl's taste and look. Always check for the best before dates on packaged items. {{ingredient_image_2}} To start, season the chicken breasts well. Use salt, pepper, and garlic powder. This mix adds a great flavor. Let the chicken rest for 10 minutes. This time helps the seasonings soak in. Next, we coat the chicken. Pour the cornstarch into a shallow dish. Take each chicken breast and coat it in the cornstarch. Make sure to cover all sides. After that, shake off the extra cornstarch. Too much can cause clumps. Now, heat a large skillet on medium-high. Add a few tablespoons of oil. Once the oil shimmers, place the coated chicken in the skillet. Cook for about 6-7 minutes on each side. You want a golden-brown color and the chicken should reach 165°F (75°C). After cooking, let the chicken rest for a few minutes. This keeps it juicy. Time for the sauce! In a bowl, mix mayonnaise, sweet chili sauce, sriracha, soy sauce, and rice vinegar. Whisk until smooth. Taste the sauce. If you want more heat, add more sriracha. Adjust it to your liking. Now, let's put it all together. Start with a scoop of jasmine rice at the bottom. Then, add the sliced chicken. Next, place cucumber slices and shredded carrots on top. Drizzle the Bang Bang sauce all over. For a nice finish, add chopped green onions, sesame seeds, and fresh cilantro. These toppings make it look pretty and taste even better. Serve it in colorful bowls to show off the vibrant ingredients. A lime wedge on the side can add a nice touch too! - To prevent chicken from drying out, always let it rest after cooking. This keeps the juices inside. - Use a meat thermometer to check the chicken's internal temperature. It should be 165°F (75°C). - I recommend using a large skillet for even cooking. Non-stick pans work well for this dish. - Pair your Bang Bang Chicken Bowl with a light salad or steamed veggies. They balance the flavors nicely. - A refreshing drink, like iced tea or lemonade, complements the meal well. - Serve the bowl warm for the best taste. The flavors meld beautifully when everything is hot. Pro Tips Marinate for Extra Flavor: Allow the chicken to marinate in your seasoning for at least 30 minutes or even overnight. This enhances the flavor and tenderness of the meat. Perfectly Crispy Coating: Ensure that your oil is hot enough before adding the chicken. If the oil is not hot, the coating will absorb too much oil and become soggy. Customize Your Sauce: Feel free to experiment with the Bang Bang sauce! Add lime juice or a dash of honey for a unique twist that complements the dish. Fresh Ingredients Matter: Use fresh vegetables for garnish and toppings. Fresh cucumbers and carrots not only taste better but also add vibrant color to your dish. {{image_4}} You can easily swap out some ingredients in the Bang Bang Chicken Bowl for your taste. If you want a lighter option, you can replace mayonnaise with Greek yogurt. It still gives a creamy texture but is a bit healthier. For a different sauce, try using tahini or avocado instead of mayonnaise. Both add a unique flavor. You can also play with the veggies. If you don't like cucumber, try bell peppers or radishes for a crunch. You can add other toppings like avocado slices or chopped peanuts for extra flavor. To make this dish gluten-free, simply use gluten-free soy sauce. It tastes just as good and keeps the flavors intact. Also, check your sweet chili sauce for gluten-free options. If you're aiming for a vegetarian or vegan dish, substitute the chicken with crispy tofu or tempeh. Just coat the tofu in cornstarch and fry it the same way as the chicken. You can still enjoy the same tasty sauce and fresh veggies. This way, everyone can enjoy a delicious Bang Bang Bowl! To keep your Bang Bang Chicken Bowl fresh, follow these steps: - Refrigerator Storage: Place leftovers in an airtight container. Make sure to separate the sauce from the chicken and veggies to keep everything fresh. Store in the fridge for up to three days. - Freezing Instructions: If you want to freeze, put the chicken in a freezer-safe bag. You can freeze the rice and veggies too. Make sure to label the bags with the date. Use within two months for best quality. Reheating your Bang Bang Chicken Bowl can be easy. Here are some methods: - Microwave: Place the chicken and rice in a microwave-safe dish. Cover with a damp paper towel. Heat for 1-2 minutes, stirring halfway through. This keeps moisture in. - Stovetop: Heat a skillet over low heat. Add a splash of water or broth. Add chicken and rice, stirring often. This method helps regain flavor and keeps the food moist. - Oven: Preheat your oven to 350°F (175°C). Place the chicken and rice in a baking dish. Cover with foil to keep it from drying out. Heat for about 15-20 minutes. With these tips, your leftovers will taste just as good as when you first made them! The Bang Bang Chicken Bowl is a tasty dish that combines crispy chicken with fresh veggies. It features chicken breasts coated in cornstarch, cooked until golden, and drizzled with a creamy Bang Bang sauce. This sauce blends mayonnaise, sweet chili sauce, and sriracha for a rich flavor. You serve it over fluffy jasmine rice with cucumber, carrots, and green onions. It’s colorful, crunchy, and full of flavor. Yes, you can prepare many parts of this dish in advance. Cook the chicken and rice a day before. Store them in separate containers in the fridge. You can also make the Bang Bang sauce early. Just keep it in a sealed jar. This way, when you are ready to eat, you can quickly assemble the bowl. To save time, chop the veggies ahead of time too. The Bang Bang Chicken Bowl can be adjusted for spice levels. The sriracha gives it heat, but you can use less if you prefer milder flavors. If you want more spice, add extra sriracha to the sauce. You can also serve sliced jalapeños on the side for those who enjoy more heat. This flexibility makes it great for everyone! In this blog post, we explored how to make a delicious Bang Bang Chicken Bowl. We broke down the key ingredients and shared tips for quality and freshness. I provided step-by-step instructions for preparing the chicken, cooking, and making the sauce. We discussed serving suggestions and storage tips for leftovers. Remember, you can customize this dish to fit your taste and dietary needs. Now, you have the tools to create a tasty meal that everyone will love. Enjoy your culinary adventure!
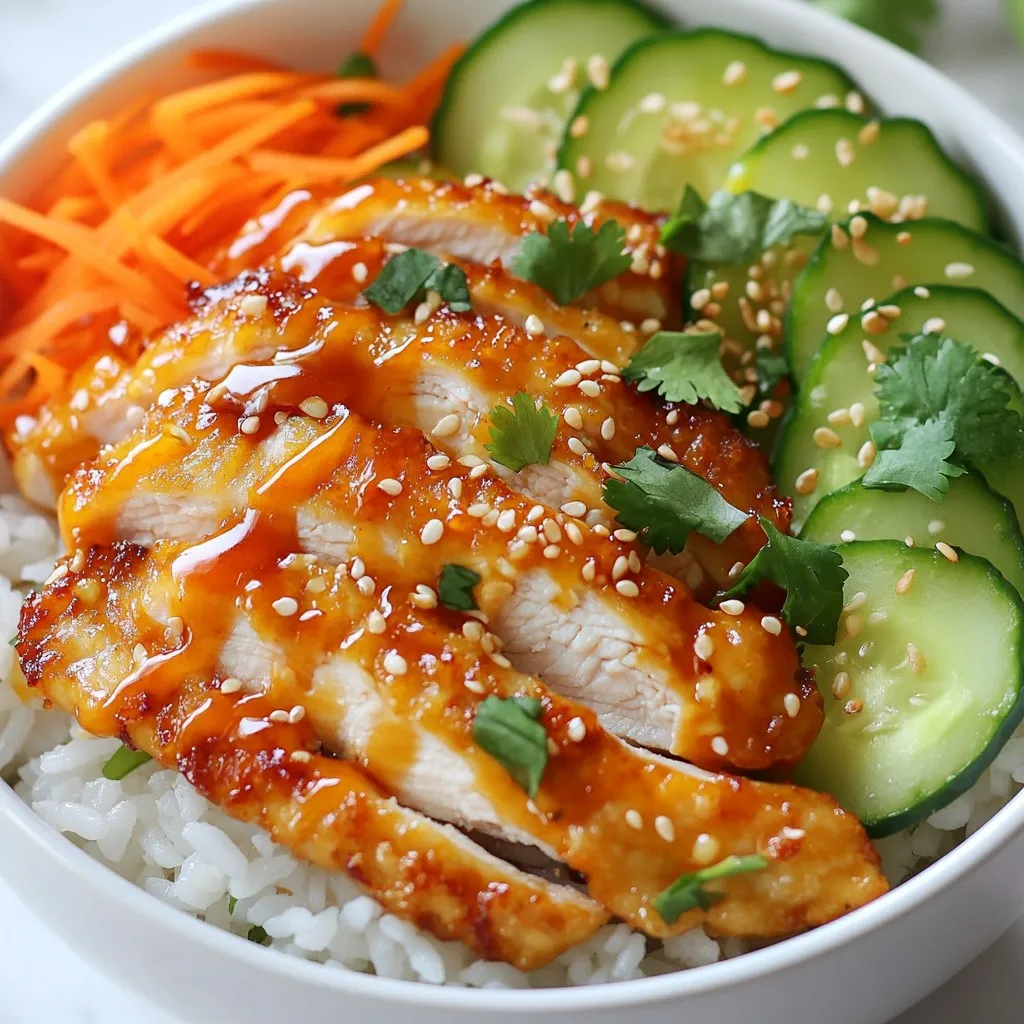
Bang Bang Chicken Bowl Flavorful and Easy Recipe
Craving a dish that’s bursting with flavor and easy to make? Look no further than the Bang Bang Chicken Bowl! This recipe brings together tender
- 1 cup seitan, sliced - 2 cups mushrooms, sliced (cremini or button) - 1 medium onion, diced - 2 cloves garlic, minced Seitan gives this dish a hearty texture. I love using it for a meat-like feel. Mushrooms add a rich, earthy flavor. They soak up all the tasty bits. Onions bring sweetness when sautéed. Garlic adds a nice kick to the mix. - 1 tablespoon olive oil - 2 tablespoons soy sauce - 1 teaspoon paprika - 1 teaspoon dried thyme - 1 cup vegetable broth Olive oil helps to sauté the onions and garlic. Soy sauce adds depth and saltiness. Paprika gives a warm, smoky note. Thyme adds a hint of earthiness. Vegetable broth ties everything together. - 1 cup coconut milk - 2 tablespoons nutritional yeast - 2 tablespoons cornstarch mixed with 2 tablespoons water - Fresh parsley, chopped Coconut milk brings creaminess that many love. Nutritional yeast adds a cheesy flavor, perfect for plant-based dishes. Cornstarch helps thicken the sauce, giving it a nice body. Fresh parsley is great for a pop of color and freshness on top. With these ingredients, you can create a delicious and filling Vegan Mushroom Seitan Stroganoff. {{ingredient_image_1}} - Sauté onion and garlic First, heat one tablespoon of olive oil in a large skillet over medium heat. Add one medium diced onion. Cook it for about 3-4 minutes until it turns soft and clear. Next, add two cloves of minced garlic. Cook for one more minute until it smells great. - Cook mushrooms Now, add two cups of sliced mushrooms to the skillet. I like using cremini or button mushrooms. Cook them for 5-7 minutes. Let them release their juices and get tender. This step adds a nice flavor. - Add seitan and combine It’s time to add one cup of sliced seitan to the pan. Stir everything together well. Cook for another 3-4 minutes. You want the seitan to warm up and mix with the other flavors. - Pour in liquids and seasonings Next, pour in one cup of vegetable broth, two tablespoons of soy sauce, one teaspoon of paprika, one teaspoon of dried thyme, and one cup of coconut milk. Stir it all together until the mixture is combined. This is where the magic happens! - Thicken sauce Let the mixture simmer for about 8-10 minutes. This helps the flavors mix and the sauce to reduce slightly. After that, add two tablespoons of cornstarch mixed with two tablespoons of water. This will thicken the sauce. Cook for another 2-3 minutes until it’s just right. - Serve with pasta or rice Serve your stroganoff right away over cooked pasta or rice. I like to garnish it with fresh chopped parsley for a pop of color and flavor. Enjoy your delicious vegan mushroom seitan stroganoff! To make your Vegan Mushroom Seitan Stroganoff really shine, adjust the seasoning to your taste. This dish loves salt and pepper. A little extra soy sauce can add depth. For mushrooms, I recommend using cremini or button varieties. They both have great flavor and hold up well in cooking. You can also mix in shiitake for a richer taste. Getting the right texture with seitan is key. You want it to be firm yet tender. Sauté it with your onions and mushrooms until it's heated through and a bit golden. Sautéing gives you a wonderful caramelization, while simmering in broth makes it tender. I like to sauté first, then let it simmer in the sauce. This way, you get the best of both worlds. For this recipe, you need a large skillet. A sturdy one ensures even cooking. A wooden spoon works well for stirring the ingredients. When serving, a shallow bowl or plate is best. It shows off the dish and makes it easy to eat. Don’t forget to have a sharp knife for cutting the seitan! Pro Tips Use Fresh Ingredients: Always opt for fresh mushrooms and vegetables to enhance the flavor and nutritional value of your dish. Customize the Creaminess: Adjust the amount of coconut milk to achieve your desired creaminess; you can add more for a richer sauce or less for a lighter option. Thicken with Care: When using the cornstarch mixture, ensure to stir continuously to prevent lumps from forming in your stroganoff. Garnish for Flavor: Don’t skip the fresh parsley; it adds a burst of freshness and color that elevates the dish's presentation and taste. {{image_2}} Seitan alternatives If you want a different texture, try using tempeh or chickpeas. Both options offer great protein and flavor. You can also use tofu for a softer bite. Just make sure to press it well before cooking. Dairy-free cream options Coconut milk gives a nice creamy texture. If you want a lighter option, use cashew cream or almond milk. Both can add creaminess without dairy. For a tangy flavor, try adding a splash of lemon juice. Pairing with different grains This stroganoff tastes great over pasta or rice. Try serving it with quinoa for a nutty twist. You can also use farro for an earthy flavor. Each grain adds a unique texture and taste. Creative garnishing ideas Fresh parsley adds color and freshness. You can also use chives for a mild onion flavor. For a pop of color, sprinkle some paprika on top. Consider adding a dollop of dairy-free yogurt for extra creaminess. Traditional versus vegan adaptations Traditional stroganoff uses beef and sour cream. This vegan version swaps seitan for meat and coconut milk for cream. It keeps the rich flavor while being plant-based. You still get that hearty feel. Other mushroom-based variations Mushrooms are the star here, but you can mix it up. Try adding different mushrooms like shiitake or oyster. Each type brings a new layer of flavor. You can even throw in some spinach for added nutrition. To keep your Vegan Mushroom Seitan Stroganoff fresh, store it in an airtight container. Make sure it cools down before sealing. This dish lasts about 3 to 5 days in the fridge. Always check for any signs of spoilage before eating. If you want to save some for later, freezing works well. Place the stroganoff in a freezer-safe container. Leave some space at the top for expansion. It can stay frozen for up to 3 months. When ready to eat, thaw it in the fridge overnight. To reheat, warm it on the stove over low heat. You may need to add a splash of broth or water for moisture. Preparing this dish ahead of time makes for easy meals. You can cook a big batch and portion it into containers. Store them in the fridge or freezer. For quick meals, just grab a portion and reheat. If you freeze it, let it thaw overnight before reheating. Enjoy your delicious stroganoff without the fuss! Yes, you can make this recipe gluten-free. Instead of seitan, use jackfruit or tofu. You can also find gluten-free seitan made from pea protein or other grains. Just check the label to ensure it fits your needs. To reheat leftover stroganoff, use the stovetop for best results. Place it in a skillet over low heat. Stir often until warmed. If using the microwave, heat in short bursts, stirring in between. This helps keep the sauce from getting too thick. Absolutely! You can add other vegetables for more nutrition. Try spinach, bell peppers, or zucchini. These will add color and flavor to your dish. Just chop them small and toss them in with the mushrooms. This blog post outlined a tasty stroganoff recipe with main ingredients like seitan, mushrooms, and garlic. I shared easy steps to prepare, cook, and enhance the dish. You learned tips to perfect flavors and suggested variations for creativity. Storage tips help you keep leftovers fresh. In closing, cooking stroganoff is fun and rewarding. Try different ingredients and methods to find your favorite taste. With practice, you'll impress everyone with your delicious meals. Enjoy the cooking journey!
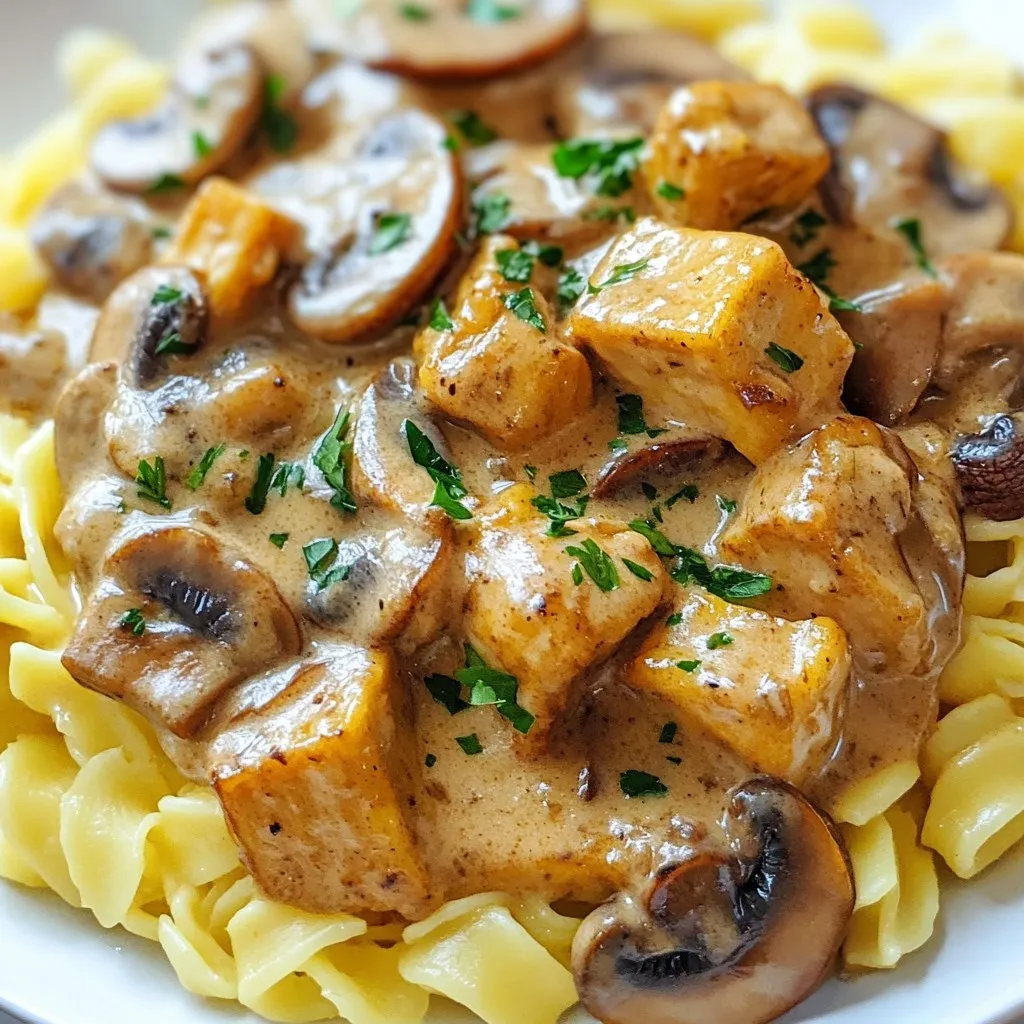
Vegan Mushroom Seitan Stroganoff Flavorful Delight
Get ready to savor a delicious Vegan Mushroom Seitan Stroganoff that will impress your taste buds! This rich, creamy dish blends hearty seitan and flavorful
- Shredded chicken - Shredded mozzarella cheese - Cream cheese - Minced garlic - Italian seasoning - Salt and pepper - Flour tortillas - Fresh spinach leaves - Sun-dried tomatoes (optional) To make cheesy garlic chicken wraps, you need a few key ingredients. First, use 2 cups of cooked, shredded chicken. This gives the wraps a hearty base. Next, have 1 cup of shredded mozzarella cheese ready. This cheese melts well and adds that gooey texture we love. Then, grab 1/2 cup of softened cream cheese. It helps bind everything together and makes the filling creamy. You’ll also need 2 cloves of minced garlic. Garlic adds a strong flavor that pairs great with chicken. Add 1 teaspoon of Italian seasoning for a burst of herbaceous taste. Don’t forget salt and pepper to enhance all the flavors. For the wraps, you'll use 4 large flour tortillas. They hold the filling well and are easy to roll. Fresh spinach leaves add a nice crunch and color. If you want to mix things up, consider using 1/4 cup of chopped sun-dried tomatoes. They bring a tangy sweetness that complements the chicken. Having these ingredients ready will make your cooking process smooth and enjoyable. Each component plays a vital role in creating delicious cheesy garlic chicken wraps. {{ingredient_image_1}} To start, grab a large mixing bowl. Combine 2 cups of shredded chicken, 1 cup of shredded mozzarella cheese, and 1/2 cup of softened cream cheese. Add 2 minced garlic cloves, 1 teaspoon of Italian seasoning, and a sprinkle of salt and pepper. Mix all the ingredients well. This step is key for creaminess. Use a spatula or a fork to blend everything together. Make sure there are no lumps. You want a smooth and cheesy mix. Next, lay a large flour tortilla flat on your clean surface. Take a quarter of the cheesy chicken mixture and spread it in the center. Be sure to leave some space around the edges. On top, add a handful of fresh spinach leaves and some chopped sun-dried tomatoes if you like. The spinach adds color and crunch. Fold the sides of the tortilla inward. Then, roll it up tightly from the bottom. Make sure the filling is well enclosed. Now, heat a skillet over medium heat. Lightly spray it with cooking spray or drizzle it with olive oil. This helps the wraps get crispy. Place the wraps seam-side down in the skillet. Cook for 3 to 4 minutes until they turn golden brown. Carefully flip them over and cook the other side for another 3 to 4 minutes. This step gives you that perfect golden brown look. Once done, take them out and let them cool for a minute. Then, slice them in half. Enjoy your tasty Cheesy Garlic Chicken Wraps! Seasoning makes a big difference in your wraps. Use salt and pepper to bring out the taste. Italian seasoning adds a nice touch too. For garlic, fresh cloves work best. They give a strong flavor that dried garlic can't match. Mince the garlic finely to spread its flavor evenly throughout the mix. You can cook these wraps in different ways. An air fryer works well and saves time. It makes the wraps crispy without frying in oil. If you use a skillet, heat it well before adding the wraps. This helps get that golden brown color. Flip them gently to avoid spilling the filling. Check the bottom often to avoid burning. Make your wraps look nice to impress your guests. Slice them in half to show off the cheesy filling. You can place them on a wooden board for a rustic look. A sprinkle of fresh herbs adds color and flavor. Serve with dips like marinara or garlic sauce for extra taste. These little details make your meal feel special. Pro Tips Use Leftover Chicken: This recipe is perfect for utilizing any leftover rotisserie or grilled chicken, saving time and enhancing flavor. Customize Your Cheese: Feel free to mix different cheeses like cheddar or pepper jack for a unique flavor profile. Enhance the Garlic Flavor: For a stronger garlic taste, add a bit of garlic powder along with the minced garlic. Make It Healthier: Substitute whole wheat tortillas for a healthier option and increase the fiber content of your wraps. {{image_2}} You can change the cheese to suit your taste. Try using pepper jack for a spicy kick. Or use cheddar for a stronger flavor. You can also swap the chicken for turkey or beef. These meats work great in this wrap. Each option will give a new twist to your dish. Spices can add a nice touch. Try adding cayenne for heat or paprika for smokiness. You can also mix in fresh herbs like basil or cilantro for a fresh taste. Don’t forget to include veggies! Bell peppers, onions, or mushrooms can add crunch and flavor. Just sauté them lightly before adding to your wrap. If you need gluten-free options, use corn or rice tortillas. They hold up well and taste great. You can also make the dish lighter. Swap cream cheese for Greek yogurt. This keeps it creamy without all the fat. Use low-fat cheese if you're watching calories but still want that cheesy goodness. To keep your cheesy garlic chicken wraps fresh, store them right. Place any leftovers in an airtight container. This helps keep moisture out. The fridge is the best place for storage. They will last up to three days. If you want to keep them longer, freezing is a great option. Wrap each wrap in plastic wrap before placing them in a freezer bag. This way, they stay fresh for up to three months. When it’s time to enjoy the leftovers, reheating is key. The best way to do so is in a skillet. Heat on medium. This method keeps the wrap crispy. Cook for about three minutes on each side. If you are in a hurry, use a microwave. Place the wrap on a microwave-safe plate. Heat for about 1-2 minutes. However, this method might make the wrap less crispy. If you want that golden crunch, stick to the skillet. You can pair these wraps with many tasty sides. Here are some popular choices: - Fresh salad: A light green salad with vinaigrette adds crunch. - Vegetable sticks: Carrots, celery, and bell peppers are great for dipping. - Dips: Serve with marinara sauce or garlic aioli for extra flavor. - Potato wedges: Crispy potato wedges make a hearty side dish. These sides add variety and enhance your meal. Yes, you can prepare these wraps in advance. Here’s how: - Make the filling: Prepare the cheesy chicken mixture and store it in the fridge. - Wraps: Assemble the wraps, then wrap them tightly in plastic wrap. - Store: Keep them in an airtight container in the fridge for up to 24 hours. When you’re ready, just heat them up in a skillet or microwave. To keep your wraps crispy, follow these tips: - Dry filling: Make sure your chicken is not too wet before mixing. - Cool before wrapping: Let the filling cool slightly before you wrap it. - Reheat correctly: Heat in a skillet instead of a microwave when possible. This ensures your wraps stay crunchy and delicious. You now have all the steps to make delicious Cheesy Garlic Chicken Wraps. Start with the right ingredients, mix them well, and assemble the wraps with care. Remember to season well for the best flavor. Explore variations to suit your taste and dietary needs. Store leftovers properly to enjoy them later without losing quality. With these tips, you can create a tasty meal that impresses. Cooking wraps can be fun and rewarding. Enjoy every bite!
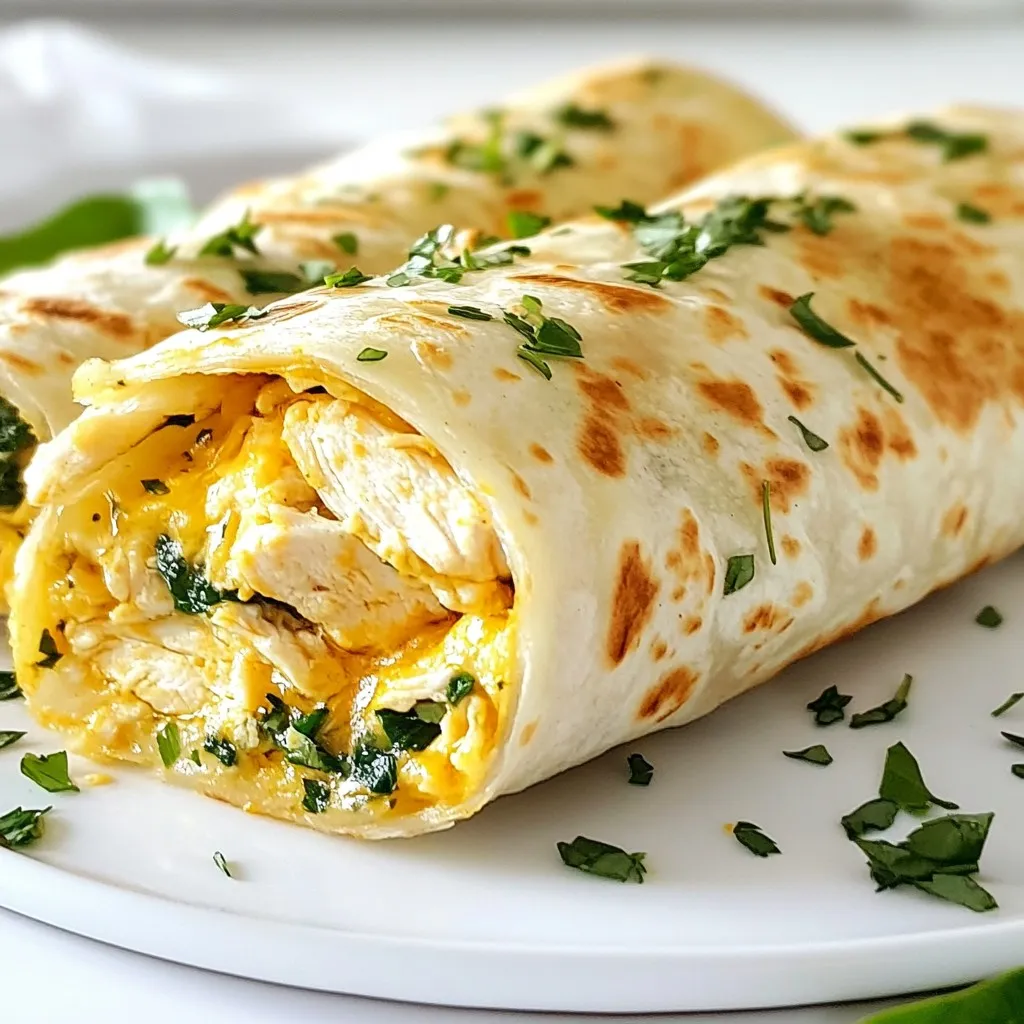
Cheesy Garlic Chicken Wraps Easy and Flavorful Meal
Looking for a quick, tasty meal that’s sure to please? Cheesy Garlic Chicken Wraps are the answer! With just a few simple ingredients, you can
To make Marry Me Chicken Pasta, you need: - 2 boneless, skinless chicken breasts - 2 tablespoons olive oil - Salt and pepper to taste - 1 teaspoon garlic powder - 1 teaspoon dried Italian herbs - 1 cup cherry tomatoes, halved - 2 cups baby spinach - 1 cup heavy cream - 1/2 cup grated Parmesan cheese - 8 oz penne pasta - Fresh basil leaves for garnish These ingredients work together to create a rich and creamy dish. Each one adds its own flavor. You can boost the flavor by adding: - Crushed red pepper flakes for heat - Lemon zest for brightness - Extra garlic for depth These options can make the dish even more exciting. Feel free to mix and match based on your taste. If you’re missing something, here are some swaps: - Chicken breasts can be replaced with thighs for more flavor. - Heavy cream can be swapped with half-and-half for a lighter sauce. - Spinach can be changed to kale or Swiss chard. These substitutions can make the dish work for your needs. Don't hesitate to get creative with what you have! {{ingredient_image_1}} First, fill a pot with water. Add a pinch of salt. Bring the water to a boil. Once boiling, add 8 ounces of penne pasta. Stir well. Cook according to the package instructions until the pasta is al dente. This usually takes around 8 to 10 minutes. When done, drain the pasta and set it aside. Next, take 2 boneless, skinless chicken breasts. Rinse them under cold water and pat them dry. Season both sides with salt, pepper, garlic powder, and dried Italian herbs. Make sure to cover them well. In a large skillet, heat 2 tablespoons of olive oil over medium heat. Once hot, add the chicken. Cook for 6 to 7 minutes on each side. Look for a nice golden brown color. When cooked through, remove the chicken and set it aside. In the same skillet, add 1 cup of halved cherry tomatoes. Sauté them for about 3 to 4 minutes until they soften. Next, toss in 2 cups of baby spinach. Stir until the spinach wilts, which takes about 2 minutes. Then, pour in 1 cup of heavy cream. Mix well. Add 1/2 cup of grated Parmesan cheese. Stir until the cheese melts and the sauce thickens a bit. Slice the cooked chicken into strips. Return the chicken to the skillet. Add the drained penne pasta as well. Toss everything together gently. Make sure the pasta is coated with the creamy sauce. Taste and adjust the seasoning if needed. Serve hot, garnished with fresh basil leaves for that extra burst of flavor. Enjoy your Marry Me Chicken Pasta! To get the best chicken, start with even pieces. They cook better this way. Season them well with salt, pepper, garlic powder, and Italian herbs. Heat olive oil over medium heat in a skillet. Cook the chicken for 6-7 minutes per side. Look for a golden brown color. Use a meat thermometer to check if it’s 165°F (75°C). This ensures it is safe to eat. For a rich sauce, pay close attention while cooking. After you add the heavy cream, stir well. This helps blend the cream and cheese. Let the sauce cook for a few minutes. It should thicken slightly but stay creamy. If it feels too thick, add a splash of pasta water. This helps loosen it up while keeping the flavor strong. Serve your Marry Me Chicken Pasta hot. A sprinkle of fresh basil adds a nice touch. You can pair it with garlic bread or a green salad. This brings a fresh balance to the meal. For extra flair, try adding lemon zest. It brightens the dish and gives a fresh taste. Enjoy your delicious creation! Pro Tips Perfectly Cooked Chicken: Ensure the chicken breasts are of even thickness for uniform cooking. You can pound them slightly to achieve this. Fresh Herbs: For an aromatic boost, add fresh basil or parsley to the sauce just before serving to enhance freshness. Cheese Variations: Feel free to experiment with different cheeses such as mozzarella or feta for a unique flavor twist. Pasta Tip: Reserve a cup of pasta water before draining. Adding a splash can help adjust the sauce's consistency if it becomes too thick. {{image_2}} You can make a tasty vegetarian version of Marry Me Chicken Pasta. Swap the chicken for mushrooms or eggplant. Both options add a nice texture. Use firm tofu for more protein. Just remember to season it well with salt and herbs. To make this dish healthier, try using whole wheat penne pasta. It has more fiber and keeps you full longer. You can also use low-fat cream or a plant-based cream. This change cuts down on fat but keeps the taste creamy. Adding more spinach or other veggies boosts nutrients too. If you want to try different proteins, shrimp or salmon work great. Cook the shrimp until pink, or bake the salmon until flaky. Both add a lovely flavor and pair well with the creamy sauce. You can even try diced turkey for a lighter option. Store any leftover Marry Me Chicken Pasta in an airtight container. Let the dish cool first. You can keep it in the fridge for up to three days. Make sure to seal it well to keep the flavors fresh. To reheat, use a microwave or stovetop. If using the microwave, heat in short bursts. Stir between each burst to ensure even heating. If using the stovetop, add a splash of cream or water. This helps to revive the sauce's creamy texture. Heat on low until warm. You can freeze Marry Me Chicken Pasta for later. Place the cooled pasta in a freezer-safe container. Seal it tightly and label it with the date. It can last for about three months in the freezer. To enjoy, thaw it overnight in the fridge before reheating. Marry Me Chicken Pasta is a creamy and tasty dish. It features chicken, pasta, and a rich sauce. The sauce has heavy cream, Parmesan cheese, and fresh spinach. The cherry tomatoes add a nice burst of flavor. Many people love this dish for its simple steps and delicious taste. You can cook the chicken and sauce ahead. Just store them in the fridge. When you’re ready to eat, cook the pasta. Then, warm the sauce and combine them. This way, you save time and still enjoy a great meal. Yes, you can use any pasta you like. Penne works well, but you can try fettuccine or rotini. Each type will give a different feel to the dish. Just be sure to cook it until al dente. This dish is not spicy, but you can add heat if you want. A pinch of red pepper flakes can spice it up. Adjust the amount based on your taste. This way, you can make it just right for you. In this post, we explored Marry Me Chicken Pasta. We covered required and optional ingredients, along with substitutions. You learned step-by-step cooking methods for the pasta, chicken, and sauce. Tips ensured perfect chicken and sauce consistency. We discussed variations for vegetarians and healthier options. Finally, storage methods for leftovers were shared. Enjoy making this dish for family or friends. It’s sure to impress and satisfy!
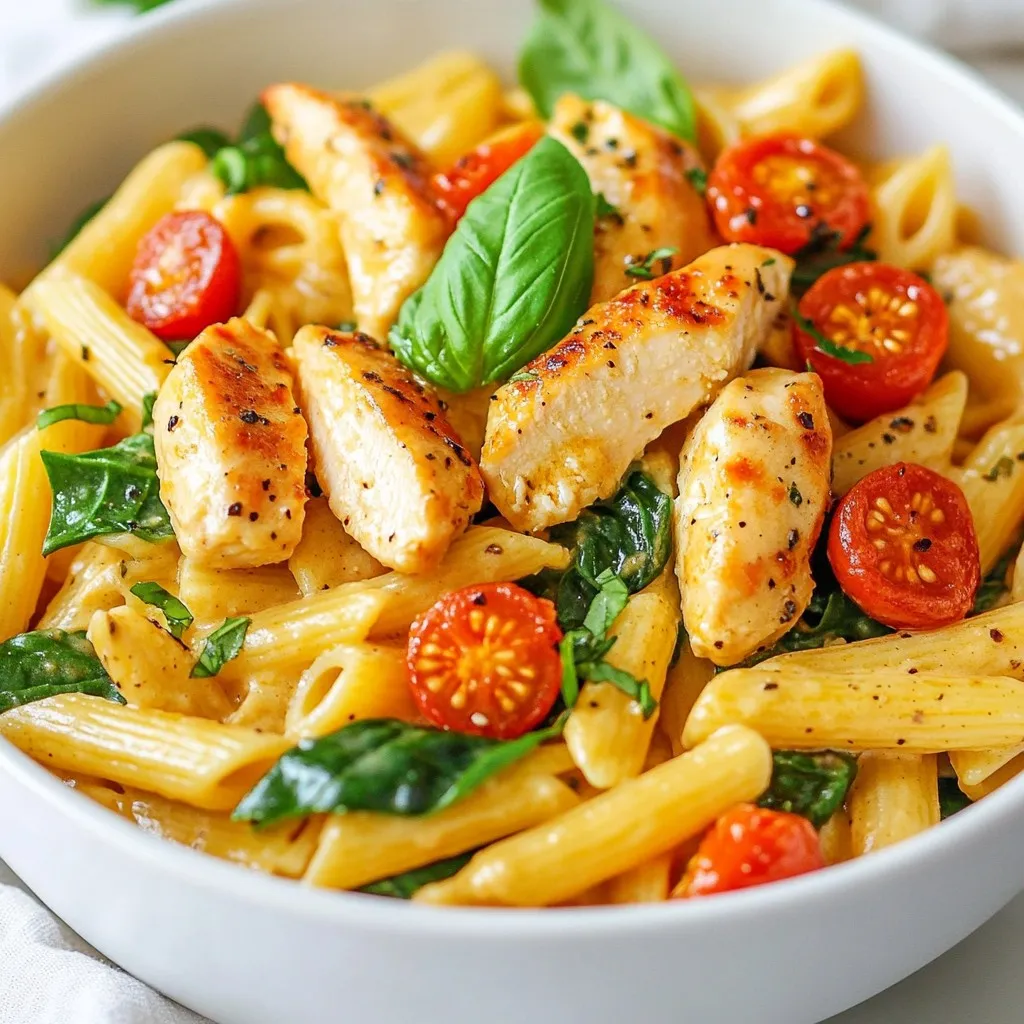
Marry Me Chicken Pasta Simple and Flavorful Dish
If you want a dish that impresses and delights, you’ve found it! Marry Me Chicken Pasta is simple and full of rich flavors. This creamy