Dinner

- 4 medium-sized potatoes, peeled and diced - 2 cups corn kernels (fresh, frozen, or canned) - 1 medium onion, chopped - 2 cloves garlic, minced - 4 cups vegetable broth - 1 cup heavy cream or coconut cream for a dairy-free version - 1 teaspoon dried thyme - 1 teaspoon smoked paprika - Salt and pepper to taste - 2 tablespoons olive oil - Fresh parsley or chives for garnish To make my Slow Cooker Creamy Potato Corn Chowder, you need simple, fresh ingredients. First, the potatoes are key to giving the chowder its texture. I like to use medium-sized potatoes, peeled and diced. They become soft and creamy during cooking. Next, corn adds sweetness and a nice pop of color to the dish. You can use fresh, frozen, or canned corn. All options work well. Onion and garlic are essential for flavor. I chop one medium onion and mince two cloves of garlic. Sautéing them brings out their sweetness, which enhances the chowder. For the liquid base, I use four cups of vegetable broth. It gives depth and richness to the dish. Then, I add one cup of heavy cream or coconut cream if you prefer a dairy-free option. This adds a rich, creamy texture. Seasonings like dried thyme and smoked paprika elevate the flavor. I use one teaspoon of each, along with salt and pepper to taste. Olive oil is used for sautéing the onion and garlic. It adds a smooth richness to the base. Lastly, I love garnishing with fresh parsley or chives. They add a pop of color and freshness to finish the dish. Each ingredient brings its own special touch to this chowder, making it comforting and delicious! Sautéing Onion and Garlic First, grab a skillet and set it over medium heat. Add 2 tablespoons of olive oil. Once the oil warms, add 1 medium onion, chopped. Cook the onion for about 3-4 minutes. You want it to turn translucent. Next, add 2 cloves of minced garlic. Sauté for another minute until it smells great. This adds a lot of flavor to your chowder. Preparing Potatoes and Corn While the onion and garlic cook, peel and dice 4 medium-sized potatoes. It’s best to cut them into small pieces. This helps them cook evenly. Now, measure out 2 cups of corn kernels. You can use fresh, frozen, or canned corn. Set these aside. Combining Ingredients in the Slow Cooker In your slow cooker, add the diced potatoes and corn kernels. Next, pour in the sautéed onion and garlic from the skillet. Then, add 4 cups of vegetable broth. This broth gives the chowder its base flavor. Stir in 1 teaspoon of dried thyme and 1 teaspoon of smoked paprika. Don’t forget to season with salt and pepper to taste. Mix everything well to coat all the ingredients in the broth. Cooking Times for Low and High Settings Cover the slow cooker with its lid. Cook on low for 6-7 hours. If you're short on time, you can set it to high for 3-4 hours. The potatoes should be tender when done. Mashing or Blending the Chowder After cooking, you have a choice to make. Use a potato masher to roughly mash the potatoes in the chowder. This will thicken the chowder nicely. If you prefer a smooth texture, use an immersion blender. Blend a portion of the chowder until creamy. Adding Cream and Adjusting Seasoning Now, stir in 1 cup of heavy cream or coconut cream if you want a dairy-free option. After adding the cream, taste your chowder. Adjust the seasoning if needed. Let it cook for another 15-20 minutes on low. This allows all the flavors to blend together. Your chowder is now ready to serve! - Choosing the Right Potatoes For a tasty chowder, I like to use yellow or red potatoes. They hold their shape well and add a nice creaminess. Avoid starchy potatoes like russets; they can break down too much. - Enhancing Flavor with Seasonings Seasonings make your chowder sing. I love using dried thyme and smoked paprika. They bring warmth and depth. You can also add a pinch of cayenne for some heat. Don't forget to taste and adjust salt and pepper. - How to Achieve Creaminess To achieve that dreamy creaminess, I blend part of the chowder. After cooking, use a potato masher or an immersion blender. This gives you a thick, velvety base. For a richer taste, stir in heavy cream or coconut cream at the end. - Adjusting Thickness If your chowder is too thick, add more vegetable broth or cream. Mix it in slowly until you reach your desired thickness. If it’s too thin, mash up more potatoes or let it simmer longer without the lid. This will help it thicken naturally. {{image_2}} Using Coconut Cream If you want a dairy-free chowder, coconut cream is a great choice. It adds a rich and creamy texture. To use it, simply swap the heavy cream for one cup of coconut cream. This change keeps the chowder thick while adding a hint of sweetness. Alternative Creamy Ingredients You can also try other dairy-free options. Cashew cream or almond milk can work well too. For cashew cream, soak cashews in water overnight. Blend them with a bit of water until smooth. Then stir it into the chowder for creaminess. Protein Additions To make your chowder heartier, you can add protein. Diced cooked chicken or crispy bacon bits blend nicely into the flavors. Just stir in about one to two cups of your chosen protein during the last hour of cooking. This will infuse the chowder with extra taste and texture. Vegetable Variations Feel free to get creative with your vegetables. Diced carrots, bell peppers, or celery can add color and crunch. You can also use frozen peas or green beans for a pop of freshness. Just remember to chop them into small pieces for even cooking. To keep your chowder fresh, you can store leftovers easily. First, let the chowder cool down. Then, place it in an airtight container. You can keep it in the fridge for up to 3 days. Make sure to label it with the date so you remember when you made it. If you want to store it longer, freezing is a great option. Pour the cooled chowder into freezer-safe bags or containers. Leave some space at the top, as liquids expand when frozen. You can freeze it for up to 3 months. When you want to enjoy your chowder again, reheating is simple. The best method is to use the stove. Pour the chowder into a pot and heat it over medium heat. Stir it often to keep it from sticking. If you prefer the microwave, place the chowder in a microwave-safe bowl. Heat it in short bursts, about 1-2 minutes at a time. Stir in between to ensure even heating. To keep the chowder creamy, avoid boiling it. High heat can change the texture. If you find it too thick, add a splash of broth or cream while reheating. This will help restore its smoothness. Can I use frozen corn? Yes, you can use frozen corn in this recipe. It saves time and is easy to use. Just add it directly to the slow cooker. Frozen corn cooks well and tastes great in chowder. How long does the chowder last in the fridge? The chowder lasts for about 3 to 5 days in the fridge. Store it in an airtight container to keep it fresh. Reheat it on the stove or microwave when you're ready to eat. Can I make this chowder ahead of time? Yes, you can make it ahead of time. Cook it and let it cool before storing it. This chowder also tastes better the next day as the flavors blend. Is it possible to make it vegan? Yes, you can easily make this chowder vegan. Use coconut cream instead of heavy cream. Also, make sure to use vegetable broth for a full vegan option. This chowder recipe is a delightful mix of potatoes, corn, and seasonings. You learned how to prepare the ingredients and cook them in a slow cooker. Tips on texture and flavor enhance your chowder experience. You can also explore variations to suit your taste. In the end, this dish is easy to make and great to share. Enjoy the warmth and comfort that comes from each bowl!
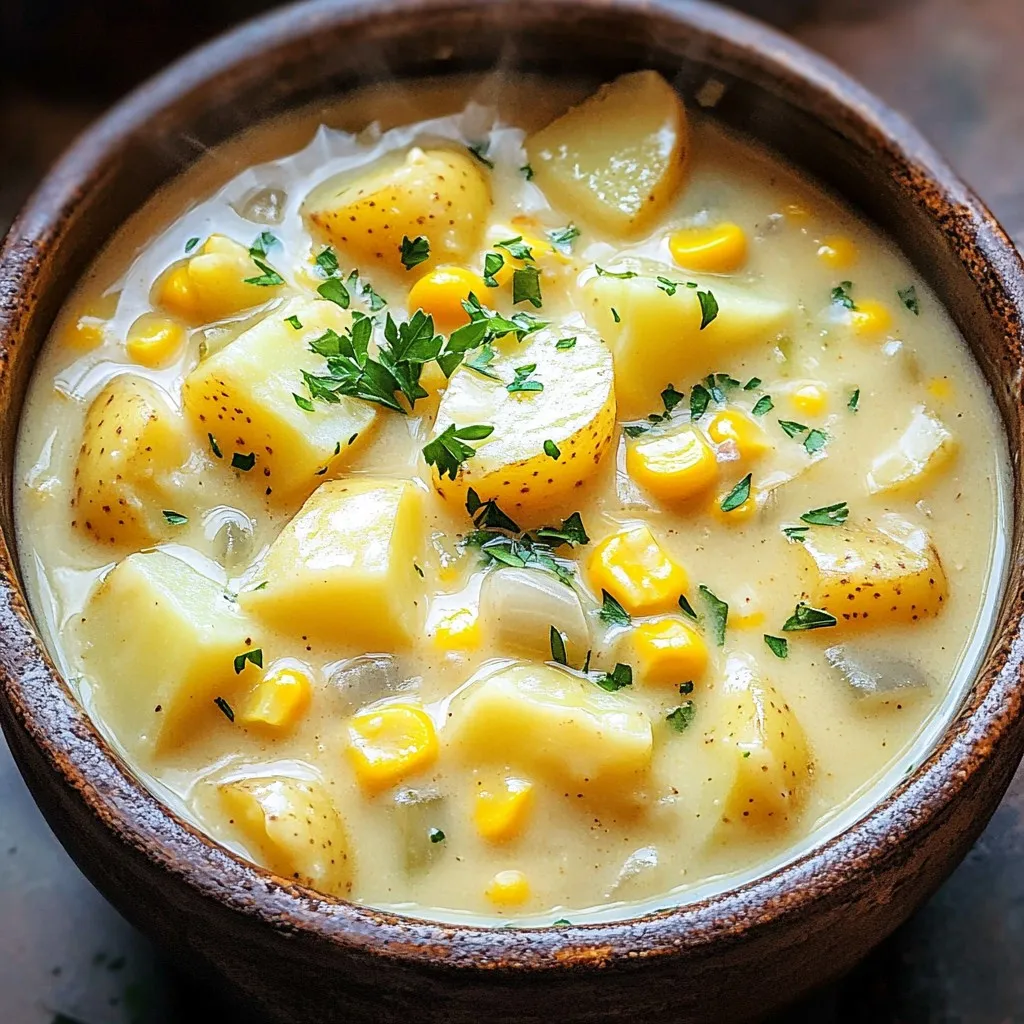
Slow Cooker Creamy Potato Corn Chowder Delightful Recipe
If you’re craving comfort food that’s easy to make, you’ll love this Slow Cooker Creamy Potato Corn Chowder. With simple ingredients like potatoes, corn, and
- 1 can (15 oz) chickpeas, drained and rinsed - 2 medium sweet potatoes, peeled and diced - 8 corn tortillas Chickpeas are high in protein and fiber. They add a hearty texture to the tacos. Sweet potatoes bring natural sweetness and creaminess. They also provide vitamins and minerals. Corn tortillas are gluten-free and perfect for holding the filling. - 1 tablespoon olive oil - 1 tablespoon chili powder - 1 teaspoon smoked paprika - 1 teaspoon garlic powder - Salt and pepper to taste - 1 cup BBQ sauce Olive oil helps the veggies roast evenly. It adds a nice flavor too. Chili powder gives a warm spice kick. Smoked paprika adds a smoky depth. Garlic powder enhances the overall taste. BBQ sauce ties everything together with its sweet and tangy notes. - 1 avocado, sliced - Fresh cilantro, chopped, for garnish - Lime wedges, for serving Avocado adds creaminess and healthy fats. Cilantro gives a fresh, herbal note. Lime wedges add brightness. A squeeze of lime juice lifts the flavors in each bite. Together, these toppings make the tacos pop! - Preheat the oven to 425°F (220°C). - Drain and rinse the chickpeas. - Peel and dice the sweet potatoes into small cubes. - On a large baking sheet, combine the chickpeas and sweet potatoes. - Drizzle with one tablespoon of olive oil. - Sprinkle chili powder, smoked paprika, garlic powder, salt, and pepper over them. - Toss everything well to coat. - Roast in the oven for 20 minutes. Stir halfway through for even cooking. - After 20 minutes, take out the baking sheet. - Pour one cup of BBQ sauce over the sweet potatoes and chickpeas. - Toss to coat evenly in the sauce. - Return to the oven and roast for another 10-15 minutes. - While roasting, warm the corn tortillas in a skillet. Heat them for about 30 seconds on each side. - To make the tacos, spoon the BBQ mixture into each warm tortilla. - Top with avocado slices and fresh cilantro. - Serve with lime wedges for a zesty kick! To get the best sweet potatoes and chickpeas, check for doneness. Sweet potatoes should be soft but not mushy. You can poke them with a fork to see if they are ready. If they are too soft, you may need to reduce cooking time next time. Avoiding mushy sweet potatoes is key. Cut them into even pieces. Smaller pieces cook faster and help keep their shape. Stir them halfway through roasting for even cooking. Warming your tortillas makes a big difference. Heat them in a skillet for about 30 seconds on each side. This makes them soft and easy to fold. You can also wrap them in a damp towel and microwave for 15-20 seconds. For fun serving ideas, stack the tacos high on a platter. Add some lime wedges on the side for a zesty kick. You can even sprinkle extra cilantro on top for a bright finish. Adjusting spice levels is easy. If you like heat, add more chili powder or some cayenne pepper. For a milder taste, use less chili powder. You can also swap BBQ sauce for other options. Try salsa for a fresh twist or a spicy chipotle sauce for more flavor. Toppings like shredded cheese or jalapeños add extra flair. {{image_2}} You can switch chickpeas for black beans or lentils. Both options add protein and fiber. Black beans have a rich taste that pairs well with BBQ flavors. Lentils cook quickly, making them a great choice too. You can use any legume you like for a twist. Just remember to adjust cooking times as needed. Roasting other veggies can make your tacos even better. Try bell peppers, zucchini, or carrots. They all add different flavors and colors to your dish. You can also use seasonal veggies, like butternut squash in autumn. This keeps your meal fresh and exciting. If you need gluten-free tortillas, corn tortillas work great. They add a nice flavor and texture. You can also try other gluten-free options like almond or chickpea tortillas. Pair your tacos with sides like rice or a fresh salad. These options keep your meal light and healthy. To keep your tacos fresh, place leftovers in an airtight container. Store them in the fridge. They can stay good for up to three days. If you want to save them longer, freeze the chickpea and sweet potato mix. Use a freezer-safe container. This way, they last for about three months. Just remember to cool them first before freezing. When you want to eat the leftovers, there are a few good ways to reheat them. You can use a microwave, which is quick and easy. Place them in a bowl and cover it with a damp paper towel. If you prefer, heat them on the stove in a skillet. This method keeps the flavors intact. Warm the tortillas in the skillet too. This makes them soft and ready to fill. Stored properly, your dish can last up to three days in the fridge. If frozen, it can last about three months. Always check for signs of spoilage before eating. Look for any off smells or changes in color. If it smells bad or looks funny, it’s best to toss it out. Yes, you can prepare this recipe ahead of time. Here are my tips for meal prep: - Cook the chickpeas and sweet potatoes as directed. - Store them in an airtight container after roasting. - You can make the BBQ chickpea and sweet potato mix up to three days in advance. - Reheat it in the oven or microwave before serving. - Warm the tortillas just before you eat for best taste. If you want to switch up the BBQ sauce, there are great alternatives. Here are some suggested options: - Use a homemade sauce made with ketchup, vinegar, and spices. - Try teriyaki sauce for a sweet and savory twist. - A spicy salsa can add a nice kick to your tacos. - You can also use a smoky chipotle sauce if you like heat. Yes, this recipe is vegan. Here’s a closer look at the ingredients: - Chickpeas and sweet potatoes are plant-based. - The olive oil is also vegan-friendly. - Make sure your BBQ sauce is vegan, as some brands add honey or other animal products. - All other ingredients, like corn tortillas, avocado, and cilantro, are vegan too. In this blog post, I covered how to make delicious chickpea and sweet potato tacos. We explored the main ingredients, seasonings, and how to assemble your tacos perfectly. I also shared tips for roasting, assembly, and customization, along with storage info and variations for your taste. You can create a tasty and healthy meal with simple steps. Enjoy your tacos and feel free to try new flavors and ingredients. Happy cooking!
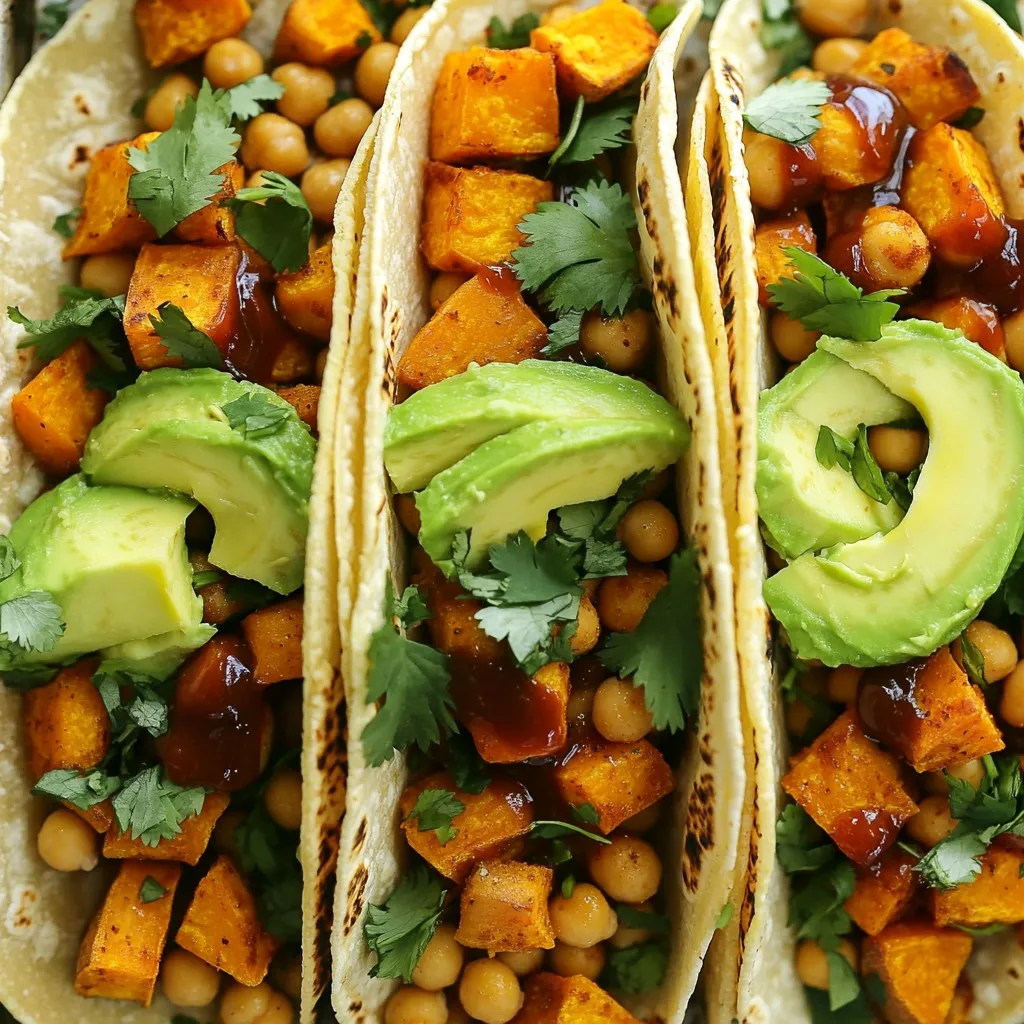
Sheet-Pan BBQ Chickpea & Sweet Potato Tacos Delight
If you’re craving a tasty meal that’s quick and easy, look no further! My Sheet-Pan BBQ Chickpea & Sweet Potato Tacos pack flavor and nutrition
- 1 pound large shrimp, peeled and deveined - 8 ounces linguine or spaghetti - 4 tablespoons unsalted butter - 4 cloves garlic, minced - 1 lemon, zested and juiced - 1 teaspoon red pepper flakes (optional) - 1 cup low-sodium chicken broth - Salt and pepper, to taste - 1/4 cup fresh parsley, chopped - 2 tablespoons olive oil For this recipe, you need clear measurements. You will use: - 1 pound of shrimp. This makes it filling. - 8 ounces of pasta. Linguine or spaghetti works best. - 4 tablespoons of butter. This adds richness. - 4 cloves of garlic. Fresh garlic brings great flavor. - 1 lemon for zest and juice. Lemon brightens the dish. - 1 teaspoon of red pepper flakes. This adds a hint of heat. - 1 cup of chicken broth. It helps create the sauce. - Salt and pepper for taste. These are essential seasonings. - 1/4 cup of parsley. Chopped fresh parsley adds color. - 2 tablespoons of olive oil. This is for cooking the shrimp. You can tweak this recipe if you need to. Here are some ideas: - Use shrimp with the shell on for more flavor. - Swap linguine for another type of pasta, like fettuccine. - If you want a lighter dish, use less butter. - Try garlic powder if you don’t have fresh garlic. - Use vegetable broth instead of chicken broth for a veggie option. - Replace parsley with basil for a different taste. - Omit red pepper flakes if you prefer no heat. This recipe allows for flexibility. You can make it your own! Start by boiling salted water in a large pot. Once it boils, add 8 ounces of linguine or spaghetti. Cook the pasta according to the package instructions. After cooking, save 1 cup of pasta water. Drain the pasta and set it aside. In a big skillet, heat 2 tablespoons of olive oil over medium heat. Add 1 pound of large shrimp that are peeled and deveined. Season the shrimp with salt, pepper, and red pepper flakes if you like spice. Cook the shrimp for 2-3 minutes on each side. They should turn pink and opaque. Once done, remove the shrimp from the skillet and set them aside. In the same skillet, add 4 tablespoons of unsalted butter and melt it. Once melted, add 4 cloves of minced garlic. Sauté the garlic for about 1 minute until it smells great. This step brings out the garlic's flavor. Next, pour in 1 cup of low-sodium chicken broth and the juice from 1 lemon. Scrape any bits stuck to the skillet. Bring the mixture to a simmer. Stir in the lemon zest and the reserved pasta water. Let this simmer for 2-3 minutes to blend the flavors. Add the cooked pasta and sautéed shrimp back into the skillet. Toss everything together to coat the pasta and shrimp in the sauce. If it looks dry, pour in more pasta water. Taste the dish and add salt and pepper as needed. Remove from heat and stir in 1/4 cup of chopped fresh parsley. Let it sit for a minute to enhance the flavors. To get the best shrimp, use large shrimp. They cook fast and stay juicy. Cook them just until they turn pink and opaque. This usually takes about 2-3 minutes per side. If you overcook them, they can become tough. Always remove them from the pan when they look perfect. Let them rest while you prepare the sauce. Your sauce should be bright and rich. Start by melting the butter and adding garlic. Let the garlic cook until it smells great but do not burn it. When you add chicken broth and lemon juice, make sure to scrape any bits from the bottom. This adds flavor. If the sauce seems too thick, add reserved pasta water a little at a time. This will help create a silky texture. To serve your dish, use a large bowl or plate for a nice look. Place the shrimp and pasta in the center. Sprinkle chopped parsley on top for a pop of color. You can also add lemon wedges on the side. This adds freshness and makes the dish look even better. Making it look great will impress your guests! {{image_2}} You can make this shrimp scampi even better by adding vegetables. Spinach, cherry tomatoes, or bell peppers work great. Just sauté them with the shrimp for a few minutes. This adds color and nutrients to your meal. You can also try adding asparagus or zucchini. They cook quickly and add a nice crunch. Make sure to cut them into small pieces for even cooking. If you want a gluten-free dish, swap the pasta. Use gluten-free linguine or spaghetti. There are many options on the market now. You can also use spiralized vegetables like zucchini or carrots. These are great low-carb choices. They cook faster than pasta, so watch them closely. You can change the flavor to match your mood. For a creamier sauce, add heavy cream or a splash of white wine. If you like it spicy, add more red pepper flakes or some diced jalapeños. Fresh herbs like basil or thyme can also enhance the dish. Experimenting with flavors lets you create a meal that fits your taste. To store your leftover shrimp scampi, let it cool first. Place it in an airtight container. Use a glass or plastic container with a tight lid. This keeps it fresh and prevents odors. Store it in the fridge for up to three days. If you want to keep it longer, freezing is a good option. When you're ready to eat, you can reheat the shrimp scampi. I suggest using the stove for the best results. Place it in a skillet over low heat. Add a splash of chicken broth or water to keep it moist. Stir it gently to heat evenly. You can also use the microwave. Heat it in short bursts, stirring in between. Make sure it’s hot all the way through. If you want to freeze shrimp scampi, it’s easy! Pack it in a freezer-safe container. Leave some space at the top for expansion. This meal can last up to three months in the freezer. When you want to eat it, thaw it overnight in the fridge. Then, reheat it as mentioned before. This way, you enjoy a delicious meal anytime! Shrimp scampi can last up to three days in the fridge. Store it in an airtight container. Make sure it cools down before you put it away. This helps keep the shrimp fresh and safe to eat. Yes, you can use frozen shrimp! Just thaw them first. Place the shrimp in cold water for about 15 minutes. After thawing, peel and devein them if needed. This makes cooking quick and easy. You can serve shrimp scampi with many sides. Here are some great options: - Garlic bread - A fresh green salad - Steamed vegetables - Rice or couscous These sides complement the flavors of the dish well. The recipe is mildly spicy with red pepper flakes. If you like heat, add more flakes. If you prefer less spice, skip them altogether. Adjusting the spice level is easy and makes it your own! This blog post covered all you need for shrimp scampi. We went through the ingredients, measurements, and swaps. Then, I guided you through cooking, from pasta to the final dish. I shared tips to get the best shrimp texture and sauce. We also looked at fun variations and smart storage tips. In the end, shrimp scampi is easy and delicious. Enjoy making it your way!
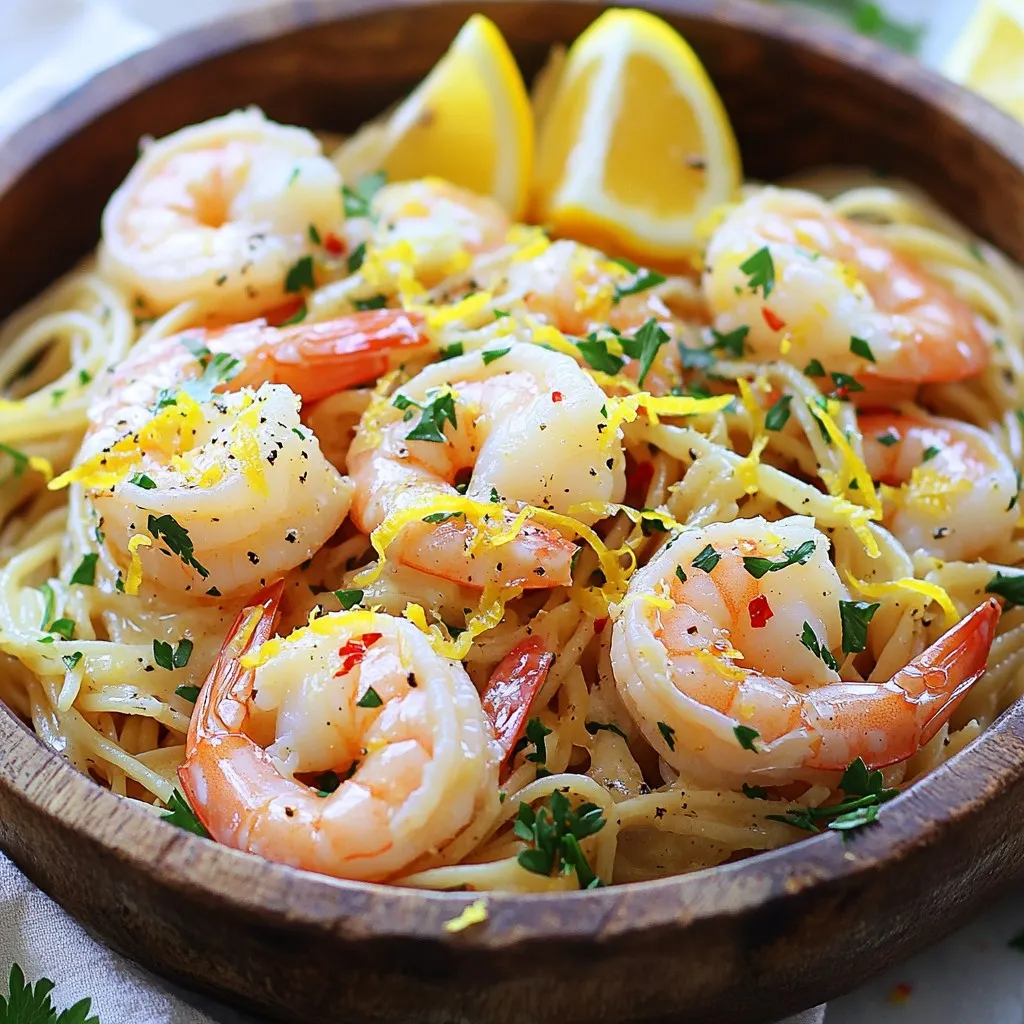
One-Pan Lemon Garlic Shrimp Scampi Quick and Easy Meal
Are you ready to make a quick and easy meal that bursts with flavor? This One-Pan Lemon Garlic Shrimp Scampi is your answer! I’ll guide
- 2 pounds ripe tomatoes, halved - 1 medium onion, chopped - 4 cloves garlic, peeled - 1/2 cup fresh basil leaves, chopped Fresh produce makes this soup shine. Ripe tomatoes are the star. Their sweetness adds a rich flavor. Choose tomatoes that feel firm. A medium onion gives depth to the taste. Garlic adds a nice kick. Fresh basil brightens the dish. Chop it up just before use for the best flavor. - 2 tablespoons olive oil - Salt and pepper to taste - 1 teaspoon dried oregano - 1 tablespoon balsamic vinegar (optional) Pantry staples are key for this soup. Olive oil helps roast the veggies and adds richness. Use salt and pepper to enhance flavors. Dried oregano gives a nice earthy note. Balsamic vinegar can add a sweet touch, but it’s optional. It’s great for those who want a little extra zing. - 2 cups vegetable broth - 1 cup heavy cream (or coconut cream for a lighter version) For a creamy texture, you need broth and cream. Vegetable broth adds depth and keeps it light. Heavy cream makes it rich and smooth. If you prefer a lighter soup, coconut cream works well. It offers a subtle sweetness and works perfectly with the tomatoes. First, preheat your oven to 400°F (200°C). This step is key for roasting. Next, take a baking sheet and arrange: - 2 pounds ripe tomatoes, halved - 1 medium onion, chopped - 4 cloves garlic, peeled Drizzle everything with 2 tablespoons of olive oil. Then, season with salt, pepper, and 1 teaspoon of dried oregano. Toss the veggies to coat them evenly. Now, it's time to roast. Place the baking sheet in your preheated oven. Roast for 30 to 35 minutes. You want the tomatoes to caramelize and the onions to become tender. Look for a nice golden color as a sign of doneness. Once the veggies are roasted, remove the baking sheet from the oven and let them cool a bit. Transfer the roasted ingredients to a blender. Add 2 cups of vegetable broth and blend until smooth. Next, pour the blended mixture into a pot over medium heat. Stir in 1 cup of heavy cream and bring it to a gentle simmer. Taste and add more salt and pepper if needed. Finally, stir in 1/2 cup of fresh basil leaves and 1 tablespoon of balsamic vinegar if you like. Let it cook for an extra 5 minutes. This helps all the flavors blend beautifully. Enjoy your creamy roasted tomato basil soup! Optimal Tomato Selection Choose ripe tomatoes for the best flavor. Look for tomatoes that are firm yet slightly soft to the touch. These tomatoes will have a sweet taste when roasted. Varieties like Roma or vine-ripened tomatoes work great. They add depth to your soup. Roasting Tips for Enhanced Flavors Roasting brings out natural sweetness. Spread your tomatoes, onions, and garlic evenly on the baking sheet. Drizzle with olive oil and season with salt and pepper. Don’t forget the dried oregano! Roasting at 400°F for 30 to 35 minutes caramelizes the veggies, adding rich flavors. Achieving Smooth Consistency Once your veggies have cooled, transfer them to a blender. Add vegetable broth to help with blending. Blend until smooth, and make sure there are no chunks. This step is key for that silky texture. Adjusting for Thickness If your soup is too thick, add more broth. Blend again to combine. For a thicker soup, let it simmer longer after blending. The cream will also help with thickness, so adjust based on your taste. Best Practices for Freshness Store leftover soup in airtight containers. This keeps it fresh for up to five days in the fridge. Allow the soup to cool before sealing. This helps avoid condensation in the container. Garnishing Ideas Garnish your soup with fresh basil leaves for a pop of color. A drizzle of cream adds richness. You can also sprinkle some croutons on top for crunch. Experiment with different toppings to find your favorite combination! {{image_2}} You can easily adjust the creamy roasted tomato basil soup to fit your needs. For a lighter version, use coconut cream instead of heavy cream. This swap adds a lovely hint of sweetness without the heaviness. It keeps the soup rich but light. For those who follow a vegan diet, consider using plant-based cream alternatives. Options like cashew cream or almond milk work well. They maintain the creamy texture and flavor while keeping the soup vegan. Want to boost the flavor even more? Add extra herbs and spices. Fresh thyme or rosemary can deepen the taste. A dash of smoked paprika adds warmth and depth. Experiment with these additions to find your favorite blend. If you want to make this soup a meal, consider adding protein. Grilled chicken or chickpeas can turn this soup into a hearty dish. Simply stir them in during the final cooking steps. When serving your creamy roasted tomato basil soup, pair it with the right sides. Grilled cheese sandwiches are a classic choice. The crisp bread and gooey cheese complement the soup perfectly. For a creative twist, try serving the soup in a bread bowl. It adds flavor and fun to the meal. You can also garnish the soup with extra basil leaves or a swirl of cream for a beautiful presentation. How Long Can It Last in the Fridge? Creamy roasted tomato basil soup can last about 4 to 5 days in the fridge. Make sure it cools down first before you store it. This way, it stays fresh longer. Proper Containers for Storage Use airtight containers to keep the soup safe. Glass or plastic containers work well. Ensure the lid seals tightly. This keeps out air and helps maintain flavor. Freezing Tips for Long-Term Preservation You can freeze this soup for up to 3 months. Let it cool completely before putting it in the freezer. Use freezer-safe bags or containers. Leave some space at the top to allow for expansion. Reheating Tips for Best Flavor When you're ready to eat it, thaw the soup overnight in the fridge. Warm it on the stove over medium heat. Stir often to keep it smooth. Add a splash of water or broth if it gets too thick. How to Tell if Your Soup Has Gone Bad Check for off smells or a change in color. If you see mold, do not eat it. A sour taste is also a sign that it’s time to toss it. Always trust your senses to keep your meal safe. Creamy roasted tomato basil soup is a rich blend of flavors. It features sweet, roasted tomatoes, savory onions, and fragrant garlic. The addition of fresh basil creates a fresh taste that lifts the soup. The heavy cream adds a silky texture, making it comforting and smooth. Each spoonful bursts with a mix of tangy and sweet notes. You’ll find it perfect for chilly days or as a light meal. To add heat, you can include a few red pepper flakes or diced jalapeños. Mix them in when you roast the vegetables. This will infuse the soup with a nice kick. You can also top the soup with a drizzle of hot sauce when serving. Experiment to find the spice level that you enjoy most. Yes, you can skip the heavy cream to make a lighter soup. Use coconut cream instead for a dairy-free option. You can also use more vegetable broth to keep the soup light. If you prefer, try adding a splash of almond milk for a creamy touch without the heaviness. This soup pairs well with many sides. A simple grilled cheese sandwich complements the flavors nicely. You might also enjoy it with a fresh salad or crusty bread. Try serving it with a sprinkle of parmesan on top for extra flavor. Each option enhances the soup and makes a fuller meal. To store leftovers, let the soup cool first. Transfer it to an airtight container. Place it in the fridge, and it will last for up to five days. For longer storage, freeze it in portions. Use freezer-safe bags or containers to avoid freezer burn. When ready to eat, reheat gently on the stove or in the microwave. In this post, we explored making a delicious creamy roasted tomato basil soup. You learned about essential ingredients like fresh produce and pantry staples. We walked through step-by-step instructions on preparing, roasting, and blending. You found tips on perfecting flavors and storage methods. Enjoy this soup with your favorite sides for a meal. Experiment with variations to suit your tastes. The joy of cooking lies in trying new things, so have fun with it!
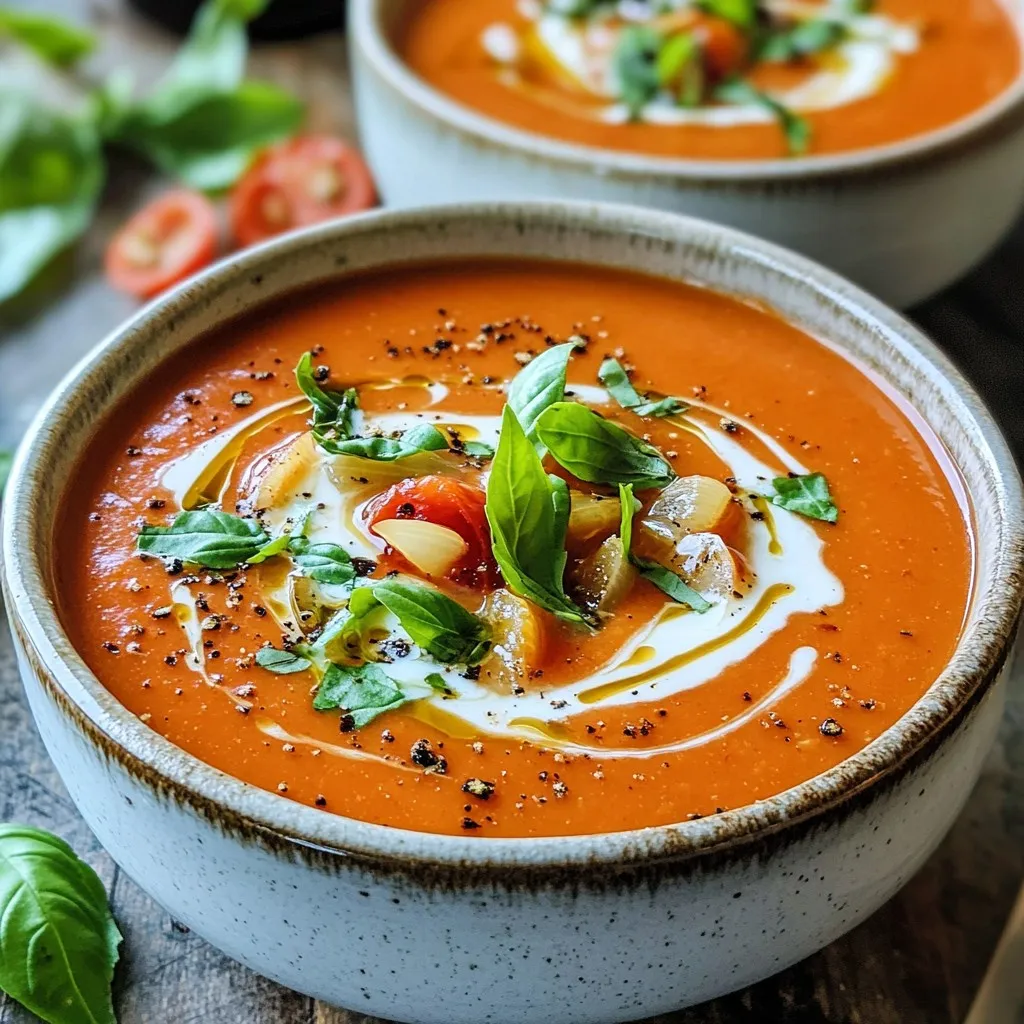
Creamy Roasted Tomato Basil Soup Flavorful and Simple
Welcome to my kitchen, where comfort food meets simplicity! Today, I’m excited to share a recipe for Creamy Roasted Tomato Basil Soup that bursts with
- 4 large bell peppers (any color for a vibrant look) - 1 lb ground turkey or beef (your choice of protein) - 1 cup cooked rice (white or brown works) - 1 can (15 oz) black beans, rinsed and drained - 1 cup corn (fresh, frozen, or canned) - 1 packet taco seasoning (store-bought or homemade) - 1 cup salsa (your favorite variety) - 1 cup shredded cheese (cheddar or Monterey Jack) - 2 tablespoons olive oil (for flavor and roasting) - Salt and pepper to taste - Fresh cilantro or parsley, chopped, for garnish You can switch up the ingredients for more flavor! Here are some options: - Use quinoa instead of rice for a nutty taste. - Replace ground meat with shredded chicken or even mushrooms for a veggie twist. - Add jalapeños for a spicy kick or diced tomatoes for extra freshness. - Top with avocado slices or guacamole for creaminess. Each serving of taco stuffed peppers is hearty and filling. Here’s a quick overview: - Calories: Around 350-400, depending on protein choice and toppings. - Protein: Approximately 25-30 grams, great for muscle health. - Fiber: About 8-10 grams from beans and veggies, great for digestion. - Vitamins: Rich in vitamins A and C from bell peppers and corn, boosting immunity. Enjoy these tasty ingredients while you create a meal that will impress! {{ingredient_image_2}} First, turn on your oven to 375°F (190°C). This gets it ready for baking. Next, take four large bell peppers. You can use any color you like. Cut the tops off and remove the seeds and membranes inside. This makes room for the filling. Drizzle olive oil over each pepper. This adds flavor and helps with roasting. Season them with salt and pepper. Stand them up in a baking dish so they won't fall over. In a large skillet, heat over medium heat. Add one pound of ground turkey or beef. Break it into small pieces while it cooks. Cook it for about 5 to 7 minutes until it's brown. If there is extra fat, drain it. Now, mix in one packet of taco seasoning. Stir it well into the meat. Next, add one cup of cooked rice, one can of rinsed black beans, and one cup of corn. Finally, pour in half of the salsa. Stir everything together and cook for another 3 to 4 minutes. Spoon the filling into each bell pepper. Pack it tightly to make sure they are full of flavor. Drizzle the rest of the salsa over the tops. Cover the baking dish with aluminum foil. Place it in the oven and bake for 25 minutes. After that time, take off the foil. Sprinkle one cup of shredded cheese on top of the peppers. Bake them uncovered for another 10 minutes. The cheese should melt and get a little golden. Once done, take the peppers out of the oven. Let them cool for a few minutes. Before serving, add some chopped cilantro or parsley on top. This gives a nice fresh touch to your meal. To make the best taco stuffed peppers, start with fresh bell peppers. Choose large ones that stand up well. Cut off the tops and scoop out the seeds. Drizzle with olive oil and season with salt and pepper. This adds flavor and helps them roast well. Cook the ground turkey or beef until it's browned. Stir in the taco seasoning to coat the meat well. This gives the filling a great taste. Mix in cooked rice, black beans, corn, and half of the salsa. Let it heat through for a few minutes to blend the flavors. Fill each pepper tightly with this mixture. This ensures every bite is packed with flavor. Store leftover taco stuffed peppers in an airtight container. They stay fresh in the fridge for up to three days. When you reheat, cover them with a damp paper towel. This keeps them from drying out. Heat in the microwave for two to three minutes. You can also bake them in the oven at 350°F (175°C) until hot. Serve taco stuffed peppers with a side of salsa or sour cream. A fresh salad adds a nice crunch. You can also pair them with tortilla chips for a fun twist. For drinks, try iced tea or a light beer. These pair well with the flavorful peppers. Enjoy your meal with friends and family for a festive touch! Pro Tips Choose Colorful Peppers: Using a mix of colored bell peppers not only enhances the visual appeal of your dish but also adds slight variations in flavor and sweetness. Customize Your Protein: Feel free to substitute ground turkey or beef with other proteins like chicken, tofu, or even lentils for a vegetarian option to suit your dietary preferences. Make Ahead: Prepare the filling in advance and refrigerate it. You can stuff and bake the peppers just before serving for a quick and easy meal. Experiment with Toppings: Don't hesitate to add your favorite toppings such as avocado, sour cream, or jalapeños to elevate the flavor and texture of your stuffed peppers. {{image_4}} You can switch up the protein in your taco stuffed peppers. Ground turkey or beef works well, but many other options exist. Try using ground chicken for a lighter meal. For a richer taste, consider ground lamb. If you want a bit of spice, chorizo adds great flavor. If you prefer a meat-free meal, many substitutes fit well. Use lentils or quinoa for a hearty base. Beans like black or pinto can easily take the place of meat. If you like it creamy, add some mashed avocado or cashew cream. For vegan cheese lovers, there are many plant-based cheese options available. Feel free to be adventurous with your flavors. Add diced jalapeños to spice things up. You can also mix in some chopped bell peppers or onions for a crunch. For a fresh twist, try adding lime juice or cilantro to the filling. Experiment with different salsas for unique tastes, like mango or pineapple salsa, to enhance the dish. To store leftover taco stuffed peppers, let them cool first. Place them in a tight container. You can keep them in the fridge for up to three days. If you want to keep them longer, freezing is a great option. Freezing taco stuffed peppers is simple. Wrap each pepper in plastic wrap. Then, place them in a freezer-safe bag or container. Make sure to remove as much air as you can. You can freeze them for up to three months. When you want to eat them, thaw them overnight in the fridge. Then, reheat in the oven until hot. The shelf life of the main ingredients varies. Here are some key points: - Bell Peppers: Last about one week in the fridge. - Ground Turkey or Beef: Raw meat lasts one to two days in the fridge. Cooked meat lasts three to four days. - Cooked Rice: Good for four to six days in the fridge. - Black Beans (canned): Last for three to four years when unopened; once opened, use within three to four days. - Corn: Fresh corn lasts about three days; canned corn lasts for two to five years unopened. - Salsa: Store-bought salsa lasts about one week after opening. By keeping track of these storage tips, you can enjoy your taco stuffed peppers longer. Yes, you can prepare Taco Stuffed Peppers ahead of time. You can make the filling and stuff the peppers. Then, cover them tightly and store them in the fridge. This makes a great meal for busy days. Just bake them when you are ready to eat. The flavors will blend nicely overnight. If you do not have taco seasoning, you can make your own. Use a mix of cumin, chili powder, garlic powder, and onion powder. You can also add paprika and oregano for extra flavor. This way, you control the spice level and flavors in your dish. The stuffed peppers are done when they are tender. The cheese should melt and bubble on top. You can use a fork to test the peppers. They should be easy to pierce but still hold their shape. If they look golden and smell great, they are ready to enjoy! This article covered how to make taco stuffed peppers. We explored the ingredients, steps to cook, and creative variations. I shared tips to ensure your peppers are just right. You learned how to store leftovers and answers to common questions. Taco stuffed peppers are a fun and tasty meal. They are great for any occasion. With these steps and ideas, you can enjoy delicious filled peppers at home. Happy cooking!
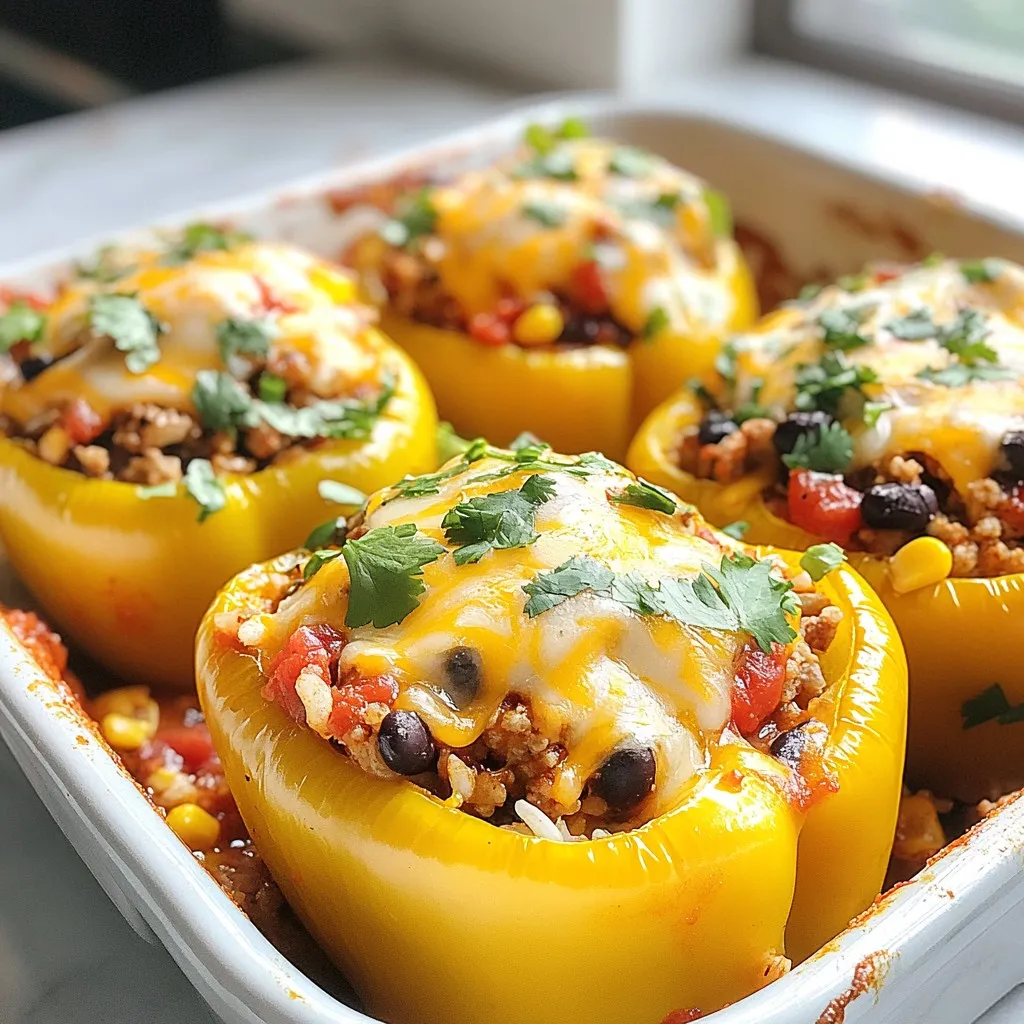
Taco Stuffed Peppers Flavorful and Filling Meal
Get ready to spice up your dinner with Taco Stuffed Peppers! This dish is not only tasty but also filling and fun to make. You
- Firm Tofu - Cornstarch - Honey or Maple Syrup - Garlic - Soy Sauce - Rice Vinegar - Sesame Oil - Vegetable Oil - Green Onion - Sesame Seeds - Each serving has about 280 calories. - This dish has: - Carbs: 30g - Proteins: 12g - Fats: 12g - It is vegan if you use maple syrup. It can be gluten-free with tamari. Crispy Honey Garlic Tofu packs flavor and nutrition. Firm tofu gives a nice bite. Cornstarch makes it crispy outside. Honey or maple syrup adds sweetness. Garlic brings a rich taste. Soy sauce adds umami, while rice vinegar adds a little tang. Sesame oil gives a lovely aroma. This meal is perfect for dinner. You can serve it with rice or veggies. It is a great dish for anyone, whether you are a beginner or a pro. The ingredients are easy to find. You may already have some at home. {{ingredient_image_2}} To start, you need to press the tofu. This step helps remove water and makes the tofu crispy. Place your block of firm tofu on a plate. Put another plate on top and add some weight. Let it sit for about 15 minutes. After pressing, cut the tofu into 1-inch cubes. This size helps it cook evenly. Next, it’s time to coat the tofu. Place the tofu cubes in a mixing bowl. Sprinkle the cornstarch over the tofu. Toss the tofu gently until each piece is fully covered. The cornstarch will give it that crispy outer layer when cooked. Now, heat some vegetable oil in a non-stick skillet over medium-high heat. Wait until the oil shimmers. Carefully add the coated tofu in a single layer. Avoid overcrowding the pan. Fry each side for 3-4 minutes until golden brown. Once done, use a paper towel to soak up extra oil. In the same skillet, lower the heat and add minced garlic. Sauté the garlic for about 30 seconds. You want it fragrant but not burnt. Then add honey, soy sauce, rice vinegar, and sesame oil. Stir well until mixed. Let it simmer for 2-3 minutes until the sauce thickens slightly. Now, return the crispy tofu to the skillet. Toss the tofu in the honey garlic sauce. Cook for one more minute to coat each piece well. This step makes sure every bite is flavorful. Finally, transfer your honey garlic tofu to a serving dish. For a nice touch, garnish it with chopped green onions and sesame seeds. This adds color and a bit of crunch. Enjoy your crispy honey garlic tofu! To get crispy tofu, pressing is key. Press the tofu for at least 15 minutes. This removes water, helping the tofu crisp up. After pressing, cut the tofu into 1-inch cubes. Uniform pieces cook evenly. Using cornstarch is a game changer. Coat each cube lightly with cornstarch. This creates a crunchy outside when frying. For best results, use a shallow bowl for easy tossing. Ensure the cornstarch sticks to all sides of the tofu. Frying temperature matters a lot. Heat the oil until it shimmers but is not smoking. This shows it's hot enough for frying. Add the tofu cubes in a single layer. Overcrowding the pan leads to soggy tofu. Fry in batches if needed. Flip the tofu only when it's golden brown. This helps achieve a nice crust. Each side should take about 3-4 minutes. Adjusting sweetness is easy. If you want less sweet, reduce the honey or maple syrup. You can also add a splash of soy sauce to balance the flavors. For more depth, consider extra seasonings. A pinch of black pepper or ginger adds warmth. You could also try a dash of chili flakes for heat. This adds a fun twist to the dish. Pro Tips Press Tofu Well: Ensure you press the tofu for at least 15-20 minutes to remove excess moisture. This step is crucial for achieving that crispy texture when frying. Even Coating: When coating the tofu with cornstarch, make sure to toss gently but thoroughly. An even coating will help create a consistent crispy layer on all sides. Monitor Heat Levels: Keep an eye on the oil temperature while frying. If the oil is too hot, the tofu may burn quickly; too cool, and it may become soggy. A medium-high heat is ideal. Customize the Sauce: Feel free to adjust the sweetness or saltiness of the sauce to your preference. Adding a pinch of chili flakes can also give it a nice kick! {{image_4}} You can easily make this dish vegan. Just swap honey for maple syrup. Maple syrup gives a sweet touch that works well with garlic. You can also add more plant-based ingredients. Try using a sprinkle of nutritional yeast for a cheesy flavor. You could also toss in some cashews for extra crunch. These small changes keep the dish tasty and fun. Want to spice things up? Add chili flakes for a spicy kick. You can adjust the amount based on your heat level. If you enjoy veggies, consider adding bell peppers or broccoli. They not only add color but also boost nutrition. Toss them in the pan near the end of cooking to keep them crisp. You will enjoy the mix of flavors and textures. This honey garlic tofu is super versatile! You can easily mix it into stir-fries. Just toss it with your favorite veggies and rice. It also makes a great filling for tacos or wraps. Add some slaw and a squeeze of lime for extra zest. These options make your meals exciting and full of flavor. To store leftover crispy honey garlic tofu, let it cool first. Then, place the tofu in an airtight container. This keeps it fresh and prevents it from drying out. Store it in the fridge for up to three days. If you wait longer, the tofu will lose its crispy texture. When reheating, aim to restore that crispy goodness. The best method is to use a skillet. Heat a little oil over medium heat. Then, add the tofu. Cook for about 5-7 minutes, turning occasionally. This way, you keep the outside crispy and warm the inside. Yes, you can freeze crispy tofu! First, let it cool completely. Then, place it in a freezer-safe bag or container. It can last for about two months in the freezer. When you’re ready to eat, thaw it in the fridge overnight. For reheating, use the skillet method again for best results. You can use soft tofu, but firm tofu works best. Firm tofu holds its shape during cooking. It gives you that nice, crispy texture. Soft tofu may fall apart when you fry it. For this recipe, stick with firm tofu for great results. Yes, but you need to check your soy sauce. Traditional soy sauce has gluten. Look for gluten-free soy sauce, like tamari. It has a similar taste but is safe for gluten-free diets. Always read labels to ensure it fits your needs. To add some heat, try chili pepper flakes. You can also use chili sauce. Start with a little, then taste it. Adjust until it’s just right for you. Spicy and sweet make a fantastic pair with the tofu. Pair this tofu with rice or quinoa for a full meal. Steamed veggies like broccoli or snap peas add color. You can also enjoy it in a wrap with fresh greens. A side of salad complements the dish nicely. This article covered the key ingredients and steps for making crispy honey garlic tofu. We talked about preparation, frying, and making a delicious sauce. You learned tips for a great texture and flavor variations to try. In closing, making this dish can be fun and rewarding. Experiment with flavors and share your tasty results. Enjoy your cooking adventure, and savor every crispy bite!
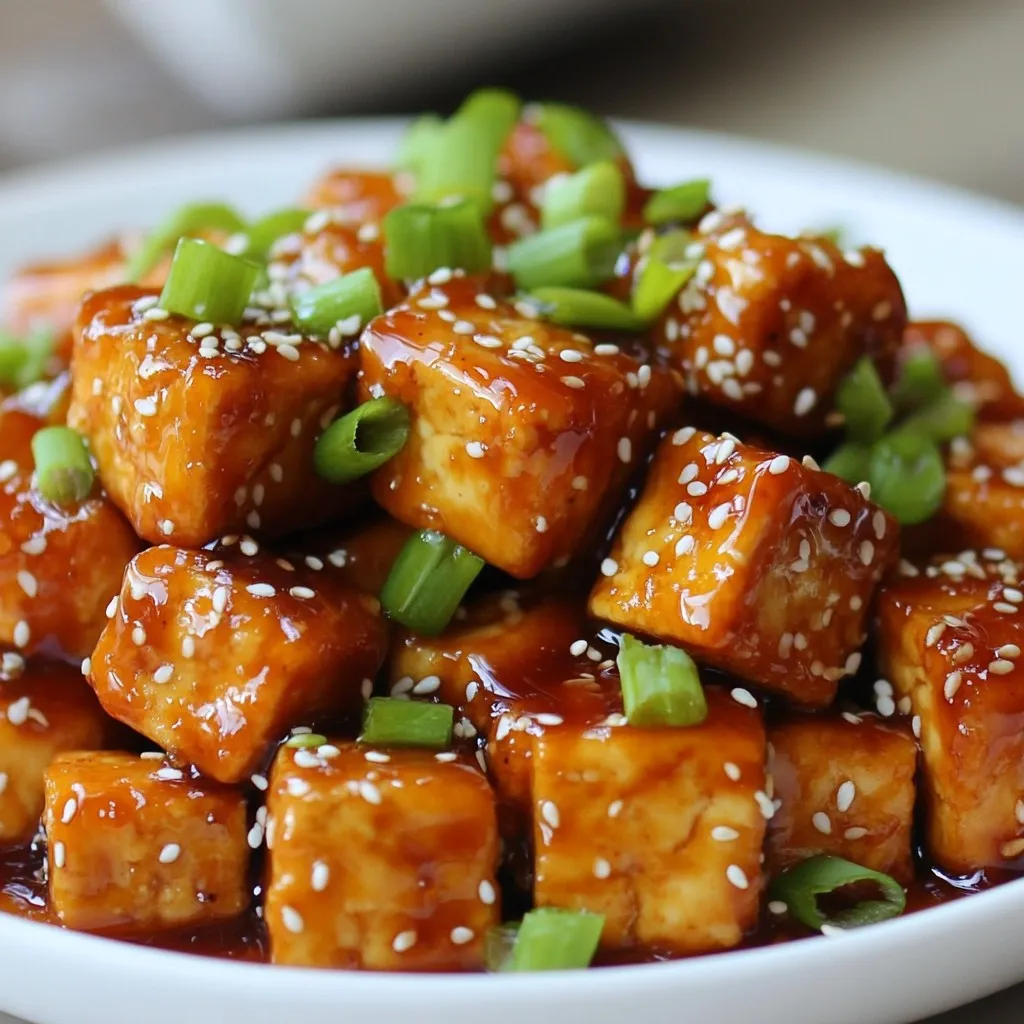
Crispy Honey Garlic Tofu Flavor-Packed Delight
Are you ready to elevate your tofu game? Discover how to create Crispy Honey Garlic Tofu, a dish bursting with flavor and texture! This easy
- 1 lb ground beef - 8 oz elbow macaroni - 1 small onion, finely diced - 2 cloves garlic, minced - 1 packet of taco seasoning (or use a homemade blend) - 1 can (15 oz) diced tomatoes with green chiles - 2 cups beef broth - 1 cup corn (canned or frozen) - 1 cup shredded cheddar cheese - 2 tablespoons olive oil - Fresh cilantro, chopped (for garnish) - Salt and pepper, to taste Using fresh ingredients makes a big difference in taste. I recommend fresh garlic and onion for a great base. The taco seasoning boosts flavor, but you can make your own if you want. Mix chili powder, cumin, and paprika to create a nice blend. The beef broth adds richness to the dish. You can use low-sodium broth if you prefer less salt. Diced tomatoes with green chiles bring heat and flavor. Adjust the amount based on your spice level. For a cheesy finish, use a good quality cheddar. It melts well and adds creaminess. Fresh cilantro at the end gives a fresh touch. You can swap ground beef for ground turkey or chicken. These options still keep it hearty but are leaner. If you want a meatless version, try black beans or lentils instead. For pasta, try shells or penne if you don't have elbow macaroni. Use vegetable broth instead of beef broth for a vegetarian option. You can also mix in different vegetables like bell peppers or zucchini for extra nutrients. These substitutions help customize the dish to your taste and dietary needs. Enjoy experimenting! {{ingredient_image_2}} Start by gathering all your ingredients. This makes cooking easier and faster. You need: - 1 lb ground beef - 8 oz elbow macaroni - 1 small onion, finely diced - 2 cloves garlic, minced - 1 packet of taco seasoning - 1 can (15 oz) diced tomatoes with green chiles - 2 cups beef broth - 1 cup corn - 1 cup shredded cheddar cheese - 2 tablespoons olive oil - Fresh cilantro, chopped - Salt and pepper, to taste Next, finely dice the onion and mince the garlic. This will help release their flavors. Set them aside for later use. In a large skillet, heat the olive oil over medium heat. Once hot, add the diced onion and minced garlic. Sauté for about 3-4 minutes. You want the onion to be soft and fragrant. Then, add the ground beef. Use a wooden spoon to break it apart. Cook the beef for 5-7 minutes. Make sure it is browned and cooked through. If there is excess fat, drain it carefully from the skillet. Now, stir in the taco seasoning. Let it cook for 1-2 minutes. This step helps bring out the spice flavors. Pour in the can of diced tomatoes and the beef broth. Stir it well and bring everything to a gentle simmer. Add the elbow macaroni to the skillet. Stir to combine it with the other ingredients. Cover the skillet and let it simmer for about 10-12 minutes. Stir occasionally, until the pasta is al dente and most of the liquid is absorbed. After the pasta is cooked, fold in the corn and shredded cheddar cheese. Stir until the cheese melts. This adds creaminess to the dish. Taste and season with salt and pepper as needed. Finally, remove the skillet from heat. Garnish with freshly chopped cilantro. Serve hot for a comforting meal. Enjoy the bold flavors in each bite! To make your Beef Taco Pasta Skillet shine, follow these tips: - Use lean ground beef. This keeps your dish light and tasty. - Sauté onions and garlic well. Cook them until soft to build flavor. - Don’t skip the taco seasoning. It adds that bold taco taste. - Stir often while simmering. This helps the pasta cook evenly. - Taste as you go. Adjust salt and pepper to fit your liking. Make your meal pop with these serving ideas: - Use deep bowls. This adds a nice touch and holds the sauce well. - Top with fresh cilantro. This gives a burst of color and flavor. - Serve with lime wedges. A squeeze of lime adds freshness. - Pair with tortilla chips. They add crunch and enhance the taco vibe. Avoid these common missteps: - Overcooking the pasta. Keep an eye on it to ensure it stays al dente. - Not draining excess fat. This can make your dish greasy. - Skipping the simmer. Letting it simmer helps meld the flavors. - Ignoring leftovers. They can taste even better the next day! Pro Tips Brown the Beef: Ensure the ground beef is well browned for better flavor. This step helps to develop a rich, savory taste. Use Homemade Taco Seasoning: For a fresher taste, consider making your own taco seasoning using spices like cumin, paprika, and chili powder. Don’t Overcook the Pasta: Since the pasta will continue to cook even after you remove it from the heat, aim for al dente for the best texture. Add Extra Veggies: Feel free to include additional vegetables like bell peppers or zucchini for more nutrition and color in your dish. {{image_4}} You can easily make this dish vegetarian or vegan. Use plant-based ground meat instead of beef. Look for brands that mimic the texture and taste of real meat. For vegans, use vegetable broth instead of beef broth. You can also add more veggies like bell peppers or zucchini for extra flavor. If you like heat, add some chopped jalapeños or a pinch of cayenne. You can also use hot taco seasoning instead. If you prefer less spice, choose a mild seasoning. Adjust the amount based on your taste. Feel free to customize your Beef Taco Pasta Skillet. Add black beans for protein or diced bell peppers for crunch. You could mix in some spinach for extra nutrients. Experiment with different cheeses like pepper jack or mozzarella for a twist. This dish is fun and allows for creativity! After you enjoy your Beef Taco Pasta Skillet, store leftovers in an airtight container. Make sure to let it cool down first. The pasta can absorb moisture, so keep it sealed tight. You can store it in the fridge for up to three days. When you're ready to enjoy your leftovers, you can reheat them on the stove or in the microwave. If using the stove, add a splash of beef broth to keep the pasta moist. Stir it often over low heat until it's warm. If using a microwave, heat in short bursts. Stir in between to avoid hot spots. To freeze your Beef Taco Pasta Skillet, place it in a freezer-safe container. Make sure to leave some space at the top for expansion. Seal it well and label it with the date. It can last up to three months in the freezer. When you are ready to eat, thaw it in the fridge overnight before reheating. To make this dish in a slow cooker, start by browning the ground beef in a pan. This step adds great flavor. After browning, add the beef to the slow cooker. Then, mix in the diced onion, minced garlic, taco seasoning, diced tomatoes, beef broth, and elbow macaroni. Stir everything well. Cook on low for about 4-6 hours. When it's almost done, mix in the corn and cheese. Let it melt before serving. Yes, you can swap out the elbow macaroni. Feel free to use penne, rotini, or any pasta you like. Just remember that cooking times may change. Make sure to check the pasta for doneness. Cook until it is al dente. This keeps your dish from getting mushy. This meal pairs well with a fresh salad or some warm tortillas. You can also serve it with lime wedges for a zesty kick. Sour cream or avocado slices add creaminess too. A side of black beans or rice would complete the meal nicely. This blog post covers all aspects of making Beef Taco Pasta. We discussed key ingredients, step-by-step cooking instructions, and shared tips for perfect results. I also offered ideas for variations, storage info, and common questions to enhance your cooking experience. Remember, you can easily adjust this dish to fit your taste. With practice, you can make a delicious meal that everyone will enjoy. Enjoy cooking and experimenting with Beef Taco Pasta!
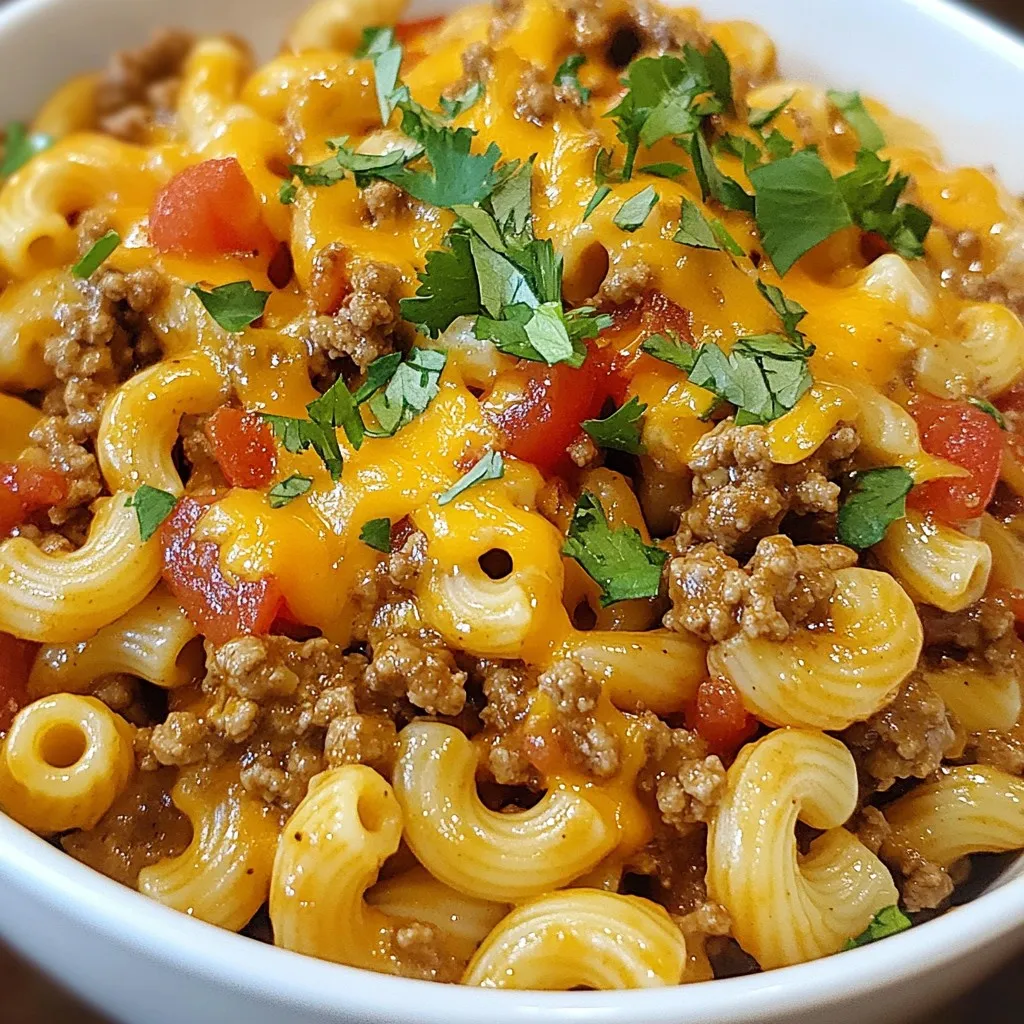
Beef Taco Pasta Skillet Flavorful One-Pan Meal
Looking for a quick, tasty meal the whole family will love? The Beef Taco Pasta Skillet is your answer! This one-pan dish combines the bold
For this recipe, I like to use white fish fillets. Cod or tilapia works best. These fish have a mild flavor and cook quickly in the air fryer. When choosing fish, look for fresh, firm fillets with no fishy smell. Ensure they are bright in color. This makes a big difference in taste. To create a crispy coating, we use panko breadcrumbs. They give a nice crunch. You will also need: - 1 lb white fish fillets (such as cod or tilapia) - 1 cup panko breadcrumbs - 1 teaspoon paprika - 1/2 teaspoon garlic powder - 1/2 teaspoon cayenne pepper (adjust to taste) - Salt and pepper to taste - 2 tablespoons olive oil Mix the breadcrumbs with spices in a shallow dish. This adds flavor and crunch. Brush the fish with olive oil before coating it in the breadcrumb mix. This helps the coating stick and get crispy. The slaw adds a fresh crunch to the tacos. I use a mix of green and red cabbage. This gives a nice color and taste. You will need: - 1 cup green cabbage, finely shredded - 1/2 cup red cabbage, finely shredded - 1/4 cup fresh cilantro, chopped - 1/4 cup sour cream - 1 tablespoon lime juice - 1 teaspoon honey or agave syrup In a large bowl, combine the shredded cabbages and cilantro. For the dressing, whisk together sour cream, lime juice, and honey. Pour the dressing over the cabbage mix and toss it well. This slaw is bright and tangy, balancing the crispy fish perfectly. Start by patting the fish fillets dry. Use paper towels to remove moisture. Next, sprinkle salt and pepper on both sides. This simple step boosts the flavor. You can use cod or tilapia for this dish. Both are mild and flaky fish. In a shallow dish, mix the panko breadcrumbs with paprika, garlic powder, and cayenne pepper. This mix adds a great crunch and flavor. Brush the fish with olive oil. Then, press each fillet into the breadcrumb mix. Make sure all sides are coated well. Preheat your air fryer to 400°F (200°C). Place the coated fish in the air fryer basket in a single layer. If you have many fillets, cook them in batches. Air fry for about 10-12 minutes. Flip the fish halfway through. You want it golden brown and cooked through. In a large bowl, mix green cabbage, red cabbage, and chopped cilantro. This adds color and crunch. In a small bowl, whisk sour cream, lime juice, and honey or agave syrup until smooth. Pour this sauce over the cabbage mix. Toss well to coat every piece. While the fish cooks, warm the corn tortillas. Use a dry skillet over medium heat. Heat each tortilla for about 30 seconds on each side. This makes them soft and easy to fold. Once the fish is ready, break it into pieces. Place a few pieces on each tortilla. Top with a generous amount of slaw. For extra flavor, serve with lime wedges and cilantro for garnish. Enjoy your tasty tacos! To make your fish crispy, use panko breadcrumbs. They are light and airy. This type of breadcrumb helps the fish get that nice crunch. Make sure to coat the fish well. Brush it with olive oil before dipping it in the panko mix. The oil helps it crisp up in the air fryer. Cook the fish at 400°F for about 10 to 12 minutes. Flip it halfway for even cooking. You want the fish to be golden brown. If you love heat, add more cayenne pepper. Start with half a teaspoon, then taste. You can always add more, but you can’t take it out. If you prefer milder flavors, use less cayenne. You can also skip it entirely for a more subtle taste. Remember, the paprika adds flavor without much heat. Play around with the spices until you find your favorite mix. Warm your corn tortillas for the best taste. Heat them in a dry skillet over medium heat. This makes them soft and easy to fold. Warm them for about 30 seconds on each side. You can also wrap them in a clean towel to keep them warm. If you want to get fancy, try grilling them for a smoky flavor. This adds another layer to your fish tacos. Enjoy the crunch of the slaw with the warm tortillas for a perfect bite! {{image_2}} You can switch up the fish in your tacos. Cod and tilapia are great, but you can also try halibut or mahi-mahi. These fish have a nice texture and flavor. They will still give you that crispy bite when cooked in the air fryer. You can even use shrimp for a fun twist. Just adjust the cooking time, as shrimp cooks faster. The slaw dressing can change the flavor a lot. Instead of sour cream, try Greek yogurt for a healthier option. You could also use a vinaigrette made with olive oil and vinegar. If you like spice, add a dash of hot sauce to the dressing. This adds a nice kick to your slaw. Mix and match until you find your favorite. Toppings can make your tacos even better. Fresh avocado slices add creaminess and flavor. Pickled onions can give a tangy crunch. You could also sprinkle crumbled feta or queso fresco on top. If you love heat, add jalapeños or a drizzle of spicy mayo. Get creative! Each topping can change the taste, making your meal unique every time. To store leftover fish tacos, first, separate the fish from the tortillas and slaw. Place the fish in an airtight container. Keep the tortillas and slaw in separate containers. This helps keep everything fresh. You can store them in the fridge for up to two days. To reheat the fish, preheat your air fryer to 350°F (175°C). Place the fish in the basket and heat for about 5-7 minutes. Check to make sure it’s hot all the way through. For the tortillas, heat them on a skillet for about 30 seconds on each side. This brings back their soft texture. Store slaw in an airtight container in the fridge. It should last for about 3 days. If you add dressing, it may get soggy faster. To avoid this, keep the dressing separate until you are ready to eat. This keeps the slaw crunchy and fresh. Yes, you can use frozen fish fillets. Just make sure to thaw them completely before cooking. Pat them dry with paper towels to remove excess moisture. This helps the coating stick better and get crispy. Frozen fish works well but may take a bit longer to cook. To make gluten-free fish tacos, use gluten-free panko breadcrumbs. You can find these in most grocery stores. Also, ensure your tortillas are gluten-free. Many brands offer corn tortillas that are naturally gluten-free. This way, you can enjoy tasty tacos without the gluten. Fish tacos pair well with many side dishes. Here are some great options: - Mexican rice - Black beans - Grilled corn - Avocado salad - Pico de gallo These sides add flavor and nutrition to your meal. Leftover fish tacos can last up to two days in the fridge. Store the fish and slaw in separate containers. This keeps the fish crispy and the slaw fresh. Reheat the fish in the air fryer for the best results. Yes, you can prepare the slaw ahead of time. Make it a few hours before serving. This lets the flavors blend well. Just store it in the fridge in an airtight container. Mix it again before serving to refresh the texture. In this post, we explored making delicious fish tacos. We covered selecting fresh fish, seasoning, and slaw ingredients. You learned simple steps for preparing and cooking, plus tips for crispy fish and customizing your meal. Try different fish, slaw, and toppings to suit your taste. Proper storage keeps leftovers tasty, and answering your FAQs helps clarify common concerns. With these tips, you can create fantastic fish tacos at home that impress every time. Enjoy your cooking adventure!
Air Fryer Fish Tacos with Slaw Flavorful Delight
Craving a fresh and tasty meal? Let’s dive into the world of Air Fryer Fish Tacos with Slaw! This recipe is quick, easy, and loaded
To make Minute Chili Crisp Egg Fried Rice, you need a few key ingredients: - 2 cups cooked jasmine rice (preferably day-old) - 2 large eggs - 2 tablespoons chili crisp sauce - 1 tablespoon soy sauce - 1 tablespoon sesame oil - 1 small onion, finely chopped - 2 cloves garlic, minced - 1 small carrot, diced - 1/2 cup frozen peas - Salt and pepper to taste Day-old rice works best. It has a firmer texture, and it fries well. Fresh rice tends to be too sticky. The chili crisp sauce adds a spicy crunch that makes this dish special. Use good-quality soy sauce for extra flavor. Sesame oil gives the fried rice a nutty taste. For a pop of color and taste, consider these optional garnishes: - 2 green onions, sliced - Lime wedges Green onions add freshness. Lime wedges bring a zesty kick. You can drizzle extra chili crisp on top for more heat. I recommend using jasmine rice, but you can also try these: - Long-grain rice - Basmati rice - Brown rice Each type has its own taste and texture. Jasmine rice gives a fragrant aroma. Long-grain rice keeps grains separate. Brown rice offers a nutty flavor and is more nutritious. Choose what you like best! First, gather your ingredients. You will need: - 2 cups cooked jasmine rice (preferably day-old) - 2 large eggs - 2 tablespoons chili crisp sauce - 1 tablespoon soy sauce - 1 tablespoon sesame oil - 1 small onion, finely chopped - 2 cloves garlic, minced - 1 small carrot, diced - 1/2 cup frozen peas - 2 green onions, sliced (for garnish) - Salt and pepper to taste Using day-old rice gives the best texture. Fresh rice can be too sticky. If you need to cook rice now, spread it out to cool quickly. Next, heat a teaspoon of sesame oil in a large skillet or wok over medium heat. Crack the eggs into the pan. Scramble them until just set. This step takes about a minute. Once cooked, remove the eggs from the pan and set them aside. In the same skillet, add the rest of the sesame oil. Toss in the chopped onion and minced garlic. Sauté for about 2 minutes until they smell nice. Then, add the diced carrots and frozen peas. Cook for another 2 to 3 minutes until the veggies soften. Now, add the cold rice to the skillet. Break up any clumps with a spatula. Stir-fry the rice for about 2 minutes. This step helps the rice get some color. Pour in the soy sauce and chili crisp sauce. Mix everything well to spread the flavors. Add the scrambled eggs back into the pan. Season with salt and pepper to taste. Remove the pan from heat and transfer the fried rice to serving plates. For a lovely touch, garnish with sliced green onions on top. You can drizzle some extra chili crisp sauce for more flavor. Serve with lime wedges on the side for a zesty kick! For fried rice, jasmine rice is best. It has a lovely aroma and soft texture. Day-old rice works best because it dries out. This helps the rice fry better and not clump. If you use fresh rice, let it cool first. Spread it on a tray to dry for a bit. Scrambled eggs add creaminess to the dish. Heat a bit of sesame oil in your pan. Crack the eggs in and stir gently. Cook until they are just set, not too dry. Remove them from the pan for now. This way, they stay soft and fluffy. Chili crisp adds a nice kick. Start with one tablespoon if you like mild heat. You can always add more later. Stir it well into the rice so it spreads evenly. If you want more spice, add a bit more at the end. Just remember to taste as you go! You can make this fried rice a full meal. Add veggies like bell peppers or broccoli for more color. You can also include proteins like chicken or shrimp. Tofu is a great choice for a veggie option. Just make sure to cook your add-ins before mixing them in. {{image_2}} You can make a tasty vegetarian version of this dish. Simply leave out the eggs. Instead, use tofu. Cut firm tofu into cubes and sauté until golden. Add it to the rice for protein. You can also add more veggies, like bell peppers or zucchini. This will give your fried rice more color and texture. For extra protein, try adding chicken or shrimp. If you choose chicken, use cooked, diced chicken breast. For shrimp, toss in peeled shrimp until they turn pink. To keep it vegetarian, stick with tofu. Each option brings its flavor and heartiness. Just remember to cook the protein first, then add it back in with the rice. While chili crisp is great, you can mix it up. Try hoisin sauce for sweetness or oyster sauce for umami. You can also use sriracha for more heat. These sauces can add different layers of flavor. Experiment to find what you like best. Each sauce can change the dish’s taste in a fun way. Leftover Minute Chili Crisp Egg Fried Rice is easy to store. First, let the rice cool to room temperature. Then, transfer it to an airtight container. This helps keep it fresh. You can store it in the fridge for up to three days. Reheating fried rice can be tricky. To keep it fluffy, add a splash of water before microwaving. Cover the dish with a damp paper towel. This traps steam and helps the rice stay moist. Heat in short bursts, stirring often. If you use a skillet, add a little oil and stir-fry over medium heat. This brings back the crispy texture. You can freeze leftover fried rice, too. Portion it into freezer-safe bags or containers. Be sure to remove as much air as possible. Label the bags with the date. Frozen fried rice can last for up to three months. When you are ready to eat it, thaw it in the fridge overnight before reheating. You can use fresh rice, but it may not fry well. Day-old rice dries out a bit. This helps it hold its shape and texture. Fresh rice can be too soft and sticky. If you must use fresh rice, spread it out on a tray to cool. Let it sit for at least 30 minutes. Chili crisp is a spicy oil made with chili peppers and crunchy bits. It has a rich flavor with textures from garlic, onions, and spices. Regular chili sauce is smooth and often less complex. Chili crisp adds heat along with a crunch that makes dishes pop. It’s great for adding depth to fried rice. To reduce the spice, cut back on chili crisp sauce. You can also add more rice to balance the heat. Another option is to use a milder sauce, like sweet soy sauce. Adding extra veggies, such as carrots or peas, can also help tone down the spice. Yes, you can prep it in advance. Cook the rice and store it in the fridge. You can also chop the veggies ahead of time. When ready to eat, quickly stir-fry everything together. This keeps the flavors fresh and bright. Fried rice pairs well with many side dishes. You can serve it with spring rolls for crunch. A simple cucumber salad adds freshness. You might also enjoy it with grilled chicken or steamed dumplings. These sides complement the flavors of the fried rice nicely. In this post, I shared how to make Minute Chili Crisp Egg Fried Rice. We covered key ingredients, cooking steps, and tips for spice and texture. I included simple variations and storage advice. This dish is quick, tasty, and easy to customize. You can enjoy it as a meal or a side. I hope you try it and have fun in your kitchen!
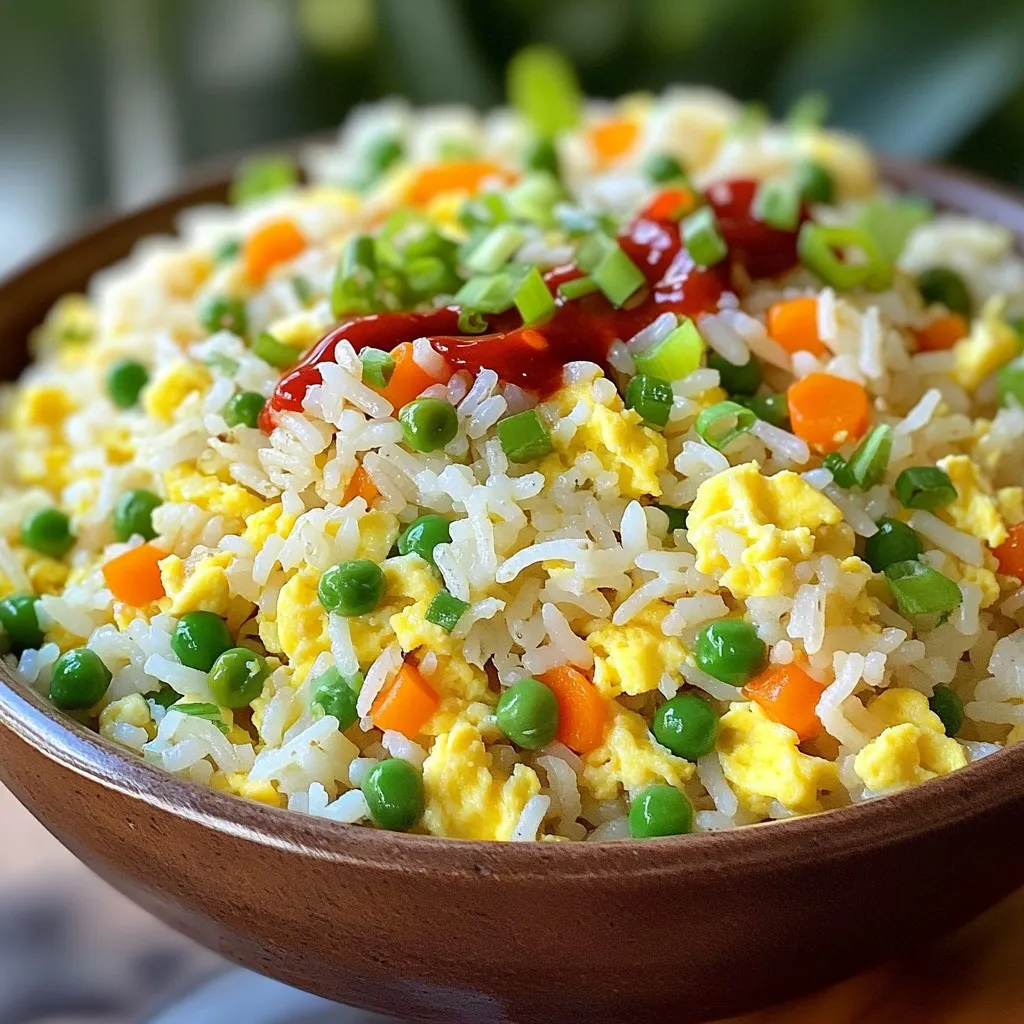
Minute Chili Crisp Egg Fried Rice Flavorful Delight
If you’re looking for a quick dish that packs a flavorful punch, you’ve found it! Minute Chili Crisp Egg Fried Rice is both easy to
- 1 pound boneless, skinless chicken breasts - 1 can (15 oz) white kidney beans, drained and rinsed - 1 can (15 oz) corn, drained - 1 onion, chopped - 2 cloves garlic, minced - 1 can (4 oz) diced green chilies The main ingredients create a hearty base for your chili. The chicken adds protein and richness. Beans provide fiber and creaminess, while corn offers a sweet crunch. Onion and garlic boost flavor, and green chilies add a mild heat. Each component blends well, making every bite satisfying. - 1 teaspoon ground cumin - 1 teaspoon chili powder - 1/2 teaspoon smoked paprika - 1 teaspoon salt - 1/2 teaspoon black pepper Spices bring life to this dish. Ground cumin gives an earthy taste. Chili powder adds warmth, while smoked paprika brings a hint of smokiness. Salt enhances all flavors, and black pepper adds a subtle kick. Together, these spices create a balanced profile that brings out the best in your ingredients. - 4 cups chicken broth - 1 cup heavy cream - Garnishes: fresh cilantro, sliced jalapeños, lime wedges Chicken broth serves as the soup’s base, making it rich and savory. Heavy cream adds a creamy texture, turning the chili into a comforting meal. Fresh cilantro and jalapeños give brightness and heat as garnishes. Lime wedges offer a zesty finish that brightens each spoonful. Start by placing the chicken breasts at the bottom of your slow cooker. This layer will keep the chicken moist as it cooks. Next, add the white kidney beans, corn, chopped onion, minced garlic, and diced green chilies on top of the chicken. These veggies give great flavor and texture. Now, it’s time for the spices. Sprinkle the ground cumin, chili powder, smoked paprika, salt, and black pepper evenly over all the ingredients. These spices add warmth and depth to the chili. Pour in the chicken broth. Make sure the chicken is well submerged to keep it juicy. Next, cover the slow cooker with its lid. Set it to cook on low for 6-8 hours or on high for 3-4 hours. The chicken should become very tender during this time. After cooking, remove the chicken breasts from the pot. Use two forks to shred the chicken into bite-sized pieces. Return the shredded chicken to the slow cooker. Stir in the heavy cream to make the chili rich and creamy. Let it cook on low for another 30 minutes. Before serving, taste the chili and adjust the seasoning if needed. This step ensures the flavors are perfect. To make your white chicken chili shine, always pick fresh ingredients when you can. Fresh garlic and onion give a strong flavor. Canned ingredients like beans and corn save time but can lack taste. If you use canned products, rinse them well. This helps remove extra salt and improves flavor. For cooking, slow and steady is best. Use low settings to keep the chicken tender. Cooking on low for 6-8 hours is my go-to. If you’re in a rush, you can cook it on high for 3-4 hours. Just be sure to check the chicken for doneness. When serving, think about fun sides. Warm tortilla chips can be great for dipping. A slice of crusty bread is also nice. For a bright touch, add lime wedges. They give a nice zesty kick. Top the chili with fresh cilantro and sliced jalapeños. This adds color and flavor. Serve it in bowls to show off the toppings. One big mistake is overcooking the chicken. This can make it dry. Keep an eye on the cooking time. You want the chicken tender but not falling apart. Another mistake is not balancing spices. Start with the suggested amounts. Taste as you go. If you like it hotter, add more chili powder or jalapeños. Adjusting spices to your taste makes the chili just right for you. {{image_2}} You can easily swap ingredients in your white chicken chili. If you want a different bean, use black beans or pinto beans instead of white kidney beans. For chicken, try turkey or even rotisserie chicken for a quicker meal. Adding more vegetables can boost nutrition. Toss in diced bell peppers, carrots, or zucchini. These veggies add flavor and color to your chili. They also provide extra vitamins and minerals, making the dish healthier. Adjusting spices can change the flavor of your chili. If you like heat, add more chili powder or a splash of hot sauce. For a milder version, reduce the chili powder and smoked paprika. You can also experiment with spice blends. Try adding oregano or coriander for a different taste. Each blend offers a unique twist to this classic recipe. Making your chili fit different diets is simple. For a gluten-free option, ensure your spices and broth are certified gluten-free. If you want a dairy-free version, replace heavy cream with coconut milk. This swap keeps the chili creamy while adding a hint of sweetness. For vegetarian or vegan adaptations, omit the chicken. Replace it with chickpeas or tofu for protein. This makes the dish hearty and satisfying for everyone. To store leftover chili, let it cool first. Place the chili in a container with a tight lid. Glass or plastic containers work best. Make sure to use the chili within three days for the best taste. To freeze the chili, pour it into freezer bags or containers. Remove as much air as possible. Label with the date. The chili stays good for up to three months in the freezer. For thawing, move it to the fridge overnight before reheating. The best way to reheat chili is on the stove over low heat. Stir often to keep it from sticking. You can also use a microwave. Heat in short bursts, stirring in between. This keeps the flavor and texture just right. Add a splash of cream if needed to refresh the taste. Yes, you can use frozen chicken. Just remember that it will change cooking time. When using frozen chicken, cook on high for 4-5 hours instead of 3-4 hours. This ensures the chicken cooks through. The texture might be a bit different. It may not shred as easily. Still, the chili will taste great. To add heat, use spices and peppers. You can add jalapeños or cayenne pepper for a kick. Start with a small amount, then taste and adjust. More chili powder can also help. If you want more flavor, try using spicy green chilies. This makes your chili unique and fun. If your chili is too thick, don’t worry! You can easily thin it out. Add more chicken broth, a little at a time. Stir well after each addition. If you want a creamier texture, add some extra heavy cream. You can also use water, but broth adds more flavor. This blog post walks you through making a delicious chili with chicken and beans. You learned about the key ingredients, spices, and steps to prepare it perfectly. You also discovered tips for flavor and serving suggestions, as well as variations for dietary needs. Always remember to store leftovers safely and how to reheat them properly. With these tips, you'll make a tasty meal every time. Enjoy your cooking adventures and don't hesitate to get creative!
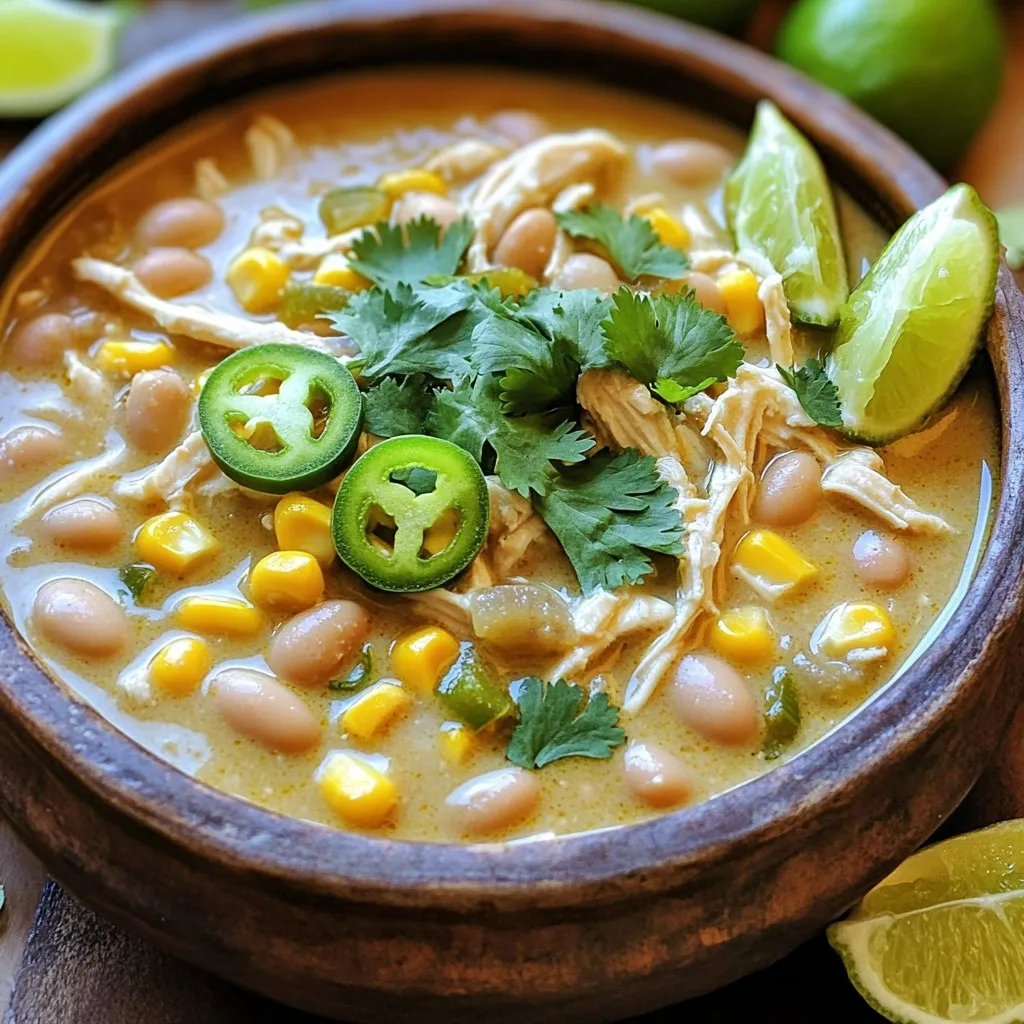
Slow Cooker White Chicken Chili Flavorful Comfort Meal
If you’re craving a warm, soothing meal, look no further than this Slow Cooker White Chicken Chili. Packed with tender chicken, creamy broth, and a