Dinner

To make a delicious Pizza Tater Tot Casserole, you need to gather some key ingredients. Here’s what you will need: - Frozen tater tots - Ground beef or turkey - Chopped onion - Diced bell pepper - Minced garlic - Pizza sauce - Seasonings (Italian, garlic powder, salt, pepper) - Shredded mozzarella and cheddar cheese - Sliced pepperoni - Fresh basil or parsley for garnish Each ingredient plays a role in making this dish tasty and fun. The frozen tater tots provide a crispy base. Ground beef or turkey adds protein and heartiness. Chopped onion, diced bell pepper, and minced garlic give a fresh flavor. The pizza sauce ties it all together with tomato goodness. Seasonings like Italian seasoning and garlic powder boost the taste. The mixture of mozzarella and cheddar cheese creates a melty top. Sliced pepperoni adds classic pizza flair. Finally, fresh basil or parsley gives a bright finish. These ingredients come together for a fun family dinner. You can find the complete details in the Full Recipe. - Preheat the oven to 425°F (220°C). - In a large skillet, cook the ground meat with the chopped onion, diced bell pepper, and minced garlic. Stir until the meat is brown and the vegetables are soft. Drain any excess fat. - Mix in the pizza sauce, Italian seasoning, garlic powder, salt, and pepper. Stir until well combined. - Spread the meat mixture evenly in a greased 9x13 inch baking dish. - Layer the frozen tater tots over the meat mixture, making sure to cover it completely. - Sprinkle the shredded mozzarella and cheddar cheeses on top of the tater tots. Add the sliced pepperoni evenly across the cheese. - Bake in the preheated oven for 25-30 minutes. Look for golden brown tater tots and bubbling cheese. - After baking, let the casserole cool for a few minutes. Garnish with fresh basil or parsley before serving. You can find the full recipe for this tasty dish elsewhere in the article. Enjoy your cooking! - How to ensure crispy tater tots: Start by baking the tater tots directly from the freezer. Do not thaw them. This helps them get crispy. Place them in a single layer on top of your casserole. This way, they cook evenly and get that perfect crunch. - Choosing the right ground meat: You can use ground beef or turkey. Ground beef gives a rich flavor. Turkey is a leaner choice. Both work well. Choose what fits your taste and health goals. - Importance of seasoning: Always season your meat. Use salt and pepper as a base. Italian seasoning adds depth. Garlic powder enhances the flavor. Good seasoning makes your dish stand out. - Best sides to serve with casserole: A simple green salad works great. It adds freshness to your meal. Garlic bread is another fun option. It complements the cheesy casserole well. - Ideal beverages to pair with Pizza Tater Tot Casserole: You can enjoy this dish with a fizzy soda. A light beer also pairs nicely. For a non-alcoholic choice, try sparkling water with lemon. - Adding more vegetables: You can sneak in more veggies. Try adding mushrooms, spinach, or zucchini. This adds flavor and nutrition. You can chop them finely and mix them into the meat. - Spicing it up with different toppings: Feel free to get creative! Add jalapeños for heat. Black olives can bring a nice briny flavor. Experiment with different cheese types, like pepper jack or gouda, for a twist. For the full recipe, check out the details above. Happy cooking! {{image_2}} You can make a tasty meatless version of this casserole. Just swap the ground beef or turkey for plant-based ground meat. This option keeps the dish hearty while being friendly for vegetarians. You can also use beans or lentils for a protein boost. They add texture and flavor, making your casserole filling and nutritious. For those avoiding gluten, choose gluten-free tater tots. Many brands offer delicious, crispy options that taste great. You can also find gluten-free pizza sauces to keep the flavors intact. This way, everyone can enjoy a slice of this dish without worry. Want to spice things up? Add jalapeños for a kick! They bring heat and flavor to the casserole. Alternatively, you can mix in BBQ sauce for a sweet and smoky twist. Both options create unique taste experiences that keep dinner exciting. You can easily switch up the toppings based on what your family enjoys. Let your creativity shine! To keep your Pizza Tater Tot Casserole fresh, place leftovers in an airtight container. Make sure to cool it to room temperature first. Store it in the fridge for up to four days. When you reheat it, use the oven to maintain that crispy texture. Set the temperature to 350°F (175°C) and heat for about 15 minutes. This method keeps the tater tots crunchy and the cheese gooey. If you want to save some for later, you can freeze the casserole. Allow it to cool completely, then wrap it tightly in plastic wrap. After that, cover it with foil for extra protection. This prevents freezer burn. You can freeze it for up to three months. To thaw, move it to the fridge overnight before reheating. For reheating, bake it at 350°F (175°C) for about 30 minutes. This will ensure it heats evenly. In the fridge, your casserole will last about four days. If you freeze it, it will stay good for about three months. After that, the quality may drop, but it should still be safe to eat. Always check for any off smells or changes in texture before eating leftovers. Enjoy every last bite of your tasty casserole! Yes, you can prepare this casserole ahead. Cook the meat and mix it with the sauce. Layer it in the baking dish without the tater tots and cheese. Cover it tightly and store it in the fridge for up to 24 hours. When ready to bake, add the tater tots and cheese on top. Bake as directed. For best results, reheat it slowly in the oven. This keeps the tater tots crispy and the cheese bubbly. You can use other bases for your casserole if you want. Some good options are frozen hash browns or even cooked pasta. For a healthier choice, try using roasted vegetables or sweet potato cubes. These alternatives bring new flavors and textures. They also can make your meal a bit lighter. Customization is fun with this casserole! You can change the cheese by mixing mozzarella, cheddar, or even pepper jack. For meats, you can add sausage, ham, or cooked chicken. Adding veggies like mushrooms, spinach, or olives gives vibrant flavors. Feel free to get creative with your toppings to suit your family’s taste! This blog post covered how to create a delicious Pizza Tater Tot Casserole. We went through the key ingredients, step-by-step preparation, and tips for perfecting each layer. You learned about variations and storage methods to keep your leftovers fresh. In the end, this recipe is fun and easy to make. It's perfect for family meals or gatherings. Enjoy creating your own take on this tasty dish!
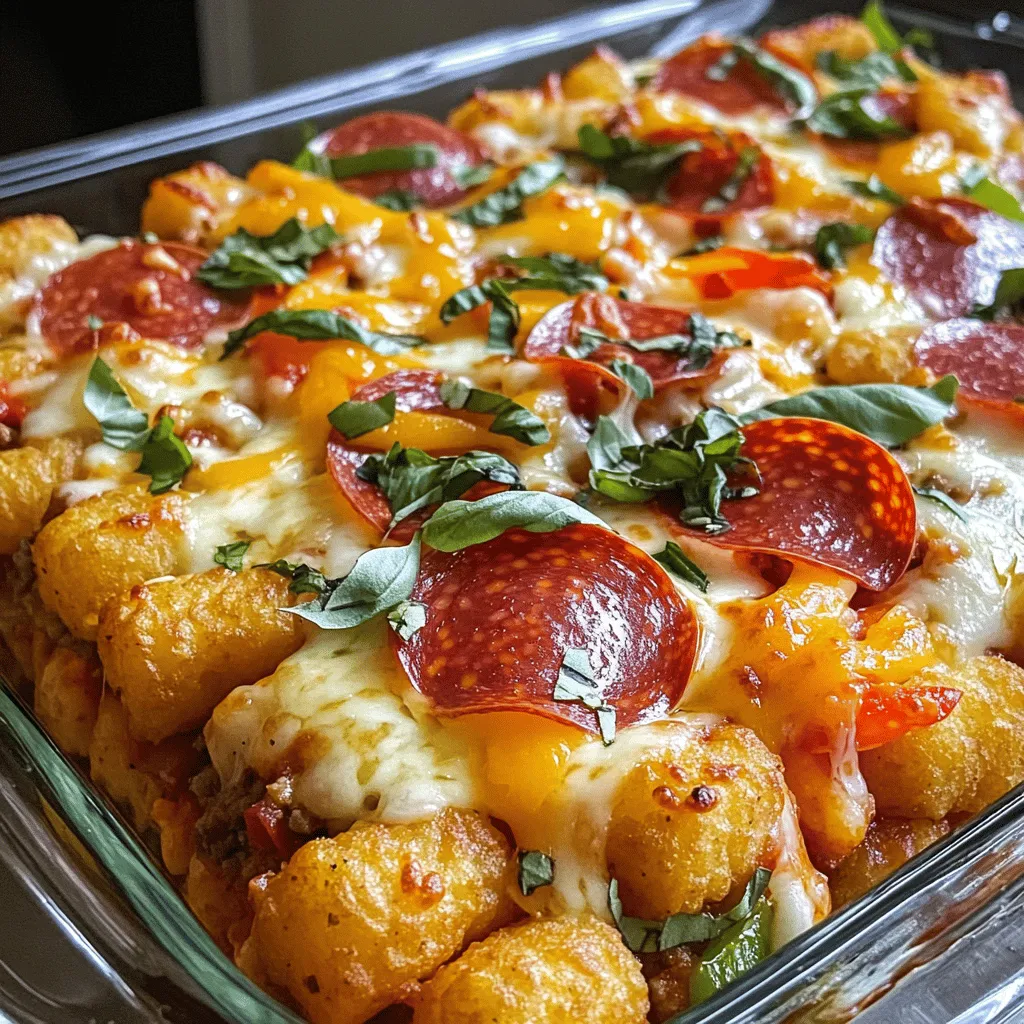
Pizza Tater Tot Casserole Tasty Family Dinner Option
Are you looking for a fun and easy dinner idea? Look no further! Pizza Tater Tot Casserole is a tasty twist that combines your favorite
- 1 lb large shrimp, peeled and deveined - 2 ripe avocados, diced - 1 cup quinoa, rinsed - 1 cup vegetable broth (or water) - 1 cup cherry tomatoes, halved - 1/2 cup red onion, finely chopped - 1 cup corn (fresh or frozen) - 1 lime, juiced - 2 tablespoons olive oil - 1 teaspoon cumin - 1 teaspoon smoked paprika - Salt and pepper to taste - Fresh cilantro, for garnish I love making shrimp and avocado bowls because they are fresh and tasty. The shrimp adds protein, while avocados give a creamy texture. You can use large shrimp for this recipe. They cook quickly and look great in the bowl. Quinoa is another star here. It is packed with nutrients. Rinsing it helps remove any bitter taste. The broth adds flavor and makes the quinoa even better. Cherry tomatoes and corn bring sweetness. The red onion adds a nice crunch. Lime juice brightens every bite. The spices, cumin and smoked paprika, give a warm kick. Fresh cilantro makes everything pop. It adds color and flavor. I always keep it on hand for garnishing. If you want the full recipe, check out Shrimp & Avocado Fiesta Bowls. Enjoy these healthy and colorful bowls! To start, combine the rinsed quinoa and vegetable broth in a medium saucepan. This mix adds flavor and makes the quinoa tasty. Bring it to a boil over medium heat. Once you see bubbles, reduce the heat to low. Cover the pot and let it simmer for about 15 minutes. When done, the quinoa will be fluffy and the liquid will be absorbed. Fluff it with a fork and set it aside. Next, heat olive oil in a large skillet over medium-high heat. Once the oil is hot, add the shrimp. You’ll want to season them with cumin, smoked paprika, salt, and pepper. Sauté the shrimp for about 3 to 5 minutes. They should turn pink and opaque when cooked through. Remove the skillet from heat to keep them juicy and tender. In a large bowl, combine the cooked quinoa, diced avocados, halved cherry tomatoes, corn, and finely chopped red onion. This mix gives the bowl a nice crunch and refreshing taste. Drizzle lime juice over the top. Gently toss everything together to mix well. Be careful not to mash the avocado, as you want its creaminess intact. Now it's time to put it all together. Divide the quinoa mixture evenly among four bowls. Top each bowl with a portion of the sautéed shrimp. This adds a beautiful contrast to the colorful veggies and grains. Finally, sprinkle fresh cilantro on top of each bowl. If you want, add an extra squeeze of lime juice for a burst of flavor. This final touch not only enhances the taste but also makes the dish look inviting and fresh. For the full recipe, check out Shrimp & Avocado Fiesta Bowls. - Avoid overcooking for best texture. Overcooked shrimp can turn rubbery. They only need 3-5 minutes in the pan. - Use fresh shrimp for enhanced flavor. Fresh shrimp offers a sweet, clean taste that frozen shrimp can't match. - Add additional spices or herbs to taste. Consider using garlic powder, chili flakes, or fresh herbs like parsley. - Experiment with different oils such as avocado oil. Oils can change the dish's taste and richness. Avocado oil adds a nice, buttery flavor. - Use colorful bowls and garnishes. Bright colors make your meal more enticing and fun to eat. A mix of greens, reds, and yellows looks great. - Serve with lime wedges for added zest. A squeeze of lime just before eating brightens the whole dish. It adds a fresh kick that complements the shrimp and avocado perfectly. {{image_2}} You can switch up the shrimp for chicken or tofu. Both options work well in this dish. Chicken adds heartiness, while tofu gives you a plant-based choice. If you want more flavor, grilled fish is another tasty option. It brings a nice smoky taste that pairs well with the fresh avocado. Not a fan of quinoa? Try brown rice or couscous instead. Both grains offer different textures and flavors. For a low-carb choice, use cauliflower rice. It’s light and keeps the dish fresh. You won’t miss the carbs when you load it with toppings. Dressings can change your bowl. A drizzle of garlic aioli can add richness. You could also mix in tropical fruits like mango or pineapple. These fruits bring sweetness and a fun twist. They balance the dish and make it more vibrant. For the full recipe, check out the details in the earlier sections. Keep your leftover shrimp and avocado bowls in an airtight container in the fridge. This helps lock in freshness. Consume them within 2-3 days for the best taste and quality. After this time, the flavors may fade, and the texture might change. If you want to store the meal longer, freeze the quinoa separately. This keeps it from getting mushy. Store the shrimp mixture in freezer-safe containers. Be sure to label them with the date. This way, you can enjoy the dish later without losing flavor. When ready to eat, thaw the frozen bowls overnight in the refrigerator. This slow thawing keeps the shrimp tender. Reheat gently on the stove or in the microwave. Avoid high heat; this prevents the shrimp from becoming rubbery. Enjoy your delicious shrimp and avocado bowls any time! For the full recipe, check out the detailed steps. Yes, you can. Just prepare each part first. Store them in separate containers. When it’s time to eat, simply assemble the bowls. This keeps everything fresh and tasty. If you’re not a fan of avocado, no worries! You can use hummus instead. A creamy dressing also works well. Both options add creaminess and flavor. Yes, it is! All the ingredients in this recipe are naturally gluten-free. Enjoy this dish without any gluten concerns. You can easily boost the veggie count. Add diced bell peppers or zucchini. Leafy greens like spinach or kale are great too. This adds nutrition and color to your meal. This recipe offers a tasty shrimp and avocado bowl packed with protein and flavor. We covered the main ingredients, step-by-step cooking, and ways to enhance your dish. Don’t hesitate to try different proteins or grains to mix things up. Storage tips help you keep leftovers fresh. Enjoy this simple, healthy meal that satisfies both hunger and taste. You can impress friends with your cooking skills while eating well.
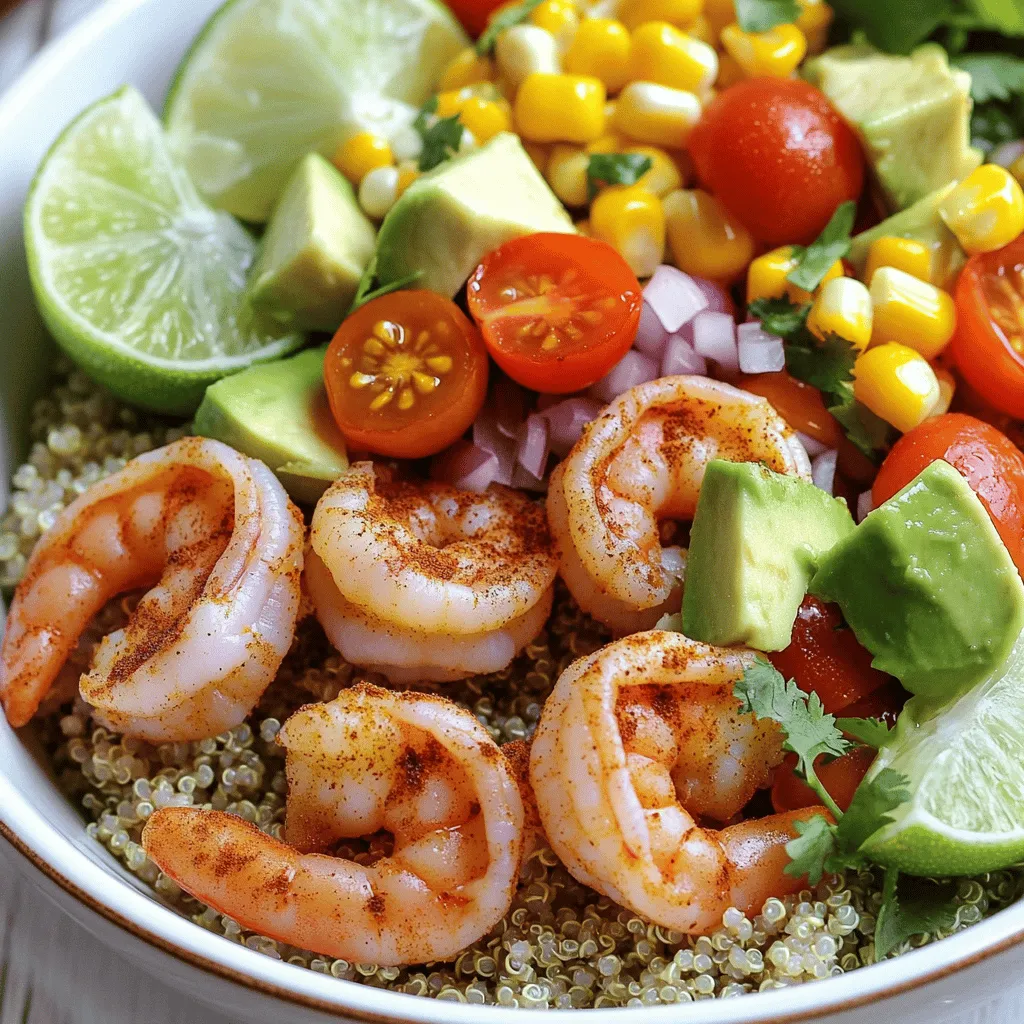
Shrimp and Avocado Bowls Flavorful Healthy Meal Idea
Looking for a healthy meal that’s packed with flavor? Try these Shrimp and Avocado Bowls! They combine juicy shrimp with creamy avocados and nutty quinoa.
- 2 cups fresh ricotta cheese - 1 cup grated Parmesan cheese - 1 large egg - 2 cups all-purpose flour - 1 teaspoon salt - Freshly cracked black pepper - 4 cups mixed heirloom tomatoes, diced - 3 cloves garlic, minced - 1 tablespoon olive oil - 1/4 cup fresh basil leaves, chopped To make delicious ravioli, it's key to choose the right ingredients. Start with fresh ricotta cheese for the filling. Its creamy texture gives a lovely mouthfeel. Mix it with grated Parmesan cheese for a sharp, nutty flavor. Add a large egg to bind everything together. For the dough, use all-purpose flour. It creates the perfect pasta texture. A teaspoon of salt enhances the flavor. Freshly cracked black pepper adds a hint of spice. Now, let’s talk about the sauce. Heirloom tomatoes bring sweetness and depth. Dicing them helps release their juices. Minced garlic adds warmth and richness. Olive oil helps blend the flavors. Lastly, fresh basil leaves add a burst of freshness. This combination of fresh ingredients shines through in every bite. If you want to dive deeper into making this dish, check the Full Recipe for more details. To make the ravioli dough, first, mix 2 cups of flour and 1 teaspoon of salt in a large bowl. Then, create a well in the center. Add 1 large egg into the well. Use a fork to mix the flour into the egg from the edges. Knead the dough for about 5 to 7 minutes until it feels smooth and elastic. Wrap the dough in plastic wrap and let it rest for 30 minutes. This rest time helps the dough become easier to roll out. For the filling, take a bowl and add 2 cups of fresh ricotta cheese, 1 cup of grated Parmesan cheese, 1 large egg, and a pinch of salt and pepper. Mix everything until the filling is smooth and creamy. This filling is rich and full of flavor, perfect for our ravioli. Once the dough has rested, divide it into four equal pieces. Roll out one piece on a floured surface until it is about 1/16 inch thick. Keep the other pieces covered to stop them from drying out. Place teaspoons of the filling about 2 inches apart on one sheet of pasta. Brush water around the filling to help seal it. Place another sheet of pasta on top and press it down to seal. Cut out the ravioli using a knife or pastry cutter. Repeat this process until all the dough and filling are used. To cook the ravioli, bring a large pot of salted water to a boil. Gently drop the ravioli into the water and cook for about 3 to 4 minutes, or until they float. Use a slotted spoon to remove them from the pot. Now, they are ready to be combined with the delicious sauce from the full recipe. - Use cold ingredients for the dough. Cold ingredients help the dough stay firm. - Don’t overfill the ravioli edges. If you fill them too much, they may burst while cooking. - Add herbs to the filling. Fresh herbs like basil or parsley boost the taste. - Use fresh tomatoes for the sauce. Fresh tomatoes give a bright, sweet flavor. - Test a ravioli for doneness before cooking the entire batch. This step helps you avoid overcooking. Just drop one in the water, and check if it floats in 3-4 minutes. If it does, your ravioli are ready! {{image_2}} You can change the filling for your ravioli. Here are two tasty options: - Spinach and ricotta: Mix fresh spinach leaves with ricotta cheese. This filling adds color and nutrition. - Mushroom and parmesan: Sauté mushrooms until soft. Then, mix them with parmesan cheese for a rich flavor. The sauce can also change your dish. Here are two great ideas: - Creamy Alfredo sauce: This sauce adds a rich and smooth taste. It pairs well with the cheese filling. - Pesto sauce instead of tomato: Try using pesto for a fresh, herby flavor. It gives a nice twist to the dish. How you serve your ravioli makes a big difference. Consider these ideas: - Top with grated cheese: A sprinkle of cheese adds extra flavor. Use parmesan or mozzarella for a nice touch. - Serve with a side salad: A fresh salad balances the meal. Greens with a simple vinaigrette work well. Explore these variations to make your ravioli truly your own! For the full recipe, check out the details above. You can keep uncooked ravioli in the fridge. Place them on a floured tray. Cover them with a clean kitchen towel. They stay fresh for up to two days. For best results, use them as soon as possible. For cooked ravioli, use airtight containers. This keeps them from drying out. You can store them in the fridge for about three days. Make sure to add a little olive oil to prevent sticking. If you want to save ravioli for later, freezing is great. Place uncooked ravioli on a baking sheet in a single layer. Freeze them for about one hour. Once frozen, transfer them to a freezer bag. This way, they can last for up to three months. To reheat frozen ravioli, boil them straight from the freezer. Cook for about five minutes, or until they float. You can also sauté them in your favorite sauce for added flavor. For the full recipe, check out the details above. The best way to cook fresh ravioli is by boiling. Start by filling a large pot with water. Add a good amount of salt to the water. Bring the water to a rolling boil. Once boiling, gently drop the ravioli in. Cook them for about 3-4 minutes. - Tip: Stir gently to prevent sticking. - Timing: Ravioli is done when it floats to the top. Yes, you can make ravioli dough ahead of time. After mixing your dough, wrap it tightly in plastic wrap. Store it in the fridge for up to two days. - Resting: It's important to let the dough rest. This helps the gluten relax. - Tip: Bring it back to room temperature before rolling. You can tell when ravioli is done by watching it float. Fresh ravioli will rise to the surface when it is cooked. - Floating technique: Once they float, give them another minute. - Cooking times: Typically, this takes about 3-4 minutes in boiling water. For a complete guide on how to make this delicious dish, check out the Full Recipe. Making homemade ravioli is a rewarding experience. You start with simple ingredients and end up with delicious pasta. From mixing the dough to preparing flavorful fillings, each step adds excitement. The tips on cooking and storing make sure you enjoy your ravioli longer. You can also try fun variations with different fillings and sauces. Enjoy your culinary journey, and share your tasty creations with friends and family! Homemade ravioli can be a hit at any meal.
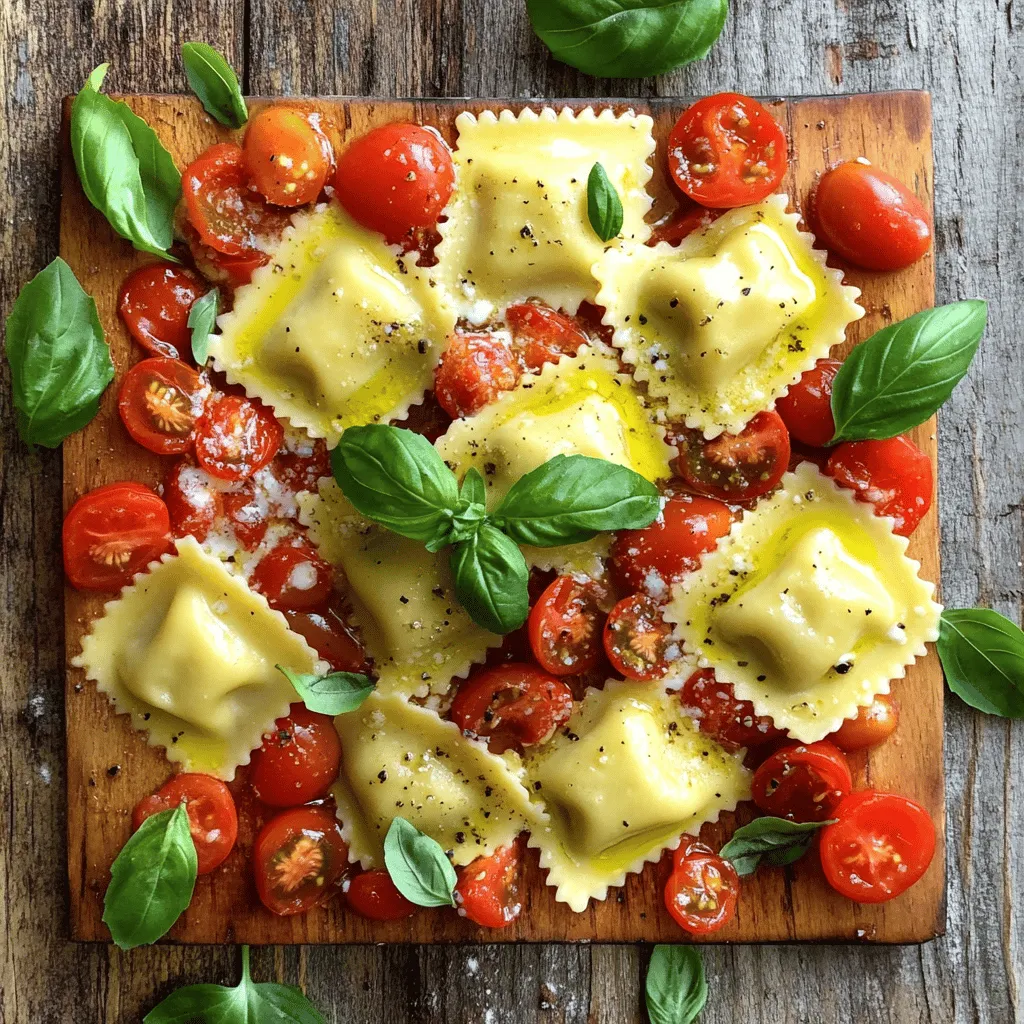
Delicious Ravioli with Fresh Tomatoes and Cheese Recipe
If you crave a tasty meal that’s both simple and satisfying, you’re in the right spot! In this “Delicious Ravioli with Fresh Tomatoes and Cheese”
To make Cheesy Ranch Potatoes with Sausage, you need some simple ingredients. Here’s the list: - 4 medium russet potatoes, diced into 1-inch cubes - 1 pound smoked sausage, sliced - 1 cup shredded cheddar cheese - 1 cup ranch dressing - 2 tablespoons olive oil - 1 teaspoon garlic powder - 1 teaspoon paprika - ½ teaspoon onion powder - Salt and pepper to taste - 2 green onions, chopped (for garnish) - Fresh parsley, chopped (for garnish) Each ingredient plays a role in creating the dish's rich flavor. The russet potatoes give a nice texture, while the sausage adds a savory kick. The cheddar cheese melts into gooey goodness, and the ranch dressing brings everything together with its creamy tang. Don't forget the spices! Garlic powder and paprika enhance the taste, while onion powder adds depth. The salt and pepper finish the flavor balance. Finally, the green onions and parsley add a fresh touch, making the dish look beautiful. {{ingredient_image_1}} Start by setting your oven to 400°F (200°C). This step is key to getting your potatoes crispy and golden. In a large bowl, combine 4 diced russet potatoes and 1 pound of sliced smoked sausage. I like to use turkey, chicken, or beef sausage. Next, drizzle 2 tablespoons of olive oil over the mixture. Add 1 teaspoon of garlic powder, 1 teaspoon of paprika, and ½ teaspoon of onion powder. Season with salt and pepper to taste. Toss everything together until well coated. Spread the potato and sausage mixture evenly on a large baking sheet. Make sure there is enough space for even cooking. Bake for 30 to 35 minutes. Stir halfway through to ensure even browning and tenderness. - Drizzle Ranch Dressing and Add Cheese Once the potatoes are tender and golden, take the baking sheet out of the oven. Drizzle 1 cup of ranch dressing over the hot mixture. Then, sprinkle 1 cup of shredded cheddar cheese on top. - Final Baking to Melt Cheese Return the baking sheet to the oven. Bake for an additional 5 to 7 minutes. This will melt the cheese and make it bubbly. - Garnish and Serve After baking, remove the sheet from the oven. Garnish with chopped green onions and fresh parsley for a touch of color. Serve hot and enjoy your cheesy ranch potatoes with sausage! Choose medium russet potatoes for this dish. They have a great texture. Russets are starchy and turn soft and fluffy when cooked. Look for potatoes that are firm and free from spots or blemishes. This ensures they will cook well and taste great. To boost the cheese flavor, use a blend of cheeses. Cheddar is fantastic, but you can mix in mozzarella or pepper jack for a twist. Try adding more cheese than the recipe calls for. It will make your dish extra gooey and delicious. To get even cooking, cut your potatoes into 1-inch cubes. Uniform size helps them cook at the same rate. Spread the mixture out on the baking sheet. Make sure the pieces do not touch. This allows hot air to flow around them. - How to Avoid Soggy Potatoes To keep potatoes crispy, don’t cover them while baking. Use a high oven temperature, around 400°F (200°C). Stir the mixture halfway through cooking to promote browning. The olive oil helps crisp the edges, so don’t skip it! Pro Tips Choose the Right Sausage: Opt for a smoked sausage that complements the flavors of ranch and cheese; turkey or chicken sausage can be a lighter alternative. Perfect Potato Preparation: Ensure your potato cubes are uniform in size for even cooking; dicing them into 1-inch cubes helps them cook through perfectly. Layering Flavors: For an extra kick, consider adding a sprinkle of red pepper flakes or your favorite hot sauce to the ranch dressing before drizzling it over the dish. Garnish Wisely: Fresh herbs like parsley or chives not only add color but also enhance the freshness of the dish; don’t skip this step! {{image_2}} You can easily make Cheesy Ranch Potatoes healthier. Swap smoked sausage with turkey sausage. Turkey sausage has less fat and fewer calories. You can also use low-fat ranch dressing. This gives you the same creamy taste without the extra calories. These small changes can help you enjoy this dish while keeping it lighter. Want to spice things up? Add some heat with cayenne pepper or diced jalapeños. Both will give your dish a nice kick. You can also mix up the cheese. Try pepper jack for a spicy twist, or mozzarella for a milder flavor. Each cheese brings a different taste to your Cheesy Ranch Potatoes. You can get creative with add-ins. Bell peppers, broccoli, or corn work well. Just chop them into small pieces and mix them in. They add color and nutrition. For toppings, consider crispy bacon bits or crushed tortilla chips for crunch. A sprinkle of smoked paprika can also enhance the flavor. Each addition makes the dish more fun and tasty. To keep your cheesy ranch potatoes with sausage fresh, place them in an airtight container. Let them cool before sealing. Store the container in the fridge. They will last for 3 to 4 days. When ready to eat your leftovers, preheat your oven to 350°F (175°C). Spread the potatoes and sausage on a baking sheet. Heat for about 15-20 minutes until warm. You can also use a microwave. Heat in a microwave-safe dish for 2-3 minutes. Stir halfway for even heating. If you want to freeze this dish, place it in a freezer-safe container. It will stay good for up to 3 months. To thaw, move the container to the fridge for a day before cooking. Reheat in the oven or microwave as mentioned above. Enjoy your cheesy delight even after freezing! Yes, you can make Cheesy Ranch Potatoes without sausage. Just skip the sausage and add more veggies. Try bell peppers or mushrooms for extra flavor. You can also add beans for protein. The ranch dressing and cheese will still make it delicious! If you need a ranch dressing substitute, use plain yogurt mixed with herbs. Combine yogurt with garlic powder, dill, and a splash of lemon juice. You can also use blue cheese dressing or Italian dressing. Each option adds a different taste, but will still be tasty. Baking time changes with potato size. If you use smaller cubes, check for doneness at 25 minutes. Larger cubes may need up to 40 minutes. Always poke a potato with a fork to see if it’s soft. Adjust as needed to ensure they cook through. Yes, you can prepare Cheesy Ranch Potatoes in advance. Cut the potatoes and sausage, and mix them with the seasoning. Store them in the fridge for up to a day. When ready, bake them as usual. Just remember to adjust the baking time if they are cold. In this article, we explored how to create delicious Cheesy Ranch Potatoes. We covered the key ingredients, simple step-by-step instructions, and helpful tips for perfect results. Plus, you learned about tasty variations and smart storage tips. These cheesy potatoes are easy to make and fun to share. Feel free to mix in your favorite ingredients. Enjoy this dish at your next gathering and impress your friends and family!
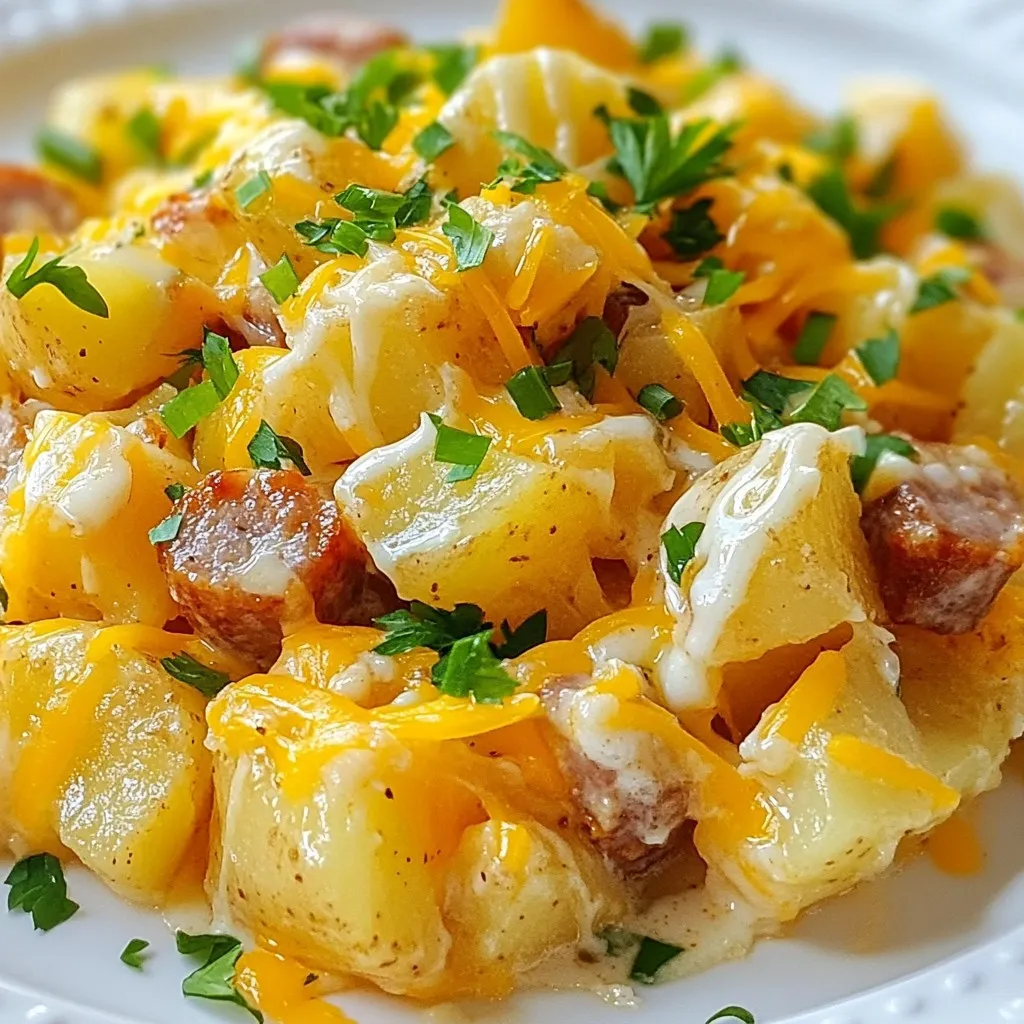
Cheesy Ranch Potatoes with Sausage Simple Delight
Craving a comforting dish that’s easy to make? Look no further! In this post, I’ll show you how to whip up Cheesy Ranch Potatoes with
- 1 lb ground beef or turkey - 1/2 cup breadcrumbs - 1/4 cup grated Parmesan cheese - 1 large egg - 1 cup barbecue sauce - 2 cups cooked rice To make these bowls, you need ground beef or turkey. This gives the meatballs their taste and texture. Breadcrumbs add fluffiness. Parmesan cheese gives a nice, salty flavor. You’ll also need a large egg to help bind the mixture. Barbecue sauce is key for that sweet, smoky taste. Finally, cooked rice acts as a bed for the meatballs. - 1 cup cherry tomatoes, halved - 1 large avocado, sliced - Fresh parsley, for garnish - Fresh cilantro, for garnish Toppings make your dish pop. Cherry tomatoes add sweetness and color. Sliced avocado gives creaminess. Sprinkle fresh parsley to brighten the dish. Lastly, cilantro adds a fresh taste. These toppings not only look great but also enhance the flavors of your meal. {{ingredient_image_2}} Set your oven to 400°F (200°C). Preheating is key for baking meatballs right. In a large bowl, add these ingredients: - 1 lb (450 g) ground beef or turkey - 1/2 cup (50 g) breadcrumbs - 1/4 cup (25 g) grated Parmesan cheese - 1 large egg - 2 tablespoons fresh parsley, finely chopped - 1 tablespoon garlic powder - 1 teaspoon onion powder - 1/2 teaspoon black pepper Mix these items well, but do it gently. Use your hands or a spatula. Too much mixing makes meatballs tough. Roll the mixture into 1-inch (2.5 cm) meatballs. Place them on a baking sheet lined with parchment paper. Keep some space between each ball. This helps them cook evenly. Now, bake the meatballs for about 20 minutes. They should be fully cooked and look golden-brown. To check, you can cut one open; it should be hot and not pink inside. Once done, take them out. Brush each meatball with barbecue sauce. Make sure they are well-coated. Put them back in the oven for 5-10 minutes. This will make the sauce sticky and delicious. To get the perfect meatball, mix the ingredients gently. Overmixing can make them tough. I combine ground meat, breadcrumbs, Parmesan, egg, parsley, garlic powder, onion powder, and black pepper in a bowl. Use your hands or a spatula for mixing. Just mix until everything is combined. This keeps your meatballs tender and juicy. For the best flavor, glaze the meatballs with barbecue sauce. Brush it on after the meatballs bake for about 20 minutes. This gives the sauce time to soak in. Return the meatballs to the oven for 5 to 10 more minutes. This extra time allows the sauce to caramelize, creating a sticky, delicious glaze. Make your Barbecue Meatball Bowls eye-catching. After placing rice in the bowl, add the meatballs on top. Arrange halved cherry tomatoes and avocado slices around the meatballs for color. A sprinkle of fresh cilantro adds flair. Drizzle extra barbecue sauce over the top for shine. Using colorful bowls can make your meal look even more appealing. Enjoy the vibrant presentation! Pro Tips Choose the Right Meat: Using ground turkey makes for a leaner option, while ground beef provides more flavor and richness. Select based on your dietary preferences! Don’t Overmix: Mix the meatball ingredients just until combined. Overmixing can lead to dense, tough meatballs. Aim for a gentle touch! Experiment with Sauces: Feel free to try different barbecue sauces or even homemade versions to customize the flavor of your meatballs. A spicy sauce can add a nice kick! Garnish for Freshness: Adding fresh herbs like cilantro not only enhances the visual appeal but also elevates the dish's flavor profile. Don’t skip this step! {{image_4}} You can switch up the meat in your barbecue meatball bowls. Ground turkey works well if you want a leaner option. If you prefer a plant-based meal, try using lentils or chickpeas. Both options offer great flavor and texture. Just mash them well and mix in the same ingredients. This way, you still get tasty meatballs that fit your diet. If you're watching carbs, consider using cauliflower rice instead of regular rice. Cauliflower rice is a great alternative. It adds texture without the carbs. You can find it pre-made in stores or make your own by grating cauliflower. Just steam it lightly before adding to your bowl. This keeps it tender and flavorful. To make your barbecue meatball bowls pop, add more veggies or spices. You can toss in finely chopped bell peppers or zucchini for added nutrition. Spices like smoked paprika or cayenne pepper can give your dish extra zing. Feel free to experiment and find your favorite combination. The more colorful your bowl, the more fun it is to eat! To store leftovers, let them cool first. Then, place the meatball bowls in airtight containers. Make sure to separate rice and toppings if you want them fresh. You can keep them in the fridge for up to three days. When ready to eat, reheat in the microwave or oven until warm. To freeze, let the meatball bowls cool completely. Then, wrap them tightly in plastic wrap or place them in freezer bags. Label them with the date. You can freeze the bowls for up to three months. To reheat, thaw in the fridge overnight. Then, warm in the oven or microwave until hot throughout. This way, you enjoy a tasty meal later! To check if meatballs are done, use a meat thermometer. The inside should reach 165°F (74°C). If you don't have a thermometer, cut one in half. The meat should be brown, not pink. The juices should run clear. This ensures they are safe to eat and juicy. Yes, you can use homemade barbecue sauce. Making your own allows you to control flavors. Use your favorite spices and sweeteners. A mix of ketchup, brown sugar, and vinegar works well. Just ensure it's thick enough to coat the meatballs. This adds a personal touch to your dish. You can serve several tasty sides with your meatball bowls. Here are some ideas: - Coleslaw for crunch and creaminess - Grilled corn for a sweet touch - Garlic bread for a savory option - Steamed broccoli for a healthy balance - A fresh green salad for extra veggies Feel free to mix and match! This blog post shared a simple and tasty recipe for barbecue meatball bowls. We covered the key ingredients, from meat and breadcrumbs to fresh toppings. Step-by-step instructions made cooking easy, and tips helped improve texture and flavor. We explored variations, like different proteins and rice alternatives. Lastly, storage info provided ways to keep leftovers fresh. In closing, trying this recipe can bring fun and flavor to your meals. Happy cooking!
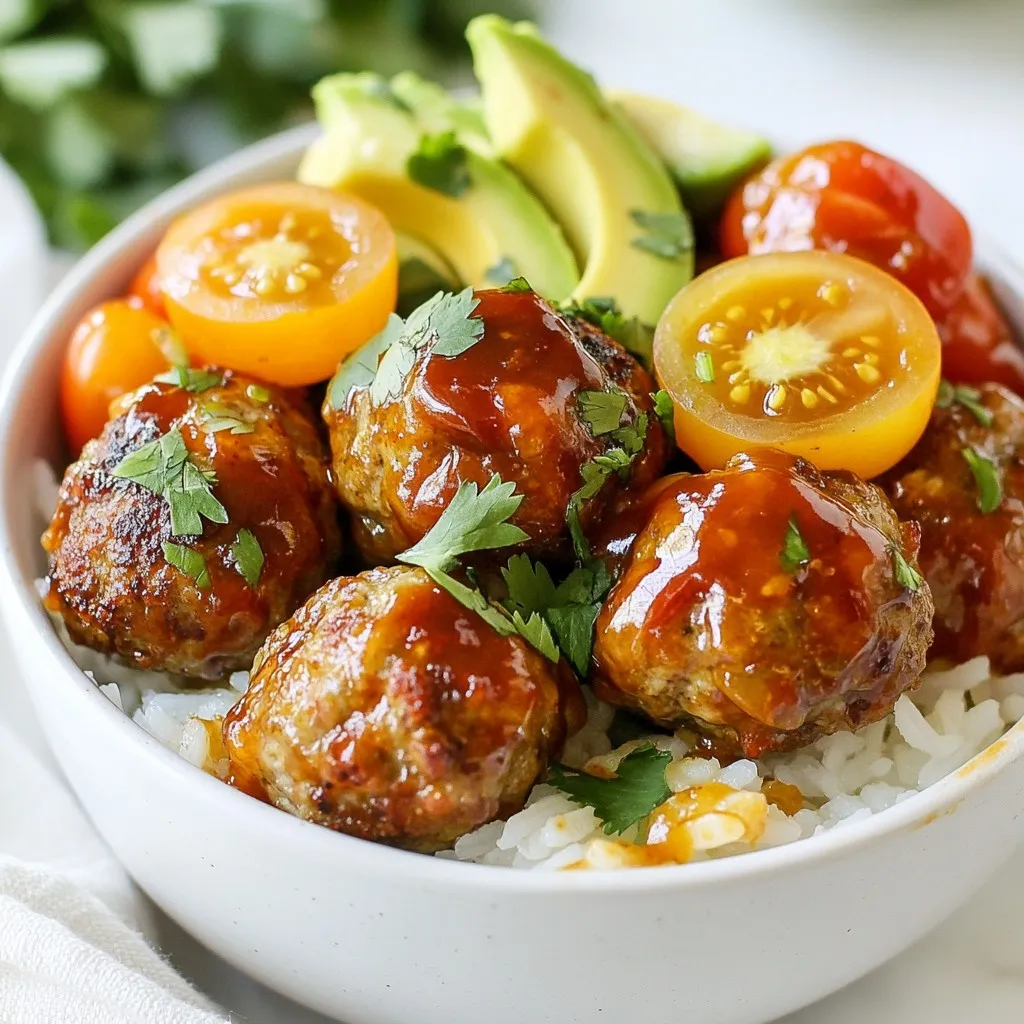
Barbecue Meatball Bowls Savory and Satisfying Meal
Craving a dish that’s both hearty and delicious? Barbecue Meatball Bowls are the answer! Packed with juicy meatballs, savory barbecue sauce, and fresh toppings, this
- 2 lbs boneless, skinless chicken thighs - 1 cup pineapple chunks (fresh or canned) - 1 cup diced bell peppers (use red and orange for vibrant color) - 1/2 cup red onion, diced - 1/4 cup low-sodium soy sauce - 1/4 cup honey - 2 tablespoons apple cider vinegar - 1 tablespoon garlic, minced - 1 teaspoon ginger, minced - Salt and pepper to taste - 2 green onions, sliced (for garnish) - Cooked jasmine rice (for serving) To make Sweet Hawaiian Crockpot Chicken, gather these ingredients first. The chicken thighs form the base of the dish. They stay juicy and tender during cooking. Pineapple adds sweetness, while bell peppers bring color and crunch. Red onion adds a mild flavor that complements the dish well. The sauce is simple but packed with flavor. Low-sodium soy sauce gives it a rich, umami taste. Honey balances the saltiness with its sweetness. Apple cider vinegar adds a nice tang. Garlic and ginger enhance the dish with warmth and depth. Don't forget to season with salt and pepper. You can garnish the final dish with green onions for a pop of color. Serve it over fluffy jasmine rice. Enjoy the tropical flavors! {{ingredient_image_2}} - Seasoning the Chicken: Start with 2 lbs of boneless, skinless chicken thighs. Place them in the bottom of your crockpot. Lightly sprinkle salt and pepper on top. This will bring out the chicken's flavor. - Placing in the Crockpot: Make sure the chicken is evenly spread out. This helps it cook well. You want each piece to soak up the sauce later. - Mixing Ingredients: In a mixing bowl, add 1 cup of pineapple chunks, 1 cup of diced bell peppers, and 1/2 cup of red onion. Then, pour in 1/4 cup of low-sodium soy sauce, 1/4 cup of honey, 2 tablespoons of apple cider vinegar, 1 tablespoon of minced garlic, and 1 teaspoon of minced ginger. Stir everything together. Ensure all the ingredients blend well. - Pouring Over Chicken: Once mixed, carefully pour the colorful sauce over the seasoned chicken in the crockpot. Make sure the chicken is well coated. This will help it absorb all the great flavors. - Selecting Cooking Time: Cover the crockpot with its lid. Set it to cook on low for 6-7 hours or on high for 3-4 hours. The longer it cooks, the more tender the chicken will be. - Shredding Chicken After Cooking: When the cooking time is up, use two forks to shred the chicken right in the crockpot. Mix it back into the sauce and veggies. This helps the flavors mix evenly. If you want a thicker sauce, cook uncovered on high for 30 more minutes. How to Ensure Tender Chicken To get tender chicken, choose boneless, skinless chicken thighs. These will stay juicy and flavorful. Season them lightly with salt and pepper before placing them in the crockpot. Cooking on low for 6 to 7 hours gives the chicken time to break down. If you're short on time, the high setting for 3 to 4 hours works too. Always shred the chicken in the crockpot. This helps mix it with the sauce and keeps it moist. Achieving the Right Sauce Consistency For a thick sauce, check the consistency before serving. If the sauce is too thin, cook on high with the lid off for 30 minutes. This helps reduce the liquid. Stir the sauce well after shredding the chicken. You can also adjust the flavors by adding more honey for sweetness or soy sauce for saltiness. Best Accompaniments Serve your sweet Hawaiian chicken over fluffy jasmine rice. The rice soaks up the sauce, making each bite delicious. You can also pair it with a fresh salad or steamed veggies for added crunch. For a tropical twist, try adding slices of fresh pineapple on the side. Presentation Ideas For a beautiful presentation, use individual bowls. Spoon the chicken and sauce over the rice. Garnish with sliced green onions for color. You can also add a wedge of pineapple on the side. This makes the dish look inviting and fun! Pro Tips Use Fresh Ingredients: Whenever possible, use fresh pineapple and bell peppers for better flavor and texture in your dish. Adjust Sweetness: Depending on your preference, you can modify the amount of honey to make the dish sweeter or less sweet. Marinate for More Flavor: For an even more flavorful dish, marinate the chicken in the sauce for a few hours before cooking. Serve with Variety: Try serving the chicken with a side of steamed broccoli or snap peas for added color and nutrition. {{image_4}} Enhancing Flavor with Spices You can add spices to boost flavor. Try adding a teaspoon of smoked paprika for a subtle smokiness. A pinch of red pepper flakes can add heat if you like spice. Fresh herbs, like cilantro or basil, also add a bright touch. Alternative Vegetables Feel free to swap out the bell peppers. Zucchini or snap peas work great too. Carrots add a sweet crunch and color. You can even use frozen mixed veggies to save time. Instant Pot Version If you want a faster meal, use the Instant Pot. First, season your chicken and add it to the pot. Layer the sauce and veggies on top. Secure the lid and cook on high pressure for 10 minutes. Let it naturally release for 5 minutes, then shred the chicken. Stovetop Quick Method For a stovetop option, heat a large pan over medium heat. Add the seasoned chicken and brown it on both sides. Then add the sauce and veggies. Cover the pan and simmer for about 20 minutes. Shred the chicken when it’s tender. Refrigeration Guidelines After you enjoy your sweet Hawaiian crockpot chicken, store leftovers in the fridge. Use an airtight container to keep it fresh. The chicken can stay good for up to four days. Make sure it cools down before sealing it. This helps keep moisture in and prevents spoilage. Freezing Tips If you want to save it for later, freezing is a great option. Place the chicken in a freezer-safe bag or container. Remove as much air as you can to avoid freezer burn. You can freeze it for up to three months. When you’re ready to eat, thaw it in the fridge overnight for best results. Best Methods for Reheating To reheat your sweet Hawaiian chicken, the best method is using the stovetop. Place it in a pan over medium heat. Stir occasionally until it’s heated through. You can also use the microwave. Just cover it with a lid or microwave-safe wrap. Heat in short bursts, stirring in between to ensure even warming. Maintaining Flavor and Texture To keep the flavor and texture, avoid overheating. If you notice it’s drying out, add a splash of water or soy sauce. This helps to keep it juicy and full of flavor. Enjoy it over fresh jasmine rice again for a tasty meal! Can I use chicken breasts instead of thighs? Yes, you can use chicken breasts. They will cook well in the crockpot. However, chicken thighs are juicier and more flavorful. If you prefer breasts, keep an eye on cooking time. They may cook faster than thighs. How to make the dish gluten-free? To make this dish gluten-free, swap the soy sauce for a gluten-free version. Look for brands made with tamari or coconut aminos. These options taste great and keep the dish safe for gluten-free diets. What can I substitute for soy sauce? If you want to avoid soy sauce, use tamari or coconut aminos. Both add a similar salty flavor. Another option is to mix broth with some vinegar. This will give a nice taste without using soy. What is the best cooking time for frozen chicken? If using frozen chicken, cook on high for 5-6 hours. When cooking on low, aim for 8-9 hours. Check that the chicken reaches 165°F for safety. Can I cook on high for a shorter time? Yes, you can cook on high for 3-4 hours. This will still give you tender chicken. Just be sure to monitor it closely so it doesn’t overcook. This blog post covered everything you need to make a tasty chicken dish. We discussed key ingredients like chicken and vegetables. You learned how to prepare and cook everything in a crockpot. The tips and tricks help you ensure tender chicken and the best sauce. Plus, we shared variations to mix things up and ways to store leftovers. Remember, cooking can be easy and fun. With these steps, you can enjoy a delicious meal any time. Ready to try it yourself? Your kitchen adventure starts now!
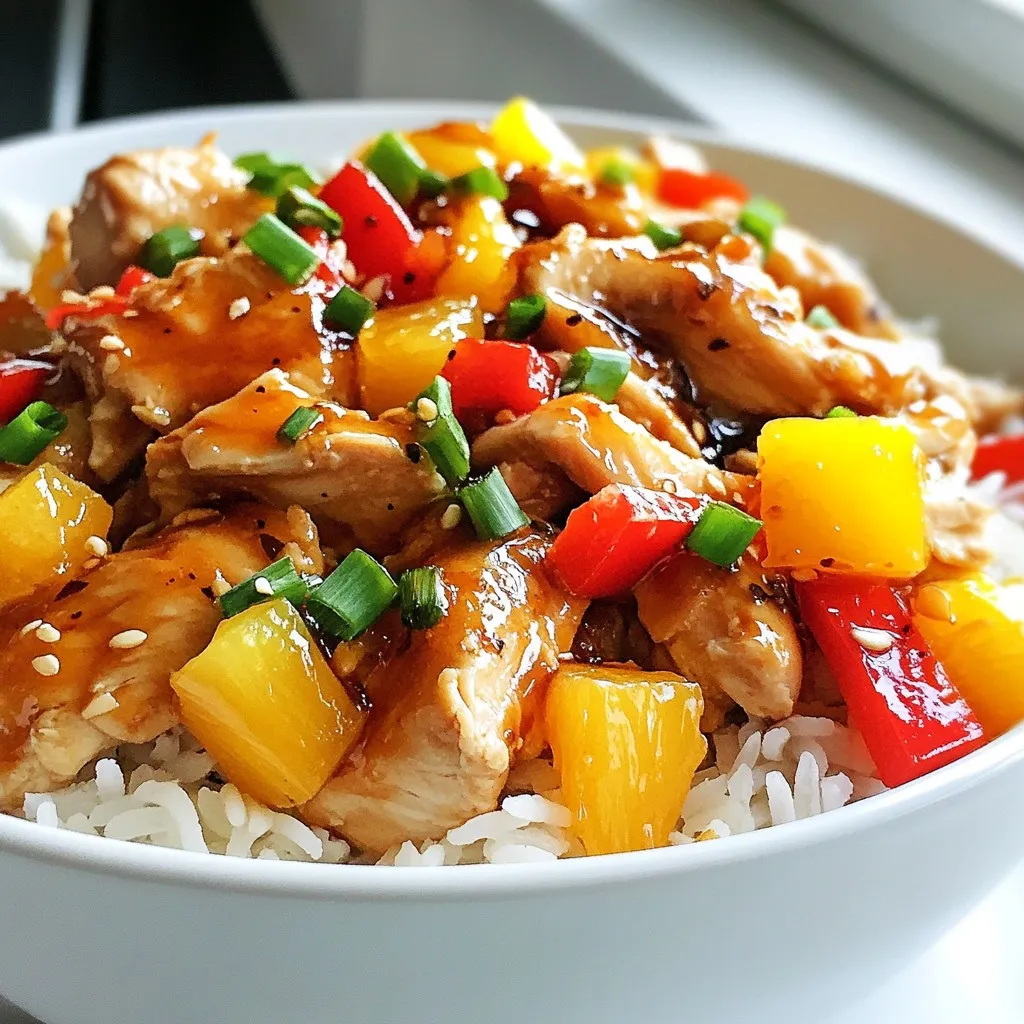
Sweet Hawaiian Crockpot Chicken Easy and Tasty Meal
Looking for an easy and tasty meal? Sweet Hawaiian Crockpot Chicken is your answer! This dish combines tender chicken with vibrant vegetables and a sweet,
To make Sweet and Spicy Steak Pasta, gather these items: - 8 oz fettuccine pasta - 1 lb flank steak, thinly sliced against the grain - 2 tablespoons soy sauce - 2 tablespoons honey - 1 tablespoon sriracha (or more, depending on spice preference) - 1 teaspoon garlic powder - 1 teaspoon ground ginger - 1 red bell pepper, thinly sliced - 1 cup snap peas, trimmed - 3 green onions, finely chopped - 2 tablespoons olive oil - Salt and freshly ground black pepper, to taste - Fresh cilantro leaves, for garnish The key to the sweet and spicy taste lies in these ingredients: - Soy sauce: Adds saltiness and umami. - Honey: Gives sweetness and smoothness. - Sriracha: Brings heat and kick. - Garlic powder and ground ginger: Infuse depth and warmth in every bite. These elements create a balance that excites your taste buds. You can easily swap some ingredients based on what you have: - Pasta: Use any pasta shape you like, such as penne or spaghetti. - Flank steak: Try chicken or shrimp for a different protein. - Honey: Agave syrup or maple syrup can work as alternatives. - Sriracha: Use chili paste or hot sauce for heat. - Vegetables: Broccoli or zucchini can replace bell peppers and snap peas. These changes keep the dish fresh and fun, letting you play with flavors. {{ingredient_image_2}} Start by boiling water in a large pot. Add salt to the water once it boils. This adds flavor to the pasta. Then, add the fettuccine. Cook it based on the package instructions, usually around 8-10 minutes. Once it’s al dente, drain the pasta in a colander. Remember to save about 1 cup of that pasta water for later. Set the drained pasta aside while you prepare the other ingredients. Grab a medium mixing bowl for the marinade. Combine the sliced flank steak with soy sauce, honey, sriracha, garlic powder, and ground ginger. Mix everything well. Make sure each piece of steak is coated evenly. Cover the bowl and let it sit in the fridge. Allow it to marinate for at least 15 minutes. This step is key to bringing out those sweet and spicy flavors. Heat olive oil in a large skillet over medium-high heat. Wait until the oil shimmers before adding the marinated flank steak. Spread the steak out in a single layer. Cook it for 5-7 minutes. Stir occasionally to get an even cook. The steak should be nicely browned when done. Once it’s ready, move the steak to a plate and cover it with foil to keep it warm. In the same skillet, add the sliced red bell pepper and snap peas. Sauté them for 3-4 minutes. You want them vibrant and tender but still crisp. Lower the heat to medium now. Add the cooked fettuccine to the skillet along with the veggies. Gradually pour in some of that reserved pasta water. Mix it well to find your preferred sauce consistency. Start with half a cup and adjust as needed. Return the cooked flank steak to the skillet. Toss everything gently to blend the flavors. Season with salt and freshly ground black pepper to taste. Once done, remove the skillet from heat. Transfer the pasta to a serving dish or shallow bowls. Sprinkle with chopped green onions. Finish with fresh cilantro leaves for a colorful and delicious touch. Enjoy your meal! To get juicy, tender steak, start by choosing flank steak. It cooks quickly and is easy to slice. Slice the steak against the grain. This helps keep it tender. Marinate the steak for at least 15 minutes. A longer marinating time adds more flavor. Cook it in a hot skillet. This gives a nice sear. Avoid overcooking; aim for medium-rare. This keeps the steak juicy. A good marinade makes your steak pop. Combine soy sauce, honey, sriracha, garlic powder, and ground ginger. Each ingredient adds a unique taste. The soy sauce gives umami flavor. Honey brings a sweet touch. Sriracha adds a spicy kick. Garlic powder and ginger add warmth. Mix these well, and coat the steak evenly. Let it sit in the fridge. This allows the flavors to soak in. For perfect pasta, start with a big pot of boiling salted water. Add the fettuccine and cook until al dente. This usually takes about 8 to 10 minutes. Stir it often to prevent sticking. Reserve some pasta water before draining. This starchy water helps make the sauce creamy. Drain the pasta, but don’t rinse it. Rinsing removes the starch that helps sauce cling to the noodles. Pro Tips Marinate Longer for More Flavor: If time allows, marinate the steak for at least 30 minutes or even overnight. This will enhance the flavors and tenderness of the meat. Use Fresh Ingredients: Opt for fresh vegetables and high-quality flank steak for the best taste. Fresh produce will add vibrant color and flavor to the dish. Adjust Spice Levels: Feel free to tweak the amount of sriracha to suit your heat preference. You can also add red pepper flakes for additional spice. Reserve More Pasta Water: Keep extra pasta water on hand as you mix the pasta and sauce. It helps to create a silky texture for the sauce. {{image_4}} You can easily swap the flank steak for chicken or shrimp. For chicken, use thinly sliced breasts or thighs. Marinate them the same way as the steak. Cook them for about 5-6 minutes in the skillet until they are fully cooked. If you prefer shrimp, use about 1 pound of large shrimp. Cook them for about 3-4 minutes until they turn pink. Both options keep the dish flavorful and satisfying. For a vegetarian twist, replace the steak with tofu. Use firm tofu, cut into cubes. Press the tofu to remove excess moisture first. Then marinate it in the same sauce for about 30 minutes. Cook the tofu in the skillet until golden brown. You can also add more veggies, like broccoli or carrots, to boost nutrients. This makes the dish colorful and healthy, while still being tasty. Adjust the heat to suit your taste. If you want a milder dish, cut back on the sriracha. You can also add sweet bell peppers, which balance the spice. If you love heat, increase the sriracha or add red pepper flakes. This way, you can customize the flavor and make it just right for you. To store leftovers, let the pasta cool to room temperature. Place it in an airtight container. Make sure to store the steak and vegetables with the pasta. This way, they keep their flavor. You can keep the leftovers in the fridge for up to three days. If you plan to eat them later, store them right away. When you're ready to eat, you can reheat the pasta easily. Use a microwave-safe bowl. Add a splash of water to keep it moist. Heat it in short bursts, stirring in between. This helps it warm evenly. You can also use a skillet on low heat. Add a bit of olive oil or butter for extra flavor. If you want to freeze this dish, it's best to do it before adding fresh toppings. Divide the pasta into meal-sized portions. Use freezer-safe bags or containers. Remove as much air as possible to avoid freezer burn. You can freeze it for up to three months. When you are ready, thaw it overnight in the fridge. Reheat it as mentioned above for a quick meal. It takes about 30 minutes to cook Sweet and Spicy Steak Pasta. You spend 15 minutes prepping the ingredients and marinating the steak. Then, you cook the pasta and steak in about 15 minutes. This dish is quick and perfect for a weeknight meal. Yes, you can prepare parts of this dish ahead of time. You can marinate the steak up to 24 hours in advance. Cook the pasta and veggies just before serving. This way, you keep the flavors fresh and vibrant. You can serve Sweet and Spicy Steak Pasta with a simple side salad. A fresh green salad with a light vinaigrette works great. You can also add garlic bread for a filling meal. For drinks, consider iced tea or a light red wine. This article covered how to make delicious sweet and spicy steak pasta. We explored essential ingredients and substitutions for taste. You learned step-by-step cooking instructions, including tips for the perfect steak. We discussed variations for proteins and veggie options too. Finally, we went over storage and reheating tips. Remember, cooking can be fun and creative. Enjoy making this dish your own!
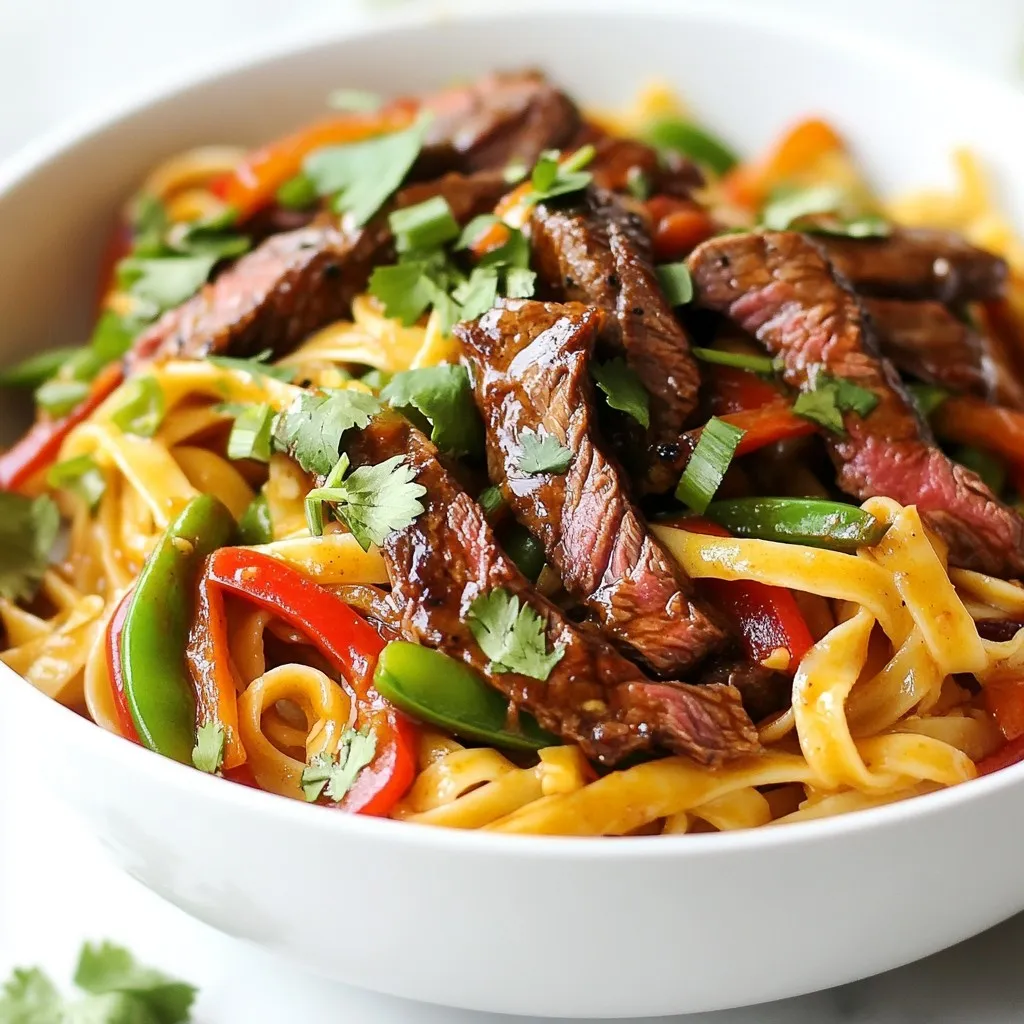
Sweet and Spicy Steak Pasta Easy Weeknight Meal
Looking for a quick and tasty dinner idea? You’ve come to the right place! In this post, I’ll show you how to make Sweet and
To make the best creamy baked mac & cheese, you need a few key ingredients: - 8 oz elbow macaroni - 2 cups sharp cheddar cheese, shredded - 1 cup mozzarella cheese, shredded - 1/2 cup cream cheese, softened - 2 cups whole milk These ingredients create a rich and cheesy flavor. The elbow macaroni holds the cheese sauce well. The blend of sharp cheddar and mozzarella adds depth. Cream cheese brings extra creaminess, while whole milk gives a smooth base. If you want to make your mac & cheese even better, consider these optional ingredients: - 1/2 cup breadcrumbs for crunch - Fresh herbs like parsley for garnish - Additional cheese types, like gouda or parmesan Breadcrumbs add a delightful crispy top. Fresh herbs bring color and a fresh taste. Different cheeses can change the flavor profile, making it unique. Feel free to mix and match to find your favorite combination! {{ingredient_image_2}} To start, bring a large pot of salted water to a boil. Add 8 oz of elbow macaroni to the water. Cook it until it's al dente, which means it should still have a little bite. This usually takes around 8-10 minutes. Once it’s done, drain the pasta and set it aside. This step is key for great texture. Now, let’s create a rich cheese sauce. First, melt 1/4 cup of unsalted butter in a large saucepan over medium heat. Once it’s melted, add 1/4 cup of all-purpose flour. Whisk it together for about 1-2 minutes. You want a smooth roux. Next, slowly pour in 2 cups of whole milk while whisking. Keep stirring until the mixture thickens, about 5-7 minutes. Then, lower the heat to medium-low and add 1/2 cup of softened cream cheese. Stir until the cream cheese melts and blends in. For flavor, mix in 1 teaspoon of garlic powder, 1 teaspoon of onion powder, and 1/2 teaspoon of smoked paprika. Don’t forget to add salt and fresh ground pepper to taste. Next, we’ll melt the cheese into our sauce. Gradually add 2 cups of shredded sharp cheddar and 1 cup of shredded mozzarella cheese. Keep stirring until the cheese melts, making a creamy sauce. Now, it's time to bring everything together. Gently fold in the cooked elbow macaroni. Mix until the pasta is fully coated in the cheese sauce. Transfer the mac and cheese mixture into a greased 9x13 inch baking dish. Spread it evenly. For a crispy topping, sprinkle 1/2 cup of breadcrumbs across the top. This will create a nice crunch. Now, place the dish in a preheated oven at 350°F (175°C). Bake for 20-25 minutes, or until the top is golden brown and bubbling. Enjoy the aroma filling your kitchen! For the best creamy mac and cheese, heat matters. Warm cheese melts better. Cold cheese does not blend well. When you mix cheese into your sauce, make sure it's warm. This helps it melt smoothly. Using a variety of cheeses adds depth. I love mixing sharp cheddar and mozzarella. The cheddar gives a rich flavor. The mozzarella adds stretch and creaminess. You can also try gouda or fontina for a twist. To know if your mac and cheese is done, look for bubbling edges. The top should be golden brown. If it is too pale, give it a few extra minutes. Every oven heats differently, so check it often. If your oven runs hot or cold, adjust the bake time. You may need less or more time based on your oven. If you find it browning too fast, cover it with foil until cooked through. For a pretty plate, serve the mac and cheese in ramekins. This makes each serving look special. You can also sprinkle extra parsley on top for color. Pair it with a crisp side salad. The freshness of the salad complements the richness of the dish. Consider adding some sliced tomatoes or cucumbers for a nice crunch. Pro Tips Use a Mix of Cheeses: Combining different cheeses like sharp cheddar and mozzarella enhances the flavor and texture, creating a creamier and more complex cheese sauce. Don’t Overcook the Pasta: Cook the macaroni until just al dente, as it will continue to cook during baking. This prevents the pasta from becoming mushy. Customize Your Toppings: Feel free to add your favorite toppings like crumbled bacon, diced tomatoes, or different herbs for added flavor and texture. Let It Rest: Allow the baked mac and cheese to cool for a few minutes before serving. This helps the dish set and makes it easier to serve. {{image_4}} You can easily make this dish to fit your needs. If you’re gluten-free, try using gluten-free pasta. Many brands make great options that work well. For a vegan version, switch to plant-based cheese. Brands like Daiya or Violife melt nicely and keep the creaminess. Want to add more flavor? Try adding cooked bacon or sausage. They bring a savory kick that pairs well with the cheese. You can also include vegetables like broccoli or spinach. This adds a nice touch of color and nutrition to your meal. Toppings can change the whole dish. Instead of traditional breadcrumbs, try panko for extra crunch. You can also use crushed chips or nuts. They give a fun texture that makes each bite exciting. To store leftovers properly, let the mac and cheese cool first. Use an airtight container to keep it fresh. This way, it stays tasty for up to three days in the fridge. Glass or plastic containers work well for storage. When reheating, keep the creaminess intact. You can use the microwave or oven. For the microwave, place a portion on a plate and add a splash of milk. Heat on medium power for one to two minutes. Stir halfway through to mix the heat. If you use the oven, preheat it to 350°F (175°C). Place the mac and cheese in a baking dish, cover it with foil, and heat for about 15-20 minutes. This method helps keep the dish creamy. To freeze baked mac and cheese, let it cool completely. Transfer it to a freezer-safe container. You can also wrap it tightly in plastic wrap, then foil. This method helps keep the flavor and texture. To thaw, move it to the fridge the night before. Bake it straight from the freezer, adding a few extra minutes to the baking time. The best cheese for mac and cheese is a blend of sharp cheddar and mozzarella. Sharp cheddar gives a strong flavor, while mozzarella adds creaminess. You can also try gouda or parmesan for a unique taste. Mixing several cheeses creates a rich and tasty sauce. Experiment with cheese combinations to find your favorite mix. Yes, you can make mac and cheese ahead of time. Prepare the dish as usual but stop before baking. Cover it tightly with plastic wrap and store it in the fridge. When ready to bake, remove the wrap and bake it straight from the fridge. You may need to add a few extra minutes to the bake time. This method lets you enjoy homemade mac and cheese without all the last-minute work. If your mac and cheese turns dry, don't worry! You can revive it easily. Start by adding a splash of milk to the dish. Mix it well to combine. If it still feels dry, you can add more cheese or a little butter. Heat it gently on the stove or in the oven until warm. Stir it often to keep it creamy. Yes, you can make mac and cheese without cream cheese. Use more whole milk to keep the sauce creamy. You can also add extra cheese like gouda or a bit of sour cream for creaminess. Blending these ingredients will help you achieve that rich texture even without cream cheese. Baked mac and cheese is a delicious comfort food that many enjoy. We covered the best ingredients, from elbow macaroni to sharp cheddar, for a creamy dish. I shared steps to make the cheese sauce and combine everything perfectly. Plus, I offered tips for the creamiest texture and fun variations to try. Remember, you can customize this dish and store it for later. Enjoy making your own version of this classic meal!
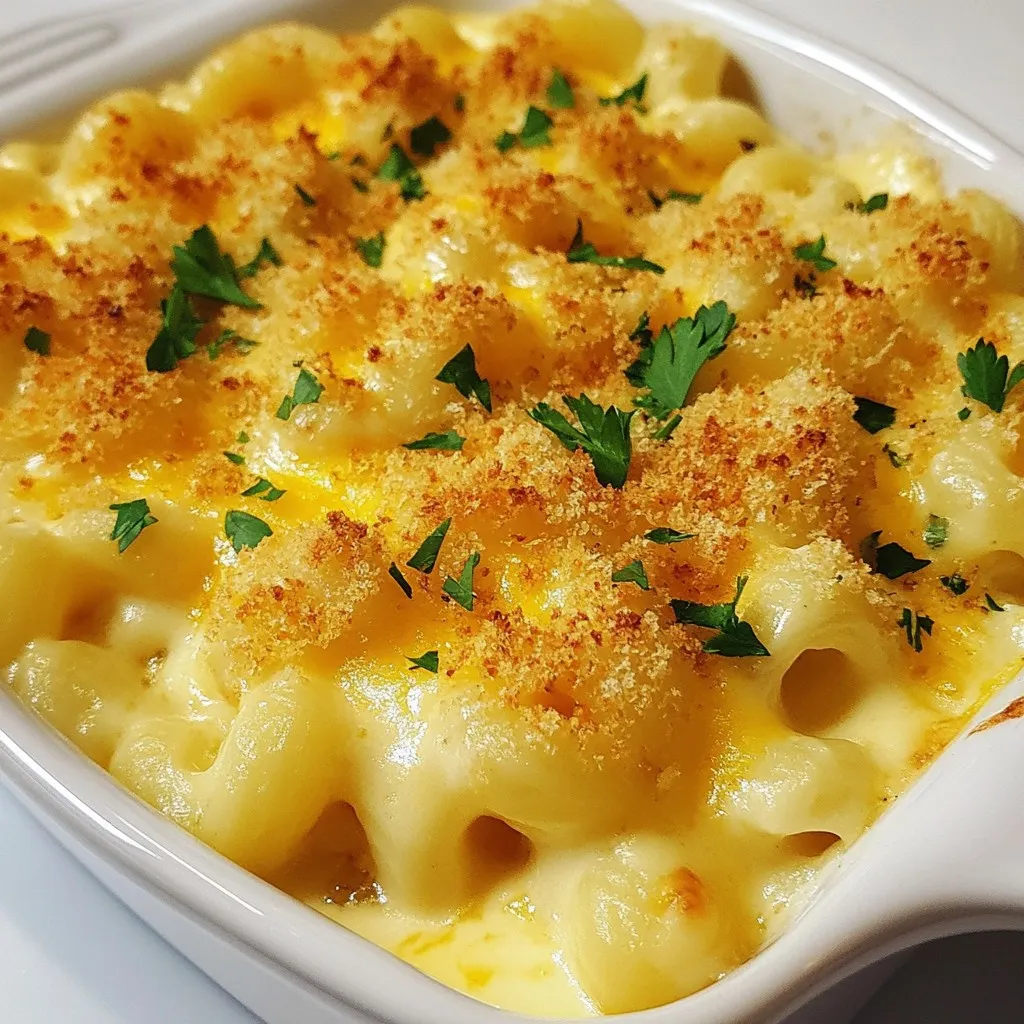
Creamy Baked Mac & Cheese Delightful Comfort Dish
Looking for the ultimate comfort food? Creamy Baked Mac & Cheese is your answer! This dish is rich, cheesy, and oh-so-delightful, perfect for cozy nights
To make Greek chicken meatballs, gather these key ingredients: - 1 pound ground chicken - 1/2 cup fresh breadcrumbs - 1/4 cup finely grated Parmesan cheese - 1/4 cup red onion, finely chopped - 2 cloves of garlic, minced - 1/4 cup fresh parsley, chopped - 1/4 cup fresh mint, chopped - 1 large egg, beaten - 1 teaspoon dried oregano - 1 teaspoon sea salt - 1/2 teaspoon freshly cracked black pepper - 2 tablespoons extra-virgin olive oil (for frying) You can enhance the taste of your meatballs with these optional ingredients: - 1/4 teaspoon cayenne pepper (for a hint of heat) - Additional herbs like dill or basil for more flavor These meatballs are not just tasty; they also pack a nutritional punch. Here’s a quick overview: - Protein: Ground chicken provides lean protein, vital for muscle health. - Vitamins: Fresh herbs like parsley and mint add vitamins A and C. - Fiber: The breadcrumbs give some fiber for digestion. - Caloric Content: Each meatball contains around 150 calories. This makes a serving of four meatballs about 600 calories. These ingredients combine to create a delicious meal that is rich in flavor and nutrients. Enjoy cooking these Greek chicken meatballs! {{ingredient_image_2}} To start, gather your ingredients. You will need: - 1 pound ground chicken - 1/2 cup fresh breadcrumbs - 1/4 cup finely grated Parmesan cheese - 1/4 cup red onion, finely chopped - 2 cloves of garlic, minced - 1/4 cup fresh parsley, chopped - 1/4 cup fresh mint, chopped - 1 large egg, beaten - 1 teaspoon dried oregano - 1 teaspoon sea salt - 1/2 teaspoon freshly cracked black pepper - 1/4 teaspoon cayenne pepper (optional) In a large mixing bowl, combine the ground chicken, breadcrumbs, Parmesan, red onion, garlic, parsley, mint, beaten egg, oregano, salt, black pepper, and cayenne if you want some heat. Mix all the ingredients well with your hands or a spoon. Make sure everything is even and blended fully. Now, cover the bowl with plastic wrap or a lid. Pop it in the fridge for about 30 minutes. This step helps the flavors mix and makes shaping the meatballs easier. While the mixture rests, preheat a large skillet over medium heat. Add 2 tablespoons of extra-virgin olive oil to the skillet. You want the oil to shimmer but not smoke. Next, take the chilled meat mixture and shape it into meatballs. Aim for about 1 to 1.5 inches in size. This helps them cook evenly. If they are all the same size, they will brown nicely. Carefully place the meatballs in the skillet. Make sure not to overcrowd them. If your skillet is small, cook them in batches. Cook each side for about 5-7 minutes. You want them golden brown and fully cooked, reaching an internal temperature of 165°F. Once cooked, take the meatballs out and place them on a plate lined with paper towels. This helps soak up any extra oil. Serve the warm meatballs with a cool tzatziki sauce. Pair them with warm pita bread. A bright side salad works great too—think diced tomatoes, cucumber, and crumbled feta cheese. For a beautiful display, arrange the meatballs on a large platter. Garnish with sprigs of mint and parsley. Place the tzatziki sauce in a small bowl in the center. Enjoy your delicious meal with friends and family! To get the best meatballs, follow these tips: - Use fresh ingredients: Fresh herbs and spices change the flavor. - Mix gently: Over-mixing can make meatballs tough. Just blend until combined. - Uniform size: Shape meatballs to be the same size for even cooking. - Don’t overcrowd: Give meatballs space in the skillet. This helps them brown well. Moisture is key for tasty meatballs. Here are some ways to keep them juicy: - Add breadcrumbs: They soak up moisture and keep meatballs tender. - Use egg: The beaten egg helps bind and adds moisture. - Chill before cooking: Resting the mixture in the fridge lets flavors blend and helps meatballs hold their shape. Spices can make or break your dish. Here’s how to adjust them: - Taste the mixture: Before cooking, taste a small bit of the raw mix. Adjust spices as needed. - Start small: Add spices a little at a time, especially strong ones like cayenne pepper. - Experiment: Try new herbs like dill or basil to find your favorite flavor. These tips will help you make Greek chicken meatballs that are not just good, but great! Pro Tips Chill the Mixture: Allowing the meat mixture to chill in the refrigerator for at least 30 minutes not only enhances the flavors but also makes it easier to shape the meatballs without them falling apart. Uniform Size: To ensure even cooking, aim to shape your meatballs into uniform sizes. This helps them brown nicely and cook through at the same rate. Don’t Overcrowd the Pan: When frying the meatballs, avoid overcrowding the skillet. This allows for better browning and prevents steaming, resulting in a more flavorful crust. Check Internal Temperature: Use a meat thermometer to check the internal temperature of the meatballs; they should reach 165°F for safe consumption. {{image_4}} You can swap the ground chicken for ground turkey or beef. Turkey gives a leaner option. It keeps the meatballs moist and tasty. Beef offers a richer flavor and a heartier bite. Just adjust the cooking time if using beef. Always check that the meat reaches 165°F for safe eating. If you want a plant-based version, use chickpeas or lentils. Mash cooked chickpeas until smooth. Combine them with breadcrumbs, herbs, and spices. You can also use tofu or tempeh. Crumble the tofu and mix it well with your spices. These options keep your meal tasty and healthy. You can change the flavor by adding spices. For a spicy kick, increase the cayenne pepper. For a fresh taste, add more herbs like dill or basil. If you love smoky flavors, add smoked paprika. Each choice gives your meatballs a unique twist. Experiment with flavors to find what you love best! To store your Greek chicken meatballs, first let them cool. Place them in an airtight container. Make sure they are not stacked too high to avoid crushing. You can keep them in the fridge for up to three days. If you want to save them for longer, consider freezing. When you are ready to enjoy your leftovers, reheating is key. Preheat your oven to 350°F. Place the meatballs on a baking sheet. Cover them with foil to keep them moist. Heat for about 15-20 minutes. You can also reheat them in a skillet over low heat. This way, they stay juicy and tasty. Freezing meatballs is a great way to have meals ready. Shape the meatballs and cook them as usual. After they cool, place them on a baking tray lined with parchment paper. Freeze them for about one hour. Once frozen, transfer them to a freezer bag. Label the bag and use them within three months for the best flavor. You can serve Greek chicken meatballs with many tasty sides. I recommend warm pita bread, a fresh salad, or tzatziki sauce. The salad can have diced tomatoes, cucumber, and crumbled feta cheese. These add bright flavors and textures. You could also pair them with roasted vegetables or rice for a heartier meal. Yes, you can make these meatballs ahead of time. Prepare the meatball mixture and shape them. Then, place them in the fridge for a few hours or overnight. This helps the flavors blend. You can also freeze cooked meatballs for later. Just thaw and reheat them when you're ready to eat. To check if the meatballs are cooked, use a meat thermometer. They should reach an internal temperature of 165°F. You can also cut one in half. The inside should be no longer pink and juices should run clear. If they meet these criteria, they are safe to eat! In this post, we covered how to make tasty meatballs. We explored key ingredients, shared step-by-step cooking instructions, and offered useful tips. You learned about variations using different proteins and ways to store your meatballs. Remember, a little spice can change everything. Feel free to experiment with flavors to find what you love best. With these tips, you’ll create delicious meatballs every time. Enjoy your cooking adventures!
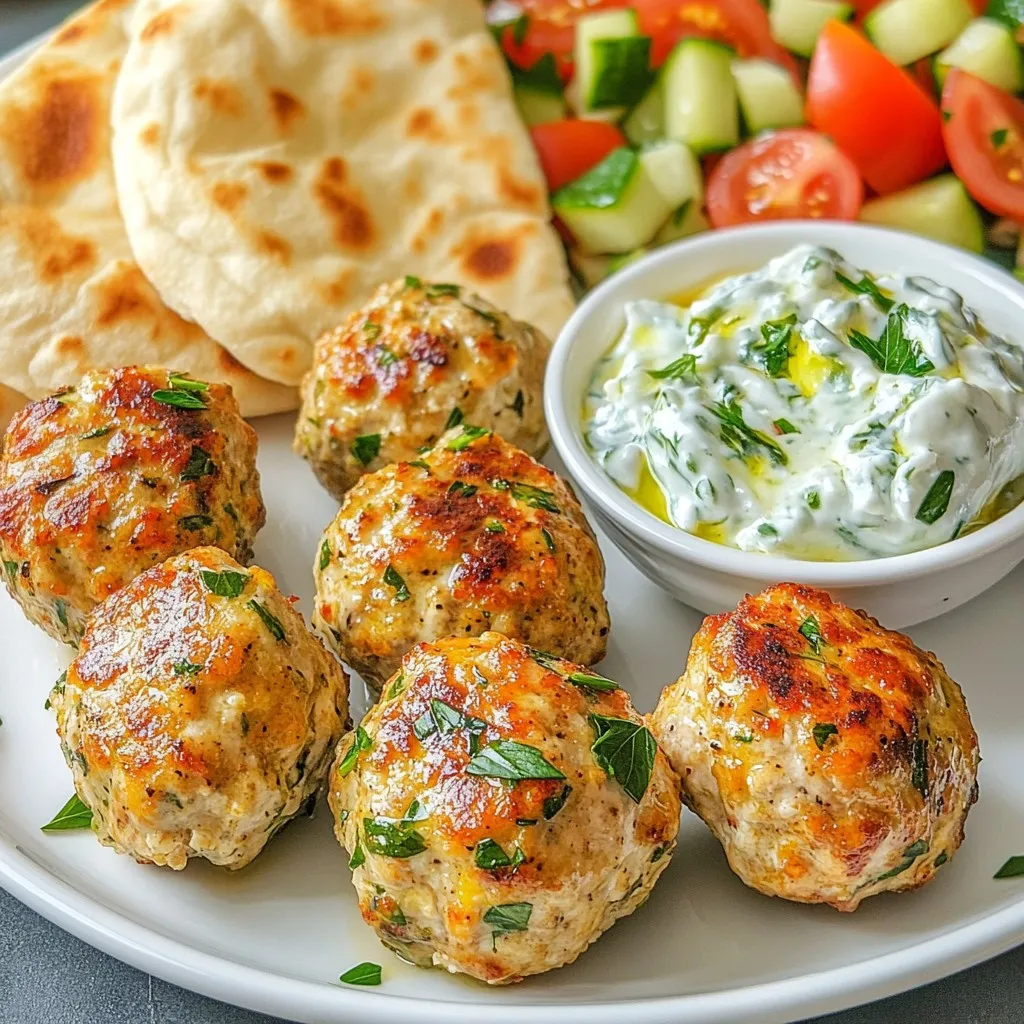
Greek Chicken Meatballs Flavorful and Easy Recipe
Are you ready to bring a taste of Greece to your kitchen? Greek Chicken Meatballs are not only easy to make, but also packed with
- 4 large flour tortillas - 2 cups potatoes, peeled and diced - 1 cup shredded cheese (cheddar or Mexican blend) - 1 teaspoon garlic powder - 1 teaspoon smoked paprika - ½ teaspoon ground cumin - Salt and pepper to taste - 1 cup cooked black beans, rinsed and drained - ½ cup sour cream - ¼ cup green onions, thinly sliced - 2 tablespoons olive oil - Salsa (for serving) Gather these ingredients for a fun cooking adventure. You will start with four flour tortillas that will hold all the tasty goodness. Next, peel and dice two cups of potatoes. These will be the heart of your burrito. For flavor, you’ll need a mix of spices: garlic powder, smoked paprika, and ground cumin. Add salt and pepper to make everything pop. You can’t forget the cheese! Use one cup of shredded cheese, either cheddar or a Mexican blend for extra zest. The black beans add protein, so grab one cup of those, rinsed and drained. To finish, you’ll need sour cream and green onions for a fresh topping. Don’t forget the salsa to dip your burrito in! With these ingredients, you’re all set to make cheesy potato burritos that are simple and flavorful. Enjoy the process and the delicious results! {{ingredient_image_2}} Boiling the potatoes Start by placing the diced potatoes in a large pot. Cover them with salted water. Bring the water to a boil. Reduce the heat and let the potatoes simmer. Cook them until they are fork-tender, about 10-12 minutes. Once they are done, drain the potatoes and set them aside. Seasoning and crisping Next, heat olive oil in a large skillet over medium heat. Add the drained potatoes to the skillet. Sprinkle in garlic powder, smoked paprika, ground cumin, salt, and pepper. Cook this mixture for about 5 minutes. Stir gently to help the potatoes crisp up and soak up the spices. Mixing in black beans Now, add the cooked black beans to the skillet. Stir to mix the beans with the potatoes. Heat everything for an additional 2-3 minutes. This step ensures that all flavors blend together well. Incorporating cheese After heating, remove the skillet from the heat. Fold in the shredded cheese gently. The heat from the potatoes and beans will help melt the cheese just enough to make it creamy. Filling and rolling techniques Take a flour tortilla and lay it flat on a clean surface. Spoon a generous amount of the cheesy potato and black bean mixture into the center of the tortilla. Be careful not to overfill it, or it may spill when you roll it. Optional crisping method Top the filling with a dollop of sour cream and a sprinkle of sliced green onions for freshness. Carefully fold in the sides of the tortilla. Then, roll it up tightly from the bottom to enclose the filling. For extra crunch, heat a non-stick skillet over medium heat. Place the burritos seam side down in the skillet. Cook for 2-3 minutes on each side until they are golden and crispy. Serve warm with salsa on the side for dipping. To make the best cheesy potato burritos, focus on two key areas: cooking and filling. - Ensuring even cooking: Cook the potatoes in salted water until they are tender. This takes about 10-12 minutes. Stir gently in the skillet to make sure they crisp up evenly. This step is key to avoid soft spots. - Avoiding overfilling: When you fill your tortilla, keep it generous but not too much. A good amount is about 1 cup of filling. Too much will make it hard to roll and can create a mess. Pair your burritos with tasty sides for a complete meal. - Side dishes that pair well: A simple green salad, rice, or chips are great choices. They add freshness and crunch to your meal. - Recommended salsas and dips: Serve with your favorite salsa for a kick. Try a fresh pico de gallo or a creamy avocado dip. These add extra flavor and make every bite exciting. Pro Tips Choose the Right Potatoes: For a creamier texture, opt for Yukon Gold or Russet potatoes which mash well and provide a rich flavor. Spice it Up: Customize the seasoning by adding cayenne pepper or diced jalapeños for an extra kick in your burritos. Make Ahead: Prepare the potato and bean filling in advance and store it in the fridge for up to 3 days. This makes assembly quick and easy when you're ready to eat! Perfectly Crispy Burritos: If you choose to pan-fry your burritos, use a bit of butter in addition to olive oil for a delicious golden crust. {{image_4}} You can make your cheesy potato burritos even more fun by swapping some ingredients. - Using different types of cheese: Cheddar is great, but you can try Monterey Jack or pepper jack for a spicy kick. Creamy mozzarella also melts well and adds a nice texture. - Alternative proteins or veggies: Instead of black beans, you can use pinto beans or even lentils. For veggies, add bell peppers, corn, or spinach. This gives a fresh twist to the burrito. Spice up your burritos with simple changes. - Adding spices or sauce variations: Besides garlic powder, try adding chili powder for heat. A dash of taco seasoning can also bring a new flavor. For a tangy touch, drizzle some lime juice inside the burrito. - Customizing with additional toppings: Get creative with toppings! Add diced tomatoes, jalapeños, or avocado. Fresh cilantro or a squeeze of lime juice on top makes every bite pop. You can also try different salsas for unique flavors. To store leftover cheesy potato burritos, wrap them in foil or place them in an airtight container. This keeps them fresh and prevents them from drying out. You can also use a resealable plastic bag. Make sure to remove as much air as possible. Leftovers will last in the fridge for about 3 to 4 days. Always check for any signs of spoilage before eating. If they smell off or look strange, it's best to toss them. Freezing cheesy potato burritos is easy and a great way to save them for later. To freeze, wrap each burrito tightly in plastic wrap. Then, place them in a freezer-safe bag or container. Label with the date for easy tracking. To reheat, you can bake them in the oven at 350°F for about 20-25 minutes, or until heated through. For a quicker method, microwave them for 2-3 minutes, flipping halfway. To keep the flavor and texture, avoid freezing them with salsa or sour cream. Add those toppings when you're ready to eat. Can I make these burritos vegan? Yes, you can make these burritos vegan! Use vegan cheese instead of regular cheese. Replace sour cream with a plant-based option like cashew cream or dairy-free yogurt. Make sure your tortillas are free from animal products. What are some good side dishes to serve with them? These burritos pair well with many sides. Here are some ideas: - Mexican rice - Refried beans - A fresh green salad - Guacamole with tortilla chips - Roasted corn on the cob These options add great flavor and textures to your meal. How can I adjust the spiciness of the burritos? To change the spice level, start with mild spices. You can use less smoked paprika and cumin. Add diced jalapeños or hot sauce for more heat. Test the mix to find a spice level that suits your taste. We explored how to make cheesy potato burritos from scratch. You learned about the key ingredients, simple steps, and helpful tips to perfect your dish. Remember, you can get creative with swaps and flavors to make it your own. Store leftovers correctly to enjoy them later. With these methods, you’ll impress your friends and family. Try making your own burritos soon. You might just find a new favorite meal!
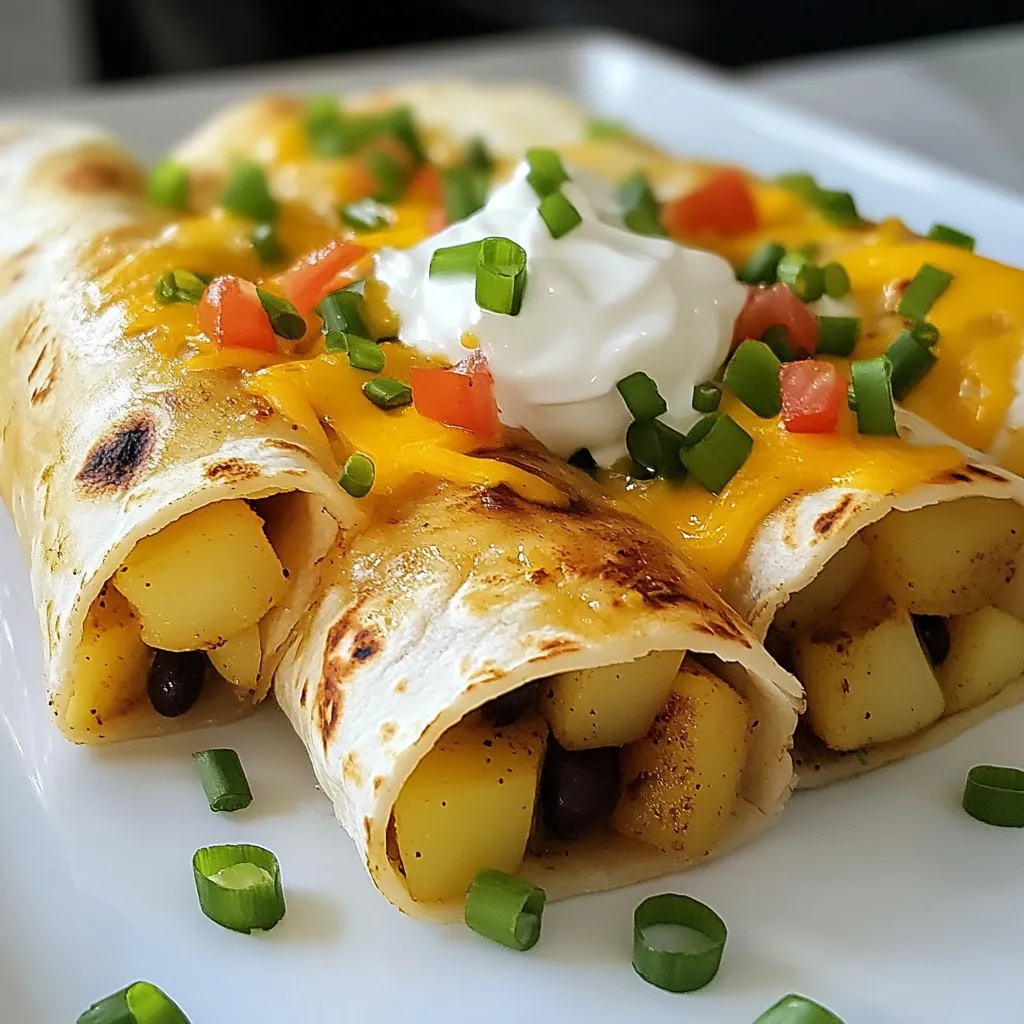
Cheesy Potato Burritos Simple and Flavorful Recipe
Are you ready to dive into a deliciously cheesy world? My Cheesy Potato Burritos recipe is simple and full of flavor. With just a few