Dinner

To make these tasty energy bites, you need a few key ingredients. Here’s what you need: - 2 ripe bananas, mashed - 1 cup rolled oats - ¼ cup almond butter (or any nut butter) - 2 tablespoons chia seeds - 1 teaspoon vanilla extract - ½ teaspoon cinnamon - 1 tablespoon honey or maple syrup (optional, for sweetness) - ¼ cup chopped walnuts (or pecans) - Pinch of salt These ingredients bring together flavor and nutrition. The bananas give natural sweetness, while chia seeds add fiber and healthy fats. You can make these bites your own. Here are some fun options: - Chocolate chips for a sweet treat - Dried fruits like raisins or cranberries - Different nuts for varied crunch - Nutmeg for a warm spice twist - Shredded coconut for extra texture Feel free to mix and match. This way, you can create a bite that suits your taste! If you lack an ingredient, don’t worry. Here are some swaps: - Use peanut butter instead of almond butter. - Swap walnuts for sunflower seeds for a nut-free option. - You can use any sweetener in place of honey or maple syrup. - For gluten-free bites, make sure to choose certified gluten-free oats. These substitutions keep the bites tasty while fitting your needs. Enjoy experimenting and finding your perfect mix! Start by peeling and mashing two ripe bananas in a large bowl. Use a fork to mash them until smooth. Next, add ¼ cup of almond butter and 1 teaspoon of vanilla extract. Mix these until they blend well. This creates a creamy base for the energy bites. In the same bowl, add 1 cup of rolled oats, 2 tablespoons of chia seeds, ½ teaspoon of cinnamon, and a pinch of salt. Stir everything together until well mixed. This step adds texture and flavor to your energy bites. If you like them sweeter, you can add 1 tablespoon of honey or maple syrup at this point. Finally, fold in ¼ cup of chopped walnuts or pecans for a nice crunch. Once your mixture is ready, cover the bowl and put it in the fridge for 20-30 minutes. This helps it firm up. After chilling, take small portions of the mixture and roll them into balls, about 1 inch in size. Place these on a lined baking sheet. For extra flavor, you can roll them in chia seeds or shredded coconut. Chill the bites again for at least 30 minutes before you enjoy them. For the full recipe, check out the earlier section. To get the best texture for your chia banana bread energy bites, focus on the bananas. Use ripe bananas as they add natural sweetness and moisture. Mash them well so there are no big lumps. The oats should be rolled oats, not instant. They give a chewy texture. Mixing the ingredients gently helps keep the bites from becoming too dense. You can adjust the sweetness to fit your taste. The ripe bananas already add sweetness. If you want it sweeter, add honey or maple syrup. Use only a tablespoon to start. Taste the mixture before you chill it. You can always add more if needed. This way, you control the sweetness level. Serving your energy bites can be fun! Place them in a small bowl and sprinkle some chia seeds on top. You can also drizzle a little honey for extra flair. These bites are perfect for snacks or a quick breakfast. Try pairing them with yogurt or fruit for a balanced meal. They are great for kids and adults alike! {{image_2}} You can make a nut-free version of these energy bites. Just swap out the nut butter for sunflower seed butter. This keeps the bites creamy and tasty without nuts. It’s a great choice if you have allergies. The flavor still shines through, and you won't miss the nuts! Want to mix things up? Add chocolate chips or dried fruit. Both options boost flavor and fun. Dark chocolate chips add sweetness and a rich taste. Dried fruit, like raisins or cranberries, adds chewiness and natural sweetness. You can also use coconut flakes for a tropical twist. Just fold these extras in with the other ingredients. You can try other nut butters for different tastes. Peanut butter gives a classic flavor. Cashew butter is smooth and mild. Each nut butter brings its unique taste and texture. This allows you to customize the bites to suit your mood. Just remember, if you switch the nut butter, the flavor will change, too! For the complete recipe, check out the Full Recipe. To keep your Chia Banana Bread Energy Bites fresh, store them in an airtight container. Place a sheet of parchment paper between layers if stacking them. This helps prevent sticking. Keep the container in the fridge. This will keep the bites firm and tasty. When stored correctly, these energy bites last up to one week in the fridge. If you notice any change in smell or texture, it's best to toss them. Always check for freshness before grabbing a bite! You can freeze these energy bites for longer storage. Place them on a baking sheet in a single layer. Freeze for about two hours, then transfer them to a freezer-safe bag. They can last up to three months in the freezer. When ready to eat, just take out a few and let them thaw in the fridge. Enjoy them anytime! Chia Banana Bread Energy Bites are packed with nutrients. Each bite has about 100 calories. They contain healthy fats, fiber, and protein. You get around 3 grams of protein and 2 grams of fiber per bite. The chia seeds add omega-3 fatty acids, which are good for your heart. Bananas provide potassium and natural sweetness. This snack is not only tasty but also healthy. Yes, you can easily make these energy bites vegan. Just replace honey with maple syrup. This swap keeps the sweetness without using animal products. All other ingredients, like oats and chia seeds, are already vegan. Using nut butter, like almond or peanut butter, also keeps it plant-based. Enjoy a simple, vegan snack that fuels your day. Making these energy bites gluten-free is simple. Just use certified gluten-free oats instead of regular oats. Most nut butters are gluten-free, so check the label. This way, you avoid gluten while still enjoying the bites. It’s a great option for those with gluten allergies or sensitivities. You can add many ingredients to make these bites more exciting. Consider mixing in chocolate chips or dried fruit for added flavor. You can also use different nuts or seeds for texture. Try adding a scoop of protein powder for an extra boost. Customize to your liking while keeping the base flavors intact. Check the Full Recipe for more ideas! These Chia Banana Bread Energy Bites are simple and fun to make. You’ve learned about key ingredients, preparation steps, and ways to customize your bites. Use the tips to get the best texture and flavor. Remember, storing them right helps keep them fresh. With various options, you can make these bites suit your taste and diet needs. Experiment and enjoy your healthy snacks!
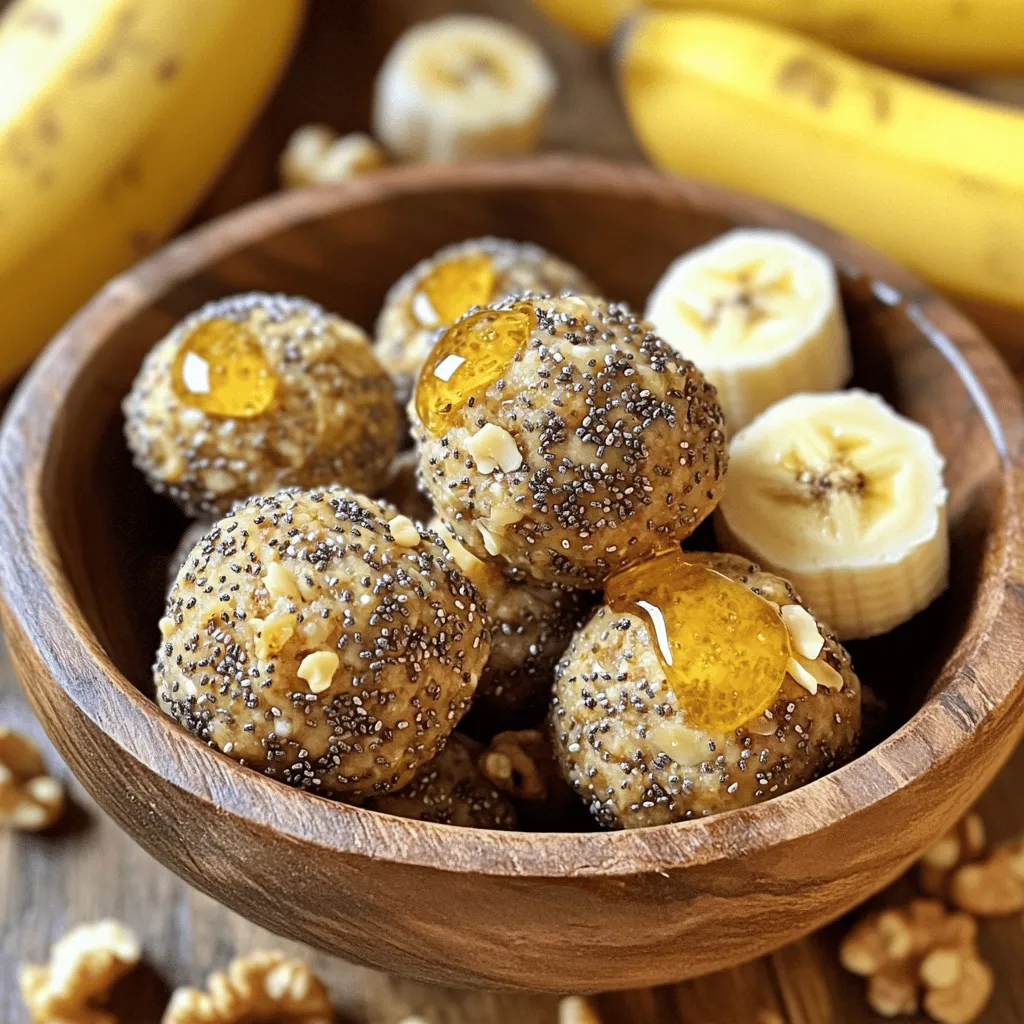
Chia Banana Bread Energy Bites Healthy Snack Idea
Looking for a healthy snack that’s easy and tasty? You’ll love these Chia Banana Bread Energy Bites! They pack a punch of flavor and nutrition,
- 2 ribeye steaks (about 1 inch thick) - 3 cloves garlic, minced - 2 tablespoons olive oil - 1 teaspoon paprika - 1 teaspoon salt - ½ teaspoon black pepper - 1 cup shredded mozzarella cheese - Fresh parsley, chopped for garnish - Air fryer - Mixing bowl - Measuring spoons - Tongs - Instant-read meat thermometer - Cutting board Gathering the right ingredients is key to a great meal. I use ribeye steaks for their rich flavor and tenderness. The minced garlic adds a bold taste that pairs well with steak. Olive oil keeps the meat moist while enhancing the flavor. Paprika, salt, and black pepper spice things up. You will need an air fryer to cook the steaks perfectly. A mixing bowl helps you combine the marinade. Measuring spoons ensure you get the right amounts. Tongs are handy for flipping the steaks. For best results, I always recommend an instant-read meat thermometer. It helps you know when the steaks are just right. A cutting board is essential for resting and slicing your steaks. When you have all these ingredients and tools ready, you are set for a delicious meal. For the full recipe, check out the details we have provided. First, gather your ingredients. You need garlic, olive oil, and spices. In a small bowl, mix these together. Use three minced cloves of garlic, two tablespoons of olive oil, one teaspoon of paprika, one teaspoon of salt, and half a teaspoon of black pepper. This mixture creates a rich flavor. Next, rub this mixture all over the ribeye steaks. Make sure to coat every part well. This step adds depth to the taste. Now, let's talk about marinating. If you let your steaks sit at room temperature, aim for about 30 minutes. This helps the flavors soak in. If you have more time, refrigerate the steaks for up to two hours. Marinating is key. It not only adds flavor but also helps keep the meat juicy. The longer you marinate, the better the flavor. Preheat your air fryer to 400°F (200°C). This usually takes about five minutes. A hot air fryer sears the meat quickly, locking in juices. Once preheated, place the marinated steaks in the basket. For medium-rare, cook for 10 to 12 minutes. Flip the steaks halfway through to ensure even cooking. If you like your steak medium or medium-well, add one to two extra minutes of cooking time. Near the end, sprinkle shredded mozzarella cheese on each steak. Cook for an additional two minutes to let the cheese melt. Enjoy the aroma as it fills your kitchen! To get the best doneness for your steaks, use a meat thermometer. Insert it into the thickest part of the steak. For medium-rare, aim for 130°F (54°C). Adjust your cooking time based on steak thickness. Thicker steaks need a bit more time. Timing is key when adding cheese. Put it on when the steak is nearly done. This gives the cheese time to melt perfectly. Choose mozzarella for its great melt and stretch. You can also try cheddar or gouda for a different taste. Boost flavor with extra seasonings. Consider adding onion powder, or a touch of cayenne for heat. You can also mix in herbs like thyme or rosemary. Marinade variations can help too. Try adding soy sauce or balsamic vinegar for a unique twist. {{image_2}} You can swap ribeye for other cuts. Flank steak, sirloin, or filet mignon work well. Each cut has its own taste and texture. - Flank Steak: This cut is lean and cooks fast. Adjust cooking time to 8-10 minutes. - Sirloin: A bit thicker, it needs 10-12 minutes for medium-rare. - Filet Mignon: This cut is tender. Cook it for about 9-11 minutes. Cooking times may vary based on thickness. Use a meat thermometer to check doneness easily. Cheese can add a lot of flavor. Besides mozzarella, try provolone or gouda. - Provolone: It has a rich, tangy taste. Use it for a different twist. - Gouda: This cheese melts well and offers a smoky flavor. You can mix cheeses, too! For instance, blend mozzarella with parmesan for a cheesy kick. You can add vegetables to make your meal even better. Try bell peppers, zucchini, or asparagus. - Bell Peppers: Cut into strips and add them for color and crunch. - Zucchini: Slice this vegetable thinly. It cooks fast and soaks up flavors. - Asparagus: Trim the ends and place them in the air fryer with the steaks. Add veggies halfway through cooking. This way, they cook just right without getting mushy. To keep your Air Fryer Cheesy Garlic Steaks fresh, store them in the fridge. First, let the steaks cool to room temperature. Wrapping them in foil helps keep them moist. You can also place them in an airtight container. This method keeps the flavors locked in. Aim to eat leftovers within three days for the best taste. To reheat your steaks, the air fryer works best. Set it to 350°F (175°C). Place the steaks in the basket and heat for about 5 minutes. This keeps the steaks juicy and warm. If you don't have an air fryer, you can use a skillet. Heat on medium-low and flip often to avoid burning. If you want to freeze cooked steaks, wrap them tightly in plastic wrap first. Then, place them in a freezer bag. Try to remove as much air as possible. They can last up to three months in the freezer. To thaw, move the steaks to the fridge overnight. This way, they stay safe and tasty. Yes, you can use different air fryer brands. Most air fryers work similarly. Brands like Philips, Ninja, and Cosori all cook well. Just check the size of your fryer. If your fryer is smaller, adjust the steak size or cook in batches. Follow the same cooking times in the recipe. Always ensure good air flow around the food. I recommend marinating the steaks for at least 30 minutes. This time allows the flavors to soak in well. If you have more time, try to marinate them for up to 2 hours in the fridge. This extra time makes the steaks even tastier. Just remember to bring them to room temperature before cooking. Cheesy garlic steaks shine with simple sides. Here are some tasty options: - Garlic mashed potatoes - Roasted vegetables like broccoli or asparagus - A fresh green salad - Crispy fries or sweet potato fries These sides balance the rich flavors of the steak. They also make a full, satisfying meal. This guide showed you how to make cheesy garlic ribeye steaks in an air fryer. We covered ingredients and tools, detailed steps to prepare and cook the steaks, and shared helpful tips for perfect doneness. You learned about storage and reheating too. In the end, air frying offers quick and tasty results, perfect for any meal. Enjoy experimenting with different flavors and cuts. Your cooking adventure starts now!
Air Fryer Cheesy Garlic Steaks Flavorful Easy Meal
Looking to impress with an easy yet tasty meal? Air Fryer Cheesy Garlic Steaks are your answer! In this post, I’ll guide you step-by-step on
To make the best white cheddar baked corn, you need a few simple ingredients. Gather these items to create your dish: - 4 cups corn kernels (fresh, frozen, or canned) - 1 cup white cheddar cheese, shredded - 1/2 cup milk - 1/4 cup heavy cream - 2 tablespoons butter, melted - 1/4 cup grated Parmesan cheese - 2 tablespoons sugar - 1 teaspoon garlic powder - 1 teaspoon onion powder - Salt and pepper to taste - 1/4 cup breadcrumbs (optional, for a crunchy topping) - Fresh parsley, chopped (for garnish) Each ingredient plays a key role. The corn provides sweetness and texture. White cheddar cheese adds a creamy, rich flavor. Milk and cream make the dish smooth and velvety. Butter adds a lovely richness that enhances every bite. Parmesan cheese gives a nice salty kick. Using sugar balances the flavors. Garlic powder and onion powder bring depth. Salt and pepper elevate the taste. If you want more crunch, add breadcrumbs on top. Finally, fresh parsley brightens the dish and makes it look pretty. Check out the Full Recipe for complete cooking instructions to whip up this tasty comfort food! 1. Preheat your oven to 375°F (190°C). This helps cook the dish evenly. 2. Grease a baking dish with butter. Use a dish that holds about 2 quarts. 3. In a large bowl, combine the corn kernels with shredded white cheddar cheese, milk, heavy cream, and melted butter. 4. Add grated Parmesan cheese, sugar, garlic powder, onion powder, salt, and pepper. Stir until everything mixes well. 1. Pour the mixture into the greased baking dish. Spread it out evenly for nice cooking. 2. Optional: If you want a crunchy topping, sprinkle breadcrumbs over the corn mix. 3. Bake in the preheated oven for 30-35 minutes. Look for a golden brown top and bubbly edges. 1. Let it cool for a few minutes after baking. This helps set the dish. 2. Garnish with chopped fresh parsley. This adds color and flavor. 3. You can serve this dish as a side or a main. It pairs well with grilled meats or a fresh salad. For the complete recipe, check the Full Recipe section. To make your white cheddar baked corn even better, try different cheese varieties. You can mix in gouda for a smoky taste or mozzarella for extra stretchiness. This adds a fun twist and makes the dish unique. Adjusting seasoning is also key. Taste your mixture before baking. If it needs more salt or pepper, now is the time to fix it. A creamy texture is vital for this dish. To achieve this, use both milk and heavy cream. They blend well and help create a rich base. Mix the ingredients thoroughly to ensure an even spread. This way, every bite is packed with flavor and creaminess. You can prepare this dish ahead of time. Just mix the ingredients and store them in the fridge. When you're ready, bake it fresh. This saves time on busy days. Using frozen or canned corn is another great option. It cuts down on prep time and works just as well as fresh corn. Remember, these tips will help you create a perfect white cheddar baked corn. Enjoy the process and the delicious results! For the full recipe, check out the recipe section. {{image_2}} You can easily change up the recipe. Try adding different veggies. Bell peppers or green onions work well. They add color and flavor. You can also mix cheeses. Use a blend of sharp cheddar and gouda for a richer taste. This small change can make a big difference. Want some heat? Add jalapeños or a pinch of cayenne pepper. They give a nice kick to the dish. Fresh herbs like basil or cilantro can also add brightness. Just chop them up and mix them in for a fresh twist. If you need gluten-free options, skip the breadcrumbs. You can use ground nuts for crunch instead. For dairy-free alternatives, try almond milk and vegan cheese. They work well and keep the dish creamy. This way, everyone can enjoy white cheddar baked corn. For the full recipe, refer to the main section above. To keep your white cheddar baked corn fresh, store it in the fridge. Use an airtight container for best results. This helps to keep moisture in and odors out. Let it cool before putting it away. This will prevent condensation and sogginess. If you want to save some for later, freezing is a great option. Portion the leftovers into freezer-safe containers. Be sure to leave some space at the top, as the corn will expand. When you're ready to eat, thaw it overnight in the fridge. To reheat, place it in the oven at 350°F (175°C) until heated through. This keeps the texture nice and creamy. You can store this dish in the fridge for about three to four days. If you freeze it, it will last for about two to three months. Always check for signs of spoilage. If it smells off or looks discolored, it’s best to toss it. Enjoy your comfort food, but make sure it’s still good! What can I serve with white cheddar baked corn? You can serve it with grilled chicken, steak, or fish. It pairs well with salads too. Add some roasted veggies for a complete meal. Can I make this recipe ahead of time? Yes, you can prepare it one day in advance. Just cover it and keep it in the fridge. Bake it when you're ready to serve. Is it possible to make this dish vegetarian? Absolutely! This dish is already vegetarian. Just use vegetable broth if needed instead of meat-based options. What if I don’t have white cheddar cheese? You can use other cheeses like sharp cheddar or Monterey Jack. Each will give a different taste but will still be delicious. Can I use frozen corn instead of fresh? Yes, frozen corn works great. Just thaw it first and drain any excess water. This way, the dish stays creamy. How do I know when it's fully cooked? Look for a golden brown top and bubbly edges. You can also check if the center feels hot when poked with a fork. Can I add protein to this dish? Yes! You can mix in cooked chicken, bacon, or even beans for added protein. Just fold them in before baking. How to adjust the recipe for fewer servings? Simply cut the ingredients in half. This way, you still get all the flavors in a smaller batch. Doubling the recipe for a larger crowd? To double it, just multiply each ingredient by two. Make sure to use a larger baking dish for even cooking. For the full recipe, you can refer to the detailed instructions provided earlier. In this post, we covered a tasty white cheddar baked corn recipe. You learned about ingredients, easy steps, and helpful tips. We also explored fun variations and storage methods. This dish is simple to make and perfect for any meal. With a bit of creativity, you can make it your own. Enjoy the rich flavors and share with family and friends.
White Cheddar Baked Corn Irresistible Comfort Food
If you’re craving a cozy dish that warms both the heart and the stomach, you’ve found it! White Cheddar Baked Corn is the ultimate comfort
- 1 pound shrimp, peeled and deveined - 2 ears of corn, cut into quarters - 1 pound baby potatoes, halved - 1 tablespoon olive oil - 4 cloves garlic, minced - 1 tablespoon Old Bay seasoning - 1 tablespoon lemon juice - 1 teaspoon smoked paprika - Salt and pepper to taste - Fresh parsley, chopped (for garnish) - Lemon wedges (for serving) - Aluminum foil - Grill or oven - Large mixing bowl - Measuring spoons and cups When making shrimp boil foil packs, have your ingredients ready. You’ll need shrimp, corn, and baby potatoes. First, peel and devein the shrimp. Cut the corn into quarters. Halve the baby potatoes for even cooking. Next, gather your cooking tools. You’ll need aluminum foil to create the packets. A grill or oven works well for cooking. Use a large mixing bowl to combine all your ingredients. Measuring spoons and cups help you get the right amounts. Using fresh ingredients makes a big difference. The shrimp should be firm and pink. Look for corn that is bright yellow and fresh. Choose baby potatoes that are smooth and firm. These ingredients will make your meal taste great. For a touch of flavor, use garlic and Old Bay seasoning. The lemon juice adds a nice zing. Smoked paprika gives a warm, smoky taste. Always season with salt and pepper to enhance the flavors. For the full recipe, check out the complete Shrimp Boil Foil Packs recipe. Enjoy making this dish! To start, gather all your ingredients in a large bowl. You need shrimp, corn, baby potatoes, olive oil, garlic, Old Bay seasoning, lemon juice, smoked paprika, salt, and pepper. Now, add all these items into the bowl and mix well. Make sure every piece of shrimp and potato gets coated. This step is key for great flavor. Next, cut four sheets of aluminum foil. Each should be about 12x18 inches. Lay out your foil sheets flat on a clean surface. Divide the shrimp and vegetable mixture evenly among the sheets. Place one portion in the center of each foil. Now, fold the sides of the foil over the mixture. Make sure to seal the top tightly. This will help keep all the juices and flavors inside. Now, preheat your grill or oven to 400°F (200°C). Once ready, place the foil packets on the grill or on a baking sheet if using the oven. Cook for 15 to 20 minutes. You want the shrimp to turn pink and the potatoes to be tender. When the time is up, carefully open the packets. Remember to watch out for steam! Finally, garnish with fresh parsley and serve with lemon wedges. Enjoy your meal! To make your shrimp boil foil packs pop, adjust your seasoning. You can add more Old Bay for a spicy kick or a pinch of cayenne for heat. If you like herbs, try adding fresh thyme or dill. These small changes can change the whole taste! You can also add different veggies or proteins. Bell peppers, zucchini, or asparagus work well. For extra protein, toss in some sausage or crab. Each addition brings a new twist to the dish. You can cook shrimp boil foil packs in an oven or on a grill. Both methods work great. The grill adds a smoky flavor, while the oven gives even heat. Just preheat your grill or oven to 400°F (200°C) before cooking. To avoid overcooking, keep an eye on your packets. Shrimp cooks fast, so check them after 15 minutes. When they turn pink, they are done. Tender potatoes are the sign to remove them from heat. For side dishes, corn on the cob or a fresh salad pairs well. A light coleslaw adds crunch and balance. You can also serve crusty bread to soak up all the juices. For garnishes, fresh parsley brightens the dish. Lemon wedges add a zesty touch when served. You can also try thinly sliced green onions for extra flavor. Each garnish adds a lovely finish to your shrimp boil foil packs. {{image_2}} You can switch up the proteins in your shrimp boil foil packs. Try using crab or sausage. Both options add a nice touch of flavor. You can also mix proteins for a unique taste. For veggies, consider seasonal options. Bell peppers, zucchini, or asparagus work great. You can use whatever you find fresh at the market. This keeps your meal exciting and fresh. Want a kick in your shrimp boil foil packs? Add some heat with red pepper flakes or hot sauce. This spiciness pairs well with the shrimp and veggies. You can also experiment with herbs and spices. Try fresh thyme or dill for a bright taste. A dash of lemon zest can uplift the flavors too. These small tweaks make a big difference in taste. You can easily make gluten-free shrimp boil foil packs. Just ensure your seasoning and other ingredients are gluten-free. For low-carb options, skip the baby potatoes. You can add more veggies like cauliflower instead. This keeps your meal light and healthy. Adjusting your shrimp boil foil packs allows everyone to enjoy them. To store leftover shrimp boil foil packs, first let them cool. Place them in an airtight container. This helps keep them fresh. You can refrigerate leftovers for up to three days. If you want to keep them longer, freezing is a good option. To freeze shrimp boil packets, wrap them tightly in plastic wrap. Then, place them in a freezer-safe bag. Make sure to remove as much air as possible. You can freeze these packs for up to three months. To reheat your shrimp boil foil packs, you can use either the oven or the microwave. If you use the oven, preheat it to 350°F (175°C). Place the foil packet on a baking sheet. Heat for about 15 minutes or until warmed through. If you prefer the microwave, place the packet on a microwave-safe plate. Heat for 3 to 5 minutes. Watch closely as cooking times may vary. To keep the shrimp tender, don’t overheat. Check the packets often to maintain flavor and texture. Enjoy your meal just like it was fresh! You should cook shrimp in foil for about 15 to 20 minutes. This time works well for both grilling and baking. The shrimp will turn pink and curl slightly when done. Make sure to check the potatoes too; they should be tender. Yes, you can! Preheat your oven to 400°F (200°C). Place the foil packs on a baking sheet. Cook for 15 to 20 minutes just like on the grill. This method gives you that same great flavor. You can use homemade blends or other seasonings. Try a mix of paprika, garlic powder, and celery salt. Lemon pepper is a great option too. Adjust to your taste to keep it flavorful. Yes, shrimp boil foil packs are quite healthy. They offer lean protein from shrimp and lots of nutrients from vegetables. Corn and potatoes provide fiber and vitamins. Use olive oil for healthy fats and enjoy a balanced meal. For the complete Shrimp Boil Foil Packs recipe, check out the [Full Recipe]. In this post, we covered how to make shrimp boil foil packs. We reviewed the ingredients needed, cooking equipment, and step-by-step instructions. I also shared tips for flavor, different variations, and how to store leftovers. These foil packs are easy to make and fun to eat. With simple tweaks, you can make them your own. Enjoy experimenting with flavors and ingredients. Happy cooking!
Shrimp Boil Foil Packs Easy and Flavorful Recipe
Get ready to savor the taste of a classic shrimp boil in a fun new way! My easy Shrimp Boil Foil Packs bring together fresh
- Ground turkey: This lean meat offers a great protein source. It cooks quickly and absorbs flavors well. Using ground turkey keeps your dish light and healthy. - Bell peppers (red and yellow): These colorful veggies add crunch and sweetness. They also bring vitamins and minerals to your meal. Dicing them allows for even cooking and a nice pop of color. - Onion and garlic: These aromatics build a strong flavor base. Sautéing onions brings out their natural sweetness. Garlic adds depth and a savory kick to the dish. - Smoked paprika: This spice gives a warm, smoky flavor. It enhances the overall taste without being too spicy. Just a teaspoon can change the dish. - Cumin: This spice adds a nutty flavor. It pairs well with turkey and peppers. Cumin brings a hint of earthiness that rounds out the dish. - Chili powder: This spice adds warmth and a touch of heat. Use it to elevate the flavor profile. You can adjust the amount based on your spice preference. - Fresh cilantro: This herb adds a fresh, bright note. It enhances the dish's flavor and makes it visually appealing. Sprinkle it on top before serving for an extra burst of color. - Avocado slices: These add creaminess and a rich taste. They can balance the spices in the dish. Serve them on the side or on top for added texture. For the complete recipe, check out the [Full Recipe]. To start, heat olive oil in a large skillet over medium heat. Add the chopped onion and sauté for 3-4 minutes until it smells good and turns soft. Next, toss in the minced garlic and cook for one more minute. Make sure to stir often to prevent burning. Now, add the ground turkey. Break it up with a spatula as it cooks. Brown it for about 6-8 minutes until there is no pink left. Once the turkey is ready, sprinkle in the smoked paprika, cumin, chili powder, salt, and pepper. Stir well to mix in all the spices. Then, fold in the diced bell peppers and the drained tomatoes. Cook everything together for another 5-7 minutes. This helps the peppers soften and the flavors blend nicely. It's time to taste your dish! Adjust the seasoning if you need to add more salt or spices. After that, take it off the heat and let it sit for a minute. Garnish with chopped cilantro before serving. For a fresh touch, add avocado slices on the side or on top of each serving. Enjoy this delicious meal with the full recipe! When buying ground turkey, look for lean options. Lean turkey has less fat and is healthier. Check the label for fat content; 93% lean is a great choice. Fresh turkey should smell clean and look pink. Avoid turkey that looks gray or has a strong odor. Always buy from a trusted source. Dicing bell peppers is simple. Start by washing them well. Cut off the top and bottom, then slice them in half. Remove the seeds and white parts. Next, chop each half into small pieces. This helps them cook evenly. To balance flavors, use spices wisely. Smoked paprika adds warmth, while cumin brings depth. Chili powder can add a kick. Start with small amounts and taste as you go. This way, you can customize the dish to your liking. Make your dish look great with a nice presentation. Use a shallow bowl to showcase the colorful turkey and peppers. Sprinkle fresh cilantro on top for a pop of green. Pair this dish with sides like rice or a fresh salad. They add texture and make the meal more filling. You can also serve it with avocado slices for creaminess. These simple touches can elevate your meal and impress your guests. For the full recipe, check out the Turkey & Pepper Fiesta. {{image_2}} To spice things up, you can add jalapeños to your dish. They bring a nice kick. Just slice them thin and toss them in with the peppers. You can also try different spice blends. A taco seasoning mix can give it a fun twist. Or, for a smoky flavor, use chipotle powder instead of chili powder. If you want to switch things up, consider alternatives for ground turkey. Ground chicken or beef works well as substitutes. You can even try plant-based meats for a veggie version. Chickpeas or lentils also make great meatless options. Just cook them until they are heated through. You can take this dish in different culinary directions. For a Mexican-inspired version, add corn and black beans. Top it with cheese and serve with tortillas. If you're feeling Mediterranean, use feta cheese and olives. A drizzle of lemon juice can brighten the flavors. These twists keep the dish fun and exciting. Check out the Full Recipe for more ideas. To keep your ground turkey and peppers fresh, store leftovers in an airtight container. Place the dish in the fridge within two hours of cooking. It will stay good for 3 to 4 days. Always check for signs of spoilage before eating. If you want to save some for later, freezing is a great option. Let the dish cool completely first. Then, portion it into freezer-safe bags or containers. Remove as much air as possible to prevent freezer burn. It can last in the freezer for up to 3 months. When you're ready to eat, thaw it overnight in the fridge. Reheat it in a skillet over medium heat or in the microwave. Meal prepping is fun and helps save time. You can make a big batch of ground turkey and peppers and divide it into portions. Use small containers for easy grab-and-go meals. Pair each portion with rice or a salad to complete your meal. This way, you have healthy options ready for busy days! Ground turkey typically takes about 15 to 20 minutes to cook. To ensure it's fully cooked, use a meat thermometer. The internal temperature should reach 165°F. This ensures the turkey is safe to eat. Stir it often to cook evenly. Avoid crowded pans, which can trap steam and affect cooking time. You want a nice brown color, which adds flavor. Yes, you can use frozen ground turkey. To cook it safely, you should thaw it first. The best method is to leave it in the fridge overnight. If you're short on time, place it in cold water. Change the water every 30 minutes. This method takes about 1 to 2 hours. Once thawed, cook it right away. Cooking frozen turkey takes longer, about 50% more time than fresh. Ground turkey and peppers are very versatile. You can use them for tacos, stuffed peppers, or casseroles. They also work well in stir-fries or pasta dishes. For a hearty soup, combine them with broth and beans. You can also make a savory chili. Explore new flavor pairings by adding different spices or herbs. For more ideas, check the Full Recipe for inspiration! This article covered key ingredients for your dish, including ground turkey, peppers, and spices. I shared step-by-step instructions on cooking and tips for selecting quality ingredients. You can vary the recipe with different spices and ingredient swaps. Proper storage and meal prepping can help you enjoy leftovers. Embrace this recipe, and make it your own. Enjoy delicious meals that are easy, healthy, and fun.
Ground Turkey and Peppers Flavorful Easy Recipe
Are you ready to spice up your weeknight meals? This Ground Turkey and Peppers recipe is both flavorful and easy to make! With just a
- 8 oz elbow macaroni - 1 lb chicken breast, cut into bite-sized pieces - 2 tablespoons unsalted butter, divided - 3 cloves garlic, finely minced - 1/2 cup honey (preferably local) - 1/4 cup soy sauce (use tamari for gluten-free option) - 1 tablespoon apple cider vinegar - 1 teaspoon smoked paprika - Salt and freshly ground black pepper, to taste - 2 green onions, thinly sliced (for garnish) - 1/4 cup grated Parmesan cheese (optional) This dish is simple but packed with flavor. The honey and garlic make a great sauce for the chicken. The elbow macaroni adds a fun twist. You can even use local honey for a special touch. This is a quick meal that works for busy nights. You can serve it with a salad on the side. Enjoy the yummy taste while keeping it easy to make! {{ingredient_image_2}} 1. Boil a large pot of salted water. 2. Add 8 oz of elbow macaroni. 3. Cook according to package directions until al dente. 4. Drain the pasta and set it aside. Do not rinse. 1. In a large skillet, melt 1 tablespoon of unsalted butter over medium heat. 2. Add 1 lb of chicken breast cut into bite-sized pieces. 3. Season with salt, pepper, and 1 teaspoon of smoked paprika. 4. Sauté the chicken for 6-8 minutes. Cook until golden brown and fully done. 1. Remove the cooked chicken from the skillet and place it on a plate. 2. In the same skillet, add the remaining tablespoon of butter and 3 minced garlic cloves. 3. Sauté the garlic for 1-2 minutes until it smells great. 4. Pour in 1/2 cup of honey, 1/4 cup of soy sauce, and 1 tablespoon of apple cider vinegar. 5. Stir to mix all the ingredients and let it simmer for 2-3 minutes. This helps the sauce thicken. 1. Put the chicken back into the skillet. Toss it in the honey garlic sauce. 2. Add the cooked macaroni to the skillet and mix everything well. 3. Cook for an additional 2 minutes to let the flavors blend perfectly. 4. Remove from heat. Garnish with sliced green onions and sprinkle with Parmesan cheese if you like. Serve hot and enjoy! To achieve perfectly cooked chicken, start with bite-sized pieces. This helps cook the chicken evenly. Season the pieces well with salt, pepper, and smoked paprika. Sauté them in butter over medium heat. Cook until they turn golden brown, about 6-8 minutes. Keep stirring to ensure they don't stick. For cooking macaroni to al dente, boil a large pot of salted water. Add the elbow macaroni and follow the package directions. Check about a minute before the time is up. You want the pasta tender but still firm to the bite. Drain and set aside without rinsing. This keeps the starch that helps the sauce stick. Using homemade or local honey gives the best flavor. Local honey adds a taste of your area and can be healthier. If you can, visit a local market for fresh honey. You can also add spice variations to your dish. Red pepper flakes give a nice kick. Add them when you mix the chicken with the sauce. You can adjust the amount based on your heat preference. Pair your Honey Garlic Butter Chicken Mac with side dishes or salads. A green salad with a light dressing works well. You can also serve it with steamed veggies for added color and nutrition. For creative presentation, serve the mac in bowls and top with green onions. A sprinkle of Parmesan cheese adds a nice touch. You can also use a drizzle of honey on top for a sweet finish. Enjoy your meal! Pro Tips Use Local Honey: Local honey can enhance the flavor of your dish and supports local beekeepers. It’s often richer in taste than mass-produced honey. Perfectly Cooked Pasta: To avoid mushy pasta, always cook your elbow macaroni until al dente. This ensures it retains a slight bite and holds up well in the sauce. Adjust Sweetness: Feel free to adjust the amount of honey based on your taste preference. If you like it sweeter, add a bit more, or reduce it for a more savory flavor. Add Vegetables: For a more balanced meal, consider adding some sautéed vegetables like bell peppers or spinach into the mix for added nutrition and color. {{image_4}} You can switch up your pasta by using gluten-free options like rice or chickpea pasta. This keeps the dish tasty for those with gluten issues. For chicken, try using tofu or shrimp instead. Tofu absorbs flavors well, and shrimp cooks quickly. Both options can give you a fun twist. If you're dairy-free, just skip the cheese. The dish stays delicious without it. For a low-sugar option, consider using agave syrup or monk fruit sweetener instead of honey. Both will still give you that sweet taste without the sugar rush. Changing the sauce can change the whole dish. Swap honey garlic for teriyaki or barbecue sauce for a new flavor. You can also add veggies like broccoli or bell peppers. This not only adds nutrition but also makes the dish more colorful and fun. To keep your Honey Garlic Butter Chicken Mac fresh, follow these steps: - Allow the dish to cool down to room temperature. - Place leftovers in airtight containers. - Store in the fridge for up to three days. This way, you can enjoy your meal later without losing flavor. You can reheat your dish using two methods: - Stovetop: Place the mac in a skillet. Add a splash of water or broth. Heat on low until warm. Stir often to keep it moist. - Microwave: Put the mac in a microwave-safe bowl. Cover it loosely. Heat for 1-2 minutes, stirring halfway through. Both methods keep the texture and taste great! If you want to save some for later, freezing works well: - Portion the mac into single servings. Use airtight containers or freezer bags. - Label them with the date. Freeze for up to three months. When you're ready to eat, defrost in the fridge overnight. Reheat as mentioned above for best results. Enjoy your meal anytime! If you need a honey substitute, try maple syrup or agave nectar. Both add sweetness. You can also use brown sugar mixed with water for a similar taste. Each option gives a unique twist, so pick what you like best! You can store Honey Garlic Butter Chicken Mac for up to four days in the fridge. Make sure to keep it in an airtight container. This helps keep it fresh and safe to eat later. Yes, you can prepare this dish ahead of time. Cook the macaroni and chicken, then store them separately. When ready to eat, just combine and heat them together. This saves time for busy days! This dish is not spicy. It has a sweet and savory flavor from the honey and garlic. If you enjoy heat, add red pepper flakes or hot sauce to spice it up. Adjust the heat to match your taste! This dish combines simple ingredients to create a tasty meal. We talked about cooking elbow macaroni and chicken, then making a sweet sauce. I shared tips on flavoring and serving your dish. You can even change ingredients for different tastes. Overall, this recipe is easy and perfect for any meal. Prepare, enjoy, and impress your family with your skills!
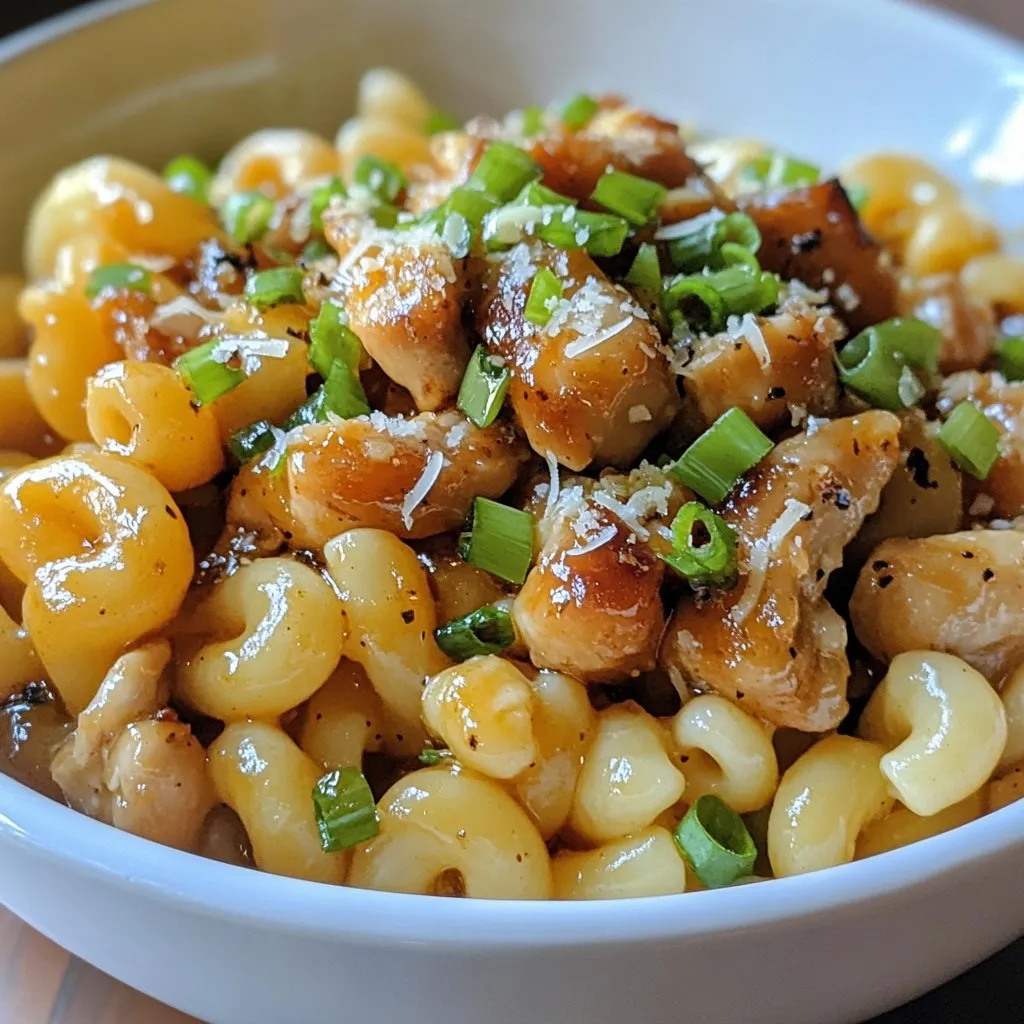
Honey Garlic Butter Chicken Mac Quick and Tasty Meal
Looking for a quick and tasty meal? Try my Honey Garlic Butter Chicken Mac! This dish blends tender chicken, rich butter, and sweet honey for
- 1 pound ground beef - 1 cup fresh spinach, chopped - 3 cloves garlic, minced - 1/2 cup breadcrumbs - 1/4 cup grated Parmesan cheese - 1/4 cup milk - 1 teaspoon Italian seasoning - Salt and pepper to taste - 8 oz mozzarella cheese, cut into small cubes - 1 egg, beaten - 1 tablespoon olive oil Gathering the right ingredients is key to making delicious spinach garlic meatballs stuffed with mozzarella. Start with good quality ground beef; it forms the base of your meatballs. Fresh spinach adds color and nutrition. Minced garlic gives a strong flavor that pairs well with the beef. You will need breadcrumbs for texture, and grated Parmesan cheese adds a nice cheesy touch. Milk keeps the mixture moist. Italian seasoning brings warmth and depth. Don't forget salt and pepper to enhance all the flavors. The star of the show is the mozzarella cheese. Cutting it into small cubes helps it melt beautifully inside the meatballs. An egg binds everything together, ensuring your meatballs hold their shape. Finally, a tablespoon of olive oil is essential for browning your meatballs, giving them that beautiful golden crust. For the full recipe, check out the detailed instructions to create this dish. - Preheat your oven to 400°F (200°C) and line a baking sheet with parchment paper. - In a large mixing bowl, combine the ground beef, chopped spinach, minced garlic, breadcrumbs, grated Parmesan cheese, milk, Italian seasoning, salt, and pepper. Mix until well combined. - Take a small portion of the meat mixture, about the size of a golf ball, and flatten it in your palm. - Place a cube of mozzarella in the center of the flattened meat and carefully fold the meat around the cheese, ensuring it is completely sealed. Repeat this process until all the meat mixture is used. - In a large skillet, heat the olive oil over medium heat. Add the meatballs and sear them for about 2-3 minutes on each side until they are browned. - Transfer the browned meatballs to the prepared baking sheet and bake in the preheated oven for 15-20 minutes, or until cooked through. - Once cooked, remove the meatballs from the oven and let them sit for a few minutes before serving. By following these steps, you will create delicious spinach garlic meatballs stuffed with mozzarella. Enjoy the process! To brown meatballs evenly, use a hot skillet with olive oil. Sear them for 2-3 minutes on each side. This helps lock in flavor. Make sure not to overcrowd the pan. Give each meatball space to cook properly. To prevent meatballs from breaking, do not overmix the meat mixture. Gently shape them with your hands. If you add breadcrumbs, they will hold together better. To elevate the flavor, consider adding a pinch of crushed red pepper or smoked paprika. These spices can bring a warm kick to your meatballs. For stuffing, try using different types of cheese like provolone or gouda. Each cheese offers a unique taste that can surprise your palate. For plating, serve the meatballs on a large platter. Drizzle them with marinara sauce for a pop of color. Garnish with fresh basil or parsley to add a fresh touch. This makes the dish look inviting. You can also sprinkle a bit of grated cheese on top before serving. It adds a nice finishing touch. For a side, consider garlic bread or a simple salad. They pair wonderfully with the meatballs. For a full recipe, check out the complete Spinach Garlic Meatballs Stuffed with Mozzarella recipe. {{image_2}} You can easily swap ground beef for turkey or chicken. This change makes the dish lighter without losing flavor. If you want a plant-based option, use lentils or chickpeas. These alternatives give a great texture and taste. Try different cheeses for stuffing. Cheddar or feta can add a fun twist. For more flavor, mix in herbs or spices. Adding basil or crushed red pepper can make the meatballs stand out. You can serve meatballs with marinara sauce or even a creamy sauce. Pair them with garlic bread or a fresh salad for balance. If you want a full meal, serve meatballs over pasta. It makes a hearty dish that everyone will love. For the complete Spinach Garlic Meatballs Stuffed with Mozzarella recipe, check the link above. To keep your meatballs fresh, store them in an airtight container. Place them in the fridge within two hours of cooking. If you want to freeze them, wrap each meatball in plastic wrap and place them in a freezer bag. This way, they stay moist and tasty. When reheating, use the oven or stovetop instead of the microwave. This helps prevent drying out the meatballs. Heat them gently over low heat until warm. Cooked meatballs can last about 3 to 4 days in the fridge. Uncooked meatballs stay fresh for 1 to 2 days. Always check for signs of spoilage. If the meatballs smell sour or have a slimy texture, discard them. Fresh meatballs should have a firm feel and a pleasant aroma. To simplify weeknight meals, make meatballs in advance. You can prepare them on the weekend and store them in the fridge. For freezing, place uncooked meatballs on a baking sheet to freeze them individually. Once frozen, transfer them to a freezer bag. This makes it easy to grab a few for quick dinners during the week. You can bake them straight from the freezer; just add a few extra minutes to the cooking time. For a full recipe, check out the complete Spinach Garlic Meatballs Stuffed with Mozzarella recipe. To check if your meatballs are done, use a meat thermometer. The safe internal temperature for beef is 160°F (71°C). Insert the thermometer into the center of a meatball. If it reads 160°F or higher, they are safe to eat. If not, return them to the oven for a few more minutes. Always double-check the temperature to ensure safety and avoid undercooked meat. Yes, you can make these meatballs ahead of time. Prepare the mixture and form the meatballs. Place them on a baking sheet and freeze them for later. Once frozen, transfer the meatballs to a freezer bag. When ready to cook, you can bake them straight from the freezer. Just add a few extra minutes to the cooking time. This method saves time and makes meal prep easier. These meatballs pair well with many sides. You can serve them with spaghetti and marinara sauce for a classic dish. A fresh salad or garlic bread makes a nice addition too. Roasted vegetables or a creamy polenta can also enhance the meal. Feel free to get creative with your sides and enjoy a well-rounded dinner. For the complete Spinach Garlic Meatballs Stuffed with Mozzarella recipe, check out the [Full Recipe](#). In this blog post, we explored making delicious Spinach Garlic Meatballs with mozzarella. You learned about the key ingredients like ground beef, spinach, and garlic. We walked through preparation, cooking steps, and tips to enhance flavor. I also shared variations and ways to store your leftovers effectively. Final thoughts: This recipe is fun to make and easy to adapt. Enjoy experimenting, and happy cooking!
Spinach Garlic Meatballs Stuffed with Mozzarella Delight
If you love a delicious home-cooked meal, these Spinach Garlic Meatballs Stuffed with Mozzarella are a must-try! Packed with flavor from fresh spinach and garlic,
- 4 ears of fresh corn, husked and kernels removed - 1 tablespoon olive oil - 1 small onion, diced - 2 cloves garlic, minced - 1 red bell pepper, diced Fresh corn is the star of this soup. It gives a sweet, juicy taste. I love using corn right off the cob. It adds freshness that frozen corn can't match. Olive oil helps to sauté the veggies, bringing out their flavors. Onions, garlic, and red bell pepper add depth and richness to the soup. The sweet pepper balances the corn's sweetness. - 1 jalapeño, seeds removed and diced (optional for spice) - 1 cup coconut milk If you like heat, add a jalapeño. It gives the soup a nice kick. If you prefer it mild, skip the jalapeño. Coconut milk makes the soup creamy. It adds a touch of sweetness and a hint of tropical flavor. You can also use cream if you want a richer taste. - 1/2 cup crumbled queso fresco or feta cheese (for garnish) - 1/4 cup freshly chopped cilantro (for garnish) - Juice of 1 lime Garnishes make this dish pop. Crumbled queso fresco or feta cheese adds a salty bite. Fresh cilantro gives a burst of color and flavor. Lime juice adds acidity, balancing the sweetness of the corn. These toppings are not just pretty; they enhance the soup's taste. For the full recipe, check out the Mexican Street Corn Soup section. Preparing the Vegetables Start by husking the corn. Use a sharp knife to remove the kernels from the cob. You need about four ears. Next, dice one small onion and two cloves of garlic. If you like spice, dice one jalapeño, removing the seeds. Chop one red bell pepper into small pieces as well. Heating the Olive Oil In a large pot, heat one tablespoon of olive oil over medium heat. This oil adds flavor and helps cook the veggies. Sautéing the Onion and Garlic Once the oil is hot, add the diced onion. Sauté for about three to four minutes until it turns soft and translucent. Add the minced garlic next. Keep stirring for about one minute. This brings out the garlic’s great flavor. Adding Corn and Spices Now, stir in your corn kernels, diced red bell pepper, and jalapeño if using. Add one teaspoon of smoked paprika, one teaspoon of cumin, salt, and pepper. Let this cook for two to three minutes. This step helps the corn caramelize a bit. Blending the Soup Pour in four cups of vegetable broth and bring the mix to a boil. Reduce the heat and let it simmer for about 10 to 15 minutes. Once it’s ready, use an immersion blender to make the soup smooth. If you don’t have one, you can blend it in batches using a regular blender. Incorporating Coconut Milk Return the soup to the pot and stir in one cup of coconut milk. Let it simmer for another five minutes. This adds creaminess to the soup. Don’t forget to add the juice of one lime for a fresh kick. Enjoy your delicious Mexican Street Corn Soup! For the full recipe, check out the recipe section above. Fresh corn is key to great flavor. Visit local farmers' markets or grocery stores. Look for ears with bright green husks. The kernels should feel plump and firm. If the silk is brown and sticky, it's fresh. Spices make your soup shine. Use smoked paprika for a warm flavor. Cumin adds a nice earthiness. Always check the freshness of your spices. Old spices lose their punch. To get the best texture, sauté your veggies well. Cook them until they soften. This step builds flavor. When blending, stop when it’s smooth but still has some chunks. This gives a nice bite. Taste your soup as you cook. Adjust salt and pepper as needed. If it’s too spicy, add coconut milk to tone it down. If it lacks flavor, a squeeze of lime can brighten it up. Serve your soup with salsa or tortilla chips. This adds crunch and flavor. You can even mix in corn salsa for extra texture. It's a fun way to elevate your dish! Garnish with crumbled queso fresco or feta cheese. Fresh cilantro adds a bright touch. A squeeze of lime juice gives it a fresh kick. These small touches make a big difference! For the full recipe, check out the [Full Recipe]. {{image_2}} Vegan Version To make this soup vegan, simply skip the cheese and use vegetable broth. The coconut milk adds creaminess without any dairy. You still enjoy a rich taste. This version is just as delicious and satisfying. Gluten-Free Options Great news! This soup is naturally gluten-free. Just confirm that your vegetable broth is gluten-free. Making this soup safe for everyone at your table is easy. You can serve it without worry. Adding Different Peppers Want to spice things up? Try using different peppers. You can add poblano for a smoky taste or serrano for more heat. Each pepper gives a unique twist to your soup. Mix and match to find your favorite flavor. Incorporating Other Vegetables Feel free to add other veggies. Some great options are zucchini, carrots, or even tomatoes. These will add color and nutrition. Plus, they enhance the flavor of your Mexican street corn soup. Get creative with what you have on hand! Chilled Version In warm weather, a chilled version is refreshing. Just let the soup cool completely, then chill in the fridge. Serve it cold with fresh cilantro and lime. It’s a perfect summer treat! Creamy vs. Brothy Some like their soup creamy, while others prefer it brothy. If you want a creamier soup, add more coconut milk. For a brothier version, add extra vegetable broth. Adjust to your taste for the best experience. For the full recipe, check out the details above. To store leftover soup, let it cool first. Pour it into an airtight container. Store it in the fridge. This keeps the soup fresh for later meals. Best practices for keeping freshness include keeping the soup covered. Use it within three to four days for the best taste. If you notice a change in smell or color, it’s time to toss it. For freezing instructions, use a freezer-safe container. Leave some space at the top for expansion. The soup can last up to three months in the freezer. Reheating tips are simple. Thaw it in the fridge overnight before reheating. Heat it on the stove over medium heat, stirring often. You can add a splash of broth to restore its creaminess. In the fridge, expect the soup to last about three to four days. After that, it may spoil. Signs of spoilage include a sour smell or visible mold. If you see either, do not eat it. Always trust your senses when checking food. Mexican Street Corn Soup is a warm and creamy dish inspired by elote, a popular street food. This soup combines sweet corn, spices, and creamy coconut milk. You enjoy the flavors of grilled corn, lime, and cheese in every bite. The fresh corn gives it a sweet taste, while the spices add warmth. It's a delicious way to celebrate the vibrant flavors of Mexico. Yes, you can make this soup ahead of time. Cook the soup as directed, then let it cool completely. Store it in an airtight container in the fridge for up to three days. When you're ready to eat, simply reheat it on the stove over low heat. Stir well to combine, and it will taste fresh again. To change the spice level, you can add or remove jalapeños. If you want a mild soup, skip the jalapeño. For a spicier kick, add more diced jalapeños or include red pepper flakes. Tasting as you go helps you find the perfect balance for your palate. Absolutely! Frozen corn works well in this recipe. It saves time and is often sweeter than canned corn. Just add the frozen corn directly to the pot when you cook the soup. There’s no need to thaw it first. The cooking time may be a little longer, but it will taste great. If you need a substitute for coconut milk, try heavy cream or almond milk. For a non-dairy option, use oat milk or cashew milk. Each option will change the flavor slightly, but the soup will still be delicious. Choose what fits your taste or dietary needs best. To thicken the soup, you have a few options. You can blend in more corn until it reaches your desired texture. Adding a cornstarch slurry is another method; mix equal parts cornstarch and water, then stir it into the soup. Let it simmer for a few minutes, and it will thicken nicely. This blog post covered how to make a delicious Mexican Street Corn Soup. We explored key ingredients, like fresh corn and spices. You learned step-by-step instructions for cooking and blending your soup perfectly. We shared tips on sourcing ingredients and offered variations to suit different diets. As you prepare this dish, remember that fresh flavors make a big difference. Enjoy the cooking process and have fun experimenting with your own twists. Your soup will be a hit every time!
Mexican Street Corn Soup Flavorful and Easy Recipe
If you love the vibrant taste of Mexican street corn, you’ll adore this soup! In just a few easy steps, you can create a warm
To make Italian grinder sliders, you need some key ingredients. Each one plays a part in creating that rich flavor. - 1 pound ground beef and 1 pound Italian sausage - 1 small onion, finely chopped - 2 cloves garlic, minced - 1 teaspoon dried oregano - 1 teaspoon Italian seasoning - 1/2 teaspoon red pepper flakes (optional, for added heat) - 1 cup marinara sauce - 12 slider buns - 1 cup shredded mozzarella cheese - 1/2 cup grated Parmesan cheese - Fresh basil leaves, for garnish These ingredients work together to build a tasty slider. The ground beef and sausage give it depth, while the onions and garlic add a nice base flavor. The spices bring warmth and a hint of heat if you choose to add red pepper flakes. Marinara sauce ties it all together, adding moisture and richness. Don't forget the cheeses! Mozzarella melts beautifully, while Parmesan adds a sharp note. Finally, fresh basil not only looks nice but brings a burst of freshness. Gather these ingredients, and you're ready to create a mouthwatering dish. Let's dive into the steps to make these sliders shine! {{ingredient_image_2}} First, I heat a large skillet over medium heat. I add 1 pound of ground beef and 1 pound of Italian sausage, breaking up the meat with a wooden spoon. I cook this for about 8-10 minutes until it turns brown and is fully cooked. Next, I add 1 small finely chopped onion and 2 cloves of minced garlic. I sauté these for 3-4 minutes until the onion is soft. Then, I mix in 1 teaspoon of dried oregano and 1 teaspoon of Italian seasoning. If you like heat, add 1/2 teaspoon of red pepper flakes. I let this cook for another minute to bring out the flavors. Finally, I pour in 1 cup of marinara sauce and stir well. I let this simmer for about 5 minutes to blend the flavors nicely. Now, I preheat my oven to 375°F (190°C). I slice 12 slider buns in half and place the bottom halves in a baking dish. I spoon the meat mixture generously over these buns, spreading it evenly. Next, I sprinkle 1 cup of shredded mozzarella cheese on top, followed by 1/2 cup of grated Parmesan cheese. I press the top halves of the buns gently over the cheese layer. I cover the baking dish with aluminum foil and place it in the preheated oven for 15 minutes. After that, I carefully remove the foil and bake for another 10 minutes. This step helps the tops of the buns become golden brown and the cheese bubble up. Once baked, I take them out and let them cool for a few minutes. I garnish with fresh basil leaves before serving to add a lovely touch. To make your sliders pop, adjust the seasoning. Try adding more red pepper flakes for heat. If you like it mild, skip them. I often use homemade marinara. It gives a fresh taste. Store-bought sauces save time but may lack depth. Serve these sliders on a big wooden board. Add a bowl of marinara for dipping. Pair them with crispy potato chips or a fresh salad. This combo brings balance and crunch. Chop your onions and garlic small for even cooking. Use a sharp knife to save time. When cooking meat, keep the heat medium. This helps it brown nicely without burning. Break up the meat as it cooks for the best texture. Pro Tips Mixing Meats: Combine different types of ground meats for a richer flavor profile. The blend of ground beef and Italian sausage adds depth to the sliders. Cheese Options: Experiment with different cheeses like provolone or fontina for a unique twist on the classic flavor. These can melt beautifully and add a different taste. Make Ahead: Prepare the meat mixture a day in advance and store it in the fridge. This allows the flavors to develop further and makes the assembly quicker on the day of serving. Serving Suggestions: Pair the sliders with a fresh side salad or crispy potato wedges for a complete meal experience. It balances the richness of the sliders perfectly. {{image_4}} You can change the cheese for your Italian grinder sliders. Provolone adds a nice flavor. It melts well and gives a creamy bite. Cheddar is another good choice. It brings a sharp taste that contrasts with the meat. If you want a twist, try fontina. It's rich and smooth. Mix and match cheeses for your perfect blend. You can make these sliders vegetarian too! Use plant-based ground meat instead of beef and sausage. There are many options on the market now. You can even use chopped mushrooms or lentils for texture. They add a nice earthy flavor and are very filling. Don’t forget to add extra spices to boost the taste! You can make your marinara sauce just how you like it. If you like heat, add red pepper flakes for a spicy kick. You can also toss in extra veggies. Chopped bell peppers or spinach can add color and nutrients. Simmer these veggies in the sauce to let the flavors blend. This gives your sliders a fresh and tasty twist! To keep your Italian grinder sliders fresh, let them cool first. Place them in an airtight container. Use parchment paper between layers to avoid sticking. Store in the fridge for up to three days. This way, they stay tasty and safe to eat. You can freeze these sliders for later. First, assemble the sliders but do not bake them. Wrap each slider tightly in plastic wrap. Then, place them in a freezer bag. They can stay good for up to three months. When you're ready to eat, thaw them in the fridge overnight. To reheat, bake at 375°F for about 20 minutes until hot. In the fridge, your sliders last about three days. If you freeze them, they can last up to three months. Always check for any signs of spoilage before eating. Enjoy them fresh for the best taste! Bake your Italian grinder sliders for 25 minutes. First, cover them with foil for 15 minutes. Then, remove the foil and bake for 10 more minutes. This helps the tops get golden brown and the cheese melt nicely. Yes, you can prep these sliders ahead. Assemble them and keep them covered in the fridge. Bake them just before serving for the best taste. This makes it easy for parties or gatherings. Great sides include: - Crispy potato wedges - Fresh garden salad - Garlic bread - Coleslaw These sides balance the rich flavors of the sliders. To reheat, place sliders in the oven at 350°F (175°C). Heat for about 10-15 minutes. This keeps them warm and the cheese melty. You can also microwave them for a quicker option. They can be spicy! The red pepper flakes add heat if you choose to use them. If you want less spice, just skip them. The flavors still shine through without the spice. Use soft slider buns for the best texture. Here are some great options: - Hawaiian rolls - Potato buns - Mini ciabatta These choices add flavor and hold the filling well. This post shared how to make delicious Italian grinder sliders. You learned about the key ingredients, like ground beef, sausages, and cheeses. I gave you step-by-step instructions, plus tips to perfect the flavors. You can even explore variations, from vegetarian options to different cheeses. Lastly, I explained how to store your sliders for later. No matter your choice, these sliders promise satisfaction! Enjoy your cooking and the tasty results.
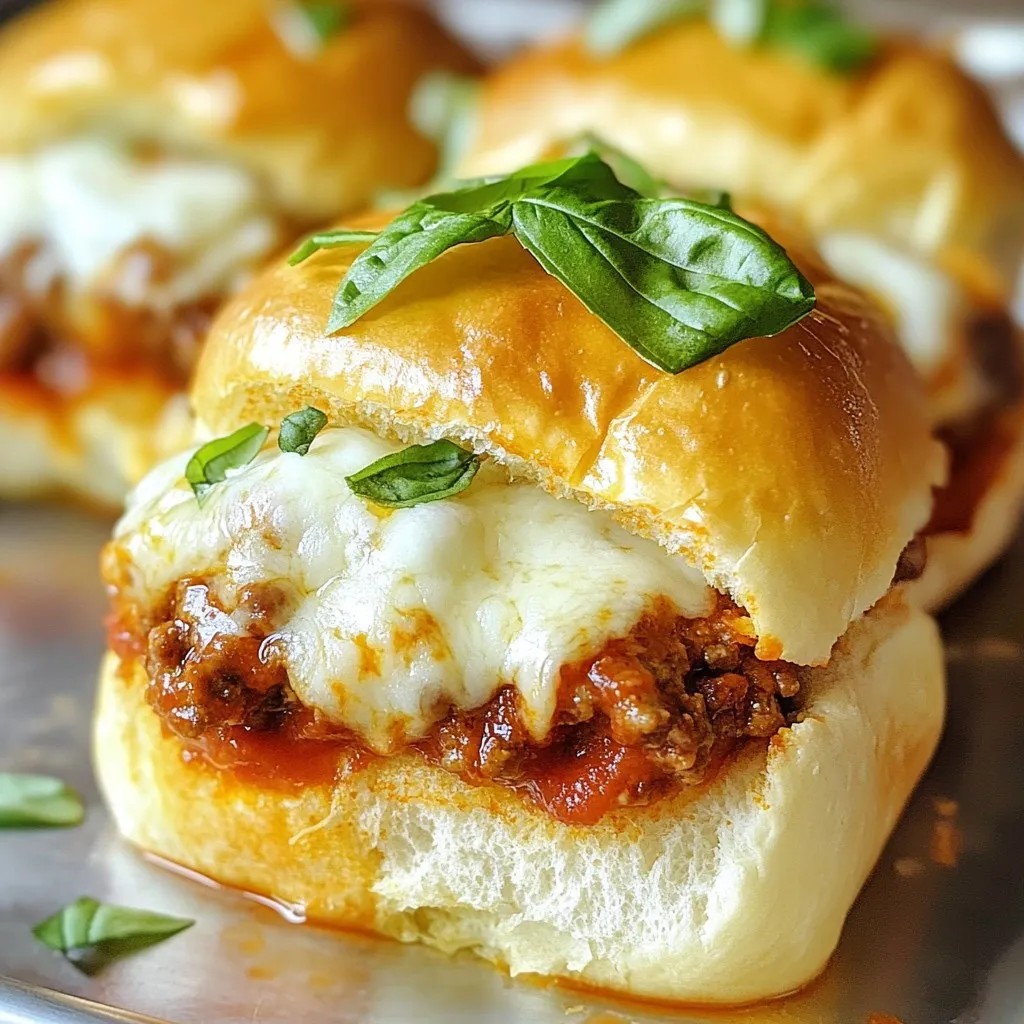
Italian Grinder Sliders Flavorful and Simple Recipe
Get ready to impress your friends and family with my Italian Grinder Sliders! This simple recipe combines ground beef, Italian sausage, and gooey cheese, all
- 1 lb chicken tenderloins - 1 cup breadcrumbs (preferably panko) - 1/2 cup grated Parmesan cheese - 2 tablespoons fresh parsley, finely chopped - 1 tablespoon fresh thyme leaves - 1 teaspoon garlic powder - 1 teaspoon onion powder - Salt and pepper to taste - 2 eggs, beaten - 1 tablespoon olive oil - Citrus Salsa ingredients When I create meals, I want them to be both tasty and easy. Chicken tenderloins are a great choice because they cook quickly and stay juicy. This zesty herb-crusted chicken tenderloin recipe is a personal favorite. The magic starts with the main ingredients. You only need chicken tenderloins, breadcrumbs, and Parmesan cheese. Panko breadcrumbs add the perfect crunch. Next, we mix in herbs and spices. Fresh parsley and thyme bring bright flavors. Garlic and onion powders add depth. Don’t forget to add salt and pepper to enhance all these flavors. For extra richness, you will need beaten eggs. They help the breadcrumbs stick to the chicken. A drizzle of olive oil adds flavor and helps the chicken crisp up nicely. And let’s not forget the citrus salsa! It’s fresh and bright. You can use oranges, grapefruit, and jalapeño for a kick. This salsa pairs perfectly with the chicken. All these ingredients come together to create a meal you will love. For more details, check the Full Recipe. - Preheat your oven to 400°F (200°C). - Line a baking sheet with parchment paper. - Mix breadcrumbs and cheese with herbs and spices in a bowl. - Beat the eggs in a separate bowl until smooth. - Dip each chicken tenderloin in the egg, letting the excess drip off. - Coat the chicken with the breadcrumb mixture, pressing gently. - Place the coated chicken on the baking sheet and drizzle with olive oil. - Bake for 15-20 minutes until golden brown. While your chicken cooks, this is a great time to prepare the zesty citrus salsa that pairs so well with the chicken. The bright flavors of the salsa make each bite even more exciting! - Ensure the internal temperature reaches 165°F (75°C). - Let the chicken rest for better juiciness. Cooking chicken tenderloins can be simple and rewarding. A meat thermometer helps ensure you hit the right temperature. Insert it into the thickest part of the tenderloin. This step guarantees safe and tasty chicken. After cooking, let the tenderloins rest for a few minutes. This allows the juices to settle and keeps them moist. - Experiment with different cheeses or herbs. - Add a dash of hot sauce for a spicy kick. You can boost flavor with ease. Try adding different cheeses like cheddar or mozzarella. Fresh herbs like basil or oregano can add a bright taste. If you like heat, a dash of hot sauce is perfect. It adds an exciting kick to each bite. - Use panko breadcrumbs for extra crunch. - Broil for a couple of minutes at the end for browning. For a crunchy texture, panko breadcrumbs work best. They create a light, crispy coating. After baking, broil the tenderloins for a few minutes. This extra step gives them a beautiful golden color and enhances the crispiness. You can enjoy these tenderloins with the zesty salsa from the Full Recipe for a great flavor combination. {{image_2}} You can change up how you coat your chicken tenderloins for fun. Here are some ideas: - Swap breadcrumbs for crushed nuts for a gluten-free version. - Use crushed cornflakes for a crunchier texture. These options add new flavors and textures to your meals. Changing the flavor can make your chicken tenderloins shine. Try these ideas: - Add lemon zest to the coating for a citrus twist. - Create an Asian-inspired version with sesame seeds and soy sauce. These twists can take a simple dish to a new level. How you serve your chicken can make it even better. Here are some tasty pairings: - Pair with different salsas or sauces like mango salsa or BBQ sauce. - Serve over a bed of salad or with a side of rice. These suggestions can help you create a colorful and delicious plate. For a full recipe, check out the Zesty Herb-Crusted Chicken Tenderloins with Citrus Salsa. Store leftover chicken tenderloins in an airtight container. They stay good for up to 3 days in the fridge. Make sure they cool down before sealing. This helps keep them fresh longer. When you’re ready to eat, just heat them up! You can freeze chicken tenderloins for easy meal prep. Coat them but do not cook them first. Place them in a freezer bag, squeezing out the air. They can last for months this way. When you want to cook them, just thaw and bake. For cooked tenderloins, you can also freeze them. Reheat cooked tenderloins in the oven. This keeps their texture nice and juicy. When reheating, the oven is better than the microwave. The oven keeps the chicken crispy. Microwaving can make it soggy. If you do use a microwave, place a paper towel over the chicken. This helps absorb extra moisture. Always check that it’s hot all the way through. Enjoy your tenderloins just like they were fresh! Chicken tenderloins are small strips of meat located under the breast. They are very tender and flavorful. This part of the chicken is known for its quick cooking time. Many people love them for their ease and taste. Yes, you can use chicken breasts instead of tenderloins. Cut the breasts into strips to mimic tenderloins. Keep in mind that chicken breasts take longer to cook. Adjust your cooking time to ensure they are tender and juicy. Look for a few signs to know when chicken tenderloins are ready. The meat should be opaque and no longer pink. The juices should run clear when you cut into them. Use a meat thermometer to check for an internal temperature of 165°F (75°C). Letting the chicken rest before serving helps keep it juicy. Zesty herb-crusted chicken tenderloins are easy and fun to make. We covered the main ingredients and step-by-step instructions to achieve a delicious dish. I shared tips for perfect tenderloins and suggested flavor variations and storage methods. Remember, cooking is about trying new things. Experiment with spices or coatings to find your favorite. Enjoy your cooking journey and share these tasty meals with friends and family!
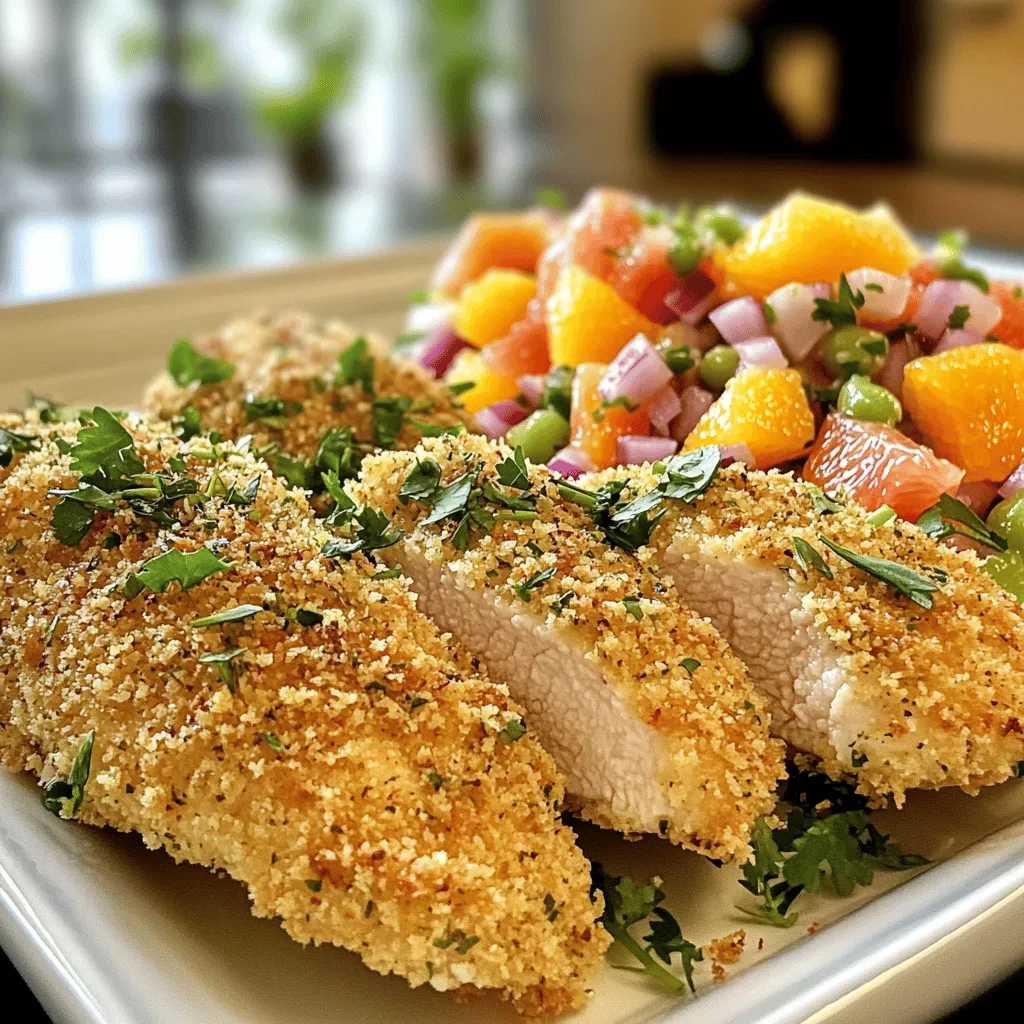
Delicious Chicken Tenderloin Meals Flavorful and Easy
Are you ready to transform chicken tenderloins into a flavorful feast? In this post, I will share easy and delicious recipes that will please your