Dinner

- 1 pound large shrimp, peeled and deveined - 2 cups broccoli florets - 3 tablespoons honey - 3 tablespoons soy sauce - 2 cloves garlic, minced - 1 teaspoon fresh ginger, grated - 2 tablespoons olive oil - 1 tablespoon cornstarch - 2 tablespoons water - 1 teaspoon sesame seeds (for garnish) - 2 green onions, sliced (for garnish) - Salt and pepper to taste - You can swap shrimp for chicken, tofu, or scallops. - Use low-sodium soy sauce if you want less salt. - For sweeteners, maple syrup or agave work well instead of honey. These ingredients combine to create a sweet and savory dish. The shrimp offers a firm texture, while the broccoli adds color and crunch. Each element plays a role in balancing flavors. For more detailed cooking steps, check out the Full Recipe. 1. Whisking the sauce ingredients Start by taking a small bowl. Add honey, soy sauce, minced garlic, grated ginger, cornstarch, and water. Whisk these ingredients together until they are smooth. This sauce will give the dish its sweet and savory flavor. 2. Cooking the broccoli Heat 1 tablespoon of olive oil in a large skillet or wok over medium-high heat. Once the oil is hot, add the broccoli florets. Stir-fry them for about 3-4 minutes. They should look bright green and feel tender-crisp. Remove them from the skillet and set them aside. 1. Heating the oil and seasoning shrimp In the same skillet, add another tablespoon of olive oil. Now, add the shrimp. Season them with salt and pepper. This step will bring out their natural taste and enhance the dish. 2. Ensuring perfect shrimp texture Cook the shrimp for about 2-3 minutes on each side. They should turn pink and opaque when they are done. This will ensure they are juicy and tender. 1. Mixing in the honey garlic sauce Pour the honey garlic sauce over the cooked shrimp. Stir well to coat all the shrimp evenly. This ensures every bite is packed with flavor. 2. Finalizing with broccoli and serving suggestions Add the stir-fried broccoli back into the skillet. Mix everything together until it is well combined and heated through. For serving, place it on a plate or bowl. Drizzle extra sauce on top and garnish with sesame seeds and sliced green onions. Enjoy it with steamed rice or quinoa for a complete meal. For the full recipe, refer to the recipe section above. - Perfect shrimp cooking time: Cook shrimp for 2-3 minutes on each side. They should turn pink and opaque. Overcooking makes them tough. Keep an eye on them to get the right texture. - Ensuring broccoli retains its crunch: Stir-fry broccoli for 3-4 minutes until bright green. It should stay tender-crisp. Don't cook it too long, or it will become mushy. - Adding spice for heat: If you like heat, add red pepper flakes or a dash of hot sauce. This adds a nice kick without overpowering the sweet and savory flavors. Adjust to your spice level. - Adjusting sweetness level: If you prefer less sweetness, reduce honey by a tablespoon. You can also add a splash of vinegar for balance. Taste as you go to find your ideal mix. - Plating ideas: Serve shrimp and broccoli in a shallow bowl. Drizzle extra honey garlic sauce on top. This makes the dish look appetizing and adds more flavor. - Garnishes that elevate the dish: Use sesame seeds and sliced green onions for garnish. They add color and texture. You can also add a wedge of lime for a fresh touch. {{image_2}} You can change this dish easily by adding different vegetables. Try bell peppers, snap peas, or carrots. These veggies add color and crunch. You can also use different proteins like chicken or tofu. Each option brings its own flavor and texture. Chicken works great with the honey garlic sauce. Tofu soaks up the sauce well, making it tasty and filling. Pair your honey garlic shrimp and broccoli with rice or noodles. White or brown rice complements the dish nicely. Noodles can make it feel more like a stir-fry. You can also serve it as part of a meal prep. Divide the shrimp and broccoli into containers for easy lunches. This way, you have a healthy meal ready to go. To make this meal gluten-free, switch to a gluten-free soy sauce. Many brands offer this option, and it tastes just as good. For vegan adaptations, replace shrimp with tofu or tempeh. Use maple syrup instead of honey for sweetness. These swaps keep the flavor while meeting your dietary needs. To store leftovers safely, let the dish cool first. Place the shrimp and broccoli in an airtight container. This keeps them fresh and prevents odors from spreading. You can store it in the fridge for up to three days. For best results, use glass or plastic containers with tight-fitting lids. These types help maintain flavor and moisture. Avoid using metal containers, as they might react with the sauce. Reheating honey garlic shrimp and broccoli is easy. The best method is to use a skillet. Heat a little oil over medium heat. Add the leftovers and stir gently. This helps keep the shrimp tender and the broccoli crisp. Heat for about 5-7 minutes. Stir often to prevent sticking or burning. You can also use a microwave if you’re in a hurry. Heat on medium for 1-2 minutes, stirring halfway through. Yes, you can freeze honey garlic shrimp and broccoli. Place it in a freezer-safe bag or container. Remove as much air as possible to prevent freezer burn. This meal can last up to three months in the freezer. When you’re ready to eat, thaw in the fridge overnight. For quick thawing, place the bag in cold water. Once thawed, reheat it using the skillet method to bring back its flavors. How long does it take to cook shrimp? Cooking shrimp takes about 4 to 6 minutes. You want them pink and opaque. Cook them for 2 to 3 minutes on each side. Be careful not to overcook shrimp. They can turn rubbery. Can I use frozen shrimp for this recipe? Yes, you can use frozen shrimp. Just make sure to thaw them first. You can leave them in the fridge overnight. If you’re in a hurry, run them under cold water. Pat them dry before cooking. What can I substitute for honey? If you need a substitute for honey, try maple syrup or agave. Both add sweetness and flavor. You can also use brown sugar mixed with water. Adjust based on your taste. Is soy sauce necessary for the recipe? Soy sauce adds saltiness and depth to the dish. If you need a substitute, use tamari for gluten-free. You can also use coconut aminos for a sweeter taste. If you skip it, add more salt. How can I make this dish spicier? To spice things up, add red pepper flakes or sriracha. You can also include diced jalapeños. Adjust the heat level based on your taste. Start slow, then add more if needed. What are the best side dishes to pair with honey garlic shrimp & broccoli? Serve this dish with steamed rice or quinoa. Both absorb the sauce well. You can also add a fresh salad or stir-fried noodles. For a light meal, pair with a simple cucumber salad. For more detailed guidance, check the [Full Recipe](#). This blog post covered the key ingredients and steps to make honey garlic shrimp and broccoli. You learned about cooking tips, variations, and how to store leftovers. Remember, cooking is about having fun and experimenting. Feel free to change up the ingredients and make it your own. Enjoy your meal with friends or family. With this easy dish, dinner will be a win every time. Happy cooking!
Honey Garlic Shrimp & Broccoli Flavorful Quick Meal
Looking for a quick and tasty dinner idea? Honey Garlic Shrimp & Broccoli is your answer! With just a few simple ingredients, you can whip
To make Italian grilled cheese sandwiches, you need key ingredients. Here’s the list: - 4 slices of rustic Italian bread - 2 tablespoons basil pesto - 1 cup fresh mozzarella cheese, sliced - ½ cup sun-dried tomatoes, chopped - ½ teaspoon garlic powder - 2 tablespoons olive oil - Salt and pepper to taste - Fresh basil leaves for garnish These ingredients blend well to create a tasty sandwich. The rustic Italian bread gives a great texture. The mozzarella melts beautifully, making each bite rich and creamy. Sun-dried tomatoes add a sweet and tangy touch. You can add some optional extras to boost the flavor. Consider these options: - Roasted red peppers for sweetness - Fresh spinach for a healthy crunch - Prosciutto for a salty kick - A sprinkle of red pepper flakes for heat These extras let you customize your sandwich. Feel free to mix and match based on your taste. Choosing the right bread is key to a great grilled cheese. Here are some recommended types: - Ciabatta for a crispy crust - Focaccia for a fluffy inside - Pane Toscano for a rustic flavor Each bread type brings its own character. Experiment with different breads to find your favorite! For a full recipe, you can check the detailed steps provided. First, gather all your ingredients. You will need: - 4 slices of rustic Italian bread - 2 tablespoons basil pesto - 1 cup fresh mozzarella cheese, sliced - ½ cup sun-dried tomatoes, chopped - ½ teaspoon garlic powder - 2 tablespoons olive oil - Salt and pepper to taste - Fresh basil leaves for garnish Start by laying out your bread slices. Spread basil pesto on one side of each slice. Next, slice your fresh mozzarella. Chop the sun-dried tomatoes. This prep makes cooking easy and fun. Now, it's time to grill. Preheat your skillet over medium heat. Drizzle olive oil in the hot skillet. Take two slices of bread with pesto facing out. Place mozzarella slices on the non-pesto side. Sprinkle the chopped sun-dried tomatoes on top. Season with garlic powder, salt, and pepper. Cover with the other two slices of bread, pesto side out. Place the sandwiches in the skillet. Grill each side for about 3-4 minutes. You want the bread golden and crispy, and the cheese melted. Once grilled, remove the sandwiches from the skillet. Let them cool for a minute. This helps the cheese set a bit. Slice the sandwiches in half for easy eating. Garnish with fresh basil leaves for color and aroma. Enjoy your tasty Italian grilled cheese! For detailed cooking steps, check the Full Recipe. To get that ideal golden crust, you need two things: heat and fat. Use medium heat. If it's too hot, the bread burns. If it's too low, it won't crisp up. Use olive oil when grilling the sandwich. It adds flavor and helps the bread brown nicely. Spread it evenly on the outside of the bread. This will make each bite crunchy and tasty. For the best melt, I love fresh mozzarella. It gets gooey and adds a creamy taste. You can also mix cheeses. Try adding provolone or fontina for extra flavor. Keep in mind that shredded cheese melts faster than slices. If you're in a hurry, shredded works great. Just remember to layer it well for a good melt. One big mistake is using cold bread. Always let the bread sit at room temperature. Cold bread won't cook well. Another mistake is not enough oil or butter. You need enough fat to help the bread crisp. Don’t rush the cooking. Let each side grill for 3-4 minutes. If you flip too soon, the cheese won't melt properly. Keep these tips in mind, and you’ll make the best Italian grilled cheese sandwiches every time! {{image_2}} If you love meat, add slices of prosciutto or salami. These meats pair well with the rich cheese. They add great flavor and texture. You can even use grilled chicken for a heartier meal. Just layer your chosen meat on top of the cheese before grilling. This gives you a tasty, protein-packed sandwich. For a veggie twist, you can add roasted peppers, spinach, or artichoke hearts. These ingredients add color and nutrition. They also bring a fresh taste. Try mixing in some sliced mushrooms for an earthy flavor. Just layer your veggies between the cheese and bread. This way, you keep the sandwich hearty and filling without meat. If you need gluten-free options, use gluten-free bread. Many brands offer great flavors and textures. Look for rustic or artisan styles for the best results. Also, check ingredients to ensure they fit your diet. Grilling may take a bit longer, but you’ll get that crispy crust. Enjoy your Italian grilled cheese without missing out! To store leftover Italian grilled cheese sandwiches, let them cool first. Wrap each sandwich in foil or parchment paper. This keeps them from getting soggy. Place them in an airtight container. They will last up to three days in the fridge. When you’re ready to eat, reheat the sandwiches to keep them crispy. A skillet works best. Heat it over medium heat, adding a little butter or oil. Place the sandwich in the skillet. Grill each side for about 2-3 minutes. This method helps restore that golden, crunchy crust. You can also freeze these sandwiches for later. Wrap each sandwich tightly in plastic wrap. Then, place them in a freezer bag. They can last up to two months in the freezer. When you want one, just thaw in the fridge overnight. Reheat as mentioned above for the best results. Yes, you can use different cheeses! Try provolone, fontina, or even a mix. Each cheese gives a unique taste. Mixing cheeses can add depth and richness to your sandwich. For a sharp flavor, use aged cheeses. For a milder option, mozzarella works great. Just remember to keep that gooey texture we love when melting! Great sides can lift your meal! A fresh salad with arugula and cherry tomatoes pairs well. You can also serve it with a bowl of tomato soup. The soup adds warmth and comfort. For a crunchy touch, try potato chips or pickles. They contrast nicely with the creamy sandwich. To make this dish dairy-free, choose vegan cheese. Brands like Daiya or Violife offer tasty options. Use dairy-free butter or olive oil for grilling. You can also add nutritional yeast for a cheesy flavor. This keeps the essence of the sandwich while catering to your needs! You can find the Full Recipe for Italian Grilled Cheese Sandwiches right here. It lists all the ingredients and step-by-step instructions to guide you through the process. Enjoy every bite of this delightful treat! You learned how to make Italian grilled cheese sandwiches with the best tips and tricks. We covered essential ingredients, how to grill them perfectly, and ways to store leftovers. Remember to play with flavors and toppings to suit your taste. Making these sandwiches can be quick and easy. With practice, you'll impress yourself and others. Enjoy your tasty creations and don't be afraid to experiment!
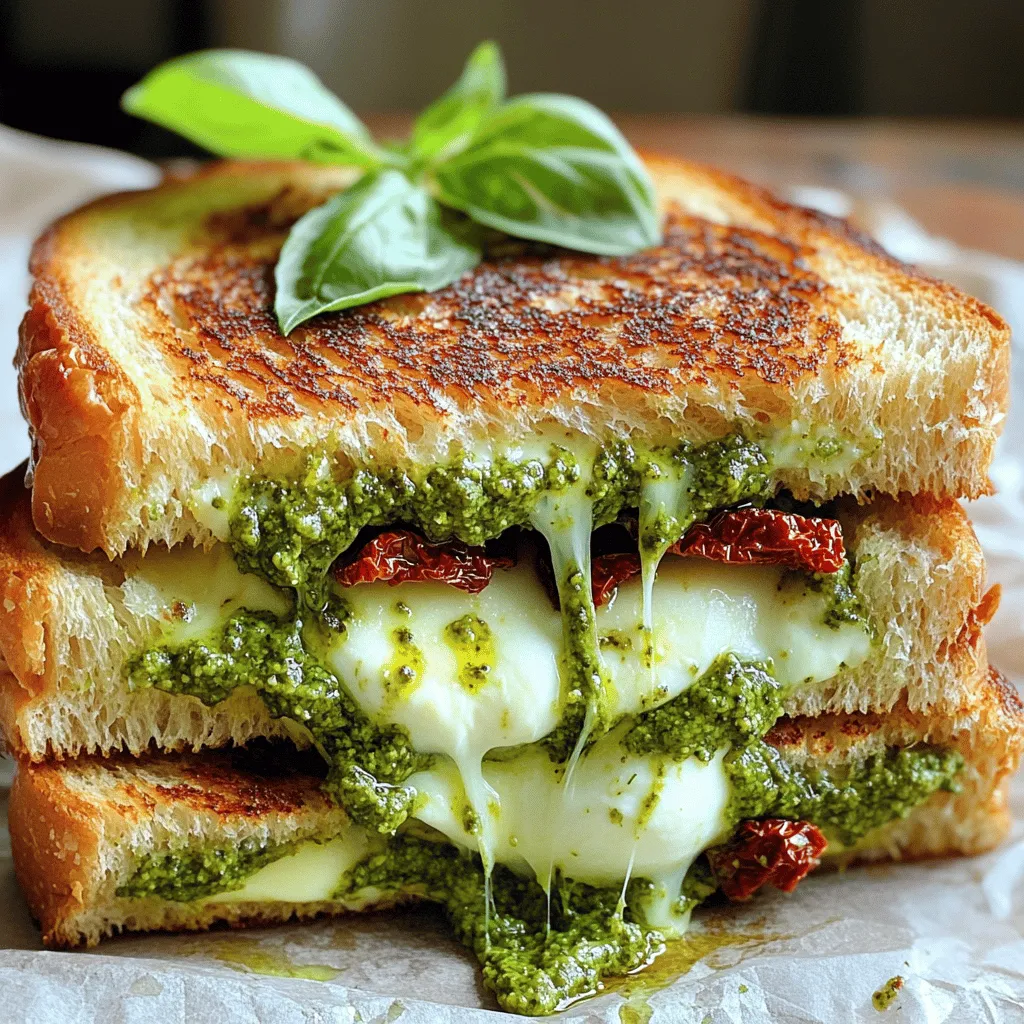
Italian Grilled Cheese Sandwiches for Tasty Delight
Are you ready to take your grilled cheese game to a whole new level? In this post, we’ll explore the art of making Italian grilled
- 8 oz egg noodles (or ramen noodles) - 2 tablespoons vegetable oil - 1 cup mixed bell peppers, julienned - 1 small carrot, julienned - 1 cup broccoli florets - 2 green onions, thinly sliced - 2 cloves garlic, finely minced - 3 tablespoons soy sauce - 1 tablespoon sesame oil - 1 teaspoon fresh ginger, grated - Salt and freshly cracked pepper - Sesame seeds for garnish For this quick and tasty dish, you need a mix of fresh ingredients. I prefer to use vibrant bell peppers for color and crunch. The egg noodles or ramen noodles serve as the base. Vegetables are key. They add texture and flavor. Use broccoli florets for a nice bite. Julienne the carrots and peppers for even cooking. The green onions add a fresh touch at the end. Don’t forget the aromatics! Garlic and ginger bring warmth and depth. They make the dish smell amazing. The soy sauce and sesame oil add a savory kick. Adjust these based on your taste. Finally, the sesame seeds are a must! They add a nice crunch and look great on the plate. When you gather these ingredients, you are set for a delightful meal. {{ingredient_image_2}} To cook the noodles, start with a large pot. Bring salted water to a strong boil. Add in 8 oz of egg noodles. Cook them for about 3 minutes. You want them to be al dente, which means they should still have a slight bite. Drain the noodles in a colander. Rinse them with cold water. This stops the cooking process and keeps them from getting soggy. Set the noodles aside for later. While the noodles cook, let’s prepare the vegetables. For the mixed bell peppers and carrot, use a sharp knife to julienne them. This means cutting them into thin strips. For the broccoli, break it into small florets. Make sure each piece is bite-sized. This helps them cook evenly. Once cut, keep the veggies aside until you need them. Next, heat oil in a skillet or wok. Pour in 2 tablespoons of vegetable oil. Turn the heat to medium-high. Wait until the oil shimmers and is hot. Add 2 cloves of minced garlic and 1 teaspoon of grated ginger to the hot oil. Stir-fry for about 30 seconds until they smell good. Then, add the julienned bell peppers, carrot, and broccoli florets. Stir-fry for 3-4 minutes. You want the veggies tender but still crunchy. Now, it’s time to combine everything. Gently add the pre-cooked noodles into the skillet with the veggies. Use a spatula to toss everything together. Make sure the noodles and veggies mix well. Next, drizzle in 3 tablespoons of soy sauce and 1 tablespoon of sesame oil. Toss again to coat everything evenly. Taste, and add salt and freshly cracked pepper if needed. This step ensures every bite is flavorful. To keep your veggies crunchy, stir-fry them for just a few minutes. Start with garlic and ginger for flavor. Then, add bell peppers, carrots, and broccoli. Cook until they are bright and tender. Avoid overcooked noodles by boiling them for only three minutes. Rinse them under cold water to stop the cooking. This keeps them firm and ready to fry. Adjust the soy sauce based on your taste. If you love saltiness, add more. For a lighter flavor, use less. Sesame oil adds a nice nutty touch. Don't skip the garnishes! Green onions and sesame seeds make each bite pop. They add color and crunch to your dish. Serve your noodles in shallow bowls for a nice look. This way, everyone sees the colorful veggies. Add a sprig of fresh cilantro on top for extra flair. Using chopsticks to eat adds fun too! Choose bright dishware to highlight the dish's colors and make it appealing. Pro Tips Use Fresh Ingredients: Fresh vegetables will enhance the flavor and nutritional value of your dish. Opt for seasonal produce whenever possible. Customize Your Noodles: Feel free to substitute egg noodles with whole wheat or gluten-free options based on your dietary preferences. Adjust the Sauce: Experiment with different types of soy sauce, such as low-sodium or tamari, to suit your taste and health needs. Spice It Up: If you enjoy heat, add a pinch of red pepper flakes or a drizzle of sriracha for an extra kick in flavor. {{image_4}} You can add protein to your Minute Pan-Fried Noodles for extra flavor and nutrition. Here are some tasty options: - Chicken: Use about 1 cup of cooked, diced chicken. Cook it for 5-7 minutes until golden. - Shrimp: Add 1 cup of shrimp. Cook for 2-3 minutes until they turn pink. - Tofu: Use 1 cup of firm tofu, cut into cubes. Cook for about 4-5 minutes until golden. Adding protein makes the dish more filling and satisfying. You can switch up the vegetables based on what you have. Here are some ideas for seasonal swaps: - Zucchini: Slice it thin. It cooks quickly and adds a nice texture. - Snap Peas: These add a sweet crunch. Stir-fry them for about 2 minutes. - Spinach: Toss in a handful at the end. It wilts quickly and adds nutrients. Using different vegetables not only boosts the dish’s flavor but also increases its nutritional value. If you love heat, add a spicy kick to your noodles. Here’s how to do it: - Chili Flakes: Sprinkle in about 1 teaspoon while cooking. Adjust based on your spice level. - Sriracha: Drizzle some on top right before serving. It packs a flavorful punch. Balancing the heat is key. You want to enhance the flavors, not overpower them. To keep your Minute Pan-Fried Noodles fresh, use airtight containers. Glass or plastic containers work great. Make sure to cool the noodles before sealing them. Store them in the fridge for up to three days. If you plan to eat them later, try to keep the veggies separate to avoid sogginess. When it's time to enjoy your leftovers, use the stovetop for the best results. Heat a pan over medium heat and add a splash of water. This will help keep the noodles moist. Stir them gently to avoid sticking. If you're in a hurry, you can use the microwave. Just cover the bowl with a damp paper towel. This helps prevent drying out. You can freeze cooked noodles for longer storage. First, let them cool completely. Then, place them in a freezer-safe bag. Remove as much air as possible before sealing. They can last up to three months in the freezer. When you're ready to eat, thaw them in the fridge overnight. Reheat them as you normally would, adding a bit of water if needed. Pan-fried noodles can last about 3 to 5 days in the fridge. To store them, place the noodles in an airtight container. Make sure they are cool before sealing. This keeps them fresh and prevents moisture loss. Always check for any off smells or signs of spoilage before eating. Yes, you can easily make this recipe gluten-free. Use rice noodles or gluten-free egg noodles instead of traditional egg noodles. For soy sauce, choose a gluten-free version or use tamari. Both options give great flavor without gluten. Egg noodles and ramen noodles are both great choices for pan-frying. Egg noodles cook quickly and have a nice chew. Ramen noodles are also quick and can get crispy when fried. Avoid using thick pasta, as it may not cook evenly in this quick dish. To save time, prep ingredients ahead of time. Chop your veggies and cook noodles the day before. You can also use pre-cooked or instant noodles. They take less time to cook. Keep your skillet hot to speed up cooking the vegetables. Absolutely! To make this recipe vegetarian, simply skip the meat and use vegetable broth instead of any meat-based sauces. You can also add more vegetables or tofu for protein. This keeps the dish hearty and satisfying without any meat. In this blog post, we explored the key ingredients for delicious pan-fried noodles and how to cook them perfectly. We discussed cooking techniques, tips for great flavor, and variations to suit your taste. It's clear that with the right ingredients and methods, you can create a tasty meal. Remember to store leftovers properly and enjoy the creative options this dish offers. Your pan-fried noodle adventure starts now!
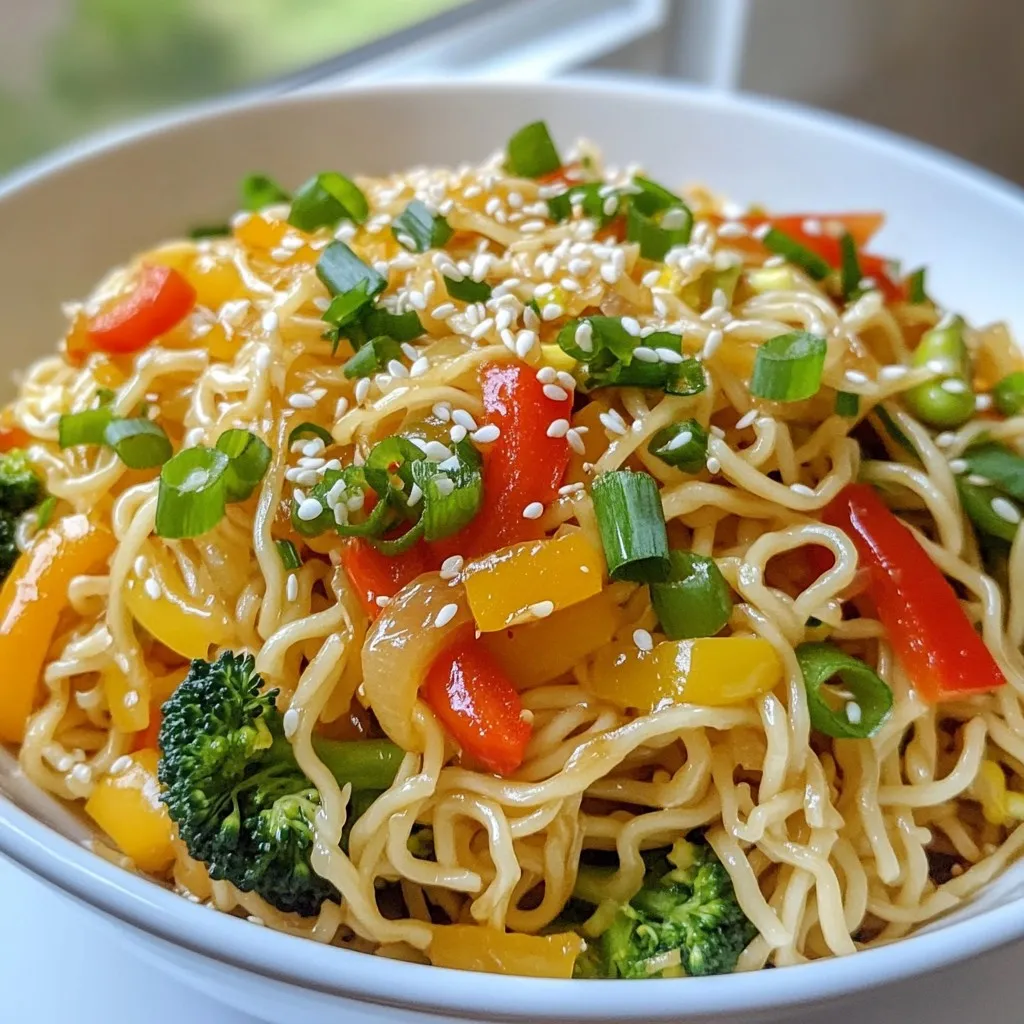
Minute Pan-Fried Noodles Quick and Flavorful Meal
Need a quick meal that’s both tasty and easy to make? Let me show you how to whip up Minute Pan-Fried Noodles. In just a
To make Chicken Pot Pie Pasta, gather these simple ingredients: - 8 oz pasta (fusilli or penne recommended) - 2 tablespoons extra virgin olive oil - 1 medium onion, diced - 2 medium carrots, diced - 2 celery stalks, diced - 2 cloves garlic, minced - 2 cups cooked chicken, shredded - 1 cup frozen peas - 3 cups chicken broth (homemade or low-sodium for best flavor) - 1 cup heavy cream - 1 teaspoon dried thyme - 1 teaspoon dried rosemary - Salt and freshly ground black pepper to taste - 1 cup shredded sharp cheddar cheese - Fresh parsley, chopped for garnish You can change this dish to suit your taste. Consider these options: - Use different pasta shapes like rotini or farfalle. - Swap cooked chicken for turkey or rotisserie chicken. - Add mushrooms for extra flavor and texture. - Toss in spinach or kale for added nutrients. - Use a blend of cheeses, like mozzarella or gouda, for a twist. This dish is not just tasty; it's also a good source of nutrients. Here’s a quick look: - Calories: Approximately 500 per serving - Protein: High due to chicken and cheese - Carbs: Comes mainly from pasta and veggies - Fats: Heavy cream and cheese add healthy fats Enjoy this hearty meal packed with flavor! {{ingredient_image_2}} To start, bring a large pot of salted water to a boil. I suggest using a good amount of salt. This adds flavor to the pasta. Once the water is boiling, add 8 ounces of fusilli or penne pasta. Cook it according to the package instructions until it is al dente. This usually takes about 8 to 10 minutes. After cooking, drain the pasta but save a small cup of pasta water. You might need it later to adjust the creaminess. Next, we’ll prepare the veggies. In the same pot, heat 2 tablespoons of extra virgin olive oil over medium heat. Once the oil is hot, add 1 medium diced onion, 2 diced carrots, and 2 diced celery stalks. Sauté these vegetables for about 5 minutes. You want them to soften and the onion to turn translucent. After that, add 2 minced cloves of garlic. Stir this mixture for about one minute. The garlic should become fragrant but not browned. Now, let’s make the sauce. Add 2 cups of shredded cooked chicken to the pot. Stir it in with the sautéed veggies. Gradually pour in 3 cups of chicken broth. Bring this mixture to a gentle simmer. Reduce the heat and mix in 1 cup of heavy cream. Now, add 1 teaspoon of dried thyme and 1 teaspoon of dried rosemary. Season with salt and freshly ground black pepper to taste. Let this simmer for 5 to 7 minutes until it thickens slightly. After thickening, fold in the cooked pasta and 1 cup of frozen peas. Stir well to combine everything. If the dish looks too thick, add a splash of the reserved pasta water. This helps reach your desired creaminess. Finally, remove the pot from heat and stir in 1 cup of shredded sharp cheddar cheese. This creates a creamy, cheesy finish. Serve hot and garnish with chopped fresh parsley for added color and freshness. To make a creamy sauce, use heavy cream. It adds richness. You can also mix in a bit of pasta water. This helps with texture and flavor. If your sauce seems too thick, add more cream or water. Stir it well until smooth and creamy. Using fresh herbs like thyme and rosemary boosts flavor. Always taste your sauce. Adjust salt and pepper based on your liking. Store any leftovers in an airtight container. Let it cool down first. Refrigerate it within two hours of cooking. Chicken Pot Pie Pasta stays fresh for about three days. For longer storage, freeze it. Make sure to use a freezer-safe container. Label it with the date. When you're ready to eat, thaw it overnight in the fridge. To make a complete meal, serve this dish with a side salad. A simple green salad pairs well. You can also offer garlic bread for a nice touch. If you want more veggies, add steamed broccoli or green beans. For drinks, a light white wine or sparkling water can enhance the meal. Enjoy it with family or friends for a cozy dinner! Pro Tips Use Fresh Herbs: Fresh thyme and rosemary can elevate the flavor profile of your dish significantly. Consider using fresh herbs instead of dried for a more vibrant taste. Cook Pasta Al Dente: Make sure to cook your pasta al dente, as it will continue to cook slightly when combined with the sauce. This will prevent it from becoming mushy. Adjust Creaminess: If the sauce is too thick after adding the pasta, use the reserved pasta water to adjust the consistency to your liking. It helps to maintain the flavor as well. Garnish for Freshness: A sprinkle of fresh parsley not only adds a pop of color but also enhances the overall flavor of the dish. Don't skip this final touch! {{image_4}} You can switch up the protein in this dish. Try turkey instead of chicken. Shredded rotisserie chicken works great too. For a seafood twist, use cooked shrimp or crab. Just make sure to add them at the right time to keep them tender. If you want a veggie version, skip the chicken. Add mushrooms for a meaty texture. Bell peppers and zucchini also work well. You can use vegetable broth instead of chicken broth. This keeps the flavor rich and satisfying without meat. Boost the flavor with spices. Add a pinch of cayenne for heat. A splash of lemon juice brightens the dish. Fresh herbs like basil or dill add a nice touch. You can also mix in some garlic powder or onion powder for depth. Experiment to find your perfect blend! To store Chicken Pot Pie Pasta, first let it cool. Use an airtight container. This keeps the pasta fresh and tasty. Try to eat it within three days. You can store it in the fridge. Avoid leaving it out for too long. When you reheat Chicken Pot Pie Pasta, do it slowly. Use a stove or microwave. If using a stove, add a little water or broth. This keeps it creamy. Heat on low to avoid burning. Stir often to warm it evenly. In the microwave, cover it to keep moisture in. Heat in short bursts, stirring in between. Freezing Chicken Pot Pie Pasta is a great option. Use a freezer-safe container. Leave some space at the top. This allows for expansion. You can freeze it for up to three months. To thaw, place it in the fridge overnight. Reheat it as described above for the best taste. Yes, you can use gluten-free pasta. Look for brands that offer fusilli or penne shapes. These work well in this dish. Cooking times may vary, so check the package instructions. Gluten-free pasta can be just as tasty and will soak up the creamy sauce. To lower calories, use whole wheat pasta. This adds fiber and keeps you full longer. Swap the heavy cream for a low-fat milk or unsweetened almond milk. You can also cut back on cheese or use a lighter version. Adding more veggies like spinach or mushrooms can help cut calories too. If you need a substitute for heavy cream, try using half-and-half. It gives a creamy texture with fewer calories. You can also blend silken tofu with a little water for a dairy-free option. Greek yogurt adds creaminess too, but mix it in at the end to avoid curdling. This blog post gives you all you need for a tasty Chicken Pot Pie Pasta. You learn about key ingredients, how to cook each part, and the best tips for creamy sauce. You also discover ways to customize the dish and store leftovers. Remember, whether you choose chicken or a veggie option, enjoy experimenting with flavors. Now, you have a dish that’s not only easy to make, but also fun to share. Happy cooking!
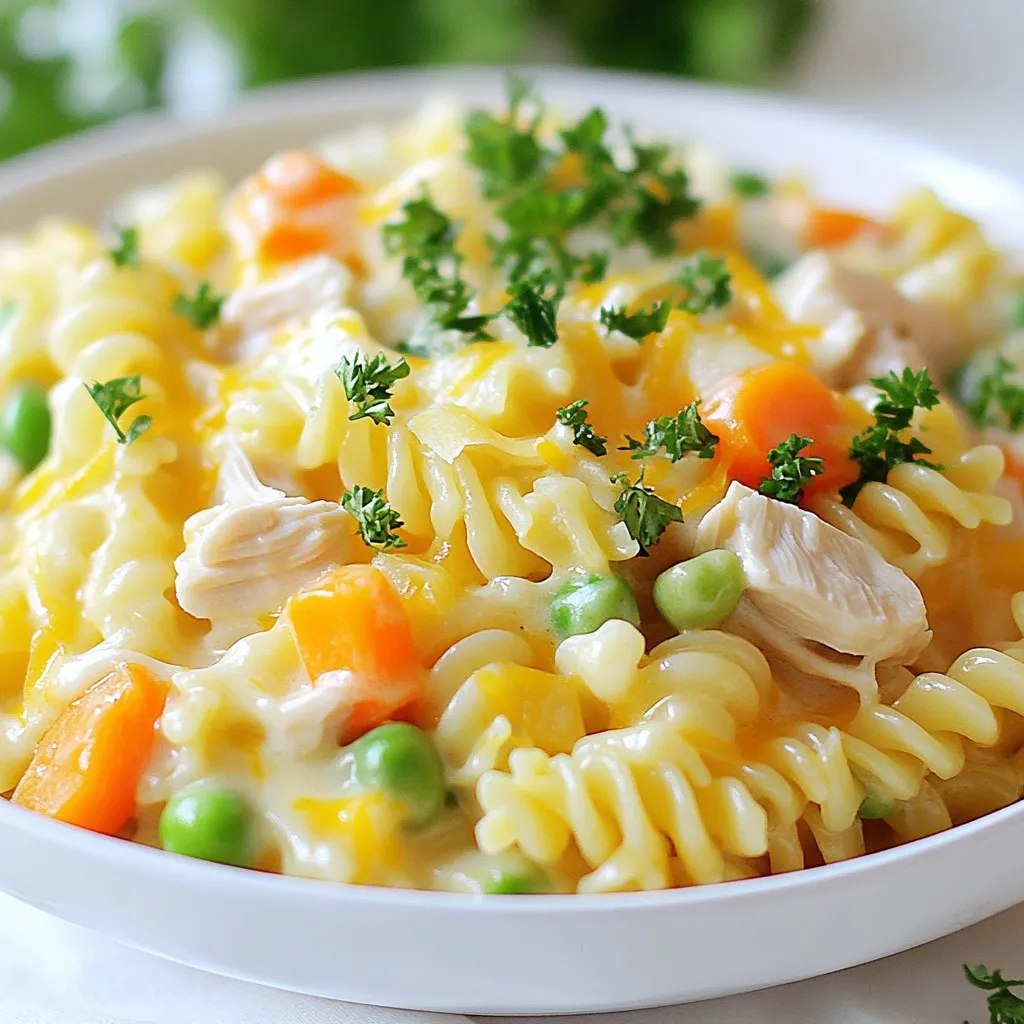
Chicken Pot Pie Pasta Flavorful Comfort Food Dish
Looking for a cozy dish that warms your heart and fills your belly? Chicken Pot Pie Pasta is your answer! This flavorful comfort food combines
- 2 lbs large shrimp, peeled and deveined - 1 lb baby potatoes, halved - 2 ears of corn, cut into thirds - 1 onion, quartered - 4 cloves garlic, minced - 3 tablespoons Old Bay seasoning - 2 teaspoons smoked paprika - 2 tablespoons olive oil - Fresh parsley, chopped (for garnish) - 4 cups chicken broth - Salt & pepper to taste - Lemon, sliced To create a Traeger shrimp boil, you need fresh and simple ingredients. The shrimp gets its flavor from the garlic and Old Bay seasoning. The baby potatoes and corn add a nice texture and sweetness. Using fresh shrimp is key. Look for large shrimp that are firm and smell clean. The baby potatoes should be tender but not mushy. Fresh corn on the cob brings a sweet crunch. The seasonings make the dish shine. Old Bay adds that classic seafood taste. Smoked paprika adds a warm depth. Olive oil helps the flavors meld together. Don't forget the chicken broth! It creates a tasty base for boiling. Adding lemon slices brightens the dish. A sprinkle of parsley at the end adds color and fresh flavor. You can find the Full Recipe to dive deeper into the steps. Enjoy making this outdoor feast! - Preheat your Traeger grill to 350°F (175°C). - In a large pot or grill-safe pan, mix chicken broth, onion, garlic, Old Bay seasoning, smoked paprika, and seasoning. - Step 1: Add halved baby potatoes; cook for 15 minutes. - Step 2: Add corn; cook for an additional 5 minutes. - Step 3: Add shrimp and lemon slices; cook until shrimp turns pink (about 3-5 minutes). Cooking on a Traeger grill gives the shrimp boil a unique smoky flavor. I love the way it enhances the dish. The mix of shrimp, potatoes, and corn creates a fun feast for family and friends. Just follow these steps, and you will impress everyone at your next outdoor gathering. For the full recipe, check out the details above. Enjoy the process and the delicious meal! To tell when shrimp is done, watch for its color. Cooked shrimp turns pink and opaque. The flesh should be firm but not rubbery. For size, cook large shrimp for about 3-5 minutes. Medium shrimp need around 2-3 minutes. Always check the shrimp's thickest part for doneness. Use a heavy pot or a deep grill-safe pan on your Traeger grill. A cast-iron pot works well for even heat. Make sure it fits comfortably on your grill grates. When handling hot cookware, wear heat-resistant gloves. Be careful to avoid burns when lifting pots off the grill. To boost flavor, consider adding spices like cayenne or garlic powder. You can also try soaking shrimp in a marinade. A mix of olive oil, lemon juice, and garlic gives shrimp a nice kick. Let shrimp sit in the marinade for about 30 minutes before cooking. These steps elevate your Traeger shrimp boil to a new level. For the full recipe, check the earlier section. {{image_2}} You can take your Traeger shrimp boil to the next level. Adding sausage works wonders. Choose smoked sausage for a rich flavor. You can also try andouille or kielbasa for a bit of heat. Chopped up, it cooks well alongside shrimp and potatoes. Incorporate different vegetables, too. Bell peppers add color and sweetness. Carrots bring a nice crunch. Zucchini or asparagus can also be tasty additions. Just remember to chop them to a similar size for even cooking. Do you want a milder shrimp boil? Add a bit of cream or more broth. This will help tone down the spice. You can also remove some of the Old Bay seasoning. If you like more heat, sprinkle in red pepper flakes. You can add hot sauce to the broth for a kick. Just mix it in while simmering. Adjust to your taste for the perfect balance. You can make shrimp boil on the stovetop, but the Traeger adds a great smoky flavor. It’s easy to set up and clean. Plus, you can enjoy the outdoors while cooking. If you don't have a Traeger, you can use a regular grill. Just put your pot on a grill-safe surface. Make sure it stays stable and doesn’t tip over. You can still enjoy that delicious taste no matter your cooking method. For the full recipe, click here! To keep your Traeger shrimp boil fresh, store leftovers right away. Place them in airtight containers. This helps keep moisture and flavor in. Make sure to let the shrimp boil cool a bit before sealing it. I recommend using glass containers. They don’t stain or hold odors. When you want to enjoy leftovers, the best way to reheat is gently. Use a stovetop or microwave. If using a stovetop, add a splash of broth. This keeps the shrimp moist. Avoid high heat to prevent rubbery shrimp. Cook just until warm. Can you freeze shrimp boil? Yes, you can freeze it! But do this before adding shrimp. Cook all other ingredients, then cool before freezing. Use freezer-safe bags to save space. When ready to eat, thaw overnight in the fridge. Then, reheat on the stovetop, adding fresh shrimp. This keeps the shrimp tender and tasty. For a Traeger shrimp boil, large shrimp work best. They hold up well during cooking. You can use fresh or frozen shrimp. Fresh shrimp have a sweet taste. Frozen shrimp are often more convenient and still tasty. Just make sure to thaw them properly before cooking. For size, I recommend 16/20 count shrimp. This means there are 16 to 20 shrimp per pound. They cook evenly and look great on the plate. Don't forget to peel and devein them. This step saves time and keeps your meal clean. Yes, you can cook a shrimp boil without a Traeger grill. Here are a few ways: - Stovetop: Use a large pot on your kitchen stove. - Slow Cooker: Combine all ingredients and let them cook slowly. - Campfire: If you're outdoors, use a pot over a campfire for that smoky flavor. - Oven: Bake everything in a covered dish at a low temperature. Each method can give you a delicious result, so choose what works best for you! A shrimp boil pairs well with various sides and sauces. Here are some ideas: - Sides: Coleslaw, garlic bread, or a fresh green salad add balance. - Dipping Sauces: Try garlic butter, cocktail sauce, or a spicy remoulade. - Beverages: Serve with chilled beer or lemonade for a refreshing touch. These options will enhance your meal and make it even more enjoyable! This shrimp boil recipe combines fresh shrimp, potatoes, corn, and spices for great flavor. You learned how to prepare your Traeger grill and the perfect cooking sequence for best results. I shared tips for cooking shrimp and enhancing flavors, along with storage advice. Remember, a delicious shrimp boil can be tailored to your taste. Experiment with spices, add proteins, or try new vegetables. Enjoy this dish with friends and family for a fun meal. Happy grilling!
Traeger Shrimp Boil Delicious and Easy Outdoor Feast
Are you ready to impress your friends with a fun outdoor feast? The Traeger shrimp boil is a simple and delicious way to enjoy a
- 4 boneless, skinless chicken thighs - 1 cup long-grain white rice - 1 ½ cups chicken broth - ½ cup honey - ½ cup BBQ sauce - 1 tablespoon olive oil - 1 teaspoon garlic powder - 1 teaspoon onion powder - 1 teaspoon smoked paprika - ½ teaspoon salt - ¼ teaspoon black pepper - 1 cup mixed bell peppers, diced (red, yellow, green) - ½ cup corn (frozen or canned) - 2 green onions, sliced (for garnish) Always choose fresh chicken thighs for the best flavor and texture. I like to use organic chicken when possible. Long-grain white rice works best here, as it cooks evenly. For honey, look for raw or local honey for a deeper flavor. Use your favorite BBQ sauce, but a quality brand can enhance the dish. Fresh bell peppers add color and crunch. Frozen corn is quick and easy, while fresh corn can add sweetness. If you can't find chicken thighs, you can use boneless chicken breasts. They will cook a bit faster, so watch them closely. For the rice, brown rice can be used, but you will need to adjust the cooking time and liquid. You can swap the honey for maple syrup for a different sweet note. If you don't have bell peppers, use any other veggies you like, such as zucchini or carrots. The dish will still be tasty! {{ingredient_image_2}} To start, gather your ingredients. This makes cooking smooth and fun. You will need: - 4 boneless, skinless chicken thighs - 1 cup long-grain white rice - 1 ½ cups chicken broth - ½ cup honey - ½ cup BBQ sauce - 1 tablespoon olive oil - 1 teaspoon garlic powder - 1 teaspoon onion powder - 1 teaspoon smoked paprika - ½ teaspoon salt - ¼ teaspoon black pepper - 1 cup mixed bell peppers, diced - ½ cup corn - 2 green onions, sliced Make sure to wash and chop the bell peppers. This adds color and flavor to your dish. Next, heat the olive oil in a large skillet over medium-high heat. While the oil heats, season your chicken thighs. Use garlic powder, onion powder, smoked paprika, salt, and black pepper. Once the oil is shiny, place the chicken thighs in the skillet. Sear each side for 4-5 minutes. You want a nice golden-brown crust. After searing, remove the chicken and set it aside on a plate. In the same skillet, add the long-grain white rice. Pour in the chicken broth, honey, and BBQ sauce. Stir well to mix everything. Now, add the diced bell peppers and corn over the rice. This not only adds flavor but also makes the dish look bright. Next, return the seared chicken thighs to the skillet. Nestle them on top of the rice and vegetables. Bring the mixture to a gentle boil. Once it boils, reduce the heat to low and cover the skillet. Let it simmer for 20-25 minutes. This allows the rice to soak up the flavors and become tender. After the cooking time, remove the skillet from heat. Use a fork to fluff the rice gently. Mix in the chicken and vegetables. Garnish with sliced green onions for a fresh touch. Enjoy your meal! To get that nice golden-brown crust on your chicken, start with a hot pan. Heat olive oil over medium-high heat until it shimmers. While the oil heats, season your chicken thighs well. Use garlic powder, onion powder, smoked paprika, salt, and black pepper. This adds flavor. Place the chicken in the hot skillet and don’t crowd the pan. Sear for 4-5 minutes on each side. You'll know it's ready when it releases easily from the pan. This step is key for great taste. For fluffy rice, rinse the long-grain white rice before cooking. This removes extra starch and helps it cook evenly. After searing the chicken, use the same pan. This keeps all the tasty bits. Pour in the chicken broth, honey, and BBQ sauce with the rice. Stir well to mix. Once it starts to boil, reduce the heat and cover. Let it simmer for 20-25 minutes. Fluff the rice with a fork before serving. This adds air and makes it light. If you have leftovers, let the dish cool before storing. Keep it in an airtight container. This helps keep the flavors fresh. You can store it in the fridge for up to 3 days. When reheating, use a microwave or stovetop. Add a splash of chicken broth to keep it moist. If you want to save it longer, consider freezing. Just make sure to use a freezer-safe container. It can last up to 3 months frozen. Pro Tips Marinate for Extra Flavor: Consider marinating the chicken thighs in a mixture of honey and BBQ sauce for at least 30 minutes before cooking. This will enhance the flavor profile and provide a deeper taste. Choose the Right Rice: Using long-grain white rice is ideal for this recipe, as it cooks evenly and absorbs the flavors well. Avoid using quick-cooking rice as it may not yield the same texture. Keep it Covered: Make sure to keep the skillet covered while simmering. This traps steam and helps the rice cook evenly, resulting in a fluffy texture. Garnish for Color: Adding freshly sliced green onions not only adds color to the dish but also provides a nice crunch and a pop of fresh flavor that balances the sweetness of the honey and BBQ. {{image_4}} You can easily tweak this recipe for different diets. If you want it gluten-free, use gluten-free BBQ sauce. To make it low-carb, replace the rice with cauliflower rice. For a vegan option, swap the chicken for firm tofu. Tofu absorbs flavors well, making it a great choice. You can also use vegetable broth instead of chicken broth for added depth. If you want a change from chicken, there are many proteins to try. Boneless turkey thighs work well and have a similar texture. You can also use shrimp, which cooks fast and adds a nice twist. For a heartier option, try pork chops. Just adjust the cooking time to ensure everything cooks evenly. Adding different veggies can change the dish's flavor and texture. Try zucchini, spinach, or carrots for a fresh touch. You can also sneak in some kale or broccoli for extra nutrients. Just chop them small so they cook quickly. Mix and match based on what you have at home. This keeps the dish exciting and colorful! To keep your One-Pan Honey BBQ Chicken & Rice fresh, let it cool first. Place the leftovers in an airtight container. This helps keep the meal safe and tasty. Store it in the fridge for up to 3 days. If you want to save it longer, freezing is a good choice. When you're ready to eat your leftovers, reheat them gently. Use a microwave-safe dish and cover it with a lid or a damp paper towel. Heat on medium power in short bursts, stirring every minute. This helps the meal warm evenly. You can also reheat it on the stovetop. Just add a splash of chicken broth to keep it moist. If you want to freeze the dish, portion it out first. Make sure to use freezer-safe containers or bags. Label them with the date, so you know when you made it. The meal can stay in the freezer for up to 3 months. When you're ready to eat, transfer the frozen meal to the fridge overnight to thaw. Then, reheat it as described above for the best taste. Yes, you can use brown rice. Brown rice adds a nutty taste and more fiber. However, it needs more cooking time. Use 2 cups of chicken broth instead of 1 ½ cups. Cook for about 30-35 minutes, or until tender. The best way to reheat this dish is on the stove. Place the leftover chicken and rice in a skillet. Add a splash of chicken broth to keep it moist. Heat over medium-low heat, stirring often, until warmed through. You can also use the microwave. Place in a microwave-safe dish, cover it, and heat in short bursts. Stir in between to avoid hot spots. You can adjust the sweetness easily. If you want it sweeter, add more honey or BBQ sauce. If it’s too sweet, add a splash of vinegar or lemon juice. This will balance the flavors. Taste as you go to find your perfect mix. This blog post covered key steps to make a great One-Pan Honey BBQ Chicken and Rice. We discussed essential ingredients and quality choices. You learned how to prepare and cook everything perfectly. I shared my best tips for searing chicken, making rice fluffy, and storing leftovers. You can also explore variations to fit your taste or diet. With these insights, you can create a delicious meal that satisfies everyone. Enjoy your cooking and get ready to impress!
One-Pan Honey BBQ Chicken & Rice Simple Delight
If you’re looking for a tasty and easy meal, you’ll love my One-Pan Honey BBQ Chicken & Rice. This dish is simple, quick, and only
To create this flavorful delight, gather the following ingredients: - 1 lb shrimp, peeled and deveined - 2 cups broccoli florets - 4 tablespoons unsalted butter - 4 cloves garlic, minced - 1 teaspoon red pepper flakes (adjust to taste) - Salt and pepper to taste - Zest and juice of 1 lemon - 2 tablespoons fresh parsley, chopped - Cooked rice or quinoa, for serving Each ingredient plays a key role in this dish. The shrimp brings protein and a mild taste. The broccoli adds crunch and nutrition. Garlic delivers a rich, warm flavor. Butter gives a creamy base, while lemon adds brightness. Red pepper flakes introduce just the right amount of heat. Fresh parsley adds a pop of color and freshness. If you want to make this dish even more special, consider using high-quality shrimp. Fresh shrimp can enhance the taste significantly. Also, try using organic broccoli for better flavor and texture. For the full recipe, follow the detailed steps provided. Enjoy your cooking journey! - Blanching broccoli florets: Start by boiling a large pot of salted water. Once it boils, add the broccoli florets. Blanch them for about 2-3 minutes. You want them bright green and just slightly tender. - Ice bath technique: After blanching, quickly move the broccoli to an ice bath. This cools them fast and keeps their color bright. Let them sit for a few minutes, then drain. - Melting butter and adding garlic: In a large skillet, melt 4 tablespoons of unsalted butter over medium heat. Once the butter is melted, add 4 cloves of minced garlic. Sauté for about 1 minute until it becomes fragrant. - Incorporating red pepper flakes: Next, add 1 teaspoon of red pepper flakes. You can adjust this based on how spicy you like your dish. Stir well and let the flavors mingle. - Timing for shrimp cooking: Increase the heat to medium-high and add 1 pound of peeled and deveined shrimp. Season with salt and pepper. Cook them for about 3-4 minutes. They should turn pink and opaque. - Incorporating broccoli and seasonings: Once the shrimp is cooked, add the blanched broccoli back to the skillet. Toss everything together gently. - Final steps for serving: Squeeze the juice of 1 lemon over the dish and add the zest. Stir to combine and heat for another minute. Adjust the seasoning if needed. Serve this delightful mix over cooked rice or quinoa. Don't forget to garnish with chopped parsley for a fresh touch. For the full recipe, check the previous section! To avoid overcooking shrimp, watch the color change. Cook them until they turn pink and opaque. This usually takes about 3 to 4 minutes. If they curl tightly, they are overdone. For seasoning, use salt, pepper, and a dash of lemon juice. The lemon brightens the dish and enhances the flavor. If fresh broccoli is not available, you can use frozen broccoli. Just remember that frozen broccoli cooks faster. Reduce the cooking time by a minute or two. This helps keep the texture nice and firm. Always check the package for specific cooking times to get the best result. For a beautiful plate, serve the shrimp and broccoli over a mound of rice or quinoa. This adds height and makes it look fancy. To garnish, sprinkle fresh parsley on top. You can also add lemon wedges for a splash of color. These small touches make your dish pop and invite everyone to dig in. {{image_2}} You can make garlic butter shrimp and broccoli even better with some tasty add-ins. Try adding bell peppers, snap peas, or even carrots for a colorful twist. These veggies bring crunch and flavor to the dish. For protein options, you might want to add scallops or chicken. They both cook well with shrimp and blend nicely with the garlic butter flavor. If you’re feeling adventurous, mix in some cooked sausage for a hearty meal. To make your meal shine, serve garlic butter shrimp with rice or quinoa. They soak up the sauce and add a nice base. You can also try it with a light salad for a fresh touch. When it comes to drinks, a glass of white wine pairs perfectly. A crisp Sauvignon Blanc or a smooth Chardonnay enhances the garlic butter taste. If you need gluten-free options, this dish is already a winner! Just make sure to use gluten-free rice. For a low-carb choice, skip the rice and serve the shrimp and broccoli over zoodles (zucchini noodles) or cauliflower rice. You'll enjoy a healthy meal without missing out on flavor. For the full recipe, check out the details above! After cooking, let your garlic butter shrimp and broccoli cool. Use airtight containers to keep them fresh. Glass containers work well for this dish. They do not stain, and you can see the food inside. Store leftovers in the fridge for up to three days. To reheat without losing flavor, use a skillet on low heat. This method warms the dish evenly. You can also add a splash of water or broth to keep it moist. Stir gently to maintain the texture of the shrimp. Avoid using the microwave, as it can make the shrimp tough. To freeze, place the cooled dish in a freezer-safe container. Seal tightly to prevent freezer burn. It can last up to three months in the freezer. When ready to eat, thaw overnight in the fridge. Reheat on the stove with a little water to restore moisture. Enjoy this tasty meal even when it's frozen! The total time is about 20 minutes. You need 10 minutes for prep and 10 minutes for cooking. This quick recipe is perfect for busy nights. Yes, you can prep this dish in advance. Cook the shrimp and broccoli, then store them in the fridge. You can also blanch the broccoli and keep it ready. Just reheat when you are ready to eat. This dish pairs well with cooked rice or quinoa. You can also add a fresh salad or crusty bread. A light white wine can enhance the meal too. For the full recipe, check out the earlier section. In this blog post, we explored a tasty Garlic Butter Shrimp and Broccoli recipe. We covered key ingredients, step-by-step cooking instructions, and helpful tips to achieve the perfect dish. Remember, timing is key to avoid overcooking shrimp. Don’t hesitate to try different veggies or proteins for variety. Lastly, enjoy your meal with the suggested sides for a complete feast. Cooking can be fun and rewarding, so dive in and enjoy the process!
Garlic Butter Shrimp and Broccoli Flavorful Delight
Who doesn’t love a quick and tasty meal? Garlic Butter Shrimp and Broccoli is packed with flavor and can be made in no time. With
- 2 boneless, skinless chicken breasts - 1 cup buttermilk - 1 cup all-purpose flour - 1/2 cup cornstarch - 1 teaspoon paprika - 1 teaspoon garlic powder - 1/2 teaspoon cayenne pepper - Salt and pepper to taste - Oil for frying - 1 cup cooked jasmine rice - 1 cup shredded cabbage (green or purple for color) - 1/2 cup sliced cucumbers - 1 avocado, sliced - 3 green onions, sliced (for garnish) - Sesame seeds (for garnish) The chicken breasts are the star. They soak in buttermilk to get tender. The flour and cornstarch mix adds crunch and flavor. Spices like paprika and garlic powder make every bite pop. Fresh veggies like cabbage, cucumbers, and avocado bring color and nutrition. - 1/2 cup mayonnaise - 2 tablespoons sweet chili sauce - 1 tablespoon sriracha (or more for extra heat) - 1 teaspoon lime juice The sauce is creamy and sweet with a kick. Mayonnaise gives it a rich base. Sweet chili sauce adds a hint of sweetness. Sriracha gives it heat, and lime juice brightens up the flavor. - Mixing bowls - Skillet for frying - Serving bowls You will need mixing bowls for marinating and coating the chicken. A skillet is a must for frying. Finally, serving bowls will hold your beautiful Bang Bang Chicken Bowl. For the full recipe, check out the details above! For the best taste, marinate the chicken for at least 30 minutes. This helps the meat soak up flavor and stay juicy. Using buttermilk is key. It tenderizes the chicken and adds a nice tang. In a separate bowl, mix the dry ingredients. Combine flour, cornstarch, paprika, garlic powder, salt, and pepper. Cornstarch is vital for crunch. It makes the breading extra crispy when you fry it. Heat about an inch of oil in a large skillet over medium heat. When the oil is hot, add the chicken. Fry each piece for about 5 to 7 minutes per side. The chicken should turn golden brown and be cooked through. Use a meat thermometer to check if it reaches 165°F. In a small bowl, mix mayonnaise, sweet chili sauce, sriracha, and lime juice. Stir until the sauce is smooth. You can adjust the heat by adding more sriracha if you like it spicy. Start by adding jasmine rice to your serving bowls. Layer on the shredded cabbage, sliced cucumbers, and avocado. Slice the cooked chicken into strips. Place the chicken on top, then generously drizzle the Bang Bang sauce over everything. For garnishing, sprinkle sliced green onions and sesame seeds on top. This adds a nice crunch and color. Serve the bowl warm, and enjoy a colorful and tasty meal. To get the best fried chicken, follow these tips. First, avoid sogginess in breading. Start by making sure the chicken is dry after marinating. Pat it well with paper towels. This helps the breading stick better. Next, ensure even cooking. Heat your oil to 350°F before adding the chicken. If it's too hot, the outside burns while the inside stays raw. Fry the chicken in small batches. This allows for better heat control. Flip the chicken only once for the best crust. You can play with the Bang Bang sauce to make it your own. If you want it creamier, add more mayonnaise. For a different flavor, try Greek yogurt instead. For spice lovers, you can increase the sriracha. If you want less heat, reduce the sriracha or use mild chili sauce. You can also add a dash of soy sauce for extra umami. The Bang Bang Chicken Bowl pairs well with many sides. Try serving it with crispy fried plantains or a simple green salad. Both add freshness and texture. For drinks, consider iced tea or a light beer. These options balance the meal's richness and enhance the flavors. Enjoy your bowl with friends for a fun meal! {{image_2}} You can grill your chicken instead of frying it. Grilling gives the chicken a nice smoky taste. It also cuts down on oil and calories. To make it even lighter, swap the buttermilk for plain yogurt. This change adds creaminess without extra fat. You can also use whole wheat flour instead of all-purpose flour for better nutrition. If you're gluten-free, substitute all-purpose flour with a gluten-free blend. You can also use gluten-free breadcrumbs for the breading. For a vegan version, replace chicken with tofu or tempeh. Marinate the tofu in the same buttermilk mix, using almond milk or soy milk instead. This keeps the flavor profile while making it plant-based. Add extra spices like ginger or coriander for a unique twist. You can also sprinkle sesame seeds or chopped nuts on top for extra crunch. Try using different vegetables like bell peppers, carrots, or radishes for color and taste. Mixing in fresh herbs like cilantro or basil can also elevate the dish. Feel free to get creative and make the bowl your own! To keep your Bang Bang Chicken Bowl fresh, store leftovers right away. Place chicken and sauce in separate containers. Use airtight containers to lock in flavor and moisture. Glass or BPA-free plastic containers work best. For the best taste, reheat chicken in an oven. Set it to 350°F (175°C) and warm for about 10-15 minutes. This method keeps the chicken crispy. For veggies, use a microwave. Heat them in short bursts to avoid overcooking. Remember, you want them warm, not mushy. Yes, you can freeze the Bang Bang Chicken Bowl! For best results, freeze chicken and sauce separately. Use freezer-safe bags or containers. When ready to eat, thaw chicken in the fridge overnight. Reheat as mentioned above. For the sauce, let it thaw in the fridge too before using. A Bang Bang Chicken Bowl is a fun and tasty dish. It features crispy chicken over rice with fresh veggies. This dish comes from Asian cuisine, blending flavors from Thai and Chinese cooking. The name "Bang Bang" refers to the spicy sauce that gives it a kick. You get a mix of textures and tastes in each bite, creating a delightful meal. You can store leftover Bang Bang Chicken Bowl in the fridge for 3 to 4 days. Make sure to keep it in an airtight container. This helps the chicken and veggies stay fresh. If you notice any changes in smell or texture, it's best to toss it. Yes, you can prepare parts of the Bang Bang Chicken ahead of time. Marinate the chicken in buttermilk the night before. You can also make the Bang Bang sauce in advance. Just store it in the fridge. This way, you save time when you're ready to cook. Bang Bang Chicken Bowl pairs well with many sides. Here are some tasty options to consider: - Steamed broccoli for a healthy crunch. - Fried wontons for extra texture. - A simple cucumber salad for freshness. - Egg rolls for a fun finger food. To boost the heat in your Bang Bang Chicken Bowl, add more sriracha to the sauce. You can also sprinkle red pepper flakes on top. If you enjoy spicy food, try using fresh jalapeños as a topping. Adjust the heat level to match your taste! You learned about creating a Bang Bang Chicken Bowl from start to finish. We covered ingredients, cooking steps, tips, and variations. Remember, marinating adds great flavor, and the right sauce makes it special. Feel free to customize the bowl to your taste. With smart storage and reheating, leftovers can still shine. Use this guide to enjoy a delicious meal anytime. Cooking should be fun and tasty, so dive in and make it yours!
Bang Bang Chicken Bowl Recipe for Tasty Delight
Get ready to treat your taste buds with my Bang Bang Chicken Bowl Recipe! This dish combines crispy chicken, fresh veggies, and a creamy, spicy
- 12 jumbo pasta shells - 1 cup ricotta cheese - 2 cups fresh spinach, chopped - 1 cup shredded mozzarella cheese - 1/2 cup grated Parmesan cheese - 1 egg - 2 cloves garlic, minced - 1 teaspoon dried oregano - 1 teaspoon salt - 1/2 teaspoon black pepper - 2 cups marinara sauce - Fresh basil leaves for garnish Alternatives for Ricotta Cheese If you can’t find ricotta, try cottage cheese. It gives a similar texture. You can also blend silken tofu for a dairy-free option. Spinach Options: Fresh vs. Frozen I love using fresh spinach for its flavor. However, frozen spinach works too. Just make sure to drain the excess water. Choosing the Right Pasta Shells Jumbo shells are the best for stuffing. If you can’t find them, use large manicotti shells. They work just as well. This dish packs a lot of flavor and is fun to make. You can find the full recipe above and enjoy cooking! Preheating the Oven First, set your oven to 375°F (190°C). This step is key for the perfect bake. Cooking the Jumbo Pasta Shells Next, boil the jumbo pasta shells according to the package instructions. Cook them until they are al dente. This means they should still have a slight bite to them. After boiling, drain the shells and let them cool a bit. Preparing the Spinach and Ricotta Filling In a large bowl, mix 1 cup of ricotta cheese, 2 cups of chopped fresh spinach, and half of the mozzarella cheese. Add in 1/2 cup of grated Parmesan cheese, 1 egg, 2 cloves of minced garlic, 1 teaspoon of dried oregano, 1 teaspoon of salt, and 1/2 teaspoon of black pepper. Stir everything together until it is well mixed. How to Properly Stuff the Shells Take a spoon and carefully fill each shell with the spinach and ricotta mixture. Be gentle to avoid tearing the shells. Place each stuffed shell in a baking dish. Arranging in the Baking Dish Make sure the stuffed shells sit close together in the dish. This helps them stay warm and cook evenly. Adding and Spreading Marinara Sauce Pour 2 cups of marinara sauce over the stuffed shells. Spread it evenly so all the shells are covered. This adds flavor and moisture as they bake. Covering and Uncovering for Perfect Cheese Cover the baking dish with foil. This traps steam and helps the shells cook. After 25 minutes, remove the foil. Then, sprinkle the remaining mozzarella cheese on top. Baking Times: What to Look For Bake for an additional 10 minutes. Look for the cheese to be bubbly and golden. This is when your dish is ready to enjoy! For the full recipe, check out the section titled Full Recipe. To ensure your shells do not stick together, use a large pot of boiling water. Add salt to the water. This helps keep the shells from clumping. Stir the shells gently while they cook. This keeps them moving and prevents sticking. For al dente pasta, cook the shells for one to two minutes less than the package states. This way, they will finish cooking in the oven. Al dente shells hold the filling better and have a nice bite. To add some heat, sprinkle in red pepper flakes. This gives a nice kick to the dish. You can also mix in Italian seasoning for a deeper flavor. Fresh herbs like parsley or thyme can brighten the taste. For cheese combos, try mixing ricotta with goat cheese. It adds a tangy twist. You can also swap some mozzarella for fontina. This gives a creamy texture that melts well. Garnishing with fresh basil leaves makes your dish pop. It adds color and a lovely aroma. Place the basil on top right before serving to keep it fresh. For serving suggestions, pair the stuffed shells with a simple side salad. A crisp Caesar salad works well. You can also serve garlic bread on the side. This makes for a complete and satisfying meal. Feel free to explore the Full Recipe for more detailed steps and measurements. {{image_2}} You can easily change the filling for stuffed shells. This keeps meals fresh and fun. - Adding Other Vegetables: Try adding chopped bell peppers or zucchini. You can also use mushrooms or artichokes for a tasty twist. Mix these veggies into the ricotta for more flavor. - Mixing in Different Cheeses: Swap ricotta for goat cheese or cream cheese. You can also add feta for a tangy kick. Each cheese brings a new taste to your dish. You can adapt this dish to fit your diet. Here are some great ideas: - Gluten-Free Options: Use gluten-free pasta shells. Many brands make tasty shells that hold the filling well. Just be sure to cook them carefully to avoid mushiness. - Vegetarian Add-ins: While this dish is vegetarian, you can add more veggies. Consider using lentils or beans for protein. These swaps keep your meal hearty and filling. You have choices when it comes to cooking. Baked shells are warm and cheesy, but unbaked is quick! - No-Bake Approach for Quick Meals: For a fast option, skip the oven. Just fill the shells and pour sauce over them. Heat in a pot until warm. This is great for busy nights! - Using the Air Fryer for a Unique Twist: If you love your air fryer, use it for stuffed shells. Cook them at 350°F (175°C) for about 15 minutes. This gives a crispy, golden finish that everyone will enjoy. For the full recipe, check out the details above and get cooking! To keep your stuffed shells fresh, store them in an airtight container. Place them in the fridge within two hours of cooking. This method helps maintain the flavor and texture. Make sure to cover the shells with some marinara sauce to prevent them from drying out. When you are ready to eat, reheat them gently in the oven. Cover them with foil to keep them moist. Bake at 350°F (175°C) for about 20 minutes, or until heated through. This way, you will enjoy maximum flavor. To freeze your stuffed shells, let them cool completely first. Arrange the shells in a single layer on a baking sheet. Place them in the freezer for about an hour. This step prevents them from sticking together. Once frozen, transfer them to a freezer-safe bag. Be sure to label the bag with the date. For reheating, you can bake them straight from the freezer. Cover with foil and bake at 375°F (190°C) for about 40-45 minutes. Remove the foil during the last 10 minutes to brown the cheese. Refrigerated stuffed shells last for about 3-5 days. If you freeze them, they can stay good for up to 3 months. However, the taste and quality may change over time. Always check for signs of spoilage before eating. Proper storage helps you enjoy your delicious dish longer. For the full recipe, check out the section above. Can I use other types of pasta? Yes, you can use other pasta shapes. Try using manicotti or cannelloni. Just adjust your cooking time as needed. The key is to ensure the pasta holds the filling well. How do I know when the stuffed shells are fully cooked? Check for a bubbly and golden cheese top. Also, the filling should be hot throughout. You can use a food thermometer; a safe internal temperature is 165°F (74°C). Can I make these shells ahead of time? Absolutely. You can prepare them a day before. Just cover and refrigerate. When ready, just bake as directed from the fridge. This saves time and is great for meal prep. Are spinach and ricotta stuffed shells healthy? Yes, they can be quite healthy. Spinach provides vitamins and minerals. Ricotta adds protein and calcium. Use low-fat cheese for lighter options. Caloric content per serving: What to expect? Each serving has about 350-400 calories. This can change based on specific ingredients used. To cut calories, consider reducing cheese or using whole wheat pasta. What to do if the filling is too runny? If your filling is runny, add more ricotta or a bit of breadcrumbs. This helps absorb extra moisture. Let it sit for a few minutes to thicken. Why did my shells break during cooking? Shells may break if overcooked. Always boil them until al dente. Use a gentle touch when handling them to avoid cracking. Easy Spinach and Ricotta Stuffed Shells are simple and tasty. We covered ingredients, step-by-step cooking, and helpful tips. You can customize your shells with different fillings or dietary options. Storing and reheating is easy, so nothing goes to waste. Remember, cooking can be fun and creative. Experiment and make this dish your own. Enjoy your delicious result, and share it with friends and family!
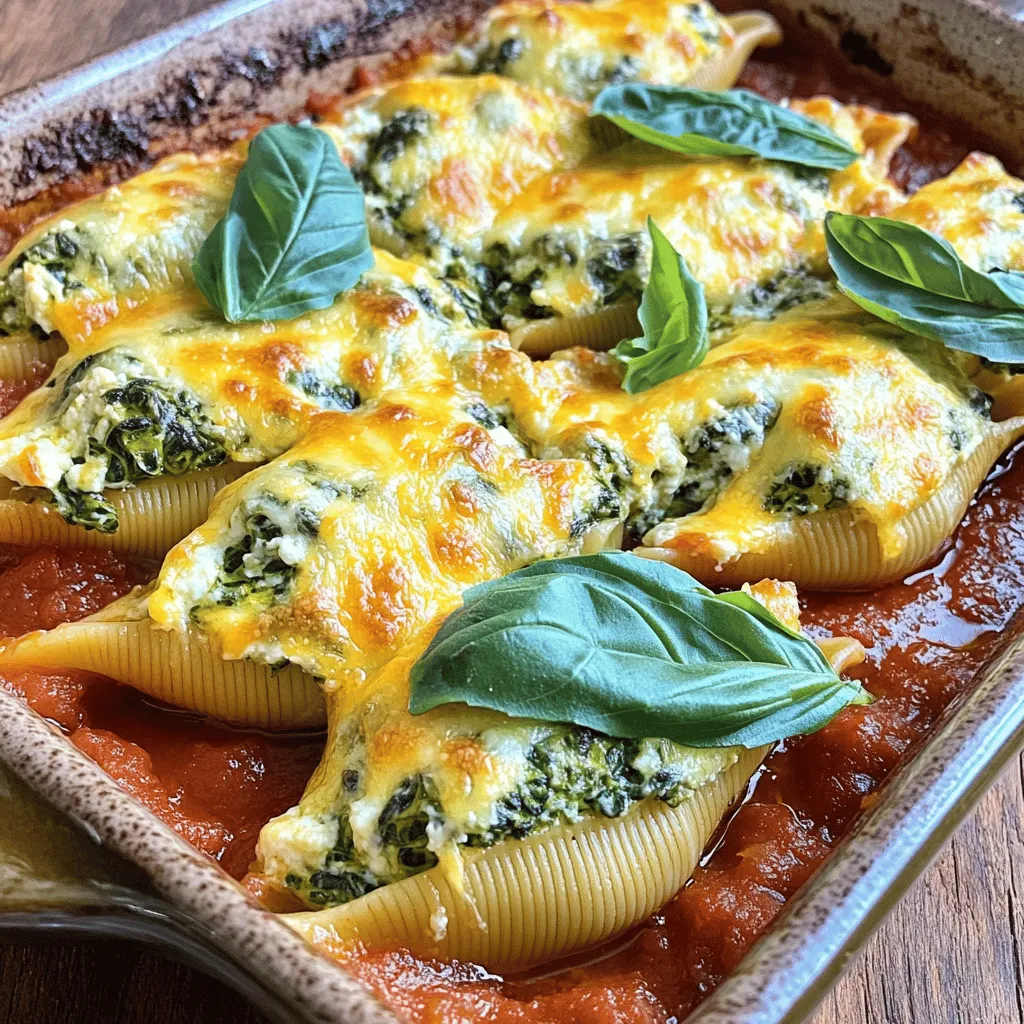
Easy Spinach and Ricotta Stuffed Shells Tasty Dish
If you’re craving a comforting meal, these Easy Spinach and Ricotta Stuffed Shells are a must-try! Packed with creamy ricotta, fresh spinach, and a zesty
- Ground beef: 1 lb (80/20 is ideal for juicy burgers) - Seasonings: - 1 teaspoon garlic powder - 1 teaspoon onion powder - 1 teaspoon smoked paprika - Salt and pepper to taste For a great air fryer hamburger, you need the right ground beef. I suggest using beef with an 80/20 fat ratio. This mix gives you juicy burgers that are not too greasy. The fat helps keep the burger moist as it cooks. Seasonings play a big part in flavor. I love using garlic powder, onion powder, and smoked paprika. These spices add depth and a hint of smokiness. I always add salt and pepper for balance. Mix these well into your beef for the best taste. - Hamburger buns: 4 (choose your favorite type) - Popular toppings: - Leafy romaine lettuce - Tomato, sliced - Pickles, optional - Ketchup and mustard, for serving - 4 slices of cheddar cheese Choosing buns can change your burger experience. I recommend soft, fresh buns that match your burger size. Toasting them lightly in the air fryer adds a nice crunch. For toppings, classic choices like lettuce and tomato work well. They add freshness and color. Pickles give a nice tang, while ketchup and mustard add a touch of sweetness and spice. You can find the full recipe and more tips to make your hamburgers shine! Start by mixing the ground beef with seasonings. In a bowl, combine: - 1 lb ground beef - 1 teaspoon garlic powder - 1 teaspoon onion powder - 1 teaspoon smoked paprika - Salt and pepper to taste Make sure to mix gently. Overworking the meat can make the burgers tough. Next, divide the meat into four equal parts. Form each part into a patty about ¾ inch thick. Here’s a key tip: use your thumb to make a small indent in the center of each patty. This helps the burger cook evenly and prevents puffing. Now it’s time to preheat your air fryer. Set it to 375°F (190°C) for about five minutes. Preheating is essential for even cooking. When ready, place the patties in the air fryer basket. Make sure they don’t touch each other. You might need to cook them in batches, depending on your air fryer size. Cook the burgers for 8-10 minutes. Flip them halfway through for even doneness. Aim for a temperature of 160°F (71°C) for medium burgers. As the burgers near the end of cooking, add a slice of cheddar cheese on each patty. This lets the cheese melt nicely. Once cooked, take the burgers out and let them rest for a few minutes. Now, it’s time to build your burger! Start with the bottom half of the bun. Place the patty on it. Add leafy romaine lettuce, then tomato slices, and pickles if you like. Finally, drizzle with ketchup and mustard before topping with the other half of the bun. For more details, check out the Full Recipe. Choosing the right ground beef is key. I recommend using beef with an 80/20 fat ratio. This mix offers enough fat for flavor while keeping the burger juicy. Leaner beef can dry out, leading to tough burgers. For seasoning, keep it simple but bold. I use garlic powder, onion powder, and smoked paprika. These add depth without overwhelming the beef. Always season the meat before forming patties. This ensures every bite is flavorful. To avoid overcooking, check the temperature. Use a meat thermometer to ensure your burgers reach 160°F (71°C) for medium. This method prevents guesswork and ensures juicy results. For even cooking, place patties in a single layer in the air fryer. Make sure they don’t touch. If your air fryer is small, cook in batches. Flipping the patties halfway through helps them cook evenly. Toasting buns adds a nice crunch. You can toast them right in the air fryer. Place the buns cut side up for about 2-3 minutes at 375°F (190°C). Keep an eye on them to avoid burning. For the best results, toast the buns just before the burgers finish cooking. This way, they stay warm and fresh. It’s a small step that makes a big difference in your burger experience. Remember, you can find the full recipe [Full Recipe]. Enjoy your cooking journey! {{image_2}} You can easily change up the flavors of your burgers. Try adding different seasonings. For a spicy kick, use cayenne pepper or chili powder. If you like a sweeter taste, mix in some brown sugar. You can also swap smoked paprika for regular paprika or add fresh herbs like basil or cilantro for a fresh twist. When it comes to cheese, the options are endless. Cheddar is classic, but you can try mozzarella for a milder taste. Swiss cheese melts well and adds a nutty flavor. Blue cheese is bold and pairs nicely with savory toppings. If you want to make healthier burgers, consider using leaner ground beef, like 90/10. This will cut down on fat without losing flavor. You can also use ground turkey or chicken for a lighter choice. Another great option is to make burgers using beans or lentils. These are tasty and packed with protein. For vegetarian or vegan options, use black bean patties or chickpea burgers. You can also make portobello mushroom caps that grill well and have a meaty texture. Toppings can truly elevate your burger. Try adding avocado slices or a dollop of guacamole for creaminess. Pineapple can add a sweet touch, while jalapeños give a spicy crunch. If you want a gourmet feel, use caramelized onions or sautéed mushrooms. A drizzle of balsamic glaze can add a sweet and tangy flavor. Experiment with different combinations to find your favorite. Don't forget to check out the Full Recipe for more ideas! To keep your leftover burgers fresh, let them cool first. Place each burger on a plate or tray. Once they cool, wrap each burger tightly in plastic wrap or foil. This step is key to keeping moisture inside. Then, store them in the fridge. They can last for about three days. To keep the flavor and texture, avoid stacking them. For reheating, the air fryer works best. Preheat your air fryer to 350°F (175°C). Place the burgers in the basket. Heat them for about 3 to 5 minutes. This method helps keep the burgers juicy. Check the internal temperature to ensure they reach 165°F (74°C) for safety. If you have cheese, add a slice on top during the last minute. To freeze cooked patties, let them cool completely. Wrap each patty in plastic wrap, then place them in an airtight bag. Label the bag with the date. Cooked patties can stay fresh for up to three months. When you're ready to eat, thaw them in the fridge overnight. You can also use the microwave on the defrost setting for quicker results. Cook hamburgers in the air fryer for 8-10 minutes. Flip them halfway through. For medium doneness, aim for an internal temperature of 160°F (71°C). Use a meat thermometer for best results. If you like your burgers rare, cook for less time. For well-done, add a couple of extra minutes. Set your air fryer to 375°F (190°C). This temperature cooks the burgers evenly. It gives you a nice crust outside while keeping the inside juicy. Preheating the air fryer for about 5 minutes helps achieve the right cooking conditions. Yes, you can cook frozen hamburgers in the air fryer. Place the frozen patties in the basket without thawing. Increase the cooking time to about 12-15 minutes. Flip the burgers halfway for even cooking. Check the internal temperature to ensure safety. Enjoy a quick meal without the fuss! In this blog post, you learned how to make delicious air fryer hamburgers. We covered key ingredients, from the right ground beef to spices and bun choices. I shared step-by-step instructions for preparing patties and cooking them perfectly. You discovered tips for keeping them juicy and flavorful, including creative topping ideas. Finally, we discussed storage methods for leftovers. Enjoy your cooking adventure and create the best air fryer hamburgers at home!
Air Fryer Hamburgers Flavorful Recipe Made Easy
Craving a juicy, flavorful hamburger without the hassle? I’ve got you covered! In this post, I’ll show you how to make perfect air fryer hamburgers