Dinner

Garlic Butter Honey BBQ Beef Tacos Mouthwatering Delight
Are you ready to elevate your taco game? These Garlic Butter Honey BBQ Beef Tacos are a true treat! Picture juicy, flavorful beef wrapped in
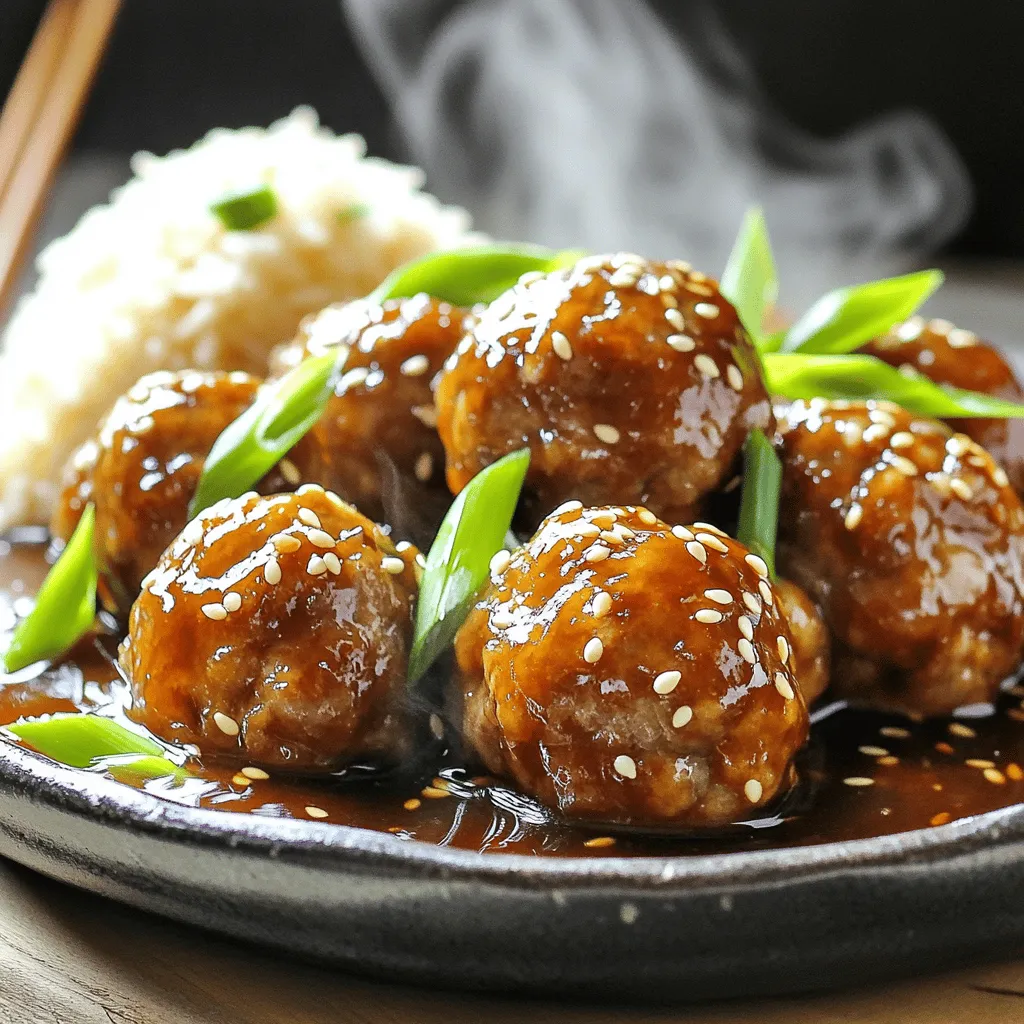
Easy Mongolian Meatballs Flavorful and Simple Recipe
If you’re craving a quick and tasty dinner, try these Easy Mongolian Meatballs! Packed with flavor and simple to make, this recipe uses common ingredients
![- 1 lb ground beef - 1 medium onion, chopped - 2 cloves garlic, minced - 2 cups enchilada sauce - 1 can black beans, rinsed and drained - 1 cup corn, frozen or canned - 1 teaspoon chili powder - 1 teaspoon cumin - 8 corn tortillas, cut into strips - 2 cups shredded cheese (cheddar and Monterey jack mix) - Fresh cilantro, for garnish - Sour cream, for serving (optional) - Additional spices (e.g., cayenne pepper, paprika) - Vegetables (e.g., bell peppers, zucchini) - Large skillet - 9x13 inch baking dish - Aluminum foil For this beef enchilada casserole, I use ground beef for a hearty base. Chopped onion and minced garlic add flavor and aroma. The enchilada sauce is key, providing rich taste. Black beans and corn offer texture and nutrition. If you want to spice things up, try adding cayenne pepper or paprika. You can also toss in vegetables like bell peppers or zucchini for extra flavor. For cooking, a large skillet helps brown the beef and mix the filling. A 9x13 inch baking dish is perfect for layering all the ingredients. Aluminum foil is useful for covering the dish while it bakes. This recipe is simple and rewarding. You will love how easy it is to put together! To view the full recipe, click here [Full Recipe]. - Preheat your oven to 350°F (175°C). - Grease a 9x13 inch baking dish. - In a large skillet over medium heat, cook 1 lb of ground beef. - Break the beef apart with a spatula. - Cook until it turns brown, about 5 to 7 minutes. - Drain any extra fat from the skillet. - Add 1 chopped onion and 2 minced cloves of garlic to the skillet. - Cook until the onion is clear, about 5 minutes. - Stir in 1 can of black beans and 1 cup of corn. - Add 1 teaspoon of chili powder and 1 teaspoon of cumin. - Pour in half of the 2 cups of enchilada sauce. - Cook for another 2 to 3 minutes until warm. - Start layering in the baking dish: - Place half of the 8 corn tortilla strips on the bottom. - Pour half of the beef mixture over the tortillas. - Drizzle with half of the remaining enchilada sauce. - Sprinkle with half of the 2 cups of shredded cheese. - Repeat these layers with the rest of the ingredients. - Cover the dish with aluminum foil. - Bake for 20 minutes in the oven. - Remove the foil and bake for another 10 to 15 minutes. - Look for bubbly and lightly golden cheese on top. - Let the casserole cool for a few minutes before slicing. For the full recipe, refer to the [Full Recipe]. To avoid soggy tortillas, use corn tortillas that are slightly toasted. You can quickly warm them on a skillet for about 30 seconds on each side. This helps them hold their shape better when layered in the casserole. For even cooking, spread your beef mixture evenly. Ensure that each layer of tortillas is well covered with sauce and beef. This helps all the flavors combine well and cook at the same rate. For sides, I love to serve this casserole with a fresh green salad. The crispness of the salad contrasts nicely with the warm casserole. You might also add some Mexican rice or refried beans to round out the meal. When serving, slice the casserole into neat squares. Garnish each square with fresh cilantro and a dollop of sour cream. This adds a colorful touch and enhances the flavors. You can add toppings to personalize your dish. Sour cream, diced avocado, or even sliced jalapeños can elevate your meal. They bring creaminess and extra flavor that pairs well with the enchiladas. Feel free to adjust the spice level to your taste. If you like it hot, add some cayenne pepper or diced green chilies. For a milder flavor, skip these and keep the chili powder mild. {{image_2}} You can switch the beef for ground turkey or chicken. Use the same amount, about 1 lb. This change makes the dish lighter but still tasty. If you want a vegetarian option, try using beans or tofu. Black beans work great. You can also mash firm tofu and mix it with spices. If you prefer homemade sauce, it's easy to make. Combine tomato sauce, chili powder, garlic powder, and cumin. This mix gives you a fresh flavor. You can also use salsa or a creamy green sauce for different tastes. Each option brings a unique twist to your casserole. If you need a gluten-free dish, corn tortillas are your best choice. They hold up well and add flavor. For a dairy-free version, choose vegan cheese or skip it entirely. Use nutritional yeast for a cheesy taste without dairy. These adjustments make the casserole fit many diets while keeping it delicious. For the full recipe, click here [Full Recipe]. To store your Beef Enchilada Casserole, let it cool first. This helps keep moisture in. Place it in airtight containers. This protects the flavors and keeps it fresh. If you use plastic wrap, press it tight against the food. This method stops air from spoiling your meal. You can store it in the fridge for up to four days. Freezing is great for longer storage. Cut your casserole into portions. Wrap each piece in plastic wrap. Then, place them in freezer bags. Make sure to squeeze out as much air as you can. Label each bag with the date. When you want to eat it, thaw it in the fridge overnight. Reheat it in the oven at 350°F (175°C) until hot. In the fridge, Beef Enchilada Casserole lasts about four days. If frozen, it can last up to three months. Check for signs of spoilage. Look for off smells or mold. If it smells strange or has changed color, toss it out. Your health is important, so it's better to be safe! Can I make this casserole ahead of time? Yes, you can prepare this casserole a day before. Just assemble the layers, cover it, and keep it in the fridge. When ready to bake, just pop it in the oven. It saves time on busy nights! How do I prevent the casserole from being dry? To keep it moist, use enough enchilada sauce. Make sure to layer the sauce well. Adding beans and corn also helps maintain moisture. Cover the dish with foil while baking to trap steam, then remove it later for a bubbly cheese topping. What can I use instead of enchilada sauce? If you want a change, try salsa, tomato sauce, or a homemade sauce with tomatoes and spices. You can even use barbecue sauce for a sweet twist. Just ensure it complements the beef and spices well. Approximate calories per serving Each serving of this casserole has about 400 to 450 calories. This can vary based on your choice of cheese and any added toppings. Breakdown of macronutrients - Carbohydrates: 40g - Protein: 25g - Fat: 20g This balance makes it a filling and tasty meal. How to incorporate into weekly meal planning This casserole fits well in your meal prep. You can make it on Sunday and eat it throughout the week. Just portion it out and heat it up when needed. Quick sides to pair for a complete meal Serve this casserole with a simple side salad or some Mexican rice. Guacamole and tortilla chips also make great partners. They add texture and flavor to your meal! Beef enchilada casserole combines easy ingredients and simple steps to create a tasty meal. You can customize this dish with options for proteins and sauces. Use tips for perfect layers and flavors that suit your taste. Store leftovers well for quick meals during the week. With so many variations to try, this casserole makes every gathering special. Cook it today and enjoy every bite!](https://therecipehatch.com/wp-content/uploads/2025/06/7b06f10c-3de2-4def-ae94-efaa74235205.webp)
Beef Enchilada Casserole Simple and Tasty Dinner
Looking for a tasty dinner that’s easy to make? Look no further! This Beef Enchilada Casserole hits the spot. It’s filled with juicy beef, black
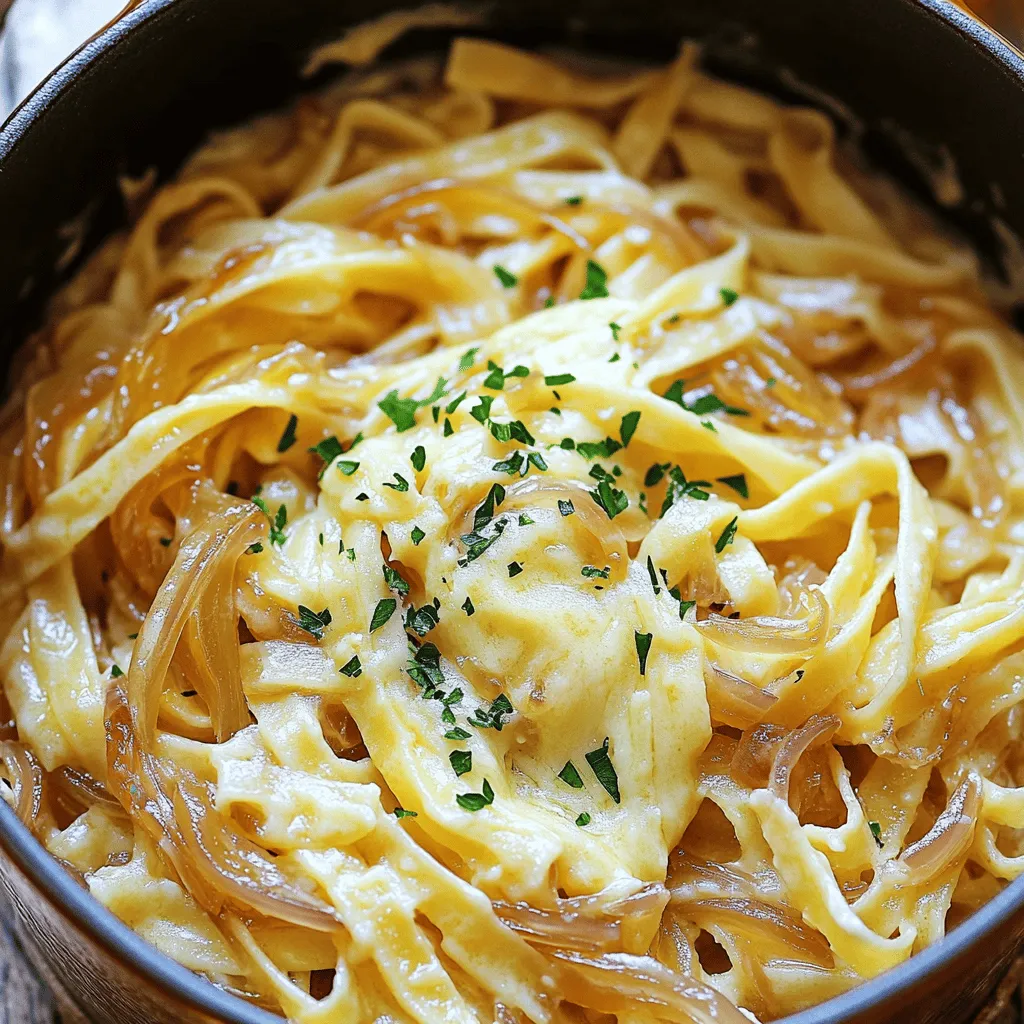
One Pot French Onion Pasta Flavorful Home Cooked Meal
Looking for a cozy and delicious dinner option? Try my One Pot French Onion Pasta! This flavorful home-cooked meal combines rich caramelized onions, savory broth,
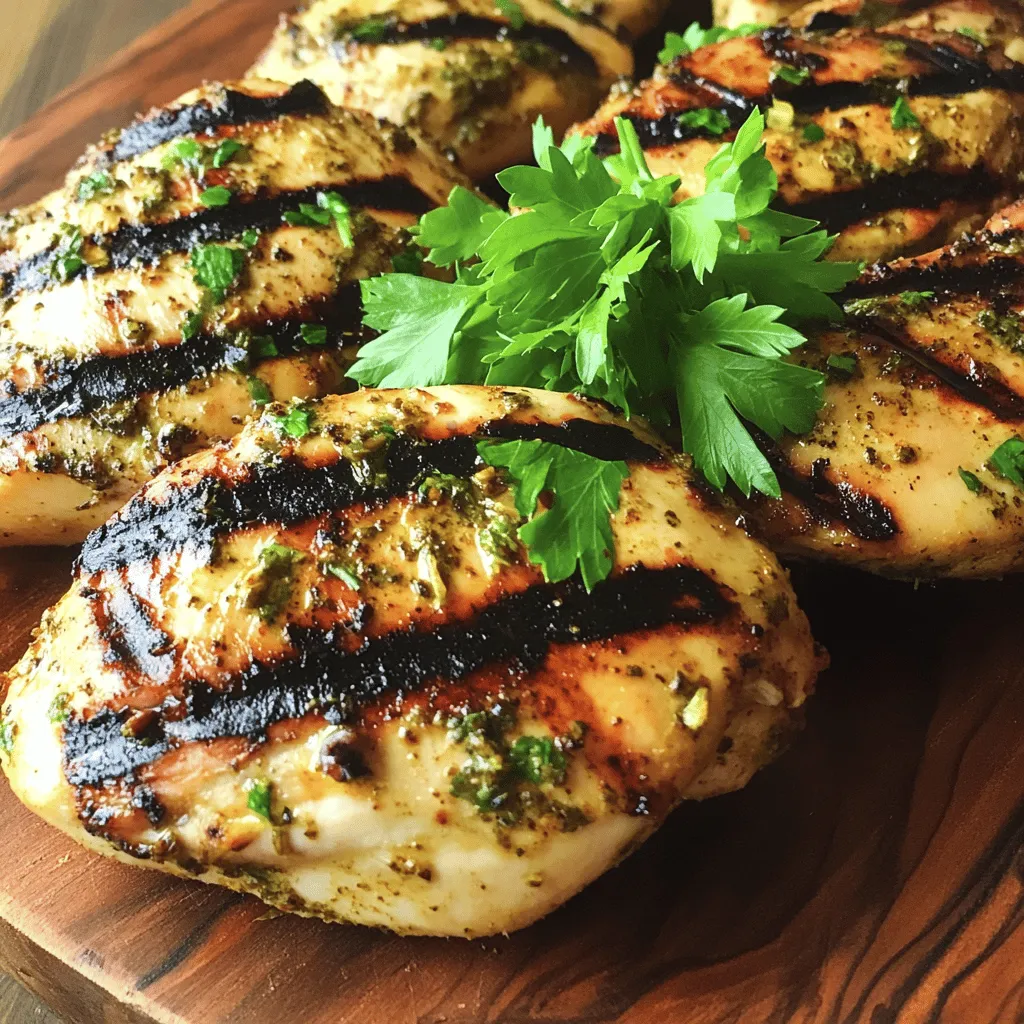
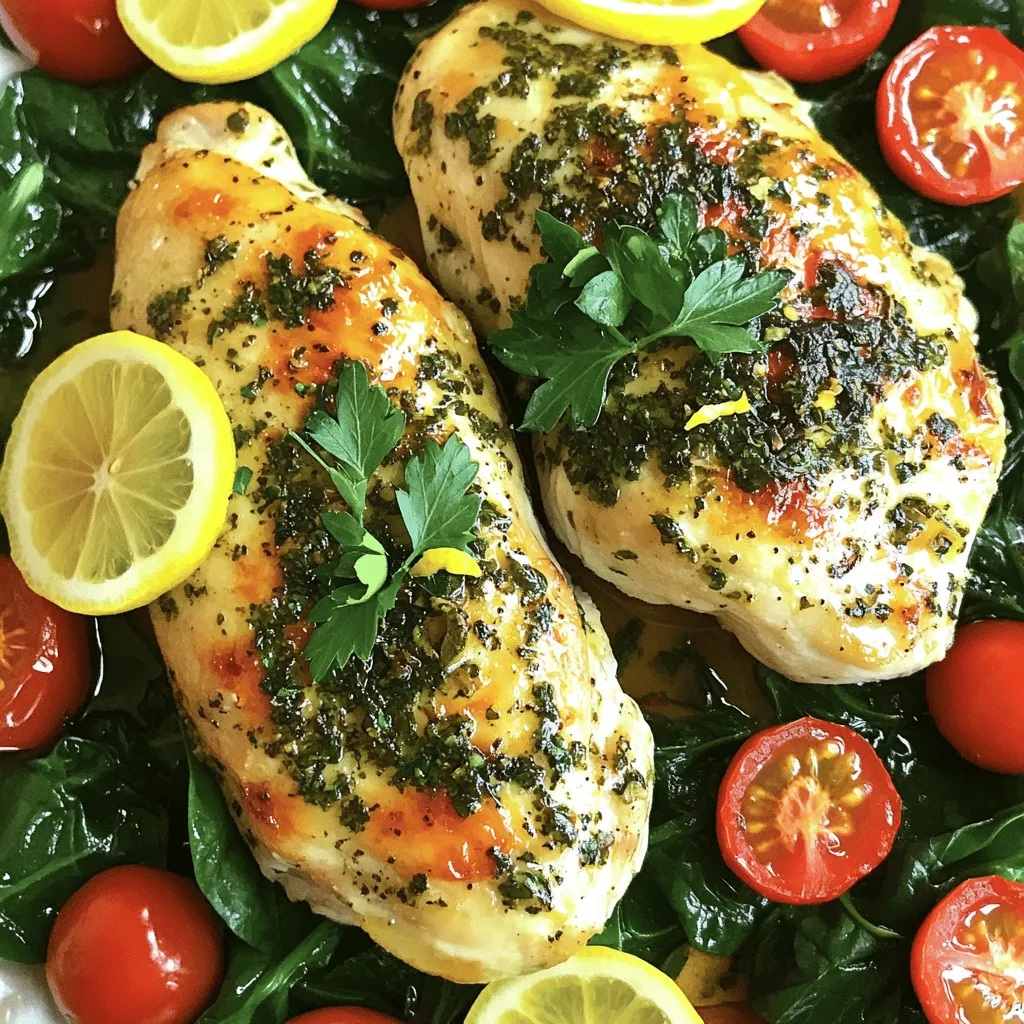
Air Fryer Grilled Chicken Juicy and Flavorful Recipe
You want juicy and flavorful grilled chicken without the hassle of traditional methods? Look no further! In this guide, I’ll share my easy Air Fryer
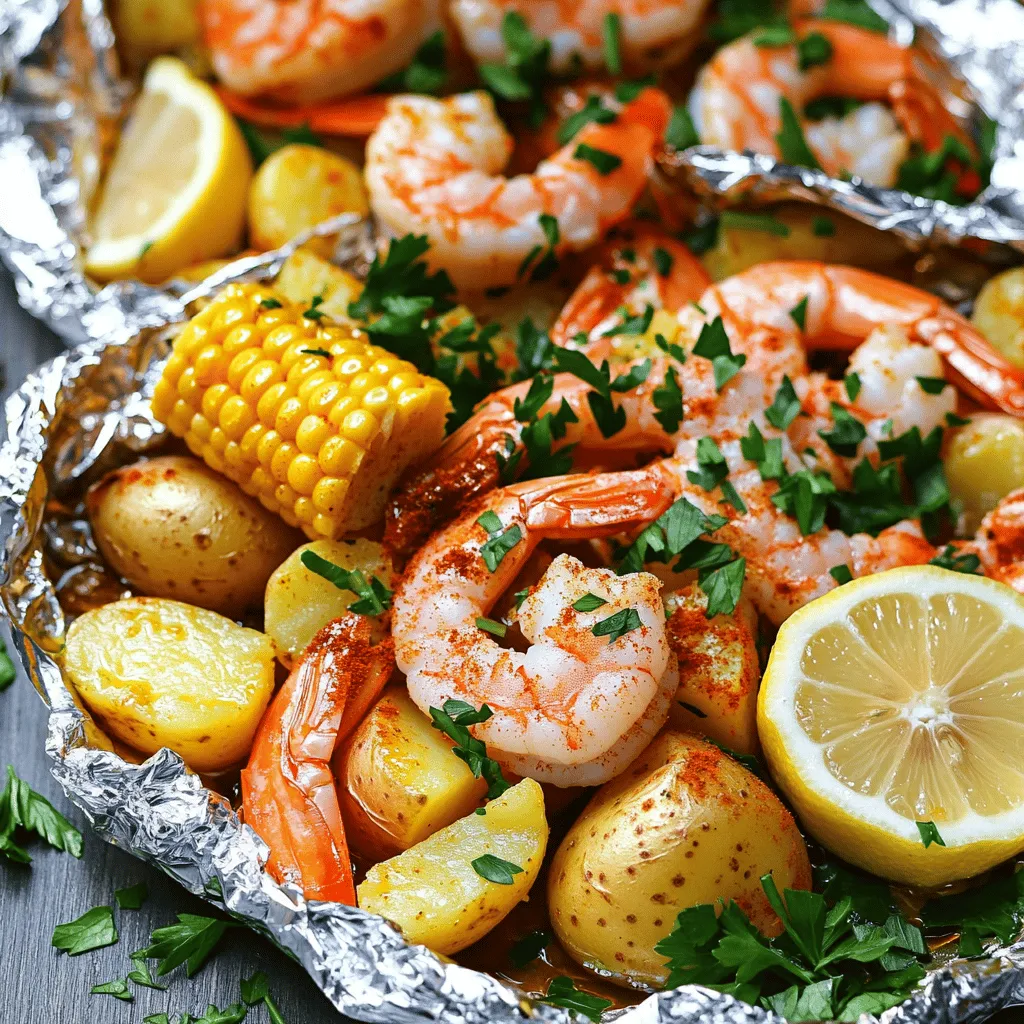
Shrimp Boil Foil Packets Flavorful and Easy Recipe
Looking for an easy and tasty meal? Try my Shrimp Boil Foil Packets! This recipe combines shrimp, corn, and potatoes in a simple, flavorful dish
Italian Baked Chicken Rich in Flavor and Easy Prep
If you’re craving a dish that’s bursting with flavors and requires minimal prep, you’ve come to the right place! Italian Baked Chicken is my go-to
![To make a delicious Tortilla Espanola, you need the following ingredients: - 4 large eggs - 2 medium potatoes, peeled and sliced thinly - 1 medium onion, finely chopped - ½ cup olive oil - Salt, to taste - Freshly ground black pepper, to taste - Fresh parsley, chopped (for garnish) When choosing potatoes, look for waxy types. They hold their shape well during cooking. I prefer Yukon Gold or red potatoes. For eggs, always pick fresh ones. This makes a big difference in taste and texture. You can also add some fun extras to your Tortilla Espanola. Here are some ideas: - Bell peppers for sweetness and color - Chorizo for a spicy kick - Spinach for added greens - Cheese for creaminess Feel free to mix and match these options. The key is to enhance the flavor while keeping the dish balanced. Using the full recipe will guide you through every step. Enjoy your cooking! To make a great Tortilla Espanola, start with the potatoes and onions. First, peel the potatoes and slice them thin. Aim for about 1/8-inch thickness. Thin slices cook evenly and blend well with the eggs. Next, chop the onion finely. This helps distribute the flavor throughout the dish. Now, heat a large skillet over medium heat and pour in the olive oil. Add the potato slices and chopped onions, sprinkling salt over them. Stir gently. Cook this mix for about 15-20 minutes. You want the potatoes to become tender and lightly golden. Stir them occasionally to avoid sticking. Once your potatoes and onions are soft, drain them from the oil. Save about one tablespoon of the oil for later. Let this mixture cool for a few minutes. Meanwhile, grab a large mixing bowl. Crack the eggs into the bowl and whisk them. Add salt and freshly ground black pepper to taste. Mix well. Now, fold the cooled potato and onion mixture into the eggs. Be gentle; you want to keep the potato slices intact. Ensure everything is well combined. This step is key for a tasty tortilla. Return to the same skillet and add the tablespoon of reserved olive oil. Heat it over medium heat. Next, pour the egg mixture into the skillet. Make sure it spreads evenly across the pan. This helps create a nice shape. Cook the tortilla for about 5-7 minutes. You will notice the edges starting to set. Gently shake the pan a bit to ensure it does not stick. This is an important step. To flip the tortilla, grab a large plate. Place it upside down over the skillet. Carefully turn the skillet over. The tortilla should land on the plate. Now slide it back into the skillet to cook the other side. Cook for another 5-7 minutes. You want both sides to be golden brown and fully set. When it is done, slide the tortilla onto a serving platter. Let it cool for a few minutes before slicing. Finally, sprinkle some fresh parsley on top for color and taste. You now have a beautiful Tortilla Espanola ready to enjoy! To make a great Tortilla Espanola, keep these tips in mind: - Use the right potatoes. I prefer waxy potatoes. They hold their shape well. - Slice evenly. Thin slices cook evenly and blend nicely with the eggs. - Low heat is key. Cooking on low heat helps the potatoes soften without browning too fast. - Don’t rush the flip. Use a large plate to flip the tortilla. This prevents spills and keeps it intact. Common pitfalls to avoid: - Too much oil. Use just enough to coat the pan and potatoes. - Overcooking the eggs. Cook until just set to keep the tortilla moist. - Skipping the cool down. Letting the potato mixture cool before mixing with eggs helps in blending. Tortilla Espanola is versatile and pairs well with many sides: - Fresh salad. A light green salad adds a refreshing touch. - Crusty bread. Serve with a slice of baguette for a classic combo. - Sangria. This fruity drink complements the dish perfectly. For presentation: - Slice into wedges. This makes it easy to serve and share. - Garnish with parsley. A sprinkle on top adds color and flavor. - Serve at room temperature. This enhances the taste and texture. Try these tips and enjoy your delicious Tortilla Espanola! For the full recipe, check out the [Full Recipe]. {{image_2}} Tortilla Espanola has many styles based on where you are in Spain. In Catalonia, they often add bell peppers to the mix. This adds a sweet touch and a nice crunch. In the Basque Country, you might find it served with chistorra, a spicy sausage. This gives the dish a heartier flavor. Each region puts its spin on this classic, making it fun to explore! You can easily adapt this dish to fit different diets. To make it vegetarian, simply skip the meat. You can add more veggies like spinach or mushrooms for extra flavor. If you want more protein, try adding some cheese or even tofu. For those with gluten concerns, you're in luck! Tortilla Espanola is naturally gluten-free. Just make sure to check your ingredients, especially if you add toppings. This way, everyone can enjoy this tasty dish! After enjoying your Tortilla Espanola, store any leftovers in the fridge. Use an airtight container to keep it fresh. This method helps avoid drying out. You can keep the tortilla in the fridge for up to 3 days. If you want to store it longer, you can freeze it. Wrap it tightly in plastic wrap, then place it in a freezer-safe bag. You can freeze it for up to 2 months. To reheat your tortilla, use a skillet over low heat. This method helps keep the texture soft. Heat it for about 5 minutes on each side. You can also use a microwave if you’re in a hurry. Just cover it with a damp paper towel and heat it for 30 seconds to 1 minute. Both methods help maintain the yummy flavor and texture of the Tortilla Espanola. What is the difference between Tortilla Espanola and a regular omelet? Tortilla Espanola is thicker and has potatoes. A regular omelet uses only eggs. The Spanish version is cooked slowly, letting the flavors blend. Typically, it is served in wedges, while an omelet is folded. How can I customize my Tortilla Espanola recipe? You can add many items to your Tortilla Espanola. Consider adding: - Bell peppers for crunch and color. - Chorizo for a spicy kick. - Spinach for a fresh taste. Feel free to mix and match ingredients that you love! What to do if my tortilla falls apart? If your tortilla falls apart, it may need more cooking time. Make sure you let it set well before flipping. You can also try using a larger pan. This allows the tortilla to cook evenly. How do I know when the tortilla is fully cooked? You can tell when the tortilla is done by gently shaking the pan. If it moves as one piece, it’s ready. The edges should be golden brown, and the center should not jiggle. A toothpick inserted in the center should come out clean. Tortilla Espanola is a simple yet delicious dish made from few key ingredients. We explored the best potatoes and eggs, along with tips for extra flavors. I shared step-by-step instructions for preparation and cooking, making the process easy to follow. Remember, avoiding common mistakes ensures great taste. You now have ideas for variations and serving suggestions too. Enjoy this dish warm, cooled, or reheated, as it pairs well with many sides. Keep these tips in mind for a successful Tortilla Espanola every time. Cooking can be fun and satisfying, so start your culinary adventure!](https://therecipehatch.com/wp-content/uploads/2025/06/c8b0acbb-446c-49f2-9ab1-b65d2d30d462.webp)
Tortilla Espanola Spanish Egg and Potato Omelet Recipe
Are you ready to make a delicious Tortilla Española, the classic Spanish egg and potato omelet? This dish is simple yet packed with flavor. You
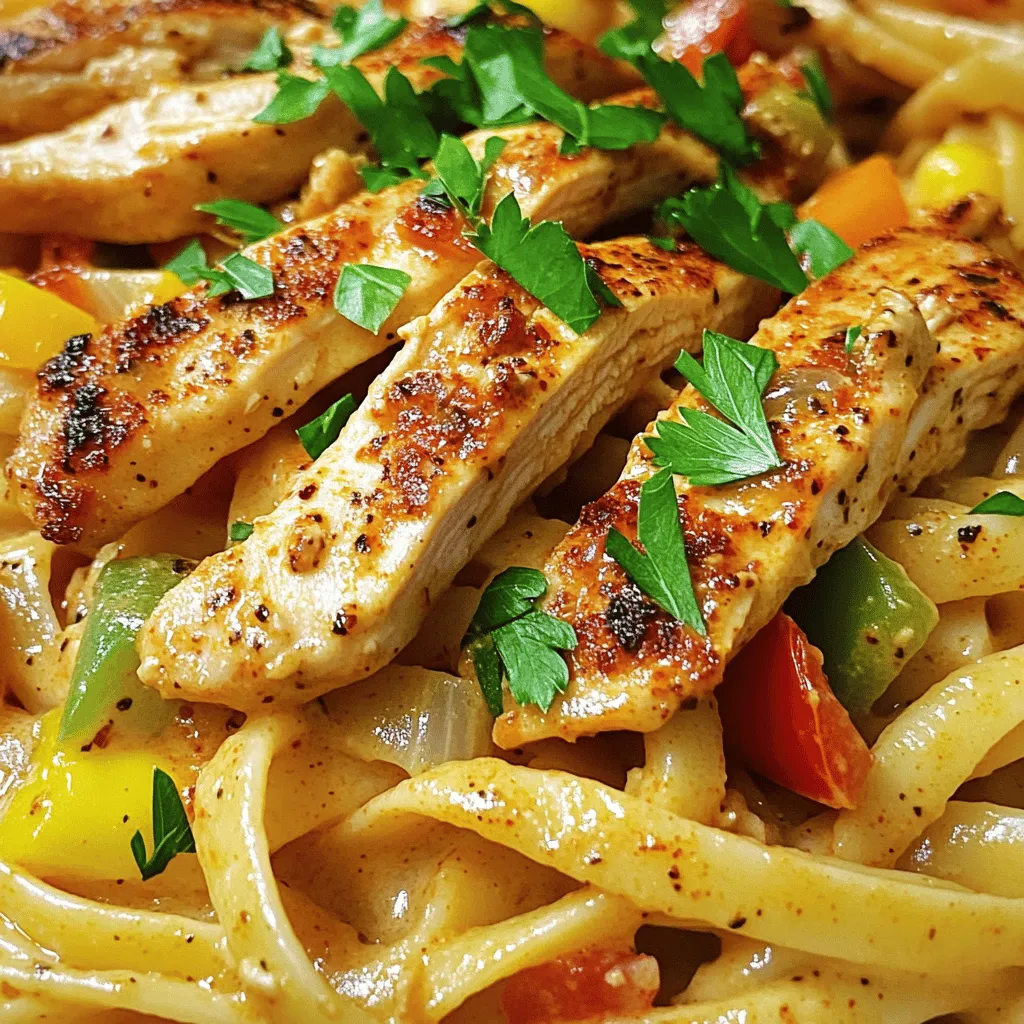
Creamy Cajun Chicken Pasta Flavorful Dinner Delight
Looking for a dinner that’s full of flavor and easy to make? Let me introduce you to Creamy Cajun Chicken Pasta! This dish combines seasoned

BBQ Chicken & Roasted Sweet Potato Bowls Simple Meal
Looking for a simple yet delicious meal? You’ve found it! BBQ Chicken & Roasted Sweet Potato Bowls are packed with flavor and nutrition. This dish