Dinner
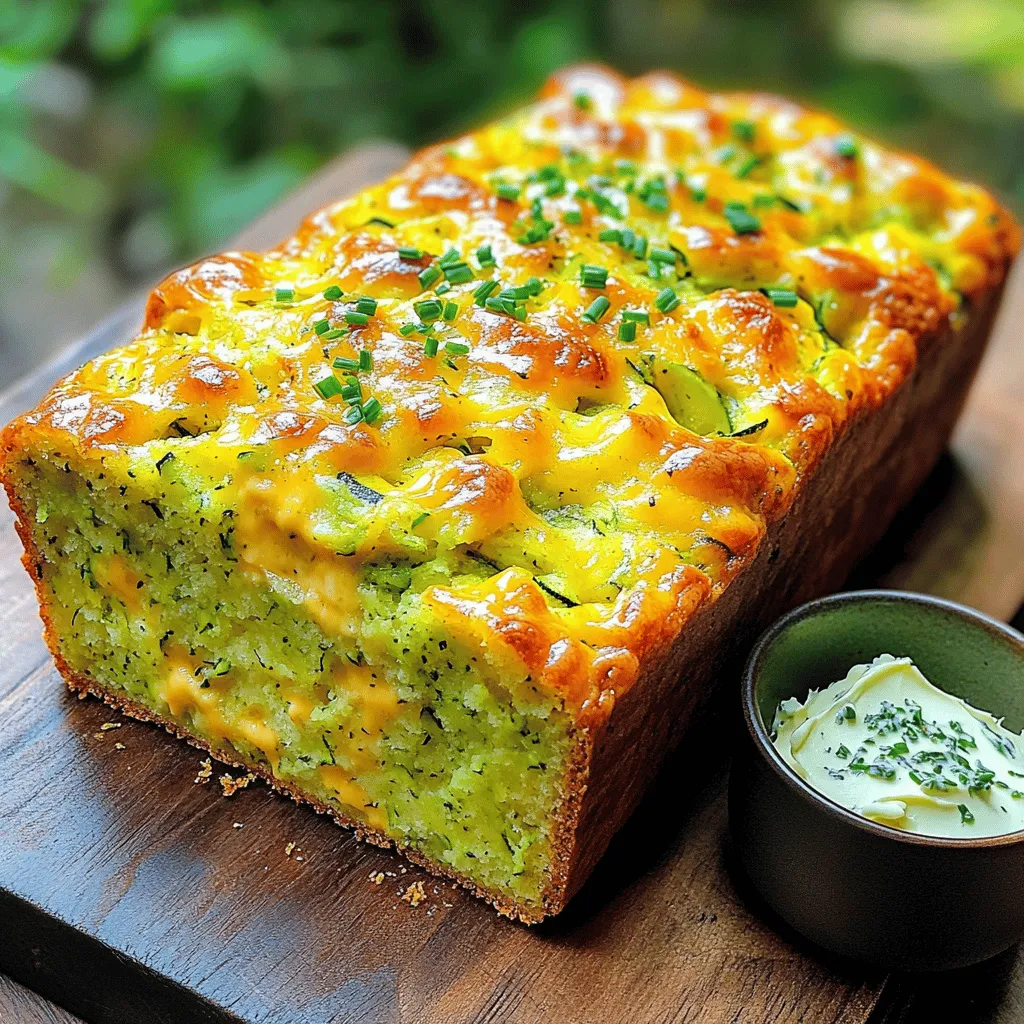
Zucchini Cheddar Herb Beer Bread Fresh and Flavorful
Are you ready to bake something fresh and flavorful? This Zucchini Cheddar Herb Beer Bread is a game-changer! With its blend of savory cheese, fresh
![- 2 cups cooked rice - 2 cups cooked chicken, shredded - 1 cup cream of mushroom soup - 1 cup sour cream - 1 cup chicken broth - 1 cup mixed vegetables (peas, carrots, corn) - 1 teaspoon garlic powder - 1 teaspoon onion powder - 1 teaspoon paprika - 1 cup shredded cheddar cheese - Salt and pepper to taste - 1/2 cup breadcrumbs (for topping) - 2 tablespoons olive oil When cooking, fresh ingredients make a big difference. Choosing quality ingredients helps elevate your dish. I always look for bright colors and firm textures. For example, fresh vegetables should feel crisp and not limp. - Rice: Use short or long-grain rice. Avoid stale packages. - Chicken: Buy organic or free-range chicken for taste and health. - Vegetables: Go for frozen mixed veggies for convenience and freshness. They are often picked at peak ripeness. - Dairy: Check expiration dates on sour cream and cheese. Fresh is best! You can easily swap ingredients if needed. Here are some ideas: - Cream of Mushroom Soup: Use cream of chicken or homemade white sauce. - Sour Cream: Greek yogurt works as a great substitute. - Mixed Vegetables: Use any fresh veggies you have on hand. - Cheese: Try mozzarella or pepper jack for a different flavor. These tips make it easy to customize your creamy angel chicken rice casserole. You can find the full recipe above to see how it all comes together! 1. Start by preheating your oven to 350°F (175°C). This ensures even baking. 2. Grease a 9x13 inch baking dish with a little oil. This helps prevent sticking. 3. In a large bowl, mix the cooked rice, shredded chicken, and mixed vegetables. 4. Add the cream of mushroom soup, sour cream, and chicken broth. Stir until well blended. 5. Season your mixture with garlic powder, onion powder, paprika, salt, and pepper. Taste and adjust if needed. 1. Spread the rice and chicken mixture evenly in the greased baking dish. 2. Sprinkle cheddar cheese on top of the mixture for a creamy texture. 3. In a small bowl, mix breadcrumbs with olive oil. This makes a crunchy topping. 4. Evenly spread the breadcrumb mix over the casserole. 5. Cover the dish with aluminum foil. Bake for 25 minutes. This keeps the moisture in. 6. Remove the foil and bake for another 10-15 minutes. Look for a golden brown top. 7. After baking, let the casserole rest for a few minutes. This helps set the layers. For the full recipe, refer to the earlier section. Enjoy your cooking adventure! To make your creamy angel chicken rice casserole even creamier, try adding more sour cream. This small change brings a rich texture that everyone will love. You can also mix in some cream cheese for extra smoothness. For even cooking, spread the mixture evenly in your baking dish. This helps every bit cook at the same time. Cover it with foil during the first part of baking. This traps steam and keeps everything moist. Using store-bought rotisserie chicken saves time. Just shred it, and you're ready to go! This shortcut lets you skip cooking and focus on mixing your casserole. You can prep ingredients in advance, too. Chop your vegetables the day before. Measure out the rice and seasonings, and keep them in the fridge. This way, you can throw everything together in no time. Serve the casserole with fresh green beans or a simple salad. These sides add color and balance to your meal. For a colorful plate, add garnishes like fresh parsley or sliced green onions. A sprinkle of paprika on top adds a nice touch, too. These small details make your dish look fancy and inviting. For the full recipe, refer to the beginning of this article. {{image_2}} You can make this dish lighter with simple swaps. - Low-fat substitutes: Use low-fat sour cream and reduced-fat cheese. This keeps the creaminess while cutting calories. - Vegetable-loaded options: Add more veggies like spinach, bell peppers, or broccoli. These not only boost nutrition but also enhance flavor. Adding extra flavors can make your casserole shine. - Adding herbs and spices: Try fresh herbs like thyme or basil. They add a pop of freshness. You can also mix in a dash of cayenne for heat. - Different cheese options: Swap cheddar for mozzarella or pepper jack. Each cheese brings a unique twist to the dish. You can easily adjust this recipe for your needs. - Scaling the recipe for larger gatherings: Double the ingredients for a big crowd. Use a larger baking dish to fit everything. - Individual servings in mini dishes: For a fun twist, bake the casserole in small ramekins. This makes serving easy and adds a personal touch. For the complete recipe, check out the [Full Recipe]. Enjoy customizing this creamy angel chicken rice casserole! To keep your creamy angel chicken rice casserole fresh, refrigeration is key. Allow the casserole to cool first. Then, transfer it to an airtight container. This will help keep it moist and full of flavor. Store it in the fridge for up to three days. If you want to save it for longer, freezing is a great option. Portion the casserole into smaller servings. Wrap each portion tightly in plastic wrap. Then, place them in a freezer-safe bag. This way, you can enjoy it later without losing taste. The casserole can last up to three months in the freezer. When it’s time to enjoy your leftovers, reheating properly is important. The best method is using the oven. Preheat it to 350°F (175°C). Place the casserole in an oven-safe dish. Cover it with foil to keep it from drying out. Heat for about 20-25 minutes, or until it is hot throughout. You can also use the microwave for quick reheating. Place a serving on a microwave-safe plate. Cover it with a damp paper towel to maintain moisture. Heat for about 2-3 minutes, checking often to avoid overheating. Maintaining flavor and texture is vital. Avoid reheating multiple times; it can make the dish dry. Instead, only heat what you plan to eat. Enjoy every bite of your delicious creamy casserole! Can I make this dish ahead of time? Yes, you can prepare this casserole a day ahead. Just mix all the ingredients and store it in the fridge. When you're ready to bake, add a few extra minutes to the cooking time. What can I use if I don’t have cream of mushroom soup? You can substitute with cream of chicken soup or a homemade white sauce. Both will add creaminess and flavor without changing the dish too much. How do I know when the casserole is done baking? The casserole is done when the top is golden brown and bubbly. You can also check the center with a knife; it should be hot throughout. What sides pair well with this casserole? This casserole goes great with a simple green salad or garlic bread. You can also serve it with steamed broccoli or green beans for a healthy side. How do I properly store mixed vegetables? Store mixed vegetables in an airtight container in the fridge. Use them within three to four days for the best taste and texture. Can I substitute chicken for another protein? Absolutely! You can use turkey, pork, or even cooked beans for a meatless option. Just make sure to adjust cooking times as needed. For the full recipe of Creamy Angel Chicken Rice Casserole, check out the complete dish instructions! This blog post showed you how to make a tasty Creamy Angel Chicken Rice Casserole. We covered each ingredient you need and tips for choosing fresh ones. I shared steps for prep and baking, plus time-saving tricks. You learned about variations and how to store leftovers well. In the end, making this casserole can be quick and fun. Try it your way and enjoy every bite!](https://therecipehatch.com/wp-content/uploads/2025/06/13dfbd81-a81c-44df-b524-f5527e1e005b.webp)
Creamy Angel Chicken Rice Casserole Delightful Dish
Looking for a warm and comforting meal? My Creamy Angel Chicken Rice Casserole hits the spot! Packed with tender chicken, creamy goodness, and veggies, it’s
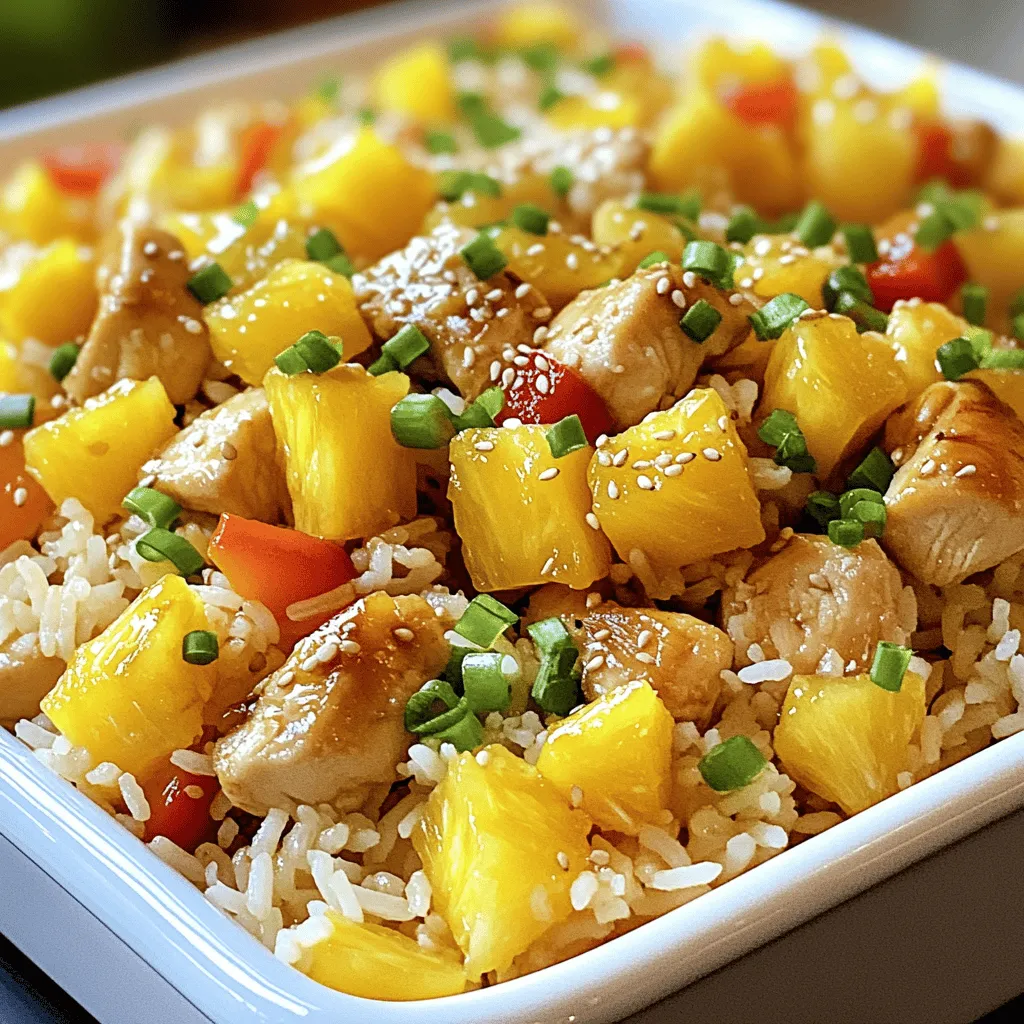
Sweet and Savory Pineapple Chicken Rice Delight
Craving a quick, delicious meal that balances sweet and savory flavors? Look no further than my Sweet and Savory Pineapple Chicken Rice Delight! This easy

Baked Potato Soup Comforting and Creamy Recipe
Looking for a warm hug in a bowl? This Baked Potato Soup is creamy, comforting, and easy to make! With just a few simple ingredients
![- Ground beef - Egg noodles - Sesame oil - Onion - Garlic - Ginger - Bell peppers - Green onions - Soy sauce - Oyster sauce (optional) - Brown sugar - Chili paste - Salt and pepper - Sesame seeds The heart of Mongolian Ground Beef Noodles lies in its main ingredients. Ground beef gives this dish a rich flavor and hearty texture. I prefer using egg noodles because they are soft and soak up the sauce well. For the aromatics, onion, garlic, and ginger create a fragrant base. The bell peppers add color and crunch. Fresh green onions bring a nice touch at the end. - Sesame seeds for garnish - Additional toppings like crushed peanuts or chili flakes - Alternative vegetables like carrots or snap peas Garnishing with sesame seeds adds a lovely finish. You can also experiment with toppings like crushed peanuts or chili flakes. If you want to switch up the veggies, try using carrots or snap peas for a different taste and texture. For the complete recipe, check out the Full Recipe. To cook the egg noodles, start by boiling a large pot of salted water. Once the water is boiling, add the noodles. Cook them as per the package instructions until they are al dente. This usually takes about 5-7 minutes. After cooking, drain the noodles and set them aside. To achieve the perfect texture, make sure not to overcook the noodles. They should be firm enough to hold up when mixed with the beef and sauce. Rinse them briefly in cold water to stop the cooking process and prevent sticking. Next, let’s make the sauce. In a small bowl, mix together the soy sauce, oyster sauce (if you like), brown sugar, and chili paste. This mix adds a great depth of flavor. Balance is key here; the sweetness from the brown sugar helps to round out the saltiness of the soy sauce. Taste the sauce as you mix. If you want more heat, add more chili paste. If it’s too salty, a little more sugar can help. Now it’s time to cook the beef and vegetables. Heat sesame oil in a large skillet or wok over medium heat. Add the sliced onion, minced garlic, and grated ginger. Sauté these for about 2-3 minutes until they smell great and the onions look clear. Next, raise the heat to medium-high. Add the ground beef to the pan and cook it until brown, about 5-7 minutes. Make sure to break it apart as it cooks. After the beef is browned, stir in the bell peppers. Cook them for another 3-4 minutes until they soften a bit. Once everything is cooked, pour the sauce over the beef and vegetables. Stir well to coat everything. Finally, add the cooked egg noodles to the skillet. Toss everything together until the noodles are well mixed with the beef and sauce. Season with salt and pepper as needed. Cook for an extra 2-3 minutes until everything is heated through. For a final touch, stir in the sliced green onions before serving. Enjoy your flavorful Mongolian Ground Beef Noodles! For the complete cooking guide, check out the Full Recipe. To make your Mongolian ground beef noodles shine, focus on layers of flavor. Start with fresh garlic and ginger for a strong base. Add these to the skillet first. Their aroma sets the stage for the rest of the dish. As you cook, taste your food often. Adjust seasoning with salt and pepper as you go. This helps you build a well-rounded taste. When cooking, you can choose between sautéing and stir-frying. Sautéing is great for a slower cook. It allows flavors to blend well. Stir-frying cooks food fast over high heat. This keeps veggies crisp and bright. For the best texture, watch your timing. Add the bell peppers after the beef turns brown. This gives them the right crunch without overcooking. A good skillet or wok makes a big difference. Use a large non-stick skillet for even heat. A wok can also work well for stir-frying. Both options help avoid sticking. For utensils, use a wooden spoon or spatula. These tools help you mix everything without scratching the pan. If you want to dive deeper into this recipe, check out the Full Recipe for detailed steps and measurements. By following these tips, you’ll create a dish that’s flavorful and comforting. Enjoy the process and happy cooking! {{image_2}} You may want a gluten-free option. Use gluten-free noodles made from rice or quinoa. You can also swap soy sauce for tamari to keep it gluten-free. This keeps the dish tasty for those with gluten sensitivities. If you prefer a vegetarian meal, replace the ground beef with crumbled tofu or tempeh. You can also use mushrooms for a hearty texture. Add more veggies like carrots or zucchini to fill the plate. Want to spice it up? Try adding fresh herbs like cilantro or basil. A pinch of cumin or smoked paprika can add warmth. If you enjoy heat, toss in more chili paste or fresh chili peppers. Regional adaptations can offer a fun twist. For a Southeast Asian flair, you can mix in some coconut milk. This will give your dish a rich and creamy texture. You can also substitute the bell peppers with bok choy or snow peas for a different crunch. Pair your noodles with a fresh side salad. A light cucumber salad can balance the richness. For drinks, try serving with green tea or a light lager. When it comes to presentation, serve the noodles in a large bowl. Top it with sesame seeds and sliced green onions. This adds color and texture. You can also arrange the noodles in a nest shape for a fun look. For the full recipe, check out the [Full Recipe]. To keep your Mongolian Ground Beef Noodles fresh, let them cool first. Place the leftovers in an airtight container. This helps prevent moisture loss and keeps flavors intact. I recommend using glass or BPA-free plastic containers. They are sturdy and easy to clean. Want to save some for later? You can freeze the cooked noodles. First, let them cool completely. Then, put them in freezer-safe bags. Remove as much air as possible to prevent freezer burn. When you're ready to eat, thaw the noodles in the fridge overnight. For reheating, you can use the microwave or a skillet. If using a skillet, add a splash of water to help steam the noodles back to life. In the fridge, your Mongolian Ground Beef Noodles last about 3 to 4 days. If you freeze them, they can stay good for up to 3 months. Just remember to label your containers with the date. This way, you can track how long they’ve been stored. Mongolian Ground Beef Noodles is a hearty dish with rich flavors. It combines ground beef, egg noodles, and colorful veggies. This meal has roots in Mongolian cuisine but is popular in many places. The blend of soy sauce, sesame oil, and spices gives it a unique taste. The dish is warm and filling, making it a great comfort meal on chilly days. Yes, you can make this recipe ahead of time. Cook the noodles and beef mixture and store them separately. Place the cooled noodles in an airtight container. Store the beef and veggies in another container. This helps keep the noodles from getting soggy. You can keep them in the fridge for up to three days. When you're ready to eat, just reheat everything together on the stove. To adjust the spice levels, start with a small amount of chili paste. You can easily add more if you like it hotter. Mix in some fresh chopped chili for a fresh kick. For a milder taste, skip the chili paste or use just a little. Taste as you go, and make it your own! In this article, we explored the key ingredients for Mongolian Ground Beef Noodles, including main elements and optional extras. We covered step-by-step cooking instructions, from boiling noodles to preparing sauces. Plus, we shared helpful tips and variations for dietary needs. Remember, cooking is about experimenting and finding what you love. With a few tweaks, this dish can easily become your favorite. Enjoy creating a satisfying meal that fits your tastes. The journey of cooking is just as rewarding as the meal itself.](https://therecipehatch.com/wp-content/uploads/2025/06/208103b7-1db6-4b69-b4b8-eba06115920d.webp)
Mongolian Ground Beef Noodles Flavorful Comfort Meal
If you’re craving a warm and hearty meal, Mongolian Ground Beef Noodles is the answer. This dish blends savory beef, soft noodles, and vibrant veggies
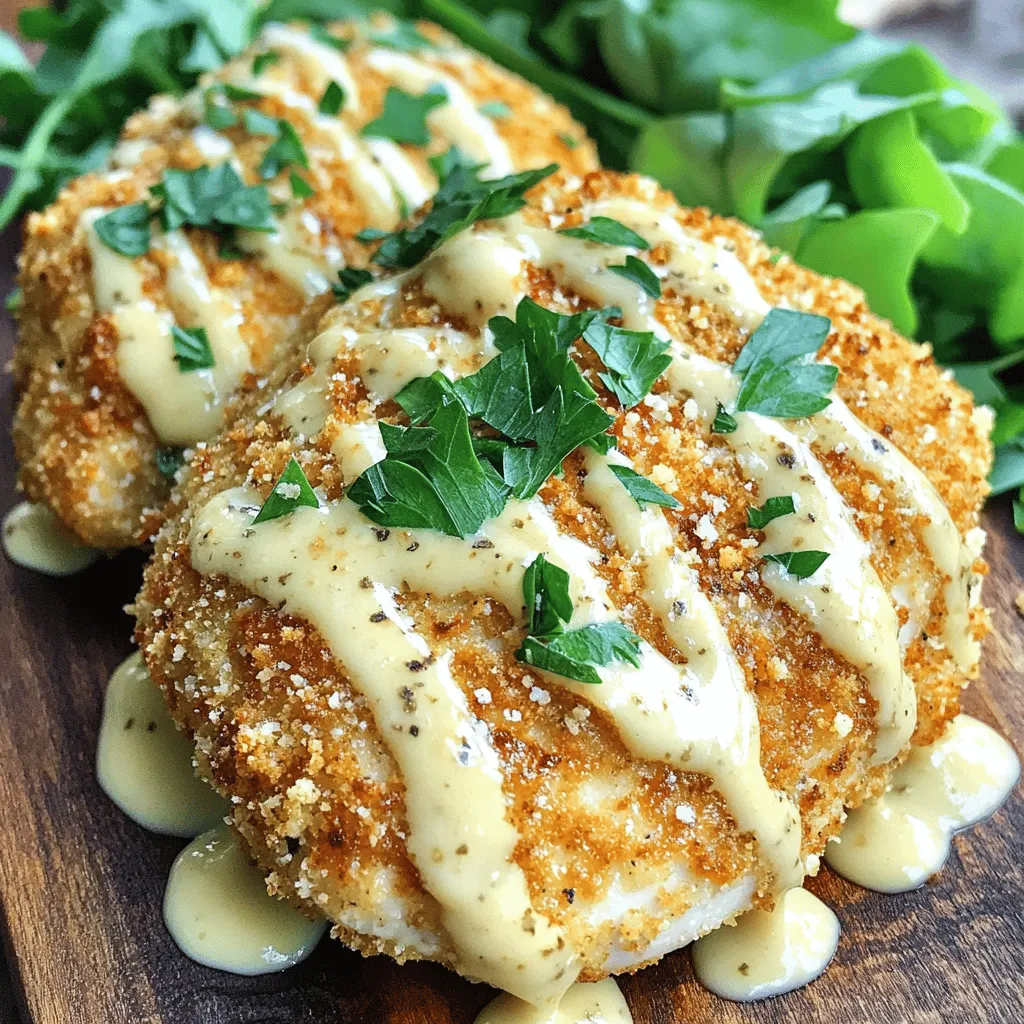
Crispy Parmesan Chicken with Garlic Cream Sauce Delight
Get ready to impress your taste buds with my Crispy Parmesan Chicken with Garlic Cream Sauce! This dish combines juicy chicken breasts coated in a
![To make Cheesy Garlic Chicken Wraps, you need some tasty ingredients. Here’s the list: - 2 cups cooked chicken, shredded - 1 cup shredded mozzarella cheese - 1/2 cup cream cheese, softened - 3 cloves garlic, minced - 1 tablespoon olive oil - 1 teaspoon dried oregano - 1 teaspoon paprika - Salt and pepper to taste - 4 large tortillas (whole wheat or flour) - 1 cup fresh spinach leaves - 1/2 cup diced tomatoes (optional) - Chopped fresh parsley for garnish Each ingredient plays an important role. The cooked chicken gives protein and flavor. The mozzarella cheese adds that gooey, cheesy goodness. Cream cheese makes everything creamy and rich. Garlic brings a savory punch. Olive oil helps blend the flavors. Oregano and paprika add spice and warmth. Salt and pepper sharpen the taste. Tortillas wrap it all up nicely. Fresh spinach adds color and crunch. Diced tomatoes offer a juicy bite, while parsley gives a fresh finish. For the full recipe, follow the steps closely. Enjoy crafting this delightful dish with simple, fresh ingredients! First, gather your ingredients. You will need cooked chicken, mozzarella cheese, cream cheese, and garlic. In a large bowl, mix them well. Add olive oil, oregano, paprika, salt, and pepper. Stir until all the chicken gets coated in cheese and spices. This mixture will be creamy and full of flavor. Now, take a tortilla and lay it flat. Scoop a generous amount of the cheesy chicken mixture. Spread it down the center of the tortilla. Next, add fresh spinach leaves and diced tomatoes if you like. Fold the sides of the tortilla over the filling. Roll it from the bottom to the top to seal it tight. Make sure everything stays inside. Heat a skillet over medium heat. Place the wraps seam-side down in the pan. Cook for about 3 to 4 minutes until golden brown. Flip the wraps and cook the other side for another 3 to 4 minutes. They should be crispy on both sides. Once done, take them out and let them cool for a bit. Slice in half and garnish with chopped parsley. Enjoy your cheesy garlic chicken wraps! For the full recipe, check the main section. To make the filling creamy and rich, blend the cheeses well. I like to use mozzarella and cream cheese together. This mix melts beautifully and gives a great texture. Add minced garlic to boost flavor and aroma. For a little kick, consider adding paprika. Taste as you mix, and adjust salt and pepper to your liking. When wrapping tortillas, start with a flat surface. Place your filling in the center of the tortilla. Fold the sides in first, then roll from the bottom up. This way, the filling stays inside better. Make sure to tuck the filling as you roll. This helps create a tight wrap for cooking. To make your wraps even tastier, think about adding herbs. Dried oregano works great for a savory touch. You can also sprinkle in some crushed red pepper if you like heat. Fresh herbs like parsley can add a pop of color and freshness. Don’t forget to use quality ingredients; they make a big difference! For the full recipe, check out the [Full Recipe]. {{image_2}} You can switch up the protein in your wraps. Instead of chicken, try turkey. Turkey gives a leaner taste but still packs in flavor. For a vegetarian option, use chickpeas or black beans. Both add protein and texture. You can also use tofu or tempeh for a plant-based twist. Cheese is key in these wraps. While mozzarella works great, other cheeses can shine too. Cheddar adds a sharp kick. Creamy goat cheese brings a tangy taste, and pepper jack offers a spicy twist. Mix and match to find your favorite combination. Cheese adds richness and pulls everything together. Don’t be afraid to get creative with veggies. Bell peppers add crunch and color; onions bring sweetness when cooked. You can also use mushrooms for a hearty bite. Try adding corn or zucchini for a fresh touch. Feel free to mix in your favorite veggies. They bring flavor and nutrients to this tasty meal. After you make the cheesy garlic chicken wraps, let them cool down. Place any leftover wraps in an airtight container. They can stay fresh in the fridge for about 3 to 4 days. If you notice any signs of spoilage, like a weird smell or mold, throw them away. If you want to save the wraps for later, freezing is a great option. Wrap each cooled wrap tightly in plastic wrap. Then, place them in a freezer-safe bag or container. These wraps can last up to 2 months in the freezer. When you’re ready to eat, just thaw them in the fridge overnight before reheating. To reheat the wraps, I recommend using a skillet. Heat the skillet over medium heat. Place the wrap in the skillet, seam-side down. Cook for about 3 to 4 minutes on each side until they’re hot and crispy. You can also use an oven at 350°F (175°C). Wrap them in foil and heat for about 10 to 15 minutes. This keeps them nice and crunchy. For more details, you can check the Full Recipe. Yes, you can make cheesy garlic chicken wraps ahead of time. Prepare them and store in the fridge. Wrap them in foil or plastic wrap. They stay fresh for up to two days. When you are ready, just heat them in a skillet or oven. Dipping sauces can add fun flavors. Here are some tasty options: - Ranch dressing - BBQ sauce - Garlic aioli - Salsa - Hot sauce These sauces can enhance the wraps. Experiment to find your favorite! To change the spice level, you can add or reduce spices. For a milder wrap, skip the paprika. For more heat, add red pepper flakes or a dash of hot sauce. You can also use spicy cheese for added flavor. Adjust to fit your taste! You learned how to make tasty cheesy garlic chicken wraps. We covered the key ingredients, like cooked chicken and mozzarella. You got step-by-step instructions on preparing, assembling, and cooking the wraps. Don’t forget about those helpful tips and tasty variations! Remember, these wraps are easy to store and reheat. With these insights, you can enjoy delicious wraps any time. Get creative and make them your own!](https://therecipehatch.com/wp-content/uploads/2025/06/a82504fe-f32f-40c3-94ce-2012f2507c3f.webp)
Cheesy Garlic Chicken Wraps Delightful and Easy Meal
Are you ready to whip up a quick and tasty meal? Cheesy Garlic Chicken Wraps are the perfect solution! With just a few simple ingredients,
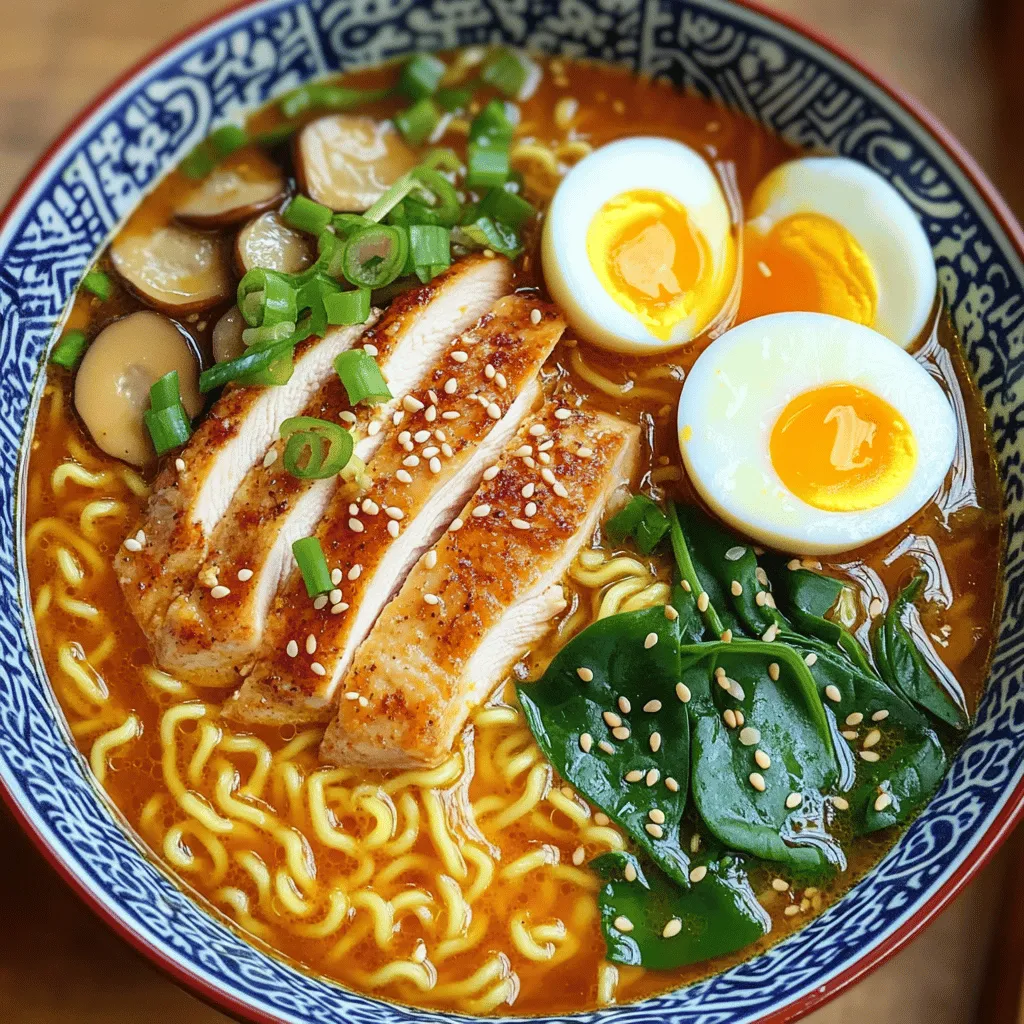
Fiery Chicken Ramen Tasty Recipe to Enjoy Today
Are you ready to spice things up in your kitchen? This Fiery Chicken Ramen recipe brings heat and flavor together in a bowl. I’ll guide
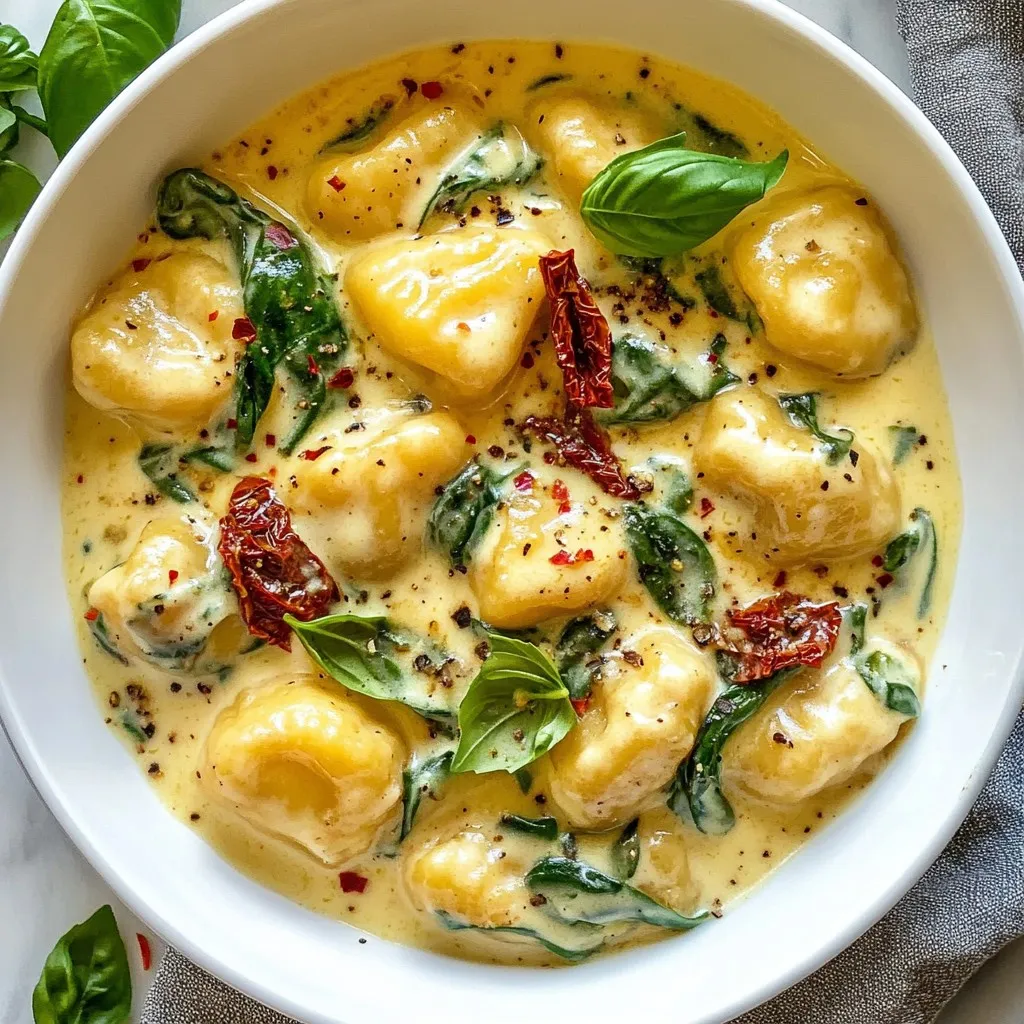
Millionaire Gnocchi Creamy and Luxurious Delight
Get ready for a taste of luxury with my Millionaire Gnocchi! This dish combines soft potato dumplings with a rich and creamy sauce that will
![- 4 white fish fillets (like tilapia or snapper) - 2 tablespoons jerk seasoning - 2 tablespoons olive oil - 1 lime, juiced - 1/2 cup red cabbage, shredded - 1 avocado, sliced - 1/4 cup fresh cilantro, chopped - Mango salsa (1 cup) for topping - Grill or grill pan - Mixing bowl - Tongs When you make jerk fish, you need fresh ingredients. The white fish fillets bring a mild taste. Jerk seasoning adds a spicy kick. This blend has herbs and spices like allspice and thyme. Olive oil helps the fish stay moist. Lime juice adds a bright flavor. For toppings, red cabbage gives crunch. Avocado brings creaminess. Fresh cilantro adds a burst of flavor. Mango salsa balances the spice. It’s sweet and tangy. You'll need a grill or grill pan. A mixing bowl is perfect for marinating. Tongs help flip the fish without breaking it. This simple list of ingredients makes a delicious meal. You can find the full recipe for these tasty jerk fish tacos easily. Enjoy every bite! To start, you need to marinate the fish fillets. In a bowl, mix olive oil, jerk seasoning, lime juice, and a pinch of salt. Coat the fish fillets well in this mixture. Let them sit for at least 30 minutes. This step is key. The longer the fish marinates, the better the flavors blend. Next, preheat your grill or grill pan over medium-high heat. Once it’s hot, carefully place the marinated fish fillets on the grill. Cook them for about 3 to 4 minutes on each side. You want the fish to become opaque and flake easily with a fork. This ensures a juicy and tender texture. While the fish rests, warm the corn tortillas on the grill. Heat them for about 30 seconds on each side until they are soft and pliable. Now, it's time to assemble. Place a piece of cooked fish on each tortilla. Top with shredded red cabbage, avocado slices, and fresh cilantro. For a sweet kick, add a generous spoonful of mango salsa on top. Enjoy the burst of flavors in each bite! For the full recipe, check the details above. To get great jerk flavor, you have two choices: homemade or store-bought jerk seasoning. I prefer homemade because I can control the heat. Use spices like allspice, thyme, and Scotch bonnet peppers. If you choose store-bought, look for a brand that has a good mix of spices and flavor. Marinate your fish for at least 30 minutes. This lets the fish soak up the jerk spices. For even more flavor, you can marinate it overnight in the fridge. Just make sure to cover it well. Fish can stick to the grill, which can be a pain. To avoid this, make sure to oil the grill grates before adding the fish. You can also oil the fish lightly. This keeps it from sticking and helps with browning. Check for doneness by using a fork. If the fish flakes easily, it is ready. Don’t overcook it! Aim for about 3-4 minutes on each side. The fish should be opaque all the way through. Jerk Fish pairs well with sides like rice and peas or a fresh green salad. These dishes balance the spicy flavors. You can also serve it with grilled vegetables for a colorful plate. For drinks, try tropical beverages. A cold beer or a fruity cocktail complements the spices. You can also offer fresh limeade or coconut water for a refreshing touch. For the full recipe, check out the Spicy Jerk Fish Tacos. It’s a delight! {{image_2}} You can use many types of fish for jerk fish tacos. While tilapia and snapper are popular, other white fish work well too. Cod and haddock are excellent choices. They are mild and soak up flavor well. If you want a bolder taste, try salmon or mahi-mahi. These types add a rich flavor to your dish. You can also use shrimp or scallops for a fun twist. Both options bring unique textures and flavors. If you prefer a plant-based option, there are great substitutes. You can use cauliflower or eggplant instead of fish. They both absorb flavors like a sponge. For cauliflower, cut it into thick steaks. For eggplant, slice it into rounds. You can still use jerk seasoning to keep the taste authentic. If you want a protein boost, try chickpeas or tofu. Marinate them just like the fish for the best flavor. To add more flavor, consider different sauces or seasonings. Try adding a spicy mango sauce or a creamy cilantro sauce. Both add a nice kick and balance the heat. You can also sprinkle on some toasted coconut for a tropical touch. For extra texture, add toppings like crunchy pickled onions or sliced radishes. These toppings give your tacos a fresh, crisp bite. You can mix and match to create your perfect jerk fish taco. For the complete recipe, check out the [Full Recipe]. To keep leftover Jerk Fish tacos fresh, store them in the fridge. Wrap each taco in plastic wrap or foil. For best results, use an airtight container. This helps keep the fish moist and the toppings crisp. You should eat leftovers within three days for the best taste. If you want to save Jerk Fish for later, freezing is a great option. First, wrap the cooked fish tightly in plastic wrap. Then put it in a freezer bag or container. For tacos, freeze the fish and toppings separately. When you're ready to eat, thaw the fish overnight in the fridge. Reheat it in the oven or on a grill to maintain flavor. Avoid microwaving, as it can make the fish rubbery. The shelf life of cooked Jerk Fish is about three to four days in the fridge. After freezing, it lasts up to three months. Check for signs that the fish is bad. If it smells sour or has a slimy texture, toss it out. Toppings like avocado and cabbage should be fresh. If they look brown or wilted, it's time to let them go. Enjoy your Jerk Fish tacos at their best! Jerk Fish is a dish that comes from Jamaica. It uses jerk seasoning, a mix of spices. This mix often includes allspice, thyme, and Scotch bonnet peppers. The dish has roots in the Maroons, African slaves who escaped to the mountains. They learned to cook with local spices and created this unique flavor. Jerk Fish is not just food; it’s part of Jamaican culture and heritage. You can taste the history in every bite. Yes, you can use frozen fish fillets for this recipe. First, thaw the fish in the fridge overnight. If you are short on time, you can use cold water. Just place the fish in a sealed bag and submerge it in cold water for about an hour. After thawing, follow the marinating steps in the Full Recipe. Cooking time may be the same, but always check for doneness. The fish should be opaque and flake easily with a fork. The spice level of Jerk Fish can vary. Traditional jerk seasoning can be hot, especially with Scotch bonnet peppers. If you prefer a milder taste, you can adjust the heat. Try using less jerk seasoning or omitting the hotter peppers. You can also add a touch of honey or sugar to balance the heat. Experiment until you find the right spice level for your taste buds. Jerk Fish tacos pair well with many sides. Here are some ideas: - Rice and peas for a classic combo. - Grilled corn on the cob for a sweet touch. - A fresh salad with lime vinaigrette to balance the flavors. - Tropical fruit salad adds a refreshing contrast. - For drinks, try coconut water or a light beer. These will enhance the meal without overpowering it. Jerk Fish tacos are simple to make and full of flavor. Remember to marinate your fish well for that perfect taste. Grilling gives it a nice texture, and toppings like mango salsa add nice freshness. You can even switch up the fish or try vegetarian options. Store leftovers properly, and you can enjoy them later. Enjoy making this dish and sharing it with friends. You’ll love the burst of flavors and the fun of grilling!](https://therecipehatch.com/wp-content/uploads/2025/06/a2aa73af-5f81-4b04-b67d-cb8d71747be5.webp)
Jerk Fish Recipe Simple and Flavorful Delight
Ready to spice up your dinner table? My Jerk Fish recipe is simple and bursting with flavor. With just a few ingredients and easy steps,