Dinner

To make a great Corn and Cherry Tomato Quiche, you need a few key items. Here’s what you should gather: - 1 pre-made pie crust (9-inch) - 1 cup fresh corn kernels (you can also use frozen) - 1 cup cherry tomatoes, halved These ingredients form the base of your quiche. The pie crust holds everything together. Fresh corn adds sweetness, and cherry tomatoes bring a burst of flavor. Next, we need some creamy and rich ingredients. These will enhance the taste and texture of your quiche. Gather these: - 3 large eggs - 1 cup heavy cream - 1 cup shredded Gruyère cheese The eggs and cream create a smooth filling. Gruyère cheese adds a nutty flavor that pairs well with the vegetables. Herbs and spices elevate the quiche to new heights. Here’s what to include: - 1 tablespoon fresh basil, chopped (or 1 teaspoon dried basil) - 1 teaspoon garlic powder - Salt and pepper to taste Fresh basil gives a bright, aromatic taste. Garlic powder adds depth, while salt and pepper balance the flavors. For the complete recipe, check out the Full Recipe. Enjoy creating this delicious dish! First, preheat your oven to 375°F (190°C). This step is key for a perfect quiche. While the oven heats, grab a skillet. Heat 1 tablespoon of olive oil over medium heat. Add 1 cup of fresh corn kernels. If you use frozen corn, that works too! Sauté for about 3-4 minutes. You want the corn to be tender, so keep an eye on it. Season with salt, pepper, and 1 teaspoon of garlic powder. Once done, take the skillet off the heat. Now, let’s make the egg filling. In a mixing bowl, whisk together 3 large eggs and 1 cup of heavy cream. This mix makes your quiche rich and creamy. Add 1 tablespoon of fresh chopped basil or 1 teaspoon of dried basil for flavor. Season with a pinch of salt and pepper. Whisk until the mixture is smooth and well combined. Next, it’s time to assemble. Take your pre-made 9-inch pie crust and place it in a pie dish. Use a fork to poke several holes in the bottom. This helps avoid a soggy crust. Evenly spread the sautéed corn and halved cherry tomatoes—1 cup—in the crust. Pour the egg and cream mix over the veggies until just covered. Finally, sprinkle 1 cup of shredded Gruyère cheese on top. Now, bake your quiche in the preheated oven for 35-40 minutes. Look for a set filling and a slightly golden top. To check doneness, gently shake the pie dish. If it wobbles in the center, let it bake a bit longer. Once done, take it out and let it cool for about 10 minutes before slicing. Enjoy your tasty Corn and Cherry Tomato Quiche! For the full recipe, check out the recipe section above. To avoid a soggy crust, bake the crust for a few minutes before adding filling. This step helps set the base and keeps it crisp. Make small holes with a fork in the crust to let steam escape. For a fluffier texture, whisk the eggs well. Use room temperature eggs and heavy cream for a smoother mix. You can add different cheeses to make your quiche unique. Try feta for a tangy bite or cheddar for a sharp flavor. Mixing in more vegetables also boosts taste and nutrition. Spinach, bell peppers, or zucchini work great. Just sauté them first to reduce moisture. Garnish your quiche with extra chopped basil for a fresh look. You can also add a sprinkle of cheese on top before serving. Pair your quiche with a simple green salad for a light meal. A citrus vinaigrette adds a nice zing. For a heartier option, serve with roasted potatoes or a grain salad. For the full recipe, check the earlier section. {{image_2}} You can change up the flavors in your Corn and Cherry Tomato Quiche by using different vegetables. Try adding spinach, bell peppers, or zucchini. Each gives a new taste and color. You can also mix in some sautéed onions for a sweet touch. If you want to add meat or protein, consider diced ham or cooked bacon. These options give your quiche a heartier feel. For a vegetarian twist, use chickpeas or tofu for protein. The key is to balance the flavors and keep the filling moist. For those who need gluten-free options, you can make a crust using almond flour or gluten-free flour. This keeps your quiche tasty while meeting dietary needs. You can also use a crustless version. Just pour the filling directly into a greased pie dish. If you need dairy-free alternatives, swap out heavy cream for coconut milk or almond milk. You can also use vegan cheese or nutritional yeast in place of Gruyère cheese. These swaps keep the quiche creamy and flavorful without dairy. Feel free to explore these variations and make the quiche your own! For a detailed guide on the basic recipe, check out the Full Recipe. To keep your Corn and Cherry Tomato Quiche fresh, store it in the fridge. Wrap it tightly in plastic wrap or place it in an airtight container. This helps to keep moisture in and flavors strong. It will last for 3 to 5 days in the fridge. When you're ready to reheat, use an oven or toaster oven. Preheat it to 350°F (175°C). Place the quiche on a baking sheet and cover it with foil. Heat for about 15-20 minutes, or until warm throughout. This method keeps the crust crispy and the filling creamy. You can freeze this quiche for later, which is great for meal prep. Let the quiche cool completely before freezing. Wrap it tightly in plastic wrap and then in aluminum foil. This double layer prevents freezer burn. You can store it in the freezer for up to 3 months. To thaw, place the quiche in the fridge overnight. This allows it to defrost slowly and evenly. After thawing, reheat the quiche in the oven at 350°F (175°C) for about 20-25 minutes. Remove the foil during the last 10 minutes for a crispy top. If you want to enjoy this dish later, consider following the Full Recipe to ensure the best results. If you don't have Gruyère cheese, you can use other types. Swiss cheese works well. Cheddar cheese can add a sharp flavor. You might also try mozzarella for a milder taste. Each cheese brings its unique flavor. This change can slightly alter the taste of your quiche. Yes, you can make this quiche ahead. Prepare it, bake it, and let it cool. After that, cover it tightly. Store it in the fridge for up to three days. When ready to eat, reheat in the oven. This keeps the crust crispy and the filling warm. A few signs tell you when the quiche is done. The top should be golden brown. The filling should be set, not jiggly. You can check the center with a knife. If it comes out clean, it’s ready. For safety, the internal temperature should reach 165°F (74°C). You can create a delicious corn and cherry tomato quiche with simple steps. Start with a premade crust and fresh ingredients like corn and tomatoes. Mix eggs, cream, and cheese for a rich filling. Sauté the corn and layer everything nicely before baking. Experiment with herbs and spices to enhance flavor. Remember, you can customize ingredients to suit your taste. Follow my tips to avoid soggy crusts and achieve a fluffier texture. With proper storage, enjoy this dish again later. Quiche is versatile and perfect for any meal. Happy cooking!
Corn and Cherry Tomato Quiche Flavorful and Easy Recipe
Looking for a delicious dish that’s both easy to make and will impress your family? This Corn and Cherry Tomato Quiche is packed with fresh
- 4 cups ripe tomatoes, chopped - 1 tablespoon olive oil - 1 teaspoon sugar - 1 teaspoon salt - 1/2 teaspoon black pepper - 1 teaspoon dried oregano - 1/2 teaspoon garlic powder - 1 cup cornmeal - 1 cup all-purpose flour - 1 tablespoon baking powder - 1/2 teaspoon baking soda - 1 cup shredded sharp cheddar cheese - 1 cup buttermilk or milk - 1/4 cup unsalted butter, melted - Fresh basil, for garnish The key to a great Cornmeal Cheddar Tomato Cobbler is in the fresh ingredients. I love using ripe tomatoes because they bring sweetness. The olive oil adds richness, while salt and sugar balance the flavors. I like to sprinkle in black pepper and dried oregano for a punch of taste. Garlic powder rounds it out nicely. For the batter, cornmeal gives it a nice texture. I mix it with all-purpose flour to make it light. Baking powder and baking soda help it rise and get fluffy. Sharp cheddar cheese adds a wonderful flavor and creaminess. I always use buttermilk for its tangy taste and moisture. Finally, butter makes everything taste better. These ingredients work together to create a comforting dish. If you want to try making this yourself, you can check the Full Recipe for all the steps. Enjoy the process and the delicious results! To start, heat olive oil in a large skillet over medium heat. Add the chopped tomatoes, sugar, salt, black pepper, dried oregano, and garlic powder. Cook this mixture for about 5-7 minutes. You want the tomatoes to soften and let their juices flow. This step is key. It builds a rich flavor base for your cobbler. Once ready, remove the skillet from the heat and set the mixture aside. In a separate bowl, combine the cornmeal, all-purpose flour, baking powder, and baking soda. Whisk these dry ingredients together until they blend well. Next, stir in the shredded sharp cheddar cheese. This adds a nice cheesy flavor and texture. In another bowl, mix the buttermilk (or milk) with the melted butter. Pour this wet mixture into the dry ingredients. Stir gently until just combined. Avoid overmixing; this keeps the cornbread light and fluffy. Grab a greased baking dish, about 9x13 inches. Pour the tomato mixture into the dish first. It’s important to spread it evenly. Next, spoon the cornbread batter over the tomato layer. Spread it gently to cover as much as possible. Now, it’s time to bake! Place the dish in a preheated oven at 400°F (200°C). Bake for 25-30 minutes. The top should turn golden brown. To check for doneness, insert a toothpick in the center. If it comes out clean, your cobbler is ready. Let it cool slightly before serving, and enjoy this tasty comfort dish! To make your Cornmeal Cheddar Tomato Cobbler even tastier, add fresh herbs. Basil and thyme work wonders. You can also use dried herbs like oregano, which add depth. For spices, a pinch of red pepper flakes brings a nice kick. When it comes to cheese, sharp cheddar is your best bet. Its bold flavor shines through. You can also mix in Monterey Jack for creaminess. If you love blue cheese, just a little can add a unique twist. Preventing sogginess is key for a great cobbler. First, use firm, ripe tomatoes. Remove extra seeds and juice before cooking. This keeps your filling from getting too watery. Cook the tomatoes just until soft, not mushy. To achieve a golden brown top, make sure your oven is fully preheated. Bake at 400°F (200°C) for 25-30 minutes. If the top isn't browning, switch to broil for a minute. Watch closely to avoid burning. For the full recipe, refer to the earlier section. {{image_2}} You can switch up the tomatoes and cheese in this dish. If you want a twist, use roasted red peppers or sun-dried tomatoes instead of fresh tomatoes. For cheese, try mozzarella or a milder cheddar. These swaps will change the taste, making it fun to experiment. If you need a gluten-free option, use gluten-free flour instead of all-purpose flour. Almond flour or a blend of rice and chickpea flour works well too. Just keep in mind that the texture may vary slightly with these alternatives. You can go sweet or savory with this cobbler. If you like sweet, add a bit of honey or maple syrup to the batter. This sweetness pairs well with tomatoes. For a savory twist, mix in some cooked bacon or sausage into the tomato layer. Adding spices like cayenne pepper can also give it a nice kick. Want to boost the veggie game? Toss in spinach, zucchini, or bell peppers with the tomatoes. These will add color and nutrition. Just make sure to chop them small and cook them a bit before adding. This keeps the cobbler from getting too watery. To keep your cornmeal cheddar tomato cobbler fresh, store it in the fridge. Place it in an airtight container. This helps prevent it from drying out. You can keep it for about 3-4 days. If you want to store it longer, freezing is a great option. For freezing, make sure it cools completely first. Cut it into slices for easy thawing later. Wrap each slice tightly in plastic wrap. Then, place them in a freezer-safe bag. This way, you can enjoy it for up to three months. When it's time to enjoy your cobbler again, reheating is key. The best method is using an oven. Preheat the oven to 350°F (175°C). Place the cobbler in a baking dish and cover it with foil. This keeps it moist. Heat for about 15-20 minutes or until warmed through. You can also use a microwave. Just place a slice on a microwave-safe plate. Heat it for about 1-2 minutes. Keep an eye on it to avoid overcooking. Regardless of the method, aim to maintain the texture and flavor. The crust should stay slightly crispy, and the tomatoes juicy. Enjoy your delicious leftovers! For the full recipe, check the earlier sections. What sides pair well with this dish? This cobbler is rich and hearty. I suggest pairing it with a simple green salad. A light vinaigrette will add a fresh taste. You could also serve it with roasted vegetables or a tangy slaw. These sides balance the flavors nicely. Can I make it ahead of time? Yes, you can prepare the tomato mixture in advance. Store it in the fridge for up to two days. You can also make the cornbread batter ahead of time. Just mix it right before baking to keep it fresh. How to know when it's done cooking? Check for a golden brown top. Insert a toothpick in the center; it should come out clean. The cobbler should be firm and not jiggly. If it is still wet, give it a few more minutes in the oven. Is it possible to use canned tomatoes? Yes, canned tomatoes work well for this dish. Drain them to avoid excess liquid. Choose whole or diced tomatoes for best results. They will still give you that rich flavor without the hassle of fresh ones. For the full recipe, check out the earlier section. This blog post covered everything you need for a delicious Cornmeal Cheddar Tomato Cobbler. We discussed key ingredients, step-by-step cooking instructions, and helpful tips to enhance flavor and texture. You can also explore ingredient variations and smart storage tips. Remember, small changes can make a big difference. Experiment with flavors and enjoy this cozy dish. Happy cooking!
Cornmeal Cheddar Tomato Cobbler Tasty Comfort Dish
If you’re craving comfort food that bursts with flavor, you’ve come to the right place. This Cornmeal Cheddar Tomato Cobbler is a savory dish that
To make a delicious Tomato Mozzarella Pie, gather these simple ingredients: - 1 pre-made pie crust (store-bought or homemade) - 4 medium ripe tomatoes, thinly sliced - 1 cup fresh mozzarella cheese, sliced - 1/4 cup fresh basil leaves, chopped - 2 tablespoons olive oil - Salt and pepper to taste - 1/2 teaspoon garlic powder - 1/2 teaspoon dried oregano - 1 tablespoon balsamic glaze (optional for drizzling) To boost the flavor of your pie, consider adding: - A sprinkle of red pepper flakes for heat. - Fresh thyme leaves for an earthy taste. - A dash of lemon zest to brighten the dish. These small touches can transform your pie from good to great. If you can't find fresh items, don't worry! You can swap ingredients easily: - Use canned tomatoes if fresh ones aren't available. - Try burrata cheese instead of mozzarella for creaminess. - Substitute dried basil for fresh, using one teaspoon instead. These swaps keep the recipe easy while still tasting amazing. Start by preheating your oven to 400°F (200°C). If you use a frozen pie crust, let it thaw first. Fit the crust into a 9-inch pie dish. Prick the bottom with a fork. This step stops bubbles from forming. You can use a store-bought crust or make your own if you prefer. In a large bowl, mix the sliced tomatoes with olive oil, garlic powder, oregano, salt, and pepper. Make sure to coat the tomatoes well. Layer half of this tomato mixture in the pie crust. Then, add half of the mozzarella slices and half of the chopped basil. Repeat these layers with the remaining ingredients. You want a nice stack of flavors. Place the assembled pie in the oven. Bake for 30 to 35 minutes. You'll know it's ready when the tomatoes are soft and the cheese is bubbly. The top should look slightly golden. After baking, let it cool for 5 to 10 minutes. If you like, drizzle some balsamic glaze on top for extra flavor. Now, slice and serve it warm or at room temperature. Enjoy your delicious Tomato Mozzarella Delight Pie! For the complete recipe, check [Full Recipe]. Choose ripe tomatoes for the best flavor. Look for tomatoes that feel heavy for their size. The skin should be smooth and firm. A little give when you squeeze them is fine. Heirloom tomatoes are colorful and tasty. They add great flavor and beauty to your pie. Try to use fresh tomatoes in season for the best taste. For a great melt, use fresh mozzarella. This cheese is soft and creamy, which helps it melt perfectly. Slice it thin, so it melts evenly. To make it even better, let the cheese sit at room temperature for about 30 minutes before use. This helps it melt faster and adds rich flavor. To keep your crust crispy, start with a pre-baked crust. Pricking the bottom with a fork helps too. This allows steam to escape and prevents sogginess. Another trick is to use a layer of cheese on the bottom of the crust. This acts as a barrier against moisture from the tomatoes. Be sure to follow the Full Recipe for the best results. {{image_2}} You can add fun toppings to your Tomato Mozzarella Pie. Try sliced olives for a briny touch. Fresh spinach adds color and nutrition. For a spicy kick, sprinkle red pepper flakes on top. You can also layer in roasted peppers or artichokes for extra flavor. Each add-on changes the taste and makes it your own. This pie is great for vegetarians. You can make it vegan by using plant-based cheese. Many brands offer delicious mozzarella-style cheese made from nuts. You can also replace the pie crust with a vegan option. Use a veggie crust made from cauliflower or almond flour. These swaps keep the dish tasty and plant-based. Switching ingredients with the seasons can change your pie. In summer, use juicy heirloom tomatoes for a burst of flavor. In fall, try butternut squash slices for sweetness. You can even mix in seasonal herbs like thyme or rosemary. These swaps keep your dish fresh and exciting all year. For the full recipe, check out the [Full Recipe]. To store your leftover pie, let it cool first. Place it in an airtight container. You can also cover it tightly with plastic wrap or foil. Keep it in the fridge. It will stay fresh for up to three days. This way, you can enjoy your pie later without losing flavor. When you are ready to eat, preheat your oven to 350°F (175°C). Place the pie on a baking sheet. Cover it with foil to keep it from drying out. Heat for about 15-20 minutes. Check if the cheese is warm and bubbly. This method keeps the crust crisp and the filling tasty. You can freeze the Tomato Mozzarella Pie for later enjoyment. First, slice the pie into portions. Wrap each slice in plastic wrap and foil. Place wrapped slices in a freezer-safe bag. Label the bag with the date. You can freeze it for up to three months. To enjoy, thaw in the fridge overnight, then reheat in the oven. This keeps the pie nearly as fresh as the day you made it. Yes, you can use other cheeses. Try cheddar, gouda, or feta for a twist. Each cheese brings a unique flavor. Cheddar adds sharpness, while gouda offers creaminess. Feta gives a tangy bite. Mixing cheeses can also enhance the taste! Baking takes about 30 to 35 minutes. Your pie is ready when the cheese bubbles and turns golden. The tomatoes should be soft and juicy. Keep an eye on it to avoid burning. This pie pairs well with salads and crusty bread. A fresh green salad adds a light touch. Garlic bread complements the pie’s flavors nicely. You can also serve it with a side of roasted vegetables for extra color. Tomato Mozzarella Pie has roots in Italian cuisine. It showcases fresh, simple ingredients. The dish reflects Italy’s love for tomatoes and cheese. Many regions in Italy have their own twist on this classic. To make it gluten-free, use a gluten-free pie crust. Many stores offer great options. You can also make your own crust with almond flour or oat flour. Just ensure all other ingredients are gluten-free. Yes, you can prepare the pie ahead of time. Assemble it and store it in the fridge. Bake it just before serving for the best taste. This makes it easy for gatherings or busy nights. For the full recipe, check the details above! In this article, we explored how to make a tasty Tomato Mozzarella Pie. We covered ingredients, step-by-step instructions, and essential tips to get it just right. You learned about storage options and variations to customize your dish. Remember, fresh ingredients make a big difference. Enjoy experimenting with flavors and textures. This dish is fun to make and share. With these steps, you'll create something delicious every time. Happy baking!
Savory Tomato Mozzarella Pie Simple and Satisfying
Are you ready to dive into a dish that bursts with flavor and is simple to make? My Savory Tomato Mozzarella Pie is a delightful
- Heirloom tomatoes - Cheeses (Mozzarella, Ricotta, Parmesan) - Fresh herbs and spices - Pie crust options For the best taste, use these amounts: - 4 large heirloom tomatoes, sliced - 1 cup shredded mozzarella cheese - 1 cup ricotta cheese - 1/2 cup grated Parmesan cheese - 1/2 cup chopped fresh basil - 1 teaspoon dried oregano - 1/2 teaspoon garlic powder - Salt and pepper to taste - 1 pre-made pie crust (or homemade if you prefer) - 1 tablespoon olive oil If you want a healthier version, try low-fat cheeses or a whole wheat crust. You can swap out some cheeses too. Try goat cheese for a tangy flavor. Using fresh heirloom tomatoes makes a big difference. They have a rich taste and juicy texture. They give the casserole a vibrant look and a fresh flavor. In peak season, heirloom tomatoes shine. You can find them at farmers' markets or local stores. Canned tomatoes can work in a pinch. Use them when fresh ones are not available. They save time and can still add flavor. Just remember, canned tomatoes are softer and may make the pie too watery. If using canned, drain them well before adding. First, preheat your oven to 375°F (190°C). This step warms the oven for even cooking. Next, gather your ingredients. You need: - 4 large heirloom tomatoes, sliced - 1 cup shredded mozzarella cheese - 1 cup ricotta cheese - 1/2 cup grated Parmesan cheese - 1/2 cup fresh basil, chopped - 1 teaspoon dried oregano - 1/2 teaspoon garlic powder - Salt and pepper to taste - 1 pre-made pie crust (or homemade if preferred) - 1 tablespoon olive oil In a large bowl, mix the ricotta, half of the mozzarella, Parmesan, basil, oregano, garlic powder, salt, and pepper. Blend until smooth and creamy. Now, it’s time to layer the casserole. Place the pie crust in a 9-inch pie dish. Press it against the bottom and sides. Start by adding half of the sliced heirloom tomatoes at the bottom. Sprinkle a pinch of salt and pepper over the tomatoes for flavor. Then, spread the cheese mixture evenly on top of the tomatoes. This ensures every bite has great taste. Next, layer the remaining tomato slices on top. Drizzle with olive oil for extra richness. Finally, add the rest of the shredded mozzarella cheese. This will create a bubbly, golden top when baked. Bake the casserole in the preheated oven for 35-40 minutes. Look for bubbling cheese and a golden crust on top. These are signs your casserole is done. Let it cool for about 10 minutes before slicing. This allows the layers to set and makes serving easier. For the full recipe, check out the complete instructions. Enjoy this tasty heirloom tomato pie casserole with your family! To enhance the tomato flavor, use ripe heirloom tomatoes. The sweeter they are, the better. You can sprinkle a bit of salt on the tomatoes to draw out moisture and intensify their taste. For a crispy pie crust, bake it for a few minutes before adding the filling. This helps keep it firm and prevents sogginess. Pair your casserole with a fresh green salad or crusty bread. A light vinaigrette adds a nice touch. For presentation, slice the pie neatly and arrange it on a colorful plate. A sprinkle of fresh basil on top makes it look stunning. Avoid using overripe tomatoes, as they can make the dish mushy. Also, be careful with salt; too much can overpower the flavors. When cooking, do not rush the baking time. If you take it out too soon, the texture may not be right. Follow the Full Recipe for the best results. {{image_2}} You can change the cheese in this dish to match your taste. Try using goat cheese for a tangy twist. Cream cheese also works well if you like a richer flavor. You can also add veggies or proteins to make it heartier. Spinach or bell peppers add color and nutrients. For protein, cooked chicken or bacon can bring a nice touch. If you need a gluten-free option, look for gluten-free crusts at the store. You can also make your own using almond flour or oats. For a vegetarian or vegan version, skip the cheese or use plant-based cheese. Tofu can work as a great substitute for ricotta. Always check labels to ensure they fit your diet. Want more flavor? Add spices like cayenne pepper for heat. A pinch of smoked paprika can also deepen the taste. Using seasonal ingredients can make a big difference too. Fresh corn in summer or roasted squash in fall can change the entire dish. Enjoy experimenting with what you love! You can find the full recipe [here](#). To keep your Easy Heirloom Tomato Pie Casserole fresh, store leftovers in airtight containers. Glass containers work great because they are safe for the oven and microwave. Wrap the casserole tightly with plastic wrap if you do not have a container. For freezing, cut the casserole into portions. Use freezer-safe bags or containers. Squeeze out the air to prevent freezer burn. When reheating, avoid losing the great taste and texture. The best way is to use the oven. Preheat it to 350°F (175°C). Place the casserole in a baking dish. Heat for 20-25 minutes or until hot. You can also use the microwave. Heat on medium for 5-7 minutes. Check every few minutes to ensure even warming. In the fridge, your casserole lasts about 3-5 days. If you freeze it, it can last for up to 3 months. Look for signs of spoilage like a sour smell or mold. If you see any, it’s best to toss the casserole. Enjoy your tasty meal and keep it fresh! Yes, you can use other types of tomatoes. Some good options are beefsteak, Roma, or cherry tomatoes. These types offer great flavor and texture. However, heirloom tomatoes shine in this recipe. They have a rich taste and juicy texture that make the dish special. When using different tomatoes, adjust cooking time if needed. Each variety has a different water content that can change the results. Absolutely! You can prepare the casserole a day early. Simply follow the recipe up to the baking step. Cover it tightly with foil and store it in the fridge. When ready to bake, just pop it in the oven. You may need to add a few extra minutes to the cooking time. This tip makes meals easier during busy days. Look for a bubbly and golden top. The cheese should melt and brown lightly. You can also insert a knife into the center. It should come out warm. If it feels cool or wet, it needs more time. Let it cool for about 10 minutes before slicing. This helps the layers set and makes serving easier. This blog post guided you through making a delicious heirloom tomato pie. We covered essential ingredients, preparation steps, and baking instructions for perfect results. I shared helpful tips, common mistakes to avoid, and delicious variations. Remember, using fresh heirloom tomatoes enhances flavor, while proper storage keeps leftovers fresh. Enjoy experimenting with different cheeses and flavors. With these insights, you can create a tasty dish that impresses everyone. Happy cooking!
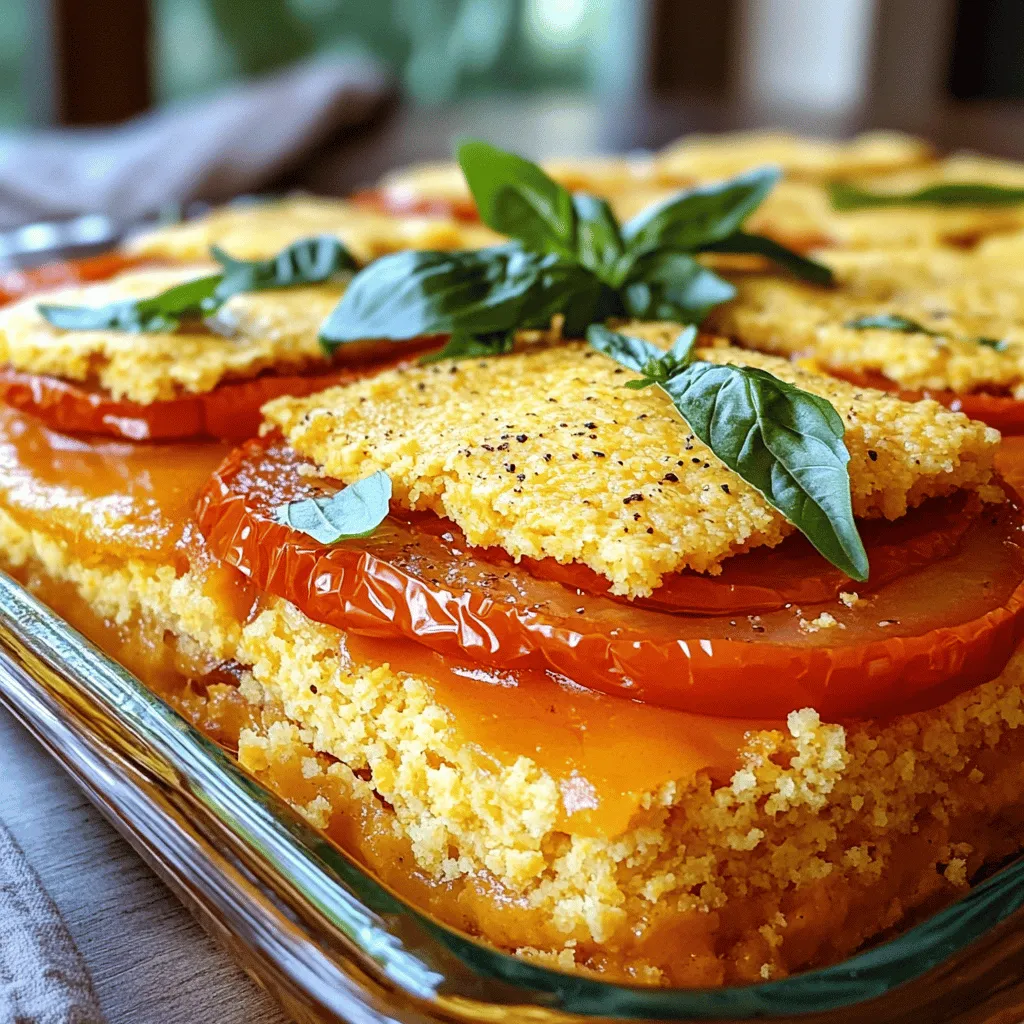
Easy Heirloom Tomato Pie Casserole Tasty Family Meal
If you’re looking for a hearty family meal that bursts with flavor, look no further! My Easy Heirloom Tomato Pie Casserole combines fresh, juicy heirloom
Choose your chicken wisely. I prefer skin-on pieces. Thighs, drumsticks, or breasts work best. The skin adds flavor and helps keep the meat juicy. Look for fresh chicken with a nice pink color. Avoid any pieces with a strong odor or discoloration. Buttermilk is key for tender chicken. It breaks down proteins and adds flavor. In a bowl, mix 1 cup of buttermilk with 1 teaspoon of hot sauce if you like some heat. Submerge your chicken pieces in this mixture. Cover it and let it sit in the fridge for at least 2 hours, or overnight for the best taste. This step makes your chicken super tender. Seasoning makes all the difference. In a separate bowl, combine: - 1 ½ cups all-purpose flour - 1 teaspoon paprika - 1 teaspoon garlic powder - 1 teaspoon onion powder - ½ teaspoon cayenne pepper - 1 teaspoon salt - ½ teaspoon black pepper Mix these well to ensure the spices are evenly distributed. This blend gives your chicken a flavorful crust. For the full recipe, check the Crispy Dreams Fried Chicken. It has all the details you need to create this dish. Start by mixing the buttermilk and hot sauce in a bowl. This adds taste and keeps the chicken moist. Take your chicken pieces and soak them in the buttermilk mix. Cover the bowl and place it in the fridge for at least 2 hours. For more flavor, let it sit overnight. The longer it marinates, the better it tastes. In another bowl, mix the flour with paprika, garlic powder, onion powder, cayenne pepper, salt, and black pepper. This blend gives the chicken its crunchy and tasty coating. Make sure to stir well so the spices mix evenly. You want every bite to be flavorful. Heat about 2 inches of vegetable oil in a large skillet or Dutch oven. The oil should reach 350°F (175°C). Carefully take the chicken out of the buttermilk. Let the extra buttermilk drip off. Then, coat each piece in the flour mixture. Press gently to help it stick. Place the chicken in the hot oil, but don’t overcrowd the pan. Fry in batches for about 12-15 minutes. Turn the chicken once until it’s golden brown and reaches an internal temperature of 165°F (75°C). When done, let the fried chicken rest on a wire rack lined with paper towels. This helps it stay crispy. Enjoy your crispy dreams fried chicken with your favorite dips! You can find the full recipe [here](#). To get that perfect crunch, start with cold chicken. Marinate it in buttermilk. This adds moisture and flavor. Coat each piece well in the seasoned flour. Press it firmly to stick. Fry in hot oil, around 350°F. Don't crowd the pan; this helps keep the oil hot. Flip the chicken once for even cooking. After frying, let it rest on a wire rack. This keeps it crispy. For extra flavor, add spices to your buttermilk. A teaspoon of hot sauce or a sprinkle of herbs can do wonders. You can try adding smoked paprika for a deeper taste. Mixing in some lemon zest can brighten the flavor. Experiment with different spices to find your favorite blend. Pairing it with sauces like honey mustard adds a delicious touch. One big mistake is not marinating long enough. Aim for at least two hours; overnight is best. Another error is using too much oil. You only need about two inches in the pan. If the oil isn’t hot enough, the chicken absorbs too much grease. Lastly, avoid cutting the chicken before it rests. This keeps all the juices inside. For more details, check out the Full Recipe. {{image_2}} To make spicy fried chicken, add heat to your recipe. Mix 1-2 teaspoons of cayenne pepper into your flour blend. You can also add hot sauce to the buttermilk. This adds a nice kick. Adjust the spice to your taste. I love using smoked paprika for a deeper flavor. This variation is perfect for those who enjoy bold flavors. For a fresh touch, try herb-infused fried chicken. Add finely chopped fresh herbs like rosemary, thyme, or parsley to your flour mixture. This adds a lovely aroma and taste. You can also mix herbs into the buttermilk. A hint of dill really brightens the dish. This variation is a great choice for spring or summer meals. If you need a gluten-free option, swap regular flour for gluten-free flour. Use a 1:1 gluten-free flour blend. Make sure your spices are also gluten-free. The process remains the same, and you will still get crispy chicken. This option makes your meal inclusive for all diets. Enjoy your crispy dreams fried chicken without worry! After enjoying your crispy fried chicken, store leftovers in an airtight container. This keeps the chicken fresh and prevents it from drying out. Place the container in the fridge. Fried chicken stays good for about three to four days. Be sure to let the chicken cool first before sealing it up. To keep your fried chicken crispy when reheating, use the oven. Preheat it to 375°F (190°C). Place the chicken on a baking sheet. Heat for about 15-20 minutes. This method keeps the crust crunchy and the meat juicy. Avoid the microwave, as it can make the chicken soggy. For longer storage, you can freeze fried chicken. First, let the chicken cool completely. Wrap each piece tightly in foil or plastic wrap. Place the wrapped chicken in a freezer-safe bag. It can last up to three months in the freezer. To reheat, thaw in the fridge overnight, then bake as noted above. Enjoy your crispy, flavorful chicken anytime! Marinate the chicken for at least 2 hours. For the best flavor, marinating overnight is best. The buttermilk tenderizes the meat and adds flavor. This step is key to juicy, tasty fried chicken. Plus, it helps the coating stick better. I recommend using vegetable oil for frying. It has a high smoke point, which is good for frying. Canola oil or peanut oil also work well. Avoid oils with low smoke points like olive oil. They can burn and affect the flavor. Yes, you can make fried chicken in the oven! To bake, preheat your oven to 425°F (220°C). Coat the chicken just like in the frying method. Place it on a wire rack over a baking sheet. Bake for 30-40 minutes, turning halfway. The chicken will be crispy, but less oily than frying. For the best results, check out the Full Recipe. You learned how to make great fried chicken. Choose your chicken carefully and mix a tasty buttermilk. The right seasoning makes a big difference. We talked about marinating, coating, and frying steps. Follow the tips for extra crispiness and flavor. Remember, there are fun variations too, like spicy or gluten-free. Store leftovers properly so they taste great later. With these simple steps, you can enjoy fried chicken anytime. Happy cooking!
The Best Fried Chicken Crispy and Flavorful Recipe
Are you ready to make the best fried chicken ever? You’ll love this recipe for crispy and flavorful fried chicken. I’ll guide you through every
To make the best Homemade Sweet & Spicy Korean Fried Chicken, gather these key ingredients: - Chicken pieces (1.5 lbs wings or drumsticks) - Coating ingredients (1 cup all-purpose flour, 1 cup cornstarch) - Seasoning components (1 teaspoon baking powder, garlic powder, onion powder, salt, black pepper) - Sauce ingredients (1/2 cup gochujang, 1/4 cup honey, 1/4 cup soy sauce, 2 tablespoons rice vinegar, 1 tablespoon sesame oil, 2 cloves garlic, minced, 1 tablespoon ginger, minced, 1 tablespoon sesame seeds, 2 green onions, chopped) These ingredients blend together to create a tasty dish that bursts with flavor. The chicken pieces are the star of this recipe. You can use wings or drumsticks, depending on your preference. The coating mix of flour and cornstarch gives the chicken a great crunch. The seasoning mix adds depth. Baking powder helps the coating puff up, making it crispy. Garlic and onion powder bring a savory kick. Salt and black pepper balance the flavor. The sauce is where the magic happens. Gochujang adds heat and sweetness. Honey gives it a sticky texture. Soy sauce adds umami, and rice vinegar adds brightness. Sesame oil brings a rich, nutty flavor. Garlic and ginger enhance the sauce with a fresh taste. Finally, sesame seeds and green onions are perfect for garnishing. This combination makes for a delightful dish that you will love to share. For the full recipe, check the section above. Start with 1.5 lbs of chicken wings or drumsticks. First, pat them dry with paper towels. This step is key. It helps the flour stick better. Next, in a large bowl, mix together the following: - 1 cup all-purpose flour - 1 cup cornstarch - 1 teaspoon baking powder - 1 teaspoon garlic powder - 1 teaspoon onion powder - 1 teaspoon salt - 1/2 teaspoon black pepper Toss the chicken pieces into the flour mixture. Make sure each piece is well-coated. Then, shake off any excess flour. This prevents clumps and keeps the chicken crispy. Heat vegetable oil in a deep frying pan or large pot. Aim for medium-high heat, around 350°F (175°C). Use a thermometer for accuracy. Once hot, add the coated chicken. Do this in batches. Overcrowding can make the chicken soggy. Fry the chicken for about 8-10 minutes. Look for a golden brown color. Use a meat thermometer to check for doneness. The internal temperature should reach 165°F (75°C). Once cooked, move the chicken to a wire rack or paper towels. This drains any extra oil. While the chicken fries, make the sauce. In a saucepan, combine: - 1/2 cup gochujang - 1/4 cup honey - 1/4 cup soy sauce - 2 tablespoons rice vinegar - 1 tablespoon sesame oil - 2 cloves garlic, minced - 1 tablespoon ginger, minced Stir well and heat over medium. Bring it to a simmer and cook for about 5 minutes. Stir occasionally. The sauce should thicken nicely. Once ready, toss the fried chicken in the sauce until coated. For garnish, sprinkle sesame seeds and chopped green onions on top. Enjoy your delicious creation! For the complete recipe, check out the Full Recipe. To fry chicken well, you must set the oil temperature right. Aim for 350°F (175°C). This heat ensures a crispy skin while cooking the inside fully. Use a deep frying pan or pot for better heat control. To check for doneness, use a meat thermometer. The internal temperature should reach 165°F (75°C). This step is key to safe eating. If you don’t have a thermometer, cut into a piece. The juices should run clear, and the meat should be white, not pink. You can tweak the sauce to fit your taste. If you like it sweeter, add more honey. For extra heat, increase the gochujang. Start with small amounts, then taste as you go. This way, you can find the perfect balance. Adding toppings can boost flavor and look. Try sesame seeds for crunch. Chopped green onions add a fresh touch. You can also serve the chicken with pickled radishes. They add a nice tang that contrasts well with the rich chicken. For the full recipe, check out the Homemade Sweet & Spicy Korean Fried Chicken. {{image_2}} You can switch up the meat for this dish. Try using chicken thighs or tenders. Thighs stay juicy and have great flavor. Tenders cook fast and are easy to eat. If you want a vegetarian option, use tofu or cauliflower. Tofu absorbs the sauce well, giving it a nice taste. Cauliflower gets crispy and has a similar texture to chicken. Feel free to get creative with flavors. You can add spices like paprika or cayenne for extra heat. If you prefer a sweeter touch, try honey garlic sauce. This sauce brings a lovely sweetness to the fried chicken. Another option is teriyaki sauce, which adds a savory umami flavor. You can mix and match to find your favorite taste. Use the Full Recipe as a base and enjoy experimenting! To keep your leftover Korean fried chicken fresh, follow these tips: - Use airtight containers: Glass or plastic containers that seal well work best. - Refrigerate: Store the chicken in the fridge for up to 3 days. - Do not stack: Lay the chicken pieces flat to avoid sogginess. When you're ready to eat, reheating the chicken is key: - Use an oven: Preheat to 375°F (190°C). Place the chicken on a baking tray and heat for 10-15 minutes. This helps retain crispiness. - Air fryer option: Heat at 350°F (175°C) for about 5-7 minutes for a quick crisp. If you want to store your chicken longer, freezing is a great option: - Cool completely: Let the chicken cool before freezing. - Wrap well: Use freezer bags or aluminum foil to prevent freezer burn. - Label: Write the date on the bag for easy tracking. For thawing, here’s what to do: - Overnight in the fridge: Best for maintaining texture and flavor. - Microwave: If you’re in a hurry, use the defrost setting; however, this might affect crispiness. Follow these storage tips to enjoy your homemade sweet and spicy Korean fried chicken at its best! For the complete recipe, check out the Full Recipe section. To make this dish, follow these key steps: 1. Prep your chicken: You can use 1.5 lbs of wings or drumsticks. 2. Mix the coating: Combine 1 cup of flour, 1 cup of cornstarch, 1 teaspoon baking powder, garlic powder, onion powder, salt, and black pepper in a bowl. 3. Coat the chicken: Pat the chicken dry and coat it in the flour mix. Shake off any extra flour. 4. Fry the chicken: Heat vegetable oil to 350°F (175°C) and fry the chicken in batches for 8-10 minutes until golden brown. Use a meat thermometer to check if it reaches 165°F (75°C). 5. Make the sauce: In a pan, mix gochujang, honey, soy sauce, rice vinegar, sesame oil, minced garlic, and ginger. Cook until thickened. 6. Combine: Toss the fried chicken in the sauce and garnish with sesame seeds and green onions. These steps will guide you to a delicious meal. You can find the Full Recipe for more detail. Yes, you can use frozen chicken. However, make sure to thaw it first. Thaw chicken in the fridge overnight for the best results. You can also use the cold water method. Place the chicken in a sealed bag and submerge it in cold water for about 1-2 hours. Change the water every 30 minutes. After thawing, be sure to pat it dry. This helps the coating stick better. Korean fried chicken pairs well with many sides. Here are some popular options: - Pickled radishes: They add a nice crunch and balance the heat. - Kimchi: This spicy fermented cabbage gives a tangy flavor. - Rice: Steamed white or brown rice works great. - Coleslaw: A fresh, crunchy slaw can complement the chicken well. - Korean potato salad: This creamy dish adds richness to your meal. These sides will enhance your dining experience and make it even more enjoyable. You learned how to make delicious Sweet & Spicy Korean Fried Chicken. We covered important ingredients, step-by-step cooking, and helpful tips. You can use different meats or tweak the flavors for your taste. This dish is perfect for any occasion. With the right techniques, you can impress your family and friends. Enjoy making this tasty meal, and don't forget to savor each bite! Try it soon; you won't regret it.
Homemade Sweet & Spicy Korean Fried Chicken Delight
Are you ready to spice up your kitchen with a mouthwatering treat? Homemade Sweet & Spicy Korean Fried Chicken is the star of any meal,
- 2 to 4 frozen chicken breasts (about 1.5 to 2 pounds) - 1 cup chicken broth (or vegetable broth for a lighter taste) - 1 tablespoon olive oil - 2 teaspoons garlic powder - 1 teaspoon onion powder - 1 teaspoon paprika - 1 teaspoon Italian seasoning - Fresh parsley or cilantro For this recipe, I keep it simple. The frozen chicken breasts are the star, and the broth adds moisture. I use olive oil for a nice sear. The seasoning mix packs flavor into the chicken. Garlic powder and onion powder add depth. Paprika gives a slight kick, while Italian seasoning adds a nice herbal note. Finish with fresh parsley or cilantro for color and taste. You can find the full recipe in the article. This easy list of ingredients makes cooking frozen chicken in your Instant Pot fun and stress-free! First, plug in your Instant Pot. Set it to the 'Sauté' function. This will heat the pot. Once it warms up, add one tablespoon of olive oil. Let the oil heat for about one minute. This step adds flavor to your chicken. While the pot heats, let’s prepare the seasonings. In a small bowl, mix the garlic powder, onion powder, paprika, Italian seasoning, salt, and pepper. Use about two teaspoons of garlic powder and one teaspoon of each other spice. Now, take the frozen chicken breasts and rub the spice mixture all over them. This adds great flavor. Now, it’s time to cook! Once the olive oil is hot, place the seasoned chicken breasts in the pot. Pour in one cup of chicken broth around the edges. Don’t pour it directly on the chicken. This will create steam and help cook the chicken evenly. Close the lid tightly. Make sure the valve is set to 'Sealing'. Press the 'Manual' or 'Pressure Cook' button. Set the timer for 10 minutes if the breasts are thin, or 12 minutes for thicker ones. When the cooking time is up, let the pot sit for about five minutes. This is called natural pressure release. After five minutes, carefully switch the valve to 'Venting'. This releases any remaining pressure. Now, open the lid carefully. Check the chicken's internal temperature with a meat thermometer. It should be at least 165°F (75°C). If it is not, let it cook a bit longer. Once done, remove the chicken from the pot. You can serve it whole or shred it with two forks. Enjoy your delicious meal! For the full recipe, check out the Instant Pot Magic: Juicy Frozen Chicken Breasts. For thin chicken breasts, set your Instant Pot timer to 10 minutes. This ensures they cook through without drying out. If your breasts are thick, increase the time to 12 minutes. Always check the internal temperature after cooking. It should reach 165°F (75°C) for safe eating. Cooking frozen chicken is safe if done right. The Instant Pot cooks the meat quickly. This helps kill harmful bacteria. However, if you thaw the chicken first, use it within two days. Always store thawed chicken in the fridge. Avoid refreezing thawed chicken for best quality and safety. While the basic seasoning mix is great, feel free to get creative! Add lemon zest for a bright taste. Consider a splash of soy sauce for umami. You can also use fresh herbs like rosemary or thyme. Marinating the chicken for a few hours can also boost flavor. Just remember to adjust cooking times if you use thicker cuts. For more ideas, check out the Full Recipe for extra tips! {{image_2}} You can use your Instant Pot for other frozen meats too. Turkey and pork work great. Just adjust cooking times slightly. For turkey, cook for about 12 to 15 minutes. For pork, 15 to 20 minutes should do the trick. Always check the internal temperature. It should reach at least 165°F (75°C) for safety. Changing herbs and spices can alter the flavor of your chicken. Try using cumin for a warm taste. For a fresh twist, add lemon zest and dill. You can also use a barbecue rub for a smoky flavor. The options are endless. Mix and match to find your favorite blend. Sauces can enhance your chicken's taste. Try adding teriyaki sauce for a sweet flavor. BBQ sauce is another great option. You can also mix ranch dressing with the broth for a creamy finish. Just pour the sauce over chicken after cooking. This adds moisture and flavor, making every bite enjoyable. For more detailed instructions, check the Full Recipe. Once you finish cooking your chicken, cool it down quickly. Place the chicken in a shallow dish. Cover it with plastic wrap or a lid. Store it in the fridge within two hours of cooking. This keeps it safe to eat later. Make sure to eat the chicken within three to four days. If you don’t plan to eat it soon, freeze it. To freeze cooked chicken, let it cool first. Slice or shred the chicken into smaller pieces. This helps it freeze faster. Use airtight containers or freezer bags. Remove as much air as you can from the bags. Label them with the date. You can freeze the chicken for up to three months. This way, you have a quick meal on hand. When it’s time to reheat the chicken, do it safely. Thaw frozen chicken in the fridge overnight. You can also use the microwave for quick thawing. Reheat the chicken in the oven, microwave, or stovetop. If using the oven, set it to 350°F (175°C). Heat until the chicken reaches 165°F (75°C). This ensures it is safe to eat. Enjoy your perfectly reheated chicken! It usually takes about 10 to 12 minutes. Thin breasts need 10 minutes. Thicker ones need 12 minutes. Always remember to add extra time for the pot to come to pressure. Yes, you can. Water works fine, but broth adds more flavor. You can also use white wine or coconut milk for a different taste. Just make sure the liquid covers the bottom of the pot. Yes, it is safe. The Instant Pot cooks food quickly, killing any harmful bacteria. However, you need to ensure the chicken reaches at least 165°F (75°C). Use a meat thermometer to check. If your chicken isn't done, just seal the pot again. Cook for an extra 2 to 3 minutes. Check the temperature again afterward. It's important to ensure it reaches 165°F (75°C). You can double the recipe. Just make sure not to overload the pot. The cooking time stays mostly the same, but it may take longer for the pot to come to pressure. In this blog post, we explored how to cook frozen chicken in an Instant Pot. We covered key ingredients, step-by-step instructions, and helpful tips. Remember, using quality broth and the right seasoning makes a big difference. Always check chicken doneness with a thermometer. If you want to try other proteins or flavors, I shared options for that too. With proper storage and reheating, your leftovers can stay tasty. Enjoy cooking with these easy steps and tips!
How To Cook Frozen Chicken Breasts In The Instant Pot
Do you have frozen chicken breasts and no time to thaw? The Instant Pot is your best friend! In just a few simple steps, you
- 1 lb large shrimp, peeled and deveined - 6 tablespoons unsalted butter - 4 cloves garlic, minced - 1 lemon, zested and juiced - 1 teaspoon red pepper flakes - 1 cup spinach, chopped - 1 cup cherry tomatoes, halved - ½ cup grated Parmesan cheese - 1 cup panko breadcrumbs - 2 tablespoons fresh parsley, chopped - Salt and pepper to taste For this Garlic Butter Shrimp Scampi Bake, I love to start with fresh, large shrimp. You want them peeled and deveined for easy eating. Next, I use unsalted butter. It gives a rich flavor without being too salty. Fresh garlic is key; I always use minced garlic for that strong aroma. The lemon zest and juice add a bright, tangy flavor that balances the dish. Red pepper flakes give a nice kick, but you can adjust the amount to your taste. For some green, I chop up spinach, which adds color and nutrition. Cherry tomatoes bring sweetness and juiciness, making the meal more vibrant. I use grated Parmesan cheese for a creamy texture and a savory taste. The panko breadcrumbs add crunch on top. Fresh parsley gives a pop of color and freshness. Finally, season with salt and pepper to enhance all those wonderful flavors. Gather these ingredients, and you are ready to create a flavorful dish that’s both easy and impressive! {{ingredient_image_1}} - Preheat the oven to 375°F (190°C). - Melt 6 tablespoons of unsalted butter in a skillet over medium heat. - Sauté 4 cloves of minced garlic until it smells great. - Add 1 pound of peeled and deveined shrimp. Cook them until they turn pink, about 2-3 minutes. - Mix in the juice and zest from 1 lemon, 1 teaspoon of red pepper flakes, salt, and pepper. - Stir in 1 cup of chopped spinach and 1 cup of halved cherry tomatoes. Cook for another 2 minutes until the spinach wilts. - Transfer the shrimp and veggies to a baking dish. - In a bowl, mix 1 cup of panko breadcrumbs, ½ cup of grated Parmesan cheese, and 2 tablespoons of chopped parsley. Drizzle in the rest of the melted butter and mix well. - Spread the breadcrumb mixture evenly over the shrimp bake. - Bake for 15-20 minutes, until the top is golden brown and the shrimp are cooked through. To avoid overcooking shrimp, cook them for just 2-3 minutes. They turn pink when done. Remove them from heat as soon as they change color. This keeps them tender and juicy. For sautéing garlic, heat the butter over medium heat. Add minced garlic and stir for about one minute. Watch carefully so it doesn’t burn. Burnt garlic can ruin your dish's flavor. Serve your dish straight from the baking dish. It looks rustic and inviting. Top with fresh parsley and lemon wedges for color. The bright lemon adds a nice touch. Pair this dish with crusty bread. It’s perfect for sopping up that tasty garlic butter. A light salad also works well to balance the meal. To add extra flavor, consider fresh herbs like basil or dill. They brighten up the dish. You can also squeeze more lemon juice on top before serving. If you love spice, adjust the red pepper flakes. Start with a teaspoon and add more if you like heat. This lets you control the spice level to suit your taste. Pro Tips Fresh Shrimp: Always use the freshest shrimp you can find for the best flavor and texture; look for shrimp that are firm and have a mild sea smell. Breadcrumb Texture: For extra crunch, toast the panko breadcrumbs in a skillet with a little butter before adding them to the topping mixture. Adjusting Spice: If you prefer a milder flavor, reduce the amount of red pepper flakes or omit them altogether; alternatively, add more if you love heat. Serving Suggestions: This dish pairs beautifully with a side of garlic bread or a light salad to complement the rich flavors of the shrimp scampi. {{image_2}} You can swap shrimp for other tasty proteins. Try scallops or chicken for a change. Each option brings a unique flavor. Scallops add a sweet touch, while chicken makes it hearty. Vegetables can also switch up your dish. Bell peppers add crunch and sweetness. Zucchini brings a mild taste and a nice texture. Feel free to mix and match! If you need gluten-free options, use crushed cornflakes instead of panko breadcrumbs. They give a nice crunch without the gluten. For a dairy-free dish, you can use vegan butter and nutritional yeast. These options keep the flavor while being kinder to your diet. Herbs can elevate your dish. Try fresh basil or thyme for a fragrant boost. Even a little dill can add a nice twist! Adding a splash of white wine brightens the flavors. Pour it in after cooking the shrimp. It adds depth you will love! Don't be afraid to experiment with these ideas. They make the dish your own. To store leftovers, place them in an airtight container. This keeps the dish fresh. Let it cool down to room temperature first. You can keep it in the fridge for up to three days. When reheating, use the oven for best results. Preheat to 350°F (175°C). Place the dish in the oven for about 10-15 minutes. This helps restore the crispy top and warm the shrimp evenly. Can you freeze Garlic Butter Shrimp Scampi Bake? Yes, you can! Just make sure it cools completely before freezing. Use a freezer-safe container or wrap it tightly in plastic wrap. It lasts well for up to three months in the freezer. When you’re ready to eat, thaw it in the fridge overnight. Reheat in the oven to maintain the texture. Understanding how long the dish lasts is key to food safety. In the fridge, it stays good for about three days. If you freeze it, it can last for three months. Watch for signs of spoilage. If it looks discolored or has an off smell, it’s best to toss it out. Always trust your senses! What can I serve with Garlic Butter Shrimp Scampi Bake? You can serve this dish with crusty bread. It helps soak up the tasty garlic butter. A fresh salad pairs well too. The cool, crisp greens balance the rich flavors. Can I prepare this dish ahead of time? Yes, you can prep it ahead. Cook the shrimp and veggies, then store them. Cover and chill in the fridge. When ready, add the breadcrumb topping and bake. Is it possible to make this dish spicy? Absolutely! Adjust the red pepper flakes to your taste. Add more for heat or less for mild flavor. You can also add sliced jalapeños for an extra kick. Can I use frozen shrimp instead of fresh? Yes, frozen shrimp works fine. Just make sure to thaw them fully. Pat them dry before cooking to avoid extra water in the dish. What can I use instead of Parmesan cheese? You can use Pecorino Romano for a sharper taste. Nutritional yeast is a great dairy-free option. It adds a cheesy flavor without the dairy. Can I cook this recipe in a skillet instead of baking? Yes, you can! Cook the shrimp and veggies in a skillet. After mixing in the toppings, cover it with a lid. Cook on low heat until the topping is golden. How do I know when the shrimp are fully cooked? Shrimp are done when they turn pink and opaque. They should curl into a C shape. Overcooked shrimp become tough, so watch them closely. This blog post covered how to make a delicious Garlic Butter Shrimp Scampi Bake. You learned about key ingredients like shrimp, garlic, and lemon. I shared step-by-step instructions, cooking tips, and serving ideas. You can also explore variations for dietary needs and flavor swaps. In the end, this dish is not just tasty; it's easy to make. Enjoy it fresh, and don't hesitate to get creative with the ingredients!
Garlic Butter Shrimp Scampi Bake Flavorful Delight
Are you ready to impress your friends and family with a delicious Garlic Butter Shrimp Scampi Bake? This dish combines timeless flavors, fresh ingredients, and
To make this tasty Eggplant Tomato Pie, you need simple, fresh ingredients. Here’s what you will need: - 1 large eggplant, sliced into 1/4 inch rounds - 2 large tomatoes, sliced - 1 onion, thinly sliced - 2 cloves garlic, minced - 1 cup ricotta cheese - 1 cup shredded mozzarella cheese - 1/2 cup grated Parmesan cheese - 1 pre-made pie crust (store-bought or homemade) These main ingredients create a flavorful base for your pie. Each layer adds depth to the dish. For that extra punch of flavor, you will need some seasonings and cheese: - 1 teaspoon dried oregano - 1 teaspoon fresh basil, chopped (or 1/2 teaspoon dried basil) - 1 tablespoon olive oil - Salt and pepper to taste The dried oregano and fresh basil elevate the taste. The cheeses provide creaminess and richness. You can add a few more ingredients for a unique twist: - A drizzle of balsamic reduction for sweetness. - Red pepper flakes for a spicy kick. - Fresh parsley or chives for garnish. These optional ingredients can personalize your Eggplant Tomato Pie. They allow you to explore different flavors. For the complete cooking process, check out the Full Recipe. Start by slicing the eggplant into 1/4 inch rounds. Lay the slices on a baking sheet. Drizzle them with olive oil. Then, sprinkle on some salt and pepper. This helps bring out the eggplant's flavor. Bake the slices at 375°F (190°C) for about 20 minutes. Flip them halfway through baking. Look for a tender and lightly browned texture. Once done, take them out and set the slices aside. While the eggplant bakes, you can make the ricotta mixture. Take a skillet and heat a small amount of olive oil. Add the thinly sliced onion and cook until it turns translucent. This should take about 5 minutes. Next, add the minced garlic and cook for one more minute. Remove the skillet from the heat. In a mixing bowl, combine the ricotta cheese, half of the mozzarella, Parmesan cheese, oregano, and fresh basil. Don’t forget to season it with salt and pepper. Mix everything well until it’s nice and smooth. Now it's time to put everything together. Roll out your pie crust and place it in a pie dish. Spread the ricotta mixture evenly over the crust. Next, layer the baked eggplant slices on top. Follow that with a layer of sliced tomatoes. Then, add the sautéed onion and garlic mixture. Finally, sprinkle the remaining mozzarella on top. Bake this beautiful pie in the oven for 25 to 30 minutes. Look for bubbly, golden cheese as a sign that it’s ready. Let the pie sit for about 10 minutes before slicing. This waiting time helps it set up nicely. For an added touch, garnish with fresh basil or a drizzle of balsamic reduction. Enjoy this delightful dish! For the full recipe, check out the details above. To make the best eggplant tomato pie, start with the eggplant. Choose a large eggplant, firm and smooth. Slice it into 1/4 inch rounds. This size helps it cook evenly. To reduce bitterness, sprinkle the slices with salt and let them sit for 30 minutes. Rinse and pat them dry. This step enhances the flavor. Bake the eggplant slices until tender. Drizzling them with olive oil adds flavor. Flip the slices halfway for even cooking. This simple method makes your eggplant soft and delicious. A crispy crust is key to a great pie. Use a pre-made pie crust for ease. You can also try a homemade crust if you prefer. Before adding the filling, blind bake the crust. This means baking it empty for a few minutes. It helps to prevent a soggy bottom. Ensure your oven is fully preheated to 375°F (190°C). This temperature helps the crust cook nicely. Watch your pie as it bakes. If the edges brown too quickly, cover them with foil. Serving your eggplant tomato pie can be fun! Slice the pie into wedges. Serve warm for the best taste. Garnish each slice with fresh basil. This adds a pop of color and flavor. A drizzle of balsamic reduction on top adds elegance. You can also serve it with a simple green salad. This makes a well-rounded meal. For a special touch, pair it with a chilled glass of white wine. Enjoy every bite of this delightful dish! For the full recipe, check the beginning of the article. {{image_2}} You can easily make this eggplant tomato pie vegetarian and vegan. For a vegetarian version, simply keep all the ingredients the same. If you want it vegan, swap the cheeses for plant-based alternatives. Use cashew cheese or tofu mixed with nutritional yeast. Both options give a creamy texture and rich taste. You can also skip the cheese altogether for a lighter dish. Herbs and spices can change the flavor of your eggplant tomato pie. Try adding fresh thyme or rosemary for a fragrant twist. A pinch of red pepper flakes will add heat. You can also mix in a teaspoon of smoked paprika for a warm, smoky flavor. Experimenting with these options makes it fun and unique every time you bake. Cheese lovers can play with different cheese types. Instead of ricotta, you might use goat cheese for a tangy flavor. Feta cheese is another great option, adding a salty kick. For a dairy-free choice, try vegan mozzarella. It melts well and keeps the pie creamy. Each cheese brings its own flair, so feel free to mix and match based on your taste. Check out the Full Recipe for more details on making this delicious pie. To store leftover eggplant tomato pie, let it cool first. Cover it tightly with plastic wrap or aluminum foil. You can also place it in an airtight container. This helps keep the pie fresh. Store it in the refrigerator. It will stay good for about three to four days. When you're ready to enjoy leftovers, reheat the pie in the oven. Preheat your oven to 350°F (175°C). Remove the cover and place the pie in the oven. Heat for about 15 to 20 minutes. Make sure it is warmed through. You can also reheat it in the microwave. Heat slices for about one to two minutes. This method is quick but may not keep the crust crispy. If you want to freeze the pie, it is best to do so before baking. Wrap it tightly in plastic wrap and then in foil. This helps prevent freezer burn. You can freeze it for up to three months. When you're ready to bake, remove the wrap. Bake it from frozen at 375°F (190°C) for about 40 to 50 minutes. If you have leftovers after baking, let them cool before freezing. Just remember to use them within three months for the best taste. For the full recipe, check the section above. If you don't have ricotta cheese, you can use cottage cheese. It gives a similar texture. You can also try cream cheese, but it will be richer. Another option is making a blend of Greek yogurt and sour cream. This mix has a nice tang and creaminess. Just remember to adjust the seasonings as needed. Yes, you can use fresh herbs! Fresh herbs add great flavor. For example, use one tablespoon of fresh basil instead of one teaspoon of dried. The taste will be more vibrant. Just chop the herbs finely before mixing them in. This small change can make your dish feel even more special. Eggplant tomato pie can last about three to four days in the fridge. Make sure to store it in an airtight container. If you want to keep it longer, you can freeze it. When frozen, it can last up to three months. Just remember to thaw it overnight in the fridge before reheating. Enjoy your pie at its best! For a complete guide, check the Full Recipe. We explored the joy of making Eggplant Tomato Pie. You learned about key ingredients, seasonings, and optional flavors to enhance your dish. I shared step-by-step instructions, plus tips for a crispy crust and great presentation. We discussed tasty variations, storage tips, and answer common questions. This dish is versatile and fun to make. Enjoy your cooking journey as you create a delicious pie that everyone will love. Don't hesitate to experiment and make it your own!
Eggplant Tomato Pie Flavorful and Simple Recipe
Are you ready to enjoy a dish that celebrates fresh flavors? Eggplant Tomato Pie is not only tasty but also simple to make. In this
- Chicken: Use four boneless, skinless chicken breasts. This cut cooks evenly and stays juicy. You can also use thighs if you prefer dark meat. Always season your chicken well with salt and pepper for the best flavor. - Tomatoes: I love using cherry tomatoes for this dish. They are sweet and burst with juice when cooked. Look for firm, bright ones at the store. If you can't find cherry tomatoes, you can use grape tomatoes or even standard tomatoes, but chop them smaller. - Fresh basil: Fresh basil gives this dish its bright flavor. Look for vibrant green leaves. Avoid leaves that are wilted or brown. When you chop basil, do it just before cooking to keep its scent strong. - Garlic: I prefer fresh garlic cloves over pre-minced. Fresh garlic has a stronger taste and aroma. You can adjust the garlic to your liking. If you love garlic, add more! - Olive oil: Use high-quality extra virgin olive oil. It adds richness to the dish. Avoid using light olive oil, as it lacks the flavor needed for this recipe. - Seasonings: The balance of seasonings makes a big difference. Use dried oregano for depth. A splash of balsamic vinegar adds sweetness and acidity. Always taste and adjust salt and pepper as needed. This combination of ingredients will make your Tomato Basil Chicken shine. For the full recipe, check out the complete instructions above. Preheating the oven: Why this is crucial Preheating the oven helps cook the chicken evenly. Set your oven to 375°F (190°C). This way, the chicken starts cooking right when you place it inside. Preparing the tomato mixture In a large bowl, mix the halved cherry tomatoes, minced garlic, olive oil, dried oregano, balsamic vinegar, and chopped basil. Add a pinch of salt and pepper. Stir until everything is well combined. This mix will add great flavor to your chicken. Seasoning the chicken: Techniques for flavor Take the chicken breasts and season both sides with salt and pepper. This simple step boosts the chicken's taste. You can also add a sprinkle of dried herbs if you like. Searing the chicken: Tips for a perfect crust Heat a tablespoon of olive oil in a large oven-safe skillet over medium-high heat. When the skillet is hot, add the chicken breasts. Sear for about 5 minutes on each side. Look for a nice golden brown color. This step locks in the juices and adds flavor. Baking the dish: Timing and temperature checks Once the chicken is seared, pour the tomato mixture over the chicken. Make sure every piece is coated. If using fresh mozzarella, place the slices on top. Transfer the skillet to the preheated oven. Bake for 20-25 minutes. Check that the chicken reaches 165°F (75°C) inside. Finishing touches: Adding mozzarella and garnishing After baking, remove the skillet from the oven. Let the dish rest for 5 minutes before serving. This helps the juices settle. For an extra touch, garnish with more fresh basil. Enjoy your Tomato Basil Chicken! For the full recipe, check out the earlier section. - How to properly sear chicken: Start with a hot skillet. Add a bit of oil. Place the chicken in the skillet without touching it. Let it cook for about five minutes. This helps form a nice crust. Flip it over and repeat. This method locks in the juices. - Importance of not overcrowding the skillet: If you add too many chicken pieces, they will steam instead of sear. This can lead to soggy chicken. Always leave space between each piece. This helps each piece cook evenly. - Resting time for chicken: Why it matters: After cooking, let the chicken rest for five minutes. This allows the juices to redistribute. If you skip this step, the juices run out when you cut it. The chicken will taste drier. - Adding spices: Best practices for boosting flavor: Use salt and pepper to season the chicken before cooking. This adds basic flavor. You can also use garlic powder or paprika for extra taste. Remember, spices should enhance, not overpower. - When to add extra ingredients like cheese or herbs: For Tomato Basil Chicken, add fresh mozzarella near the end of baking. This way, it melts but does not burn. Fresh herbs should be added just before serving. This keeps their flavor bright. - Balancing acid and fat for optimal taste: The balsamic vinegar gives a nice tang. The olive oil adds richness. Together, they create a balanced flavor. If your dish tastes flat, adjust with more vinegar or oil. Always taste as you go! {{image_2}} You can easily swap some ingredients in Tomato Basil Chicken to suit your taste. - Alternative proteins: Consider using turkey instead of chicken for a leaner option. Tofu is also great for a plant-based meal. - Tomato varieties: Standard tomatoes work well, but heirloom tomatoes add a richer flavor. Try both to see what you like best. - Herb substitutes: If you run out of basil, use parsley or oregano. These herbs can still add flavor to your dish. Pair your Tomato Basil Chicken with tasty sides. Here are some ideas: - Pairing options: Steamed vegetables or a fresh salad complement the chicken well. A side of rice or pasta can also enhance your meal. - Transforming leftovers: If you have leftovers, shred the chicken and mix it into a pasta salad or a wrap. It makes a quick lunch. - Recommended wine pairings: A light white wine, like Sauvignon Blanc, works well with this dish. It enhances the flavors without overpowering them. Explore these variations and serving ideas to make your meal even more enjoyable! For the full recipe, check out the detailed steps to create this flavorful dish. To store leftovers of Tomato Basil Chicken, place them in an airtight container. Let the dish cool to room temperature before sealing it. Store it in the fridge for up to four days. This keeps the chicken juicy and the flavors intact. The shelf life of cooked Tomato Basil Chicken is about three to four days. After this time, the quality declines. Always check for signs of spoilage before consuming. If you want to keep Tomato Basil Chicken longer, freezing is a great option. First, let the chicken cool completely. Then, wrap each piece tightly in plastic wrap. Place the wrapped chicken in a freezer-safe bag to avoid freezer burn. You can store it this way for up to three months. When reheating after freezing, it’s best to thaw the chicken overnight in the fridge. This helps maintain its moisture. Reheat in the oven at 350°F (175°C) until heated through. This method ensures the chicken stays tender and flavorful. What can I serve with Tomato Basil Chicken? You can pair this dish with many sides. Some great options include: - Steamed vegetables, like broccoli or green beans - A light salad with mixed greens - Garlic bread for a tasty addition - Pasta tossed in olive oil and herbs These sides will complete your meal and enhance the flavors of the chicken. Can Tomato Basil Chicken be made in advance? Yes, you can prepare this dish ahead of time. You can marinate the chicken and mix the tomatoes earlier in the day. Just store them in the fridge. When you're ready to cook, just sear the chicken and bake it. This can save you time on busy nights. How do I know when the chicken is cooked? To check if your chicken is done, use a meat thermometer. The thickest part should reach 165°F (75°C). If you don't have a thermometer, cut into the chicken. The meat should be white, not pink. Juices should run clear. Why is my chicken dry? Dry chicken often comes from cooking it too long. Make sure to check the internal temperature. Also, using a meat thermometer can help you avoid this mistake. Cooking at a lower temperature can also keep the meat tender. How to fix bland flavors in the dish? If your dish tastes bland, try adding salt and pepper. Fresh herbs can also boost flavor. You may also add a splash of balsamic vinegar for acidity. Taste as you go to find the right balance. What to do if the tomatoes are too watery? Watery tomatoes can happen if they are overripe. To fix this, drain excess liquid before baking. You can also cook them longer to reduce moisture. Adding a bit of cornstarch can help thicken the sauce as well. For the complete recipe, check out the Full Recipe section. This blog post covered important steps to make a great Tomato Basil Chicken. We discussed key ingredients, like chicken, tomatoes, and fresh basil. You learned preparation steps, cooking tips, and variations to try. Proper storage methods help keep your dish fresh. Remember, cooking is about experimenting. Don’t be afraid to make it your own. Enjoy your meal, and share it with family and friends for a delightful experience. Happy cooking!
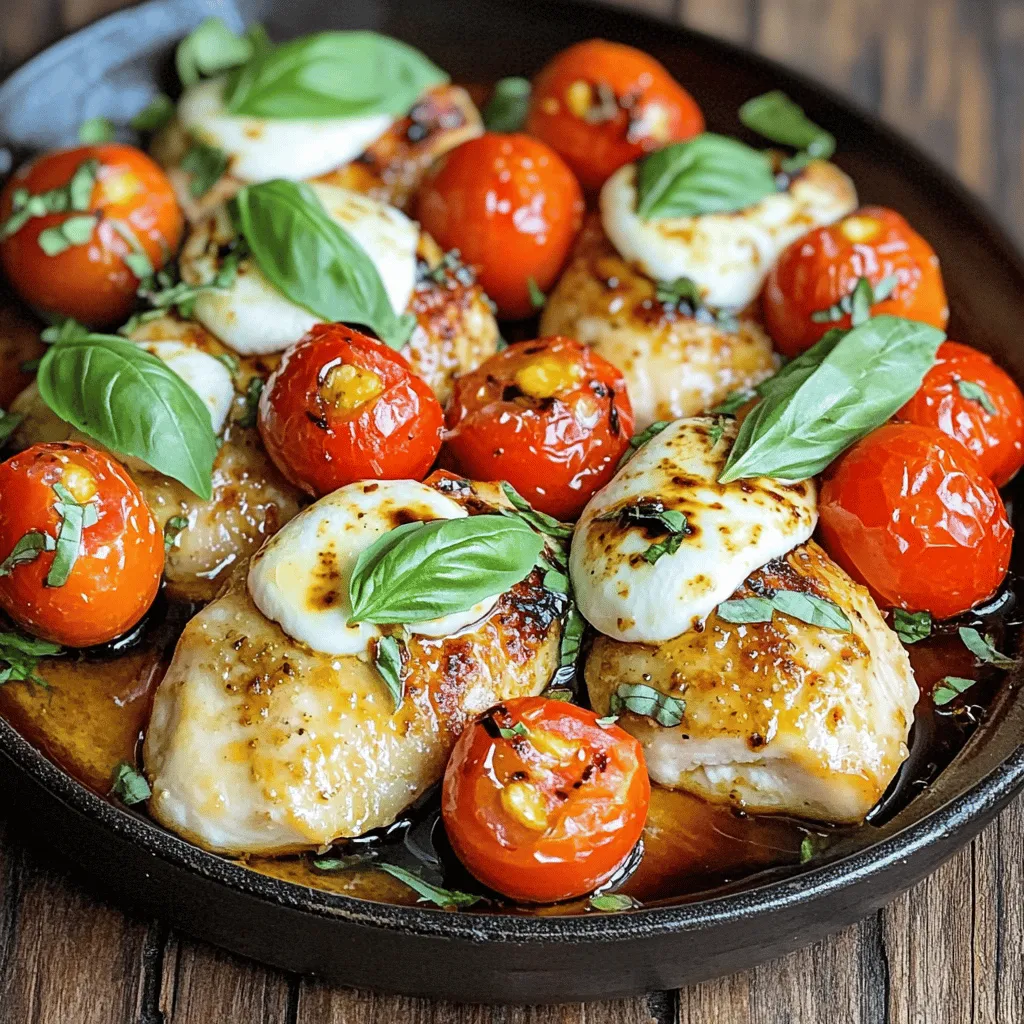
Tomato Basil Chicken Savory and Flavorful Dinner Recipe
Looking for a dinner that bursts with flavor? My Tomato Basil Chicken recipe is just the answer! This dish combines juicy chicken, ripe tomatoes, and