Dinner

- 4 boneless, skinless chicken breasts - 6 tablespoons unsalted butter, melted - 4 cloves garlic, minced For this dish, I love using fresh chicken breasts. They cook evenly and stay juicy. The butter adds richness, while the garlic brings a lovely aroma and flavor. - 1 teaspoon dried thyme - 1 teaspoon dried rosemary - 1 teaspoon paprika - Salt and pepper to taste These herbs and spices are key. Thyme and rosemary give a warm, earthy taste. Paprika adds a hint of color and smokiness. Salt and pepper enhance all the flavors. - Fresh parsley, chopped (for garnish) - Lemon wedges (for serving) Garnishing with parsley gives a fresh look. Lemon wedges add a bright touch when served. A squeeze of lemon juice over the chicken makes it even tastier. This recipe creates a simple dinner delight that is sure to impress. For the full recipe, feel free to check out the complete details. - Preheat the oven to 400°F (200°C). - In a mixing bowl, combine melted butter, minced garlic, dried thyme, dried rosemary, paprika, salt, and pepper. Stir until everything mixes well. - Take the chicken breasts and place them in a baking dish. - Pour the garlic butter mixture over the chicken. Make sure each piece is well coated. - Bake in the preheated oven for 25 to 30 minutes. Check that the internal temperature reaches 165°F (75°C). - Once cooked, remove the chicken from the oven. Let it rest for about 5 minutes. - Garnish with freshly chopped parsley. Serve with lemon wedges on the side. You can drizzle the lemon over the chicken for extra flavor. This simple method makes a delicious meal that feels gourmet. For the full recipe, check out [Full Recipe]. To get the best garlic butter baked chicken, start with chicken breasts that are even in thickness. This helps them cook evenly. A meat thermometer is your best friend here. It tells you when the chicken hits 165°F (75°C), which means it’s safe to eat. Want to take the flavor up a notch? Add a splash of lemon juice to the garlic butter mixture. This gives the chicken a bright and zesty kick. You can also marinate the chicken for a few hours. This adds depth and makes it extra tasty. Use a sturdy baking dish for best results. This helps the chicken cook evenly. Lining your dish with parchment paper makes cleanup a breeze. No one likes scrubbing dishes after a long day! For the full recipe, check out the detailed instructions above. {{image_2}} You can easily change some ingredients. For a juicier option, substitute chicken thighs for the breasts. Chicken thighs have more fat, which keeps them moist and tasty. You can also try different herbs. Use oregano or basil to give your dish a unique twist. These herbs add fresh flavors that can brighten the meal. Grilling is another fun way to prepare this dish. It adds a smoky flavor that many enjoy. If you have an air fryer, you can use that too. Air frying the chicken gives you a quicker and crispier result. Just make sure to adjust the cooking time to keep it juicy. When it’s time to serve, think about your sides. This chicken goes great over rice or pasta. You can also serve it with a fresh salad for a complete meal. Another nice touch is to pair it with roasted vegetables. They add nutrition and color to your plate. For full details, check the [Full Recipe]. Store any leftover garlic butter baked chicken breast in an airtight container. This keeps it fresh and tasty. Enjoy it within 3 to 4 days for the best flavor and texture. You can freeze cooked chicken for easy meals later. Divide it into portioned bags. This makes it easy to grab and go. When you're ready to eat, thaw it in the refrigerator overnight. To reheat, use the oven. This method keeps the chicken juicy and delicious. If you use a microwave, add a bit of water. This helps prevent the chicken from drying out. Bake chicken breasts for 25-30 minutes at 400°F (200°C). This time gives juicy, tender meat. Always check the internal temperature. It should reach 165°F (75°C) to be safe to eat. If your chicken is thicker, it may need extra time. Use a meat thermometer for best results. Yes, you can use frozen chicken breasts. However, adjust your cooking time. Bake them for about 40-50 minutes at 400°F (200°C). Check the internal temperature to ensure it reaches 165°F (75°C). If possible, thaw them in the fridge overnight for even cooking. Many sides pair nicely with garlic butter baked chicken. Here are some tasty suggestions: - Steamed broccoli - Garlic mashed potatoes - Roasted carrots - Fresh green salad - Quinoa or rice with herbs These sides add color, flavor, and nutrition to your meal. Enjoy mixing and matching! For a full recipe of garlic butter baked chicken breast, refer to the earlier section. This recipe for garlic butter baked chicken is straightforward and tasty. We covered the main ingredients, step-by-step instructions, and tips for success. You can also try fun variations or storage methods to enjoy leftovers. Remember, using fresh herbs and proper cooking times makes a big difference. With simple tweaks, you can create a delicious meal every time. Enjoy making this dish and impressing your family or friends!
Garlic Butter Baked Chicken Breast Simple Dinner Delight
Are you ready to elevate your dinner routine? Garlic Butter Baked Chicken Breast is a simple yet delightful dish that brings bold flavors with minimal
To make One Pan Lemon Garlic Chicken, you need simple, fresh ingredients for great flavor. Here's what you'll need: - Chicken and seasoning - 4 chicken thighs, skin-on and bone-in - 2 tablespoons olive oil - 1 teaspoon salt - ½ teaspoon black pepper - Vegetables and aromatics - 4 cloves garlic, minced - 1 cup cherry tomatoes, halved - 1 cup baby spinach - 1 teaspoon dried thyme (or 1 tablespoon fresh thyme) - Liquids and garnishes - Juice and zest of 2 lemons - 1 cup chicken broth - Fresh parsley, chopped (for garnish) These ingredients blend perfectly to create a tasty meal. The chicken thighs bring a juicy base. The lemon and garlic add bright flavors, while the spinach and tomatoes add color and nutrition. You can find the Full Recipe linked above for more details on cooking. - Preparing the chicken thighs: Start with four chicken thighs. Make sure they have skin and bones for flavor. Rinse them under cold water. Pat the chicken dry with paper towels. This helps the skin crisp up later. - Searing the chicken: Heat two tablespoons of olive oil in a large oven-safe skillet. Set the heat to medium-high. Once hot, season the chicken with one teaspoon of salt and half a teaspoon of black pepper. Place the chicken thighs skin side down in the skillet. Sear them for 5 to 7 minutes. Look for a golden brown color. Flip them and cook for another 5 minutes. After that, remove the chicken and set it aside on a plate. - Mixing the sauce: In the same skillet, add four minced garlic cloves. Sauté for about 30 seconds until fragrant. Pour in one cup of chicken broth. Add the juice and zest of two lemons. Stir to mix well. Scrape the brown bits off the skillet's bottom. This adds great flavor to your dish. - Adding vegetables and broth: Next, add one teaspoon of dried thyme, one cup of halved cherry tomatoes, and one cup of baby spinach to the skillet. Stir gently to combine everything. - Final roasting process: Nestle the seared chicken thighs back into the skillet, skin side up. Transfer the skillet to your preheated oven at 400°F (200°C). Roast for 25 to 30 minutes. This will cook the chicken through and keep it juicy. - Checking for doneness: Use a meat thermometer to check the chicken's internal temperature. It should reach 165°F (74°C). If it does, it’s ready! Remove the skillet from the oven and let the chicken rest for 5 minutes. Garnish with fresh parsley before serving. For the complete recipe, you can refer to the [Full Recipe]. - Ensuring the chicken skin is crispy: Start with a dry chicken. Pat it with paper towels to remove moisture. Use medium-high heat to sear the skin for 5-7 minutes. This seals in flavor and gives a nice crunch. - How to avoid overcooking the chicken: Use a meat thermometer. Chicken should reach 165°F (74°C) inside. Remove it from the oven once it hits this temp. Let it rest for 5 minutes before serving. This helps keep it juicy. - Best skillet to use: A large, oven-safe skillet is best. Cast iron or stainless steel works well. These materials heat evenly and retain warmth. This helps cook the chicken just right. - Ideal side dishes to pair: Serve this dish with rice or crusty bread. Both soak up the tasty sauce. You can also add a simple salad for freshness. Roasted vegetables work great too. - Presentation tips: Arrange the chicken thighs on a large platter. Spoon the sauce and veggies over the top. Garnish with fresh parsley for a pop of color. This makes the dish look appealing. - How to reheat leftovers: Place leftovers in a skillet over low heat. Add a splash of chicken broth to keep it moist. Cover with a lid. Heat until warm throughout. This keeps the chicken tender and flavorful. For the full recipe, check out the One Pan Lemon Garlic Chicken. {{image_2}} You can make One Pan Lemon Garlic Chicken even more fun! Here are some ideas: - Adding herbs and spices: Try fresh rosemary or basil for a new twist. A pinch of red pepper flakes adds heat. Experiment with smoked paprika for a smoky flavor. - Utilizing different cuts of chicken: Use chicken breasts if you prefer lean meat. Drumsticks work well, too. Each cut offers a unique taste and texture. - Alternative vegetables: Swap cherry tomatoes for bell peppers or zucchini. Broccoli and asparagus also fit nicely. Mix and match your favorites for variety. You can adjust this dish for different diets. Here’s how: - Making it gluten-free: This recipe is naturally gluten-free! Just use gluten-free broth. Always check ingredient labels to be safe. - Options for paleo or keto dieters: Skip the baby spinach if you're on keto. Instead, add cauliflower rice for a filling side. You can also use coconut aminos instead of broth for a paleo-friendly flavor. - Vegetarian adaptations: You can make a veggie version! Replace the chicken with firm tofu or chickpeas. Use vegetable broth and add more veggies for a hearty meal. For the complete recipe, check out the Full Recipe section. To store leftovers, let the chicken cool down first. Place it in an airtight container. This keeps the chicken fresh and prevents odors. Use parchment paper between layers if stacking. The expected shelf life in the fridge is about 3 to 4 days. Make sure to check for any off smells before eating. To freeze, first cool the chicken completely. Then, wrap it tightly in plastic wrap. Place the wrapped chicken in a freezer-safe bag. This method protects it from freezer burn. You can freeze it for up to 3 months. To reheat frozen portions, thaw them overnight in the fridge. Once thawed, you can reheat the chicken in a skillet over low heat. Ensure the internal temperature reaches 165°F (74°C) for safety. You can also use the oven for reheating if you prefer a crispy skin. How to make One Pan Lemon Garlic Chicken? To make One Pan Lemon Garlic Chicken, start by gathering your ingredients. You need chicken thighs, olive oil, salt, black pepper, garlic, lemons, thyme, chicken broth, cherry tomatoes, baby spinach, and parsley. Preheat your oven to 400°F (200°C). Heat olive oil in an oven-safe skillet. Season the chicken with salt and pepper. Sear the chicken skin side down until it is golden brown. Flip and cook for five more minutes. Remove the chicken from the skillet. Sauté minced garlic for about 30 seconds. Add chicken broth, lemon juice, and zest. Mix in thyme, cherry tomatoes, and spinach. Nestle the chicken back in the skillet. Roast in the oven for 25-30 minutes until fully cooked. This is a simple yet tasty dish. Can I use boneless chicken? Yes, you can use boneless chicken. Boneless thighs or breasts work well. Adjust the cooking time, as boneless cuts cook faster. Keep an eye on the chicken to avoid drying it out. Check the internal temperature to ensure it's safe to eat. It should reach 165°F (74°C). What should I do if the chicken isn’t cooked through? If the chicken isn't cooked through, return it to the oven. Use a meat thermometer to check the temperature. If it’s below 165°F (74°C), cook for an extra 5-10 minutes. You can also cover the skillet with foil to keep moisture in. This helps the chicken cook evenly. Always ensure you check before serving. This blog covered everything you need for making a tasty One Pan Lemon Garlic Chicken. You learned the key ingredients, step-by-step cooking instructions, and helpful tips to get the best results. I shared great flavor and dietary variations, plus how to store and reheat leftovers. In my view, this dish is simple yet delicious. With the right techniques, you can impress anyone. Enjoy cooking and sharing this meal with family and friends.
One Pan Lemon Garlic Chicken Simple Dinner Delight
Are you looking for an easy and tasty dinner? One Pan Lemon Garlic Chicken is a simple dish that impresses. With juicy chicken, fresh veggies,
- 4 medium zucchinis - 1 tablespoon olive oil - 2 cloves garlic, minced - 1 cup cherry tomatoes, halved - 1 cup fresh basil leaves, roughly chopped - 1/4 teaspoon red pepper flakes - Salt and pepper to taste - 1/4 cup grated Parmesan cheese - Lemon zest for garnish To make Stanley Tucci's zucchini pasta, start with fresh, high-quality ingredients. You need four medium zucchinis, which are the star of this dish. Zucchini gives a light and fresh taste. Olive oil adds a rich flavor and helps cook the garlic. Minced garlic gives a savory touch that makes everything taste better. Cherry tomatoes add sweetness and a pop of color. Fresh basil brings a fragrant aroma and a hint of peppery taste. You can also add red pepper flakes for a little heat. Salt and pepper are essential for seasoning. If you like cheese, grated Parmesan adds creaminess and depth. Lastly, lemon zest gives a bright finish to the dish. For the full recipe details, check the Full Recipe. This simple list of ingredients will help you create a tasty meal that captures the essence of home cooking. - Wash the zucchinis well. - Use a spiralizer to create long noodles. - Set the prepared zucchini noodles aside. - Heat one tablespoon of olive oil in a large skillet. - Add two cloves of minced garlic and sauté for one minute. - Toss in one cup of halved cherry tomatoes. - If you like heat, add red pepper flakes. Cook for three to four minutes. - Add the zucchini noodles to the skillet. - Season with salt and pepper to taste. - Sauté for two to three minutes until tender. - Stir in one cup of roughly chopped basil. - If you want, sprinkle grated Parmesan cheese on top. - Mix to combine all flavors well. This recipe is quick, fresh, and packed with flavor. For more details, check the Full Recipe. To get the best texture, use fresh zucchinis. Choose ones that are firm and shiny. When spiralizing, aim for even noodles. This helps them cook just right. For a nice bite, avoid overcooking. Sauté for only 2-3 minutes. This keeps them tender yet crisp. To prevent soggy noodles, don't add too much salt early. Salt draws out moisture. It's best to season at the end. To boost flavor, add fresh herbs like thyme or oregano. These herbs pair well with zucchini. A hint of lemon juice can brighten the dish. For cheese, Parmesan is a classic choice. It adds a rich, salty note. If you want a creamier texture, try goat cheese. Both options enhance the meal beautifully. Cook your zucchini noodles for just a few minutes. This helps them stay crispy. Serve them right away to enjoy the best texture. Pair the dish with a light salad or grilled chicken for a full meal. A side of crusty bread also complements the flavors well. You can find the Full Recipe for more detailed steps. {{image_2}} For those avoiding gluten, zucchini pasta is a great choice. You can swap traditional pasta with zucchini noodles easily. They provide a light and healthy base for your meal. You can also mix in other vegetables like carrots or sweet potatoes. This adds color and flavor. These variations keep your dish fresh and exciting. If you want a vegan option, skip the cheese. Instead, try nutritional yeast for a cheesy flavor. It adds a nice touch without animal products. You can also boost flavor with spices like smoked paprika or lemon juice. These help enhance the taste without using meat or dairy. Using fresh, seasonal vegetables makes this dish even better. In the summer, add bell peppers or corn. In the fall, consider using squash or mushrooms. These local produce options add unique flavors. Adapting the recipe to what’s in season keeps it fresh. You can enjoy the best flavors all year round. To keep your zucchini pasta fresh, use airtight containers. Glass or plastic containers work well. Make sure the pasta cools before sealing. This helps keep moisture in check. Zucchini pasta can last in the fridge for up to three days. After that, it may lose some crunch. When reheating, avoid the microwave if possible. It can make the noodles soggy. Instead, use a skillet over low heat. Add a splash of olive oil to keep it moist. Stir gently until warm. You can also add leftover zucchini pasta to soups or salads for a tasty twist. This adds flavor and makes a new meal. You can use a vegetable peeler to create long strips of zucchini. Just peel the zucchini into thin, flat ribbons. You can also use a box grater. Simply grate the zucchini lengthwise for thin noodles. Both methods work well and give you a nice texture. Yes, many vegetables make great substitutes. Try using carrots, sweet potatoes, or butternut squash. You can mix different veggies to create unique flavors. Each vegetable has its own taste and texture, adding fun to your meal. Zucchini pasta is low in calories and carbs. One medium zucchini has about 33 calories and 6 grams of carbs. It also offers vitamins A and C, along with potassium. This dish is a great way to add nutrients to your diet without heavy carbs. You can find the Full Recipe for Stanley Tucci's Zucchini Pasta in the article above. It gives you all the steps and tips you need to make this delightful dish. You learned how to make a tasty zucchini pasta dish with fresh ingredients. We covered steps for preparing, cooking, and serving your meal. You can personalize it with different spices or vegetables. Remember to store your leftovers properly for later enjoyment. With these tips, you can create a delicious and healthy meal that impresses anyone. Enjoy your cooking and the great flavors of zucchini pasta!
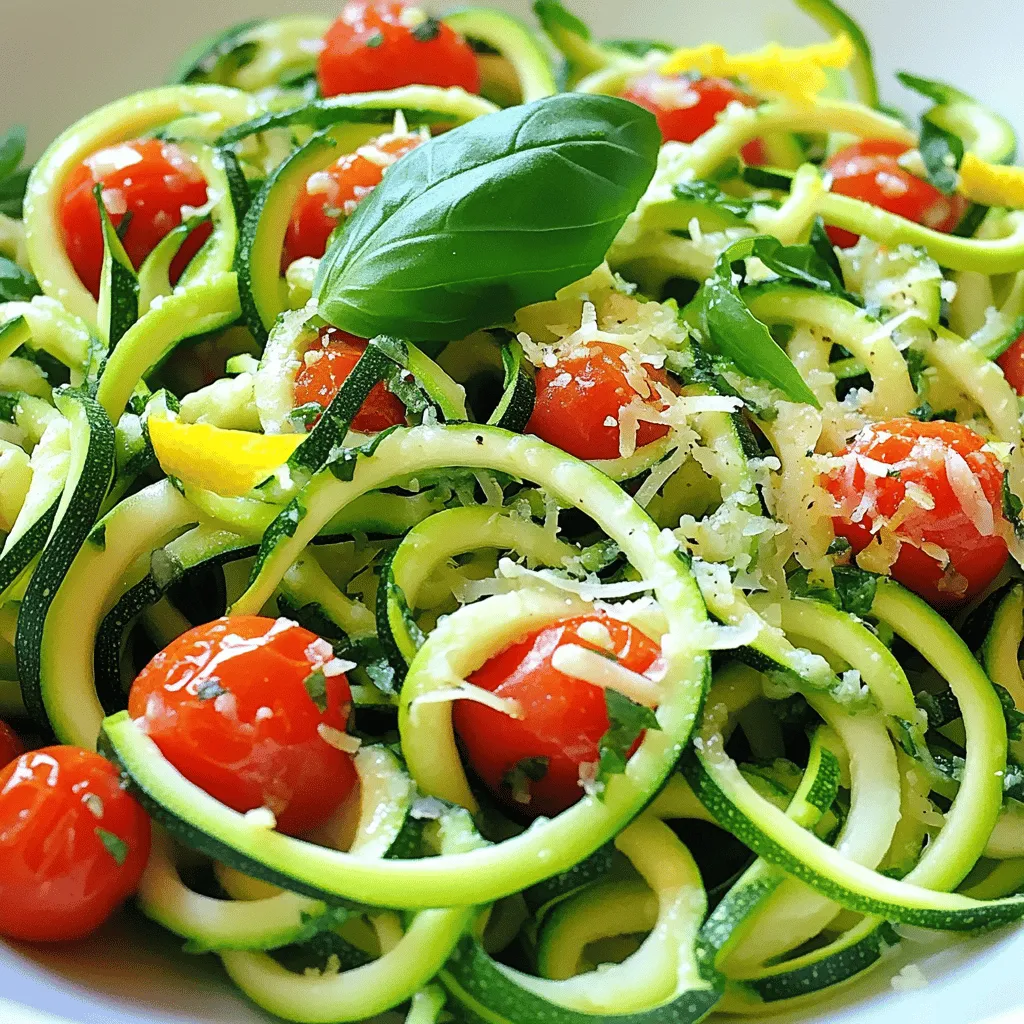
Stanley Tucci’s Zucchini Pasta Flavorful and Simple Meal
Looking for a quick, tasty meal? Stanley Tucci’s Zucchini Pasta is a fun way to enjoy fresh veggies. This simple recipe is loaded with flavor
- 4 medium zucchinis - 1 cup fresh dill - 1 cup Greek yogurt - 1 cup shredded mozzarella cheese - 1 cup breadcrumbs - 2 eggs - 1 tablespoon olive oil - 1 teaspoon garlic powder - 1 teaspoon onion powder - Salt and pepper - Optional: 1/2 teaspoon red pepper flakes To make a hearty and flavorful Zucchini Dill Casserole, gather fresh ingredients. Zucchini is the star of the dish. Its mild flavor blends well with dill, making every bite tasty. Fresh dill adds a bright, herbaceous note. Use Greek yogurt for creaminess and a slight tang. It also adds protein, making the dish more filling. Mozzarella cheese gives the casserole a nice melt and stretch. Breadcrumbs create a crunchy topping, adding texture. Eggs bind the mixture together, ensuring it holds its shape when baked. Olive oil helps everything cook evenly and adds flavor. Garlic powder and onion powder enhance the taste, while salt and pepper season it perfectly. If you like a little heat, consider adding red pepper flakes. - Baking dish (9x13-inch) - Mixing bowl - Oven To whip up this casserole, you need some basic tools. A 9x13-inch baking dish is perfect for this recipe. It provides enough space for the zucchini mixture. A mixing bowl is essential for combining all the ingredients. Lastly, preheat your oven to 375°F (190°C) to ensure the casserole bakes evenly. For the full recipe, please refer to the original instructions. - Preheat the oven to 375°F (190°C). - In a large bowl, combine the sliced zucchinis, fresh dill, Greek yogurt, mozzarella cheese, eggs, garlic powder, onion powder, salt, and pepper. If you like spice, add red pepper flakes. Mix well until all the ingredients blend together nicely. This step is crucial for a flavorful base. - Grease a 9x13-inch baking dish with olive oil. - Pour the zucchini mixture into the greased dish. Spread it evenly to make sure every bite is tasty. - In a small bowl, mix the breadcrumbs with a drizzle of olive oil. This will help the crumbs to brown and get crunchy. Sprinkle this breadcrumb mix over the top of the casserole. - Bake in the preheated oven for 35-40 minutes. - Check for doneness by looking for a golden brown top and tender zucchini. You can poke it with a fork; it should slide in easily. - Let it cool for about 5 minutes before serving. This waits for the flavors to settle and makes serving easier. To make the best zucchini dill casserole, start with even slices of zucchini. Use a sharp knife or a mandoline. Aim for slices about 1/4 inch thick. This helps the zucchini cook evenly and become tender. Draining excess moisture from the zucchini is key. After slicing, sprinkle salt on them and let them sit for 15 minutes. This draws out water. Pat the slices dry with a paper towel before adding them to your mix. This step keeps your casserole from becoming soggy. To boost the flavor of your zucchini dill casserole, try adding fresh herbs. Basil, parsley, or thyme work well with dill. They add depth and freshness. Spices can also enhance your dish. Consider adding smoked paprika for a smoky kick or a pinch of cumin for warmth. Experiment with flavors to find what you like best. When it's time to serve, present your casserole in the baking dish. This keeps it warm and inviting. Garnish each serving with a sprig of fresh dill for a nice touch. Pair the casserole with a crisp salad or some crusty bread. These sides balance the rich flavors and add texture to your meal. Enjoy this hearty dish with family and friends. For the complete recipe, check out the Full Recipe. {{image_2}} You can switch cheese types in this dish. Feta cheese adds a tangy twist. Goat cheese offers a creamy texture. Both give great flavor profiles. For those avoiding dairy, use dairy-free yogurt and cheese. These substitutes keep the dish rich and tasty. Want to make it heartier? Add cooked chicken or sausage for a protein boost. This change adds depth and keeps you full longer. If you prefer a veggie option, try chickpeas or lentils. These options still pack in the protein without meat. You can change up the veggies based on the season. Try yellow squash for a sweet flavor. Carrots add a nice crunch and color. This dish is flexible and lets you use what’s fresh. Adapting keeps it exciting throughout the year. For the full recipe, check back to see how to make this delicious dish! To keep your zucchini dill casserole fresh, store it in the fridge. Place it in an airtight container. This will help maintain flavor and texture. If you have a lot left, you can cut it into smaller pieces. This makes it easier to grab for meals later. Reheat your casserole slowly. Use an oven at 350°F (175°C) for about 15-20 minutes. Cover it with foil to keep it moist. If you want to freeze it, cool it first. Wrap it well in plastic wrap and then in foil. This helps avoid freezer burn. In the fridge, your casserole is good for about 3-4 days. If you freeze it, it lasts for up to 3 months. Make sure to label your containers with the date. This way, you’ll know when to use them. For the best taste, use it sooner rather than later. If you don't have Greek yogurt, you can use sour cream. It has a similar taste and texture. Another option is plain regular yogurt, but it may make the dish a bit thinner. You can also try cottage cheese, but blend it first for a smoother mix. Each substitute may change the casserole's creaminess slightly, but all will work well. Yes, you can use fresh dill instead of dried. Fresh dill has a stronger flavor, so you will need more. Use about three times the amount of fresh dill. If the recipe calls for one cup of dried dill, use three cups of fresh. This will give your dish a bright and lively taste. The casserole is not gluten-free due to the breadcrumbs. To make it gluten-free, use gluten-free breadcrumbs. You can also crush gluten-free crackers or use ground nuts as a topping. This way, you can enjoy the dish while sticking to a gluten-free diet. This Zucchini Dill Casserole is easy and tasty. You learned about the essential ingredients and the right equipment. The step-by-step instructions made cooking simple. I shared tips to enhance flavors and variations to fit your taste. Proper storage helps keep leftovers fresh. Enjoy serving this dish at your next meal. Trust me, it's a crowd-pleaser.
Zucchini Dill Casserole Hearty and Flavorful Dish
Are you looking for a dish that combines freshness and comfort? Look no further than my Zucchini Dill Casserole! This hearty and flavorful dish features
- 2 boneless, skinless chicken breasts - 1/2 cup all-purpose flour - 1/4 cup buttermilk - 1 teaspoon paprika - 1 teaspoon garlic powder - 1 teaspoon onion powder - 1/2 teaspoon dried thyme - 1/2 teaspoon dried rosemary - Salt and pepper, to taste - 2 tablespoons olive oil - 1 tablespoon butter - Fresh parsley, chopped (for garnish) Gathering these ingredients is key to making a tasty meal. Start with the chicken breasts. They are the star of the show. Use boneless and skinless for easy cooking. Next, the all-purpose flour gives the chicken a nice crust. The buttermilk is important too. It helps the flour stick and adds flavor. For spices, paprika adds a warm color. Garlic and onion powders give a savory taste. Thyme and rosemary bring a nice herbal note. Salt and pepper are must-haves for seasoning. When it comes to cooking, olive oil and butter create a rich flavor. The butter also helps the chicken brown nicely. Finally, fresh parsley adds a pop of color when you serve the dish. Check the Full Recipe for a detailed guide on how to use these ingredients to make a delicious pan-fried chicken breast. - Butterfly the chicken if necessary. This means slicing thick breasts in half. It helps them cook evenly and stay juicy. - Whisk together the dry ingredients. In a bowl, mix flour, paprika, garlic powder, onion powder, thyme, rosemary, salt, and pepper. This mix adds great flavor. - Dip each chicken breast in buttermilk. Let the extra buttermilk drip off. - Dredge the chicken in the flour mix. Press gently to coat it well. This creates a nice crust. - Heat olive oil and butter in a skillet over medium-high heat. Wait until the oil shimmers. - Cook the chicken breasts in the skillet. Cook for 6-7 minutes on each side until golden brown. The chicken should reach an internal temperature of 165°F. - Let the chicken rest for 5 minutes on a plate. This helps keep the juices inside. - Slice the chicken and garnish with chopped parsley. This adds a fresh touch. Enjoy your delicious meal! Check out the [Full Recipe] for more details. To get that perfect crispy skin, you need hot oil. Heat your oil until it shimmers. This helps the chicken brown nicely. Next, do not overcrowd the pan. Cook in batches if needed. This allows each piece to fry well. Butterflying thick breasts is key. Cut them in half horizontally to make them thinner. This helps them cook evenly. Always let the chicken rest before slicing. This keeps the juices inside, making each bite tender. Adjust spices to fit your taste. You can add more garlic or use less salt. Fresh herbs can really boost flavor. Try adding parsley, thyme, or rosemary for a fresh twist. These simple changes can make a big difference. For the full recipe, check the section above. {{image_2}} I love to change up the flavors of my pan-fried chicken. One great option is a lemon herb version. Just add lemon zest to your seasoning mix. This brightens the dish and adds a fresh taste. Another fun twist is the spicy version. Simply mix in cayenne pepper to the flour. It brings heat and excitement to each bite. For a crunchier crust, try using panko breadcrumbs. They give the chicken a nice texture. If you need a gluten-free option, you can use gluten-free flour instead. This still creates a lovely coating that sticks well to the chicken. Serve your pan-fried chicken with a side salad. The crisp greens balance the rich flavors of the chicken. You can also pair it with mashed potatoes or rice. These sides soak up the juices and make each meal more filling. For the full recipe, check out the details above. Let your chicken cool down before you store it. This step keeps the chicken from steaming and getting soggy. Place the cooled chicken in an airtight container. This helps keep it fresh and tasty for later meals. The best way to reheat pan-fried chicken is in a skillet. Heat a little oil over medium heat and add your chicken. Cook until it’s warm. If you need a quicker method, use the microwave. Just place your chicken on a microwave-safe plate and heat it for short bursts until warm. You can freeze leftover chicken for up to three months. Wrap each piece individually in plastic wrap. This makes it easy to grab just what you need later. When you’re ready to eat, thaw in the fridge overnight for the best results. To check if your chicken is done, use a meat thermometer. The safe internal temperature is 165°F or 75°C. Insert it into the thickest part of the chicken. If it reads this temperature, your chicken is ready to eat. This step keeps your meal safe and tasty. Yes, you can cook chicken breasts without flour. However, the texture might change. The flour gives a nice, crispy crust. Without it, the chicken may not have the same crunch. You could try using breadcrumbs or cornmeal for a different texture. You have many options for sides. Consider serving your chicken with a fresh salad. Rice dishes are also a great match. Steamed or roasted vegetables add color and flavor. These sides balance the meal and make it more filling. For more ideas, check out the Full Recipe. In this post, we explored the essentials for cooking juicy, crispy chicken breasts. You learned about main ingredients, seasoning tips, and cooking steps. We also discussed ways to store leftovers and offered variations to keep meals exciting. Cooking can be simple and fun. Remember to adjust flavors to your taste and try different sides. Each detail helps you create a delicious dish. Happy cooking!
Pan Fried Chicken Breasts Juicy and Flavorful Meal
Looking for a quick and tasty dinner? Pan-fried chicken breasts are your answer! Juicy and flavorful, they are simple to prepare and perfect for any
To make Rosemary Cheddar Squash Bread, gather these simple ingredients: - 1 cup butternut squash puree (cooked and mashed) - 1 cup shredded sharp cheddar cheese - 2 cups all-purpose flour - 1/2 cup sugar (or coconut sugar for a healthier option) - 1 tablespoon fresh rosemary, finely chopped - 1 tablespoon baking powder - 1/2 teaspoon baking soda - 1/2 teaspoon salt - 1/2 cup milk (dairy or plant-based) - 1/4 cup olive oil - 2 large eggs You can swap some ingredients if needed. Use pumpkin puree instead of squash. This gives a similar taste. If you want a lighter bread, try almond flour in place of all-purpose flour. For a dairy-free option, use nutritional yeast instead of cheese. If sugar is a concern, replace it with honey or maple syrup. Fresh ingredients make a big difference in this bread. Fresh rosemary adds a bright flavor that dried herbs can’t match. Using freshly cooked squash gives the bread a rich texture. Quality cheese melts better and enhances the taste. Always choose the best you can find for the best results. Freshness leads to a more vibrant flavor and a lovely aroma in your kitchen. First, you want to preheat your oven to 350°F (175°C). Greasing a loaf pan (9x5 inches) helps the bread release easily after baking. You can also line it with parchment paper if you prefer. This step ensures your bread does not stick and makes cleanup easy. In a large bowl, add the cooked butternut squash puree and shredded cheddar cheese. Mix them together until they are well combined. In another bowl, whisk together the flour, sugar, baking powder, baking soda, salt, and chopped rosemary. This mix brings all the flavors together. Now, in a separate bowl, whisk the milk, olive oil, and eggs until smooth. Pour this wet mix into the squash-cheese mixture. Stir until just blended. It’s okay if there are a few lumps; do not overmix. Now, pour the batter into your prepared loaf pan and spread it evenly. Bake in your preheated oven for 50-60 minutes. You can check if it’s done by inserting a toothpick into the center. If it comes out clean, the bread is ready. Once baked, take it out and let it cool in the pan for 10 minutes. Then, transfer it to a wire rack to cool completely. Enjoy your Rosemary Cheddar Squash Bread! For the complete instructions, check the Full Recipe. To achieve the best texture for your Rosemary Cheddar Squash Bread, use fresh butternut squash puree. This keeps the bread moist and soft. Make sure to mix the dry and wet ingredients gently. Overmixing can lead to a dense loaf. Also, don’t skip the resting time after baking. It helps the flavors meld together. One common mistake is using too much flour. Always measure your flour correctly. Spoon it into the measuring cup and level it off with a knife. Another mistake is not checking your oven temperature. An oven thermometer can help you bake at the right heat. Lastly, don’t forget to grease your pan well. Sticking can ruin the loaf. Adding herbs can boost the taste of your bread. Aside from rosemary, try thyme or sage for a different twist. You can also mix in spices like black pepper or garlic powder. This adds depth to every bite. For a fun twist, consider adding a pinch of cayenne pepper. It gives a subtle heat that pairs well with cheese. For the full recipe, check the previous section. {{image_2}} You can switch up the cheese in this recipe. Try using gouda or mozzarella for a different taste. Both cheeses melt well and add nice flavors. If you want a sharper bite, use blue cheese or goat cheese. They give a bold kick and pair well with the squash. Feel free to get creative with add-ins! Chopped nuts like walnuts or pecans add crunch. Sun-dried tomatoes or olives bring a savory twist. If you like sweet, add chocolate chips or dried cranberries. Each choice gives you a new flavor to enjoy. For a gluten-free version, swap all-purpose flour with a gluten-free blend. Look for one that contains xanthan gum for better texture. This option keeps the bread soft and moist. Your friends won’t even know it’s gluten-free! Check the [Full Recipe] for more details. To keep your Rosemary Cheddar Squash Bread fresh, wrap it tightly in plastic wrap or foil. You can also place it in an airtight container. Store it at room temperature for up to three days. If you want to keep it longer, the fridge works, but it may dry out a bit. Freezing is a great option if you have extra bread. First, let the bread cool completely. Then, slice it into pieces for easy use. Wrap each slice in plastic wrap, then place them in a freezer-safe bag. This way, it will stay fresh for up to three months. Just remember to label the bag with the date. When you’re ready to enjoy the bread again, take out a slice or two. You can reheat it in the oven at 350°F (175°C) for about 10-15 minutes. Alternatively, use a toaster for a quick warm-up. Enjoy it while it’s warm for the best flavor! For the full recipe, check the section above. If you don't have butternut squash puree, you can use pumpkin puree instead. Both have a similar texture and flavor. Sweet potato puree also works well. Just make sure it's smooth and creamy for the best results. To check if the bread is done, insert a toothpick into the center. If it comes out clean, your bread is ready. You can also look for a golden-brown crust and a firm top. The bread should feel springy when you press it lightly. Yes, you can make this bread a day ahead. Allow it to cool completely, then wrap it tightly in plastic wrap. Store it at room temperature or in the fridge. This allows the flavors to deepen, making it even more delicious. For the full recipe, check the detailed instructions above. This guide covered essential ingredients, including substitutions and the need for freshness. You learned the step-by-step process for making your dish, along with tips for great texture and flavor. We also explored variations, storage, and answered common questions. Remember, using fresh ingredients and avoiding mistakes greatly improves your dish. Enjoy experimenting with flavors and make it your own. Happy cooking!
Rosemary Cheddar Squash Bread Simple and Savory Treat
If you’re craving a savory treat that’s both simple and delicious, you’ll love my Rosemary Cheddar Squash Bread. This blend of rich flavors will fill
- Chicken and Zucchini Essentials - 2 boneless, skinless chicken breasts - 2 medium zucchinis, sliced into half-moons - Seasonings and Marinade Components - 2 tablespoons olive oil - 1 lemon (zest and juice) - 3 cloves garlic, minced - 1 teaspoon dried oregano - 1 teaspoon paprika - Salt and pepper to taste - Garnishing Ingredients - Fresh parsley, chopped (for garnish) This dish uses simple, fresh ingredients. The chicken and zucchini create a delightful combo. Zucchini adds a light crunch, while chicken brings protein. The marinade gives flavor and moisture. With just a few seasonings, you enhance the dish without fuss. To make it even better, fresh parsley adds a bright touch. This recipe is easy to follow. You can find the full recipe above for step-by-step guidance. Enjoy cooking your healthy dinner! Marinating Chicken Breasts First, gather your chicken breasts. In a small bowl, mix olive oil, lemon zest, lemon juice, minced garlic, dried oregano, paprika, salt, and pepper. This marinade is key. Place the chicken in a baking dish and pour half of the marinade over it. Make sure the chicken is well coated. Let the chicken marinate for at least 15 minutes. This step adds great flavor. Creating the Zucchini Preparation While the chicken marinates, prepare the zucchini. Slice the zucchinis into half-moons. In a separate bowl, toss the zucchini with the remaining marinade. Ensure each piece is coated. This adds a lovely taste and makes the dish colorful. Baking Instructions Preheat your oven to 400°F (200°C). After marinating, arrange the zucchini slices around the chicken in the same baking dish. This helps the flavors mix while cooking. Timing for Perfectly Cooked Chicken Bake the chicken and zucchini in the oven for 20 to 25 minutes. Check the chicken's internal temperature. It should reach 165°F (74°C). This ensures it is safe to eat and juicy. Plating the Dish Once cooked, remove the dish from the oven and let it rest for a few minutes. This helps keep the chicken moist. Serve the chicken alongside the zucchini. Garnish with fresh parsley for a pop of color. Best Accompaniments This dish pairs well with rice, quinoa, or a simple salad. These sides add a nice balance to your meal. For more details, check the Full Recipe. Ensuring Juicy Chicken To keep your chicken juicy, always marinate it. Use my marinade from the Full Recipe. It has lemon juice, olive oil, and spices. These flavors soak into the meat, making it tasty. Let it sit for at least 15 minutes. For best results, marinate for a few hours. Flavor Enhancements with Spices Spices can change your dish. I use dried oregano and paprika. They add depth to flavor. You can also try garlic powder or cayenne for heat. Experiment with spices you like. Don’t be shy to mix and match. Overcooking Chicken Overcooking chicken makes it dry. Always check the internal temperature. It should be 165°F (74°C). Use a meat thermometer for accuracy. If you don’t have one, cut the chicken open. The juices should run clear, not pink. Inadequate Marinating Time Don’t rush the marinating process. Fifteen minutes is the minimum. If you can, let it marinate longer. The chicken will absorb more flavors. This makes every bite delicious. Always plan ahead for the best taste. {{image_2}} Alternative Vegetables to Use If you want to mix things up, try other veggies. Bell peppers add sweetness. Broccoli brings a nice crunch. Asparagus gives a fresh taste. You can also use yellow squash for a colorful plate. Feel free to get creative! Different Marinade Ideas You can change the flavor with different marinades. Try a balsamic glaze for a sweet tang. A soy sauce mix gives an Asian twist. For a spicy kick, add chili flakes to the lemon marinade. Each choice changes the whole dish. How to Spice it Up Want a bit of heat? Add cayenne pepper or red pepper flakes. For a smoky flavor, use smoked paprika instead of regular. You can also try adding fresh herbs like basil or cilantro for a fresh taste. Serving Styles (Grilled, Skillet, etc.) You don’t have to bake this dish. Grill the chicken for that charred flavor. A skillet gives a nice sear and cooks faster. Each method adds a different texture, so pick your favorite! Check out the Full Recipe for more details. To keep your Easy Chicken Breast with Zucchini fresh, store leftovers correctly. Place the chicken and zucchini in an airtight container. This helps lock in moisture and flavor. If you don't have an airtight container, use plastic wrap or aluminum foil to cover the dish well. The shelf life of this dish is about 3 to 4 days in the fridge. After that, the chicken may dry out or lose its taste. Always check for any signs of spoilage before you eat. If it smells off or looks strange, it’s best to toss it. When reheating your leftovers, the best methods are the oven or the stovetop. Both options keep the chicken juicy and the zucchini tender. If you use the oven, set it to 350°F (175°C) and heat for about 15 minutes. Cover it with foil to keep it moist. For stovetop reheating, place the chicken and zucchini in a skillet over medium heat. Add a splash of water or chicken broth. This adds moisture and helps maintain flavor. Stir occasionally to ensure even heating. Enjoy your meal just as you made it with the Full Recipe! What Can I Serve with Easy Chicken Breast with Zucchini? You can serve this dish with many sides. Some great options are: - Quinoa or rice for a filling base. - A fresh salad for a crisp bite. - Roasted potatoes for added texture. These sides work well with the flavors in the chicken and zucchini. They create a balanced meal that is healthy and satisfying. Can I Use Frozen Chicken Breasts? Yes, you can use frozen chicken breasts. Just remember to thaw them before cooking. It’s best to thaw in the fridge overnight. This helps keep the meat juicy. If you need to cook it straight from frozen, you may need to increase the baking time. Always check that the chicken reaches 165°F (74°C) inside. How Long Should I Bake Chicken Breasts? Bake chicken breasts for 20-25 minutes at 400°F (200°C). This time is great for keeping the chicken juicy. Always check the internal temperature to ensure it’s safe to eat. What Are the Best Sides to Pair with Zucchini? Zucchini pairs well with many sides. Here are a few to try: - Couscous for a light and fluffy option. - Steamed green beans for crunch. - Garlic bread for a tasty treat. These options enhance the meal and add more flavor to your plate. For the full recipe, check out the Zesty Lemon Herb Chicken with Zucchini. You now know how to make a tasty chicken dish with zucchini. We covered ingredients, cooking steps, and clever tips. Avoid overcooking and always marinate for the best flavor. Feel free to try variations or swap ingredients based on what you have. Proper storage keeps leftovers fresh. Remember, simple adjustments can change the whole meal. Enjoy your cooking journey and impress your friends and family with this easy recipe!
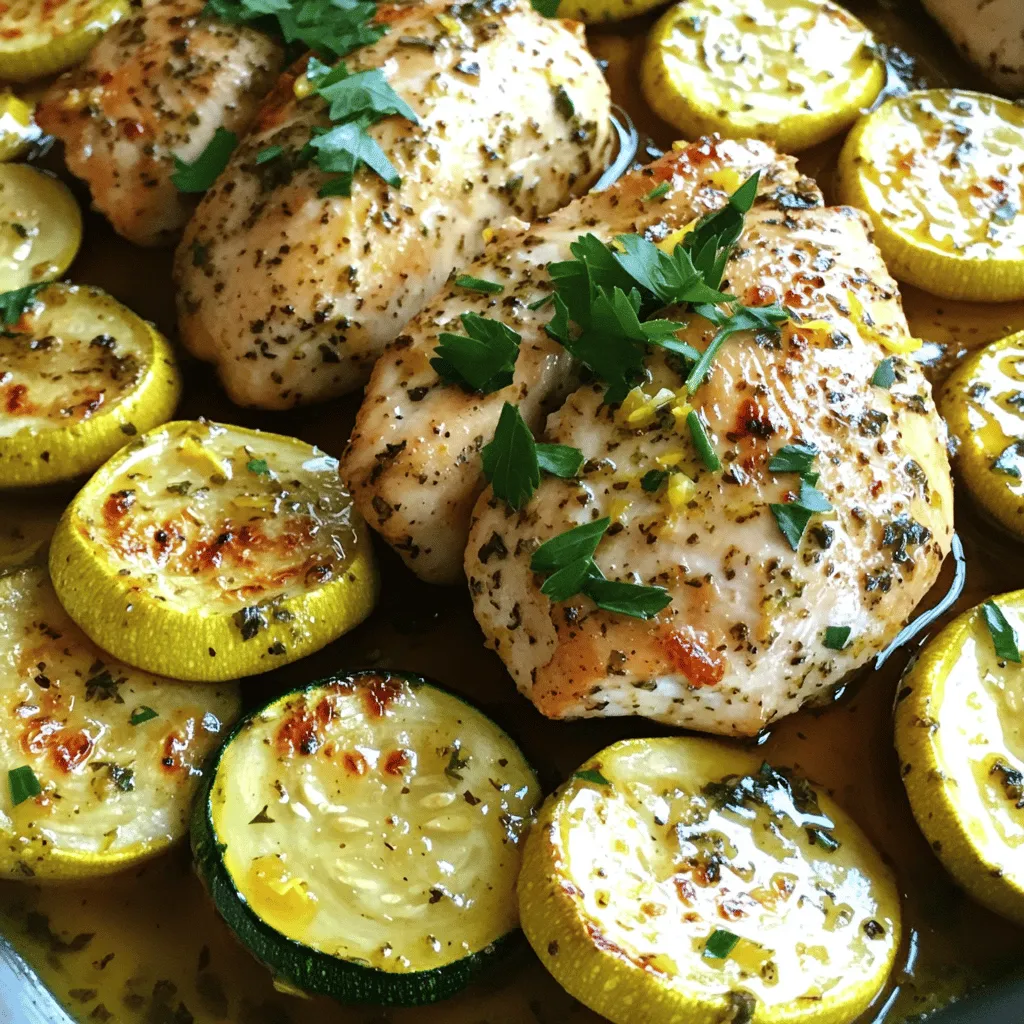
Easy Chicken Breast with Zucchini Healthy Dinner Option
Looking for a healthy dinner option that’s both easy and delicious? Let’s talk about easy chicken breast with zucchini. This dish not only tastes great
- 4 medium zucchinis, chopped - 1 medium onion, diced - 3 cloves garlic, minced - 4 cups vegetable broth The zucchinis give this soup its main flavor. Choose fresh, firm zucchinis for the best taste. The onion adds a sweet base. Garlic brings a rich aroma. The vegetable broth makes the soup hearty and warm. - 1 cup heavy cream (or coconut cream for a dairy-free option) - 1 cup freshly grated Parmesan cheese (or nutritional yeast for a vegan option) Heavy cream creates a rich, velvety texture. Coconut cream is a great dairy-free choice. Parmesan adds a savory punch. Nutritional yeast gives a cheesy flavor without dairy. - 2 tablespoons olive oil - 1 teaspoon dried thyme - Salt and pepper to taste - Fresh parsley for garnish Olive oil adds a nice, smooth taste. Thyme brings out the flavor of zucchini. Salt and pepper enhance all the tastes. Fresh parsley makes a beautiful garnish and adds color. For the full recipe, check out the Full Recipe section. First, heat two tablespoons of olive oil in a large pot over medium heat. Once hot, add one diced onion. Sauté the onion until it turns translucent, about five minutes. This step builds the soup's base flavor. Next, add three minced garlic cloves and one teaspoon of dried thyme. Stir for another minute. This releases the garlic's aroma and the thyme's earthiness. Now, stir in four chopped zucchinis. Cook them for about five to seven minutes until they soften. This helps make the soup creamy later. After that, pour in four cups of vegetable broth. Bring the mixture to a boil and then lower the heat to a simmer. Cook for about fifteen minutes. The zucchini should be very tender by now. Once the zucchini is tender, it’s time to blend. Use an immersion blender or a regular blender. If you use a regular blender, work in batches. Puree until the soup is smooth. After blending, stir in one cup of heavy cream and one cup of freshly grated Parmesan cheese. Mix well until the cheese melts and the soup is creamy. Season with salt and pepper to taste. Heat the soup through for a few minutes. Then, it’s ready to serve! For the full recipe, check the previous section. For a smooth soup, choose the right blender. An immersion blender is great for quick blending right in the pot. It saves time and reduces mess. If you use a regular blender, be careful. Blend in small batches and return the soup to the pot slowly. This helps prevent lumps. To avoid lumps, ensure the zucchini is fully cooked before blending. Soft zucchini blends easily, creating a creamy finish. To make your soup pop, add extra spices or herbs. A pinch of nutmeg gives warmth. Fresh basil or dill can add bright notes. If you want a kick, try a dash of red pepper flakes. For toppings, consider croutons for crunch or a drizzle of olive oil for richness. A sprinkle of fresh parsley on top adds a splash of color and freshness. You can prepare this soup in advance. Just follow the recipe, cool it, and store it in the fridge. It stays fresh for about three days. When ready to eat, reheat on the stove over low heat. Stir often to warm it evenly. If it thickens too much, add a splash of broth or water. This keeps it creamy and delicious. For the best taste, enjoy within a few days. For the full recipe, check back to ensure you have all steps covered. {{image_2}} To make a vegan version of this creamy Parmesan zucchini soup, you can swap out the heavy cream and cheese. Use coconut cream instead of heavy cream; it gives a rich flavor. For cheese, substitute nutritional yeast for the Parmesan. This adds a cheesy taste without dairy. You can also use any unsweetened plant-based milk, like almond or soy milk, to keep the soup creamy. If you want to add protein, try lentils or beans. They blend well with the soup's flavors. Cook lentils in the broth for about 10 minutes before blending. If you prefer chicken, add cooked, shredded chicken to the soup after blending. Always adjust cooking times to ensure proteins are fully cooked and tender. Incorporating seasonal vegetables can give your soup a fun twist. In spring, add fresh peas for a sweet touch. In the fall, use roasted butternut squash for a warm flavor. You can adjust herbs and spices based on the seasons, too. For example, use fresh basil in summer and sage in winter. This keeps the soup exciting all year round. Check out the Full Recipe for more tips and ideas! To store your Creamy Parmesan Zucchini Soup, let it cool first. Place it in an airtight container. This keeps the soup fresh. In the fridge, it lasts for about 3 to 4 days. Always check for any changes in smell or color before eating. You can freeze the soup for later use. First, let it cool completely. Then, pour it into a freezer-safe container. Leave some space at the top for expansion. The soup can stay good for about 2 to 3 months. When ready to eat, thaw it in the fridge overnight. Reheat it on the stove over low heat. Stir well to make it creamy again. For storing soup, glass containers work best. They seal tightly and do not absorb smells. You can also use BPA-free plastic containers. Make sure to label each container. Write the date on the label. This helps you keep track of how long it’s been stored. To make this soup dairy-free, you can swap heavy cream with coconut cream. This gives you a rich texture without dairy. For cheese, use nutritional yeast. It adds a cheesy flavor while being vegan. Both options still keep the soup creamy and delicious. Yes, you can use frozen zucchini. However, it may change the soup's flavor and texture. Frozen zucchini tends to be softer and can release more water. This means your soup might be a bit thinner. If you use frozen, cook it longer to bring out the flavors. This soup pairs well with crisp salads or crusty bread. A simple green salad adds freshness. You can also serve it with garlic bread for a cozy meal. Another great option is a side of roasted vegetables. These sides balance the creamy soup perfectly. The soup is ready when the zucchini is tender. You can check this by piercing it with a fork. If it goes in easily, your soup is done. After blending, heat it until warm. This ensures all flavors meld together before serving. This blog post shows you how to make a creamy Parmesan zucchini soup. We covered the key ingredients, tips, and ways to customize the recipe. In the end, you can adapt this soup to fit your taste. Experiment with flavors and add proteins when you like. Enjoy your cooking and share the soup with friends. You’ll love the fresh taste and warm feel it brings!
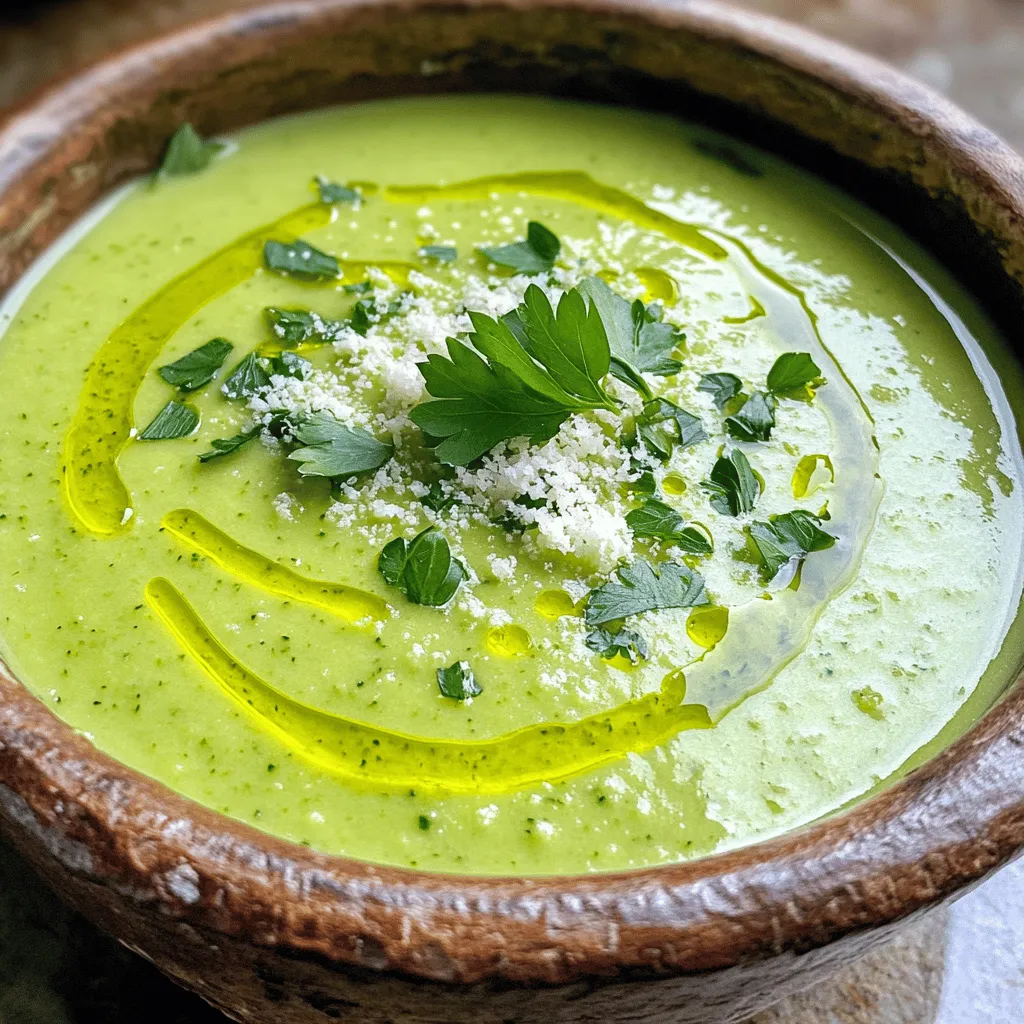
Creamy Parmesan Zucchini Soup Flavorful Comfort Meal
Looking for a warm bowl of comfort? This Creamy Parmesan Zucchini Soup is just the ticket! Packed with fresh zucchini, rich cream, and savory Parmesan,
To make crispy sesame chicken, gather these simple ingredients: - 1 lb (450g) chicken breast, cut into bite-sized pieces - 1 cup buttermilk - 1 cup all-purpose flour - 1/2 cup cornstarch - 1 teaspoon baking powder - 1 teaspoon garlic powder - 1 teaspoon ginger powder - Salt and pepper, to taste - Oil for frying (preferably vegetable or canola) These main ingredients create the base for a juicy chicken with a crunchy coating. For the sweet and sticky honey sauce, you will need: - 1/4 cup honey - 2 tablespoons low-sodium soy sauce - 1 tablespoon rice vinegar - 1 tablespoon sesame oil This sauce adds a delightful flavor that pairs perfectly with the chicken. To elevate your dish, consider these garnishes: - 2 tablespoons toasted sesame seeds - 2 green onions, finely sliced These garnishes not only add flavor but also make the dish look beautiful. {{ingredient_image_2}} First, gather your chicken breast. Cut it into bite-sized pieces. Place the pieces in a medium bowl. Pour in 1 cup of buttermilk, making sure all the chicken is covered. Cover the bowl with plastic wrap. Refrigerate for at least 30 minutes. You can let it sit for up to 2 hours. This step keeps the chicken tender and juicy. While the chicken marinates, you can prepare the coating. In a large mixing bowl, add 1 cup of all-purpose flour. Then, add 1/2 cup of cornstarch, 1 teaspoon of baking powder, and 1 teaspoon of garlic powder. Next, add 1 teaspoon of ginger powder, salt, and pepper to taste. Whisk the dry ingredients well until they are evenly mixed. This mixture will give your chicken that crispy texture we love. Now, it’s time to fry the chicken. Heat oil in a deep skillet or wok to about 350°F (175°C). Pour in enough oil to make it about 2 inches deep. Once hot, take the marinated chicken out of the fridge. Let any extra buttermilk drip off. Dredge each piece in the flour mixture, pressing lightly for an even coat. Carefully place the coated chicken in the hot oil. Fry in batches for 4-5 minutes until golden brown and crispy. Use a slotted spoon to transfer the chicken to a plate lined with paper towels. This helps drain excess oil and leaves you with perfectly crispy chicken. To get the best crispiness, start with marinating the chicken in buttermilk. This step adds moisture and flavor. It also tenderizes the meat. After marinating, coat the chicken well in the flour mixture. Make sure to press the coating onto the chicken. This helps it stick better while frying. Fry at a steady temperature of 350°F (175°C) for even cooking. If the oil is too hot, the outside burns before the inside cooks. If it’s too cool, the chicken absorbs oil and gets soggy. I recommend frying in small batches. This keeps the oil hot and the chicken crispy. You can also try using a deep fryer if you have one. It maintains a steady temperature. Another option is to bake the chicken after coating it. Spray the coated pieces with cooking oil and bake at 400°F (200°C) for about 20-25 minutes. This method is healthier and still gives a nice crunch. Serve the crispy sesame chicken on a large platter for a nice presentation. Drizzle extra honey sauce on top for added flavor. Garnish with toasted sesame seeds and sliced green onions. This not only adds taste but also color. Pair it with steamed rice or stir-fried vegetables for a complete meal. You can also offer some extra sauce on the side for dipping. This makes it fun for everyone to enjoy! Pro Tips Marinate for Maximum Flavor: Allowing the chicken to marinate in buttermilk for at least 30 minutes not only tenderizes the meat but also infuses it with flavor, making every bite deliciously juicy. Double Fry for Extra Crispiness: For an even crispier texture, consider frying the chicken twice. After the first fry, let it rest for a few minutes, then fry again until golden brown. Control Oil Temperature: Use a thermometer to ensure the oil is at the right temperature (350°F or 175°C) before frying. This prevents the chicken from absorbing too much oil and becoming greasy. Customize the Sauce: Feel free to tweak the honey sauce by adding spices like chili flakes for heat or citrus zest for brightness. This allows you to create a flavor profile that suits your taste. {{image_4}} You can change the honey sauce to suit your taste. Try using teriyaki sauce for a sweet and salty twist. If you want some heat, mix in sriracha or chili paste. For a tangy flavor, use orange juice or pineapple juice instead of honey. Each sauce will give your crispy chicken a unique taste. If you prefer, use chicken thighs instead of breasts. Thighs are juicier and add more flavor. You can also use shrimp or tofu for a different protein. Both options work great with the same coating and sauce. Just adjust cooking times accordingly. To make this dish healthier, consider baking the chicken instead of frying. Coat the chicken with the same mixture, then bake at 400°F (200°C) for about 20 minutes. You can also use whole wheat flour instead of all-purpose flour. For a lighter sauce, mix honey with a bit of water or use a sugar substitute. These changes keep the flavor while reducing calories. Once you finish your crispy sesame chicken, let it cool. Place leftovers in an airtight container. This keeps the chicken fresh for about 3 days in the fridge. If you want to keep it longer, freezing is a good option. To reheat, preheat your oven to 375°F (190°C). Place the chicken on a baking sheet. Bake for about 10-15 minutes. This method helps restore the crispiness. If you're in a hurry, you can use a microwave, but the chicken may lose some crunch. To freeze the chicken, ensure it’s completely cooled. Use a freezer-safe container or bag. Label it with the date. You can freeze it for up to 2 months. When ready to eat, thaw it in the fridge overnight before reheating. This keeps it flavorful and safe. Yes, you can use chicken thighs. Thighs are juicier and more flavorful. They stay tender when cooked. If you prefer dark meat, thighs are a great choice. Just cut them into bite-sized pieces like the breasts. If you don't have buttermilk, you can make a simple substitute. Mix one cup of milk with one tablespoon of vinegar or lemon juice. Let it sit for five minutes. This mix will give you a similar tangy flavor. You can also use plain yogurt or sour cream, thinned with a bit of milk. Yes, you can make this dish gluten-free easily. Use gluten-free flour instead of all-purpose flour. You can also swap cornstarch for a gluten-free blend. Just be sure to check labels on all sauces. This way, you can enjoy crispy sesame chicken without worry. Crispy sesame chicken is easy to make with the right ingredients and steps. You learned how to marinate chicken, prepare a tasty honey sauce, and achieve that perfect crispiness. Tips on cooking and serving can help you elevate this dish. Don't forget the fun variations and proper storage. You can enjoy this meal today and later! I hope you feel ready to try it yourself.
Crispy Sesame Chicken with Honey Sauce Delight
Get ready to impress your family with my Crispy Sesame Chicken with Honey Sauce! This dish features juicy chicken, a crunchy coating, and a sweet-tangy
Let's talk about what you need to make this tasty Pesto Zucchini Orzo. This dish is simple, fresh, and packed with flavor. Here’s what you will gather: - 1 cup orzo pasta - 2 medium zucchinis, diced - 1 cup cherry tomatoes, halved - 1/4 cup fresh basil pesto - 1/4 cup Parmesan cheese, grated - 2 tablespoons olive oil - 2 cloves garlic, minced - Salt and pepper to taste - 1/4 cup pine nuts, toasted (for garnish) Each ingredient plays a role in making this meal special. The orzo pasta serves as a great base. Zucchini adds a nice crunch and a healthy touch. Cherry tomatoes bring sweetness and color. The basil pesto ties it all together with a burst of flavor. Olive oil and garlic make the veggies shine, while Parmesan cheese adds creaminess. Don't forget the toasted pine nuts for a lovely finish. You can find the Full Recipe for step-by-step details to create this wonderful dish! To start, bring a large pot of salted water to a boil. This step is key for flavor. Once boiling, add 1 cup of orzo pasta. Cook it according to the package instructions, which usually take about 8 to 10 minutes. You want the orzo to be al dente, so keep an eye on the time. Al dente means it should be firm to the bite. After cooking, drain the orzo and set it aside for later. Next, heat 2 tablespoons of olive oil in a large skillet over medium heat. Once the oil is hot, add 2 minced cloves of garlic. Sauté for about 1 minute until the garlic smells great. Then, toss in 2 diced zucchinis. Cook them for 4 to 5 minutes. You want them tender but still a little crisp. After that, add 1 cup of halved cherry tomatoes. Cook for another 2 to 3 minutes. This will soften the tomatoes just right. Now it's time to mix everything together. Reduce the heat to low and add the cooked orzo to your skillet of veggies. Stir well to combine. Then, pour in 1/4 cup of fresh basil pesto. Toss everything together until the orzo is well coated. Lastly, add salt and pepper to taste. For a cheesy finish, stir in 1/4 cup of grated Parmesan cheese. Serve this dish warm, topped with toasted pine nuts for extra crunch. For the full recipe, check out the detailed cooking instructions shared earlier. Enjoy your meal! To prevent overcooking zucchini, cut it into even pieces. This helps it cook evenly. Cook zucchini just until it is tender and still bright green. This usually takes about 4-5 minutes. Keep an eye on it. For cooking orzo, start by bringing water to a boil. Add salt for flavor. Cook orzo according to the package, usually 8-10 minutes. Drain it and set aside. This keeps the orzo al dente, which adds a nice bite to your dish. For extra flavor, try adding red pepper flakes or a squeeze of lemon. Fresh herbs like parsley or thyme also work well. These spices and herbs can brighten the dish. Using homemade pesto can make a big difference in taste. It will be fresher and richer. Store-bought pesto is fine, but check the label for quality. Look for one with real ingredients and no fillers. Serve Pesto Zucchini Orzo in a shallow bowl. This lets the colors pop. Top it with toasted pine nuts for a nice crunch. You can also add more grated cheese on top. Use a large serving platter for family-style dining. This makes it easy for everyone to help themselves. Pair it with a side salad for a balanced meal. The fresh greens will complement the dish well. You can find the full recipe for Pesto Zucchini Orzo [here](#). {{image_2}} For those who need gluten-free options, try using rice or quinoa instead of orzo. These grains offer a similar texture and taste. If you prefer a vegan dish, you can skip the cheese. Use nutritional yeast for a cheesy flavor without dairy. Adding protein boosts the meal. Grilled chicken or shrimp pairs well with this dish. Just cook the protein in the skillet before adding the veggies. You can also mix in leafy greens like spinach or kale. They add nutrition and a vibrant color to your plate. You can switch up the vegetables based on the season. In summer, add bell peppers or corn. In fall, consider using butternut squash or broccoli. For the pesto, try different herbs. Swap basil for arugula or cilantro for a fresh twist. Each change brings new flavors to the dish. For more details, you can check the [Full Recipe]. To keep your Pesto Zucchini Orzo fresh, store it in an airtight container. This helps prevent air from spoiling your dish. Make sure the orzo cools completely before sealing it up. In the fridge, it stays good for about three to four days. This dish tastes great even after a day or two. When reheating, I recommend using a skillet. Heat it on medium and add a splash of olive oil. This method keeps the orzo and veggies from becoming mushy. You can also add a bit of water or broth to help with moisture. For a fun twist, toss in some extra cherry tomatoes or spinach when you serve it again. It adds color and flavor! Yes, you can freeze Pesto Zucchini Orzo! First, let it cool completely. Then, pack it in a freezer-safe bag or container. Try to remove as much air as possible to avoid freezer burn. When you are ready to eat, thaw it overnight in the fridge. Reheat in a skillet with a bit of oil for the best texture. This way, you can enjoy a quick meal anytime! If you don’t have orzo, you can use other small pasta shapes. Good options include: - Arborio rice: This rice gives a creamy texture. - Quinoa: A healthy grain with a nutty flavor. - Small shells: These shells hold sauce well. - Rice: Use long-grain or jasmine rice for a different twist. Choosing any of these will keep your dish tasty and satisfying. Yes, you can use store-bought pesto. However, homemade pesto often tastes better. It offers fresh flavor and more control over ingredients. Store-bought options save time, but they may lack the bright taste of homemade. If you use store-bought, try to choose one with simple ingredients. This will help maintain the quality of your dish. Pesto Zucchini Orzo is a healthy meal choice. Here’s why: - Zucchini: Low in calories and rich in vitamins. - Orzo: Provides energy from carbohydrates. - Pesto: Contains healthy fats from olive oil and nuts. - Tomatoes: High in antioxidants and vitamins. This dish offers a balance of nutrients, making it a great option for a wholesome meal. To wrap up, we explored a delightful Pesto Zucchini Orzo dish. We covered key ingredients, step-by-step cooking instructions, and tips for the best flavors. You also learned how to store leftovers and sample variations to fit your taste. Whether you want a quick meal or a gourmet touch, this recipe adapts well. Enjoy experimenting with it and making it your own. Your kitchen adventures can start today with this simple and tasty dish.
Pesto Zucchini Orzo Flavorful and Fresh Dinner Option
Looking for a fresh and tasty dinner option? Try Pesto Zucchini Orzo! This dish combines soft orzo pasta, crunchy zucchini, and sweet cherry tomatoes, all