Dinner

To make healthy chicken wraps, you need these key ingredients: - 2 large whole wheat tortillas - 1 cup cooked chicken breast, shredded - 1 ripe avocado, mashed - 1 small cucumber, thinly sliced - 1/2 red bell pepper, julienned - 1/4 cup Greek yogurt These ingredients create a tasty base. The tortillas are soft and hold everything together. Chicken adds protein, while avocado gives healthy fats. Cucumber and red bell pepper add crunch and color. To elevate your chicken wraps, don’t forget these seasonings: - 1 tablespoon lime juice - 1 teaspoon garlic powder - 1 teaspoon paprika - Salt and pepper to taste These flavors bring life to your wraps. The lime juice adds zest. Garlic powder gives depth, and paprika adds a subtle warmth. Salt and pepper enhance everything, making your wrap delicious. Want to jazz up your wraps? Consider these add-ins: - Fresh cilantro leaves for garnish - Spinach or kale for extra greens - Diced tomatoes for added juiciness These options make your wraps unique. Fresh cilantro gives a burst of flavor. Greens add nutrition, while tomatoes bring freshness. You can mix and match these add-ins based on your taste and mood. For the complete recipe, check out the Full Recipe section. First, grab a medium bowl. Add the shredded chicken, Greek yogurt, lime juice, garlic powder, paprika, salt, and pepper. Mix it all together until the chicken is well-coated. This step is key to adding flavor to your wraps. You want the chicken to taste zesty and fresh. Now, lay one whole wheat tortilla flat on your counter. Spread half of the mashed avocado on it. This adds a creamy texture. On one side, place half of the chicken mixture. Next, add the sliced cucumber, julienned red bell pepper, and a few cilantro leaves for that fresh kick. To roll, start from the side with the filling. Tuck in the sides as you roll away from you. This keeps everything inside. Once rolled, slice the wrap in half diagonally. It looks great and is easy to eat. Serve these wraps right away or wrap them in parchment for lunch later. For the full recipe, check out the details above! Pick a tortilla that fits your taste and needs. Whole wheat tortillas add fiber. You can also try corn or spinach tortillas for a twist. Make sure they are soft and fresh. This helps them roll better and taste great. If you have leftover wraps, store them in the fridge. Wrap them in plastic wrap or foil to keep them fresh. They can stay good for up to three days. To reheat, use a skillet on low heat. This keeps the tortilla soft. You can also enjoy them cold for a quick snack. Make these wraps your own! If you're vegan, swap chicken for chickpeas or tofu. Use dairy-free yogurt instead of Greek yogurt. For low-carb options, try lettuce wraps instead of tortillas. This way, you can enjoy a meal that fits your diet. Feel free to add your favorite veggies or sauces to mix things up. {{image_2}} You can enjoy healthy chicken wraps even if you're gluten-free. Use gluten-free tortillas made from rice or corn. They taste great and hold the filling well. You can also use lettuce leaves as a wrap. This cuts carbs and adds a fresh crunch. If you want to cut carbs, try using low-carb tortillas. Many brands now make wraps with fewer carbs. You can also use cauliflower wraps. They add flavor and keep things light. These options make your wraps tasty and healthy. You can change the flavors in your wraps to keep them fun. For a spicy kick, add jalapeños or hot sauce. For a Mediterranean twist, use feta cheese, olives, and hummus. These flavors make your wraps exciting and unique. Try mixing and matching ingredients for endless options. For more ideas, check out the Full Recipe for Zesty Avocado Chicken Wraps. To keep your chicken wraps fresh, store them in the fridge. Wrap each one in plastic wrap or foil. This keeps moisture in and air out. They taste best when eaten within two days. If you have leftovers, be sure to check them for any signs of spoilage. If they smell off, it’s best to toss them. You can freeze chicken wraps, but it’s best to do it before adding fresh veggies. Wrap each one tightly in plastic wrap, then place them in a freezer bag. This helps prevent freezer burn. They can stay good for up to three months. When you are ready to eat, thaw them in the fridge overnight. Reheat your wraps in the microwave for about 30 seconds. This warms them up without making them soggy. You can also use a skillet. Heat it over medium heat and cook the wrap for about 2-3 minutes on each side. This gives it a nice crispness. Enjoy your tasty Zesty Avocado Chicken Wraps from the Full Recipe! To make chicken wraps healthier, start with whole wheat tortillas. They add fiber and nutrients. Use lean chicken breast and reduce sauces. Fresh veggies like spinach and tomatoes boost vitamins. You can also swap out cheese for avocado for healthy fats. Yes, you can make chicken wraps ahead of time. Prepare the filling and store it in the fridge. Assemble the wraps just before eating. This keeps the tortillas fresh and prevents them from getting soggy. If you don’t have Greek yogurt, try cottage cheese or sour cream. You can also use mashed avocado for a creamy texture. These options keep the wraps tasty while adding health benefits. Yes, these wraps are great for meal prep. You can make several wraps and store them in the fridge. Just wrap them in parchment paper to keep them fresh. They last up to three days, making them perfect for busy weeks. To keep wraps from getting soggy, add moisture last. Spread creamy ingredients like avocado or yogurt close to the center. Layer dry ingredients, like veggies, first. Wrap tightly to reduce air exposure, and store in a cool place. For the full recipe, check out the Zesty Avocado Chicken Wraps. In this post, I covered how to make healthy chicken wraps. We discussed the key ingredients and flavors that make wraps yummy. You learned easy steps to prepare, assemble, and serve your wraps. I shared tips for choosing tortillas and storing leftovers. We explored variations for gluten-free and low-carb options. Finally, I answered common questions about making wraps healthier and meal prepping. With these insights, you can enjoy delicious, healthy wraps any time. Get creative and have fun with your wraps!
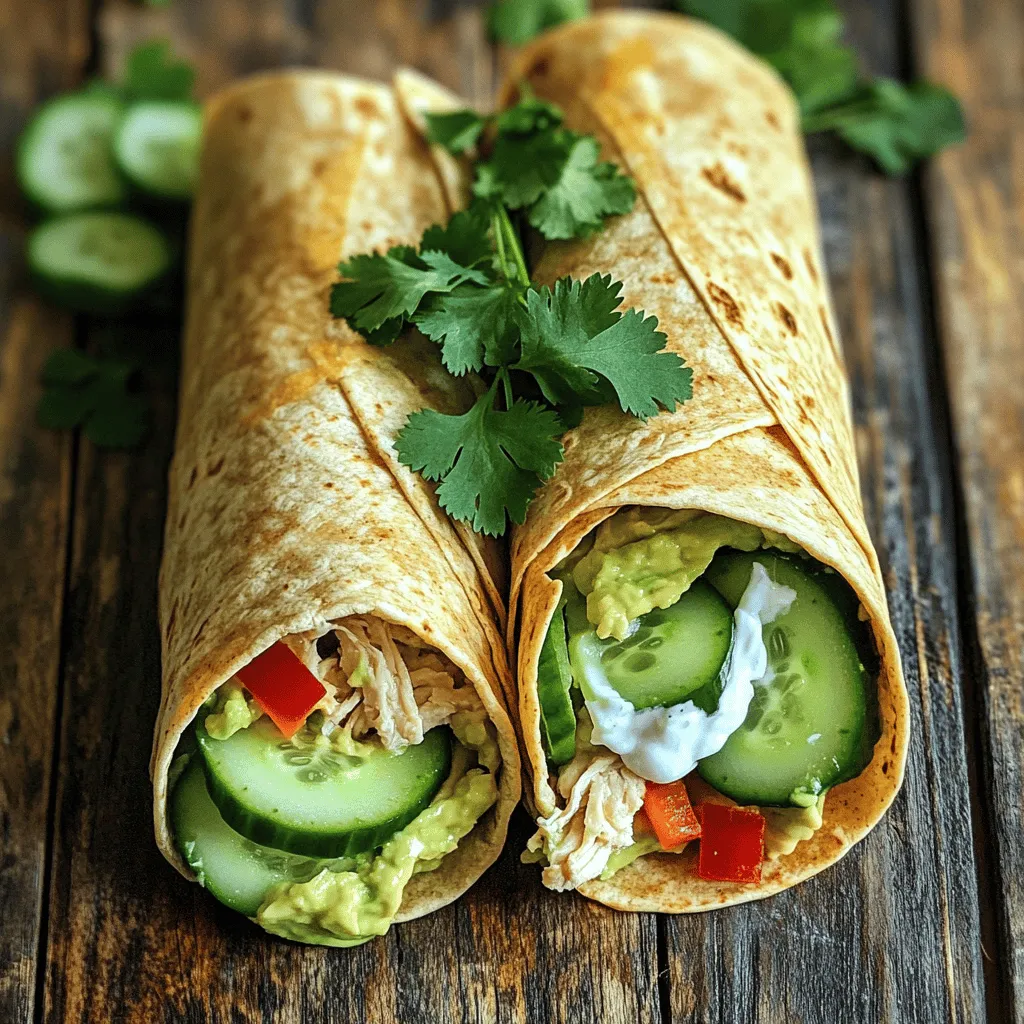
Healthy Chicken Wraps Easy to Make and Enjoy
Looking for a tasty way to enjoy chicken? These Healthy Chicken Wraps are simple to make and great for any meal. Packed with nutrients and
- 4 large russet potatoes - 1 medium onion - 3 cloves garlic - 4 cups vegetable broth The main ingredients are the heart of this soup. Russet potatoes work best for their creamy texture. Dice the potatoes into even cubes for even cooking. The onion adds sweetness, while garlic brings depth. The vegetable broth serves as a flavorful base, making each bite rich and savory. - 1 cup heavy cream - 1 cup sharp cheddar cheese - ½ cup sour cream Dairy ingredients create that luxurious creaminess. Heavy cream makes the soup silky and rich. Sharp cheddar cheese adds a kick of flavor that blends well. Sour cream gives a tangy finish, balancing the richness perfectly. - 1 teaspoon smoked paprika - 1 teaspoon dried thyme - ¼ cup green onions - Salt and pepper Seasonings elevate the soup's flavor. Smoked paprika adds warmth and depth, while dried thyme introduces an earthy note. Don’t forget salt and pepper; they enhance all the flavors. Green onions on top add a fresh, crunchy garnish that brightens the dish. {{ingredient_image_2}} Start by heating a splash of olive oil in a large pot over medium heat. Once the oil shines, add the finely diced onion. Sauté the onion for about 5 minutes until it softens and turns clear. Then, add the minced garlic and cook for one more minute. Stir it well to release its lovely aroma. Next, toss in the cubed russet potatoes. Pour in the vegetable broth and bring the mix to a strong boil. Once it boils, lower the heat and cover the pot. Let it simmer for 15 to 20 minutes until the potatoes are tender and easy to pierce with a fork. After the potatoes are cooked, it’s time to blend. Use an immersion blender to puree the soup. Blend until it’s smooth and creamy. If you prefer some texture, blend just half of it. This keeps some potato chunks, which adds heartiness to the dish. Once blended, stir in the heavy cream, grated sharp cheddar cheese, and sour cream. Add the smoked paprika, dried thyme, salt, and freshly ground black pepper. Heat the soup gently for about 5 minutes. This allows the cheese to melt and flavors to mix. Finally, fold in the crumbled turkey bacon. Taste the soup and adjust the seasoning if needed. Ladle the creamy soup into bowls. For a nice touch, sprinkle chopped green onions on top and add a bit more cheese if you like. Enjoy your warm, comforting loaded potato soup! To make your soup creamy, choose the right blending method. I like to use an immersion blender. It gives a smooth texture without transferring hot soup to a blender. Blend until you see a velvety finish. If you prefer some chunks, blend only half the soup. You can adjust the creaminess by adding more heavy cream. Start with one cup, then taste. Add more if you want it richer. Balancing flavors is key to a great soup. Use smoked paprika and dried thyme to add depth. Start with one teaspoon of each. Taste your soup after adding these spices. If it needs more kick, add salt and pepper. Always taste as you go. This helps you find the perfect balance for your taste. How you serve your soup can make it even more appealing. Garnish with chopped green onions for color and crunch. Drizzle sour cream on top for a creamy finish. You can also add extra cheese for a rich touch. These small details make your soup look great and taste even better. Pro Tips Choose the Right Potatoes: For the best texture, use russet potatoes as they become fluffy and creamy when cooked. Season Gradually: Taste the soup as you go and adjust the seasoning in stages to achieve a well-balanced flavor. Texture Preference: If you prefer a chunkier soup, reserve some potato cubes before blending and add them back in after pureeing. Garnish Creatively: Elevate presentation by adding a swirl of sour cream and a sprinkle of fresh herbs or additional cheese on top before serving. {{image_4}} You can make this soup without meat. Use vegetable broth instead of chicken broth. Replace turkey bacon with a plant-based option. This keeps the soup tasty and hearty. For a vegan version, swap the heavy cream and sour cream with coconut milk or cashew cream. Nutritional yeast can add a cheesy flavor too. Want to boost flavor? Add fresh herbs like parsley or chives. They add a bright touch to the soup. You can also mix in different cheeses. Try gouda, mozzarella, or pepper jack for unique tastes. Each cheese brings a different creaminess and flavor profile. If you like heat, spice up your soup. You can add red pepper flakes or cayenne for extra kick. For a smoky flavor, use smoked paprika instead of regular paprika. This gives the soup warmth and depth. Adjust the spice to your taste for a comforting bowl. Loaded potato soup keeps well in the fridge for about 3 to 4 days. Store it in airtight containers to keep it fresh. Make sure the soup cools before sealing. This helps avoid extra moisture inside the container. You can also divide the soup into smaller portions for easy reheating. To freeze loaded potato soup, let it cool completely. Then, pour the soup into freezer-safe bags or containers. Make sure to leave space for expansion. The soup can last for up to 3 months in the freezer. When you're ready to eat, thaw it in the fridge overnight. For quicker thawing, place the bag in cold water. You can reheat the soup on the stove or in the microwave. For the stove, heat it gently over medium-low. Stir often to avoid sticking. In the microwave, use a microwave-safe bowl. Heat in short bursts, stirring in between. This helps keep the texture and flavor. If the soup thickens too much, add a splash of broth or cream. Yes, you can make Loaded Potato Soup ahead of time. This soup tastes even better the next day. To prep, follow these tips: - Cook the soup and cool it down. - Store it in an airtight container in the fridge for up to three days. - When ready to serve, reheat the soup on low heat. Stir often to keep it smooth. - You may need to add a splash of broth or cream for the best texture. Absolutely! You can use various potatoes for this soup. Here are some options: - Yukon Gold: Creamy and buttery taste. - Red Potatoes: Slightly sweet and hold their shape well. - Fingerling Potatoes: Unique shape and flavor, great for a twist. Each potato brings a different taste and texture to the soup. Experiment to find what you love best! Yes, Loaded Potato Soup can be gluten-free. Here’s what to check: - Vegetable broth: Ensure it is labeled gluten-free. - Cheese and sour cream: Most are gluten-free, but always check the labels. - Bacon: Most bacon is gluten-free, but some may have fillers. This soup can be safe for those with gluten allergies or sensitivities. Always read labels to be sure! You now have a clear recipe for making Loaded Potato Soup. We covered the main ingredients, steps, and customization options. I shared tips for making it creamy and flavorful while also offering ways to store it. Whether you want a classic version or a vegan twist, this soup can fit any need. Enjoy creating a warm bowl that brings comfort and joy to your table today.
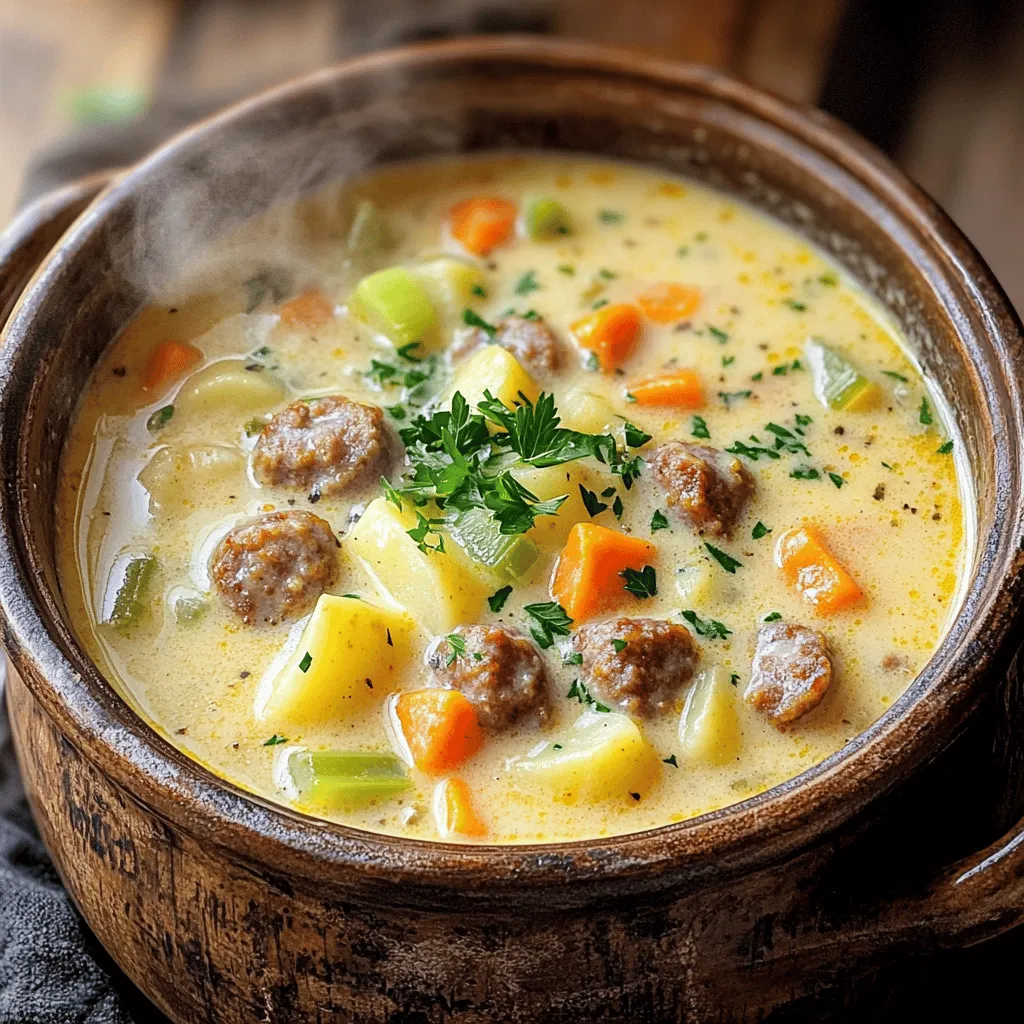
Loaded Potato Soup Comforting and Hearty Delight
If you’re craving a warm, hearty meal, look no further than loaded potato soup. This creamy delight combines simple ingredients to create a comforting bowl
- 2 cups fresh or frozen corn kernels - 1 cup heavy cream - 1/2 cup honey - 3 large eggs - 1 cup grated cheddar cheese - 1 cup crushed cornflakes - 1/4 cup unsalted butter, melted - 1 teaspoon baking powder - Salt and pepper to taste - Optional: Fresh chives for garnish When I create Honey-Glazed Corn Casserole, I focus on using fresh and simple ingredients. The corn gives the dish a sweet and crunchy bite. Heavy cream adds richness, while honey brings a delightful sweetness. The eggs bind everything together, making it fluffy and light. For cheese lovers, I use grated cheddar, which melts beautifully. Cornflakes add a nice crunch on top. The melted butter enriches the flavors, and baking powder helps it rise. Seasoning with salt and pepper is key, so taste as you go! - Alternatives for heavy cream: You can use coconut cream or cashew cream for a lighter option. - Cheese substitutions: If you want a different taste, try mozzarella or pepper jack cheese. - Gluten-free options for cornflakes: Use gluten-free breadcrumbs or crushed nuts for a similar texture. These substitutions allow you to customize the recipe. Each swap can change the flavor and texture. Don’t hesitate to experiment with what you have at home. For the full recipe, check the details above. To start, preheat your oven to 350°F (175°C). This step is key for the perfect bake. While the oven heats, prepare your baking dish. Grease a 9-inch dish with butter or cooking spray. This prevents the casserole from sticking and helps it cook evenly. In a large mixing bowl, combine the corn kernels, heavy cream, honey, and eggs. Whisk them together until smooth. This step blends the flavors well. Next, stir in the grated cheddar cheese, melted butter, baking powder, and add salt and pepper to your taste. Mix again until everything is nicely combined. Finally, gently fold in the crushed cornflakes. This adds crunch to the casserole. Once your mixture is ready, pour it into the greased baking dish. Spread it evenly for uniform cooking. Place the dish in your preheated oven. Bake for 35-40 minutes. You’ll know it’s done when the top is golden brown. A toothpick inserted in the center should come out clean. After baking, let it rest for about 5 minutes. This helps the casserole firm up before serving. For a burst of color, sprinkle fresh chives on top just before plating. Enjoy your honey-glazed corn casserole! If you want the full recipe, check the previous section. To get the ideal crispness in your Honey-Glazed Corn Casserole, bake it for 35 to 40 minutes. This time lets the top brown nicely while keeping the inside moist. For an extra crunch, fold in the crushed cornflakes gently. This way, they stay light and airy, giving your casserole that lovely texture. Seasoning is key to a tasty dish. Use salt and pepper to enhance the flavors. Don’t be shy with the honey! Adding a bit more can deepen the sweet notes. You can also mix in a pinch of cinnamon for a unique twist that pairs well with the honey. To make your casserole shine, garnish it with fresh chives. Their green color adds a nice contrast. You can serve this dish at family dinners or potlucks. Pair it with grilled meats or a fresh salad for a balanced meal. For a festive touch, consider serving it in a colorful dish. Check the [Full Recipe] for more details on making this dish. {{image_2}} You can easily change the recipe to suit your taste. Adding vegetables is a great way to boost nutrition. Try mixing in diced bell peppers, zucchini, or spinach. These veggies add color and vitamins. You can also swap honey for different sweeteners. Maple syrup or agave nectar works well. Each sweetener gives a unique flavor to the dish. If you follow a vegan diet, you can adapt this recipe. Use plant-based cream instead of heavy cream. Replace eggs with flaxseed meal or applesauce. These swaps keep the texture creamy and delicious. For a low-carb version, consider using cauliflower rice instead of corn. This change cuts down on carbs while keeping a similar taste. Adding spices can give your casserole a global twist. Try using cumin or coriander for a Middle Eastern flair. You could add smoked paprika for a hint of Spanish flavor. Another option is to mix in Italian herbs like basil or oregano. These spices will change the way the dish tastes. You can also explore international-style variations. For instance, a Mexican version might include jalapeños and queso fresco. The possibilities are endless! For the full recipe details, check out the references above. To keep your honey-glazed corn casserole fresh, let it cool first. Cover the casserole tightly with plastic wrap or aluminum foil. This helps keep it moist. Store it in the fridge if you plan to eat it in a few days. Use an airtight container for longer storage. Recommended containers include glass or BPA-free plastic. These options prevent any unpleasant smells from mixing with your casserole. They also keep the dish safe from spills. When reheating, you want to preserve its taste and texture. The microwave is quick but may dry it out. To avoid this, cover the dish with a damp paper towel. Heat it in short bursts of 30 seconds, checking often. If you use the oven, preheat it to 350°F (175°C). Place the casserole in an oven-safe dish. Add a splash of cream or water to keep it moist. Reheat for about 20 minutes, or until it's warm throughout. Freezing your corn casserole is easy. Start by cooling it completely. Cut it into portions for easier thawing. Wrap each portion tightly in plastic wrap. Then, place them in a freezer-safe bag. Label your bags with the date. This way, you know how long they have been in the freezer. The casserole can last up to three months. To thaw, move it to the fridge overnight. Reheat as mentioned above when you're ready to enjoy it again. You can prepare the casserole a day ahead. Mix the ingredients and pour them into your baking dish. Cover it tightly with plastic wrap and store it in the fridge. When ready to bake, remove the wrap and bake as usual. This method helps the flavors blend. Yes, you can easily double the recipe. Just double each ingredient and use a larger baking dish. Ensure you adjust the baking time. Check for doneness with a toothpick to ensure it cooks through. This dish pairs well with grilled meats, like chicken or steak. You can also serve it alongside fresh salads or roasted vegetables. It makes a great side for holiday meals or family gatherings. The casserole lasts about three to four days in the fridge. Make sure to store it in an airtight container. Reheat it thoroughly before serving to enjoy its full flavor. Yes, you can use canned corn. Drain it well and rinse under cold water. This step helps reduce excess salt and preserves the dish's flavor. Using canned corn makes the recipe even quicker to prepare. For the full recipe, refer to the earlier section. This blog post covers every step to make a delicious Honey-Glazed Corn Casserole. You learned about key ingredients and possible substitutions, along with clear instructions for preparation and cooking. I shared tips for achieving the best texture and flavor. You even found ideas for variations that suit different diets and tastes. Enjoy the easy storage and reheating methods for leftovers. This dish is perfect for any occasion. Try it out, and make it your own!
Honey-Glazed Corn Casserole Easy and Flavorful Dish
Looking for a dish that combines ease with deliciousness? You’ve found it! My Honey-Glazed Corn Casserole is the perfect blend of sweet and savory flavors.
To make Creamy Sausage and Potato Chowder, you need a few key items. Here is the list: - 1 pound smoked sausage, sliced - 4 medium potatoes, peeled and diced - 1 cup carrots, diced - 1 cup celery, chopped - 1 onion, finely chopped - 4 cups chicken broth - 1 cup heavy cream - 1 teaspoon garlic powder - 1 teaspoon dried thyme - Salt and pepper to taste - 2 tablespoons olive oil - Fresh parsley, chopped (for garnish) These ingredients create a rich and hearty base for your chowder. The smoked sausage adds a great depth of flavor. The potatoes give it a nice, creamy texture. You can add extra ingredients to boost the taste of your chowder. Consider these options: - 1 cup corn, fresh or frozen - 1 bell pepper, chopped - 1 teaspoon paprika for a smoky kick - 1 cup spinach or kale for a healthy touch - A dash of hot sauce for some heat These ingredients can take your chowder to the next level. They add color and different flavors, making it even more enjoyable. Choosing fresh ingredients makes a big difference. Here are some tips: - Sausage: Look for high-quality smoked sausage. Check the expiration date and choose a brand you trust. - Potatoes: Choose firm potatoes without any blemishes or sprouts. Russet or Yukon Gold work best. - Vegetables: Pick bright and crisp carrots, celery, and onions. Avoid any that look wilted or soft. - Herbs: Fresh parsley should be vibrant and aromatic. If using dried herbs, check the expiration date for freshness. Using the best ingredients helps your chowder taste amazing. Freshness can elevate any dish, so take your time when shopping. For the full recipe, check out the overall process that brings these ingredients together. To start, heat two tablespoons of olive oil in a large pot over medium heat. Add one pound of sliced smoked sausage. Cook it for about 5 to 7 minutes until it turns brown. Then, remove the sausage and set it aside. In the same pot, add one finely chopped onion, one cup of diced carrots, and one cup of chopped celery. Sauté these veggies for about 5 minutes until they start to soften. Next, add four peeled and diced potatoes to the pot. Stir them well with the other ingredients. Now, pour in four cups of chicken broth and season with one teaspoon of garlic powder, one teaspoon of dried thyme, salt, and pepper to taste. Bring this mixture to a boil. Once it boils, reduce the heat and let it simmer for 15 to 20 minutes until the potatoes are tender. Finally, stir in the cooked sausage and one cup of heavy cream. Let the chowder simmer gently for another 5 to 10 minutes, stirring occasionally. Adjust the seasoning if needed, and serve hot, garnished with fresh parsley. - Ensure the sausage is well-browned. This adds a nice flavor. - Do not rush the sautéing of vegetables. It helps them develop sweetness. - When adding potatoes, make sure they are evenly diced. This ensures even cooking. - Use low heat to simmer the chowder. This keeps it creamy without boiling. - Taste the chowder before serving to adjust seasoning if necessary. - Avoid using too high heat while cooking the sausage. It might burn instead of brown. - Do not skip the sautéing step. This adds depth to your chowder. - Be careful not to overcook the potatoes. They should be tender but not mushy. - Do not add the cream too early. It should be added at the end to keep it rich. - Avoid thickening the chowder too much. It should remain creamy and easy to ladle. You can find the full recipe for this delightful chowder above. Enjoy crafting your perfect Creamy Sausage and Potato Chowder! To make your chowder creamy, use heavy cream. This adds thickness and richness. Start by browning the sausage. This step brings out deep flavors. When you sauté the onions, carrots, and celery, cook them until soft. This adds sweetness to the chowder. Stir in the cream after the potatoes cook. This keeps the cream from curdling. Allow the chowder to simmer gently for a few minutes. This helps meld the flavors together. Add fresh herbs for bright flavors. Parsley is a great choice for garnish. You can also try thyme or chives. If you love spice, add crushed red pepper. This brings warmth without overpowering the dish. Consider adding a splash of lemon juice. This adds a nice zing to the chowder. A sprinkle of smoked paprika can enhance the smoky sausage taste. Serve your chowder with crusty bread. A warm baguette or sourdough works well. You can also pair it with a simple salad. A light green salad will balance the meal. For a heartier option, serve it with grilled cheese. This combination is always a crowd-pleaser. If you want a light drink, try iced tea or lemonade. These drinks refresh and complement the chowder. You can find the full recipe and detailed instructions to make this dish delightful. Enjoy your cooking! {{image_2}} You can make this chowder lighter without losing flavor. Try using turkey sausage instead of smoked sausage. This cut will reduce fat and calories. You can also substitute heavy cream with low-fat milk or coconut milk. This change keeps the chowder creamy while cutting back on calories. For gluten-free options, ensure your broth is gluten-free. You can replace regular chicken broth with homemade or store-bought gluten-free broth. For a dairy-free version, use unsweetened almond milk instead of cream. This swap will still give you a nice base. Want to change up the flavor? Add spices like smoked paprika or cayenne for a kick. You could also toss in some fresh herbs like basil or dill to brighten the dish. For a sweet touch, mix in some corn or peas. Each variation creates a new experience while keeping the chowder delicious. For the complete recipe, check out the Full Recipe. Store your leftover chowder in an airtight container. Make sure it cools down first. Place it in the fridge. It will stay fresh for up to three days. If you want to keep it longer, freezing is a great option. To freeze chowder, use freezer-safe containers. Leave some space at the top for expansion. Seal the containers well to prevent freezer burn. Your chowder can last up to three months in the freezer. When ready to eat, thaw it overnight in the fridge. Reheat your chowder on the stove for best flavor. Use low heat and stir often. You can also use the microwave for quick reheating. Add a splash of broth or cream if it seems thick. This helps bring back its creamy texture. Enjoy your chowder warm and delicious again! For the full recipe, check the above section. Creamy Sausage and Potato Chowder lasts about 3 to 4 days in the fridge. Store it in an airtight container. This keeps it fresh and safe to eat. Make sure to let it cool before sealing. If you see any signs of spoilage, toss it out. Yes, you can make this chowder in advance. It actually tastes better after a day. The flavors blend well when it sits. Just store it in the fridge after it cools. Reheat it gently on the stove when you’re ready to eat. Absolutely! You can use any sausage you like. Try spicy sausage for a kick. Chicken or turkey sausage works well too. Just remember to adjust the cooking time if needed. Each type gives a unique flavor to the chowder. For more details, check out the Full Recipe. This blog post covered all you need for creamy sausage and potato chowder. We discussed essential and optional ingredients to bring out flavor. I shared step-by-step cooking tips, so you avoid common mistakes. You learned about cooking techniques for a creamy texture and ways to enhance taste. We also talked about storage tips to keep your chowder fresh. With these insights, you can make a delicious chowder that suits your taste. Enjoy creating a warm, satisfying dish!
Creamy Sausage and Potato Chowder Delightful Meal
Craving a cozy meal that warms your soul? Discover the delight of Creamy Sausage and Potato Chowder! This easy recipe combines savory sausage, tender potatoes,
- 2 cans (14.5 oz each) diced tomatoes - 2 tablespoons olive oil - 4 cloves garlic, minced - 1 teaspoon dried basil - 1 teaspoon dried oregano - ½ teaspoon sugar - Salt and pepper to taste - Fresh basil leaves for garnish - Additional spices or herbs - Vegetables to enhance flavor - Medium-sized pot - Wooden spoon or spatula This recipe for Easiest Canned Tomatoes brings quick flavor to your meals. The ingredients are simple and easy to find. You can use canned tomatoes to save time. They are good for quick weeknight dinners or tasty sauces. I like to add garlic to give the dish a rich taste. Dried basil and oregano add great herbal notes. Sugar helps balance the acidity of the tomatoes. You can adjust salt and pepper to your liking. For a twist, try adding red pepper flakes for heat or bell peppers for texture. Fresh herbs like parsley or thyme can give a bright finish. You can use a medium-sized pot and a wooden spoon to cook this dish. With these ingredients and tools, you're ready to make a delicious meal! Don't forget to check out the Full Recipe for step-by-step guidance. - First, heat 2 tablespoons of olive oil in a medium-sized pot over medium heat. - Next, add 4 cloves of minced garlic and sauté until it smells good, about 1 minute. Be careful not to brown the garlic. - Pour in 2 cans of diced tomatoes with their juice. Stir well. - Then, mix in 1 teaspoon of dried basil, 1 teaspoon of dried oregano, and ½ teaspoon of sugar. Season with salt and pepper to taste. - Bring the mixture to a gentle simmer. You will see small bubbles forming. - Lower the heat to keep it simmering gently. Cook uncovered for 15-20 minutes. Stir it occasionally. This lets the sauce thicken nicely. - Taste the sauce and adjust the seasonings if needed. You may want to add more salt, pepper, or herbs. - Finally, serve it hot. Garnish with fresh basil leaves for a nice touch. For the full recipe, check out the Easiest Canned Tomatoes Delight . To boost the taste of your canned tomatoes, fresh herbs shine. They add brightness and depth. Use fresh basil or parsley for a vibrant lift. If you opt for dried herbs, remember they are stronger. Use less than fresh. A good ratio is one teaspoon of dried herbs for every tablespoon of fresh. Balancing acidity is crucial. Canned tomatoes can be quite tart. A simple trick is adding sugar. Just a half teaspoon can help mellow the sharpness. Taste as you go, and adjust until you find that perfect balance. Garlic brings a lot of flavor but can burn easily. To prevent this, always sauté on low heat. Stir it often and watch for that sweet aroma. If garlic burns, it turns bitter and ruins your dish. Simmering is key for flavor development. Once you add your tomatoes, let them cook slowly. This allows the flavors to mix and meld. Simmer for at least 15 minutes. The sauce will thicken and taste richer. This sauce pairs well with many dishes. Serve it over pasta for a quick meal. You can also use it as a base for pizza or lasagna. Try it in a ratatouille or as a topping for grilled chicken. Get creative! Use this sauce in a shakshuka dish. Just add eggs and cook until they are set. You can also blend it into soups for a rich, tomato flavor. The options are endless! For the full recipe, check out the Easiest Canned Tomatoes Delight. {{image_2}} You can swap canned tomatoes for fresh ones. Use ripe tomatoes for the best taste. Peel and chop them before adding to your pot. This gives a fresh flavor to your dish. For those who follow a vegan or vegetarian diet, this recipe is easy to adapt. Simply skip any meat or animal products. You can add more veggies or plant-based proteins. Chickpeas or lentils work great in this dish. To make your dish spicier, add red pepper flakes. Start with a pinch and taste as you go. This small change can really make a big difference. Adding protein is another way to change the flavor. Ground meat or beans can add heartiness. Cook the protein first, then set it aside. Mix it in with the tomatoes later for a filling meal. If you love Italian food, try adding some Italian herbs. Oregano and basil are classic choices. They enhance the dish's taste and make it feel authentic. You can also incorporate Mediterranean flavors. Add olives, capers, or feta cheese. These will give your dish a fresh and bright taste. It's a fun way to explore new flavors while using the same base recipe. For more ideas, check out the Full Recipe for Easiest Canned Tomatoes Delight. To cool your sauce, let it sit at room temperature for about 30 minutes. This helps prevent steam buildup. Once cooled, transfer it to airtight containers. These containers keep the sauce fresh and tasty. I like glass jars or BPA-free plastic. Make sure to leave some space at the top. This allows for expansion if you freeze it later. Freezing is a great way to save extra sauce. Pour the cooled sauce into freezer-safe containers. You can also use freezer bags for easy storage. Divide it into portions for quick meals. When you're ready to use it, take out a portion. Place it in the fridge overnight to thaw. This keeps the flavor and texture just right. To reheat the sauce, use a pot on the stove. Heat it over low heat, stirring often. This method keeps the flavor intact. If you must use a microwave, do so carefully. Place it in a microwave-safe bowl and cover it. Heat in short bursts, stirring in between. This avoids hot spots that can burn the sauce. Enjoy your meal! You can store this dish in the fridge for up to five days. Keep it in an airtight container. If you want to save it longer, freeze the sauce. It stays good in the freezer for up to three months. Just thaw it in the fridge before using. Yes, you can use fresh tomatoes! Fresh tomatoes can taste great, but they require more work. You need to peel, chop, and cook them longer. Canned tomatoes already have a soft texture, so they cook faster. If you want quick flavor, go for the canned option. Canned tomato sauce is very versatile. You can use it in many dishes, like: - Pasta sauce - Chili - Shakshuka - Pizza topping - Soup base You can also mix it with meats, veggies, or grains to create quick meals. The possibilities are endless! For more ideas, check out the Full Recipe. In this article, we explored how to make a simple and delicious tomato sauce. You learned about the key ingredients you'll need, plus some optional add-ins to suit your taste. We also talked about the right tools, steps for preparation, and tips for enhancing flavor. Finally, we covered ways to adjust the recipe and store leftovers for later. This sauce brings joy to many meals. Don't be afraid to experiment with different ingredients and flavors. Enjoy your cooking adventure!
Easiest Canned Tomatoes Recipe for Quick Flavor
Are you ready to elevate your meals with minimal effort? My Easiest Canned Tomatoes Recipe is your ticket to quick, delicious flavor. With just a
- 1 pound ground chicken - 1/2 cup breadcrumbs - 1/4 cup grated Parmesan cheese The main components of these meatballs come together quickly. Ground chicken is the star here. It gives a soft and juicy bite. I like to use ground chicken for its light flavor. Breadcrumbs help hold the meatballs together. They also add a nice texture. Parmesan cheese gives a rich, savory kick. This cheese melts into the meatballs, making them even tastier. - 1/4 cup fresh parsley, chopped - 1 large egg Fresh ingredients make this dish special. Parsley adds color and a fresh taste. It brightens up each meatball. Plus, it brings a bit of health to your meal. The egg is a key ingredient. It binds the mixture and helps it stay together. Without it, your meatballs might fall apart. This simple mix makes for a tasty meal. You can find the full recipe online to follow step by step. First, preheat your oven to 400°F (200°C). Line a baking sheet with parchment paper. This step helps the meatballs brown nicely and makes cleanup easy. Next, grab a large mixing bowl. Combine the ground chicken, breadcrumbs, grated Parmesan, chopped parsley, and the egg. Mix these ingredients with your hands. Be gentle and do not overmix. This keeps the meatballs tender and juicy. Now, it’s time to shape the meatballs. Take a small amount of the mixture and roll it into a ball about 1 inch in diameter. Make sure they are uniform in size for even cooking. Place each meatball on the prepared baking sheet. Once you finish shaping, bake the meatballs in the preheated oven. Cook them for 20 to 25 minutes. Check for doneness by cutting one open. The meat should no longer be pink inside. Once they are golden brown and fully cooked, remove them from the oven. Let them cool slightly before serving. Enjoy these simple and tasty meatballs! For the full recipe, check out the details in the earlier sections. To make the best chicken meatballs, keep a few key tips in mind. First, when you mix the ingredients, use your hands gently. Overmixing can make the meatballs tough. You want them soft and tender. Just mix until the ingredients are combined, and then stop. Next, oven temperature is key. Preheat your oven to 400°F (200°C) for the best results. This heat helps the meatballs brown nicely. Bake them for 20 to 25 minutes. Check for doneness by cutting one in half. The inside should be white and no longer pink. These meatballs shine on their own but can pair well with different sauces. Try serving them with marinara or a zesty dipping sauce. You can also toss them in a light lemon sauce for a fresh flavor. For sides, serve with a simple salad or steamed veggies. They also go great with pasta or rice. You can even make meatball subs with crusty bread for a fun twist. Feel free to explore these ideas to find your favorite way to enjoy them! For the full recipe, check out the details above. {{image_2}} You can change the taste of your chicken meatballs easily. Adding spices or herbs can make them unique. Try mixing in garlic powder or onion powder for depth. Fresh herbs like basil or thyme can give a fresh kick. If you want heat, add some red pepper flakes. Cheese is another fun option. Instead of Parmesan, use feta or mozzarella. Feta adds a salty touch, while mozzarella gives a creamy texture. Experiment with flavors to find your favorite mix. If you need a gluten-free option, switch the breadcrumbs. Use crushed rice crackers or almond flour. These work well and keep the meatballs moist. For those on low-carb diets, skip the breadcrumbs altogether. You can use grated zucchini instead. It adds moisture without extra carbs. This simple change keeps your meal light and healthy. To store leftover chicken meatballs, place them in an airtight container. Make sure they cool down first. This helps keep them fresh. I recommend storing them for up to three days in the fridge. After that, the taste may fade. You can freeze both cooked and uncooked chicken meatballs. For cooked meatballs, let them cool, then place them in a freezer bag. Squeeze out the air before sealing. For uncooked meatballs, shape them first and freeze them on a tray. After they freeze, transfer them to a bag. To thaw, take them out of the freezer and place them in the fridge overnight. You can also use a microwave for quick thawing. When reheating, make sure they reach an internal temperature of 165°F (74°C). This keeps them safe and tasty. For the full recipe, check out the details above. Can I use turkey instead of chicken for these meatballs? Yes, you can use ground turkey. It works well and gives a similar taste. Just remember that turkey may be a bit drier than chicken. You can add a bit more egg or some oil to keep them moist. How do I know when the meatballs are done cooking? Check the meatballs for a golden brown color. Also, use a meat thermometer. The center should reach 165°F (74°C) to ensure they are safe to eat. What to do if the meatballs are too dry? If your meatballs turn out dry, try adding a splash of broth. You can also mix in a little more egg. This will help bring moisture back into the meatballs. How to prevent meatballs from sticking to the baking sheet? To prevent sticking, line your baking sheet with parchment paper. You can also lightly oil the paper. This will help your meatballs slide off easily after baking. In this post, we covered how to make tasty chicken meatballs. We discussed the key ingredients, like ground chicken and fresh herbs. Then, I shared simple steps for mixing, shaping, and baking your meatballs. Plus, I offered tips and variations for different diets. Lastly, I explained storage tips for leftovers. Remember, these meatballs can be a fun dish for any meal. With a few tweaks, you can make them your own. Happy cooking!
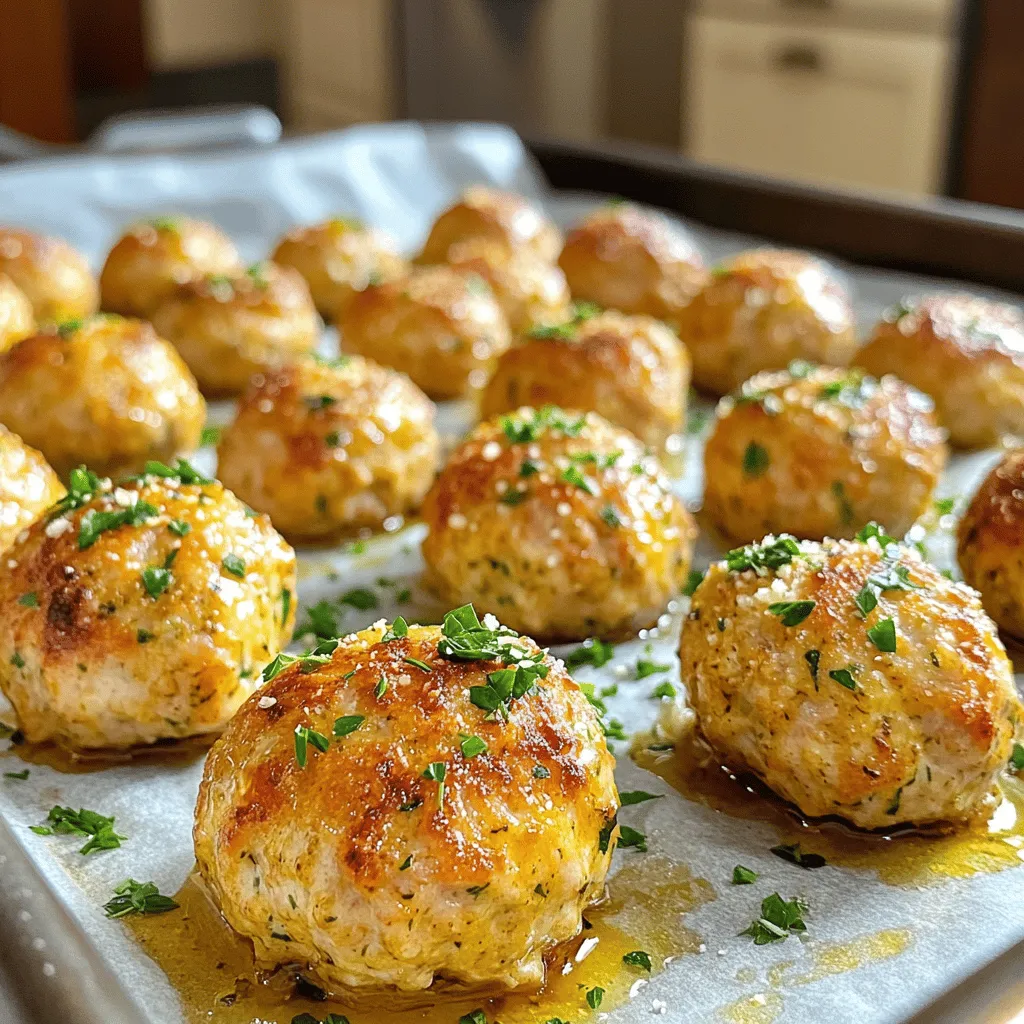
5-Ingredient Chicken Meatballs Simple and Tasty Meal
Looking for an easy, tasty dinner? Try these 5-ingredient chicken meatballs! With just ground chicken, breadcrumbs, Parmesan, parsley, and an egg, you’ll have a quick
To make honey roasted sweet potatoes, you need the right ingredients. These will create a delicious and simple dish. Here’s what you’ll need: - 4 medium sweet potatoes, peeled and cut into 1-inch cubes - 3 tablespoons honey - 2 tablespoons olive oil - 1 teaspoon cinnamon - ½ teaspoon nutmeg - Salt and pepper to taste - 2 tablespoons chopped fresh rosemary (or 1 tablespoon dried) - Optional: ¼ cup chopped pecans or walnuts for crunch - Optional: Feta cheese crumbles for garnish Each ingredient adds flavor and texture. Sweet potatoes are full of vitamins and minerals. Honey gives a nice sweetness that balances the spices. Olive oil helps the sweet potatoes roast well. Cinnamon and nutmeg add warmth and depth. Rosemary brings a fresh herbal note. You can add nuts for a nice crunch, too. Feta cheese is great if you want a creamy touch. These ingredients work together to create a dish everyone will enjoy. To see the full recipe, check the section above. - Preheat your oven to 425°F (220°C) and line a baking sheet with parchment paper. - In a large bowl, mix the honey, olive oil, cinnamon, nutmeg, and a pinch of salt and pepper. - Add the sweet potato cubes to the bowl and toss them in the honey mixture until they are well coated. - Spread the sweet potatoes evenly on the lined baking sheet. - Sprinkle chopped rosemary over the sweet potatoes. If you like, add chopped pecans or walnuts for extra crunch. - Roast in the oven for about 25-30 minutes. Turn the sweet potatoes halfway through to ensure they cook evenly. This method gives you tender and flavorful honey roasted sweet potatoes, perfect for any meal. You can find the full recipe [here](#). When picking sweet potatoes, look for ones that are firm and smooth. Avoid any with soft spots or blemishes. Size matters too. Medium sweet potatoes are best for even cooking. They should fit nicely in your hands. You can find both organic and conventional options. Organic sweet potatoes may cost more but often taste sweeter. Choose what fits your budget and values. For even cooking, cut your sweet potatoes into uniform 1-inch cubes. This helps them roast at the same rate. Spread them out on the baking sheet. Leave space between the pieces to allow steam to escape. To achieve that lovely caramelization, roast them at a high temperature, like 425°F (220°C). Don't forget to turn them halfway through cooking. This ensures all sides get golden and crispy. You can easily switch up the flavors in this dish. Try adding spices like paprika or cayenne for some heat. A sprinkle of garlic powder can bring a savory twist. If you like it sweeter, drizzle in more honey or maple syrup. You can also add a splash of orange juice for a fruity boost. Customize it to fit your taste! For the full recipe, don't forget to check it out. {{image_2}} You can change the sweetener in this dish. If you want a different taste, try maple syrup instead of honey. Maple syrup adds a rich flavor that works well with sweet potatoes. If you prefer a vegan option, use agave nectar. Agave gives a sweet touch without using honey. Both choices are easy and tasty. To make your honey roasted sweet potatoes even better, think about adding herbs. Fresh thyme or sage can bring a new vibe to the dish. You can also add citrus zest, like lemon or orange. This extra step gives a bright flavor that balances the sweetness. Honey roasted sweet potatoes pair well with many proteins. Try them with grilled chicken or salmon for a complete meal. They also work great in salads. Mix them with greens, nuts, and a light dressing for a fresh and filling dish. If you want the full recipe for honey roasted sweet potatoes, check out the complete guide! To keep your honey roasted sweet potatoes fresh, store them in the fridge. Place them in an airtight container. This will help keep them from drying out. They will last about 3 to 5 days in the fridge. If you want to save them longer, freezing is a great option. - Freezing Options: - Let the sweet potatoes cool completely. - Spread them out on a baking sheet and freeze for 2 hours. - Once frozen, transfer them to a freezer-safe bag. - Label the bag with the date. They can last up to 3 months in the freezer. Reheating honey roasted sweet potatoes can be easy. You want to keep them moist and flavorful. Here are some ways to reheat them without drying out. - Methods for Reheating: - Oven: Preheat your oven to 350°F (175°C). Spread the sweet potatoes on a baking sheet. Cover with foil to lock in moisture. Heat for about 10-15 minutes. - Microwave: Place sweet potatoes in a microwave-safe bowl. Add a splash of water. Cover and heat in 30-second intervals until warmed through. - Suggestions for Using Leftovers: - Toss them in a salad with greens and feta for a tasty meal. - Mix them with eggs for a breakfast hash. - Add them to grain bowls with your favorite toppings. This way, you can enjoy this simple dish in different ways throughout the week. Yes, you can use other types of potatoes. Yukon gold and purple potatoes are great options. They have different flavors and textures. Yukon gold has a creamy taste, while purple potatoes are nutty and earthy. Both can work well with honey and spices. Just cut them into 1-inch cubes like sweet potatoes. Roasting times might vary, so keep an eye on them. Honey roasted sweet potatoes are indeed healthy. They offer many nutrients. Sweet potatoes are high in fiber and vitamins like A and C. One medium sweet potato has about 100 calories. The honey adds natural sweetness, but keep in mind it adds calories too. Overall, this dish is a nutritious choice for any meal. Honey roasted sweet potatoes can last 3 to 5 days in the fridge. Store them in an airtight container. Make sure they cool completely before putting them in the fridge. If you want to keep them longer, you can freeze them. They can last up to 3 months in the freezer. Just remember to reheat them well when you eat them later. Yes, you can prepare honey roasted sweet potatoes ahead of time. You can cut the sweet potatoes and mix the honey mixture in advance. Just keep them in the fridge until you are ready to cook. You can also cook them and store them in the fridge. When it’s time to eat, reheat them in the oven for best results. It’s a great way to save time on busy days. For the full recipe, check out the detailed instructions. You now have a clear guide for making delicious honey roasted sweet potatoes. We covered ingredients, step-by-step instructions, and tips for selecting and storing sweet potatoes. Consider trying different sweeteners or flavor additions for a unique twist. These roasted sweet potatoes make a great side or snack. Enjoy experimenting and savoring this tasty, healthy dish!
Honey Roasted Sweet Potatoes Flavorful and Simple Dish
Are you ready to enjoy a dish that’s both tasty and easy to make? Honey roasted sweet potatoes are simple to prepare and packed with
- 2 cups cooked chicken, shredded - 1 cup cooked rice (brown or white) - 1 can black beans, drained and rinsed - 1 cup corn (frozen or canned, drained) - 1 can diced tomatoes with green chilies, undrained - 1 cup salsa (your favorite kind) - 1 teaspoon ground cumin - 1 teaspoon chili powder - 1 teaspoon garlic powder - 1 cup shredded cheddar cheese - 1 cup shredded Monterey Jack cheese - 4 large flour tortillas - 1/4 cup fresh cilantro, chopped (for garnish) - Sour cream (for serving, optional) Gathering these ingredients is the first step to a tasty chicken burrito casserole. You can use leftover chicken for this dish. It saves time and adds great flavor. I love using brown rice for a nutty taste, but white rice works too. Canned black beans are easy and quick. Just rinse them well to remove extra salt. For corn, I often go with frozen because it keeps a nice crunch. Diced tomatoes with green chilies add a great kick. Choose salsa that matches your taste. I usually pick a medium spice level. Spices are key for flavor. Ground cumin gives warmth. Chili powder adds depth. Garlic powder rounds out the taste. I like mixing two types of cheese for a creamy finish. Flour tortillas serve as the base. They hold everything together and get nice and soft. Finally, fresh cilantro adds a pop of color and taste. Sour cream on top is a delightful extra! {{ingredient_image_2}} - Preheat your oven to 350°F (175°C). - Grab a 9x13 inch baking dish. Layer two large flour tortillas to cover the bottom. - In a large bowl, mix together 2 cups of shredded chicken, 1 cup of cooked rice, and 1 can of drained black beans. - Add in 1 cup of corn, 1 can of diced tomatoes with green chilies, and 1 cup of salsa. - Sprinkle in 1 teaspoon each of ground cumin, chili powder, and garlic powder. Stir until everything is well mixed. - Spread half of the chicken mixture over the tortillas in the dish. - Top with half of the shredded cheddar and Monterey Jack cheeses. - Place another two tortillas on top. Pour the rest of the chicken mixture over these tortillas. - Add the remaining cheeses on top to cover it all. - Cover the dish tightly with aluminum foil. Bake this in the oven for 25 minutes. - After that, take off the foil. Bake for another 15 minutes until the cheese is bubbly and golden. - Let it cool for 5 minutes before serving. Garnish with fresh cilantro and serve with sour cream if you'd like. - Best chicken options: Use cooked, shredded chicken for the best flavor. You can use rotisserie chicken for a quick option. This adds great taste and saves time. - Rice varieties: Choose between brown or white rice. Brown rice adds more fiber, while white rice gives a softer texture. Either works well in this dish. - Salsa selection: Pick your favorite salsa for a personal touch. You can use mild, medium, or spicy salsa. The right salsa can really enhance the flavor. - How to prevent sticking: Lightly spray your baking dish with cooking oil. This keeps the casserole from sticking. You can also use parchment paper for easy cleanup. - Ensuring a bubbly cheese layer: For a perfect cheesy top, uncover the dish during the last baking step. This lets the cheese melt and bubble nicely. Keep an eye on it to avoid burning. - Ideal side dishes: Serve with a fresh salad or tortilla chips. This adds crunch and freshness to your meal. Guacamole or a bean salad also pairs well. - Perfect garnishes: Top your casserole with fresh cilantro and a dollop of sour cream. This adds color and creamy flavor. You can also sprinkle some avocado for extra richness. Pro Tips Use Rotisserie Chicken: For added flavor and convenience, consider using store-bought rotisserie chicken instead of cooking your own. It saves time and enhances the dish's taste. Customize Your Beans: Feel free to swap black beans for pinto or kidney beans based on your preference. Each type offers a unique flavor and texture. Layering for Flavor: Layering the ingredients helps meld the flavors together as they bake. Ensure to spread the mixture evenly for the best results. Make Ahead: Prepare the casserole a day in advance and store it in the refrigerator. Just bake it when you're ready for a quick and satisfying meal. {{image_4}} You can switch up proteins in this dish. Instead of chicken, try ground beef or turkey. You can also use shredded pork or even tofu for a tasty twist. Each option will add its own flavor. For beans, black beans work great, but you can also use pinto beans or kidney beans. These swaps will change the taste and texture of your casserole. Experiment and find what you like best! Adding spices can take your casserole to the next level. Try smoked paprika for a rich, warm flavor. You might also add a dash of cayenne pepper for some heat. A pinch of oregano can add a nice touch, too. Extra toppings can make your casserole even better. Consider adding sliced jalapeños for spice or avocado for creaminess. You can also sprinkle some extra cheese on top before baking for a gooey finish. If you need gluten-free options, use corn tortillas instead of flour. They hold up well and taste great in this dish. Make sure to check that your salsa and other ingredients are gluten-free, too. For vegetarian variations, simply leave out the chicken. You can add more beans or some cooked lentils for protein. This way, you can still enjoy a hearty meal without meat. To keep your Chicken Burrito Casserole fresh, store it in the fridge. Use an airtight container. It will stay good for about 3 to 4 days. For longer storage, freeze the casserole. Cut it into portions for easy thawing. Wrap each piece tightly in plastic wrap, then place them in a freezer-safe bag. This method helps prevent freezer burn. When it's time to eat, you can reheat your casserole in several ways. The oven works best for even heating. Preheat your oven to 350°F (175°C) and place the casserole in a baking dish. Cover it with foil to keep it moist. Bake for 20-25 minutes or until it’s warm. You can also use the microwave. Heat individual portions for 1-2 minutes. Stir halfway to keep the texture nice. In the fridge, your Chicken Burrito Casserole lasts about 3 to 4 days. If you freeze it, it can last up to 3 months. Check for signs of spoilage. If it smells off or shows mold, toss it. Always trust your senses to ensure safety. Yes, you can use raw chicken. However, you need to cook it first. Start by boiling or grilling the chicken until it reaches 165°F (75°C). Once cooked, shred the chicken. This step is crucial for safety and flavor. The cooked chicken blends well with other ingredients in the casserole. Absolutely! You can prep this dish ahead of time. Mix all the filling ingredients in a bowl. Layer the tortillas and filling in the baking dish. Cover it tightly with plastic wrap or foil. Store it in the fridge for up to 24 hours. When ready to bake, just remove the cover and bake as directed. This casserole is tasty on its own, but sides enhance the meal. Consider serving it with a simple green salad. Guacamole adds creaminess and pairs well. You can also serve tortilla chips with salsa for crunch. For drinks, iced tea or a light beer complements the flavors nicely. This blog post covered a tasty dish made with chicken, rice, beans, and more. You learned the steps to mix, layer, and bake. Tips for selecting ingredients and serving ideas make it even better. Variations let you switch flavors and adjust for diets. Finally, I shared smart ways to store leftovers and reheat them. Now, you can make this dish your own, impressing family and friends with your new skills. Cooking should be fun, easy, and delicious. Enjoy your meal!
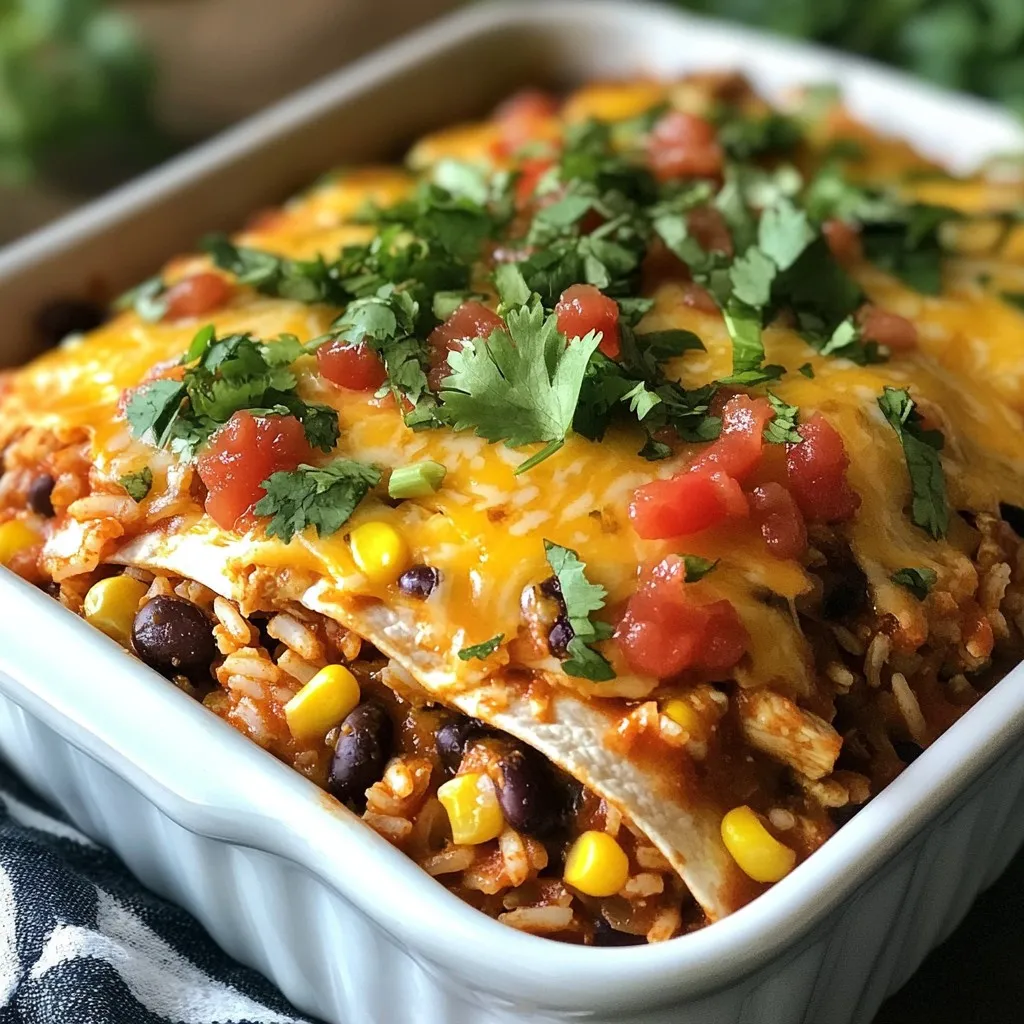
Chicken Burrito Casserole Flavorful Family Meal
Looking for a meal that pleases the whole family? Try my Chicken Burrito Casserole! It’s a simple, tasty dish that combines juicy chicken, seasoned rice,
- 1 cup cooked chicken, shredded - 1 cup pumpkin puree (canned or roasted) - 1 cup all-purpose flour - 1 teaspoon baking powder - 1/2 teaspoon salt - 1/4 teaspoon black pepper - 1/4 teaspoon ground ginger - 1/4 teaspoon garlic powder - 1/4 cup milk (or as needed) - Fresh parsley for garnish To make your chicken and pumpkin dumplings, start with the main ingredients. Shredded chicken adds protein and flavor. Pumpkin puree gives a sweet touch and a creamy texture. All-purpose flour binds everything together to form the dumpling dough. Next, we add seasonings to enhance the taste. Baking powder helps the dumplings rise and become fluffy. Salt and black pepper bring out the flavors. Ground ginger adds warmth, while garlic powder gives a savory kick. Don’t forget the milk! It helps create the right dough consistency. You may need to adjust the amount of milk based on how your dough feels. Lastly, fresh parsley makes for a lovely garnish and adds a pop of color. For the full recipe, check out the detailed instructions on how to prepare these delicious dumplings. Start by mixing the dry ingredients in a medium bowl. Combine 1 cup of all-purpose flour, 1 teaspoon of baking powder, 1/2 teaspoon of salt, 1/4 teaspoon of black pepper, 1/4 teaspoon of ground ginger, and 1/4 teaspoon of garlic powder. Stir them well until they blend completely. Next, in another bowl, combine 1 cup of shredded chicken and 1 cup of pumpkin puree. Mix these until they are fully incorporated. The pumpkin adds moisture and flavor. It also makes the dumplings light and fluffy. Now, gradually add the dry ingredients to the chicken and pumpkin mixture. Stir gently to combine everything. The mixture will start to thicken. Slowly pour in 1/4 cup of milk. Mix until the dough forms a soft, slightly sticky consistency. If the dough feels too dry, you can add a bit more milk. This step is key for texture. Bring a large pot of water to a gentle boil. Use a spoon to scoop out portions of the dumpling mixture. Roll them into balls about 1 inch in diameter. Carefully place the dumplings into the boiling water. Make sure not to overcrowd the pot. Cook the dumplings for about 6-8 minutes. They are done when they float to the top. This is a great sign they are cooked through. Using a slotted spoon, remove the dumplings and place them on a plate to drain excess water. Serve them hot, garnished with fresh chopped parsley. For the full recipe, check the earlier section. To make great dumpling dough, aim for a soft and slightly sticky texture. Start by mixing the dry ingredients well. Then, blend in the chicken and pumpkin. Gradually add milk. If the dough feels too sticky, sprinkle in a little flour. If it’s too dry, add more milk, a tablespoon at a time. This helps you find the perfect balance. When boiling dumplings, use a large pot with plenty of water. Bring the water to a gentle boil. Drop in the dumplings carefully to avoid splashing. Cook them for about 6 to 8 minutes. They are done when they float to the surface. Use a slotted spoon to lift them out. This keeps them intact and ready for serving. To serve chicken and pumpkin dumplings, think about color and texture. Place them in a bowl or on a plate. Add fresh herbs for a pop of green. Try serving them with a drizzle of soy sauce or a tangy yogurt sauce. Both pair nicely with the flavors of the dumplings. For more ideas, check out the [Full Recipe]. {{image_2}} You can switch the chicken for other proteins. Ground turkey or beef works well. For a twist, try diced shrimp or tofu. Each option adds its own flavor. You can also go meatless. Use mushrooms, sweet potatoes, or spinach for a veggie dumpling. These choices give you a colorful plate. They also make it fun to explore new tastes. Adding spices or herbs changes the taste. Try adding thyme, rosemary, or cumin. Each herb offers a new flavor journey. You can also add crushed red pepper for heat. When making the dough, mix in some cheese for richness. A little smoked paprika gives a nice depth. Feel free to experiment and find what you love most. Check the Full Recipe for more ideas. To store leftover dumplings, let them cool first. Place them in an airtight container. This keeps them fresh for up to three days. You can also wrap them tightly in plastic wrap. Make sure the seal is tight to avoid drying out. For reheating, use a pot of boiling water. Place the dumplings in for a few minutes. This method keeps them moist. You can also microwave them. Just add a splash of water and cover to steam. To freeze uncooked dumplings, first, prepare them as per the recipe. Line a baking sheet with parchment paper. Space the dumplings apart so they don’t stick. Freeze them for about an hour until firm. Then, transfer them to a freezer bag. They can last for up to three months. When you’re ready to cook frozen dumplings, don’t thaw them first. Just drop them into boiling water. Cook for about 8-10 minutes. They will float to the top when done. This method keeps them tasty and tender. Enjoy your dumplings straight from the freezer! Yes, you can use other meats. Turkey works well in this recipe. It has a similar texture and flavor. You can also try pork or beef. If you choose beef, make sure to cook it fully before mixing. Ground meat will blend easily with the pumpkin. For turkey or pork, shred it just like chicken. The cooking time for the dumplings stays the same. Dumplings are done when they float. This means they have cooked through. You should also touch one gently. It should feel soft but firm. The texture should not be gooey or sticky. If you notice any stickiness, they may need more time. After cooking, allow them to sit for a minute. This helps them firm up a bit more. These dumplings pair well with many side dishes. Try a fresh salad with greens and light dressing. A simple cucumber salad adds a nice crunch. You can also serve them with steamed vegetables. Carrots and broccoli work great here. A light broth or sauce complements the dumplings too. For a warm side, mashed potatoes are a tasty choice. They balance the dumpling's flavors nicely. Check out the Full Recipe for more ideas! In this post, we explored chicken and pumpkin dumplings from start to finish. You learned the key ingredients, the steps for making the dumplings, and some clever tips. Variations for different tastes showed how you can make this dish your own. Finally, we covered storage options to keep your dumplings fresh. Enjoy experimenting with this recipe. It’s a fun way to impress at meals!
Savory Chicken and Pumpkin Dumplings Easy Meal Guide
Looking for a cozy and easy meal? You’re in the right place! This Savory Chicken and Pumpkin Dumplings Easy Meal Guide shows you how to
To make these Brown Butter Sage Dinner Rolls, gather these ingredients: - 4 cups all-purpose flour - 1 packet (2 ¼ teaspoons) active dry yeast - 1 cup warm milk (about 110°F) - 1/4 cup brown sugar - 1/4 cup unsalted butter, plus 1/2 cup for browning - 1 teaspoon salt - 1/2 teaspoon freshly ground black pepper - 1/4 cup fresh sage leaves, finely chopped - 1 large egg - 1 tablespoon honey (optional, for brushing) You will need a few basic tools to help you make these rolls: - Mixing bowls - Small saucepan - Baking dish - Clean kitchen towel These ingredients and tools create the perfect base for warm, soft rolls. The combination of brown butter and sage gives them a unique flavor. If you're ready to get started, check out the Full Recipe. 1. Melt 1/2 cup of unsalted butter in a small saucepan over medium heat. 2. Stir the butter until it turns a deep golden brown. 3. Watch for a nutty aroma to fill the air. 4. Remove the saucepan from heat and let it cool slightly. 1. In a large mixing bowl, combine 1 cup of warm milk, 1/4 cup of brown sugar, and 1 packet of active dry yeast. 2. Allow it to sit for 5-10 minutes until it becomes frothy. 3. Mix in the prepared brown butter, 1/4 cup of finely chopped sage, 1 teaspoon of salt, 1/2 teaspoon of black pepper, and 1 egg. 4. Gradually add 4 cups of all-purpose flour until a soft dough forms. 1. Turn the dough out onto a lightly floured surface. 2. Knead the dough for 8-10 minutes until it feels smooth and elastic. 3. Place the dough in a greased bowl. 4. Cover it with a clean kitchen towel and let it rise in a warm place for about 1 hour or until it doubles in size. 1. Once the dough has risen, punch it down gently. 2. Turn it out onto the floured surface again. 3. Divide the dough into 12 equal pieces. 4. Shape each piece into a ball and arrange them in a greased baking dish. 1. Cover the rolls again and let them rise for another 30 minutes. 2. Preheat your oven to 375°F (190°C). 3. Brush the tops of the rolls with the reserved brown butter. 4. Bake for 20-25 minutes or until they turn golden brown. For the full recipe details, check the Full Recipe section. Enjoy your cooking! To make the best brown butter, control the heat. Use medium heat to avoid burning. Unsalted butter works best because you can add your own salt later. I prefer European-style butter for its rich flavor and higher fat content. Kneading is key to soft rolls. You know the dough is ready when it feels smooth and elastic. Avoid over-kneading, which can make rolls tough. If the dough sticks to your hands, add a little flour. For a flavor boost, consider adding herbs like rosemary or thyme. You can also mix in spices like garlic powder for extra depth. Try using bread flour instead of all-purpose flour for a chewier texture. These small changes can make a big difference in your rolls. {{image_2}} You can easily change up this recipe. Adding cheese can make your rolls extra tasty. Try mixing in shredded mozzarella or sharp cheddar for a cheesy twist. Garlic is another great addition. Mince a few cloves and blend them into the dough. This adds a warm, savory flavor that pairs well with the sage. You can also swap in different herbs. Rosemary or thyme work wonderfully. They provide a unique taste that makes your rolls special. If you need gluten-free rolls, use a gluten-free flour blend. Make sure it has xanthan gum for good texture. For a vegan version, replace the butter with coconut oil or a plant-based butter. You can use flaxseed meal mixed with water instead of the egg. This keeps the rolls moist and fluffy without any animal products. These rolls are perfect with soups or salads. They soak up broth and add a nice touch to any meal. For a fun twist, serve them with dipping sauces. A garlic herb oil or a rich balsamic glaze can elevate your dinner. You might also enjoy them with a creamy dip. The options are endless! For the complete recipe, refer to the [Full Recipe]. To keep your Brown Butter Sage Dinner Rolls fresh, store them in a bread box or a container. Make sure the rolls are cool before you seal them. If they are warm, they may get soggy. These rolls will stay fresh on the counter for about two days. If you want them to last longer, consider freezing. Freezing these rolls is easy and keeps them tasty. First, let the rolls cool completely. Then, wrap each roll in plastic wrap. Place them in a freezer bag or container. This helps prevent freezer burn. When you want to eat them, take them out and let them thaw at room temperature. You can also warm them in the oven at 350°F for about 10 minutes. This brings back their soft texture. These rolls taste best within the first few days. At room temperature, they stay fresh for about two days. In the freezer, they can last for up to three months. However, the flavors and textures are best within the first month. Enjoy the fresh taste while you can! For the full recipe, check out the Brown Butter Sage Dinner Rolls recipe above. Yes, you can prepare these rolls ahead of time. Here are some tips for prepping in advance: - Make the dough: You can mix the dough a day before. Let it rise, then punch it down. - Refrigerate: Cover the dough and place it in the fridge. This slows down the rising process. - Shape the rolls: Divide and shape the rolls. Place them in the baking dish. - Chill again: Cover and let them chill overnight. The next day, let them rise for 30 minutes at room temperature before baking. Several reasons could cause your dough to not rise: - Yeast issues: Make sure your yeast is fresh. Check the expiration date. - Temperature: The milk should be warm but not hot. Too much heat can kill the yeast. - Sugar levels: Sugar feeds the yeast. If you add too little, it may not rise well. - Kneading: Under-kneading can lead to dense dough. Knead until it’s smooth and elastic. Yes, you can use dried sage, but the flavor will be different: - Flavor: Dried sage has a stronger, more concentrated taste. Use less than you would of fresh. - Aroma: Fresh sage offers a bright, lively aroma. Dried sage lacks this freshness. - Substitution: Use about 1 teaspoon of dried sage for every tablespoon of fresh sage. This balance keeps the flavor pleasant. For the complete recipe, check out the Full Recipe section above. You learned how to make delicious Brown Butter Sage Dinner Rolls from scratch. We covered the key ingredients, step-by-step instructions, and helpful tips for success. Remember to control the butter temperature and knead well to get the best results. You can even customize these rolls with your favorite add-ins. Enjoy making and sharing them with family and friends. Each bite will surely impress!
Brown Butter Sage Dinner Rolls Savory and Soft Delight
Are you ready to elevate your dinner rolls to a whole new level? These Brown Butter Sage Dinner Rolls are savory, soft, and packed with