Desserts

- 2 cups chocolate cookie crumbs - 1/2 cup unsalted butter, melted - 1 cup granulated sugar - 4 (8 oz) packages cream cheese, softened - 1 cup sour cream - 1 teaspoon vanilla extract - 4 large eggs - 1 cup semi-sweet chocolate chips, melted - 1/4 cup cocoa powder - Whipped cream (for topping) - Chocolate shavings or curls (for garnish) To create this rich cheesecake, you need a mix of classic and delightful items. The chocolate cookie crumbs serve as the base, giving a perfect crunch. The melted butter binds everything together, creating a sturdy crust. Granulated sugar adds sweetness, while cream cheese and sour cream bring a creamy texture. Vanilla extract enhances flavor, and eggs help set the cheesecake. The melted semi-sweet chocolate chips add a deep chocolate flavor, while cocoa powder intensifies it. Finally, use whipped cream and chocolate shavings to top the cake for a stunning finish. - Various chocolate types (dark, milk, or white) - Liqueurs (e.g., Kahlua or coffee liqueur) - Fruit toppings for garnish (such as raspberries) For those wanting to take this cheesecake to the next level, consider adding different types of chocolate. Dark chocolate boosts richness, milk chocolate makes it sweeter, and white chocolate adds creaminess. Liqueurs like Kahlua can enhance the flavor with a coffee twist. Fresh fruit toppings, such as raspberries, add a fruity brightness that balances the chocolate. For the full recipe, check out the details above. Preheat your oven to 325°F (160°C). This warms the oven for baking. In a bowl, mix 2 cups of chocolate cookie crumbs with 1/2 cup of melted unsalted butter. Stir well until it looks like wet sand. Press this mixture firmly into the bottom of a 9-inch springform pan. Make sure it is even and compact. Bake the crust for 10 minutes and then let it cool slightly. In a large bowl, beat 4 packages of softened cream cheese with an electric mixer. You want it to be smooth and fluffy. Gradually add 1 cup of granulated sugar while mixing. Keep beating until it is fully blended. Next, mix in 1 cup of sour cream and 1 teaspoon of vanilla extract until it is smooth. Add 4 large eggs to the filling one at a time. Beat on low speed after each egg until just combined. Do not overmix, as this can make the cheesecake crack. Now, gently fold in 1 cup of melted semi-sweet chocolate and 1/4 cup of cocoa powder. Pour this filling into the cooled crust. Bake for 60-70 minutes. The center should be set but still slightly jiggly when you take it out. After baking, turn off the oven and crack the door open. Let the cheesecake cool inside for about an hour. This helps prevent cracks on top. After that, move it to the fridge. Chill it for at least 4 hours or overnight for the best taste and texture. Always remember, patience is key to a great cheesecake! To avoid cracks in your cheesecake, always cool it slowly. After baking, turn off the oven. Leave the door slightly open for about an hour. This gentle cooling helps prevent sudden temperature changes. When mixing ingredients, use a low speed on your mixer. Overmixing can add air, causing cracks. Beat until just combined. Each egg should blend in fully but avoid whipping too much. Serve your cheesecake on a lovely cake stand. This adds a special touch. For garnishing, use whipped cream on top. Add chocolate shavings or curls for extra flair. Fresh raspberries or a drizzle of chocolate sauce can brighten the plate. Consider using clear glass dishes. They show off the rich layers of your cheesecake. A simple white plate also makes your dessert pop. To boost flavor, try adding espresso powder. Just a teaspoon can enhance the chocolate taste. You might also consider a splash of coffee liqueur for depth. Pair your cheesecake with sauces. A rich chocolate sauce or a berry compote works well. A scoop of vanilla ice cream on the side adds creaminess. This combo makes each bite even more delightful. For more ideas, check out the Full Recipe for Death by Chocolate Cheesecake. {{image_2}} You can easily make this cheesecake gluten-free. Just swap regular cookie crumbs for gluten-free cookie crumbs. Brands like gluten-free Oreos work well. The crust will taste just as good, and no one will know the difference! To make a vegan version, you can replace the cream cheese. Use soaked cashews blended with coconut milk. For eggs, use flax eggs or applesauce. Both work great! Look for dairy-free chocolate chips to keep the chocolatey goodness. Brands like Enjoy Life or Lily's are good choices. You can spice up this cheesecake with seasonal flavors. In fall, add pumpkin puree and a bit of cinnamon. For winter, try peppermint extract and crushed candy canes. Each season brings new fun twists to this classic dessert! To keep your Death by Chocolate Cheesecake fresh, follow these steps. First, let the cheesecake cool completely after baking. Once cool, cover it with plastic wrap or aluminum foil. This keeps the cheesecake moist and prevents it from absorbing other smells in the fridge. Store the cheesecake in the fridge. It can last for about 5 to 7 days. If you have leftovers, slice the cheesecake into individual pieces. This makes it easier to grab a slice later. Place each slice in an airtight container or wrap in plastic wrap. Be sure to label the container with the date so you know when you made it! Want to save some cheesecake for later? You can freeze it! Start by letting the cheesecake cool completely. Wrap it tightly in plastic wrap, then place it in a freezer-safe container. This helps protect it from freezer burn. The cheesecake can last for up to 3 months in the freezer. When you're ready to enjoy your cheesecake, take it out of the freezer. Move it to the fridge for a slow thaw overnight. This keeps the texture nice. If you're in a hurry, you can also thaw it at room temperature for about 2 to 3 hours. Just remember, do not refreeze cheesecake after thawing. Enjoy your delicious treat! Serve this cheesecake cold. It tastes best when chilled. Use a sharp knife to cut clean slices. For a special touch, serve it on a nice cake stand. You can add fresh raspberries or a drizzle of chocolate sauce around the plate. This makes the dessert look fancy and inviting. Yes, you can make this cheesecake ahead of time. It tastes even better after a day in the fridge. Just bake it, cool it, and refrigerate it for at least four hours. You can also store it overnight. This saves you time when you want to serve it. To avoid cracks, bake the cheesecake at a low temperature. Turn off the oven when it is done, and leave the door open. This helps it cool slowly. Also, make sure to mix the batter gently. Overmixing can add too much air, which leads to cracks. If your cheesecake isn't set, don't panic. Check the baking time. It may need a few more minutes in the oven. If it's still soft, let it cool in the fridge longer. If it remains unset after chilling, you can bake it again at a low temperature for a bit. This article breaks down everything you need for the perfect Death by Chocolate Cheesecake. We covered essential and optional ingredients, detailed step-by-step instructions, and offered handy tips for texture and presentation. You can also try variations like gluten-free or vegan options. Remember, cooling is key for success. By following these tips, you’ll create a dessert that impresses everyone. Enjoy your cheesecake adventure and the joy it brings to your table!
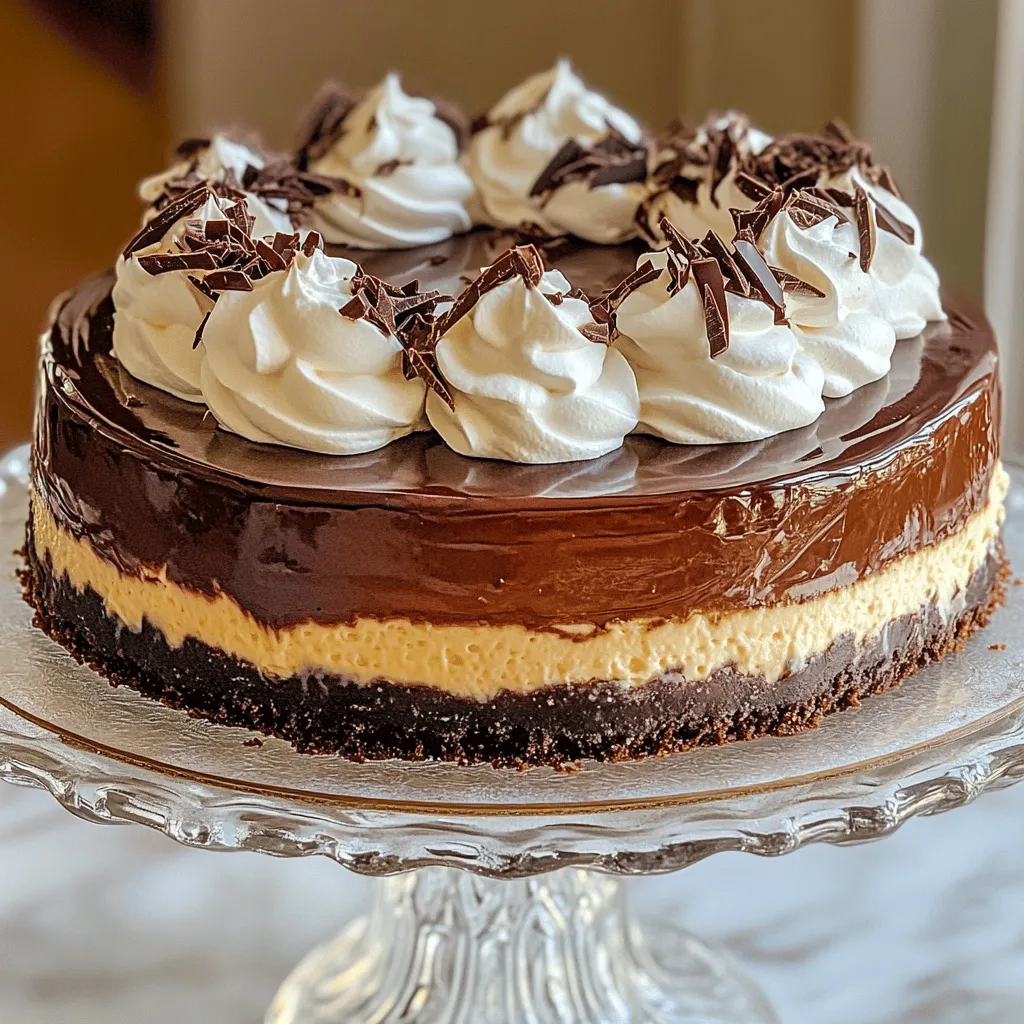
Decadent Death by Chocolate Cheesecake Recipe
Do you love chocolate? If so, you’re in for a treat! This Decadent Death by Chocolate Cheesecake recipe is your ticket to a rich and
To make the easy cinnamon roll coffee cake, you’ll need these key ingredients: - 2 cups all-purpose flour - 1 cup granulated sugar - 1 tablespoon baking powder - 1/2 teaspoon salt - 1/2 cup unsalted butter, softened - 1 cup whole milk - 2 large eggs - 1 tablespoon vanilla extract - 1 tablespoon ground cinnamon - 1/2 cup brown sugar, packed - 1/2 cup powdered sugar (for glaze) - 1-2 tablespoons milk (for glaze) These ingredients combine to create a soft, sweet cake with a delightful swirl. You can easily adapt this recipe to fit your needs. For a dairy-free version, substitute the whole milk with almond milk or oat milk. Use a dairy-free butter alternative in place of unsalted butter. This keeps the rich flavor while meeting dietary needs. If you want a lighter option, try using low-fat milk or Greek yogurt instead of whole milk. It will still keep the cake moist and tasty. Sometimes you might not have all the ingredients on hand. Here are a few common substitutes: - All-purpose flour: Use whole wheat flour for a nuttier flavor or gluten-free flour for a gluten-free option. - Granulated sugar: Coconut sugar or honey can work as natural sweeteners. - Brown sugar: If you run out, you can use white sugar mixed with a bit of molasses. - Eggs: Use applesauce or flaxseed meal mixed with water as a vegan substitute. These swaps make it easy to customize the recipe to your taste and pantry. For the full recipe, refer to the previous section. Start by gathering all your ingredients. You will need: - 2 cups all-purpose flour - 1 cup granulated sugar - 1 tablespoon baking powder - 1/2 teaspoon salt - 1/2 cup unsalted butter, softened - 1 cup whole milk - 2 large eggs - 1 tablespoon vanilla extract - 1 tablespoon ground cinnamon - 1/2 cup brown sugar, packed - 1/2 cup powdered sugar (for glaze) - 1-2 tablespoons milk (for glaze) Next, preheat your oven to 350°F (175°C). Grease a 9x13 inch baking pan. In a large bowl, whisk the flour, sugar, baking powder, and salt. In another bowl, cream the softened butter, whole milk, eggs, and vanilla until smooth. Slowly mix the wet ingredients into the dry ones. Stir until just combined. A few lumps are fine. In a small bowl, mix ground cinnamon and brown sugar to create the cinnamon swirl. Pour half of the cake batter into the greased pan. Smooth it out evenly. Sprinkle half of the cinnamon mixture on top. Pour the rest of the batter over this. Then, add the remaining cinnamon mixture on top. Use a knife to swirl it gently for a marbled look. Place the pan in the preheated oven. Bake for 30-35 minutes. To check if it is done, insert a toothpick into the center of the cake. If it comes out clean, the cake is ready. If there is batter on the toothpick, bake for a few more minutes and check again. To ensure your cake is perfectly baked, keep an eye on the time. Start checking at the 30-minute mark. If you notice the edges pulling away from the pan, it's a good sign. The top should be golden brown and spring back when touched. If you have a food thermometer, the internal temperature should be around 200°F (93°C). Once the cake is baked, let it cool. While it cools, mix powdered sugar with milk to make a glaze. Drizzle this over the cooled cake for a sweet finish. For a full recipe experience, refer to the Full Recipe section provided earlier. To get the best swirl, use a knife. After you add the cinnamon mixture, gently drag the knife through the batter. Make sure to zigzag it, not stir. This way, you get nice, pretty swirls. Keep it light; you don't want to mix it all together. A moist cake is a happy cake! Use room temperature ingredients like butter, milk, and eggs. This helps them blend well. Avoid overmixing the batter. A few lumps are okay. Also, don't skip the glaze! It adds moisture and sweetness to your cake. Cut the coffee cake into squares and serve warm. Place it on a nice platter for a great look. Dust it with extra powdered sugar for a fancy touch. Pair it with a hot cup of coffee or tea. You can also add berries or whipped cream as a side. For more details, check the Full Recipe. {{image_2}} You can add nuts for a crunchy twist. Walnuts or pecans work well. Chop them finely. Mix the nuts into the cinnamon swirl layer. This adds flavor and texture. You can also sprinkle some on top before baking. The nuts will toast and become fragrant. For a chocolatey treat, add chocolate chips. Stir in about a cup of chips into the batter. If you prefer fruit, blueberries or diced apples are great choices. Fold in one cup of your chosen fruit. Both options give the cake a lovely burst of flavor. If you want a different glaze, try maple syrup. Mix powdered sugar with maple syrup instead of milk. This gives a unique taste. You could also use cream cheese for a richer glaze. Just beat cream cheese with powdered sugar and a bit of milk. Both choices will make your cake even more special. For the full recipe, check the Cinnamon Swirl Dream Cake. Enjoy your baking adventure! After you enjoy your coffee cake, store leftovers in an airtight container. This keeps it fresh for longer. You can also wrap it tightly in plastic wrap. Keep it at room temperature for up to three days. If you need to store it longer, consider freezing. To freeze your coffee cake, let it cool completely first. Cut it into pieces, then wrap each slice in plastic wrap. Next, place the wrapped slices in a freezer bag or container. This way, they won't stick together. You can freeze the coffee cake for up to three months. When you're ready to enjoy your frozen coffee cake, take it out of the freezer. Let it thaw in the fridge overnight or for a few hours at room temperature. For quick reheating, place a slice in the microwave for 15 to 30 seconds. This warms it up nicely. You can also reheat it in the oven at 350°F (175°C) for about 10 minutes. Enjoy your delightful treat with a hot drink! Yes, you can make this coffee cake ahead of time. Bake the cake and let it cool completely. Wrap it tightly in plastic wrap or foil. Store it at room temperature for up to two days. For longer storage, place it in the fridge for up to a week. You can also freeze it for up to three months. Just remember to let it thaw before serving. Coffee cake goes well with many items. Here are some tasty ideas: - Fresh fruit like berries or sliced apples - A dollop of whipped cream - A scoop of vanilla ice cream - Hot coffee or tea - A drizzle of chocolate sauce for extra sweetness Each option adds flavor and makes for a fun pairing. To keep your cake moist, follow these tips: - Use fresh ingredients, especially eggs and milk. - Do not overbake the cake; check for doneness with a toothpick. - Add sour cream or yogurt to the batter for extra moisture. - Store the cake in an airtight container after it cools. These steps will help your coffee cake stay soft and tasty. For the full recipe, check out the detailed instructions. This blog post covered key ingredients, step-by-step instructions, and various tips for baking a delicious coffee cake. You learned about ingredient choices, how to bake it perfectly, and creative serving ideas. Remember, the right storage can keep your cake fresh for longer. Whether you choose a classic or try a fun twist, you can create a tasty treat. With practice, you’ll master this recipe and impress everyone. Enjoy the process and happy baking!
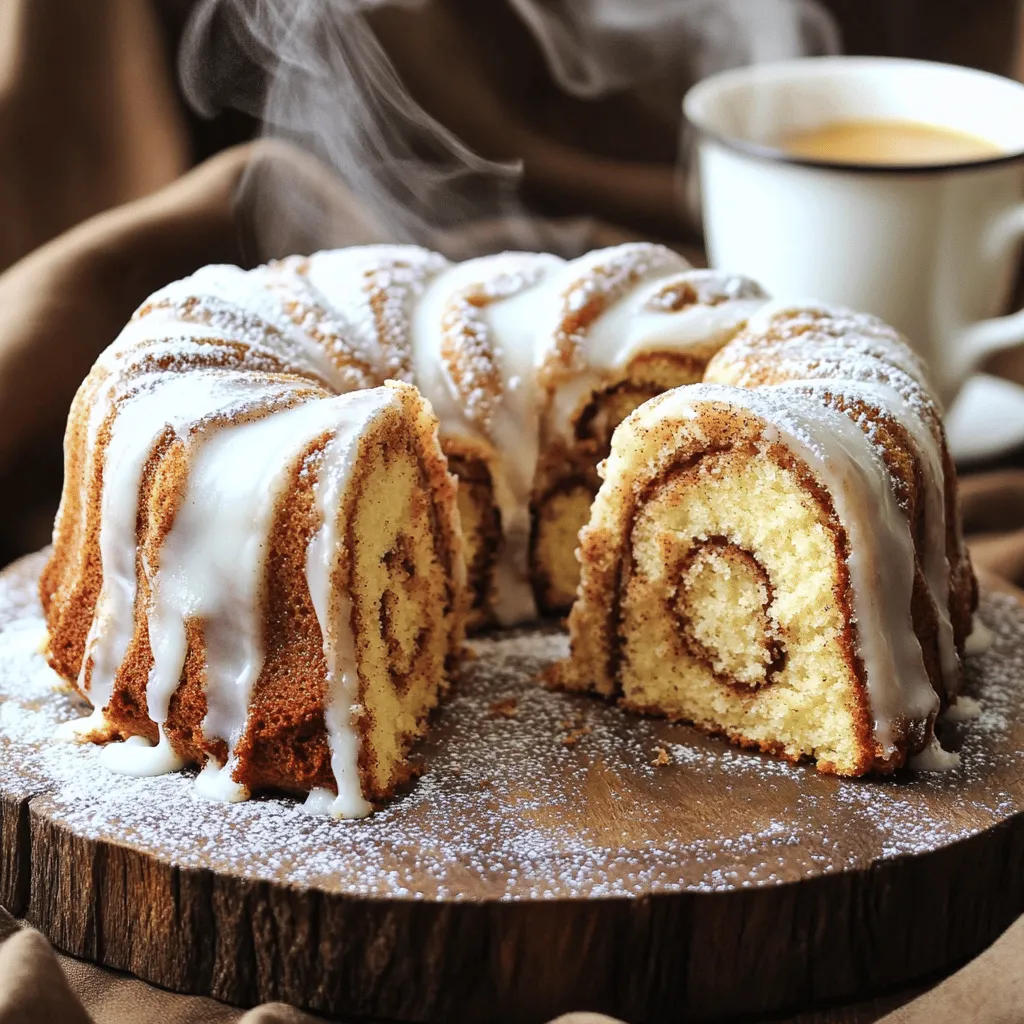
Easy Cinnamon Roll Coffee Cake Delightful Recipe Guide
Grab your baking gear! I’m here to share my easy Cinnamon Roll Coffee Cake recipe that will delight your mornings. This tasty treat combines soft
- 1 ½ cups almond flour - ½ cup unsalted butter, melted - ¼ cup honey or maple syrup - 1 teaspoon vanilla extract - 1 teaspoon baking powder - ½ teaspoon salt - 1 cup fresh blackberries - ½ cup shelled pistachios, chopped - 1 tablespoon lemon juice - 1 tablespoon cornstarch For these Blackberry Pistachio Dream Bars, I use almond flour. It gives a nice texture and flavor. The unsalted butter makes the bars rich and soft. Honey or maple syrup adds sweetness. Use vanilla extract for a warm, inviting taste. Baking powder helps the bars rise. Salt balances the flavors. Fresh blackberries are the star here. They add a burst of tartness and juiciness. Shelled pistachios provide a lovely crunch. The lemon juice brightens the berries. Cornstarch helps thicken the berry mixture. - Mixing bowls - Whisk or spatula - 9x9 inch baking pan - Wire rack You need a few simple tools to make these bars. Start with mixing bowls for combining ingredients. A whisk or spatula helps blend everything smoothly. A 9x9 inch baking pan is perfect for this recipe. Finally, a wire rack cools the bars after baking. For the full recipe, check out the complete guide. - Step 1: Preheat oven and prepare the baking pan Start by preheating your oven to 350°F (175°C). This step is key for even baking. Next, grease a 9x9 inch baking pan or line it with parchment paper. This makes it easy to remove the bars later. - Step 2: Combine dry ingredients with wet ingredients In a large mixing bowl, whisk together the almond flour, melted butter, honey (or maple syrup), vanilla extract, baking powder, and salt. Mix until a smooth dough forms. This dough will be the base of your bars. - Step 3: Spread the dough in the pan Take the dough and spread it evenly in the prepared baking pan. Press it down firmly using your fingers or a spatula. This step gives your bars a solid base. - Step 4: Prepare and layer the blackberries In another bowl, toss the fresh blackberries with lemon juice and cornstarch. This coating helps prevent the berries from sinking. Once coated, layer the blackberries evenly over the dough. - Step 5: Add chopped pistachios Now, sprinkle the chopped pistachios over the blackberries. The nuts add a nice crunch and flavor that pairs well with the berries. - Step 6: Bake and monitor timing Place the pan in the preheated oven. Bake for 25-30 minutes. Keep an eye on them; look for golden edges and a set center. Your kitchen will smell amazing! - Step 7: Cooling before slicing Once baked, remove the pan from the oven. Allow the bars to cool completely on a wire rack. Cooling is crucial; it helps the bars firm up. After cooling, slice them into squares and enjoy your delicious Blackberry Pistachio Dream Bars! For the full recipe, check the details above. To get the best dough, you need the right consistency. Your dough should be soft but not sticky. To achieve this, mix the almond flour and butter well. If it feels too dry, add a bit of honey or maple syrup. If it's too wet, add a touch more almond flour. Cooling time is important. Once baked, let the bars cool completely in the pan. This helps them set properly. If you slice them too soon, they may fall apart. Wait at least 30 minutes before cutting. For a lovely presentation, serve your bars on a wooden platter. Dust them lightly with powdered sugar. Add a sprig of mint on top for a nice touch. This makes them look more inviting. When it comes to pairing, these bars go well with tea or coffee. You can also serve them with a scoop of vanilla ice cream. The creamy flavor of ice cream matches the tartness of the blackberries. To make the bars even better, consider adding spices. A dash of cinnamon can add warmth. You can also try nutmeg for a different twist. Just a little will do! If you want to change the nut topping, feel free to experiment. Walnuts or pecans can work well too. Each nut brings its own flavor, making your bars unique every time you bake them. {{image_2}} You can switch up some ingredients for fun. If you need a gluten-free option, use coconut flour instead of almond flour. Coconut flour absorbs more liquid, so use less than the recipe calls for. Try using just 1 cup of coconut flour and add a bit more butter or liquid. If you don’t have honey or maple syrup, try agave syrup or brown sugar. Both add sweetness, but the flavor will change slightly. You can also use a sugar substitute if you prefer. Just follow the package instructions for the right amount. Want to mix things up? You can add other fruits! Raspberries and blueberries work great. They add different flavors and colors to your bars. Just make sure to adjust the amount, so it doesn’t get too wet. If you love chocolate, sprinkle in some chocolate chips. Dark or white chocolate pairs nicely with the blackberries and pistachios. It adds a rich taste that many people enjoy. If you are vegan, you can replace the butter with coconut oil. For the honey or maple syrup, use a vegan sweetener. Make sure all your ingredients are plant-based. To make the bars gluten-free, stick with almond flour or use a gluten-free flour blend. This way, you can enjoy a delicious treat without worry. To keep your Blackberry Pistachio Dream Bars fresh, store them in the fridge. Place the bars in an airtight container. This helps keep them moist and flavorful. You can also wrap them tightly in plastic wrap. They will last longer this way. For freezing, cut the bars into squares. Wrap each square in plastic wrap and then foil. This prevents freezer burn. Store them in the freezer for up to three months. When ready to eat, let them thaw in the fridge overnight. These bars are best enjoyed fresh. They stay fresh for about a week in the fridge. If you freeze them, they can last for three months. Always check for signs of spoilage. If the bars smell sour or look discolored, it’s time to toss them. To reheat, place the bars in the oven at 350°F (175°C) for about 10 minutes. This warms them up and keeps the texture nice. You can also use a microwave for a quick heat-up. Just make sure to cover them with a damp paper towel to prevent drying out. Serve the bars warm, perhaps with a scoop of vanilla ice cream or a dollop of whipped cream. This adds a creamy touch that pairs well with the flavors. Enjoy them as a sweet treat any time of day! To make these bars, start by preheating your oven to 350°F (175°C). Prepare a 9x9 inch baking pan by greasing it or lining it with parchment paper. In a bowl, mix 1 ½ cups almond flour, ½ cup melted unsalted butter, ¼ cup honey or maple syrup, 1 teaspoon vanilla extract, 1 teaspoon baking powder, and ½ teaspoon salt. This forms your dough. Press the dough into the pan evenly. In another bowl, take 1 cup of fresh blackberries and toss them with 1 tablespoon lemon juice and 1 tablespoon cornstarch. Spread these berries on top of the crust. Finish by sprinkling ½ cup chopped pistachios over the berries. Bake for 25-30 minutes until golden brown. Let the bars cool completely before slicing them into squares. You can find the Full Recipe for more details. Yes, you can substitute almond flour if you have allergies. Use coconut flour as a good alternative. It has a different texture but works well in this recipe. Just remember, coconut flour absorbs more liquid. You may need to adjust the amount of liquid in your recipe. Each serving of Blackberry Pistachio Dream Bars contains approximately 150 calories. You get about 10 grams of fat and 5 grams of protein. The bars also provide 15 grams of carbs and 2 grams of fiber. This makes them a tasty and healthy snack choice. You can use frozen blackberries in this recipe. Just remember to let them thaw before you mix them. This helps them blend better. Frozen berries may also release more juice, so add a bit more cornstarch. Using frozen fruit is a great way to enjoy this treat year-round. You now have all the steps to make delicious Blackberry Pistachio Dream Bars. From gathering ingredients to baking and storage, these bars are easy and fun to prepare. Remember to enjoy the process and get creative with flavors and toppings. Explore variations and find what suits your taste. With the right care, you can keep these bars fresh for days. I hope you feel inspired to try this recipe. Happy baking!
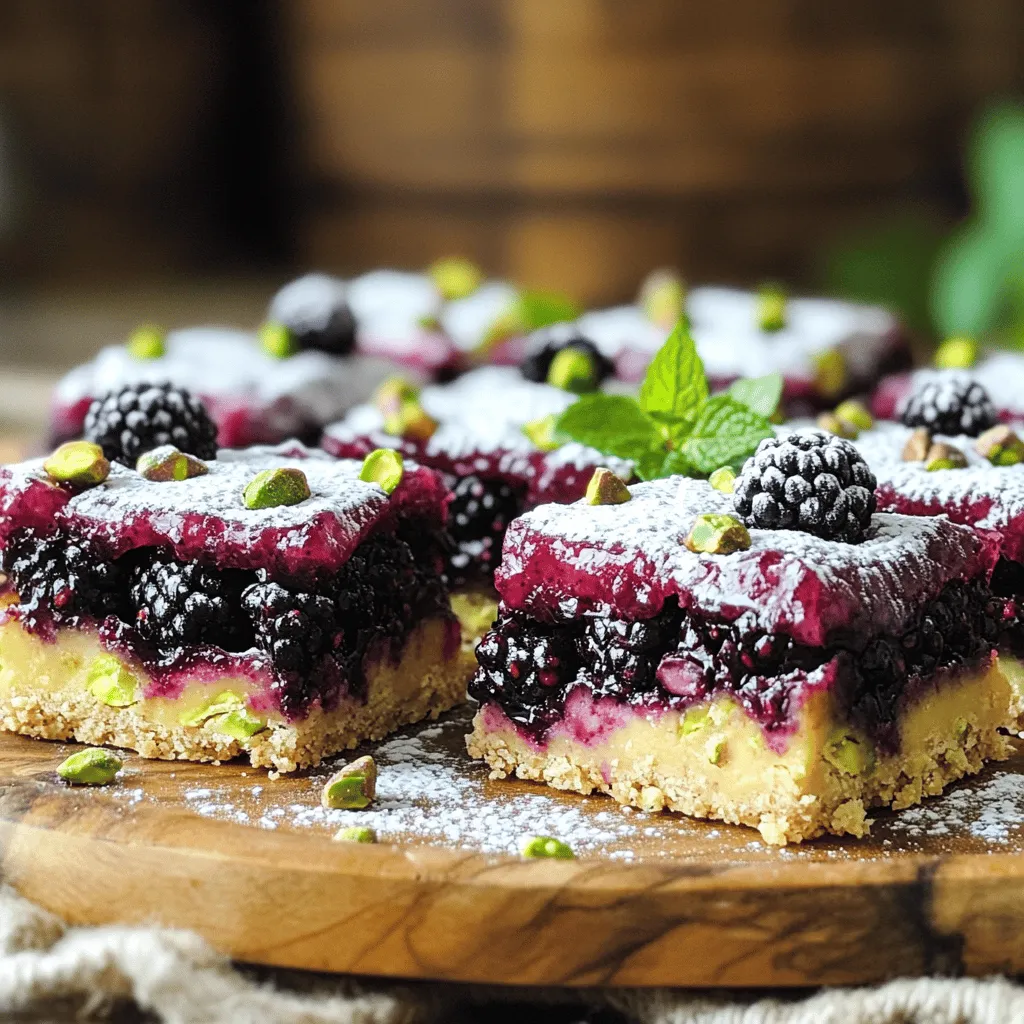
Blackberry Pistachio Dream Bars Tasty and Simple Snack
Looking for a snack that’s both tasty and easy to make? You’ll love my Blackberry Pistachio Dream Bars! With sweet blackberries and crunchy pistachios, these
To make the best Banana Pudding Rice Krispie Treats, you need simple ingredients. Here’s what you will need: - 4 cups Rice Krispie cereal - 1 cup mini marshmallows - 1/2 cup unsalted butter - 1/2 teaspoon vanilla extract - 1 box (3.4 oz) instant banana pudding mix - 1 cup milk - 1 cup sliced bananas (fresh) - 1/2 cup whipped cream (optional, for garnish) - 1/4 cup crushed vanilla wafers (for topping) Each ingredient plays a key role. The Rice Krispie cereal gives crunch. The mini marshmallows add sweetness and stickiness. Butter helps everything come together. Vanilla extract brings a nice flavor. The banana pudding mix is the star, giving that classic banana taste. Fresh bananas add a fruity touch, while whipped cream and vanilla wafers make it look pretty. When you gather these ingredients, you set the stage for a fun and tasty treat. This recipe makes about 12 servings, perfect for sharing. If you want the full recipe, check the earlier section. - Grease the baking dish. - Melt butter and marshmallows. - Combine Rice Krispies and marshmallow mixture. First, take a 9x13 inch baking dish and grease it with a bit of butter. This helps prevent sticking. Next, grab a large saucepan and melt 1/2 cup of unsalted butter over low heat. Once the butter melts, add 1 cup of mini marshmallows. Stir continuously until the marshmallows melt and become smooth. Remove the pan from heat, then add 1/2 teaspoon of vanilla extract. Mix it well. Now, slowly add in 4 cups of Rice Krispie cereal. Stir until every piece is coated with that gooey marshmallow mix. - Prepare the banana pudding mixture. - Layer the Rice Krispies and pudding. - Refrigerate to set. In a separate bowl, whisk together 1 box of instant banana pudding mix with 1 cup of milk. Whisk for about 2 minutes until it thickens. Gently fold in 1 cup of sliced bananas. Let the Rice Krispie mixture cool for a bit. Press half of it into your greased dish evenly. Next, pour the banana pudding mixture over the Rice Krispies. Spread it evenly. Top this with the rest of the Rice Krispie mix. Press down gently to secure the layers. If you want, add a dollop of whipped cream on top and sprinkle crushed vanilla wafers for extra crunch. Finally, refrigerate the treats for at least 1 hour to let them set before slicing. For the full recipe, check out the details above. - Ensure proper marshmallow melting: Melt the butter and marshmallows on low heat. Stir until smooth. This step is key for the right texture. - Press layers evenly for best texture: When adding layers, press down gently but firmly. This keeps the treats together. - Use fresh bananas for flavor: Choose ripe bananas for a sweeter taste. Fresh bananas add great flavor and texture. - Presentation ideas: Serve these treats chilled on a colorful platter. They look great cut into squares. - Drizzle options: Add a drizzle of chocolate syrup for extra sweetness. It makes them even more tempting! - Garnishing tips: Top with whipped cream and a slice of banana. Crushed vanilla wafers also add a nice crunch. For the complete recipe, check out the Full Recipe. {{image_2}} You can take your Banana Pudding Rice Krispie Treats to the next level by adding some fun flavors. Here are a few ideas: - Add peanut butter for richness: Mixing in peanut butter gives a nice nutty taste and creaminess. Use about 1/2 cup to keep the balance. - Include chocolate chips for added sweetness: Stir in 1/2 cup of chocolate chips for a sweet twist. They melt slightly, adding a delightful gooeyness. - Swap vanilla wafers with graham crackers: Graham crackers give a different crunch and flavor. They work great as a topping or in the layers. You can also make these treats fit different diets. Here are some options: - Gluten-free options: Use gluten-free Rice Krispies and ensure all other ingredients are gluten-free. This way, everyone can enjoy them! - Dairy-free variations (using coconut cream): Swap milk with coconut cream for a rich dairy-free version. It adds a nice tropical flavor, too! These variations let you customize your treats while keeping them delicious. Try them out and see which you like best! To keep Banana Pudding Rice Krispie Treats fresh, store them in the fridge. Use an airtight container to prevent them from drying out. They taste best when cold and firm. These treats can last up to five days in the fridge. Make sure to slice them before storing for easy serving. If you want to keep them longer, freezing is a great option. Wrap the treats in plastic wrap, then cover them with aluminum foil. This will help prevent freezer burn. You can freeze them for up to three months. When you’re ready to enjoy, take them out and let them thaw in the fridge overnight. Serve chilled for the best taste. Want to learn how to make these treats? Check the Full Recipe! Can I use different flavors of pudding? Yes, you can! Try chocolate or vanilla pudding for a twist. Each flavor brings its own fun vibe. Mix and match to find your favorite. How do I make these treats more festive? Add sprinkles or colored chocolate chips on top. You can also layer in fresh fruit or use fun molds for unique shapes. These ideas make your treats pop at any event. Is it necessary to use fresh bananas? Fresh bananas add great taste and texture. They give a nice creaminess to the pudding layer. If you need, use banana chips for a crunchier option, but fresh is best. Can I substitute for Rice Krispie cereal? Yes, you can. Try using other cereals like puffed rice or cornflakes. Just make sure they are light and crispy to hold the treats together well. Making these delicious Rice Krispie Banana Treats is easy and fun. You learned about the key ingredients, simple steps to prepare, and some great tips to make your treats special. Remember to use fresh bananas and press the layers well. You can personalize the recipe by adding flavors like peanut butter or chocolate. Store them properly for the best taste. Enjoy sharing your treats with friends and family. These treats will surely bring smiles to everyone!
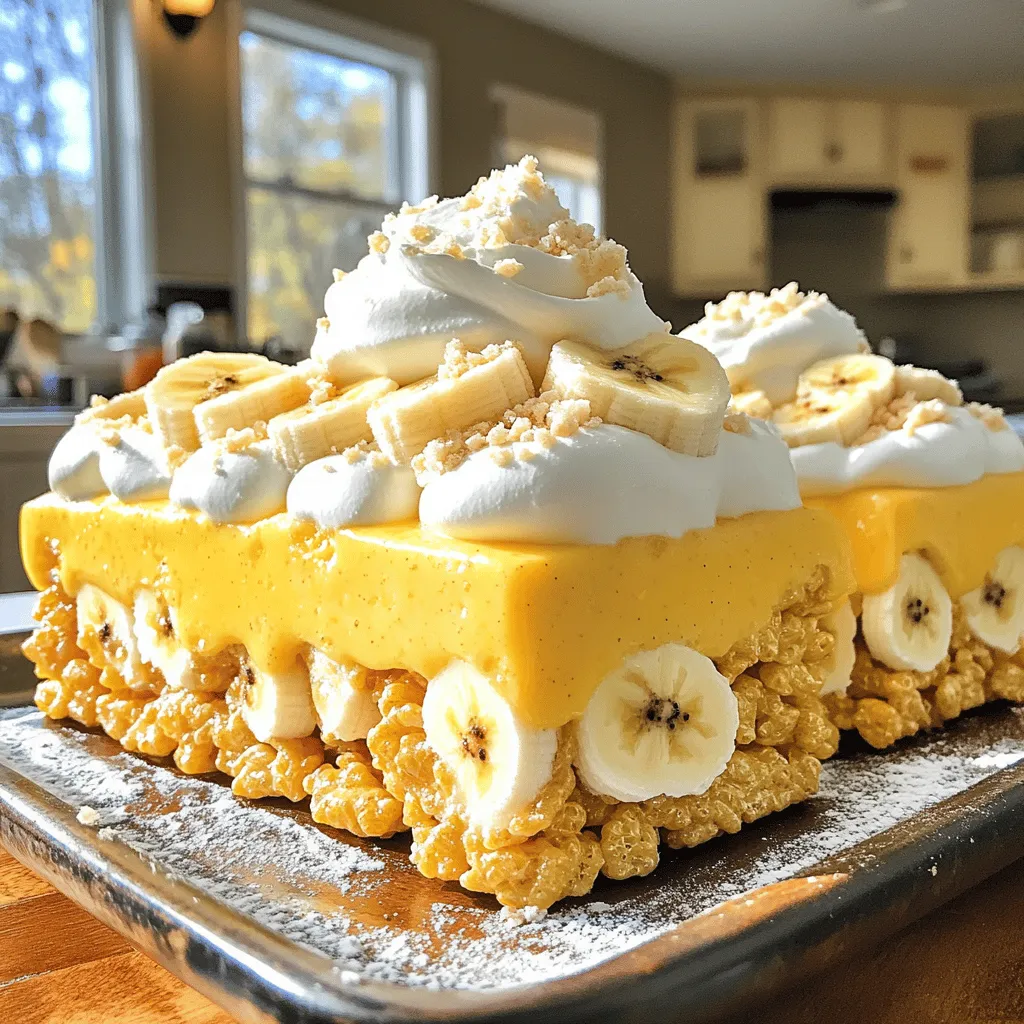
Banana Pudding Rice Krispie Treats Sweet Delight
Are you ready to try a dessert that combines two classic treats? Banana Pudding Rice Krispie Treats offer a fun twist on your favorite flavors.
- 2 ½ cups all-purpose flour - ¼ cup granulated sugar - 1 package (2 ¼ tsp) instant yeast - ½ teaspoon salt - 1 teaspoon baking powder - 1 teaspoon baking soda - 1 tablespoon cocoa powder - ½ cup whole milk, warmed - 1 large egg - 2 tablespoons unsalted butter, melted - 2 tablespoons red food coloring - 1 cup cream cheese, softened - 2 cups powdered sugar - 1 teaspoon vanilla extract - 2 tablespoons milk Gather these ingredients before you start. Each item plays a key role. The flour gives structure, while sugar adds sweetness. Yeast makes the rolls rise, and salt enhances flavor. Baking powder and baking soda create fluffiness. Cocoa powder gives that classic red velvet taste. For the wet ingredients, warm milk activates the yeast. The egg adds richness and helps bind. Melted butter gives moisture, and red food coloring brings that vibrant color. For the frosting, use softened cream cheese for smoothness. Powdered sugar sweetens it up. Vanilla extract adds depth, while milk adjusts texture. Make sure you have everything ready. This way, you’ll enjoy a smooth cooking process. Happy baking! {{ingredient_image_1}} Start by mixing the dry ingredients. In a large bowl, combine: - 2 ½ cups all-purpose flour - ¼ cup granulated sugar - 1 package (2 ¼ tsp) instant yeast - ½ teaspoon salt - 1 teaspoon baking powder - 1 teaspoon baking soda - 1 tablespoon cocoa powder Whisk these together until they blend well. In another bowl, mix the wet ingredients. Whisk together: - ½ cup warmed whole milk - 1 large egg - 2 tablespoons melted unsalted butter - 2 tablespoons red food coloring Pour the wet mix into the dry mix. Stir until a soft dough forms. Knead it on a floured surface for 5-7 minutes. The dough should feel smooth and elastic. Now, let’s make the filling. Start by spreading ½ cup of softened butter over the rolled-out dough. Leave a small edge around the sides. In a separate bowl, combine: - 1 cup packed brown sugar - 1 tablespoon cinnamon Mix these together. Then, sprinkle this mixture evenly over the buttered dough. This creates a sweet and spicy filling. Next, roll the dough. Starting from one long side, tightly roll it into a log. Use a sharp knife or dental floss to cut the log into 12 equal slices. This helps keep the rolls neat and pretty. Place the rolls in a greased 9x13 inch baking dish. Cover them with a towel. Let them rise for about 30 minutes. This will make them fluffy and soft. Preheat your oven to 350°F (175°C). Bake the rolls for 25-30 minutes. They should look lightly golden when done. Keep an eye on them to avoid burning. While the rolls bake, prepare the frosting. In a bowl, blend: - 1 cup softened cream cheese - 2 cups powdered sugar - 1 teaspoon vanilla extract - 2 tablespoons milk Mix until it’s smooth and creamy. This frosting will make the rolls extra special. Once the rolls cool a bit, ice them with this delicious cream cheese frosting. Enjoy every bite! To get the best texture for your dough, start with the right flour. Use all-purpose flour for a soft roll. Make sure to measure your flour correctly. Spoon it into the cup and level it off. Mixing is key too. Combine the dry ingredients well before adding wet ones. When kneading, aim for about 5 to 7 minutes. Your dough should feel smooth and elastic. If it sticks, add a bit more flour. If it's too dry, add a touch of milk. The rise is important for fluffy rolls. Make sure your yeast is fresh. Instant yeast works well and does not need activation. Warm your milk to about 110°F (43°C) but do not overheat it. Too hot can kill the yeast. After mixing your dough, let it rise in a warm place. A cozy spot like near an oven works great. Cover the bowl with a towel. Wait for about an hour or until it doubles in size. Patience is key here! For a creamy frosting, start with softened cream cheese. It should be at room temperature, which helps it mix well. Blend the cream cheese with powdered sugar until smooth. Add vanilla extract for flavor and milk for the right consistency. If the frosting is too thick, add a bit more milk. For a fun touch, drizzle extra frosting on top. A sprinkle of cocoa powder or nuts adds a nice look. Enjoy the creamy goodness! Pro Tips Use Fresh Yeast: Always check the expiration date on your yeast for the best rise and fluffiness in your rolls. Warm Ingredients: Ensure your milk is warm (not hot) and that your eggs are at room temperature to help activate the yeast effectively. Don’t Skip the Rise: Allowing the dough to rise properly is crucial for achieving soft and fluffy rolls, so be patient! Frost While Warm: Frosting the rolls while they are still warm allows the frosting to melt slightly, creating a delicious glaze effect. {{image_2}} To make chocolate chip red velvet cinnamon rolls, add semi-sweet chocolate chips to the filling. Mix in about 1 cup of chocolate chips with the brown sugar and cinnamon before spreading on the dough. The chocolate adds a rich flavor that pairs well with the red velvet. You can also sprinkle some on top of the frosting for a sweet touch. If you need a nut-free recipe, simply skip any nuts in the filling or toppings. The main ingredients in this recipe are naturally nut-free. Always check your frosting ingredients too, as some brands may add nuts. You can enjoy these rolls without worry! To make vegan red velvet cinnamon rolls, replace the egg with a flax egg. Mix 1 tablespoon of ground flaxseed with 2.5 tablespoons of water. Let it sit for a few minutes until it thickens. Use plant-based milk instead of whole milk and swap the butter for vegan butter. For the frosting, use a vegan cream cheese alternative. This way, everyone can enjoy these delicious treats! To keep your red velvet cinnamon rolls fresh, place them in an airtight container. This helps prevent them from drying out. You can also wrap each roll in plastic wrap. Store them at room temperature for up to two days. If you want them to last longer, consider refrigeration. Just note that chilling may slightly affect their soft texture. Freezing your cinnamon rolls is a great option for later enjoyment. Allow them to cool completely after baking. Then, place them in a single layer on a baking sheet. Freeze for about two hours until firm. After that, transfer the rolls to a freezer-safe bag. They can stay frozen for up to three months. When you're ready to eat, thaw them in the fridge overnight. Reheating your cinnamon rolls keeps them soft and tasty. Preheat your oven to 350°F (175°C). Place the rolls on a baking sheet and cover them with foil. Heat for about 10-15 minutes until warmed through. You can also use the microwave. Just heat them for about 15-20 seconds. Add a drizzle of cream cheese frosting after reheating for extra flavor! Yes, you can make these red velvet cinnamon rolls ahead of time. Prepare the rolls and place them in the baking dish. Cover them tightly and place them in the fridge overnight. In the morning, let them sit at room temperature for 30 minutes before baking. This way, you get fresh rolls without the long wait. If you want a natural option, try using beet juice instead of red food coloring. It gives a nice color and adds some nutrients. You can also use pomegranate juice, but it may change the taste. Both options work well and keep your rolls vibrant. Check the rolls for a light golden color on top. You can also insert a toothpick into the center. If it comes out clean or with a few crumbs, the rolls are done. Don’t overbake them, as they can become dry quickly. Yes, you can make gluten-free red velvet cinnamon rolls. Use a gluten-free all-purpose flour blend. Ensure it has xanthan gum for the right texture. The rest of the ingredients remain the same. Just follow the same steps, and you’ll have tasty gluten-free rolls. In this post, we explored the simple steps to make red velvet cinnamon rolls. We covered the key ingredients, including dry and wet components, plus frosting details. You learned to mix the dough, prepare the filling, and bake the rolls. I shared tips for perfect dough texture, optimal rising, and creamy frosting. Don't forget the fun variations and how to store these treats. Enjoy these rolls fresh or save some for later! With these skills, you can master this delicious recipe and share it with loved ones. Happy baking!
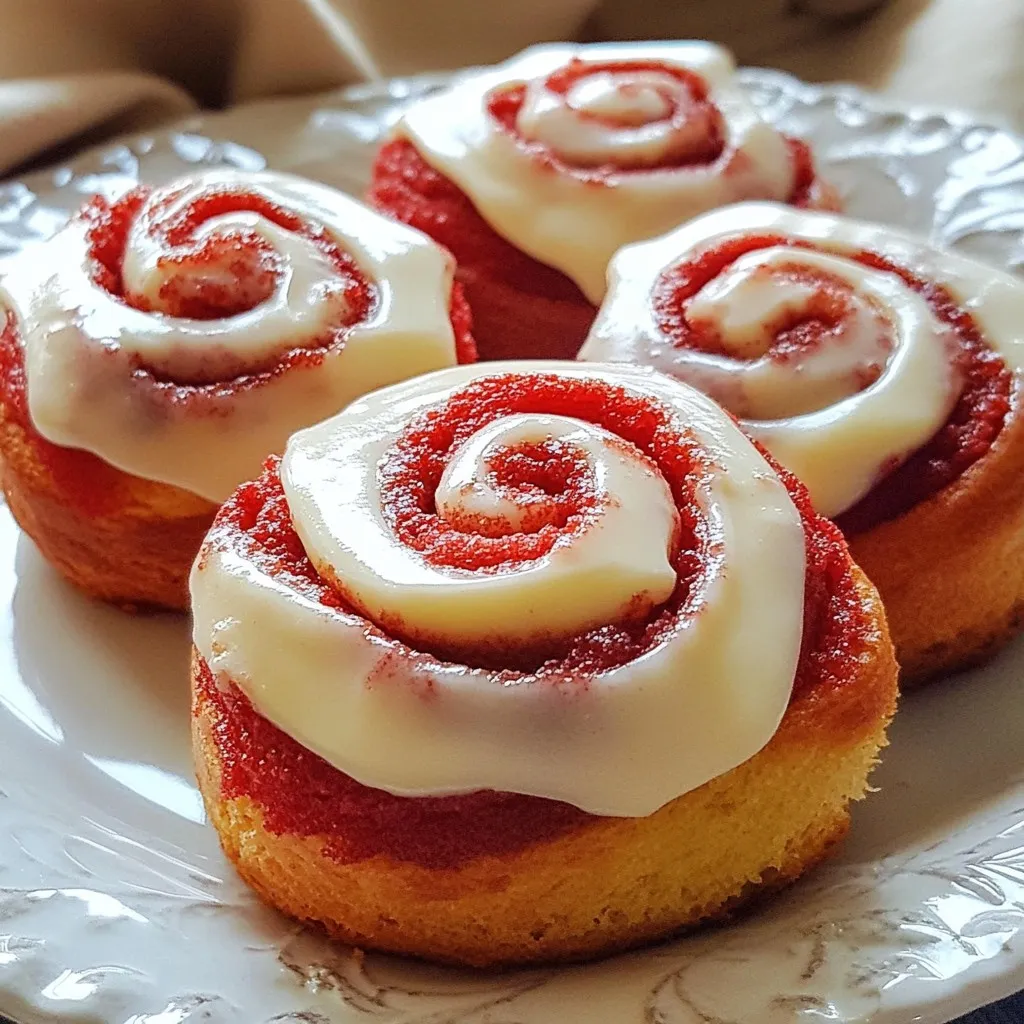
Red Velvet Cinnamon Rolls Scrumptious and Soft Treat
Are you ready to create the most scrumptious cinnamon rolls ever? These Red Velvet Cinnamon Rolls are soft, sweet, and perfect for any occasion. With
To make these delicious pumpkin s'mores cookies, gather the following ingredients: - 1 cup all-purpose flour - 1/2 cup rolled oats - 1/2 teaspoon baking soda - 1/2 teaspoon baking powder - 1 teaspoon ground cinnamon - 1/4 teaspoon nutmeg - 1/4 teaspoon salt - 1/2 cup unsalted butter, softened - 1/2 cup brown sugar, packed - 1/4 cup granulated sugar - 1/2 cup pumpkin puree - 1 large egg - 1 teaspoon vanilla extract - 1/2 cup mini marshmallows - 1/2 cup chocolate chips - 1/2 cup graham cracker crumbs Each ingredient plays a key role in creating the perfect cookie. The all-purpose flour and rolled oats give the cookies their structure. Baking soda and baking powder help them rise. The spices like cinnamon and nutmeg add warmth and comfort, perfect for fall. Unsalted butter is essential for creaminess, while brown sugar adds moisture and depth. Pumpkin puree brings a lovely fall flavor and keeps the cookies soft. Don't forget the mini marshmallows, chocolate chips, and graham cracker crumbs for that classic s'mores taste! When you have all these ingredients ready, you’ll be set to create a treat that captures the essence of fall in every bite. {{ingredient_image_1}} 1. Preheat the oven: Start by setting your oven to 350°F (175°C). This helps the cookies bake evenly. 2. Prepare the baking sheet: Line your baking sheet with parchment paper. This prevents sticking and makes cleanup easy. 1. Combine dry ingredients: In a medium bowl, whisk together: - 1 cup all-purpose flour - 1/2 cup rolled oats - 1/2 teaspoon baking soda - 1/2 teaspoon baking powder - 1 teaspoon ground cinnamon - 1/4 teaspoon nutmeg - 1/4 teaspoon salt This mix gives the cookies structure and flavor. 2. Cream butter and sugars: In a large bowl, cream together: - 1/2 cup unsalted butter, softened - 1/2 cup brown sugar, packed - 1/4 cup granulated sugar Beat until the mixture is light and fluffy. This step adds air and makes your cookies soft. 1. Incorporate pumpkin and egg: Add: - 1/2 cup pumpkin puree - 1 large egg - 1 teaspoon vanilla extract Mix until everything is combined. This adds moisture and that lovely pumpkin taste. 2. Add dry ingredients, marshmallows, chocolate, and crumbs: Gradually stir the dry mix into the wet mix. Then gently fold in: - 1/2 cup mini marshmallows - 1/2 cup chocolate chips - 1/2 cup graham cracker crumbs This makes the cookies gooey and sweet. 3. Bake the cookies: Drop rounded balls of dough onto the prepared baking sheet, spacing them about 2 inches apart. Bake for 10-12 minutes. Look for golden edges and set tops. The cookies will smell amazing! Let them cool for just a bit on the sheet before you transfer them to a wire rack. Enjoy your delicious pumpkin s'mores cookies! To get the right texture, focus on the dough. It should be soft and slightly sticky. If it feels too dry, add a bit more pumpkin puree. The temperature of your ingredients matters too. Use room temperature butter and egg for better mixing. Cold butter can lead to lumps in your dough. Set your oven to 350°F (175°C). This is a key step for even baking. If your oven runs hot, lower the temperature by 25°F. Always line your baking sheet with parchment paper. This helps cookies lift off easily and prevents sticking. To make your cookies stand out, drizzle melted chocolate over them. I love using dark chocolate for a rich flavor. You can add extra graham cracker crumbs on top for a nice crunch. Stacking them on a decorative plate makes for a great display! Pro Tips Chill the Dough: For a thicker cookie, chill the dough for at least 30 minutes before baking. This helps to prevent spreading and keeps the cookies chewy. Use Fresh Pumpkin Puree: For the best flavor, use homemade pumpkin puree or high-quality canned pumpkin. Fresh ingredients make a noticeable difference! Don’t Overmix: Mix the dry ingredients into the wet ingredients just until combined. Overmixing can lead to tough cookies. Store Properly: To keep cookies soft, store them in an airtight container at room temperature. You can also freeze them for up to 3 months for later enjoyment. {{image_2}} You can change the spices in these cookies for a new taste. Try adding ginger or cloves. They will offer a warm kick. You can also use pumpkin spice to keep it simple. For chocolate, you have options too. Swap the chocolate chips for white chocolate. This adds a sweet touch. Dark chocolate also works well for a rich flavor. If you need gluten-free cookies, use gluten-free flour. It works just as well in this recipe. Your cookies will still taste great and have good texture. For a dairy-free option, replace the butter with coconut oil. You can also use a dairy-free chocolate. This makes the cookies friendly for many diets. Nuts can add crunch to your cookies. Try adding chopped walnuts or pecans for a tasty twist. They pair well with pumpkin flavors. Dried fruit is another fun option. Add raisins or cranberries for extra sweetness. You can even mix in some coconut flakes for a tropical vibe. To keep your pumpkin s'mores cookies fresh, store them at room temperature. Place them in a container with a lid. They stay soft and tasty for about five days. If your home is warm, you might want to refrigerate them. This helps maintain their flavor and moisture. You can freeze pumpkin s'mores cookies for later. First, let them cool completely. Then, place them in a single layer on a baking sheet. Freeze them for about an hour until firm. After that, transfer the cookies to a freezer-safe bag. Make sure to remove as much air as possible. To thaw, take them out of the freezer and let them sit at room temperature for about 30 minutes. For storage, choose airtight containers. They keep your cookies fresh longer. Glass or plastic containers work well. If you use non-airtight options, the cookies may dry out. Keep them away from light and heat sources for best results. To make your cookies chewy, don't overbake them. Remove them when the edges are golden but the center is soft. This keeps moisture in. You can also add an extra egg yolk for richness. Using brown sugar instead of white sugar adds more moisture. Yes, you can use pumpkin spice! Just replace the individual spices with a mix. About 2 teaspoons of pumpkin spice will work well. It simplifies the process and gives your cookies great flavor. These cookies stay fresh for about a week at room temperature. Store them in an airtight container to keep them soft. If you want them to last longer, consider freezing them. Absolutely! You can make the dough ahead of time. Just chill it in the fridge for up to 3 days. When you’re ready, scoop and bake as usual. You can also freeze the dough for about 2 months. Pumpkin s'mores cookies go well with warm drinks. Try pairing them with hot chocolate, coffee, or chai tea. They also taste great with vanilla ice cream or whipped cream for a fun dessert! This article covered how to make delicious pumpkin s'mores cookies. We covered the key ingredients, step-by-step instructions, and useful tips for perfect texture. You learned about creative variations and how to store your cookies. Remember, baking can be fun! Experiment with flavors and textures to find what you love. Keep your cookies fresh, and share them with friends and family. Your pumpkin s'mores cookies will surely bring smiles to everyone! Enjoy your baking adventure!
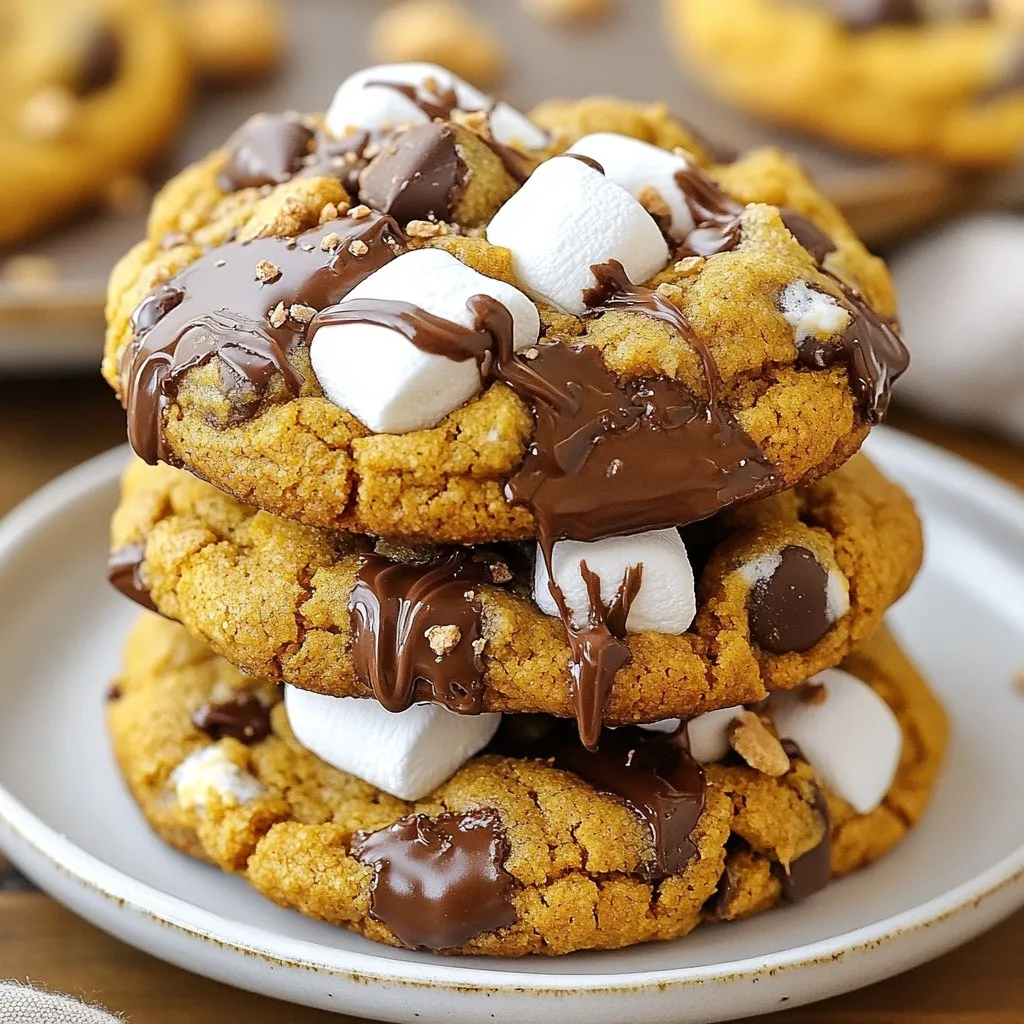
Pumpkin Smores Cookies Divine Fall Treat to Indulge
Fall brings cozy flavors, and pumpkin s’mores cookies are the perfect treat. Imagine warm, sweet cookies filled with chocolate, marshmallows, and pumpkin spice goodness. I’ll
To make Cannoli Cookie Squares, you need the right ingredients. Gather these tasty items to create this dessert: - 1 cup all-purpose flour - 1/2 cup unsweetened cocoa powder - 1/2 cup granulated sugar - 1/2 teaspoon baking powder - 1/4 teaspoon salt - 1/2 cup unsalted butter, softened - 1 large egg - 1 teaspoon vanilla extract - 1 cup ricotta cheese - 1/4 cup powdered sugar - 1 teaspoon vanilla extract (for filling) - 1/4 cup mini chocolate chips - Zest of 1 orange (optional) - 1/4 teaspoon ground cinnamon (optional) Each ingredient plays a key role in making these squares special. The flour and cocoa powder form the rich base. Sugar gives the right sweetness. Baking powder helps the cookie rise, while salt balances the flavors. The butter adds creaminess, and the egg binds everything together. Vanilla and ricotta cheese create a smooth filling. Mini chocolate chips add a fun crunch, and orange zest can brighten the flavor. You can also customize the recipe by adding cinnamon or using different toppings. Enjoy making your Cannoli Cookie Squares! {{ingredient_image_1}} First, preheat your oven to 350°F (175°C). This is the ideal temperature for baking. While it heats up, grease a 9x9-inch baking pan. You can also line it with parchment paper for easy removal. Next, let’s make the cookie base. In a mixing bowl, combine the following dry ingredients: - 1 cup all-purpose flour - 1/2 cup unsweetened cocoa powder - 1/2 cup granulated sugar - 1/2 teaspoon baking powder - 1/4 teaspoon salt Whisk them together until they mix well. In a separate bowl, cream 1/2 cup softened butter until it looks fluffy. Then add 1 large egg and 1 teaspoon vanilla extract. Mix until smooth. Now, add the dry ingredients to the wet ingredients slowly. Stir until a dough forms. This dough will be your cookie base. Take about 2/3 of the dough and press it evenly into the bottom of the prepared baking pan. Don’t forget to keep the remaining dough for the topping. For the filling, mix these ingredients in a bowl: - 1 cup ricotta cheese - 1/4 cup powdered sugar - 1 teaspoon vanilla extract (for filling) - 1/4 cup mini chocolate chips - Zest of 1 orange (optional) Mix until everything is combined. Then evenly spread this ricotta mixture over the cookie base. Next, crumble the reserved dough over the filling. This will create a nice crumble topping. Now, place your pan in the oven. Bake for 25-30 minutes. The top should feel set and slightly firm when done. After baking, let the squares cool in the pan for 10 minutes. Then transfer them to a wire rack to cool completely. This step is key before slicing into squares. You may want to switch some ingredients. Here are a few ideas: - Flour: Use whole wheat flour for a nuttier taste. - Cocoa Powder: Dutch-process cocoa gives a milder flavor. - Butter: Try coconut oil for a dairy-free option. - Ricotta Cheese: Cottage cheese can work too; just blend it smooth. - Sugar: Substitute with honey or maple syrup for a natural sweetener. Make these squares look fancy! Here are some fun ways: - Dust with Powdered Sugar: This adds a nice touch. Use a sieve for an even layer. - Serve with Berries: Place fresh strawberries or blueberries on the side. They add color and taste. - Garnish with Mint Leaves: A few mint leaves can make your dish pop. Keep these tips in mind for the best results: - Dough Consistency: Make sure your dough is not too wet or dry. It should hold together but not stick to your hands. - Baking Time: Check your squares at 25 minutes. They should feel firm but not hard. - Cooling Time: Let them cool properly before slicing. This helps the squares hold their shape. Pro Tips Use Fresh Ricotta: For the best flavor, opt for fresh ricotta cheese instead of the pre-packaged varieties. This will make a noticeable difference in your filling's taste and texture. Chill the Dough: If your dough becomes too sticky while handling, chill it in the refrigerator for about 15 minutes. This will make it easier to work with and help it maintain its shape during baking. Experiment with Flavors: Don't hesitate to add different flavorings to the ricotta filling, such as almond extract or a splash of your favorite liqueur, to create a unique twist on the classic cannoli flavor. Store Properly: To keep the cookie squares fresh, store them in an airtight container at room temperature for up to three days or refrigerate them for longer freshness. {{image_2}} You can change the filling for your Cannoli Cookie Squares to make them unique. Here are some ideas: - Adding different extracts: You can use almond extract or lemon extract for new flavors. Just add a teaspoon to the ricotta mixture. - Using ricotta alternatives or mix-ins: Try mascarpone cheese for a richer taste. You can also mix in crushed pistachios or toasted almonds for crunch. Adapting recipes can help everyone enjoy these squares. Here are some options: - Gluten-free alternatives: Use almond flour or a gluten-free all-purpose blend instead of regular flour. This keeps the texture nice and light. - Vegan options: Replace butter with coconut oil and the egg with flaxseed meal mixed with water. Use a plant-based ricotta or tofu for the filling. You can add seasonal flavors to your Cannoli Cookie Squares. Here are some fun ideas: - Incorporating seasonal fruits or spices: In the fall, add some diced apples and cinnamon. In summer, mix in fresh berries or lemon zest for a bright taste. Store any leftover Cannoli Cookie Squares in an airtight container. This keeps them fresh. You can keep them at room temperature for up to two days. If you want them to last longer, put them in the fridge. This will keep them good for about a week. Use a glass or plastic container with a tight lid. Avoid metal containers since they can cause the cookie squares to dry out. You can freeze Cannoli Cookie Squares to enjoy later. First, let them cool completely. Then, cut them into squares. Place a piece of parchment paper between the squares to prevent them from sticking. Put the squares in a freezer-safe container or bag. Make sure to remove as much air as possible. For best results, eat them within three months. To thaw the squares, take them out of the freezer. Leave them in the fridge overnight. If you need them faster, you can leave them at room temperature for a couple of hours. Enjoy your delicious treat whenever you like! To cut the squares neatly, use a sharp knife. Make sure the squares are cool. Wipe the knife with a damp cloth between cuts. This helps reduce sticking. Try to cut straight down for even edges. You can also use a ruler to measure and guide your cuts. Yes, you can make Cannoli Cookie Squares ahead of time. Bake and cool them completely. Wrap them tightly in plastic wrap. Store them in the fridge for up to three days. For longer storage, freeze them. They can last for up to three months frozen. Just thaw them in the fridge before serving. These treats are best enjoyed fresh. However, they will stay good for up to three days in the fridge. Make sure to cover them well. If frozen, they can last for about three months. When ready to eat, thaw them in the fridge overnight. Absolutely! You can add many fun toppings. Try sprinkling more mini chocolate chips on top. Or, use crushed nuts for a crunchy texture. Shredded coconut can also add flavor. For a zesty twist, consider a drizzle of orange glaze. Don't be afraid to get creative! Making Cannoli Cookie Squares is simple with the right ingredients and steps. We covered everything from gathering your supplies to baking and storage. You now know how to mix, bake, and enjoy these treats. Remember to try out different flavors and toppings for fun twists. Storing leftovers properly will keep them fresh for later. Enjoy baking and sharing these delicious squares with friends and family!
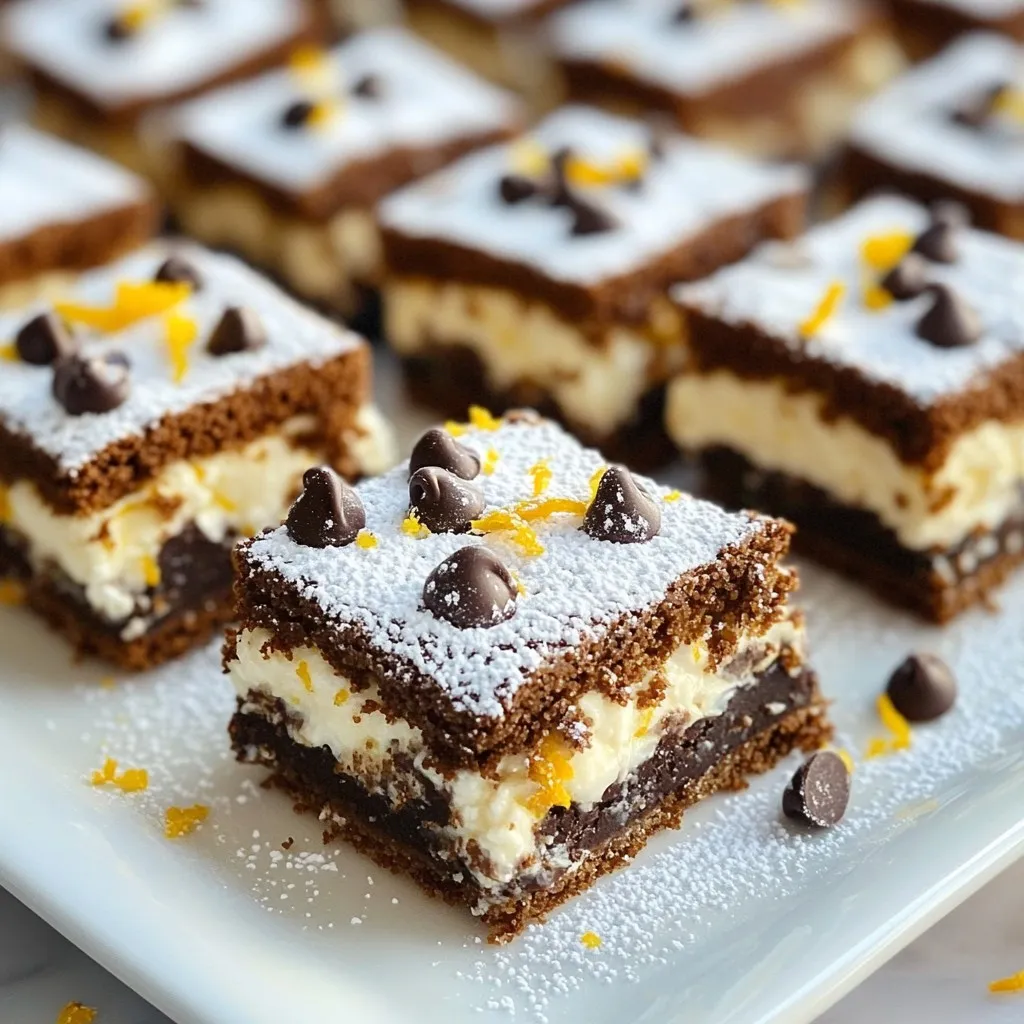
Cannoli Cookie Squares Irresistible Treat Recipe
Get ready for a treat that combines two favorite desserts: cannoli and cookies! In this recipe, I’ll guide you through making Cannoli Cookie Squares that
- 2 large apples (Fuji or Honeycrisp) - 1 cup all-purpose flour - 1 teaspoon cinnamon - ½ teaspoon nutmeg - 1 cup breadcrumbs (Panko recommended) - 2 large eggs - 2 tablespoons milk - 2 tablespoons brown sugar - Pinch of salt - Cooking spray For this recipe, I love using Fuji or Honeycrisp apples. They are sweet and crisp. The texture holds up well when frying. You want your apples to be fresh for the best flavor. You will need some basic items. Flour, cinnamon, and nutmeg make a lovely coating. The brown sugar adds a hint of sweetness. I prefer Panko breadcrumbs for that extra crunch. Eggs and milk create a nice binding agent. They help the coating stick to the apple fries. A pinch of salt balances the sweetness. Cooking spray is key; it helps the fries crisp up in the air fryer. Gathering these ingredients is easy. You might already have most of them at home. If not, a quick trip to the store will do. Make sure to choose the best apples you can find. Fresh ingredients make all the difference in the world. {{ingredient_image_1}} Wash the apples under running water to remove any dirt. Cut each apple into quarters. Use a knife to remove the core. Slice the quarters into fry-shaped pieces, aiming for even sizes. This helps them cook the same way. In a shallow bowl, mix together the flour, cinnamon, nutmeg, brown sugar, and a pinch of salt. In a second bowl, whisk the eggs and milk together until combined. In a third bowl, place the breadcrumbs. This setup makes coating the apple fries easy. Take one apple fry and dip it into the flour mix. Make sure it gets coated well. Shake off any extra flour. Next, dip it into the egg mixture. Finally, roll it in the breadcrumbs for a nice coating. Repeat this process until all fries are coated. Preheating the air fryer is key. It helps the apple fries cook evenly and get crispy. Set the temperature to 350°F (175°C) before you start cooking. Arrange the coated apple fries in the air fryer basket. Make sure they sit in a single layer. Avoid overcrowding to ensure they cook well. Lightly spray the fries with cooking spray for extra crunch. Cook the apple fries for about 10-12 minutes. Flip them halfway through to ensure even cooking. They should turn golden brown and crispy once ready. Once cooked, let the apple fries cool slightly. Serve them warm for the best taste. Pair with a small bowl of caramel sauce or vanilla yogurt for dipping. You can sprinkle some extra cinnamon and sugar on top for added flavor. When making apple fries, pick the best apples. You can choose sweet or tart varieties based on your taste. - Sweet apples: Fuji or Honeycrisp. These apples give a nice flavor. - Tart apples: Granny Smith. They add a good balance when cooked. For frying, stick to apples that hold their shape. Fuji and Honeycrisp work great. They stay firm when cooked and taste amazing. Crispiness is key for tasty apple fries. Panko breadcrumbs help a lot here. They are lighter and crunchier than regular breadcrumbs. - Use Panko: It gives a better crunch. - Cooking spray: Lightly spray your apple fries before cooking. This helps them crisp up nicely. Sometimes fries can get soggy or cook unevenly. Here are some tips to fix these issues. - Avoiding sogginess: Make sure your apple fries are not wet before breading. Use a towel to dry them first. - Fixing uneven cooking: Flip the fries halfway through cooking. This helps them brown evenly. If they still cook unevenly, try cooking them in smaller batches. Pro Tips Choose the Right Apples: Opt for firm varieties like Fuji or Honeycrisp that hold their shape when cooked, ensuring the perfect crispy fry. Even Sizing Matters: Cut the apple fries into uniform sizes to guarantee even cooking and crispiness across all fries. Don’t Overcrowd the Basket: Air fry in batches if necessary, as overcrowding can lead to uneven cooking and less crispy results. Experiment with Dipping Sauces: Try serving with different dips like caramel sauce, honey, or even chocolate for a fun twist on flavors! {{image_2}} You can add fun flavors to your apple fries. Try mixing in spices like ginger or cardamom. These spices can give your fries a unique twist. You can also swap out regular flour for coconut or almond flour. This will change the taste and add different nutrients. Coconut flour adds a sweet touch, while almond flour gives a nutty flavor. Experimenting with flavors makes cooking exciting! Apple fries can be sweet or savory. For a sweet touch, try adding some melted cheese or herbs. Cheese like cheddar can create a nice contrast with the apples. You can also dip your fries in sauces. Caramel sauce works great for sweet fries, while ranch dressing is perfect for savory ones. Mixing flavors offers more fun at snack time! If you do not have an air fryer, you can still enjoy apple fries. You can bake them in the oven. Preheat your oven to 400°F (200°C). Arrange the fries on a baking sheet and spray them with cooking spray. Bake for 15-20 minutes, flipping halfway through, until golden brown. Another option is using a traditional fryer. Heat oil in a pan to 350°F (175°C). Fry the apple fries in small batches until they are crispy. Be careful when frying, and always watch the temperature. This method gives you a classic fried texture! To keep your apple fries fresh, use airtight containers. Glass or plastic containers work well. Make sure to let the fries cool before placing them inside. This helps avoid moisture buildup. Store them in the fridge for up to three days. To enjoy your apple fries again, you can reheat them in the air fryer. Set the air fryer to 350°F (175°C). Place the fries in the basket and heat for about 5 minutes. This method keeps them crispy. If you prefer, you can also use your oven. Preheat it to 350°F (175°C). Spread the fries on a baking sheet and heat for 10-15 minutes. Flip them halfway for even heating. You can freeze apple fries for later use. First, place them in a single layer on a baking sheet. Freeze them for about an hour until hard. Then, transfer the fries to a freezer bag. Remove as much air as possible. They can stay in the freezer for up to three months. When you are ready to eat, thaw them in the fridge overnight. Reheat them in the air fryer or oven as mentioned above for the best taste. Yes, you can use different apples! Fuji and Honeycrisp are great choices. For a sweeter taste, try Gala apples. If you want a tart flavor, use Granny Smith. The texture matters, too. Firmer apples hold up better when cooked. To make these apple fries gluten-free, swap all-purpose flour for almond flour or gluten-free flour. Use gluten-free breadcrumbs instead of regular ones. These swaps keep the fries crispy and tasty. You have many fun options for dipping! Caramel sauce is a classic choice. You can also try vanilla yogurt or chocolate sauce. For a twist, mix peanut butter with honey. Each dip adds a new layer of flavor. Leftover apple fries can last for about 2-3 days in the fridge. Store them in an airtight container to keep them fresh. If you want them to stay crispy, don’t stack them. Yes, you can prepare the apple fries ahead of time! Cut and coat the apples, then store them in the fridge. Just air fry them when you’re ready to eat. This saves time and gives you a quick snack. You can make tasty apple fries at home with simple ingredients and steps. I shared how to prepare apples, coat them, and use an air fryer for the best results. Don’t forget the tips on choosing apples and keeping them crispy. You can also explore fun variations and storage methods. Enjoy experimenting with flavors and dipping sauces. Now, it’s time to gather your ingredients and enjoy a fun cooking experience! You’ll love your crunchy, sweet snack.
Air Fryer Apple Fries Crispy and Irresistible Snack
Craving a snack that’s both crispy and sweet? Let me introduce you to Air Fryer Apple Fries! This easy recipe combines the goodness of apples