Desserts
![Healthy no-bake cookies are simple to make and taste amazing. Here’s what you need: - 1 cup rolled oats - 1/2 cup nut butter (almond, peanut, or cashew) - 1/3 cup honey or maple syrup - 1/4 cup unsweetened cocoa powder - 1/2 teaspoon vanilla extract - 1/4 cup shredded coconut (unsweetened) - 1/4 cup dark chocolate chips or cacao nibs - A pinch of sea salt Each ingredient plays a key role. Rolled oats provide a hearty base. Nut butter adds creaminess and protein. Sweeteners like honey or maple syrup give just the right touch of sweetness. Unsweetened cocoa powder brings rich chocolate flavor. Vanilla extract enhances the taste. Shredded coconut adds texture, while dark chocolate chips or cacao nibs give a delightful crunch. A pinch of sea salt balances the sweetness. When you gather these ingredients, you set the stage for a tasty treat. You can also mix and match nut butters. Each nut butter has its own flavor, making your cookies unique. Try different sweeteners too. They can change the taste and sweetness level. Check the Full Recipe for exact amounts and steps. Enjoy getting creative with these simple ingredients! Making healthy no-bake cookies is easy and fun. Follow these steps to create a tasty treat. - Mixing dry ingredients: Start by grabbing a large mixing bowl. Add 1 cup of rolled oats, 1/4 cup of unsweetened cocoa powder, and 1/4 cup of shredded coconut. Stir until everything is mixed well. This mix gives your cookies texture and flavor. - Heating nut butter and sweetener: Next, take a small saucepan. Add 1/2 cup of nut butter and 1/3 cup of honey or maple syrup. Heat this mixture on low. Stir it until it is smooth. This step brings out the nuttiness and sweetness in your cookies. - Combining wet and dry ingredients: After your nut butter mix is ready, pour it over the dry ingredients in the bowl. Use a spatula to mix it all together. Make sure every oat and cocoa piece is coated well. This is where the magic happens! - Shaping cookies: Now, line a baking sheet with parchment paper. With your hands, scoop out the cookie mixture. Form small shapes, about 1 inch in diameter. Place each cookie on the sheet. This is your chance to get creative with the shapes! - Cooling and setting in the fridge: Finally, put the cookies in the fridge. Let them chill for at least 30 minutes. This helps them set properly. Once they are firm, grab one and enjoy your delicious creation. You can find the full recipe to ensure you don’t miss any details. Happy baking! To make healthy no-bake cookies, focus on consistency. You want a sticky mix that holds together. If it's too dry, add a bit more nut butter or sweetener. For a perfect shape, chill your cookies for at least 30 minutes. This helps them firm up nicely. When shaping, wet your hands slightly to prevent sticking. This makes it easier to form those perfect little cookie shapes. If you want to switch things up, try different nut butters like sunflower or soy nut butter. For sweeteners, use agave nectar or date syrup as vegan options. If you need gluten-free cookies, just make sure your oats are certified gluten-free. You can use almond flour or coconut flour to add a different texture, too. {{image_2}} You can make these cookies even more fun with flavor tweaks. Adding spices like cinnamon or nutmeg gives warmth and depth. Just a pinch can change the taste. You can also mix in dried fruits or seeds. Think raisins, cranberries, or sunflower seeds for a chewy bite. Want more chocolate? Try different options! Use dark chocolate chips for a rich flavor. You can even swap in white chocolate for a sweet twist. Get creative with your favorite flavors to make each batch unique. If you need nut-free cookies, just swap the nut butter. Use sunbutter or soy nut butter instead. This keeps the cookies safe for kids with nut allergies. For those on low-carb or keto diets, you can replace honey with a sugar-free sweetener. Look for options like erythritol or stevia. This helps keep the cookies tasty without the carbs. Want to make them vegan? Use maple syrup instead of honey. Choose a nut or seed butter that fits a vegan diet. These changes keep your cookies healthy and plant-based. For the complete recipe, check out the [Full Recipe]. To keep your healthy no-bake cookies fresh, store them in an airtight container. This helps keep them moist and tasty. You can use a glass or plastic container with a tight lid. You can choose to refrigerate or freeze them. Refrigerating works well for short-term storage. If you want to keep them longer, freeze them. Just make sure to separate layers with parchment paper. This prevents sticking. In the fridge, your cookies will last about one week. For freezing, they can last up to three months. Always check for signs of spoilage, like odd smells or changes in texture. To maintain freshness, only take out what you plan to eat. Try to avoid leaving them out too long at room temperature. This helps ensure each cookie stays as delicious as the first bite. For the full recipe, check out the Healthy No Bake Cookies section. Can I use quick oats instead of rolled oats? You can use quick oats. They will make the cookies softer. Rolled oats give more texture. I like the chewiness of rolled oats, but quick oats work too. Are these cookies suitable for a vegan diet? Yes, they can be vegan! Just swap honey for maple syrup. Use a nut butter without added ingredients. This keeps them plant-based and still tasty. How do I know when they are fully set? The cookies should feel firm but not hard. After chilling for 30 minutes, check if they hold their shape. If they do, they are ready to eat. Can I add protein powder to the recipe? Absolutely! Adding protein powder boosts nutrition. Just use a small amount to keep the texture right. Mix it in with the dry ingredients for best results. What are the health benefits of the ingredients? These cookies are full of good stuff! Rolled oats provide fiber. Nut butter adds protein. Cocoa powder is rich in antioxidants. Unsweetened coconut offers healthy fats. Together, they create a balanced snack. How many calories are in one cookie? Each cookie has about 100 calories. This can vary based on the nut butter and sweetener you choose. They make a great treat without too many calories. Are these cookies good for children? Yes, they are great for kids! They are tasty and packed with nutrients. Kids will love the chocolate chips and sweet flavor. Plus, they are easy to make together! You learned how to make delicious no-bake cookies. We covered the key ingredients, from oats to nut butter. The step-by-step guide made it easy to follow and prepare your treats. We also shared tips for perfecting the cookies and ingredient swaps for special diets. Don't forget storage tips to keep them fresh longer. Now, you can enjoy these healthy snacks anytime! Try different flavors and make them your own. Enjoy your baking adventure!](https://therecipehatch.com/wp-content/uploads/2025/06/37f12262-5603-425d-8c76-1b3be81e2875.webp)
Healthy No Bake Cookies Simple and Delicious Treats
Are you craving a sweet treat but want to keep it healthy? You’re in the right place! Let’s dive into making healthy no bake cookies—simple,
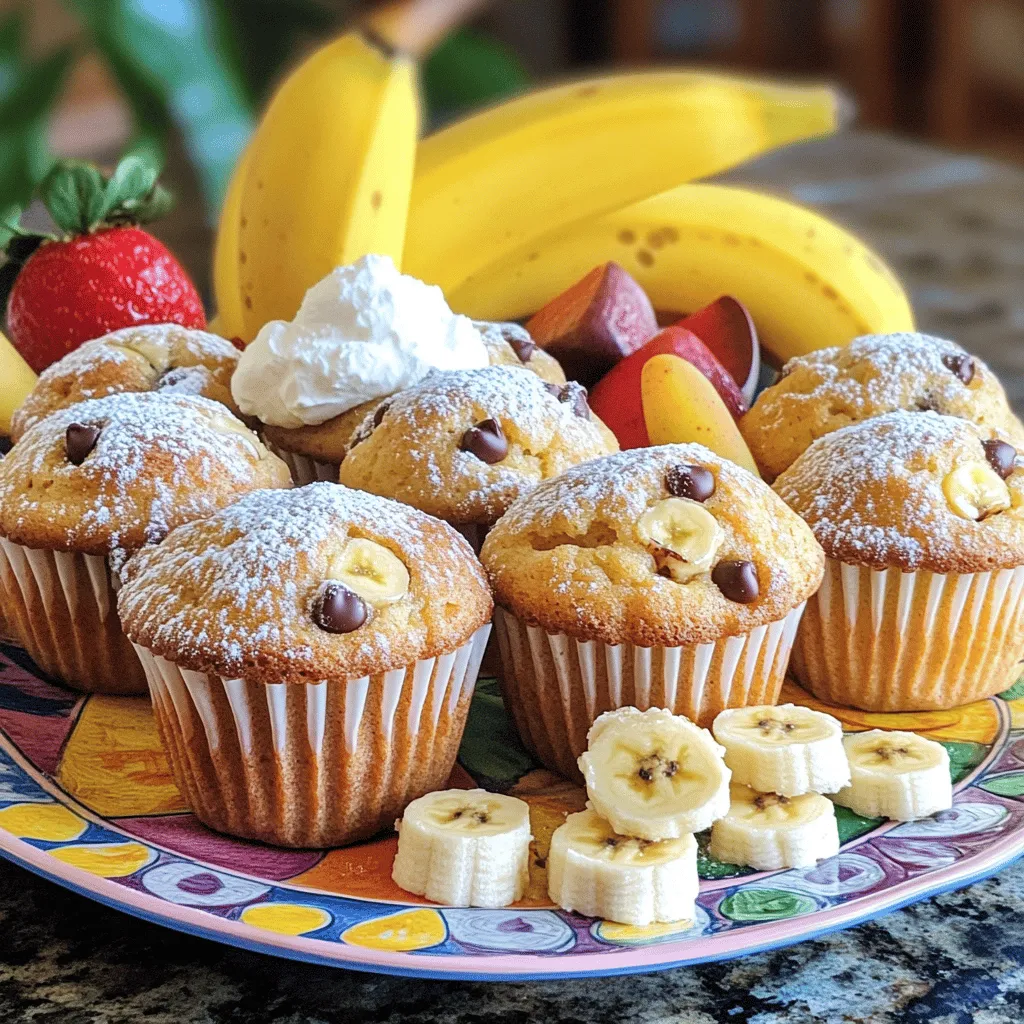
30-Minute Moist Banana Cream Cheese Muffins Recipe
Are you craving a quick and tasty treat? These 30-Minute Moist Banana Cream Cheese Muffins are just what you need! With moist texture and rich
![To make your protein cookie dough, gather these items: - 1 cup almond flour - 1/2 cup vanilla protein powder - 1/4 cup almond butter or peanut butter - 1/4 cup maple syrup or honey - 1/2 teaspoon vanilla extract - 1/4 cup mini dark chocolate chips - Pinch of salt - Optional: 1 tablespoon milk or plant-based milk Feel free to swap ingredients based on your taste or dietary needs. You can use: - Cashew butter instead of almond butter - Honey instead of maple syrup - Whey protein powder instead of plant-based protein - Coconut flour if you want a different texture Understanding the nutrition in your cookie dough helps you make smart choices. - Almond flour: Low in carbs, high in healthy fats, and rich in vitamin E. - Vanilla protein powder: A great source of protein, helping build and repair muscles. - Almond or peanut butter: Offers healthy fats and protein, plus fiber to keep you full. - Maple syrup or honey: Natural sweeteners that provide quick energy. - Vanilla extract: Adds flavor with minimal calories. - Mini dark chocolate chips: A treat that adds antioxidants and a touch of sweetness. - Salt: Enhances flavor and balances sweetness. - Milk or plant-based milk: Adds creaminess and can help with consistency. This protein cookie dough recipe packs a punch in flavor and nutrition. You can enjoy it knowing it satisfies your sweet tooth while fueling your body! For the complete recipe, check out the [Full Recipe]. To make protein cookie dough, start with a big bowl. First, mix 1 cup of almond flour and 1/2 cup of vanilla protein powder. Use a whisk to break up any lumps. Next, add 1/4 cup of almond butter and 1/4 cup of maple syrup. Mix until it looks crumbly. Then, add 1/2 teaspoon of vanilla extract and a pinch of salt. Keep mixing until the dough starts to form. If it's too dry, add 1 tablespoon of milk. This helps bring it all together. Finally, fold in 1/4 cup of mini dark chocolate chips. Your cookie dough is almost ready! Mixing is key to a great dough. Start with the dry ingredients before adding the wet ones. This helps everything blend well. Make sure to scrape the sides of the bowl. This way, you won't miss any dry spots. If you want extra flavor, try adding a bit more vanilla extract. It gives a nice taste boost. Be gentle when folding in the chocolate chips. You want them to stay whole for that yummy bite. Chilling the dough is super important. Place it in the fridge for about 30 minutes. This makes it firm and easier to scoop or shape. If you skip this step, it may be too soft to handle. While it chills, clean up your workspace. When the time is up, you can shape the dough into balls or leave it scoopable. Enjoy it as a treat or snack! For the full recipe, check the details above. To get the right texture, start by mixing the dry ingredients. Use almond flour and protein powder. If the dough feels too dry, add a little milk. This helps make it soft and smooth. You want it to be easy to scoop or roll into balls. The goal is a dough that holds together but isn’t sticky. To make your protein cookie dough even better, try adding fun flavors. Mix in a pinch of cinnamon or nutmeg for warmth. You can also add crushed nuts or dried fruits for crunch. If you love chocolate, double the mini dark chocolate chips! Each change makes the dough taste unique and special. Many people skip chilling the dough. This step is key for great texture. Chilling helps the dough firm up, making it easier to scoop. Another mistake is adding too much liquid at once. Start with a small amount and add more as needed. Lastly, be careful not to overmix. Gentle folding keeps the dough light and fluffy. For the full recipe, check out the Protein-Packed Cookie Dough Bliss ! {{image_2}} You can make protein cookie dough fun by adding flavors. Try mixing in different ingredients to find your favorite. Here are some ideas: - Chocolate Mint: Add 1/2 teaspoon of mint extract and some crushed mint leaves. - Cinnamon Roll: Mix in 1 teaspoon of cinnamon and some chopped pecans. - Peanut Butter Banana: Stir in mashed banana and extra peanut butter for a yummy twist. - Coconut Delight: Add unsweetened shredded coconut for a tropical taste. You can easily change the recipe to suit your needs. Here are some modifications: - Nut-Free: Use sunflower seed butter instead of almond or peanut butter. - Vegan: Replace honey with maple syrup or agave nectar. - Gluten-Free: Stick with almond flour, as it is naturally gluten-free. - Low-Carb: Use a low-carb protein powder and reduce maple syrup for less sugar. Protein cookie dough isn’t just a snack. You can use it in many ways: - Topping for Yogurt: Scoop some dough on top of Greek yogurt for added protein. - Energy Bites: Shape the dough into small balls for easy, on-the-go snacks. - Ice Cream Mix-In: Fold the dough into your favorite ice cream for a special treat. - Dessert Bars: Press the dough into a pan, bake briefly, and cut into bars. Feel free to explore these variations and find what you love most! For the complete recipe, check out the [Full Recipe]. Store your protein cookie dough in an airtight container. This keeps it fresh and tasty. You can also wrap it tightly in plastic wrap. Make sure it is well-sealed to avoid drying out. Place it in the fridge if you plan to eat it within a week. If you want to save it longer, consider freezing it. To freeze your protein cookie dough, first shape it into balls. Arrange the balls on a baking sheet. Freeze them for about 30 minutes until firm. Then, transfer the frozen balls into a freezer-safe bag. Label the bag with the date. This way, you can enjoy a quick treat anytime! When stored in the fridge, protein cookie dough lasts about one week. In the freezer, it stays good for about three months. Always check for any changes in smell or texture before eating. Freshness keeps your treat tasting great! For the full recipe, refer to the earlier section. Protein cookie dough is a tasty snack made with healthy ingredients. It uses protein powder, nut butter, and almond flour. This mix gives you a sweet treat that's also filling. You can eat it raw or use it in recipes. It’s a great way to enjoy cookie dough without the guilt. Yes, you can eat protein cookie dough raw! It is safe because it does not contain eggs. The almond flour and protein powder are safe to eat. Many people love eating it straight from the bowl. Just make sure to keep it chilled for the best texture. You can find protein cookie dough in health food stores. Many grocery stores carry it in the snack aisle. You can also buy it online from various brands. Look for options with natural ingredients for the best taste. Protein cookie dough is healthier than regular cookie dough. It has more protein and fewer sugars. Regular cookie dough often has lots of butter and sugar. Protein cookie dough gives you energy and helps build muscle. It’s a smart choice for a snack! Protein in snacks helps you feel full longer. It supports muscle growth and repair. Eating protein can also help with weight management. Snacks high in protein keep your energy levels steady. They are great for after workouts or busy days. You now know all about protein cookie dough. We covered the key ingredients, their nutrition, and how to mix them perfectly. I shared tips to avoid common mistakes and added fun flavor ideas. I also explained how to store your dough for later and answered common questions. Remember, you can enjoy this treat in many ways. It’s nutritious, adaptable, and easy to make. Use this knowledge to create delicious snacks that fit your needs. Enjoy your baking!](https://therecipehatch.com/wp-content/uploads/2025/06/f218aa95-bf5f-4dc1-815b-9d6b99a614c3.webp)
Protein Cookie Dough Simple and Delicious Treat
Looking for a tasty way to boost your protein intake? You’ll love this Protein Cookie Dough! It’s simple, quick, and totally delicious. In this guide,
Savory Banana Oatmeal Cookies Quick and Simple Treat
Looking for a quick and tasty treat? These savory Banana Oatmeal Cookies are the answer! With just a few simple ingredients, you can whip up
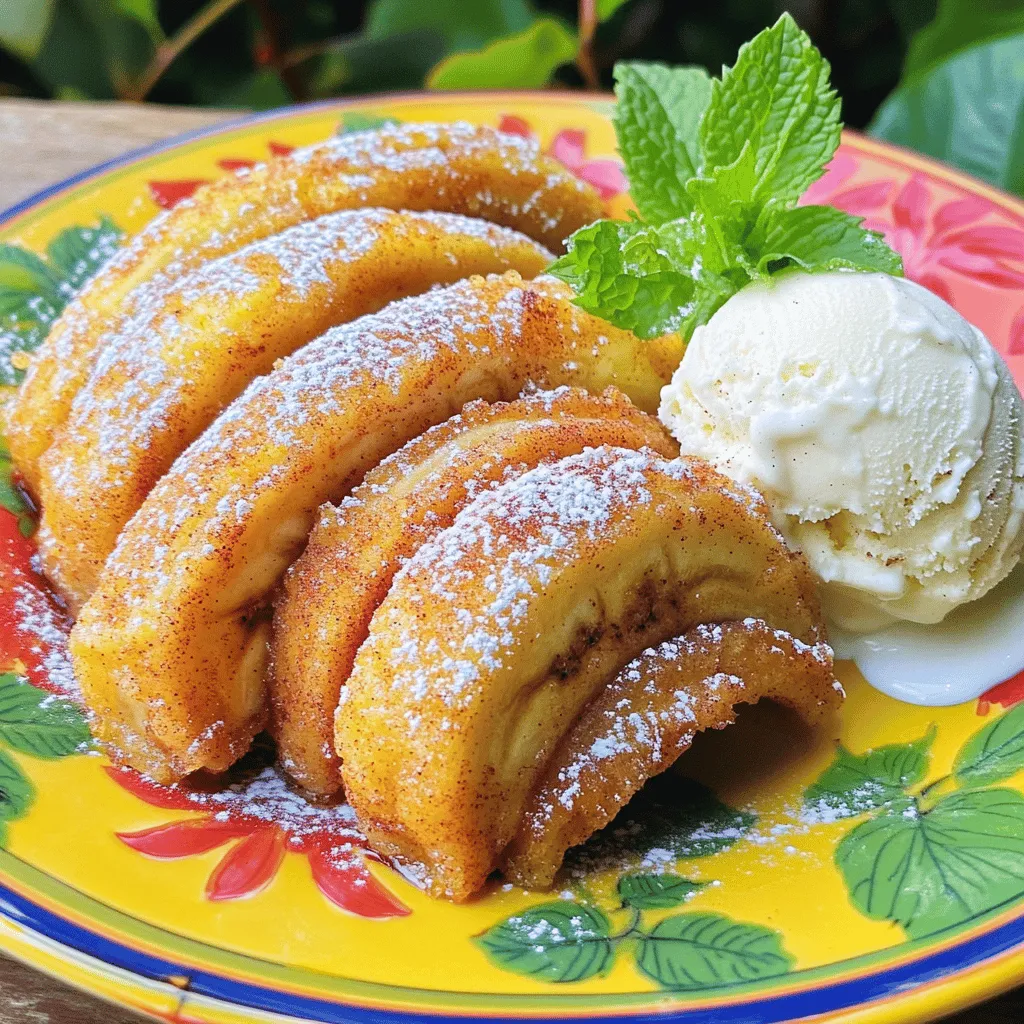
Fried Cinnamon Bananas Irresistible Sweet Treat
Are you ready to indulge in a sweet treat that will make your taste buds dance? Fried cinnamon bananas are the answer! With just a
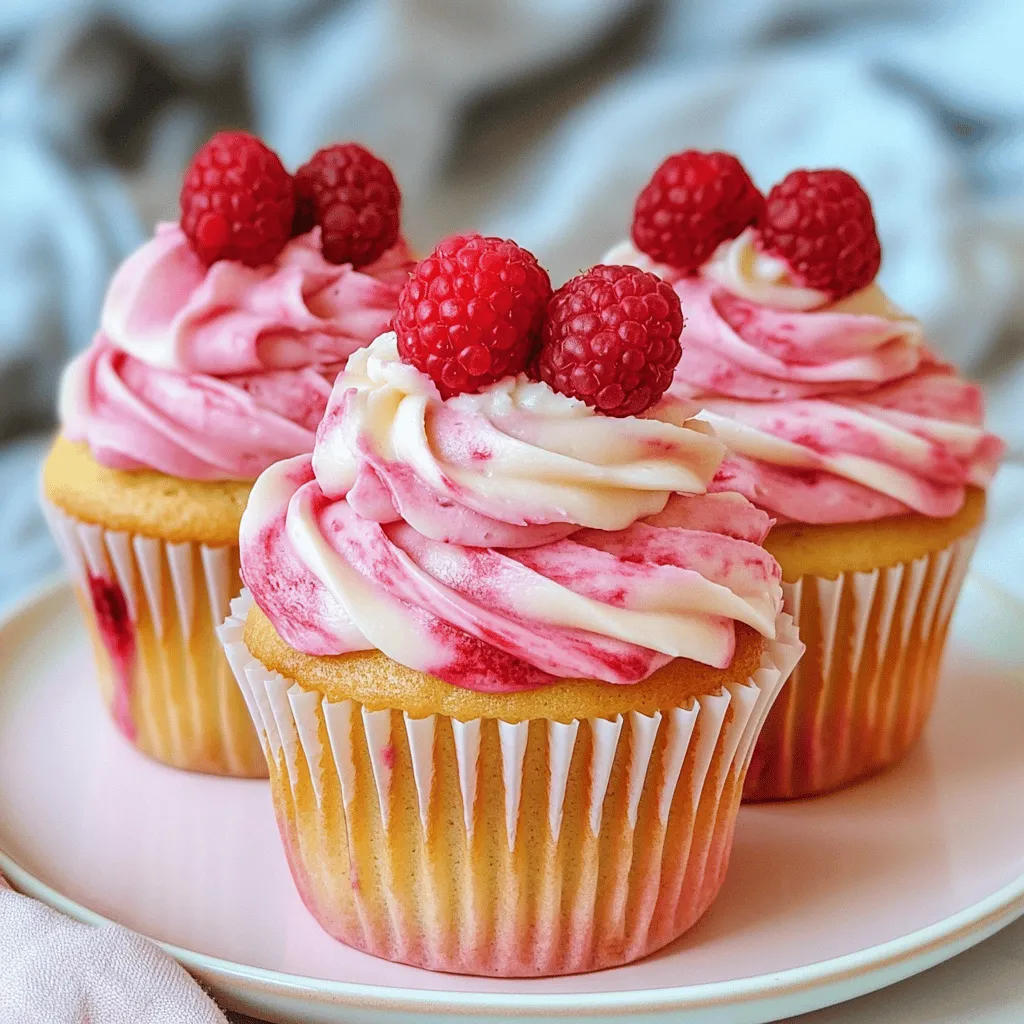
Raspberry Swirl Cupcakes Delightful and Simple Recipe
Get ready to treat yourself with my Raspberry Swirl Cupcakes! This delightful recipe brings together sweet batter and tangy raspberries in one easy-to-make treat. Whether
![- 1 box of vanilla cake mix - 3 large eggs - 1/2 cup vegetable oil - 1 cup water - 1/2 cup frosting (any flavor, but vanilla works great) - 12 mini ice cream cones - 1 cup white chocolate chips - 2 tablespoons coconut oil (or shortening) - Sprinkles (optional, for decoration) To make Ice Cream Cone Cake Pops, gather all these items first. The vanilla cake mix gives a soft base. You need eggs for moisture and structure. Vegetable oil keeps the cake tender. Water helps mix everything smoothly. The frosting adds sweetness and binds the cake crumbs. Mini ice cream cones create a fun shape. White chocolate chips provide the perfect outer layer. The coconut oil makes the melted chocolate shiny and smooth. Sprinkles are a fun touch on top, but they are optional. Having these ingredients ready makes the process easy. Use high-quality ingredients for the best flavor. This will ensure your cake pops turn out delicious and fun! If you want to see the complete process, check the Full Recipe. 1. Preheat your oven to 350°F (175°C). Line a muffin tin with paper liners. 2. In a large bowl, mix the cake mix, eggs, oil, and water. Stir until smooth. 3. Pour the batter into the muffin tin, filling each liner halfway. 4. Bake for 15-18 minutes. A toothpick should come out clean when inserted. 5. Cool the cupcakes in the tin for 5 minutes. Then, move them to a wire rack to cool completely. 1. Once cooled, crumble the cupcakes into a large bowl. Aim for fine crumbs. 2. Add the frosting to the crumbled cupcakes. Mix until fully combined; it should feel moist. 3. Roll the mixture into 1-inch balls. Place them on a parchment-lined baking sheet. 4. Freeze the cake balls for about 30 minutes until they feel firm. 1. Melt white chocolate chips in a microwave-safe bowl. Stir in coconut oil until smooth. 2. Take the cake balls from the freezer. Insert a mini ice cream cone into each ball. 3. Dip each cake pop into the melted chocolate. Let the excess chocolate drip off. 4. If you like, sprinkle colorful sprinkles on top before the chocolate sets. 5. Place the cake pops in a block of foam or a tall glass to hold them upright. 6. Let the chocolate harden at room temperature or refrigerate for quicker results. For more details, check out the Full Recipe. - Set your oven to 350°F (175°C). This helps cupcakes bake evenly. - Use an oven thermometer to check the real temperature. This ensures perfect results. - Cool the cupcakes in the tin for 5 minutes. Then move them to a wire rack. This helps them cool faster and avoids sogginess. - Crumble the cooled cupcakes until they are fine. Aim for a sandy texture. - Add frosting slowly. Mix until it feels moist but not too sticky. This helps form the cake balls easily. - Roll the mixture into 1-inch balls. If they fall apart, add more frosting to bind them. - Melt your white chocolate chips in short bursts in the microwave. Stir between each burst until smooth. - Mix in coconut oil for a shiny finish. This helps the chocolate coat evenly. - Dip each cake pop quickly. Let the excess chocolate drip off before sprinkles. - Add sprinkles right after dipping. This way, they stick well to the wet chocolate. For a full recipe, check out the [Full Recipe]. {{image_2}} You can change the cake flavor to fit your taste. Try chocolate cake mix for a rich twist. Red velvet gives a fun color and flavor. Lemon cake mix adds a zesty touch. You can also use funfetti for a festive look. Frosting options are endless! Chocolate frosting pairs well with vanilla cake. Cream cheese frosting is great with red velvet. Try strawberry or mint frosting for a fruity kick. Each choice adds a unique taste to your Ice Cream Cone Cake Pops. Get creative with decorations for your cake pops. For a birthday party, use bright colors and themed sprinkles. You can match the colors to party themes. For holidays, use red and green for Christmas, or pastel colors for Easter. Add small candy eyes for a fun, playful look. Edible glitter can make them sparkle for special events. You can even use food coloring to tint the chocolate coating. This way, every pop can be unique and festive. Present your cake pops in fun ways. Use a decorative cup filled with colorful rocks or sprinkles. This adds a pop of color to your table. You can also create a cake pop stand for a fun display. Place them upright in a foam block for easy serving. Pair cake pops with drinks like milk or hot cocoa. They also go well with fruit snacks or cookies. This makes for a delightful treat for kids and adults alike. To keep your Ice Cream Cone Cake Pops fresh, store them in an airtight container. This will help prevent them from drying out. Place a piece of parchment paper between layers if stacking them. I recommend eating them within 3 days for the best taste and texture. If you want to keep them longer, freezing is a great option. Freezing cake pops is easy and effective. First, ensure the pops are firm by freezing them for about 30 minutes. This helps them hold their shape. Once firm, wrap each pop in plastic wrap, then place them in a freezer-safe bag. They can last up to 2 months in the freezer. When you’re ready to eat them, simply take them out and let them thaw at room temperature for about 30 minutes. This way, you keep the quality intact. Enjoy your sweet treat any time! How long do Ice Cream Cone Cake Pops last? Ice Cream Cone Cake Pops stay fresh for about five days at room temperature. If you store them in the fridge, they can last up to a week. Keep them in an airtight container to avoid drying out. Can I use different types of chocolate for coating? Yes, you can use dark, milk, or even colored chocolate for coating. Each type gives a unique taste and look. Try different chocolates to find your favorite! Are Ice Cream Cone Cake Pops gluten-free? They are not gluten-free if you use regular cake mix. However, you can find gluten-free cake mixes in stores. Just check the labels for gluten-free options. What can I use instead of frosting in the cake mix? If you want a healthier option, try using yogurt or applesauce. These will keep the cake moist while cutting down on sugar. You can also use cream cheese for a richer taste. What to do if the chocolate coating is not smooth? If your chocolate isn't smooth, try adding more coconut oil or shortening. This helps thin the chocolate. Also, make sure you melt it at low power in the microwave. Stir often for a creamy texture. How to fix cake pops that won’t stay on the cone? If your cake pops fall off the cone, try chilling the cake balls longer. They need to be firm before you insert them into the cones. You can also dip the end of the cone in melted chocolate before inserting it. Can kids help in making Ice Cream Cone Cake Pops? Absolutely! Kids can help mix the batter, roll the cake balls, and decorate with sprinkles. It’s a fun way to bond and share a delicious treat together. What occasions are best for serving these cake pops? These cake pops are perfect for kids' birthday parties, summer picnics, or family gatherings. They also make great treats for holidays like Halloween or Christmas when you can use themed decorations. For the full recipe, check out the details above! In summary, this blog post guides you through making Ice Cream Cone Cake Pops. You’ve learned about the key ingredients and easy steps needed. I shared tips for baking, forming cake balls, and coating them in chocolate. Plus, I offered fun variations and storage advice. Try adding your favorite flavors and decorations. These cake pops are great for parties and gatherings. Enjoy the process and share your creations with friends and family!](https://therecipehatch.com/wp-content/uploads/2025/06/a53fe2a1-b1ea-4243-9bc3-9884a9201988.webp)
Ice Cream Cone Cake Pops Delightful Sweet Treat
Who doesn’t love cake and ice cream? Today, I’m excited to share a fun treat: Ice Cream Cone Cake Pops! These sweet bites bring the
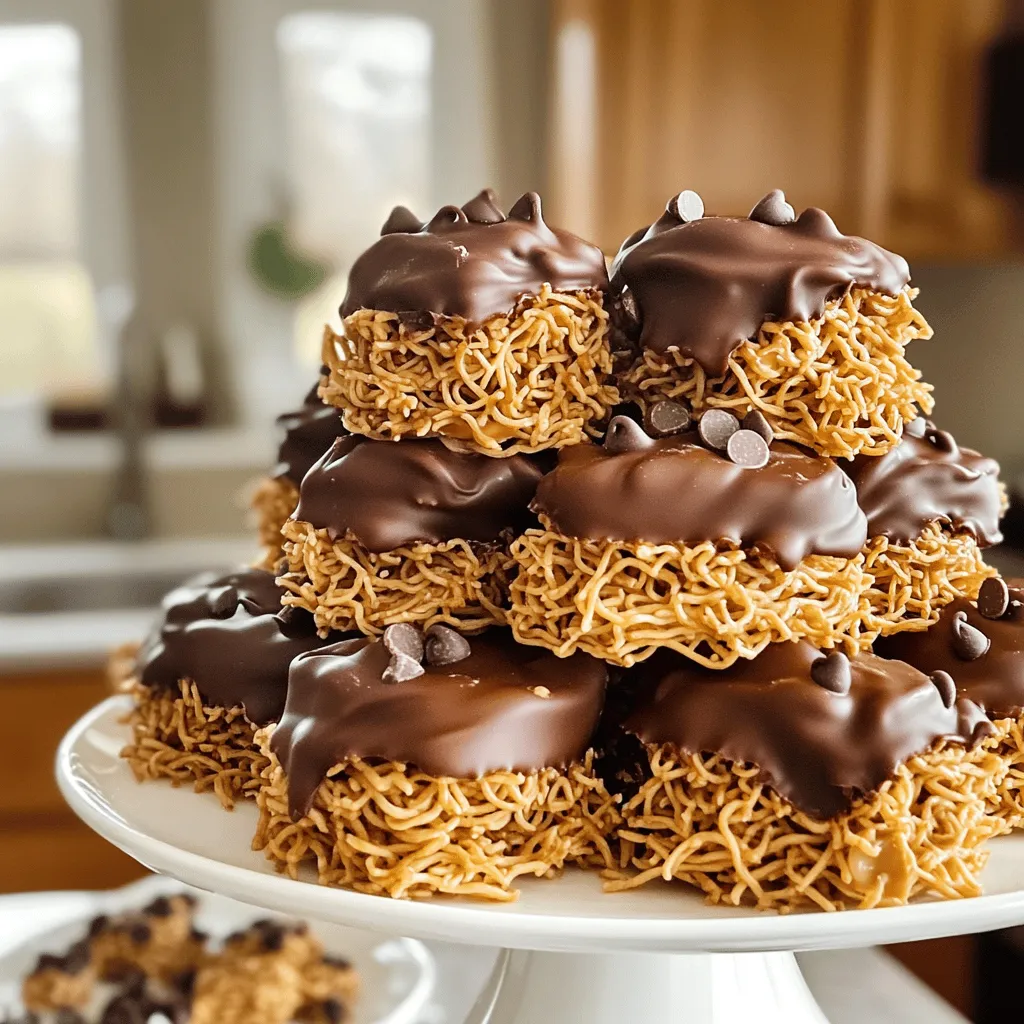
Best Easy No-Bake Peanut Butter Haystacks Delight
Looking for a quick treat that’s both easy and delicious? You’re in the right spot! My Best Easy No-Bake Peanut Butter Haystacks Delight combines creamy
![- 1 cup unsalted butter - 1 cup granulated sugar - 1/2 cup packed brown sugar - 1 large egg - 1 teaspoon vanilla extract - 2 cups all-purpose flour - 1 teaspoon baking powder - 1/2 teaspoon baking soda - 1/4 teaspoon salt - 1 cup cream cheese - 1 cup fresh strawberries, diced - 1/2 cup white chocolate chips (optional) - 1/2 cup crushed graham crackers (for topping) For these Strawberry Cheesecake Cookies, using fresh ingredients makes a big difference. The butter should be soft but not melted. This helps create a light cookie. The cream cheese adds a nice touch of richness. If you can, use ripe strawberries for a sweeter taste. You might not have cream cheese. Try using Greek yogurt instead. It keeps a creamy texture and adds a bit of tang. For a gluten-free option, you can swap all-purpose flour with a gluten-free blend. This keeps the cookies soft and chewy. If you want fewer calories, you can use a sugar alternative like coconut sugar or stevia. These options give sweetness without too many extra calories. You can find all these ingredients at your local grocery store. Look for fresh strawberries in the produce section. If you prefer shopping online, many stores deliver fresh ingredients right to your door. It’s easy to get what you need without leaving home. For the [Full Recipe], check out the rest of the article! 1. Preheat the oven to 350°F. 2. Prepare the baking sheet with parchment paper. 1. In a large bowl, cream the softened butter with granulated and brown sugars. Mix until light and fluffy. 2. Incorporate one large egg and one teaspoon of vanilla extract. Beat until well combined. 1. In another bowl, whisk together two cups of all-purpose flour, one teaspoon of baking powder, one-half teaspoon of baking soda, and one-fourth teaspoon of salt. 2. Gradually mix the dry ingredients into the wet ingredients. Stir until just combined. 1. Gently fold in one cup of softened cream cheese and one cup of diced fresh strawberries. Add white chocolate chips if you like. 2. Form the cookie dough into balls. 1. Drop dough balls onto the prepared baking sheet, about two inches apart. 2. Bake for 10-12 minutes. The edges should be lightly golden, and the centers may look slightly underbaked. Enjoy the process of making these Strawberry Cheesecake Cookies! For detailed steps, refer to the Full Recipe. To make these cookies great, start with room temperature ingredients. Softened butter and cream cheese mix better. They blend smoothly, making your dough creamy. If your ingredients are cold, the dough can be lumpy. Next, do not overmix the dough. Mix just until everything is combined. Overmixing adds air and makes cookies tough. Gently fold in your strawberries and cream cheese. This keeps the cookies soft and chewy. Want to enhance the flavor? Add lemon zest for a bright, citrusy kick. It pairs well with strawberries and cream cheese. Just a teaspoon can make a big difference. You can also try different types of chocolate. Instead of white chocolate chips, use dark or milk chocolate. Each type brings a unique taste. Experiment and find your favorite! To avoid spreading, chill your dough for about 30 minutes before baking. This helps the cookies hold their shape. You can also use a cookie scoop for even portions. For even baking, rotate your baking sheet halfway through. Ovens can have hot spots. This simple step ensures all cookies bake evenly. Keep an eye on them to prevent overbaking. You want golden edges and soft centers. For the full recipe, check out the [Full Recipe]. {{image_2}} You can change up the fruit in these cookies to fit your taste. Try using blueberries for a twist. Blueberry cheesecake cookies bring a fresh burst of flavor. The sweet blueberries mix well with the creamy cheesecake base. Raspberries are another great choice. Raspberry cheesecake cookies are tart and sweet. They add a nice contrast to the creamy filling. Both options are simple to make. Just swap the strawberries for your chosen fruit. You can also play with the size and shape of your cookies. Mini cookies are a fun option. They are cute and perfect for sharing. You can use a smaller scoop to make bite-sized treats. Bar cookies are another great choice. Instead of scooping dough, spread it in a baking pan. Bake until golden, then cut into squares. This method is quick and easy. You can enjoy the same great taste in a different form. If you need a vegan version, it is possible! Use plant-based butter and cream cheese. Substitute the egg with a flax egg or applesauce. Your cookies will still taste amazing without the animal products. For a low-sugar or keto-friendly option, swap regular sugar for a sugar substitute. You can use almond flour instead of all-purpose flour. These changes keep the cookies tasty while fitting your diet needs. For the complete recipe, check the Full Recipe link. To keep your Strawberry Cheesecake Cookies fresh, use an airtight container. This type of container will prevent air from making your cookies stale. You can stack them gently, but avoid crushing them. At room temperature, these cookies last about five days. If you notice they become soft, just pop them in the fridge for a firmer bite. Freezing cookie dough is a great way to save time. Scoop the dough into balls and place them on a baking sheet. Freeze them for about an hour. Once frozen, transfer the dough balls to a freezer bag. This keeps them fresh for up to three months. When you want to bake, take out how many you need and let them thaw in the fridge overnight. Bake them as usual. You may need to add a minute or two to the baking time if they are still a bit cold. For any unused cream cheese, wrap it tightly in plastic wrap or place it in an airtight container. It keeps well in the fridge for about a week. Always check for any changes in smell or texture before using it again. Fresh strawberries should be stored in the fridge, too. Keep them in a container with air holes to let them breathe. They stay fresh for about three to five days. Remember to wash them only before you use them to avoid mold. Strawberry Cheesecake Cookies last about one week at room temperature. Store them in an airtight container. This keeps them soft and fresh. For longer storage, place them in the fridge. They can stay good for up to two weeks there. If you freeze them, they last up to three months. To keep cookies fresh, avoid exposing them to air. Yes, you can use frozen strawberries. They work well in these cookies. However, they may change the texture. Frozen berries have more water. This can make your cookies a bit softer. To avoid this, drain any excess liquid before using. You can also chop them smaller. This way, the flavor remains strong and delicious. If you want to make these cookies egg-free, there are great options. You can use unsweetened applesauce. Use 1/4 cup for each egg. Mashed banana is another choice. Use the same amount as applesauce. Silken tofu is also a great option. Blend it until smooth, then use 1/4 cup. Each substitute gives a nice texture to the cookies. Yes, you can make gluten-free Strawberry Cheesecake Cookies. For this, use a good gluten-free flour blend. Look for one that can replace all-purpose flour. Some brands work well for baking. You can also add a bit of xanthan gum to help with texture. This will make your cookies just as tasty as the original ones. This blog post covered key ingredients for Strawberry Cheesecake Cookies and how to make them. You learned about alternatives for key ingredients and where to buy them. Step-by-step, you saw the preparation, mixing, and baking process. We explored tips for the best texture and flavor, along with fun variations that fit different diets. In conclusion, whether you stick to the classic recipe or try something new, these cookies are sure to satisfy. Happy baking!](https://therecipehatch.com/wp-content/uploads/2025/06/487adf55-795a-477c-8bb5-1565ef289af3.webp)
Strawberry Cheesecake Cookies Delightful and Easy Recipe
Looking for a sweet twist on classic cookies? These Strawberry Cheesecake Cookies are your answer! With creamy cheese, fresh strawberries, and a hint of vanilla,

Cinnamon Roll Protein Muffins Tasty and Nutritious Treat
If you love sweet treats that pack a protein punch, you’re in the right place! My Cinnamon Roll Protein Muffins are not just tasty; they’re