Desserts

To make your Salted Caramel Biscoff Cheesecake Cups, gather these simple items: - 200g Biscoff cookies (crushed) - 100g unsalted butter (melted) - 400g cream cheese (softened) - 100g powdered sugar - 1 teaspoon vanilla extract - 200ml heavy whipping cream - 100g salted caramel sauce (plus extra for drizzling) - A pinch of sea salt - Biscoff cookies (for garnish) You can tweak your cheesecake cups to fit your taste. Here are some ideas: - Add a splash of coffee to the cream cheese mix for a mocha flavor. - Swap Biscoff cookies with Oreos for a chocolate twist. - Mix in some crushed nuts for a crunchy texture. If you need to switch out ingredients, here are some great options: - Use gluten-free cookies instead of Biscoff for a gluten-free dessert. - Replace heavy cream with coconut cream for a dairy-free option. - Instead of powdered sugar, use maple syrup for a natural sweetener. These ingredients create a rich and creamy dessert that is sure to impress. To start, gather your Biscoff cookies and melted butter. In a medium bowl, mix the crushed cookies with the butter. Stir until it looks like wet sand. This mixture will form the base of our cheesecake cups. Take your serving cups or small jars and divide the cookie mix evenly into them. Press it down firmly to create a nice, sturdy crust. Then, set the cups aside in the refrigerator to chill while you make the cheesecake filling. Now, let’s make the creamy cheesecake layer. In a large mixing bowl, beat the softened cream cheese. Add the powdered sugar and vanilla extract, mixing until smooth and creamy. This step is key for a delightful texture. In another bowl, whip the heavy cream until soft peaks form. This adds fluffiness to your cheesecake. Gently fold the whipped cream into the cream cheese mixture. Be careful not to deflate the cream. Finally, add the salted caramel sauce and a pinch of sea salt. Fold this in until it’s well mixed, creating a rich, sweet flavor. Now it’s time to assemble! Spoon or pipe the cheesecake mixture on top of the chilled cookie crust in each cup. Fill them all the way to the top for a stunning look. Drizzle some extra salted caramel sauce over each layer. A tiny pinch of sea salt adds that perfect touch. To finish, garnish each cup with a Biscoff cookie on top. Chill your cups in the refrigerator for at least two hours. This helps everything set perfectly and makes them easy to serve later. Enjoy your delicious salted caramel Biscoff cheesecake cups! To make great whipped cream, start with cold tools. Use a chilled bowl and beaters. This helps the cream whip faster. Pour the heavy cream into your bowl. Beat it until soft peaks form. This means it holds its shape but is still fluffy. Don't overbeat it. If you do, it turns into butter! Gently fold the whipped cream into your cheesecake mix. This keeps it light and airy. You can change up the flavors in your cheesecake cups. Try using different cookies for the crust. Ginger snaps or Oreos work well. You can also switch the caramel sauce for chocolate sauce. Add a pinch of espresso powder for a coffee kick. Want a fruity twist? Fold in some crushed berries or lemon zest. These small changes can create a new dessert experience. Make your cheesecake cups look stunning! Use clear cups or jars to show off the layers. Drizzle extra salted caramel sauce on top right before serving. Sprinkle crushed Biscoff cookies for crunch and style. You can even add a fresh berry for color. Arrange the cups on a decorative tray. This makes your dessert look even more inviting. Serve chilled for the best taste! {{image_2}} You can swap Biscoff cookies for other types. Try Oreo cookies for a chocolate twist. Graham crackers add a classic touch. You can also use digestive biscuits for a different flavor. Each cookie brings its special taste to the cheesecake cups. Experiment with what you love most! Toppings can change how your cheesecake cups look and taste. Use fresh fruit like strawberries or raspberries for a fruity kick. Shaved chocolate adds richness and a nice visual. You could also sprinkle crushed nuts for a crunchy texture. Each topping makes your dessert unique! If you're looking for lighter options, you can make some swaps. Use low-fat cream cheese to cut down on calories. Greek yogurt can also replace cream cheese for a tangy twist. Opt for a sugar substitute in place of powdered sugar. These swaps keep the flavor while making it healthier! To keep your cheesecake cups fresh, store them in the fridge. Use airtight containers to prevent any odors from getting in. If you have leftover cheesecake cups, cover them with plastic wrap or a lid. This keeps the flavor and texture intact. Remember to chill them until you're ready to serve. It's best to eat them within a few days for the best taste. You can freeze the cheesecake cups if you want to save them for later. First, make sure they are fully chilled. Then, wrap each cup tightly in plastic wrap. After that, place them in a freezer-safe bag or container. This will help prevent freezer burn. When you're ready to eat them, thaw them in the fridge overnight. Avoid microwaving to keep the texture smooth. These cheesecake cups can last in the fridge for about 4 to 5 days. If you freeze them, they can last up to 2 months. Just remember that the longer they sit, the texture might change slightly. To enjoy the best flavor and creaminess, try to eat them sooner rather than later. Yes, you can make these cheesecake cups ahead of time. They taste even better after chilling. I recommend making them a day before serving. This gives the flavors time to blend. After you prepare them, cover each cup and place them in the fridge. They will stay fresh and delicious for up to three days. You know the cheesecake mixture is ready when it is smooth and creamy. First, mix the cream cheese, powdered sugar, and vanilla extract until there are no lumps. Then, fold in the whipped cream gently. It should look light and fluffy. If it holds its shape when you spoon it, you are good to go! You can serve these cheesecake cups with a variety of tasty options. Try fresh berries like strawberries or raspberries for a fruity contrast. A dollop of whipped cream also adds a nice touch. You could even pair them with some extra Biscoff cookies for crunch. Each bite will be a delightful mix of flavors! You learned how to make delicious cheesecake cups step by step. We covered key ingredients and helpful tips. You can customize your dessert with different flavors and toppings. Remember to follow the storage tips for the best taste. These cheesecake cups are great for sharing or special occasions. Enjoy creating your tasty dessert masterpiece!
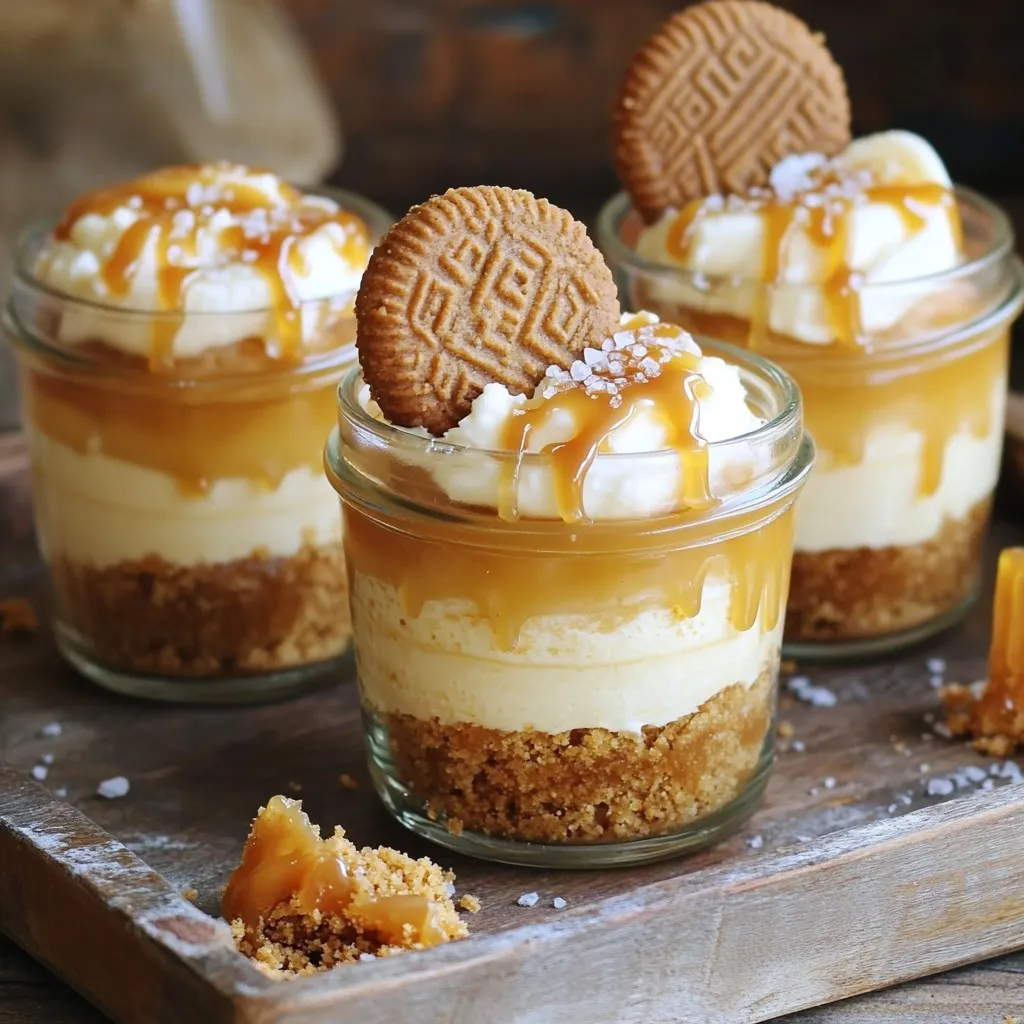
Salted Caramel Biscoff Cheesecake Cups Delightful Treat
If you’re craving a sweet treat that’s easy to make and packed with flavor, you’ve landed in the right spot! My Salted Caramel Biscoff Cheesecake
- 1 box brownie mix (with required ingredients) - 8 oz softened cream cheese - 1/2 cup granulated sugar - 1/2 cup chopped walnuts - Extra caramel sauce for drizzling - You can use pears or peaches instead of apples for a different taste. - If you need gluten-free, look for a gluten-free brownie mix. First, preheat your oven to 350°F (175°C). This step is key. A hot oven helps the brownie cups bake evenly. You can use cupcake liners or non-stick spray for the muffin tin. Cupcake liners make for easy cleanup. If you prefer, the spray works well too. Next, prepare the brownie mix according to the package instructions. Usually, this means adding water, oil, and eggs. Make sure to mix until it is smooth. If you love nuts, fold in the chopped walnuts. They add a nice crunch to the brownies. Now, let’s make the cheesecake layer. In a medium bowl, beat the softened cream cheese until it is smooth. Then, add the granulated sugar, vanilla extract, and a pinch of salt. Mix until well combined. Finally, add the egg and blend until the mixture is creamy and smooth. For the apple filling, take your diced apples and toss them with ground cinnamon. This adds a warm flavor. Then, mix in two tablespoons of caramel sauce. This makes the apples sweet and sticky. It’s time to layer the cups. Start by spooning a layer of the cheesecake mixture over the half-filled brownie cups. Then, add a layer of the cinnamon apples on top. Finally, top each cup with more brownie batter until they are about three-quarters full. Bake in the preheated oven for 20-25 minutes. Check for doneness by inserting a toothpick into the center. If it comes out with a few moist crumbs, they are ready. Allow the brownie cups to cool in the pan for 10 minutes. Then, transfer them to a wire rack to cool completely. Drizzle with extra caramel sauce for added sweetness before serving. To prevent overbaking, watch the time closely. Bake for 20-25 minutes. Check with a toothpick. If it comes out with a few moist crumbs, they are ready. This helps keep your brownie cups soft and fudgy. For a fudgy texture, do not overmix your brownie batter. Mix just until combined. Also, using warm eggs can help. They blend better and create a rich texture. Get creative with serving ideas. Try stacking two brownie cups for a fun twist. You can also serve them warm with a scoop of ice cream. Place the cups on a rustic wooden platter for a nice touch. For stunning visuals, drizzle extra caramel sauce on top. Add a sprinkle of cinnamon and a thin apple slice. This makes each cup look beautiful and inviting. Add spices like nutmeg or ginger for extra warmth. They pair nicely with the apples and caramel. You can also top your brownie cups with whipped cream or extra chopped walnuts. For ice cream pairings, vanilla or caramel ice cream works great. The creaminess balances the rich brownie. Consider a scoop of cinnamon ice cream for a fun twist. {{image_2}} You can change up the flavors in your caramel apple cheesecake brownie cups. Try adding peanut butter for a creamy twist. Mix in a half-cup of peanut butter with the cream cheese layer. This gives a rich, nutty taste that pairs well with apple. You can also swap out the apples for other seasonal fruits. Fresh pears or ripe peaches work great too. Just chop them like you do the apples. Toss them with cinnamon and caramel for that sweet flavor. If you want to make these brownie cups vegan, it's easy! Use a vegan brownie mix. Replace the cream cheese with a dairy-free cream cheese. You can also swap the egg with a flax egg. Just mix one tablespoon of flaxseed meal with three tablespoons of water. Let it sit for five minutes to thicken. For those with nut allergies, you can leave out the walnuts. You can also use seeds like sunflower or pumpkin seeds instead. They add a nice crunch without the nuts. Let your brownie cups cool in the pan for 10 minutes. This step helps them set. After that, move them to a wire rack. Cooling completely is key. It keeps the texture nice and prevents sogginess. You can store these treats in the fridge or at room temperature. If you choose the fridge, place them in an airtight container. They will stay fresh for about five days. At room temperature, they last up to three days. Use a cake dome or cover with plastic wrap. To enjoy them warm again, use the microwave. Heat them for about 10-15 seconds. This keeps them soft and tasty. Avoid overheating, as it can dry them out. If you prefer the oven, warm them at 350°F for about 5 minutes. This method helps maintain their lovely texture. These brownie cups stay fresh for about five days when stored properly. Keep them in an airtight container in the fridge. This helps keep them moist and tasty. If you leave them out, they can dry out quickly. Yes, you can freeze these brownie cups! To freeze them, let them cool completely first. Wrap each cup in plastic wrap. Then, place them in a freezer bag. They can last up to three months in the freezer. When you want to enjoy them, just thaw them in the fridge overnight. These brownie cups pair well with a scoop of vanilla ice cream. You might also try serving them with whipped cream or a drizzle of extra caramel sauce. For drinks, hot apple cider or coffee complements the flavors nicely. Absolutely! You can prepare the brownie cups a day in advance. Bake them, cool them, and store them in the fridge. Just pop them in the oven for a few minutes before serving. This warms them up and makes them extra delicious! In this post, I shared how to make delicious Caramel Apple Cheesecake Brownie Cups. You learned about the ingredients, step-by-step instructions, and helpful tips. I also covered variations and storage info to keep your treats fresh. These brownie cups bring joy and flavor to any dessert table. With simple steps, you can impress family and friends. Don't hesitate to experiment with flavors to make them your own! Enjoy your baking!
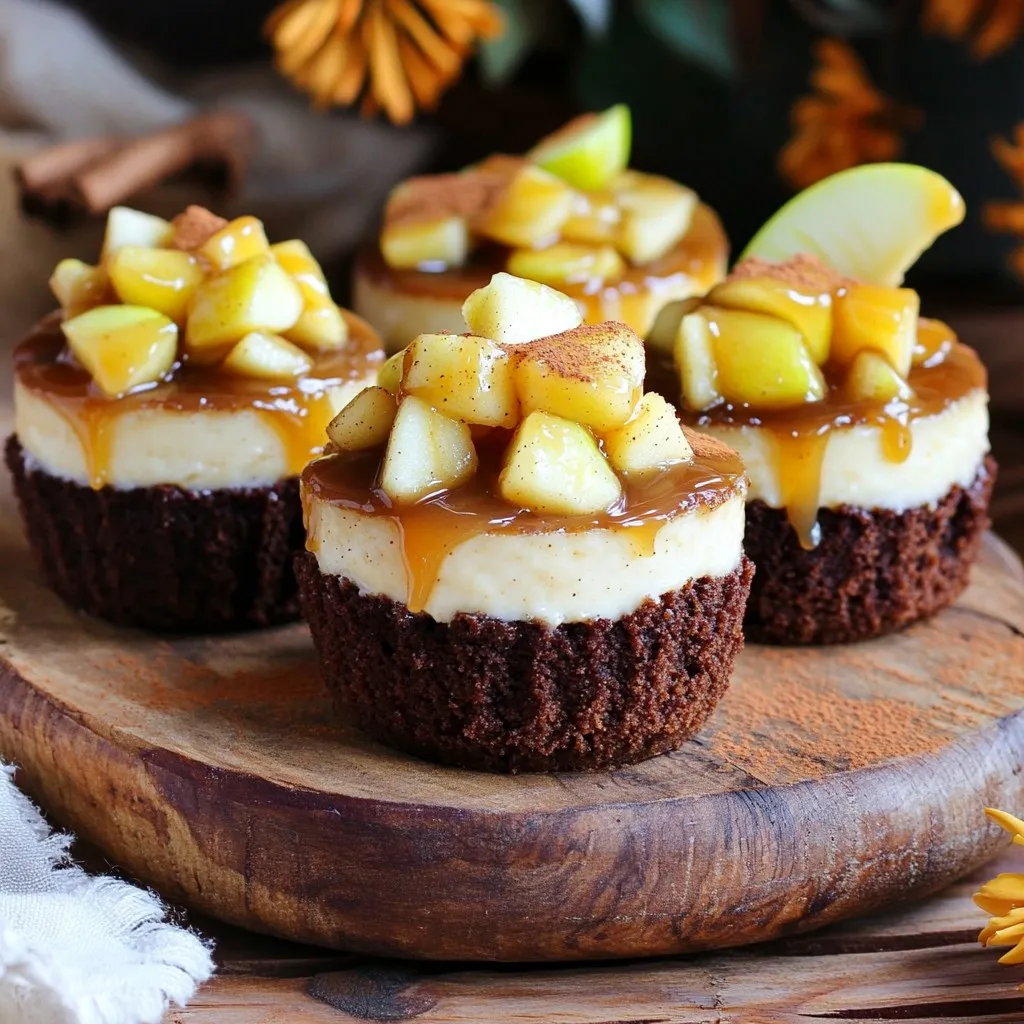
Caramel Apple Cheesecake Brownie Cups Delightful Treat
Looking for a sweet treat to impress your friends? Caramel Apple Cheesecake Brownie Cups are the perfect pick! These bite-sized delights combine rich brownies, smooth
To make this cozy drink, you need simple and tasty ingredients: - 2 cups whole milk - 1 cup heavy cream - 1 cup white chocolate chips - 1/2 cup canned pumpkin puree - 1 teaspoon vanilla extract - 1 teaspoon pumpkin spice mix - 1/4 teaspoon ground cinnamon (plus more for garnish) - Whipped cream (for topping) - A few pumpkin spice cookies (for garnish, optional) These ingredients create a creamy and rich drink. The pumpkin puree adds a smooth texture and a hint of fall flavor. The blend of spices warms you up from the inside. For the best taste, I recommend using Ghirardelli white chocolate chips. They melt well and have a rich, creamy flavor. You can also try Nestlé or Guittard brands. Always check the label for quality ingredients. Good chocolate makes a big difference in your drink. Toppings can make your hot chocolate look and taste even better. You can use: - Whipped cream - A sprinkle of ground cinnamon - Crushed pumpkin spice cookies These extras add fun and flavor to your drink. You can also try drizzling some caramel sauce on top. Let your creativity shine! To make pumpkin spice white hot chocolate, start with a saucepan. Heat 2 cups of whole milk and 1 cup of heavy cream over medium heat. Watch the mixture closely. Heat it until it steams but does not boil. Stir occasionally to avoid scorching the milk. This is key for a smooth drink. Once the milk is steaming, add 1 cup of white chocolate chips. Stir well until they melt completely. The mixture should be creamy and smooth. Next, mix in 1/2 cup of canned pumpkin puree. This adds rich flavor and color. Then, add 1 teaspoon of vanilla extract, 1 teaspoon of pumpkin spice mix, and 1/4 teaspoon of ground cinnamon. Stir everything until it is well combined and heated through. Remove your saucepan from the heat once hot. Melting white chocolate can be tricky. Here are some tips to help you. First, make sure to use gentle heat. High heat can burn the chocolate. Stir often to help it melt evenly. You can also chop the chocolate chips into smaller pieces. This helps them melt faster. If you notice any lumps, don't worry. Keep stirring until they disappear. If you prefer, you can use a double boiler. This method offers more control over the heat. Just place a heat-safe bowl over a pot of simmering water. Pour the hot chocolate into mugs once it's ready. Top it generously with whipped cream. For a festive touch, sprinkle more ground cinnamon on top. You can also add a few pumpkin spice cookies on the rim of each mug. This adds a nice crunch and flavor. For an extra treat, serve your hot chocolate with a dash of extra pumpkin spice mix. Your friends and family will enjoy this creamy winter delight! To avoid burning your milk, heat it slowly. Use medium heat and stir often. This helps to mix the milk and cream, keeping it from sticking. You want it hot but not boiling. If you see bubbles, lower the heat. This step keeps your pumpkin spice white hot chocolate creamy and smooth. Fresh pumpkin spice mix makes a big difference in flavor. It gives your drink that warm, cozy taste. If your spice mix is old, it may lack flavor. Always check the date before using it. You can also make your own by mixing cinnamon, nutmeg, ginger, and allspice. Fresh spices lead to a better drink. To make your drink even tastier, try adding extra spices. A pinch of nutmeg can give it a nice kick. You might also use a bit more cinnamon for warmth. For a fun twist, add a dash of cayenne pepper for heat. These spices can elevate your pumpkin spice white hot chocolate to another level. {{image_2}} You can make a dairy-free version of pumpkin spice white hot chocolate. Use almond milk or oat milk instead of whole milk. For creaminess, swap heavy cream with coconut cream. This gives a rich, smooth taste. Use dairy-free white chocolate chips for sweetness. Follow the same steps in the recipe, and enjoy a tasty treat without dairy. Want a coffee kick? Add espresso to your pumpkin spice white hot chocolate. Brew one or two shots of espresso before you start. Mix the espresso in right after melting the white chocolate. This creates a delicious pumpkin spice latte flavor. You get warmth from the chocolate and a caffeine boost from the espresso. It's a great way to wake up on a chilly day. If you want a lighter drink, there are healthy swaps. Use low-fat milk instead of whole milk. You can also reduce the amount of white chocolate chips. Try using just half a cup. For sweetness, add a little maple syrup or honey. This keeps the flavor but cuts down on calories. Enjoy your pumpkin spice treat without the guilt! To keep your pumpkin spice white hot chocolate fresh, pour it into a container. Make sure it cools down first. Seal the container well. This way, it stays tasty for up to three days in the fridge. Use glass or plastic containers with tight lids. These containers prevent spills and keep the drink fresh. If you have mason jars, they work great too! Always label the container with the date. When you’re ready to enjoy your drink again, heat it gently. Pour the hot chocolate into a saucepan. Warm it over low heat, stirring often. This keeps the texture smooth. You can also use a microwave. Heat it in short bursts, stirring in between. Enjoy your cozy treat! Yes, you can use skim milk. However, the drink may be less creamy. Whole milk gives a rich texture. If you prefer a lighter drink, skim works fine. Just stir well to keep it smooth. You can use vanilla baking chips or almond bark. These options melt well and keep the flavor. Dark chocolate chips can work too, but they will change the taste. Make sure to adjust the sweetness if needed. To make this recipe vegan, swap whole milk and cream for almond or oat milk. Use dairy-free white chocolate chips. You can also add a bit of maple syrup for sweetness. This keeps the cozy flavor while being plant-based. This post covered all you need to make delicious pumpkin spice white hot chocolate. We explored key ingredients, detailed preparation steps, and shared tips for the best taste. Variations offer options for dairy-free or a lighter drink. Remember to store leftovers properly for future enjoyment. With these steps, you can create a warm and cozy treat anytime. Enjoy every sip of your fall delight!
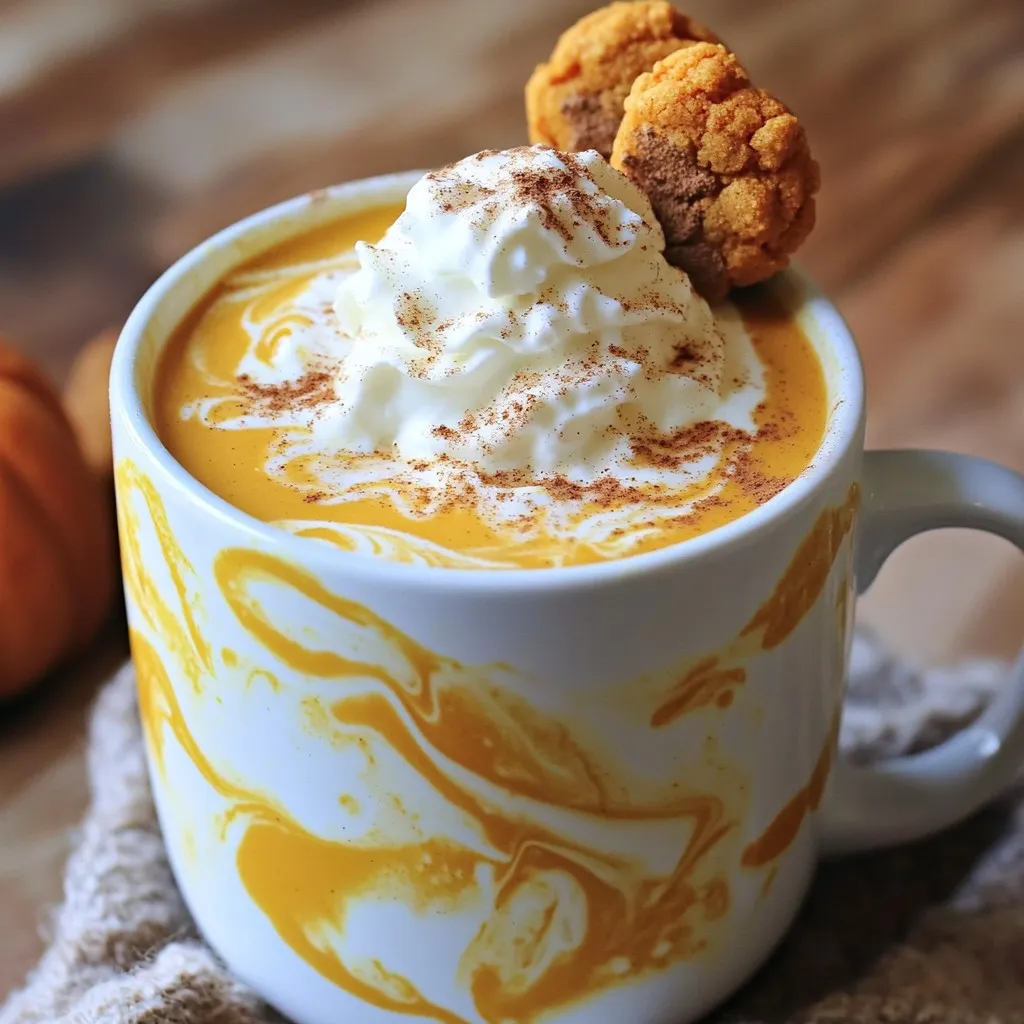
Pumpkin Spice White Hot Chocolate Creamy Winter Treat
Looking for a cozy treat to warm your winter days? You’re in the right place! This Pumpkin Spice White Hot Chocolate blends creamy white chocolate
- All-purpose flour: 1 ½ cups - Brown sugar: ½ cup, packed - Maple syrup: ½ cup - Milk or non-dairy alternative: ½ cup - Vegetable oil: 1/3 cup - Egg: 1 large - Vanilla extract: 1 teaspoon - Baking powder: 1 teaspoon - Baking soda: ½ teaspoon - Salt: ½ teaspoon - Chopped pecans: 1 cup (with extras for topping) - Optional: Cinnamon for flavor When making Maple Pecan Bakery Muffins, start with fresh ingredients for the best taste. I find that using high-quality maple syrup brings out a rich, sweet flavor. The brown sugar adds depth and moisture, making each muffin soft and tender. All-purpose flour is key for structure. If you prefer, you can mix in whole wheat flour for a nuttier taste. The pecans add a fantastic crunch. Be sure to chop them well, but leave some larger pieces for topping. This gives your muffins a nice look and extra texture. Vanilla extract enhances the sweetness and rounds out the flavors. Don’t skip it! If you like a hint of spice, adding cinnamon is a great option. It pairs perfectly with maple. Using a milk or a non-dairy alternative keeps the muffins moist. I usually opt for almond or oat milk, but any will work. Finally, the egg binds everything together and adds richness. If you want a vegan option, you can replace it with a flax egg or applesauce. Pay close attention to these ingredients. Their quality and balance will make your muffins truly inviting. 1. Start by preheating your oven to 350°F (175°C). This heat helps muffins rise nicely. 2. Line a muffin tin with paper liners or grease the cups to prevent sticking. 3. In a large bowl, combine 1 ½ cups of all-purpose flour, ½ cup of packed brown sugar, 1 teaspoon of baking powder, ½ teaspoon of baking soda, and ½ teaspoon of salt. If you want, add ½ teaspoon of cinnamon for extra flavor. Stir until everything is mixed well. 1. In another bowl, whisk together ½ cup of maple syrup, ½ cup of milk (or a non-dairy alternative), 1/3 cup of vegetable oil, 1 large egg, and 1 teaspoon of vanilla extract. Whisk until it is smooth and creamy. 1. Pour the wet mixture into the dry ingredients. Gently mix until just combined. A few lumps are fine, so don’t overmix. 2. Fold in 1 cup of chopped pecans, but be careful not to work the batter too much. 3. Divide the batter evenly among the muffin cups, filling each about 2/3 full. 4. Sprinkle some reserved chopped pecans on top of each muffin for a crunchy finish. 5. Bake in the preheated oven for 18-20 minutes. Use a toothpick to check if they are done. If it comes out clean, they are ready. 6. Let the muffins cool in the pan for about 5 minutes. Then, transfer them to a wire rack to cool completely. - How to avoid overmixing for perfect texture: Mix your batter gently. After adding wet to dry, stir until just combined. It's okay to have lumps. Overmixing makes muffins tough. - Importance of ingredient temperature: Use room temperature ingredients. This helps the batter mix better. Eggs and milk blend smoothly with other ingredients. - Presentation ideas for serving muffins: Dust cooled muffins with powdered sugar. Add a drizzle of maple syrup on the side. Serve on a bright plate for a colorful look. - Pairing with beverages: These muffins taste great with coffee or tea. A warm glass of milk also works well. Try pairing with a light fruit juice for a refreshing twist. - How to store muffins for freshness: Keep muffins in an airtight container. This helps them stay soft and tasty. Store them at room temperature for up to three days. - Reheating suggestions: To reheat, place muffins in the microwave for 10-15 seconds. You can also warm them in an oven at 350°F for about 5 minutes. This restores freshness and flavor. {{image_2}} You can change the taste of your Maple Pecan Bakery Muffins easily. Start by using different nuts. Try walnuts or almonds for a new crunch. You might even add dark chocolate chips for a sweet twist. Fruits are another great addition. Blueberries can add a juicy burst. Bananas bring a soft texture and natural sweetness. Just fold them in gently to keep the muffins fluffy. If you need gluten-free options, swap all-purpose flour for almond or coconut flour. You may need to adjust the liquid slightly to get the right texture. For vegan muffins, replace the egg with a mashed banana or flaxseed meal mixed with water. Use almond milk or another non-dairy milk instead of regular milk. These swaps keep the muffins moist and tasty without dairy or eggs. To keep your Maple Pecan Bakery Muffins fresh, store them in a sealed container. Place them on the counter for best taste. If you live in a warm area, keep them in a cool place. This helps prevent them from getting soggy. For longer storage, you can refrigerate muffins. Wrap them tightly in plastic wrap before placing them in an airtight container. This keeps moisture out and helps them last longer. You can also freeze them. Just wrap each muffin in plastic wrap. Then, place them in a freezer-safe bag. This method keeps them fresh for months. At room temperature, muffins last about three days. After that, they may start to dry out. If you refrigerate them, they can last up to a week. Look for signs of spoilage. If you see mold or an off smell, it’s time to toss them. Muffins that feel hard or dry may also not taste good. Always check before you enjoy your tasty treat! To make these muffins, gather your ingredients. Start by mixing the dry items in one bowl. This includes flour, brown sugar, baking powder, baking soda, salt, and optional cinnamon. In another bowl, whisk together maple syrup, milk, vegetable oil, egg, and vanilla. Combine the wet and dry mixes gently. Fold in chopped pecans before pouring the batter into muffin cups. Bake at 350°F for about 18-20 minutes. Yes, you can use white sugar, coconut sugar, or maple sugar. Each type will change the taste a bit. Brown sugar adds a rich flavor, while white sugar keeps it light. Experiment to see what you like best! To freeze muffins, let them cool completely. Wrap each muffin tightly in plastic wrap. Place them in a freezer bag or container. Label the bag with the date. They can last for up to three months in the freezer. Thaw by leaving them out at room temperature or microwaving for a few seconds. To boost maple flavor, use pure maple syrup instead of imitation. You can also add maple extract to the batter. Consider drizzling more syrup on top before serving. These muffins work great for both breakfast and dessert. They are sweet enough for a treat but also healthy enough for a morning meal. Serve them with coffee in the morning or with ice cream for dessert. You learned how to make tasty Maple Pecan Bakery Muffins from scratch. We covered all the ingredients, step-by-step instructions, and helpful tips. You can adjust the recipe, making it vegan or gluten-free. Don’t forget proper storage to keep your muffins fresh. Enjoy trying new flavors or serving them in fun ways. Whether for breakfast or a sweet treat, these muffins are a delight. Baking can be fun and rewarding, so get creative in the kitchen!
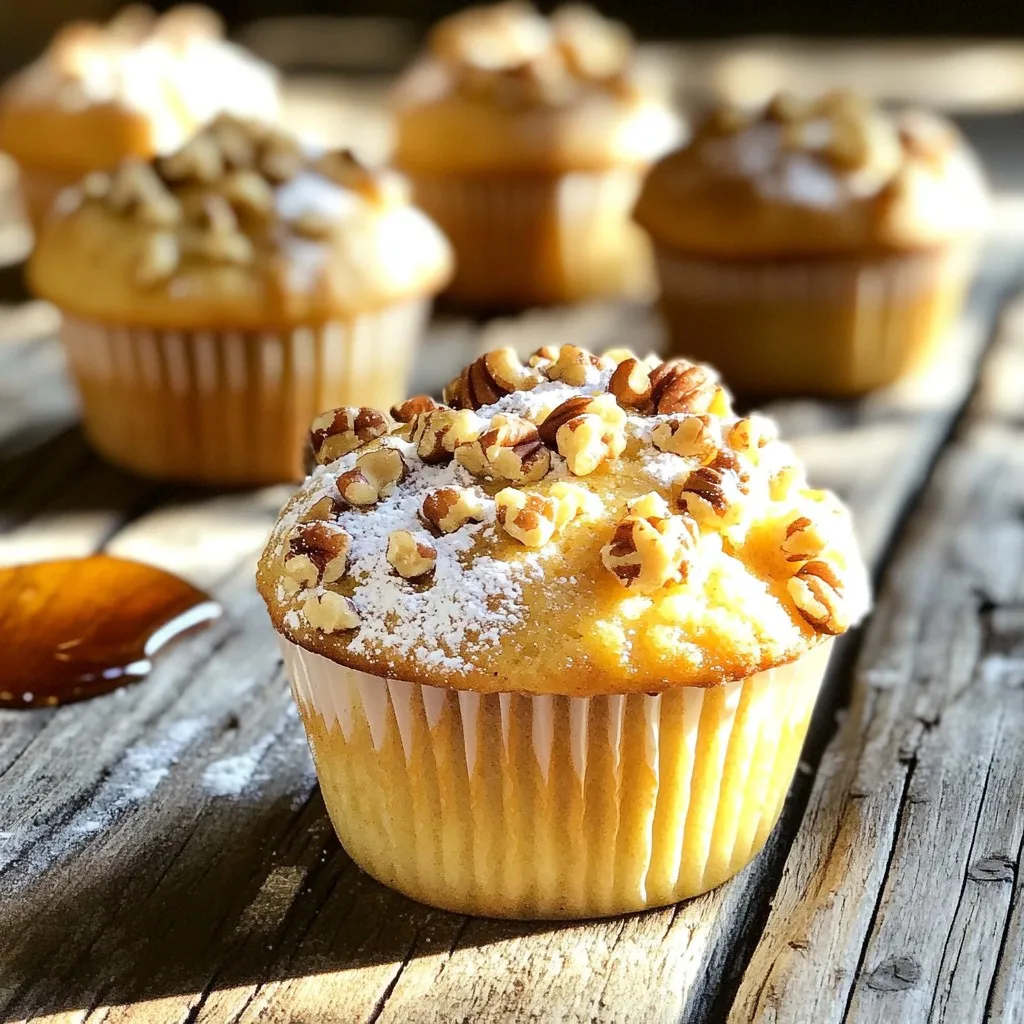
Maple Pecan Bakery Muffins Irresistible Flavor Boost
Are you ready to treat your taste buds? Imagine biting into warm, fluffy Maple Pecan Bakery Muffins packed with rich flavors. In this article, I’ll
To make No-Bake Chocolate Hazelnut Cheesecake Bars, gather these ingredients: - 1 ½ cups hazelnut cookies, crushed - ¼ cup unsalted butter, melted - 1 cup cream cheese, softened - ½ cup powdered sugar - 1 cup hazelnut spread (like Nutella) - 1 teaspoon vanilla extract - 1 cup heavy cream, whipped - ½ cup dark chocolate chips, melted - Chopped hazelnuts, for topping If you need substitutions, here are some options: - Use gluten-free cookies for a gluten-free version. - Swap cream cheese with vegan cream cheese for a dairy-free option. - Choose a nut-free spread if you have nut allergies. To create these tasty cheesecake bars, you will need some key tools: - Mixing bowls for combining ingredients - A hand mixer or stand mixer for beating cream cheese - An 8x8-inch square pan for setting the bars - A spatula to spread the filling evenly - Plastic wrap to cover the pan while chilling Having the right equipment makes the process easier and more fun! To make the crust, start by mixing your crushed hazelnut cookies with the melted butter. Use a bowl and stir well. You want all the crumbs to be coated in butter. Next, take an 8x8-inch square pan and line it with parchment paper. This helps with removing the bars later. Now, press the cookie mixture firmly into the bottom of the pan. Use the back of a measuring cup for even pressure. Make sure it's tight and flat. If your crust is not pressed evenly, it may fall apart later. Once done, place the pan in the fridge while you work on the filling. In a separate bowl, beat the softened cream cheese with powdered sugar. Mix until it is smooth and creamy. This step is key to avoid any lumps in your filling. Then, add in the hazelnut spread and vanilla extract. Blend it all together until fully combined. You want it to be silky and rich. Now, take your whipped cream and gently fold it into this mixture. Be careful here; you don't want to deflate that fluffy cream! Once your filling is ready, pour it over the chilled crust. Use a spatula to spread it evenly. Next, take your melted dark chocolate and drizzle it on top. This is where you can get creative! Use a knife or toothpick to swirl the chocolate into the filling. This creates a beautiful marbled effect. It will not only look good but taste amazing too. Cover the pan with plastic wrap and place it in the fridge. Let it chill for at least 4 hours. This helps the cheesecake set nicely. After it’s firm, lift the cheesecake out of the pan using the parchment paper. Cut into bars of your desired size. Before serving, sprinkle chopped hazelnuts on top for a nice crunch. Enjoy your delicious and easy no-bake cheesecake bars! When making No-Bake Chocolate Hazelnut Cheesecake Bars, avoid common mistakes. - Crust Issues: If the crust crumbles, press it down more firmly. Use the back of a measuring cup for even pressure. - Temperature Matters: Always use room temperature cream cheese. Cold cream cheese clumps and makes mixing hard. To get fluffy whipped cream, chill your mixing bowl and beaters. - Whipping Tips: Start on low speed, then increase to medium. This helps form soft peaks without splattering. - Taste Testing: Always taste your cheesecake filling. Adjust sweetness by adding more powdered sugar if needed. Serving your cheesecake bars well makes them more appealing. - Serving Suggestions: Cut the bars into triangles for a fun look. Serve on a colorful plate to brighten the dish. - Garnishing Ideas: Beyond chopped hazelnuts, try fresh berries or a drizzle of caramel. These add color and flavor contrast. {{image_2}} You can change the cookie base to fit your needs. Try gluten-free cookies if you want a gluten-free option. Almond or oat cookies work well for this. You can also use digestive biscuits for a different taste. For hazelnut spread, there are many choices. Look for brands like Justin's or Nutiva if you want organic options. You can even try a chocolate spread made from sunflower seeds if you need a nut-free version. To spice up the flavor, add a bit of coffee or orange zest. Coffee gives a rich depth, while orange zest adds a nice citrus note. Both pair well with chocolate and hazelnut. If you want a chocolate-free version, swap the hazelnut spread for almond or vanilla cream for a lighter taste. For vegan cheesecake bars, use coconut cream instead of cream cheese. This keeps the texture creamy and rich. Swap the butter with coconut oil for the crust. Use a plant-based sweetener like maple syrup for the filling. If you're looking for lower-calorie swaps, consider using low-fat cream cheese. You can also use Greek yogurt instead of heavy cream. This keeps the taste while cutting down the calories. To keep your No-Bake Chocolate Hazelnut Cheesecake Bars fresh, follow these steps: - Use an airtight container. This helps to keep moisture away. - Store in the fridge. The cool air helps maintain the creamy texture. - Place parchment paper between layers. This prevents sticking and keeps bars intact. These tips will ensure your cheesecake bars stay delicious for days. You can freeze these cheesecake bars if you want to save some for later. Here’s how: - Cut the bars into pieces before freezing. This makes it easy to grab a piece when you crave it. - Wrap each bar tightly in plastic wrap. This helps prevent freezer burn. - Place wrapped bars in a freezer bag. Squeeze out as much air as possible before sealing. To enjoy your frozen bars, follow these thawing guidelines: - Move the bars to the fridge. Let them thaw overnight for the best taste. - Serve chilled. This keeps the texture creamy and delightful. These steps will help you enjoy your cheesecake bars even after freezing! You can use several options if you need a substitute for hazelnut cookies. Here are some ideas: - Graham crackers: A classic choice that offers a sweet base. - Oreo cookies: Great for a chocolatey twist. - Almond cookies: If you want a nutty flavor but need a different nut. - Gluten-free cookies: Look for brands that cater to gluten-free diets. These alternatives can work well, but be aware of taste and texture differences. These cheesecake bars can last up to five days in the fridge. Just keep them in an airtight container to maintain their freshness. The flavor and texture are best within the first few days. Yes, you can make these bars up to three days in advance. Prepare them, chill them, and store them in the fridge. This way, they will be ready for your party or gathering. Just remember to garnish with chopped hazelnuts just before serving. If you lack heavy cream, you can use: - Whipping cream: This is a good substitute but may be slightly less rich. - Coconut cream: A great option for a dairy-free version. - Milk mixed with butter: For each cup, use ¾ cup of milk and ¼ cup of melted butter. These substitutes will change the texture a bit, but they still work. Absolutely! You can cut these into squares, triangles, or even shapes using cookie cutters. This adds fun to your serving. You can also make mini versions in muffin tins for bite-sized treats. Just be sure to adjust chilling time if using smaller portions. You now have all the tools to make No-Bake Chocolate Hazelnut Cheesecake Bars. We covered ingredients, equipment, and step-by-step instructions for a perfect dessert. I shared tips for success and variations to fit any need. Remember to chill your bars for the best taste and texture. Whether it's for a party or a sweet treat at home, these bars are sure to impress. Enjoy experimenting with flavors and presentations. Happy baking!
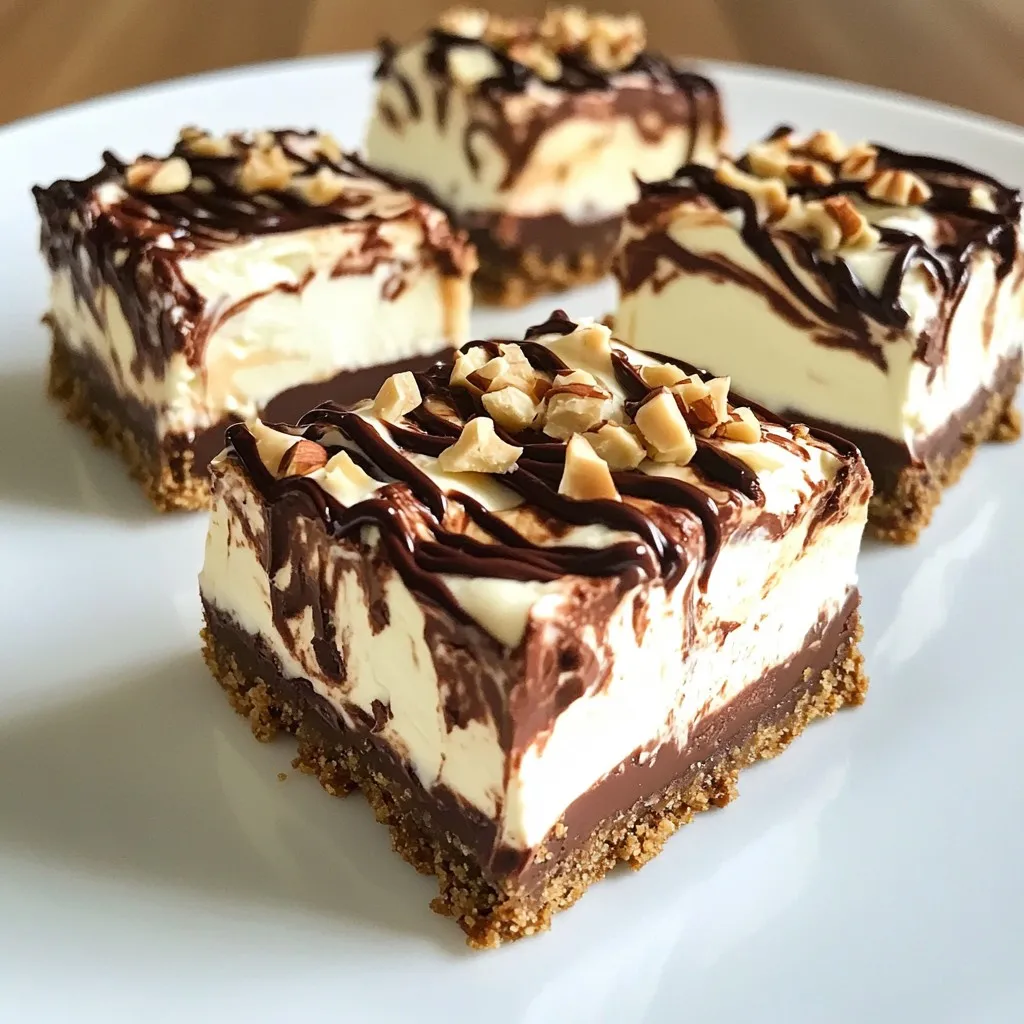
No-Bake Chocolate Hazelnut Cheesecake Bars Delight
Craving a sweet treat that’s easy to make? Dive into my No-Bake Chocolate Hazelnut Cheesecake Bars. These bars are both creamy and crunchy, perfect for
To make Brown Butter Apple Muffins, gather these key items: - 1/2 cup unsalted butter - 1 cup all-purpose flour - 1/2 cup whole wheat flour - 1 teaspoon baking soda - 1/2 teaspoon baking powder - 1/4 teaspoon salt - 1 teaspoon ground cinnamon - 1/2 cup brown sugar, packed - 1/4 cup granulated sugar - 2 large eggs - 1 teaspoon vanilla extract - 1 cup apples, peeled and diced (about 1 medium apple) - 1/4 cup apple cider (or milk) These ingredients create a soft, flavorful muffin. The mix of flours adds depth. The brown butter gives a nutty taste that pairs well with apples. You can boost your muffins with these fun extras: - 1/2 cup walnuts or pecans, chopped - Dried cranberries or raisins - A sprinkle of nutmeg or ginger These add-ins enhance the flavor and crunch. Nuts offer a nice texture. Dried fruits give sweetness and chewiness. Having the right tools makes baking easier. Here’s what you’ll need: - A saucepan for browning butter - Two mixing bowls - A whisk for mixing - A spatula for folding the batter - A muffin tin - Paper liners or non-stick spray Using good equipment helps you get the best results. A sturdy whisk and spatula make mixing simple. A good muffin tin ensures even baking. To make brown butter, start with unsalted butter. Place it in a saucepan over medium heat. Watch the butter closely as it melts. Stir often to keep it from burning. After a few minutes, it will start to foam. This is normal! Keep stirring until it turns a golden brown. You will know it is ready when it smells nutty. This process takes about 5-7 minutes. Once done, remove it from the heat and let it cool slightly. While the butter cools, grab a large bowl. In this bowl, mix all-purpose flour, whole wheat flour, baking soda, baking powder, salt, and ground cinnamon. Use a whisk to combine these dry ingredients well. In another bowl, combine brown sugar, granulated sugar, and warm brown butter. Stir until the mixture is smooth. Allow it to cool for a few minutes. Then, add in two large eggs and vanilla extract. Whisk everything together until it is well combined. Now, slowly add the dry mix to the wet mix. Use a spatula to fold the ingredients gently. Be careful not to overmix; a few lumps are okay! Next, fold in the diced apples and nuts if you want some crunch. Preheat your oven to 350°F (175°C). Line a muffin tin with paper liners. Spoon the batter into each cup, filling them about two-thirds full. Bake the muffins for 18-20 minutes. Check with a toothpick; it should come out clean. Let them cool in the tin for 5 minutes before moving them to a wire rack. Enjoy the warm muffins! To brown butter, use a light-colored saucepan. This lets you see the color change. Start by melting the unsalted butter over medium heat. Stir it often to prevent burning. After about 5-7 minutes, the butter will turn golden brown. It should smell nutty and rich. Remove it from heat right away. Let it cool slightly before using it in your mix. This step adds a deep flavor. Baking can be tricky. Here are some tips to help you succeed. First, measure your ingredients carefully. Use a kitchen scale for accuracy. Second, don’t overmix the batter. This can make your muffins tough. Mix just until combined. Third, check your oven temperature with a thermometer. Ovens can vary in heat. Finally, always use fresh ingredients, like baking soda and spices, for the best flavor. Spices can make your muffins pop. Ground cinnamon is a must, but you can add more. Try nutmeg or ginger for warmth. You can even use a pinch of cardamom for a unique twist. If you enjoy fresh herbs, consider adding a bit of rosemary or thyme. These will give your muffins a fresh taste. Just remember, a little goes a long way! {{image_2}} You can easily make these muffins gluten-free. Use 1 ½ cups of gluten-free flour mix instead of all-purpose and whole wheat flour. This mix often has the right blend of flours and starches. Check if it includes xanthan gum. If not, add 1 teaspoon for better texture. The muffins will still taste great, and you won't miss the gluten. Feel free to swap apples for other fruits. Try ripe pears or juicy peaches in the fall. In summer, use fresh berries like blueberries or raspberries. Always peel and chop the fruit into small pieces. This way, they blend well into the batter. Each fruit brings its own flavor, making the muffins exciting every season. Nuts add crunch and flavor to your muffins. Walnuts and pecans work well, but you can experiment. Try adding almond slices for a sweet touch. Sunflower seeds or pumpkin seeds also add a nice crunch and boost nutrition. Mix in about ½ cup of whatever you choose. Just remember to chop larger nuts to keep everything even. To keep your muffins fresh, store them in an airtight container. Place them at room temperature. They stay good for up to three days. If you want to store them longer, the fridge is an option. Just know that they may get a bit dry. Freezing is a great way to save muffins for later. Let the muffins cool completely. Then, wrap each one in plastic wrap. Place the wrapped muffins in a freezer bag. They can last for up to three months. When you’re ready to enjoy, just take one out to thaw. To make your muffins taste fresh again, reheat them in the oven. Preheat your oven to 350°F (175°C). Place the muffins on a baking sheet. Heat them for about 5-10 minutes. You can also use the microwave. Just heat for 15-20 seconds. Enjoy your warm, tasty muffins! Yes, you can use other types of flour. For a gluten-free option, try almond or coconut flour. You can mix these with a gluten-free blend. Just remember that each flour has a different taste and texture. Whole wheat flour adds a nutty flavor and more fiber. If you want lighter muffins, stick with all-purpose flour. You can also use oat flour, but it may change the muffin's texture. To make these muffins healthier, you can substitute some ingredients. Use applesauce instead of butter for moistness. This will cut down on fat. Also, try using less sugar or swapping in honey or maple syrup. You can even add flaxseed meal for extra fiber. Replace some of the all-purpose flour with whole wheat flour to boost nutrition. To prevent muffins from sticking, use paper liners in your muffin tin. They make it easy to remove muffins. If you don't have liners, grease the tin well with butter or non-stick spray. You can also dust the greased cups with flour, which helps muffins slide out easily. Let the muffins cool in the tin for a few minutes before removing them to avoid breakage. In this article, we covered how to make tasty brown butter apple muffins. We discussed the key ingredients and optional add-ins. You learned step-by-step instructions, helpful tips, and ways to vary the recipe. We also shared storage tips to keep your muffins fresh. Baking can be fun and rewarding. I hope you feel inspired to try these muffins soon. Enjoy creating delicious treats for yourself and your loved ones!
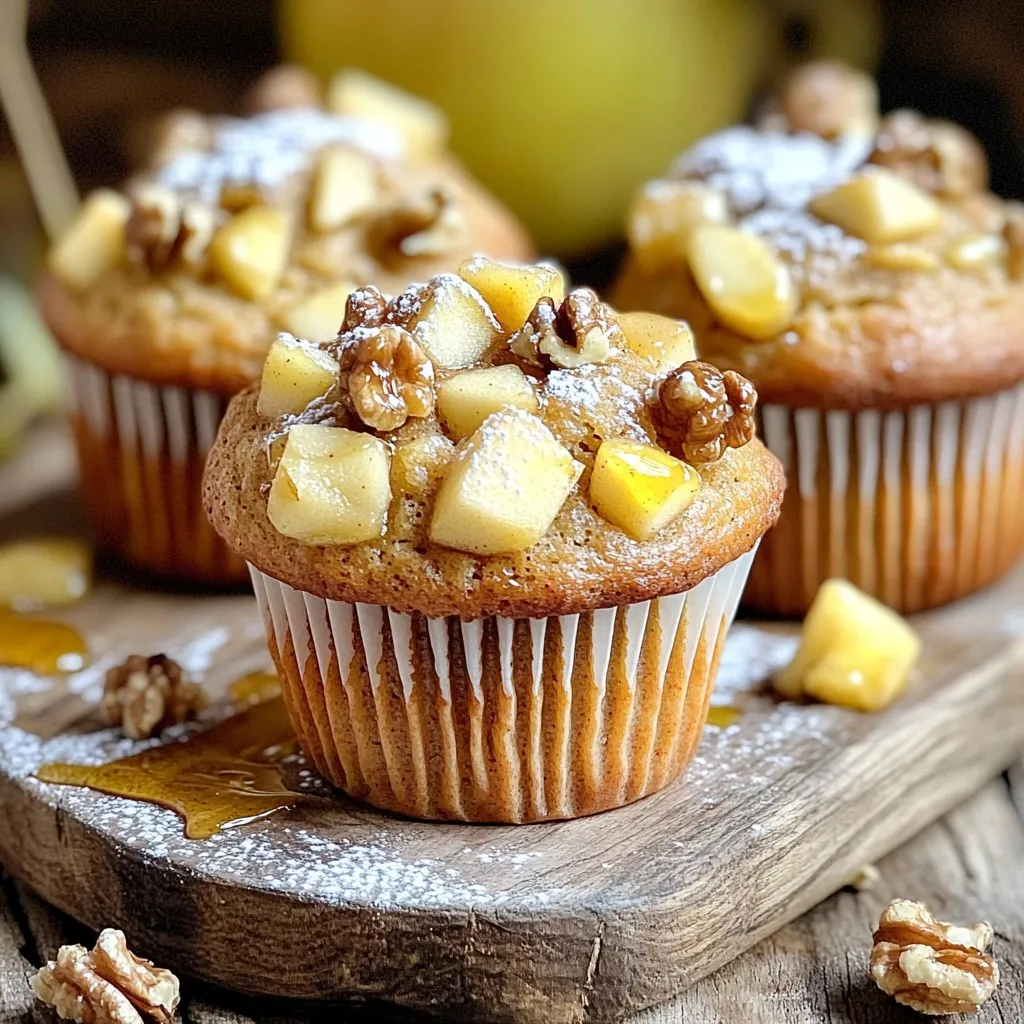
Brown Butter Apple Muffins Flavorful and Simple Treat
Looking for a simple treat that bursts with flavor? These Brown Butter Apple Muffins are just the recipe you need! With rich, nutty brown butter
To make the best chocolate chip pumpkin scones, you need a few simple ingredients. Here’s what you will need: - 2 cups all-purpose flour - 1/2 cup brown sugar, packed - 1 tablespoon baking powder - 1/2 teaspoon baking soda - 1/2 teaspoon salt - 1 teaspoon ground cinnamon - 1/2 teaspoon ground nutmeg - 1/4 teaspoon ground ginger - 1/2 cup unsalted butter, cold and cubed - 1/2 cup pumpkin puree - 1/4 cup heavy cream - 1/2 teaspoon vanilla extract - 1/2 cup semi-sweet chocolate chips - Optional: 1 egg for egg wash Each ingredient plays a role in making the scones soft and tasty. The flour gives structure, while the brown sugar adds sweetness. Baking powder and baking soda help the scones rise. Spices like cinnamon, nutmeg, and ginger bring warmth and flavor, perfect for autumn. Cold butter makes the scones flaky, and pumpkin puree keeps them moist. Don't forget the chocolate chips! They add a sweet surprise in every bite. If you want a golden color on top, use the optional egg wash. With these ingredients, you are set for a delightful baking adventure. Preheat your oven to 400°F (200°C). This helps the scones bake evenly. While the oven heats, line a baking sheet with parchment paper. This prevents sticking and makes cleanup easy. In a large bowl, combine 2 cups of all-purpose flour, 1/2 cup of brown sugar, 1 tablespoon of baking powder, 1/2 teaspoon of baking soda, 1/2 teaspoon of salt, 1 teaspoon of ground cinnamon, 1/2 teaspoon of ground nutmeg, and 1/4 teaspoon of ground ginger. Whisk these dry ingredients until they are well mixed. This blend gives the scones their warm and cozy flavor. Next, add 1/2 cup of cold, cubed unsalted butter to the flour mixture. Use a pastry cutter or your fingers to mix the butter in. You want the mixture to look like coarse crumbs. This step is key for flaky scones. In a separate bowl, blend 1/2 cup of pumpkin puree, 1/4 cup of heavy cream, and 1/2 teaspoon of vanilla extract until smooth. This pumpkin mixture adds moisture and flavor. It also gives the scones their beautiful orange color. Now, pour the pumpkin mixture into the flour blend. Gently stir until just combined. Be careful not to overmix. Then, fold in 1/2 cup of semi-sweet chocolate chips. These will melt slightly and create chocolatey pockets in your scones. Turn the dough out onto a lightly floured surface. Knead it gently two or three times to form a cohesive dough. Pat the dough into a circle about 1 inch thick. Cut the dough into 8 wedges. Place them on the prepared baking sheet. If you want, brush the tops with a beaten egg for a golden finish. Bake in the preheated oven for 15-20 minutes. The scones are done when they are golden brown and a toothpick comes out clean. Enjoy the smell of autumn filling your kitchen! To get light and fluffy scones, avoid overmixing the dough. When you mix, do it gently. You want the dough to stay tender. Overmixing makes the scones tough, which is not what we want. Mix until just combined, and fold in the chocolate chips carefully. For shiny and golden-brown scones, use an egg wash. This is simple! Just beat one egg and brush it over the tops of the scones before baking. It helps them look nice and gives a great flavor too. Serve your scones warm for the best taste. A light dusting of powdered sugar makes them look fancy. You can also put some chocolate chips on the side for extra sweetness. This makes them a fun treat for friends and family! {{image_2}} You can change the flavor by adding more spices. Try cloves or allspice for a deeper taste. These spices pair well with pumpkin. They add warmth and richness to the scones. A little goes a long way, so start with a pinch. You can always add more if you want a stronger flavor. If you love chocolate, switch it up! Use white chocolate chips or dark chocolate instead of semi-sweet. Each type gives a unique taste to the scones. White chocolate adds a creamy sweetness, while dark chocolate brings a rich, bold flavor. Experiment with what you like best. For a gluten-free version, swap all-purpose flour with a gluten-free flour blend. This change keeps the texture light and fluffy. Many blends work well, so choose one that fits your needs. Just remember to check the package for the right measurements. Enjoy your tasty scones without worries! Keep your chocolate chip pumpkin scones in an airtight container. They stay fresh at room temperature for up to 3 days. This way, you can enjoy them for breakfast or a snack without losing flavor. To enjoy these scones later, freeze them in a zip-top bag. They can last for up to 2 months in the freezer. This method is perfect for meal prep or when you want a quick treat. When you want to eat a scone, warm it in the oven. Set the oven to 350°F (175°C). Heat for about 5 to 10 minutes. This restores their fresh-baked taste and soft texture. Enjoy them warm for the best experience! Yes, but make sure to cook and puree it properly beforehand. Fresh pumpkin can add a great taste. Just peel, chop, and steam the pumpkin until soft. Then, blend it until smooth. This will give your scones a fresh flavor. You can use whole milk or a dairy-free alternative for a lighter version. Whole milk will work fine, but it may make the scones a bit less rich. For a dairy-free option, try almond milk or coconut cream. Both can add unique flavors. Prepare the dough, shape it, and freeze the unbaked scones for later baking. This way, you can bake them fresh whenever you want. Just place the shaped scones on a baking sheet and freeze until solid. Then, store them in a zip-top bag. When ready to bake, add a few extra minutes to the baking time. Now you have a simple guide to make delicious pumpkin scones. Start with quality ingredients and follow the steps closely. Remember, avoid overmixing for fluffy scones. You can add your own twist with spices or chocolate. Store them well to enjoy later. Baking should be fun and rewarding. Enjoy your scones, and share them with friends or family for a tasty treat!
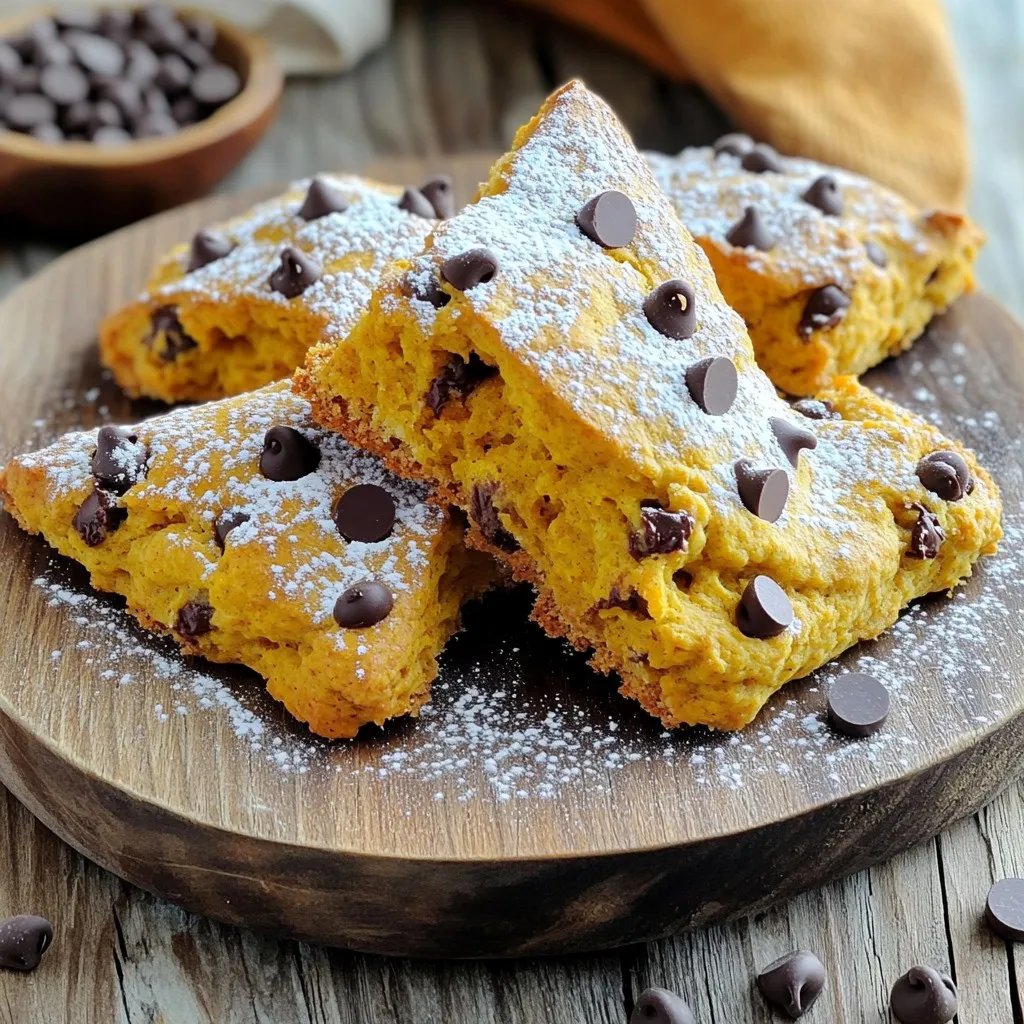
Chocolate Chip Pumpkin Scones Tasty Autumn Treat
As autumn unfolds, there’s nothing quite like the taste of Chocolate Chip Pumpkin Scones to warm your heart. These delicious treats blend pumpkin goodness with
- 2 cups milk (dairy or non-dairy) - 1/2 cup pumpkin puree - 1/4 cup unsweetened cocoa powder - 1/4 cup sugar (adjust to taste) - 1 teaspoon vanilla extract - 1 teaspoon pumpkin pie spice - A pinch of salt - Whipped cream for topping (optional) - Dark chocolate shavings for garnish (optional) To make the perfect pumpkin hot chocolate, start with your main ingredients. The milk serves as the base, giving a creamy texture. You can use dairy or non-dairy options, depending on your needs. The pumpkin puree adds rich flavor and a nice autumn color. Unsweetened cocoa powder provides the chocolatey goodness. Adjust the sugar to fit your taste. A bit of vanilla extract adds warmth to the mix. For extra flavor, include pumpkin pie spice. This mix of spices brings out the fall vibes. A pinch of salt enhances all the flavors. If you want to make it special, top your drink with whipped cream. Dark chocolate shavings add a lovely touch. They make your drink look as good as it tastes! 1. In a medium saucepan, combine 2 cups of milk and 1/2 cup of pumpkin puree over medium heat. 2. Whisk gently until both ingredients blend well and become warm. 3. Add 1/4 cup of unsweetened cocoa powder, 1/4 cup of sugar (adjust to your taste), 1 teaspoon of vanilla extract, 1 teaspoon of pumpkin pie spice, and a pinch of salt. 4. Continue to whisk until the cocoa powder fully dissolves, making a smooth mixture. 5. Heat the mixture until hot but not boiling. Stir occasionally to prevent sticking. 1. Pour the hot chocolate into mugs. 2. Top it with whipped cream and sprinkle extra pumpkin pie spice. 3. For a special touch, add dark chocolate shavings on top. Serve this cozy drink warm and enjoy the flavors of fall! To make your pumpkin hot chocolate just right, adjust the sweetness and spice levels. Start with the base recipe. Taste after mixing in the sugar and pumpkin pie spice. If you want it sweeter, add more sugar. For more spice, sprinkle in extra pumpkin pie spice. You can always tweak it, so it fits your taste. If you need a dairy-free option, choose your favorite non-dairy milk. Almond, oat, or coconut milk works great. Each type adds a unique flavor to the drink. Coconut milk will give it a creamier texture, while almond milk keeps it light. For a lovely presentation, use clear glass mugs. This lets everyone see the rich, inviting color of your drink. It adds a nice touch to your fall gathering. To make it even more festive, add a cinnamon stick in each mug. Not only does it look great, but it also adds a hint of spice as you sip. You can also sprinkle a little extra pumpkin pie spice on top. Or, if you like, add dark chocolate shavings for a fancy finish. {{image_2}} To make vegan pumpkin hot chocolate, swap dairy milk with a non-dairy option. Use almond, oat, or coconut milk. These options add various flavors while keeping it creamy. For the whipped cream, try coconut whipped cream or a store-bought vegan version. This way, you can enjoy a rich drink without any animal products. Adding spices can elevate your pumpkin hot chocolate. Try adding a pinch of nutmeg or ginger for warmth. You can also include a little cinnamon for extra depth. Adjust the amount to your taste. This way, you create a drink that warms you from the inside out. The blend of spices makes every sip a delightful experience. Want a cold treat? Make an iced version! Start with the same ingredients, but cool the mixture first. After heating, let it cool in the fridge. Once chilled, pour it over ice in a tall glass. Top with whipped cream and a sprinkle of pumpkin pie spice. This version is perfect for warm days when you crave pumpkin flavor without the heat. To store leftovers, let the pumpkin hot chocolate cool down. Pour it into an airtight container. You can keep it in the fridge for up to three days. Make sure to label the container with the date. This way, you can track how long it has been stored. If you want to save space, use smaller containers for single servings. When you’re ready to enjoy your pumpkin hot chocolate again, reheating is easy. Pour the cold hot chocolate into a saucepan. Heat it over low to medium heat. Stir often to prevent it from sticking. It should warm up nicely, but don’t let it boil. If you prefer, you can use a microwave. Just heat it in short bursts of 30 seconds. Stir in between to make sure it heats evenly. Adjust sweetness or spice if needed before serving. To make pumpkin hot chocolate vegan, swap the milk for a non-dairy option. You can use almond, soy, or oat milk. For the whipped cream, use coconut cream or a vegan alternative. Ensure the sugar is vegan-friendly, as some sugars are processed with bone char. Yes, you can use fresh pumpkin. First, cook and puree a small pumpkin. Cut it in half, remove the seeds, and roast it until soft. Let it cool, then scoop out the flesh. Blend it until smooth. This adds a fresh flavor but may require more effort. Pumpkin hot chocolate lasts about three days in the fridge. Store it in an airtight container to keep it fresh. Before serving, reheat it gently on the stove or in the microwave. Stir well to blend any settled ingredients. Pumpkin hot chocolate is a delight you can easily make. We discussed the main and optional ingredients, plus how to prepare and serve this cozy drink. You learned about customizing flavors and storage tips to enjoy it longer. In the end, this treat can bring warmth to any day. Whether you like it vegan or spiced up, you have options. Enjoy making your special cup today!
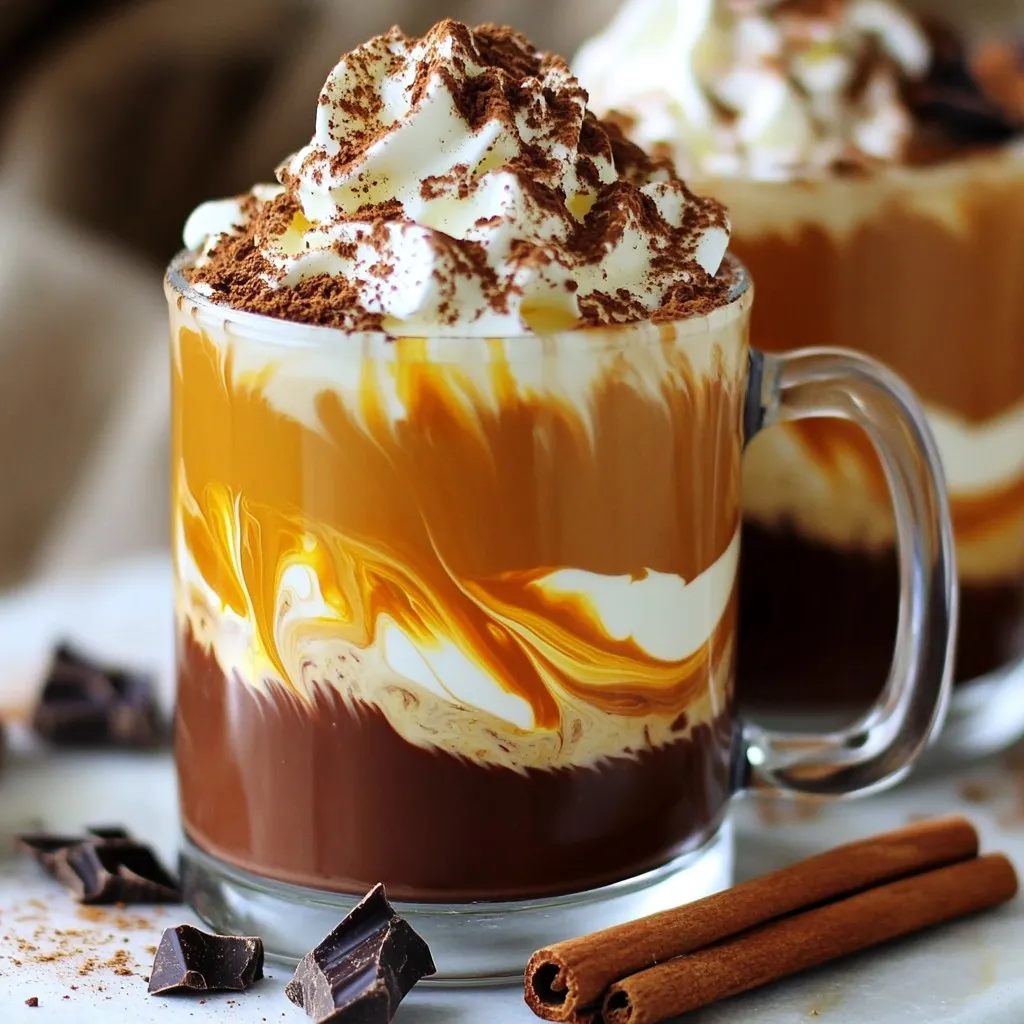
Pumpkin Hot Chocolate Cozy Fall Favorite Recipe
As the leaves turn and the air gets crisp, there’s nothing cozier than a warm mug of Pumpkin Hot Chocolate. This rich treat blends creamy
To make No-Bake Biscoff Pumpkin Cheesecake Bites, you will need: - 1 cup Biscoff cookies, crushed - 1/2 cup unsalted butter, melted - 1 cup cream cheese, softened - 1 cup pumpkin puree - 1/2 cup powdered sugar - 1 teaspoon vanilla extract - 1 teaspoon pumpkin pie spice - A pinch of salt - Extra Biscoff cookies for garnish These ingredients create a sweet, creamy treat that is both rich and light. If you want to make more or fewer bites, adjust the recipe as follows: - For 6 bites: Halve all the ingredients. - For 18 bites: Multiply by 1.5. - For 24 bites: Double all the ingredients. This way, you can fit your needs for any gathering or snack time. You might not have all the ingredients. Here are some easy swaps: - Biscoff cookies: Use graham crackers or Oreos for the crust. - Cream cheese: Substitute with mascarpone cheese for a different flavor. - Pumpkin puree: Use sweet potato puree if you cannot find pumpkin. - Powdered sugar: Brown sugar works as a sweet alternative. These substitutions keep the spirit of the recipe while allowing for personal tastes. First, you need to make the crust. Grab 1 cup of crushed Biscoff cookies. You can use a food processor or a rolling pin to crush them. Next, melt 1/2 cup of unsalted butter. Mix the crushed cookies and melted butter in a bowl. Stir until it looks like wet sand. Now, take mini muffin tins or silicone molds. Press the cookie mixture firmly into the bottom of each mold. This forms a solid base. Place the molds in the refrigerator. Let them chill while you make the filling. Now it’s time for the filling. In a large bowl, beat 1 cup of softened cream cheese. Make sure it's smooth and creamy. Then, add 1 cup of pumpkin puree. This gives the cheesecake its fall flavor. Next, mix in 1/2 cup of powdered sugar. Add 1 teaspoon of vanilla extract and 1 teaspoon of pumpkin pie spice. Don’t forget a pinch of salt. Mix everything until well combined. The filling should be thick and smooth. Take the crusts out of the fridge. Carefully fill each mold with the pumpkin cream cheese mixture. Smooth the tops with a spatula. Make sure each bite looks nice and even. Now, return the filled molds to the refrigerator. Let them chill for at least 2-3 hours. This helps the cheesecake bites set. Once they are firm, gently pop them out of the molds. For a final touch, crumble extra Biscoff cookies on top or add whipped cream. These bites look great and taste even better! To get a smooth cheesecake bite, ensure your cream cheese is very soft. This makes mixing easy. If it is too cold, it will be lumpy. Also, mix the batter well. You want it creamy and free of lumps. For a light texture, fold in your ingredients gently. This keeps air in. One common mistake is not chilling long enough. These bites need 2-3 hours to set properly. If you skip this step, they might fall apart. Also, don’t overpack the crust. Press it just enough to hold together. Too much pressure can make it hard instead of crunchy. For a beautiful presentation, use mini muffin liners. They add color and make serving easy. Top each bite with a sprinkle of crushed Biscoff cookies. This adds a nice crunch. A dollop of whipped cream also looks great. It invites everyone to take a bite! {{image_2}} You can change the flavor of your cheesecake bites. Adding chocolate gives a rich taste. Melt some dark chocolate and swirl it into the filling. It pairs well with pumpkin. You can also add nuts for a crunchy texture. Chopped pecans or walnuts work great. They add flavor and a fun bite. Want a vegan option? Use vegan cream cheese and coconut butter. Replace pumpkin puree with a nut-based cream for a unique twist. For a gluten-free version, look for gluten-free Biscoff cookies. This way, everyone can enjoy them without worry. Seasonal spices can change the vibe of your bites. In winter, add nutmeg or cloves for warmth. In spring, you might try lemon zest for brightness. Toppings can also vary. Use fresh berries in the summer or a drizzle of caramel in the fall. Each season brings its own flair. Experiment and find your favorite! To keep your no-bake Biscoff pumpkin cheesecake bites fresh, store them in an airtight container. This helps avoid any fridge odors. You can place parchment paper between layers to prevent sticking. Always refrigerate them as soon as they are set. These delightful bites last for about 5 to 7 days in the fridge. After that, they may lose their taste or texture. I recommend enjoying them within the first few days for the best flavor. You can freeze these cheesecake bites if you want to save some for later. Place them in a single layer on a baking sheet until firm. Then, transfer them to an airtight container or freezer bag. They can last up to 2 months in the freezer. When you're ready to enjoy, thaw them in the fridge overnight. Avoid thawing at room temperature to keep them creamy. Yes, you can make these cheesecake bites ahead of time. They chill well in the fridge. Prepare them a day or two before your event. Just store them in an airtight container. This keeps them fresh and tasty. If you lack pumpkin puree, use sweet potato puree instead. It has a similar taste and texture. You can also use applesauce for a different flavor. Both options work well in this recipe. Check if the cheesecake bites are firm to the touch. They should not feel soft or wobbly. After chilling for 2-3 hours, they are ready. If unsure, let them chill longer for extra firmness. This blog post covered how to create tasty cheesecake bites. We explored ingredients, conversions, and substitutions. I shared step-by-step instructions for the crust and filling. I offered tips for the perfect texture and ways to avoid mistakes. We discussed flavor variations and dietary options, plus storage tips for freshness. Remember these pointers to enjoy your cheesecake bites fully. You can have fun with flavors and make them to fit your needs. Each bite can be special and satisfying. Enjoy your time creating and tasting!
No-Bake Biscoff Pumpkin Cheesecake Bites Delight
Get ready to indulge in No-Bake Biscoff Pumpkin Cheesecake Bites! These treats blend creamy pumpkin goodness with the unique flavor of Biscoff cookies. Perfect for
- 1 ½ cups all-purpose flour - 1 tsp baking powder - ½ tsp baking soda - ½ tsp salt - 1 tsp ground cinnamon - ½ tsp ground nutmeg - ½ cup unsalted butter, softened - 1 cup brown sugar, packed - 2 large eggs - 1 tsp vanilla extract - 1 cup unsweetened applesauce - 1 medium apple, peeled and diced (like Granny Smith) - ½ cup caramel sauce These ingredients create a soft, moist cupcake filled with warm spices and apple bits. The spices, cinnamon, and nutmeg, give your cupcakes a cozy, inviting flavor. The diced apple adds texture and bursts of freshness. The caramel sauce, mixed in, enhances the sweetness and ties everything together. - 1 cup unsalted butter, softened - 4 cups powdered sugar - 2 tbsp heavy cream (or milk) - 1 tsp vanilla extract - Pinch of salt - Extra caramel sauce for drizzling The buttercream frosting is rich and creamy. It perfectly balances the spiced cupcakes. You whip the softened butter until it is light. Then, you gradually add the powdered sugar, creating a sweet, fluffy frosting. A drizzle of caramel adds a finishing touch that makes these cupcakes special. With these ingredients, you will create a treat that is both delightful and memorable. First, you need to preheat your oven to 350°F (175°C). Line a cupcake pan with paper liners. This helps the cupcakes come out easily. Next, grab a medium bowl. In this bowl, whisk together the following dry ingredients: - 1 ½ cups all-purpose flour - 1 tsp baking powder - ½ tsp baking soda - ½ tsp salt - 1 tsp ground cinnamon - ½ tsp ground nutmeg Set this bowl aside. Now, take a large mixing bowl. Cream together ½ cup of softened unsalted butter and 1 cup of packed brown sugar. Use an electric mixer for best results. Mix until the mixture is light and fluffy. Beat in 2 large eggs, one at a time. Then, add 1 tsp of vanilla extract and 1 cup of unsweetened applesauce. Mix until everything is well combined. Gradually add the dry ingredients to the wet mixture. Mix until just combined; do not overmix. Now, gently fold in 1 medium apple, peeled and diced, and ½ cup of caramel sauce into the batter. Spoon the batter into the cupcake liners. Fill each about two-thirds full. Place the cupcake pan in the preheated oven. Bake for 18-20 minutes. Use a toothpick to check if they are done. If the toothpick comes out clean, they are ready. Let the cupcakes cool in the pan for 5 minutes. Then, transfer them to a wire rack. Allow them to cool completely. While the cupcakes cool, prepare the buttercream. In a large bowl, beat 1 cup of softened unsalted butter until creamy. Gradually add 4 cups of powdered sugar. Mix well after each addition. Now, add 2 tbsp of heavy cream, 1 tsp of vanilla extract, and a pinch of salt. Beat until the frosting is light and fluffy. Once the cupcakes are completely cool, frost each one generously. Use a piping bag or spatula for this. For a sweet touch, drizzle extra caramel sauce over the frosted cupcakes. Enjoy your delicious spiced caramel apple cupcakes! To bake spiced caramel apple cupcakes that stand out, follow these tips. First, make sure all your ingredients are at room temperature. This helps the batter mix well and rise evenly. Next, do not overmix your batter. Overmixing can create tough cupcakes. Mix just until everything is combined for a light, fluffy texture. When it comes to frosting, I recommend using a piping bag. This gives your cupcakes a nice, professional look. If your frosting feels too soft, chill it in the fridge for a short time. This helps it firm up and makes piping easier. Presentation matters! Arrange your cupcakes on a decorative platter. You can sprinkle some cinnamon or chopped apples on top for extra flair. For a fun touch, add mini caramel apple slices on each cupcake. This not only looks great but also enhances the flavor. {{image_2}} You can easily change the flavor of these cupcakes. Swap the apples for pears or other fruits. This can add a new twist. You can also try different spice mixes. Try using ginger or allspice for a unique taste. If you need to make these cupcakes gluten-free, use a gluten-free flour mix. This works well and keeps the texture nice. For those who want dairy-free options, use dairy-free butter and almond or oat milk in the frosting. Both choices taste great and still deliver sweetness. These cupcakes taste amazing with a hot drink. Pair them with cider or coffee for warmth. You can also add fun toppings. Chopped nuts or chocolate chips can make them even more special. Just sprinkle them on top after frosting for extra crunch and flavor. To keep your spiced caramel apple cupcakes fresh, store them in a cool place. An airtight container works best. This helps to lock in moisture and flavor. If you don't have one, use plastic wrap. Wrap each cupcake tightly to avoid drying out. Avoid stacking them too high to prevent squishing the frosting. To freeze your cupcakes, first let them cool completely. Place them in a single layer in a freezer-safe container. Add parchment paper between layers if needed. They can stay fresh in the freezer for up to three months. When ready to eat, remove them and let them thaw at room temperature. For best quality, enjoy them within a day of thawing. Your spiced caramel apple cupcakes will stay fresh for about 3 to 5 days at room temperature. Keep an eye out for signs of spoilage. If they smell off or have a dry texture, it's time to toss them. A good rule is to check for any visible mold. Always trust your senses! You can use mashed bananas or yogurt as a substitute for apple sauce. Both options will keep the cupcakes moist. Mashed bananas add a slight sweetness, while yogurt gives a tangy taste. If you prefer a less sweet cupcake, try using unsweetened yogurt. To make homemade caramel sauce, you need sugar, butter, and heavy cream. Start by melting sugar in a saucepan over medium heat. Stir until it turns golden brown. Next, add butter and stir until melted. Finally, slowly pour in heavy cream while mixing. Watch out for the steam! Let it cool before using it on your cupcakes. Yes, you can make these cupcakes in advance. Bake them and let them cool completely. Store them in an airtight container at room temperature for up to three days. If you want to frost them later, wait until you are ready to serve. This keeps the frosting fresh and fluffy. You now have a detailed guide to make delicious caramel apple cupcakes. We've covered ingredients, step-by-step instructions, and tips for the perfect bake. You learned how to store and freeze your creations, ensuring they stay fresh. Don't hesitate to try different fruits and flavors. Each variation can lead to a new favorite. With practice, you'll gain confidence in your baking skills. Enjoy your cupcakes with friends or family, and relish the smiles they bring. Baking is fun, and these treats are sure to impress!
Spiced Caramel Apple Cupcakes with Buttercream Delight
Get ready to indulge in a treat that’s bursting with fall flavors! My Spiced Caramel Apple Cupcakes with Buttercream Delight will amaze your taste buds