Desserts

- 5 ripe peaches, peeled and sliced Fresh peaches are the star of this dish. Choose ripe, juicy ones for the best flavor. The sweetness of the peaches shines through in every bite. Their juicy texture adds a lovely contrast to the warm cobbler. If you can, pick them at a local market. You can also use frozen peaches if fresh ones aren’t available. - 1 cup granulated sugar, divided - 1 cup all-purpose flour - 1 tablespoon baking powder - 1/2 teaspoon salt - 1 teaspoon ground cinnamon The dry ingredients bring structure and sweetness to the cobbler. Mixing flour with baking powder gives it a nice lift. The sugar adds sweetness and helps create a crispy top. The salt balances the flavors, while cinnamon adds warmth and depth. Don't skip the cinnamon; it complements the peaches perfectly. - 1 teaspoon vanilla extract - 1 teaspoon lemon juice - 1 cup whole milk - 1/2 cup unsalted butter, melted The wet ingredients keep the cobbler moist and flavorful. Vanilla extract adds a fragrant touch that enhances the peach flavor. Lemon juice brightens the overall taste, making each bite refreshing. Whole milk adds richness, and melted butter gives a lovely texture. Mix these well for a smooth batter. For the full recipe, check the earlier section. Start by peeling and slicing five ripe peaches. Use a sharp knife for best results. Place the peach slices in a large bowl. Add half a cup of granulated sugar, one teaspoon of vanilla extract, and one teaspoon of lemon juice. Toss gently to mix. Let this sit for ten minutes. This allows the peaches to release their sweet juices. In another bowl, combine one cup of all-purpose flour, half a cup of granulated sugar, one tablespoon of baking powder, and half a teaspoon of salt. Whisk these dry ingredients well. This mix helps create a nice texture in the cobbler. Pour in one cup of whole milk and half a cup of melted unsalted butter. Stir gently until just mixed. You want some small lumps to remain. Grease a 9x13-inch baking dish. Pour the batter into the dish, spreading it evenly. Spoon the peach mixture over the batter, but do not stir. Sprinkle one teaspoon of ground cinnamon on top. Bake at 375°F (190°C) for 40-45 minutes. The cobbler should turn golden brown. A toothpick inserted into the center should come out clean. Let it cool before serving. For the full recipe, check the details above. To get the best peach flavor, choose ripe, juicy peaches. Look for peaches that smell sweet and feel slightly soft. If your peaches are not ripe, let them sit at room temperature. This helps them gain flavor and sweetness. When you slice the peaches, sprinkle them with sugar and let them rest. This draws out their natural juices and enhances their flavor, making your cobbler even better. A great cobbler has a soft, cake-like base. To achieve this, mix the batter gently. Overmixing can make it tough. After pouring the batter into your baking dish, spoon the peach mixture on top without stirring. The batter will rise and surround the peaches as it bakes. This gives you a nice balance of flavors and textures. Serve your warm cobbler in bowls. A scoop of vanilla ice cream or a dollop of whipped cream takes it to the next level. For a nice touch, add a slice of fresh peach on top. This not only looks pretty but also adds freshness. Enjoy your cobbler with friends or family for a delightful treat! {{image_2}} You can make your peach cobbler even better by adding berries or other fruits. Strawberries, blueberries, and raspberries blend well with peaches. Just mix them in with the peaches before baking. The berries add a pop of color and flavor. You can also try pears or apples for a twist. This makes the dish fruity and fun. Experiment with what you like best! If you need a gluten-free cobbler, you can use a gluten-free flour blend. Many brands offer great blends that work well in baking. Just swap out the all-purpose flour in the recipe. The taste will still be delicious, and the texture will remain nice. You can also check labels on baking powder to ensure they are gluten-free. This way, everyone can enjoy your tasty treat. You can change the sweetener in your peach cobbler too. Instead of granulated sugar, try honey or maple syrup. Both add a unique flavor. Make sure to adjust the amount. For example, use less honey since it is sweeter than sugar. You can also use coconut sugar for a more caramel taste. Each sweetener brings its own charm to the dish, making it special every time you bake it. For the full recipe on how to make this delicious dish, refer to the Full Recipe section. After making your fresh peach cobbler, let it cool completely. Store it in an airtight container. Keep it in the fridge for up to 3 days. This keeps the cobbler fresh and tasty. You can also cover it with plastic wrap. Just make sure it is sealed well. If you want to save your peach cobbler for later, freezing is a great option. First, let it cool to room temperature. Cut it into portions for easy thawing. Wrap each piece in plastic wrap and then foil. This helps prevent freezer burn. You can freeze it for up to 3 months. When you're ready to eat, just thaw it in the fridge overnight. To reheat your peach cobbler, preheat your oven to 350°F (175°C). Place the cobbler in an oven-safe dish. Cover it with foil to keep it moist. Heat for about 20-25 minutes. If you want a crispy top, remove the foil for the last 5 minutes. You can also use a microwave, but it may not stay as crisp. Enjoy your warm peach cobbler with whipped cream or ice cream for a treat! Yes, you can use canned peaches. Just choose peaches in light syrup or juice. Drain them well before adding to your cobbler. Canned peaches may be softer than fresh ones. This can change the texture of your cobbler. For best results, use about 2 cups of drained canned peaches. You can tell when the cobbler is done by its color. It should be golden brown on top. Insert a toothpick into the center. If it comes out clean, the cobbler is ready. Bake for about 40 to 45 minutes at 375°F. Keep an eye on it during the last few minutes. The best toppings for peach cobbler include whipped cream and vanilla ice cream. Serve the cobbler warm for a cozy treat. You might also sprinkle cinnamon on top for extra flavor. Fresh mint leaves can add a nice touch. Feel free to get creative with your toppings! This blog post covered how to make a delicious peach cobbler. We talked about fresh peaches, mixed dry and wet ingredients, and followed step-by-step instructions for baking. I shared tips for great flavor and texture, plus fun variations. Storage info helps keep your cobbler fresh. With these easy steps, you can enjoy a tasty treat. Now, get baking and share this tasty dessert with friends or family!
Fresh Peach Cobbler Simple and Delicious Recipe
Are you ready to enjoy a warm bowl of fresh peach cobbler? This simple and delicious recipe will make your taste buds dance. I’ll guide
For a tasty Healthy Peach Crumble, you need the right ingredients. Here’s what to gather: - 4 ripe peaches, sliced - 1 tablespoon honey or maple syrup - 1 teaspoon cinnamon - 1 tablespoon lemon juice - 1 cup rolled oats - 1/2 cup whole wheat flour - 1/4 cup almond meal or ground almonds - 1/4 cup coconut oil, melted - 2 tablespoons brown sugar or coconut sugar - A pinch of salt Choosing ripe peaches is key. Look for peaches that are firm but yield slightly to pressure. They should have a sweet aroma. For natural sweeteners, you can select honey or maple syrup. Both work well and add their unique flavors. Healthy fats enhance the crumble's texture. Coconut oil gives richness, while almond meal adds nutty flavor. Whole wheat flour and rolled oats provide fiber, making this dessert nutritious. Portion sizes matter for flavor balance. The recipe serves about six people. Adjust the peach quantity based on your taste. If you prefer sweeter crumbles, increase the honey or maple syrup slightly. For a thicker topping, add more oats or almond meal. If you want a lighter crumble, reduce the sugar. This gives you the freedom to create your perfect treat. Peaches are not just tasty; they are also good for you. They are low in calories and high in vitamins A and C. These vitamins support your skin and immune system. Whole grains from oats and flour increase fiber intake. Fiber helps with digestion and keeps you full longer. Healthy fats from coconut oil and almonds support heart health. This crumble combines flavors and good nutrition, making it a delightful treat. For the full recipe, check out the Healthy Peach Crumble . With these ingredients and benefits, you can enjoy a delicious dessert that is also good for you! To start, you need to slice the peaches. First, wash them well. Then, cut each peach in half. Remove the pit and slice each half into thin wedges. This way, they cook evenly. Next, place the peach slices in a bowl. Add the honey or maple syrup, cinnamon, and lemon juice. Toss gently so every slice gets coated. This will make the peaches sweet and zesty. Now, let’s mix the dry ingredients. In another bowl, combine the rolled oats, whole wheat flour, almond meal, melted coconut oil, brown sugar, and a pinch of salt. Use a fork to mix until it looks crumbly. This mixture will create a nice topping for our peaches. Preheat the oven to 350°F (175°C). Once it's hot, you’re ready to bake. Take your baking dish with the peach mixture and spread the oat topping evenly on top. Place it in the oven and bake for 25 to 30 minutes. Keep an eye on it. The topping should turn golden brown, and the peaches should be bubbling. To check if it’s done, use a fork to poke the topping. If it's firm and golden, it’s ready to come out. Let it cool for a few minutes before serving. This helps the flavors settle nicely. To serve, scoop some warm peach crumble into a bowl. A scoop of vanilla yogurt on top adds creaminess. For a fresh touch, garnish with a sprig of mint. This not only looks good but also adds a burst of flavor. If you want, whipped coconut cream is another great option. It pairs well with the warm peaches and crunchy topping. For more details, you can refer to the Full Recipe. Enjoy your healthy peach crumble! To make your peach crumble even healthier, consider these tips: - Reduce Sugar: You can cut down on sweetness by using less honey or maple syrup. Try using just half the amount or switch to a natural sweetener like stevia. - Gluten-Free Options: If you need a gluten-free version, swap whole wheat flour for almond flour or gluten-free oats. This keeps the taste great without the gluten. Adding a few extra ingredients can take your crumble to the next level: - Spices or Extracts: Adding nutmeg or vanilla extract can give your dish more depth. A pinch of nutmeg works wonders with peaches. - Pairing Suggestions: Serve it warm with vanilla yogurt or coconut cream. These pairings bring out the peach flavor and add a creamy texture. Avoid these common mistakes to ensure a perfect crumble: - Preventing Soggy Crumble: Make sure to drain excess juice from the peaches. Too much liquid can make the topping soggy. - Even Baking Results: Spread the crumb topping evenly over the peaches. This helps it bake evenly and get that nice golden color. For the full recipe, check the Healthy Peach Crumble section! {{image_2}} You can switch up the peaches for other stone fruits. Try using ripe plums, cherries, or apricots. Each fruit brings a unique flavor. You can also mix fruits for a fun twist. Seasonal fruits expand your options too. In summer, berries like blueberries or raspberries taste great. In fall, consider apples or pears for a cozy touch. Want some crunch? Add chopped nuts or seeds to your crumble topping. Walnuts, almonds, or sunflower seeds work well. They not only add texture but also boost nutrition. You can also play with spices. Try adding nutmeg for warmth or ginger for zest. A touch of vanilla extract enhances the sweetness too. You can easily adapt this recipe for different diets. For a vegan version, replace honey with maple syrup. Use coconut oil for a dairy-free fat. If you need gluten-free, swap whole wheat flour for almond or oat flour. These swaps keep the dish tasty and nutritious while meeting your dietary needs. For the full recipe, check out the Healthy Peach Crumble section! To keep your healthy peach crumble fresh, store it properly. You can refrigerate it for up to three days. Cover it with plastic wrap or foil to prevent drying out. If you want to store it longer, freeze it. Wrap individual portions in plastic wrap and place them in a freezer bag. This way, you can enjoy it later. Just remember to label the bag with the date. When you reheat your crumble, aim to keep it crispy. The best method is to use an oven. Preheat it to 350°F (175°C). Place the crumble in an oven-safe dish and cover it loosely with foil. This helps warm it without making it soggy. Heat for about 10-15 minutes until it is warm throughout. You can also use a microwave, but it may not stay as crispy. Your healthy peach crumble can last for about three days in the fridge. If frozen, it stays good for up to three months. Always check for signs of spoilage before eating. If you see mold or it smells off, it’s best to throw it away. Enjoy your delicious treat while it’s fresh! For more details, check the Full Recipe. Yes, you can use frozen peaches in this recipe. They are a great substitute. When using frozen peaches, let them thaw first. Drain any excess liquid to avoid a soggy crumble. You might need to adjust the baking time. Frozen peaches may take a little longer to cook through. You can prepare this dish a day in advance. Slice the peaches and mix them with honey, cinnamon, and lemon juice. Store this mixture in the fridge. You can also mix the dry ingredients ahead. When you are ready to bake, just combine the two and follow the baking steps in the Full Recipe. This peach crumble is best served warm. Pair it with vanilla yogurt or whipped coconut cream. You can also add a scoop of ice cream for a special treat. For a crunchy contrast, serve it with granola on the side. Each serving of this healthy peach crumble has about 180 calories. This includes healthy fats from coconut oil and fiber from oats. You can enjoy a delicious dessert while keeping your nutrition in check. In this blog post, I shared how to make a delicious peach crumble. We explored ingredient options, including ripe peaches, natural sweeteners, and healthy fats. I provided step-by-step instructions for preparation and baking. You discovered useful tips for enhancing flavor and avoiding common mistakes. Variations allow for creativity, while storage info helps maintain freshness. By following these guidelines, you can enjoy a tasty dessert tailored to your needs. Explore your options and make this recipe your own!
Healthy Peach Crumble Delicious and Nutritious Treat
Looking for a guilt-free dessert that satisfies your sweet tooth? This Healthy Peach Crumble is a perfect choice! Packed with ripe peaches and wholesome ingredients,
- 6 cups fresh peaches, peeled and sliced - 1 cup granulated sugar - 1/4 cup all-purpose flour - 1 teaspoon ground cinnamon - 1/4 teaspoon nutmeg - 1 tablespoon lemon juice - 1 tablespoon butter, diced - 1 tablespoon vanilla extract - 1 package refrigerated pie crusts (or homemade if preferred) - 1 egg, beaten (for egg wash) - Fresh herbs or spices for added flavor - Alternative sweeteners for a healthier option When making the best peach pie ever, fresh peaches are key. Choose ripe, juicy peaches. They should feel soft but not mushy. The sugar will balance the tartness of the peaches. Flour thickens the filling as it bakes. Cinnamon and nutmeg add warmth and depth. A splash of lemon juice brightens the flavors. The butter melts into the filling, making it rich. Vanilla extract enhances the sweetness. Using a pie crust, store-bought saves time. If you want, making a homemade crust adds a personal touch. Some like to add fresh herbs or spices to mix things up. You can also use honey or agave syrup instead of sugar for a healthier option. These choices can make your pie unique. You can find the Full Recipe with all the steps to create this delightful dessert. Enjoy your cooking journey! To start, you need fresh peaches. I suggest using ripe peaches for the best flavor. Wash them well and peel off the skin. Then, slice the peaches into thin pieces. Aim for about 1/4 inch thick. Next, place the sliced peaches into a large bowl. Add 1 cup of granulated sugar, 1/4 cup of flour, 1 teaspoon of ground cinnamon, and 1/4 teaspoon of nutmeg. Pour in 1 tablespoon of lemon juice and 1 tablespoon of vanilla extract. Mix all the ingredients gently until the peaches are well coated. Let this mixture sit for about 30 minutes. This allows the flavors to blend and the juices to form. Now, it is time to prepare your pie crust. If you use store-bought crusts, roll out one crust and fit it into a 9-inch pie dish. Trim any excess crust hanging over the edges. Make sure it covers the bottom well. Once your crust is ready, pour the peach filling into it. Spread the filling evenly. For extra richness, dot the top with small pieces of butter. After this, roll out the second pie crust. Place it over the filled pie. You can cut slits for steam vents or create a lattice design. Trim and fold the edges of the crust together, crimping them to seal well. Preheat your oven to 425°F (220°C). This high heat helps create a nice, golden crust. Before baking, brush the top crust with a beaten egg. This gives it a shiny look. Place the pie on a baking sheet to catch drips. Bake it for 45-50 minutes. You will know the pie is done when the crust is golden brown and the filling bubbles. For the best taste, let the pie cool for at least 2 hours before slicing. This waiting helps the filling set nicely. You can find the Full Recipe above for all the details. To make the best peach pie, start with ripe peaches. Ripe peaches feel slightly soft but not mushy. Their color should be bright, with no green spots. Overripe peaches can taste too sweet and mushy, which won't work in your pie. Always trust your senses when choosing peaches. Smell them! A sweet aroma means they are likely ripe. Sourcing local peaches can make a big difference. Visit farmers' markets or local farms. They often sell fresh, in-season peaches. Fresh peaches taste better than store-bought ones. Look for farms that practice sustainable farming. You can find unique flavors and varieties this way. Getting a perfect golden crust is key to a great peach pie. Start by preheating your oven to 425°F (220°C). This high heat helps the crust brown nicely. Use an egg wash for a shiny finish. Brush the top crust with beaten egg before baking. To prevent a soggy bottom crust, use a few tricks. First, let the peach filling sit for about 30 minutes. This allows excess juice to drain away. Also, sprinkle a little flour or cornstarch on the bottom crust. This will soak up some juice as it bakes. Lastly, place your pie on a baking sheet. This way, any drips won’t mess up your oven. Peach pie pairs wonderfully with vanilla ice cream or whipped cream. The cold cream complements the warm pie perfectly. For a twist, try serving it with cinnamon ice cream. You can also add a sprinkle of fresh herbs like mint for a pop of flavor. If you have leftovers, don’t worry. Slice up the pie and store it in the fridge. You can reheat slices in the oven for a warm treat. For a quick option, use the microwave. Just heat for about 20 seconds. Enjoy your peach pie in different ways! {{image_2}} You can make your peach pie crust in many ways. If you want to skip store-bought crusts, try a simple homemade version. Here are some ideas: - Butter Crust: Mix flour, salt, and cold butter. Add water until it forms dough. Chill before rolling. - Graham Cracker Crust: Crush graham crackers and mix with melted butter and sugar. Press into a pie dish. - Almond Flour Crust: Combine almond flour, coconut oil, and egg. Press into the pan for a gluten-free option. Want to mix things up? You can add different fruits or spices. Here are some tasty ideas: - Berry Mix: Add blueberries or raspberries for a fresh twist. They pair well with peaches. - Citrus Zest: Try adding lemon or orange zest for a bright flavor. It lifts the pie. - Spices: Cinnamon is great, but nutmeg or ginger can add warmth and depth. Just a pinch can change the flavor. You can make your peach pie just a bit healthier without losing taste. Here are some swaps: - Lower Sugar: Use less sugar or try natural sweeteners like honey or maple syrup. - Gluten-Free: Use almond flour or rice flour for the crust. You can also thicken the filling with cornstarch instead of flour. These variations help you create a pie that suits your taste and needs. Enjoy exploring these options while making your best peach pie ever! For the full recipe, check back on the main article! To keep your best peach pie ever fresh, here are some simple tips: - Short-term storage at room temperature: If you plan to eat the pie within two days, cover it with plastic wrap or a clean kitchen towel. Keep it on the counter away from direct sunlight. This helps maintain its wonderful flavor and texture. - Long-term refrigeration or freezing tips: For longer storage, place the pie in the fridge for up to five days. Wrap it well to prevent it from drying out. If you want to save it for later, freeze the pie. Wrap it tightly in plastic wrap and then foil. It can last up to three months in the freezer. When you're ready to enjoy your pie, here’s how to reheat it: - Tips for reheating slices in the oven: Preheat your oven to 350°F (175°C). Place the pie slices on a baking sheet. Cover them lightly with foil to keep them from burning. Heat for about 15-20 minutes, or until warm and fragrant. - Microwave options for quick warming: If you need a faster option, use the microwave. Place a slice on a microwave-safe plate. Heat it for 30 seconds to 1 minute, checking every 30 seconds. This method is quick but can make the crust a bit soft. Enjoy your pie warm, and don't forget the ice cream! Homemade peach pie lasts about 3 to 4 days at room temperature. You should cover it with plastic wrap or foil. If you place it in the fridge, it can last up to a week. Just make sure it is in an airtight container to keep it fresh. Yes, you can use frozen peaches. Just make sure to thaw them first. Drain any extra juice before mixing them with the other ingredients. This will help the pie stay firm and not too runny. To prevent a runny filling, use a bit of flour or cornstarch. This helps to thicken the juices from the peaches. Let the peach mixture sit for 30 minutes before pouring it into the crust. This allows the flavors to meld and helps to thicken the filling. You can make the pie ahead of time. Just bake it and let it cool completely. Cover it well and store it in the fridge. It will taste great for up to a week. If you want to freeze it, wait until it cools, then wrap it tightly. You can find the Full Recipe for the Best Peach Pie Ever in the main article. It includes all the steps and tips you need to make this delicious pie! Making a peach pie is simple and fun. We covered how to choose ripe peaches, prepare the filling, and assemble the pie. Tips on baking and serving make it even better. Plus, you now know about variations and storage options for fresh pie. Enjoying your homemade peach pie is the best part. Share it with friends or savor it all yourself. You have all the tools for a great dessert. Dive in and bake one today!
Best Peach Pie Ever Delightful Recipe to Try
If you love the sweet, juicy taste of summer, you have to try my Best Peach Pie Ever. This simple, delightful recipe uses fresh peaches
- 4 cups fresh peaches, peeled and sliced - 1 cup sugar (divided into ¾ cup and ¼ cup) - 1 tablespoon lemon juice Fresh peaches are the star of this dish. They give the cobbler a sweet and juicy flavor. I always choose ripe peaches for the best taste. You can peel and slice them easily with a knife. The sugar helps to sweeten the peaches and makes their juices flow. The lemon juice adds a nice zing that brightens the flavors. - 1 teaspoon vanilla extract - 1 teaspoon ground cinnamon Vanilla extract adds warmth and richness. It blends well with the peaches. Cinnamon gives a cozy spice that makes this dessert feel special. Just a teaspoon of each will elevate your cobbler to new heights. - 1 ½ cups all-purpose flour - 1 tablespoon baking powder - ½ teaspoon salt - ½ cup unsalted butter, melted - 1 cup milk The flour forms the base of the batter. Baking powder helps it rise, making it fluffy. A pinch of salt balances the sweetness. Butter adds richness, while milk keeps the batter moist. These ingredients work together to create a perfect cobbler texture. For the full recipe, you can check out the detailed steps. First, take 4 cups of fresh peaches and slice them. Then, place the peaches in a bowl. Add ¾ cup of sugar, 1 tablespoon of lemon juice, 1 teaspoon of vanilla extract, and 1 teaspoon of ground cinnamon. Toss the peaches well until they are nicely coated. Let them sit for about 10 minutes. This step makes the peaches juicy and sweet. In another bowl, mix the dry ingredients. Combine 1 ½ cups of all-purpose flour, 1 tablespoon of baking powder, ½ teaspoon of salt, and the remaining ¼ cup of sugar. Whisk these ingredients together until they are well mixed. Pour in ½ cup of melted unsalted butter and 1 cup of milk. Stir gently until just combined. Don’t worry about lumps; they are okay. Now, preheat your oven to 350°F. Grease a 9x13-inch baking dish. Pour the batter into the dish and spread it out evenly. Next, gently spoon the peach mixture on top of the batter. Try to spread the peaches evenly without mixing them into the batter. Bake the cobbler for 40-45 minutes. The top should be golden brown, and a toothpick should come out clean. Once done, let it cool for about 10 minutes before serving. For the full recipe, refer to the instructions above. - Use ripe peaches for the best flavor. Ripe peaches have a sweet and juicy taste. Look for peaches with a slight give when you press them. This means they’re ready to shine in your cobbler. - Do not overmix the batter for a better texture. Mixing too much can make the batter tough. Stir just until you see no dry flour. A few lumps are okay, and they can make your cobbler fluffier. - Serve warm with vanilla ice cream. The warm cobbler and cold ice cream make a perfect pairing. The ice cream melts over the cobbler, creating a creamy delight. - Garnish with fresh mint for added presentation. A sprig of mint adds color and a refreshing taste. It makes your dessert look fancy without much effort. - Forgetting to let peaches marinate. Marinating helps the peaches release their juices. This step adds flavor and makes your cobbler extra juicy. - Opening the oven too frequently while baking. Each time you open the oven, heat escapes. This can lead to uneven baking and may affect your cobbler's rise. Keep the oven door closed until it’s time to check for doneness. Enjoy your cooking! For the complete recipe, feel free to check the Full Recipe section! {{image_2}} You can swap out peaches for other fruits. Try berries or apples for a tasty change. Mixing different fruits can make a fun cobbler. Think about using cherries, plums, or even pears. Each fruit brings its unique flavor to the dish. If you need a gluten-free version, use gluten-free flour instead of regular flour. It works just as well in the recipe. You might need to adjust the baking powder to ensure it rises properly. Check the package for the right amount to use. Want to add more flavor to your cobbler? A splash of almond extract can give it a unique twist. You can also sprinkle some nutmeg on top for an added spice flavor. These little adjustments can take your cobbler to the next level! For the full recipe, check out the details earlier. To keep your peach cobbler fresh, store it in an airtight container at room temperature. If you don't eat it within two days, move it to the fridge. Refrigeration helps keep the flavors intact and prevents spoilage. You can freeze your peach cobbler for later enjoyment. Cut it into slices and place them in individual portions. Use parchment paper between slices to stop them from sticking together. This makes it easy to grab a piece anytime you want a sweet treat. When you’re ready to eat your frozen cobbler, you can reheat it in the oven. Set your oven to 350°F and heat until warmed through. If you're in a hurry, you can microwave individual portions for quick heating. Enjoy it warm for the best taste! Yes, you can use frozen peaches. Just adjust the sugar based on their sweetness. Frozen peaches may have extra water, so you may want to drain them a bit. This keeps your cobbler from getting too soggy. Always taste the peaches first to see if they need more sugar. To get a crispy top, add a sprinkle of sugar on top before baking. This little step gives the cobbler a nice crunch. You can also use a bit of butter on top for extra flavor. Both methods work well and make the cobbler even more tasty. The best way to check if your cobbler is done is to look for a golden brown top. Insert a toothpick into the center. If it comes out clean, your cobbler is ready. Don't worry if the edges look a bit darker; that's normal. Trust your eyes and the toothpick test for perfect results. To sum it up, making a peach cobbler is simple and fun. Start with fresh peaches, mix in some sugar, and prepare a quick batter. Remember to let the peaches marinate for the best taste. You can customize the recipe with different fruits or even make it gluten-free. Enjoy warm with ice cream, and store any leftovers properly. With these tips, you’ll create a delicious dessert that everyone will love. Happy baking!
Super Easy Peach Cobbler Delightful Dessert Recipe
Craving a warm and comforting dessert? Look no further than this super easy peach cobbler! With just a handful of simple ingredients and straightforward steps,
- 2 cups grated zucchini - 1 cup all-purpose flour - 1 cup whole wheat flour - 3/4 cup granulated sugar - 1/2 cup brown sugar The zucchini is the star here. It adds moisture and a soft texture. You will need two medium zucchinis for this recipe. Grate them finely to blend well into the batter. The combination of all-purpose and whole wheat flour gives a nice balance. The sugars add sweetness and depth to the flavor. - 1/2 cup chopped walnuts or pecans - 1/2 cup chocolate chips If you want to boost flavor, add nuts or chocolate chips. The nuts give a great crunch. Chocolate chips add richness that kids love. You can mix and match as you like. - Baking powder - Baking soda - Spices like cinnamon and nutmeg These ingredients help the bread rise and add flavor. Baking powder and baking soda work together for a perfect rise. Spices like cinnamon and nutmeg give warmth and depth. Don't skip these; they make your bread special. For the full recipe, check out the [Full Recipe]. 1. Preheat your oven to 350°F (175°C). This heat makes the bread rise well. 2. Grease and lightly flour a 9x5-inch loaf pan. This helps the bread slide out easily. 3. Grate about 2 medium zucchinis, which gives you 2 cups of grated zucchini. 4. Use a clean kitchen towel or paper towels to squeeze out the excess moisture. This step helps keep the bread from being too wet. 1. In a medium bowl, mix together: - 1 cup all-purpose flour - 1 cup whole wheat flour - 1 teaspoon baking powder - 1 teaspoon baking soda - 1 teaspoon ground cinnamon - 1/2 teaspoon ground nutmeg - 1/2 teaspoon salt Set this mix aside. 2. In a large bowl, whisk together: - 3/4 cup granulated sugar - 1/2 cup brown sugar - 2 large eggs Mix until well combined and slightly frothy. 3. Add in 1/2 cup of vegetable oil or melted coconut oil and 1 teaspoon of vanilla extract. Mix until smooth. 4. Gradually fold the dry mix into the wet mix. Alternate with the grated zucchini. Mix until just combined. Be careful not to overmix. 5. If you like, fold in: - 1/2 cup chopped walnuts or pecans - 1/2 cup chocolate chips These add great flavor and texture. 1. Pour the batter into your prepared loaf pan. Smooth the top with a spatula. 2. Bake in the preheated oven for about 50-60 minutes. 3. To test if it’s done, insert a toothpick into the center. If it comes out clean, the bread is ready! 4. Once baked, let it cool in the pan for about 10 minutes. Then transfer it to a wire rack to cool completely. For the full recipe, check the detailed steps above. Enjoy the process of making this tasty zucchini bread! To get the best texture in your zucchini bread, do not overmix the batter. Overmixing can lead to a dense loaf. Mix just until the dry and wet ingredients combine. This keeps your bread soft and fluffy. Properly measuring flour is also key. Use a spoon to scoop flour into your measuring cup, then level it off with a knife. This prevents adding too much flour and makes your bread heavy. For extra flavor, try adding spices like ginger or cloves. You can also use extracts like almond or coconut. Fresh zucchini gives a better taste, but frozen works too. Just make sure to drain excess water from thawed zucchini. This keeps the bread from being too wet. Slice the zucchini bread with a sharp knife for neat pieces. Serve on a wooden or ceramic board for a nice look. You can top each slice with butter or cream cheese. A sprinkle of powdered sugar also adds a sweet touch. Enjoy your bread with tea or coffee for a cozy snack. For the Full Recipe, check back in the main section. {{image_2}} You can make zucchini bread healthier in a few ways. First, try using whole wheat flour instead of all-purpose flour. This adds more fiber to your bread. If you want a gluten-free option, use almond flour or coconut flour instead. Next, consider reducing the sugar. You can cut down the amount you use by a third. You can also swap sugar for honey or maple syrup for a sweeter taste. These options add flavor and keep the bread moist. Adding fruits can boost the flavor of your zucchini bread. Try mixing in mashed bananas or grated apples. These fruits not only add sweetness but also moisture. You can also add nuts and spices. Chopped walnuts or pecans give a nice crunch. For spices, try ginger or allspice to change the flavor profile. Each addition can create a unique twist on the classic recipe. Seasonal herbs or citrus zest can brighten your bread. Fresh mint or basil can add a fresh taste, while lemon or orange zest enhances sweetness. These ingredients make the bread more vibrant and fun. For a treat, swirl in chocolate or caramel. This makes your zucchini bread richer and more indulgent. These options can turn a simple loaf into a dessert that everyone will love. For the full recipe, check out the detailed instructions above. To keep zucchini bread fresh for several days, wrap it tightly in plastic wrap. You can also place it in an airtight container. This prevents air from drying out the bread. Store it at room temperature if you plan to eat it within three days. If you want to keep it longer, put it in the fridge. Use a container that fits snugly to limit air exposure. For long-term storage, freezing zucchini bread is a great option. Slice the bread before freezing. Wrap each slice in plastic wrap, then place the slices in a freezer bag. Make sure to remove as much air as possible from the bag. This helps keep the bread fresh. When you're ready to eat, thaw the slices in the fridge overnight. For a warm treat, reheat in the oven at 350°F for about 10 minutes. To tell if your zucchini bread has gone bad, look for mold or a sour smell. If the bread feels overly dry or hard, it might not taste good. You can also check for an off flavor. To extend shelf life, always use clean utensils when cutting the bread. This helps avoid bacteria. Enjoy your delicious zucchini bread with these storage tips for the best experience! To make zucchini bread moist, use fresh grated zucchini. The moisture in the zucchini adds softness. You can also add a bit more oil or applesauce. This keeps the bread tender and delicious. Don't overmix your batter; it can make the bread tough. It's best to mix until just combined. Letting the bread cool in the pan for a bit also helps keep it moist. Yes, you can use frozen zucchini! Thaw it first and drain any excess water. This helps prevent the bread from getting soggy. Squeeze out the moisture using a clean towel. Then, use it just like fresh zucchini in the recipe. It’s a great way to use up extra zucchini! Leftover zucchini bread is great for many things! You can slice it and make French toast. Just dip the slices in a mix of eggs and milk, then cook them in a pan. You can also turn it into bread pudding by cubing it and mixing with eggs, milk, and spices. Both options are tasty and fun! Absolutely! You can double the recipe easily. Just make sure to use a larger bowl for mixing. Use two loaf pans or one big pan if you have it. Keep an eye on baking time as it may change. This way, you can share the yummy bread with friends or family! You now have all the key steps to make delicious zucchini bread. We covered the main ingredients, preparation, baking, and how to store it. Remember to keep your mix smooth and measure correctly for the best texture. Don't hesitate to explore variations and add fun flavors. With these tips, you'll create incredible zucchini bread that delights everyone. Happy baking!
The Best Zucchini Bread Simple and Tasty Recipe
Are you searching for the ultimate zucchini bread recipe? Look no further! I promise this simple and tasty recipe will wow your taste buds. With
To make a simple peach crisp, gather these fresh and tasty items: - 6 ripe peaches, peeled and sliced - 1 tablespoon lemon juice - ¾ cup brown sugar, divided - 1 teaspoon cinnamon - ½ teaspoon nutmeg - 1 cup rolled oats - ½ cup all-purpose flour - ½ cup unsalted butter, melted - ¼ teaspoon salt - Vanilla ice cream, for serving (optional) These ingredients create a warm, sweet dish that is easy to prepare. The peaches give a juicy, sweet base, while the topping adds a crunchy contrast. The lemon juice brightens the flavors of the peaches. The brown sugar, cinnamon, and nutmeg bring warmth and depth. You can adapt the recipe to suit your taste, but this list covers the basics for a delicious peach crisp. For the full recipe, check the earlier section. Start by washing six ripe peaches. Use a paring knife to peel them. Slicing the peaches is next. Aim for thick slices to keep them juicy. Place the sliced peaches in a large bowl. Add one tablespoon of lemon juice to brighten the flavor. Now, sprinkle in half a cup of brown sugar, one teaspoon of cinnamon, and half a teaspoon of nutmeg. Toss the peaches gently until they are well-coated. This step makes the filling sweet and spiced. Once mixed, transfer the peach mixture into a greased baking dish. Spread it evenly across the bottom. In another bowl, combine one cup of rolled oats, a half cup of flour, and a quarter teaspoon of salt. Add the remaining brown sugar to this mix. Next, pour in half a cup of melted unsalted butter. Stir everything together until it looks like coarse crumbs. This topping gives a nice crunch. Make sure to mix well, so every bit gets butter. Once ready, sprinkle the topping evenly over the peach filling. Preheat your oven to 350°F (175°C). Once heated, place your baking dish in the oven. Bake for 30-35 minutes. Look for a golden brown topping and bubbling peaches. These signs show that it is ready. After baking, remove the crisp from the oven. Let it cool for a few minutes. This cooling time helps the flavors meld. Serve warm, and if you like, add a scoop of vanilla ice cream on top. For a lovely finish, dust with more cinnamon. Enjoy this delightful treat! To make a great peach crisp, choose ripe peaches. Look for peaches that feel soft but not mushy. The skin should have a slight give when you press it. Color matters too. A good peach will have a warm yellow or golden hue. Check for any green spots; they mean the peach is not ripe. When you smell the peach, it should have a sweet, fruity scent. This means it is ready to eat. For a crispy topping, mix your dry ingredients well. Use rolled oats, flour, and brown sugar. Melt the butter but don’t let it cool too long. Warm butter helps create a crunchy texture. When you combine the topping, it should feel crumbly. If it sticks together too much, add a bit more flour. Spread it evenly over the peaches for the best bake. This helps the topping get nice and golden. Serve your peach crisp warm for the best taste. A scoop of vanilla ice cream is the perfect touch. It adds creaminess to the warm, sweet crisp. You can also sprinkle extra cinnamon on top for added flavor. If you want, serve with fresh mint or whipped cream. These small touches make a big difference. For a fun twist, try pairing it with yogurt instead of ice cream. Enjoy this treat with family and friends! For the full recipe, visit the section above. {{image_2}} Nuts can boost your peach crisp. They add crunch and flavor. I love using chopped pecans or walnuts. You can mix them right into the oat topping. Use about ½ cup of nuts. This change gives your dessert a nice texture. While peaches shine in this recipe, feel free to switch things up. Berries, apples, or plums work well too. Each fruit brings its own taste. Try mixing different fruits for a fun twist. For example, combine peaches with blueberries for a vibrant blend. Your crisp will still be tasty and fresh. If you need a gluten-free dessert, you can adjust the recipe easily. Replace all-purpose flour with almond flour or a gluten-free blend. Make sure your oats are certified gluten-free. This way, everyone can enjoy this delicious treat without worry. To keep your peach crisp fresh, store it in an airtight container. Place it in the fridge. It will stay good for about 3 to 5 days. Make sure it cools down before putting it away. This helps keep the topping crispy longer. To reheat your peach crisp, preheat your oven to 350°F (175°C). Place the crisp in an oven-safe dish. Cover it with foil to prevent drying out. Heat for about 15-20 minutes. If you want a crispy top, remove the foil for the last 5 minutes. You can freeze peach crisp for later. First, let it cool completely. Then, wrap it tightly in plastic wrap and foil. This helps prevent freezer burn. It will stay fresh for about 2-3 months. When ready to eat, thaw it in the fridge overnight before reheating. For best results, bake from fresh if you can. But frozen works too! Enjoy every bite. For the full recipe, check out the Peachy Paradise Crisp. To peel peaches easily, start by boiling water in a pot. Next, make a small "X" on the bottom of each peach. Once the water boils, drop the peaches in for about 30 seconds. Then, place them in a bowl of ice water. The skins will slip off easily. This method saves time and keeps the fruit intact. Yes, you can use frozen peaches for this recipe. Just keep in mind that frozen peaches may have extra moisture. To manage this, drain any excess liquid before mixing with other ingredients. Using frozen peaches can be a great option if fresh ones are out of season. They still taste delicious and save you time in prep. Your peach crisp is done when the topping turns a golden brown and the peaches bubble. This usually takes about 30 to 35 minutes in the oven. You can also check by inserting a fork into the peaches. If they feel soft, your crisp is ready. The smell will fill your kitchen, making it hard to wait! In this post, we covered how to make a delicious peach crisp. You learned about the right ingredients, how to prepare the peaches, and tips for baking. We explored ways to customize the recipe with various fruits and nuts. We also shared storage tips to keep leftovers fresh. Enjoy making this peach crisp! It’s easy, fun, and sure to impress. You’ll love sharing it with friends and family.
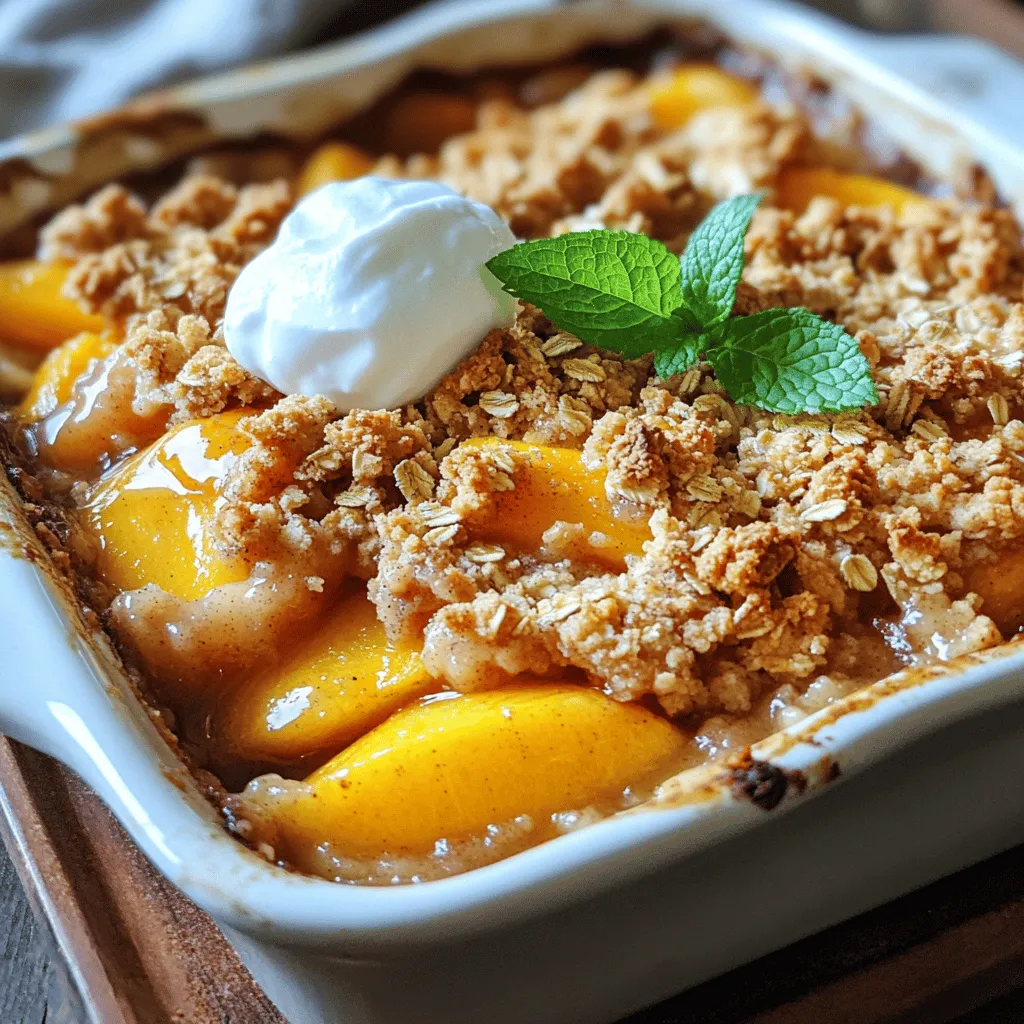
Simple Peach Crisp Flavorful and Easy Dessert Recipe
Are you ready to taste a dessert that’s both easy and full of flavor? This Simple Peach Crisp is perfect for any occasion. With ripe
To make these savory banana zucchini muffins, gather the following ingredients. Each one plays a key role in the flavor and texture of the muffins. - Ripe bananas (approximately 2-3 bananas, mashed) - Grated zucchini (with excess moisture squeezed out) - Vegetable oil or melted coconut oil - Brown sugar and granulated sugar - Eggs and vanilla extract - All-purpose flour, baking soda, baking powder, salt, and ground cinnamon - Optional add-ins: chopped walnuts or pecans, chocolate chips Using ripe bananas gives a natural sweetness to the muffins. The zucchini adds moisture without a strong taste. The oil helps keep muffins soft and tender. The mix of brown and white sugar creates a nice balance of sweetness. Eggs provide structure, while vanilla adds flavor. When mixing the dry ingredients, use all-purpose flour for the best results. Baking soda and baking powder help the muffins rise. Salt enhances all flavors, and ground cinnamon adds warmth. For optional add-ins, walnuts or pecans give a delightful crunch. Chocolate chips can be a sweet surprise in each bite. This recipe provides a great way to enjoy these ingredients. You can find the full recipe with detailed instructions to bake these delicious muffins. First, set your oven to 350°F (175°C). This temperature helps bake the muffins evenly. While the oven heats, prepare your muffin tin. You can use paper liners for easy serving or spray the tin with cooking spray. Either way works well! In a large bowl, combine 1 cup of mashed ripe bananas and 1 cup of grated zucchini. Make sure to squeeze out extra moisture from the zucchini for better texture. Add 1/2 cup of vegetable oil and 1/2 cup each of brown and granulated sugar. Mix these until they blend well. Next, whisk in 2 large eggs and 1 teaspoon of vanilla extract. This mix will give your muffins a lovely flavor. In a separate bowl, mix together 1 1/2 cups of all-purpose flour, 1 teaspoon of baking soda, 1/2 teaspoon of baking powder, 1/2 teaspoon of salt, and 1 teaspoon of ground cinnamon. Stir these dry ingredients thoroughly. Once mixed, gradually fold them into the wet ingredients. Be gentle! Overmixing can make your muffins tough. It’s okay if the batter has a few lumps. Now, it’s time to fill your prepared muffin cups. Divide the batter evenly, filling each cup about 2/3 full. This way, the muffins have room to rise without overflowing. If you like, you can add nuts or chocolate chips at this stage for extra flavor. Place the filled muffin tin in the oven and bake for 18-20 minutes. To check if they are ready, insert a toothpick into the center of a muffin. If it comes out clean, your muffins are done! Once baked, remove them from the oven. Let the muffins cool in the pan for about 5 minutes. After that, transfer them to a wire rack to cool completely. Enjoy your delicious banana zucchini muffins! For the full recipe, check out the section above. To make the best banana zucchini muffins, avoid overmixing the batter. Overmixing can make your muffins tough and chewy. Mix just until the wet and dry ingredients combine. A few lumps are okay; they help keep the muffins light and fluffy. The moisture from zucchini is key. Squeeze out the extra water after grating it. This step helps the muffins bake perfectly, giving them a soft texture. Too much moisture can lead to soggy muffins. Feel free to use alternative sweeteners. Honey or maple syrup works well in this recipe. You can also swap vegetable oil for melted coconut oil for a touch of flavor. Don't hesitate to experiment with spices. Nutmeg adds a warm, cozy flavor. You might also try adding a pinch of ginger for an extra kick. Garnishing your muffins makes them look special. Sprinkle extra chocolate chips on top before baking. This adds a lovely touch and makes them more inviting. Serve the muffins warm on a rustic wooden board. You can garnish with fresh banana slices and mint leaves for a pop of color. These little details make a big difference in how your muffins look and taste. You can find the full recipe [here](#). {{image_2}} You can change up the taste of your muffins easily. A fun way is to add cocoa powder. This gives a rich chocolate twist that blends well with the banana and zucchini. Just mix in about 1/4 cup of cocoa powder with your dry ingredients. Another idea is to use flavored extracts. Coconut or almond extracts can add a new taste to your muffins. Just a teaspoon of either can brighten the flavors. Mix it in with the wet ingredients for the best results. If you want to make your muffins gluten-free, swap all-purpose flour for a gluten-free blend. Look for a mix that works well in baking. This way, you can enjoy tasty muffins without the gluten. For those who follow a vegan diet, you can replace the eggs with flax eggs. Mix 1 tablespoon of ground flaxseed with 2.5 tablespoons of water. Let it sit for a few minutes until it thickens. You can also use maple syrup instead of sugar. You can serve these muffins in different ways. Muffin tops are a fun option. Just fill the muffin cups less full, about halfway. This way, you get those crunchy tops that everyone loves. Mini muffins are another great idea. They are perfect for a quick snack or for kids. Simply reduce the baking time to about 10-12 minutes. You’ll have bite-sized treats in no time! For the full recipe, check the earlier sections. Enjoy creating your own variations! After baking your banana zucchini muffins, let them cool. Place the cool muffins in an airtight container. This keeps them fresh. You can store them at room temperature for up to three days. If you want them to last longer, keep them in the fridge. They stay good for about a week in the fridge. Freezing muffins is a great way to keep them fresh. First, let the muffins cool completely. This step is key to avoiding ice crystals. Wrap each muffin in plastic wrap tightly. Then, place them in a freezer bag. Make sure to remove as much air as possible. You can freeze them for up to three months. When you want to enjoy one, take it out and let it thaw at room temperature. You can also microwave it for a quick treat. To reheat your muffins, you have a few options. The oven gives the best results. Preheat it to 350°F (175°C). Place the muffins on a baking sheet and heat for about 10 minutes. This keeps them moist. If you’re in a hurry, use the microwave. Heat for about 15-20 seconds. To keep the muffins moist, cover them with a damp paper towel. This tip helps avoid dryness. Enjoy your muffins warm for the best taste! You can reduce sugar by using less brown and granulated sugar. Try using just a third cup of each instead of half. Use applesauce or mashed avocado to cut down on oil. This adds moisture without extra fat. You can also swap half of the all-purpose flour for whole wheat flour. This boosts fiber and nutrients. Yes, you can easily replace eggs in this recipe. Use 1/4 cup of unsweetened applesauce for each egg. You can also use flaxseed meal. Mix one tablespoon of flaxseed meal with three tablespoons of water. Let it sit for five minutes before adding. This creates a great binding agent for your muffins. Homemade muffins last about three to five days at room temperature. Store them in an airtight container to keep them fresh. You can also keep them in the fridge, where they will last about a week. If you want to keep them longer, consider freezing them. Yes, you can make these muffins ahead of time. Bake them, let them cool, and store them in an airtight container. They freeze well too. To reheat, simply microwave them for about 20 seconds. You’ll enjoy warm muffins without much fuss. These muffins are great on their own, but pair well with yogurt or fruit. Serve with a drizzle of honey or a sprinkle of cinnamon. You can also enjoy them with a cup of tea or coffee. They make a great breakfast or snack! You can make delicious banana zucchini muffins with simple, easy steps. Start with ripe bananas and grated zucchini, mix them well, and follow the instructions provided. I shared tips to perfect the texture and enhance flavors. Feel free to try variations, like adding chocolate or using gluten-free flour. Remember to store your muffins properly for the best taste. With these easy methods, you can enjoy fresh muffins anytime. Experiment, have fun, and share these tasty treats that everyone will love!
Savory Banana Zucchini Muffins Moist and Tasty Treat
If you’re searching for a tasty treat that’s both savory and moist, look no further! My Banana Zucchini Muffins combine ripe bananas and fresh zucchini
- 1 cup grated zucchini (about 1 medium zucchini) - 1 cup granulated sugar - 1/2 cup vegetable oil - 2 large eggs - Zest of 1 lemon - 1/4 cup fresh lemon juice - 1 1/2 cups all-purpose flour - 1 tsp baking powder - 1/2 tsp baking soda - 1/2 tsp salt - 1/2 tsp ground cinnamon - 1/4 tsp nutmeg The key to making a tasty lemon zucchini bread lies in its main ingredients. Grated zucchini gives the bread moisture and a subtle flavor. Sugar and vegetable oil add sweetness and richness. Eggs bind everything together. Lemon zest and juice bring a bright, tangy flavor that lifts the bread. - 1/2 cup chopped walnuts or pecans (optional) - A splash of vanilla extract or a dash of nutmeg If you want to change things up, consider adding chopped nuts. Walnuts or pecans add crunch and depth. You can also enhance the flavor with a splash of vanilla or an extra dash of nutmeg. These simple add-ins can make your lemon zucchini bread even more special. Check out the Full Recipe for all the details! First, you need to preheat the oven to 350°F (175°C). This step is key for even baking. While the oven heats, take a 9x5-inch loaf pan. Grease it lightly with butter or spray. You can also dust it with flour. This helps the bread slide out easily once baked. In a large mixing bowl, add 1 cup of grated zucchini, 1 cup of granulated sugar, and 1/2 cup of vegetable oil. Mix these ingredients well until they blend together nicely. Next, crack in 2 large eggs. Add the zest of 1 lemon and 1/4 cup of fresh lemon juice. Beat everything together until the mixture is smooth. This adds amazing flavor and moisture to your bread. In a separate bowl, whisk together 1 1/2 cups of all-purpose flour, 1 tsp of baking powder, 1/2 tsp of baking soda, 1/2 tsp of salt, 1/2 tsp of ground cinnamon, and 1/4 tsp of nutmeg. This mix of dry ingredients helps the bread rise and gives it a nice spice. Slowly add the dry mix to your wet ingredients. Stir gently until just combined. Avoid overmixing, as this can make your bread dense. Now, pour the batter into the prepared loaf pan. Spread it evenly. Place the pan in your preheated oven. Bake for about 50 to 60 minutes. To check for doneness, insert a toothpick into the center. If it comes out clean, your bread is ready. Once baked, take it out of the oven and let it cool in the pan for about 10 minutes. Then, transfer it to a wire rack to cool completely. Enjoy the lovely aroma as it fills your kitchen! To make tasty lemon zucchini bread, avoid overmixing your batter. Overmixing can make the bread dense and tough. Mix just until you see no more dry flour. This keeps the bread light and fluffy. Use moist ingredients like grated zucchini and oil. These add moisture and help the bread stay soft. Zucchini is great for this because it adds moisture without extra fat. You want to keep the bread tender and not dry. You can boost flavor by adding vanilla or spices. A splash of vanilla makes the bread richer. Cinnamon and nutmeg add warmth and depth. You can also try adding a pinch of ginger for a fun twist. Adjust sweetness and acidity to match your taste. If you like it sweeter, add a bit more sugar. For a tangy kick, increase the lemon juice. Taste as you mix to find your perfect balance. Presentation matters when serving lemon zucchini bread. Slice the bread into even pieces and serve them on a pretty platter. Dust the top with powdered sugar to make it look special. Garnish with thin lemon slices and fresh mint leaves. This adds color and a fresh scent. A simple, lovely presentation makes the bread more inviting. You can find the full recipe to guide you through making this delicious bread. {{image_2}} You can make Lemon Zucchini Bread healthier by using whole wheat flour instead of white flour. Whole wheat flour adds fiber and nutrients. You can also try alternative sweeteners like honey or maple syrup. These options can cut down on refined sugar. Just remember, you may need to adjust the liquid in your recipe. Experimenting with different flavors can make this bread even more fun. Try adding orange or lime zest for a twist. You can also mix in spices like ginger or cardamom. Each variation brings out new tastes. You might find a favorite that you want to bake again and again. If you need gluten-free choices, use gluten-free flour blends. Many blends work well in baking. They can give you the same texture as regular flour. Just follow the package instructions for the best results. This way, everyone can enjoy your Lemon Zucchini Bread. For the full recipe, check out the details above. To keep your lemon zucchini bread fresh, store it correctly. First, let the bread cool completely. This step is key to avoid sogginess. Once cool, wrap the bread tightly in plastic wrap. You can also use aluminum foil for a snug fit. Place the wrapped bread in an airtight container. This method keeps moisture in while preventing air from drying it out. For best results, store the bread at room temperature. It will last about 3 to 4 days this way. If you want it to last longer, consider freezing. Freezing lemon zucchini bread is easy and smart. To freeze, first slice the bread into pieces. This makes it easy to grab just what you need. Wrap each slice in plastic wrap. Then, put all the slices into a freezer-safe bag. Make sure to remove as much air as you can. You can freeze the bread for up to 3 months. When you're ready to eat, just take out a slice. Thaw it at room temperature or warm it in the microwave. This way, you can enjoy fresh-tasting lemon zucchini bread anytime! For the full recipe, check out the detailed steps above. You can tell if your Lemon Zucchini Bread is done by using a toothpick. Insert it into the center of the loaf. If it comes out clean, the bread is ready. If it has wet batter, bake it longer. The top should be golden brown and feel firm to the touch. I like to check it at 50 minutes. You don’t want to overbake it, as this can dry it out. Yes, you can use yellow zucchini instead of green. They taste very similar. The color will change the look of your bread, making it a lovely golden hue. Both types of zucchini add moisture, so feel free to use what you have on hand. Just make sure to grate it finely, like with green zucchini. Lemon Zucchini Bread pairs well with a variety of options. You can serve it with a pat of butter or a drizzle of honey. Cream cheese spread is also a nice touch. If you want a refreshing drink, try serving it with iced tea or lemonade. Add fresh fruit on the side for a colorful plate. Lemon Zucchini Bread lasts about a week if stored properly. Keep it in an airtight container at room temperature. If you want to keep it longer, you can freeze it. Wrap it well in plastic wrap and then in foil. It can last up to three months in the freezer. Just thaw it in the fridge before enjoying. For the full recipe, check out the details above! Lemon zucchini bread is a delightful mix of flavors and textures. It combines fresh grated zucchini with bright lemon and sweet elements. You can customize it with nuts or spices for extra flair. Remember to prep your oven and loaf pan before mixing your wet and dry ingredients. Follow the baking tips to ensure a moist loaf. Store it properly or freeze it for later. Enjoy your baking experience and the tasty results that follow!
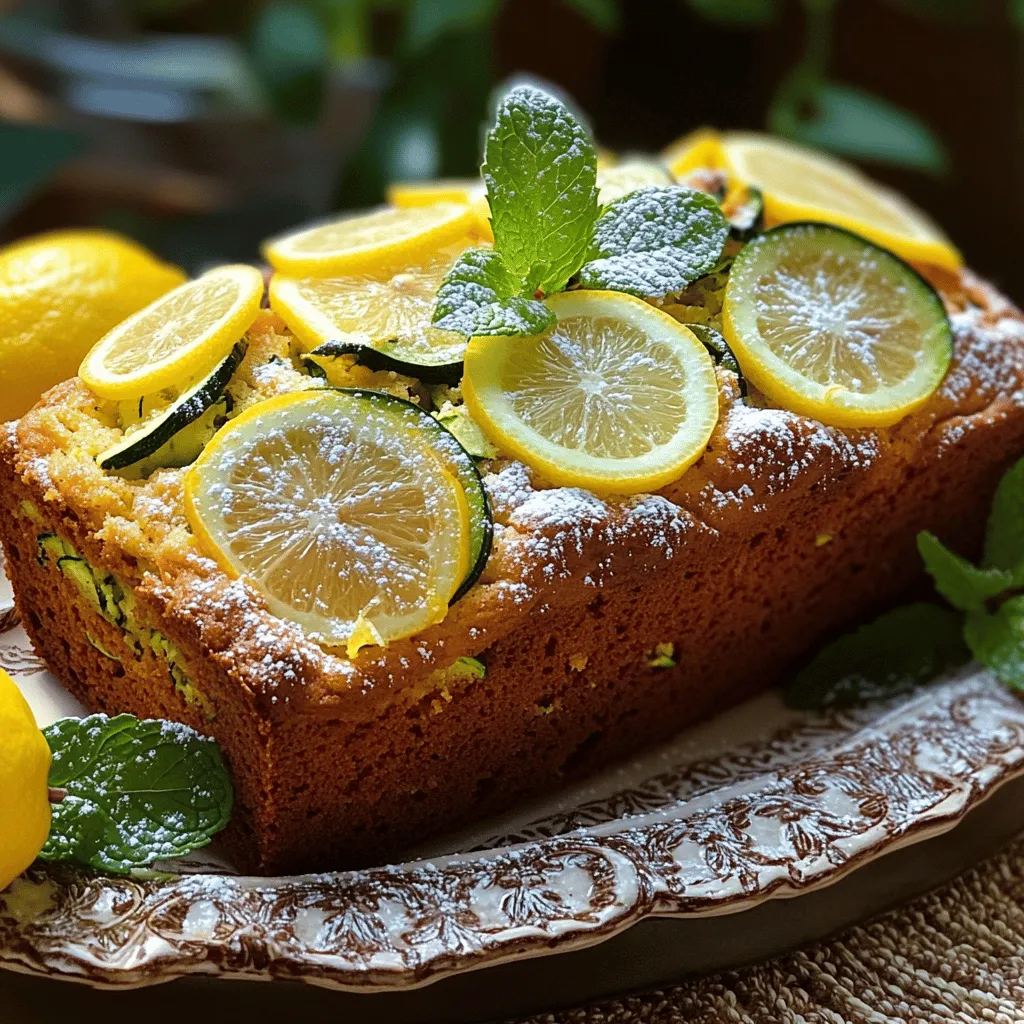
Lemon Zucchini Bread Simple and Tasty Recipe
Are you ready to brighten up your baking with a delightful twist? This Lemon Zucchini Bread recipe combines fresh zucchini and bright lemon for a
For the best peach crisp, use ripe peaches. Look for peaches that give slightly when you press them. Their skin should be smooth and free of blemishes. You will need about four peaches for this recipe. Peel and slice them before mixing with other ingredients. Fresh peaches give the best flavor and texture. You will need some dry ingredients for the topping. These include: - 1/2 cup brown sugar - 1/2 teaspoon cinnamon - 1 cup rolled oats - 1/2 cup all-purpose flour - 1/4 teaspoon salt First, measure brown sugar and cinnamon into a bowl. Then, add oats, flour, and salt. This mixture will create a crunchy topping for your peaches. You can add some fun toppings to make your peach crisp even better! Consider adding: - 1/4 cup unsalted butter, melted - 1/4 cup chopped walnuts The melted butter helps the topping brown and crisp nicely. Walnuts add a nice crunch and flavor. You can also serve your peach crisp warm with a scoop of vanilla ice cream on top. This is a great way to enhance your dessert! For the full recipe, check out the details in the main article. Start by preheating your oven to 350°F (175°C). This step is key for a great bake. While the oven heats, grease a 9-inch pie dish or baking pan with butter or oil. This helps the crisp come out easily after baking. Next, take four ripe peaches. Peel and slice them into thin pieces. Place the peaches in a large bowl. Add one tablespoon of lemon juice, half a cup of brown sugar, and half a teaspoon of cinnamon. Toss everything gently. You want the peaches to be well coated in the mix. Once ready, pour the peach mixture into your greased baking dish. Spread it out evenly. Now, grab another bowl. Combine one cup of rolled oats, half a cup of all-purpose flour, and a quarter teaspoon of salt. Then, add a quarter cup of melted unsalted butter and a quarter cup of chopped walnuts. Mix this well until it looks like coarse crumbs. This will give your crisp a nice texture. Sprinkle your oat mixture evenly over the peach layer. Now, it’s time to bake! Place the dish in the oven for 30-35 minutes. You’ll know it’s done when the top is golden brown and the peaches are bubbling. Let the crisp cool for a few minutes before serving. This makes it easier to scoop. Enjoy your peach crisp warm, maybe with a scoop of vanilla ice cream on top. For more details, check the Full Recipe. When picking peaches, look for ones that feel slightly soft. This means they are ripe and juicy. Check the color; a vibrant yellow or golden hue signals sweetness. Avoid peaches with bruises or dark spots. These may be overripe or damaged. If you can, smell the peach. A sweet aroma shows it is ready to eat. Use ripe peaches for the best crisp. They bring out the sweet, juicy flavor in the dish. If you want a healthier option, try using honey or maple syrup instead of brown sugar. Both add a lovely flavor. You can also use coconut sugar for a lower glycemic index. If you prefer, stevia or monk fruit can work too. Just remember, these sweeteners have different sweetness levels. Adjust the amount to taste. This way, you keep the peach crisp delicious without too much sugar. Serve your peach crisp warm for the best taste. A scoop of vanilla ice cream on top makes it even better. The cold ice cream melts into the warm crisp, creating a tasty combo. You can also add fresh whipped cream for a lighter touch. For extra crunch, sprinkle some chopped walnuts on top. This adds texture and flavor. Pair it with a cup of coffee or tea for a perfect dessert experience. For the full recipe, check out the detailed instructions above. {{image_2}} To make a gluten-free peach crisp, swap all-purpose flour with gluten-free flour. You can find this at most grocery stores. For oats, choose certified gluten-free rolled oats. This way, you still enjoy that crunchy topping without the gluten. It’s easy and tasty! You can mix in berries for a twist. Blueberries, raspberries, or blackberries add great flavor. Just toss them in with the peaches. You can also use other fruits like apples or pears. Each fruit brings its own sweet touch. Experiment and find your favorite combo! Cinnamon is a classic, but you can try nutmeg or ginger. Just a pinch can change the whole dish. If you like heat, a touch of cayenne pepper adds a fun kick. Don’t be afraid to play with spices. They can bring out the peachy goodness even more. For the full recipe, check the Peachy Paradise Crisp section! To store any leftover peach crisp, let it cool first. Then, place it in an airtight container. You can keep it in the fridge for up to three days. This will help keep the crisp fresh. If you want to enjoy it later, consider freezing it. When you're ready to eat your peach crisp again, preheat your oven to 350°F (175°C). Place the crisp in an oven-safe dish. Cover it with foil to keep it moist. Heat for about 15-20 minutes. Check to see if it’s warm throughout. You can also microwave individual servings for about 30-60 seconds. To freeze your peach crisp, make sure it cools completely. Cut it into portions for easy serving. Wrap each piece tightly in plastic wrap. Then, place them in a freezer-safe bag. You can freeze it for up to three months. When you crave a sweet treat, just thaw it in the fridge overnight. Then, reheat as described above. Enjoy the flavors of summer anytime! For the detailed steps, refer to the Full Recipe. Yes, you can use canned peaches. Just make sure to drain them well. Canned peaches are softer, so your crisp may be a bit mushier. If you want a firmer texture, try using fresh peaches when they are in season. You will know the peach crisp is done when the top is golden brown. The peaches should be bubbling around the edges. You can also poke a fork into the crisp. If it goes in easily, it is ready. Baking takes about 30-35 minutes, but keep an eye on it. If you do not have walnuts, you can use pecans or almonds. Both add a nice crunch. If you want a nut-free option, try using rolled oats or even sunflower seeds. They will still give you texture without the nuts. In this post, we explored making a delicious peach crisp. We discussed picking fresh peaches, measuring dry ingredients, and enhancing flavors with toppings. You learned step-by-step instructions for prepping, baking, and serving the dish. We also shared tips for variations, storage, and answered common questions. Enjoy making this simple treat with friends and family. The joy of baking can be shared with everyone. Let your creativity shine as you explore new flavors and methods!
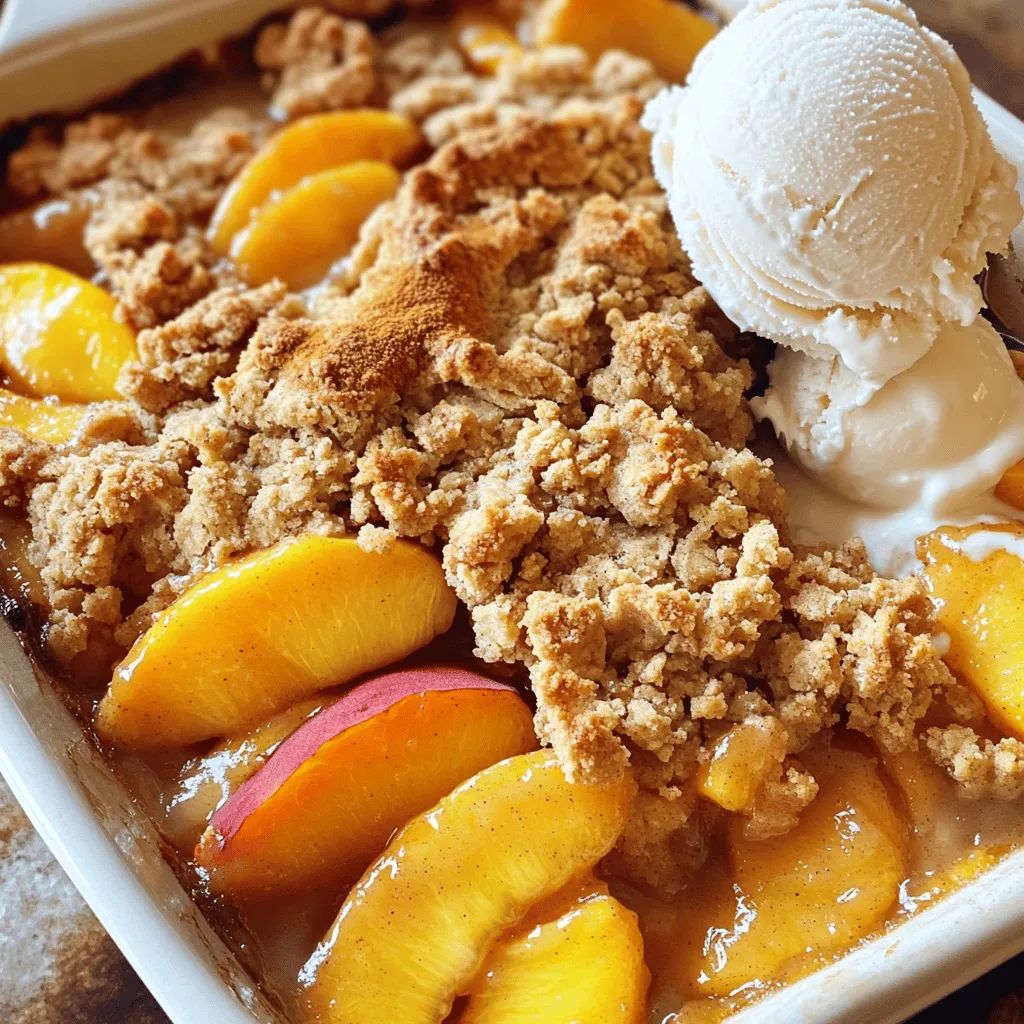
Easy Peach Crisp Recipe Simple and Delicious Dessert
Craving a warm dessert that’s easy to make? Look no further! This Easy Peach Crisp Recipe is your answer. With juicy peaches and a crunchy
To make the best Southern peach cobbler in a cast iron skillet, you need fresh and simple ingredients. Here’s what you will need: - 4 ripe peaches, peeled and sliced - 1 cup granulated sugar - 2 teaspoons lemon juice - 1 tablespoon cornstarch - 1 teaspoon vanilla extract - 1 cup all-purpose flour - 1 tablespoon baking powder - 1/2 teaspoon salt - 1/2 cup unsalted butter, melted - 1 cup milk - 1 teaspoon ground cinnamon - 1 teaspoon nutmeg These ingredients come together to create a warm, sweet dessert that is a joy to share. The peaches bring a fresh flavor, while the sugar and spices add warmth. Using a cast iron skillet gives the cobbler a beautiful golden crust. Make sure your peaches are ripe for the best taste. You can find them at local markets or grocery stores. When you slice your peaches, be careful not to bruise them. The lemon juice helps to enhance the peach flavor and keeps them fresh. For the best texture, measure your ingredients carefully. The right balance of flour, baking powder, and milk makes the batter fluffy. The sugar will sweeten the peaches, while the cornstarch helps to thicken the filling. Once you gather these ingredients, you can dive into making this delightful dessert. Check out the [Full Recipe] for step-by-step instructions. Enjoy the process and the wonderful smells in your kitchen! 1. Preheat the oven to 350°F (175°C). This step ensures the cobbler cooks evenly. 2. Marinate peaches. In a bowl, mix sliced peaches with 1/2 cup sugar, lemon juice, cornstarch, and vanilla. Let this sit for about 10 minutes. This brings out the peach flavor. 3. Prepare batter. In another bowl, whisk flour, baking powder, salt, and the remaining 1/2 cup sugar. Add melted butter and milk. Stir until just mixed; a few lumps are okay. 1. Combine ingredients in the skillet. Grease your cast iron skillet with butter. Pour the batter into the skillet evenly. 2. Layer peach mixture. Spoon the marinated peaches on top of the batter. Spread them out well for even cooking. 3. Bake and check for doneness. Place the skillet in the oven. Bake for 30-40 minutes until golden brown. Use a toothpick to check if it comes out clean. 1. Allow to cool. Let the cobbler sit for a few minutes after baking. This helps it set up. 2. Best served warm with ice cream. Scoop some vanilla ice cream on top. Drizzle caramel sauce over it, and add fresh mint leaves for a lovely touch. For the complete recipe, check the [Full Recipe]. Enjoy this delicious treat! To make a great peach cobbler, avoid overmixing the batter. When you mix, stir just until the dry and wet ingredients come together. This keeps the cobbler soft and fluffy. Also, ensure even peach distribution. Spread the marinated peaches evenly over the batter. This will help each bite be just as sweet and juicy as the last. Want to take your cobbler to the next level? Add spices like cinnamon or nutmeg. A dash of vanilla extract can also deepen the flavor. If you feel adventurous, experiment with different fruits. Berries, apples, or even pears can add a new twist. When serving, warm the cobbler and top it with ice cream. The cold ice cream melts into the warm cobbler, creating a great mix. For a pretty touch, garnish with mint leaves. This adds color and a hint of freshness to each serving. For the full recipe, check out the Cozy Southern Peach Cobbler in a Cast Iron Skillet. {{image_2}} You can switch up the peaches for other fruits. Berries like blueberries or blackberries work great. Apples also make a tasty choice. Just remember to adjust the sugar based on the fruit's natural sweetness. Mixing in other seasonal fruits is fun too. Think about pears or cherries for a twist. Each fruit brings a unique taste to the cobbler. If you want to make a healthier cobbler, consider some easy swaps. Replace granulated sugar with honey or maple syrup. You can also use coconut oil instead of butter. For those with gluten issues, almond flour or oat flour works well. These changes keep the flavor rich while making the dessert lighter. Adding extra flavors can take your cobbler to the next level. Try mixing in some chopped nuts like pecans or walnuts for crunch. A bit of chocolate can also be a fun addition. Dark chocolate chips melt into gooey pockets. Don't forget about spices! A touch of cardamom or ginger can add warmth. Experiment with these ideas to find your perfect blend. You can find the full recipe above to create your own Southern Peach Cobbler in a Cast Iron Skillet. To store your peach cobbler in the refrigerator, let it cool first. Then, cover it tightly with plastic wrap or foil. It keeps well for about 3 to 4 days. If you want to freeze it, cut it into pieces. Place the pieces in an airtight container or freezer bag. This way, it lasts for about 2 to 3 months. Just remember to label the bag with the date. When reheating, you can use either a microwave or an oven. The microwave is faster but may make the cobbler soggy. To reheat in the oven, preheat it to 350°F (175°C). Place the cobbler in a baking dish and cover it with foil. Heat for about 15 to 20 minutes. This method keeps the crust crisp and the flavors bright. Your peach cobbler lasts about 3 to 4 days in the fridge. Check for signs of spoilage. If you see mold or it smells off, it’s best to discard it. If you freeze it, check for freezer burn. That can change the taste and texture. Always trust your senses when deciding whether to eat leftovers. Yes, you can use canned peaches for this recipe. However, they differ in texture and flavor. Canned peaches are softer and sweeter. They may also have added syrup, which can make your cobbler too sweet. If you choose canned peaches, drain them well. This will help reduce excess moisture in your cobbler. To slice peaches, first, wash them under cool water. Cut around the pit to slice them easily. Twist the two halves apart to remove the pit. Use a gentle hand to avoid bruising the fruit. This keeps the slices firm and pretty for your cobbler. Yes, you can prep this recipe in advance. Slice the peaches and mix them with sugar and lemon juice. Cover and store them in the fridge for up to 24 hours. You can also prepare the batter ahead. Just keep it in the fridge until you are ready to bake. The cobbler is done when the top is golden brown. You can check it with a toothpick. Insert it into the center of the cobbler. If it comes out clean, it’s ready. You can also look for bubbling around the edges. This means the filling is hot and cooked through. This blog post covered how to make a delicious peach cobbler. You learned about the ingredients and how to prepare them step by step. We shared tips to enhance flavor and presentation, plus ways to use different fruits. You also got storage tips and answers to common questions. Overall, making this cobbler is simple and fun. With these tips, you will impress your family and friends with your baking skills. Enjoy your tasty creation warm, maybe with ice cream!
Southern Peach Cobbler in a Cast Iron Skillet Delight
Get ready to savor the ultimate Southern comfort: a peach cobbler baked in a cast iron skillet! You’ll learn how to transform ripe peaches into