Desserts
![- 1 cup all-purpose flour: This gives the bread structure and a soft texture. - 1/2 cup unsweetened cocoa powder: This provides that deep chocolate flavor we all love. - 1 teaspoon baking powder: This helps the bread rise and stay fluffy. - 1/2 teaspoon salt: Salt enhances the sweetness and balances the flavors. - 1/2 cup unsalted butter, melted: This adds richness and moisture to the bread. - 1 cup granulated sugar: Sugar sweetens the bread and helps it brown nicely. - 2 large eggs: These act as a binding agent and add moisture. - 1 teaspoon vanilla extract: This adds a warm, sweet note to the flavor. - 1/2 cup chocolate chips (semi-sweet or dark): These create pockets of melted chocolate in every bite. - 1/2 cup hot fudge sauce (store-bought or homemade): This gives the bread a rich, gooey texture. - Optional: 1/4 cup chopped walnuts or pecans: These add a nice crunch and nutty flavor. For the best flavor, choose high-quality cocoa powder. Look for brands that say "Dutch-processed." This type has a smooth taste and deep color. When picking chocolate chips, go for semi-sweet or dark for a rich taste. Brands like Ghirardelli or Guittard offer great options. You can personalize your Hot Fudge Brownie Bread with fun mix-ins. Consider adding: - Chopped walnuts: These add crunch and a nutty flavor. - Pecans: They offer a buttery taste that pairs well with chocolate. - White chocolate chips: For a sweeter twist, mix in some white chocolate. - Dried cherries or raspberries: These bring a fruity note that contrasts with chocolate. Feel free to mix and match these add-ins for your own unique bread! Start by preheating your oven to 350°F (175°C). This step ensures even baking. Next, grab a 9x5 inch loaf pan. Grease it well with butter or cooking spray. Then, line the bottom with parchment paper. This makes it easy to remove the bread later. In a medium bowl, whisk together the following dry ingredients: - 1 cup all-purpose flour - 1/2 cup unsweetened cocoa powder - 1 teaspoon baking powder - 1/2 teaspoon salt Make sure to mix them well until they look uniform. This helps the bread rise and taste great. In a large bowl, melt 1/2 cup of unsalted butter. Add in 1 cup of granulated sugar, mixing until it's smooth. Next, crack 2 large eggs into the bowl, adding them one at a time. Mix well after each egg. Finally, stir in 1 teaspoon of vanilla extract for extra flavor. Now, it’s time to combine the wet and dry mixtures. Gradually add the dry ingredients into the wet mixture. Stir gently until just combined. Be careful not to overmix; this keeps the bread soft and fudgy. Next, fold in: - 1/2 cup of chocolate chips - 1/2 cup of hot fudge sauce If you like nuts, add 1/4 cup of chopped walnuts or pecans at this stage. Pour the batter into the prepared loaf pan, spreading it evenly. Bake for 30-35 minutes. To check if it’s done, insert a toothpick into the center. It should come out with a few moist crumbs. Let the bread cool in the pan for about 10 minutes. After that, move it to a wire rack to cool completely. For an extra treat, slice it while still warm and drizzle with more hot fudge. Enjoy your delicious Hot Fudge Brownie Bread! For the complete recipe, check [Full Recipe]. To make your brownie bread fudgy and moist, follow these tips: - Use room temperature eggs: This helps the batter mix well. - Do not overmix: Stir until just combined to keep the texture soft. - Check your oven temperature: Use an oven thermometer to ensure accuracy. - Use quality cocoa powder: A rich cocoa adds depth to the flavor. Here are some fun ideas for serving your brownie bread: - Pair it with vanilla ice cream for a creamy contrast. - Drizzle extra hot fudge on top for a chocolate lover's dream. - Serve with fresh berries to balance the sweetness. - Add a sprinkle of sea salt to enhance the chocolate flavor. If you run into problems, here are some fixes: - Dry bread: This often happens from overbaking. Check doneness with a toothpick earlier. - Overmixing: This can lead to a tough texture. Mix just until combined. - Ingredient substitutions: If you need to swap eggs, try using applesauce or mashed bananas. {{image_2}} You can change the flavor of your hot fudge brownie bread with ease. Use dark chocolate instead of semi-sweet. This gives it a rich taste. Milk chocolate adds sweetness, which is great for kids. You can also mix in flavor extracts. A dash of mint or orange extract adds a fun twist. Try adding espresso powder for a coffee flavor. It pairs well with chocolate and boosts the taste. If you want a gluten-free version, swap all-purpose flour for almond flour or gluten-free flour. This keeps the bread moist and tasty. For a vegan option, replace eggs with flaxseed meal. Mix one tablespoon of flaxseed with three tablespoons of water. Let it sit for five minutes to thicken. Use coconut oil instead of butter for a dairy-free choice. This keeps the bread soft and adds a light coconut flavor. You can make your brownie bread fit the season with fun flavors. In winter, add peppermint extract and crushed candy canes on top. This gives a festive touch. For fall, mix in pumpkin spice or even pumpkin puree. It makes the bread moist and adds a warm flavor. These seasonal twists make your dessert exciting for any occasion. To keep your hot fudge brownie bread fresh, store it in an airtight container. This helps lock in moisture and flavor. If you don't have an airtight container, wrap the bread tightly in plastic wrap. This will also protect it from air. Place the wrapped bread in a cool, dry place. Avoid direct sunlight or heat sources to maintain its texture. If you want to save some for later, freezing is a great option. First, let the brownie bread cool completely. Then, slice it into individual pieces for easy thawing. Wrap each slice in plastic wrap, then place them in a freezer bag. Be sure to remove as much air as possible before sealing. To thaw, take out a slice and leave it at room temperature for about an hour. You can also warm it in the microwave for a few seconds if desired. At room temperature, the brownie bread lasts about 3 to 4 days. If you store it in the fridge, it can stay fresh for up to a week. However, the bread may dry out in the fridge, so it's best to eat it sooner. Always check for any signs of spoilage before consuming. If it looks or smells off, it’s best to discard it. For longer storage, freezing is your best bet to enjoy this dessert down the line. Hot fudge brownie bread is a rich and gooey dessert that combines the best of brownies and bread. It has a soft, fudgy texture with a deep chocolate flavor. The hot fudge sauce adds an extra layer of sweetness and decadence. Chocolate chips mixed in bring delightful bursts of chocolate in every bite. You can serve it warm or at room temperature, making it a flexible dessert option. To check if your brownie bread is done, insert a toothpick into the center. If it comes out with a few moist crumbs, your bread is ready. If it has wet batter on it, give it more time. The edges should look set, but the center may still be slightly soft. Overbaking can make it dry, so keep an eye on it. Yes, you can make this recipe ahead of time. Bake the bread and let it cool completely. Wrap it in plastic wrap or foil and store it at room temperature for up to three days. You can also freeze it for up to three months. To reheat, simply warm slices in the microwave or oven until they are soft and gooey again. You can substitute several ingredients in this recipe. For example, use whole wheat flour instead of all-purpose flour for a nuttier flavor. If you want a dairy-free option, swap the butter for coconut oil. You can also replace the eggs with applesauce for a vegan version. And if you prefer, use white chocolate chips or butterscotch chips for a different flavor twist. In summary, this guide covered everything you need to make delicious brownie bread. We explored the key ingredients and their roles, plus tips for sourcing top-quality products. I shared step-by-step instructions, baking tips, and ways to customize your bread. Remember, you can adapt the recipe to fit your tastes, including seasonal twists. Proper storage ensures your brownie bread stays fresh and tasty. Enjoy your baking journey, and savor every bite of this rich treat!](https://therecipehatch.com/wp-content/uploads/2025/06/e6ccc0c2-5d2a-46e1-8d83-cde1d5f91bbf.webp)
Hot Fudge Brownie Bread Irresistible Dessert Recipe
Are you ready to indulge in the ultimate dessert? Look no further! My Hot Fudge Brownie Bread is a rich and gooey treat that combines
. To get the right texture in your zucchini chocolate chip cookies, start with fresh zucchini. Grate it finely and squeeze out any extra moisture. This step is key. If the zucchini is too wet, your cookies may turn out soggy. Aim for a dough that is thick, but not dry. This balance helps the cookies hold their shape while baking. When baking with zucchini, keep a few things in mind. First, always measure the grated zucchini after you squeeze it. Too much can change how the cookies bake. Also, use a light hand when mixing. Over-mixing can make your cookies tough. Lastly, remember that baking time can vary. Check your cookies a few minutes early to prevent over-baking. One common mistake is not preheating your oven. Always preheat to ensure even baking. Another mistake is skipping the parchment paper. It helps cookies come off the tray easily. Don’t forget to space your cookies well on the baking sheet—about 2 inches apart. If they are too close, they may merge into one big cookie! Follow these tips to enjoy perfect zucchini chocolate chip cookies. For the complete recipe, check out the [Full Recipe]. {{image_2}} To make these cookies gluten-free, swap the all-purpose flour for a gluten-free blend. Look for a brand that includes xanthan gum to help with texture. You can also use almond flour or coconut flour, but adjust the liquid in the recipe. Start with less flour and add more if needed. This change keeps the cookies soft and tasty. For a vegan version, replace the egg with a flaxseed egg. Mix 1 tablespoon of ground flaxseed with 2.5 tablespoons of water. Let it sit until it thickens. Use vegan butter instead of regular butter. This keeps the cookies moist and rich without dairy. Adding spices can elevate your cookies. Try a pinch of nutmeg or ginger for warmth. You can also mix in chopped nuts, like walnuts or pecans, for crunch. Want a sweeter kick? Add a handful of dried fruits, like raisins or cranberries. Each option adds a unique twist to the classic recipe, making it personal and fun. For the full recipe, see the section above. To keep your zucchini chocolate chip cookies fresh, store them in an airtight container. You can place parchment paper between layers to prevent sticking. Try to keep them at room temperature for up to three days. If you need them to last longer, consider refrigeration. Refrigerated cookies will stay fresh for about a week. Freezing is a great option for longer storage. First, let your cookies cool completely. Next, line a baking sheet with parchment paper. Arrange the cookies in a single layer and freeze for about two hours. Once frozen, transfer them to a freezer-safe bag. These cookies can last up to three months in the freezer. When you want a treat, simply take out what you need. To enjoy warm cookies, you can reheat them easily. Preheat your oven to 350°F (175°C). Place the cookies on a baking sheet and heat for about 5 to 7 minutes. You can also use a microwave for a quick option. Heat them for about 10-15 seconds. This will make them soft and gooey again, just like fresh out of the oven. Yes, you can use grated carrots or sweet potatoes. Both add natural sweetness and moisture. If you choose carrots, the flavor will blend well. Sweet potatoes will make the cookies denser. Always squeeze out excess moisture for the best texture. Look for lightly golden edges. The center may seem soft. That’s normal. To check, insert a toothpick. If it comes out clean or with a few crumbs, they are done. Overbaking can make them dry, so keep an eye on the timer. You can add many fun ingredients! Try nuts like pecans or almonds for crunch. Dried fruits like raisins or cranberries add sweetness. For a twist, use peanut butter chips or white chocolate. Mix and match to create your perfect cookie! In this blog post, I covered everything you need for making delicious zucchini cookies. We looked at ingredients, measurements, and optional add-ins. You learned how to prepare and bake the cookies, plus tips to get the texture just right. Variations like gluten-free and vegan options make this recipe adaptable. Finally, I shared the best ways to store and reheat the cookies. Enjoy baking these cookies and experimenting with flavors! Happy baking.](https://therecipehatch.com/wp-content/uploads/2025/06/85ba3d98-f5be-481a-b993-6c51c8450cbe.webp)
Zucchini Chocolate Chip Cookies Healthy and Tasty Treat
Looking for a fun and tasty way to sneak veggies into your treats? I’ve got the perfect recipe for you: Zucchini Chocolate Chip Cookies! These
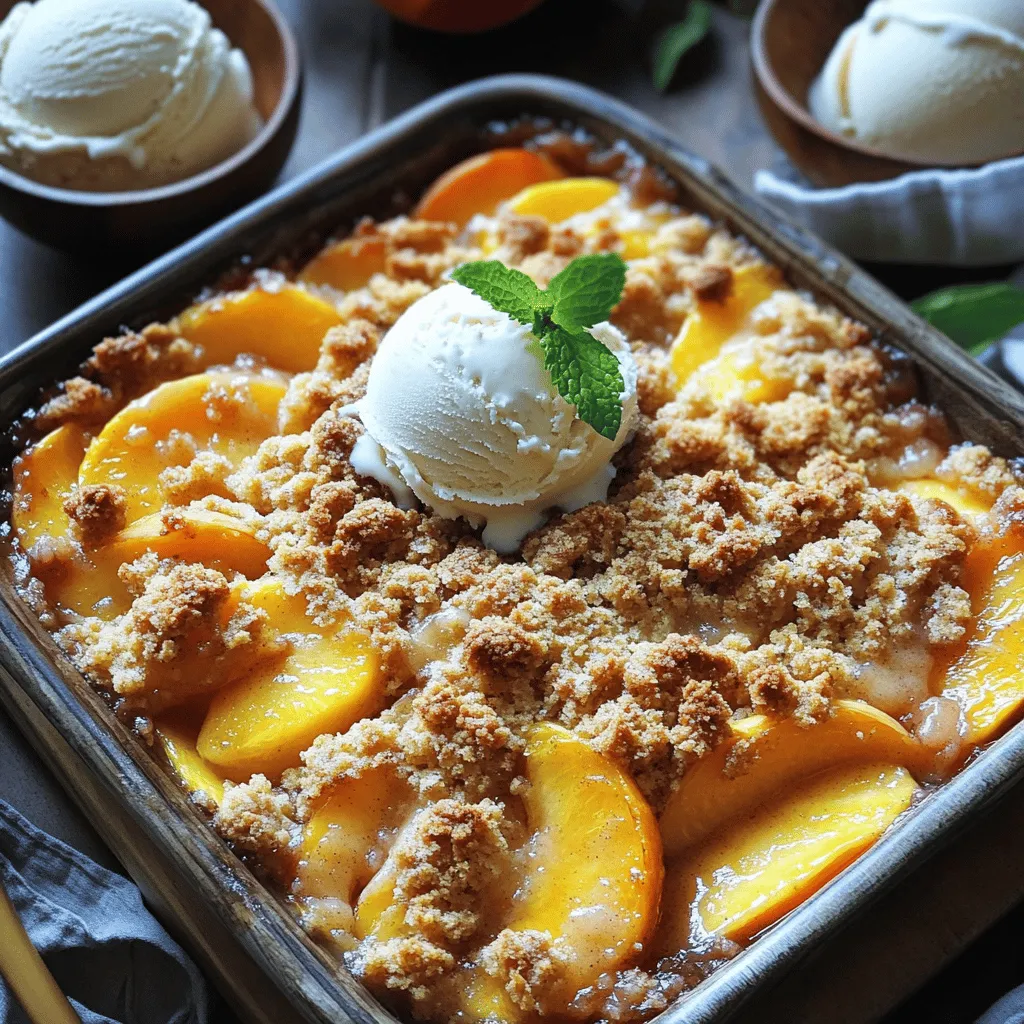
Fresh Peach Crisp Delightful and Easy Recipe
Are you ready for a sweet treat that’s quick and easy to make? In this post, I’ll guide you through creating a Fresh Peach Crisp
![- 4 cups fresh peaches, peeled and sliced - 1 cup granulated sugar, divided - 1 tablespoon lemon juice - 1 teaspoon vanilla extract - 1 teaspoon ground cinnamon - 1 ½ cups all-purpose flour - 2 teaspoons baking powder - ½ teaspoon salt - ¾ cup milk - ½ cup unsalted butter, melted - 1 teaspoon almond extract (optional) - Vanilla ice cream, for serving (optional) To make a great peach cobbler, start with fresh peaches. You want them ripe and juicy for the best flavor. Peeling and slicing them makes the cobbler even better. You will also need sugar to sweeten the peaches. The lemon juice adds brightness that really enhances the dish. Vanilla extract and ground cinnamon give warm flavors that blend well with peaches. The flour, baking powder, and salt make up the batter that creates a lovely crust. Milk and melted butter make this batter smooth and rich. If you like, add almond extract for a unique twist. - Other fruit combinations (e.g., berries, apples) - Spices (e.g., nutmeg, allspice) You can play with flavors by adding other fruits like berries or apples. Mixing different fruits can create fun new tastes. Adding spices like nutmeg or allspice can also deepen the flavor. Try these options to make your peach cobbler even more special. For the full recipe, check the section above. 1. Preheat your oven to 350°F (175°C). This helps the cobbler bake evenly. 2. In a large bowl, mix the sliced peaches with ½ cup of sugar, lemon juice, vanilla extract, and cinnamon. Toss the peaches well to coat them. 3. Pour this mixture into a greased 9x13 inch baking dish. Make sure it covers the bottom well. 1. In another bowl, combine the flour, baking powder, salt, and the remaining ½ cup of sugar. Mix these dry ingredients well. 2. Add the milk and melted butter to the dry mix. Stir until just combined. 3. If you want a hint of extra flavor, add almond extract at this stage. 1. Pour the batter over the peach mixture. Do not stir; the batter will float. 2. Bake in the preheated oven for about 45-50 minutes. Watch for the top to turn golden brown. 3. To check if it is done, insert a toothpick. If it comes out clean, it's ready. 4. Once done, remove it from the oven. Let it cool slightly before serving. For the full recipe, check out the details provided earlier. Enjoy your delicious homemade peach cobbler! - Choosing ripe and juicy peaches for maximum flavor. Look for peaches that are soft to the touch and smell fragrant. These will provide the best taste in your cobbler. If you can, use fresh peaches in season, as they shine in this dish. - Alternate baking temperatures for different ovens. Not all ovens work the same. If your cobbler is browning too fast, lower the temperature by 25°F. If it’s not browning enough, raise it by 25°F. Keep an eye on it to get that perfect golden top. - Overmixing the batter. When combining wet and dry ingredients, mix just until combined. If you mix too much, the cobbler can turn out tough instead of soft and fluffy. - Not allowing the cobbler to cool properly before serving. Patience is key! Letting it cool for about 10-15 minutes helps the filling set. This makes serving easier and improves the flavor. For the complete recipe, check [Full Recipe]. {{image_2}} You can easily switch up the fruit in your peach cobbler. Fresh blueberries or cherries make great choices. Just swap the peaches for your favorite fruit. You can also mix fruits for a tropical twist. Try adding mangoes, pineapples, or even strawberries. This adds a fun twist and new flavors to your dish! If you need a gluten-free option, no problem! You can replace regular flour with gluten-free flour. Look for blends that work well in baking. These blends usually mix rice flour, tapioca starch, and potato starch. This will keep your cobbler light and tasty. You can make your peach cobbler healthier too. For a low-sugar option, use sugar substitutes like stevia or monk fruit. They will sweeten your dish without the extra calories. If you want a vegan option, substitute dairy ingredients. Use almond milk instead of regular milk and coconut oil instead of butter. This way, everyone can enjoy this yummy dessert! For the full recipe, check out the Delightful Peach Cobbler section! To keep your peach cobbler fresh, store it in the fridge. Let it cool completely first. Then, cover it tightly with plastic wrap or foil. You can also use an airtight container. This helps to keep it moist and tasty. Leftover cobbler usually lasts about 3 to 4 days in the fridge. If you want to enjoy it later, freezing is a great option. To freeze peach cobbler, first, make sure it’s cool. Cut it into serving pieces. Place the pieces in a single layer on a baking sheet. This prevents them from sticking together. Freeze them for about 1 to 2 hours until firm. After that, transfer the pieces into a freezer-safe bag or container. They will stay good for up to 3 months. When you’re ready to enjoy, take the pieces out of the freezer. Thaw them in the fridge overnight. Reheat them in the oven at 350°F (175°C) for about 15 to 20 minutes. This will make the cobbler warm and delicious again. You can also use the microwave if you’re in a hurry. Just heat in short bursts to avoid hot spots. Enjoy your peach cobbler like it’s fresh from the oven! You can tell your peach cobbler is done by checking the top. It should be golden brown. Insert a toothpick into the batter. If it comes out clean, it is ready. The edges will bubble with the peach mixture, showing it is cooked well. Yes, you can make peach cobbler ahead of time. Prepare it a day before, then cover it tightly. Store it in the fridge. When you are ready to serve, bake it in the oven to warm it up. This adds a fresh touch. Peach cobbler pairs well with many treats. Vanilla ice cream is a classic choice. You could also serve it with whipped cream or custard. For a twist, try it with yogurt or a drizzle of caramel sauce. Yes, you can use canned or frozen peaches. If using canned, drain them well to avoid extra liquid. For frozen peaches, let them thaw and drain some juice. This keeps your cobbler from being soggy. Both options can taste delicious in your cobbler. For the full recipe, you can check the Delightful Peach Cobbler section. This blog post explored how to make a delicious peach cobbler. We covered the key ingredients, like fresh peaches and sugar, and detailed easy step-by-step instructions. I shared helpful tips to avoid common mistakes and offered variations for different diets. Remember, the right peaches make all the difference. Enjoy making this dessert, and don’t forget to store any leftovers properly! It’s perfect warm with ice cream. Now, it’s your turn to try this sweet treat and impress your friends and family. Happy baking!](https://therecipehatch.com/wp-content/uploads/2025/06/2c19cc80-1ad6-42aa-904a-73ba872ea43d.webp)
Easy Homemade Peach Cobbler Delicious and Simple Treat
Are you ready to enjoy a warm slice of homemade peach cobbler? This easy recipe brings together fresh peaches and simple ingredients for a delightful

Peach Pudding Delight Creamy and Sweet Dessert Recipe
Get ready to treat yourself to a delightful dessert! This Peach Pudding is creamy, sweet, and packed with flavor. With just a few simple ingredients
![To make the Sticky Peach Cobbler Pudding, you need these simple ingredients: - 4 ripe peaches, peeled and sliced - 1 cup brown sugar, packed - 1/2 cup unsalted butter, melted - 1 cup all-purpose flour - 1 teaspoon baking powder - 1/4 teaspoon salt - 1 cup milk - 1 teaspoon vanilla extract - 1 teaspoon cinnamon - 1 tablespoon lemon juice - Optional: whipped cream or vanilla ice cream for serving Each ingredient plays a key role in making this dessert a true delight. The ripe peaches bring a sweet, juicy flavor. Brown sugar adds depth and richness. Butter gives it that lovely moistness. Flour is the base that holds everything together, while baking powder helps it rise. Salt enhances the flavors, and milk brings a creamy texture. Vanilla extract and cinnamon add warmth and aroma. Lastly, lemon juice brightens up the peach flavor. For the best results, use fresh, ripe peaches. They will add the perfect sweetness and juiciness to your pudding. If you want to know how to combine these ingredients into a delightful dessert, check out the Full Recipe. - Preheat oven to 350°F (175°C). - Lightly grease a 9-inch baking dish. - Combine sliced peaches, lemon juice, and 1/4 cup brown sugar in a bowl. - Let marinate for about 10 minutes. This helps the peaches soak in the sweet flavors. - In another bowl, whisk together the remaining brown sugar, flour, baking powder, salt, milk, melted butter, vanilla extract, and cinnamon. - Mix until smooth and creamy. This batter forms the base of our pudding. - Pour the batter into the prepared baking dish. - Spoon the marinated peaches over the batter without stirring. The peaches will sink as it bakes. - Bake for 40 to 45 minutes. The top should be golden brown and a toothpick should come out clean. This step-by-step guide will help you create a delightful Sticky Peach Cobbler Pudding. For more details, check the Full Recipe. To get the best flavor, always choose ripe peaches. They add sweet, juicy goodness to your pudding. After baking, let the pudding cool for a bit. This helps the texture set nicely, making each bite perfect. Serve your pudding warm for the best experience. Top it with a dollop of whipped cream or a scoop of vanilla ice cream. It adds rich creaminess that everyone loves. For a pretty touch, garnish with fresh mint leaves. This makes the dessert look fancy and inviting. One big mistake is stirring the peaches into the batter. This can mix the flavors too much and ruin the look. Instead, just spoon them on top. Another common error is overbaking the pudding. This can make it dry and less enjoyable. Keep an eye on the timer and check for that golden top. For the full recipe, check the details above. {{image_2}} You can switch the peaches for other fruits. Apples and berries work great! They give different flavors and textures. Try using tart apples for a nice kick. Berries add a sweet and juicy burst. If you want, mix in nuts for a crunchy texture. Walnuts or pecans can add a lovely crunch. Just sprinkle them on top before baking for the best result. If you need a gluten-free version, it is easy! Just swap out all-purpose flour for gluten-free flour. Most blends work well in this recipe. You can enjoy the same great taste without the gluten. Make sure to check the blend you choose to ensure it has a good texture. You can get creative with flavors too! Adding a splash of almond extract gives a nice, nutty taste. It pairs well with the sweetness of the peaches. You can also try incorporating spices like nutmeg. Nutmeg adds warmth and depth to the dish. Just a pinch will do, so be careful not to overdo it. For more ideas, check the Full Recipe. To keep your Sticky Peach Cobbler Pudding fresh, store leftovers in an airtight container in the fridge. This will help keep it moist and tasty. Aim to enjoy it within 2-3 days for the best flavor and texture. When you're ready to dig in again, warm the pudding in the microwave or oven. If using the microwave, heat it in short bursts to prevent it from getting too hot. For the oven, cover it with foil and reheat at 350°F (175°C) until warmed through. If you want to save some for later, you can freeze the cooked pudding. It stays good for up to 2 months. Just place it in a freezer-safe container. When you’re ready to eat, thaw it overnight in the fridge before reheating. This makes it easy to enjoy this delicious dessert anytime! For the full recipe, check out [Full Recipe]. Insert a toothpick into the center. It should come out clean when baked properly. This simple test ensures your pudding is cooked just right, avoiding any soggy spots. Yes, you can use canned peaches. But fresh peaches provide the best flavor and texture. Fresh peaches burst with juice and sweetness, making your pudding extra special. Whipped cream, vanilla ice cream, or a drizzle of caramel sauce pairs well. These toppings bring a creamy richness that complements the warm pudding perfectly. Yes, you can easily make this pudding vegan. Substitute butter with vegan margarine and use plant-based milk. This way, everyone can enjoy this delicious dessert! For the full recipe, check the recipe section above. This blog post covered how to make a tasty Sticky Peach Cobbler Pudding. You learned what ingredients to use and the steps to prepare it. We shared tips on texture, presentation, and common mistakes to avoid. You also discovered variations to customize your dessert and storage options for leftovers. This pudding is simple yet delicious. Enjoy making it for friends and family. Treats like this bring joy to every meal. Happy baking!](https://therecipehatch.com/wp-content/uploads/2025/06/3604a56e-cad6-40e4-b3ad-669f9e008e6e.webp)
Sticky Peach Cobbler Pudding Irresistible Dessert Delight
Get ready to indulge in Sticky Peach Cobbler Pudding, the dessert that will steal your heart! This delightful treat combines juicy peaches and a buttery
![- Fresh peaches: Use ripe peaches for the best flavor. Ripe peaches give a sweet and juicy bite. They add moisture and a lovely texture to the cookies. If you can’t find fresh peaches, frozen ones work too. Just make sure to thaw and drain them first. - Optional: Chopped pecans: Adding pecans gives a nice crunch. It also adds a nutty flavor that pairs well with peaches. If you like a bit of texture, go ahead and fold some in. - All-purpose flour: This is the base of your cookie dough. It helps create a soft and chewy texture. Too much flour can make cookies dry, so measure carefully. Always spoon it into your measuring cup, then level it off. - Rolled oats: Rolled oats bring chewiness to the cookies. They absorb moisture and keep the cookies soft. Plus, they add a wholesome feel. You can use quick oats in a pinch, but rolled oats work best for texture. - Brown sugar vs. granulated sugar: Brown sugar adds a rich, caramel-like flavor. It also helps keep the cookies moist. Granulated sugar is sweeter and gives a crispier texture. Using both gives a nice balance of flavors. - Vanilla extract: This ingredient is a must for cookies. It enhances all the other flavors. Just a teaspoon makes a big difference. Always use pure vanilla extract for the best taste. For the full recipe, check out the instructions and get baking! Before baking, start by preheating your oven to 350°F (175°C). Preheating helps the cookies rise and bake evenly. While the oven heats up, line a baking sheet with parchment paper. This step keeps the cookies from sticking and makes cleanup easy. In a medium bowl, add all-purpose flour, rolled oats, baking powder, baking soda, ground cinnamon, and salt. Whisk these dry ingredients together until they blend well. In a large bowl, cream together softened butter, brown sugar, and granulated sugar. This step is key. Mix until the mixture looks light and fluffy. Then, beat in the egg and vanilla extract. This adds flavor and richness. Gradually add the dry mix to the wet mix. Stir gently to combine, but don’t overmix. Use a tablespoon or cookie scoop to drop the dough onto the prepared baking sheet. Space the dough about 2 inches apart. This spacing allows room for the cookies to spread. Bake them in your preheated oven for 12 to 15 minutes. Look for lightly golden edges. Allow the cookies to cool for 5 minutes on the baking sheet. Then, transfer them to a wire rack to cool completely. Enjoy the sweet aroma as they bake! For the full experience, check out the [Full Recipe]. To achieve soft and chewy Peach Cobbler Cookies, you want to follow a few key steps. First, use room temperature butter. Cold butter will not cream well, making the cookies dense. Second, avoid overmixing the dough. Mix until just combined to keep the cookies tender. Common pitfalls include baking cookies too long. Keep an eye on them, as they will continue to bake on the sheet after you take them out. Aim for a light golden edge while the center looks slightly underbaked. This will give you that desired soft texture. To elevate the flavor of your Peach Cobbler Cookies, consider adding spices. Ground cinnamon and nutmeg bring warmth and depth. You can also try a pinch of ginger for a little kick. If peaches are out of season, don’t worry. You can substitute with other fruits like plums or cherries. Canned peaches work well too. Just drain them well to avoid excess moisture in your cookies. Serving Peach Cobbler Cookies can be fun and creative! Try stacking them on a plate with fresh peach slices or a sprinkle of powdered sugar. For a special touch, pair them with a scoop of vanilla ice cream. You can also serve these cookies warm with whipped cream on the side. This adds a nice touch for gatherings or family dinners. Enjoy these delightful treats with a hot cup of tea or coffee for a comforting experience. For the full recipe, check out the details above. {{image_2}} If you want to change things up, try using other stone fruits. Cherries and plums make great options. They add a different flavor while still keeping the cookie's charm. If fresh fruit isn't available, canned peaches work well too. Just make sure to drain them properly. This keeps your cookies from getting soggy. For those needing gluten-free cookies, you can swap all-purpose flour for almond or coconut flour. These flours change the texture a bit but still taste great. If you want vegan cookies, replace the egg with a chia seed mix. Just combine one tablespoon of chia seeds with three tablespoons of water. For the butter, try using coconut oil. This keeps your cookies soft and chewy. Add chocolate chips for a sweet twist. They melt into the cookies and create a rich taste. You can also mix in dried fruits like cranberries or raisins. They add a nice chewy texture. For a little extra sweetness, consider a simple glaze. Just mix powdered sugar with a bit of milk until smooth. Drizzle it over your cookies after they cool. This adds a fun touch that makes them even more special. To keep your Peach Cobbler Cookies soft, store them in an airtight container. This method helps lock in moisture. Use a cookie jar or a resealable plastic bag. Avoid leaving them in a warm spot, as heat can make them dry. For best results, place a slice of bread in the container. The bread helps keep the cookies fresh longer. Change the bread slice every few days to maintain its moisture. Freezing cookies is easy and a great way to save them. If you want to freeze the dough, scoop out the cookie dough onto a baking sheet. Space them apart and freeze until solid. Then, transfer the dough balls to a freezer bag. To freeze baked cookies, let them cool first. Then, place them in a single layer in a container. You can stack them with parchment paper in between layers to prevent sticking. When you're ready to eat them, thaw cookies at room temperature for about 30 minutes. For dough, bake straight from the freezer, adding a couple of extra minutes to the baking time. Cookies can last about one week when stored properly at room temperature. Check for any signs of staleness. If they feel hard, they need some love. You can refresh them by placing them in a warm oven for a few minutes. If you're unsure, give them a sniff. If they smell off, it's best to toss them. For long-term storage, freezing is your best bet. It keeps them fresh for up to three months. For the full recipe, you can check the detailed instructions above. To stop cookies from spreading, you can try a few simple tricks: - Chill the dough: This helps solidify the butter, making it less likely to spread. - Use more flour: Adding a little extra flour can help create a thicker dough. - Don’t overmix: Mix until just combined to keep the dough from becoming too soft. These steps help your Peach Cobbler Cookies stay nice and thick. Yes, you can use frozen peaches! Here’s how: - Thaw the peaches: Let them sit at room temperature or microwave them for a few seconds. - Drain excess juice: Too much liquid can make the dough too wet. - Chop the peaches: Cut them into small pieces to mix well into the dough. Frozen peaches can taste just as good in your cookies! To check if your cookies are done, look for these signs: - Edges should be golden: The edges will brown slightly, while the centers stay soft. - Set centers: Lightly press the center; it should feel firm but still soft. - Smell the aroma: When the cookies smell amazing, they’re likely done! These cues help you bake the perfect Peach Cobbler Cookies. For the full recipe, don't forget to check out the complete instructions! Peach Cobbler Cookies blend fresh ingredients and easy steps for a tasty treat. Ripe peaches and chewy oats make each bite special. With tips on texture and clever variations, you can enjoy these cookies year-round. Remember, proper storage keeps them fresh longer. Whether you add pecans or spices, there’s a twist for everyone. Bake, share, and enjoy your cookies as a delightful dessert or snack. Embrace your baking journey and have fun experimenting!](https://therecipehatch.com/wp-content/uploads/2025/06/9e7f66c1-4100-4559-ba06-ff5d27bb8290.webp)
Peach Cobbler Cookies Perfectly Soft and Chewy Delight
If you love the warm, sweet taste of peach cobbler, you’ll adore these Peach Cobbler Cookies. They are perfectly soft and chewy, bringing all those
Easy Peach Cobbler Quick and Tasty Dessert Recipe
Craving a sweet treat that’s simple and fast? Look no further! This Easy Peach Cobbler recipe is quick, tasty, and perfect for any occasion. With
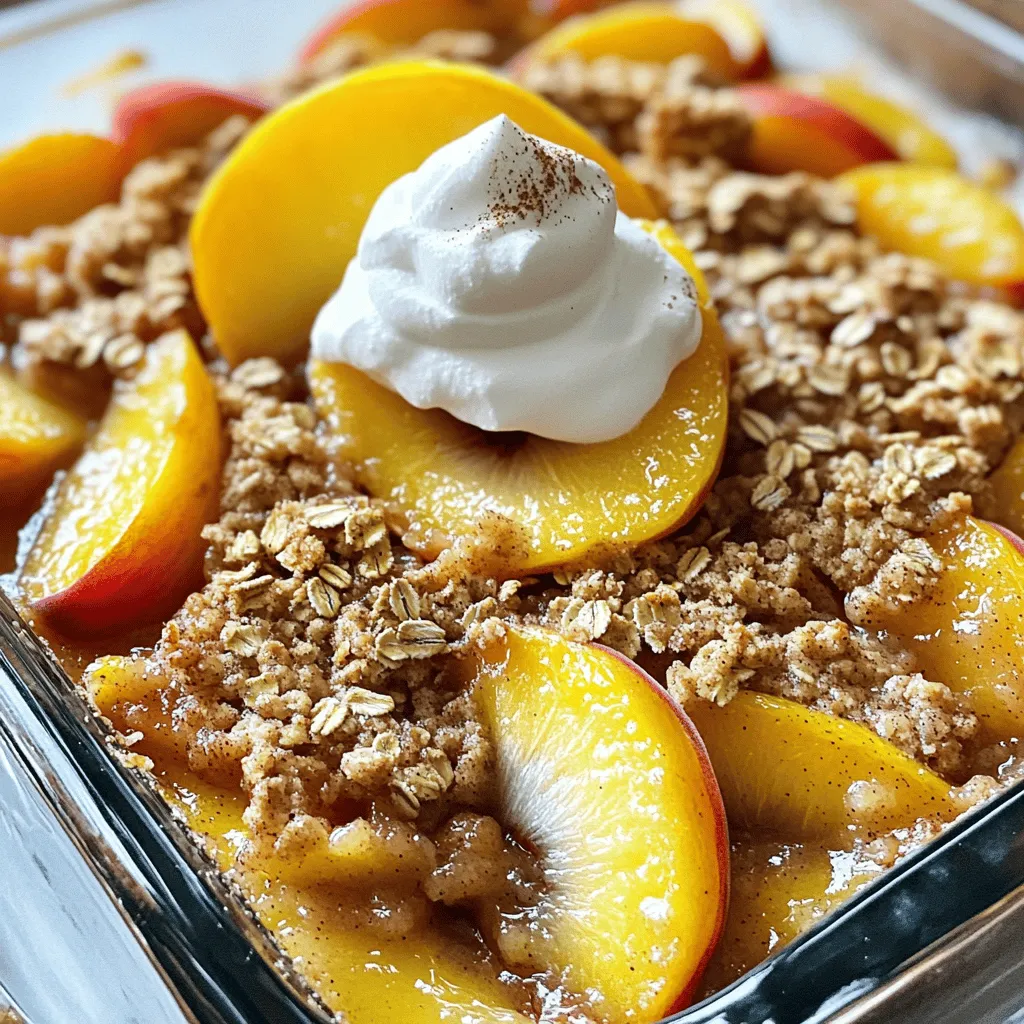
Peach Crumble Will Make You Forget All About Cobblers
Forget cobblers! Peach crumble is here to take your dessert game to the next level. With juicy peaches and a crunchy topping, this dish satisfies
![- 4 cups fresh peaches, peeled and sliced - 1 cup granulated sugar, divided - 1 tablespoon lemon juice - 1 teaspoon ground cinnamon - 1 cup all-purpose flour - 1 tablespoon baking powder - 1/2 teaspoon salt - 1 cup milk - 1/2 cup unsalted butter, melted - 1 teaspoon vanilla extract The key to a great peach cobbler lies in the ingredients. Fresh peaches bring a sweet and juicy flavor. You can also use sugar for sweetness and lemon juice to add a bright taste. Ground cinnamon gives a warm spice note, while flour makes the batter light. Baking powder helps it rise, and salt balances the flavors. The milk and melted butter add richness, and vanilla enhances the overall taste. - You can swap peaches for other fruits like blueberries or apples. - For gluten-free options, use almond flour or coconut flour. - If you need dairy-free butter, try coconut oil or vegan butter. These substitutions allow you to customize your cobbler. Each fruit adds its own unique flavor. Gluten-free and dairy-free options make this dessert more inclusive for everyone. - Fresh peaches taste best for this recipe. - Canned peaches work if fresh ones are not available. - Choose ripe peaches that yield slightly when pressed. Fresh peaches offer a juicy bite and a sweet aroma. When selecting, look for peaches with a rich color and no bruises. Seasonal peaches are always the best choice for flavor. If using canned peaches, drain them well to avoid a soggy cobbler. How to peel and slice peaches Start by placing your peaches in boiling water for 30 seconds. This helps the skin come off easily. After that, plunge them into cold water. Once cooled, the skin should slip right off. Slice the peaches into thin wedges for even cooking. Tips for preventing browning of peaches To keep your peaches fresh and bright, sprinkle some lemon juice on them right after slicing. This acid helps stop oxidation. You can also toss them in a bit of sugar, which can help preserve their color. Mixing dry and wet ingredients In a large mixing bowl, combine the dry ingredients first. Whisk together flour, baking powder, salt, and half of the sugar. In a separate bowl, mix the milk, melted butter, vanilla, and the rest of the sugar. This separation keeps the batter light. Importance of the order in combining ingredients Always add the wet ingredients to the dry ones. This helps to avoid lumps. Mix gently until it’s just combined. Overmixing can lead to a dense cobbler, which we don’t want. Ideal oven temperature and bake times Preheat your oven to 350°F (175°C). Pour the batter over the peaches without stirring. Bake for 45-50 minutes. The top should be golden brown when done. How to check for doneness Use a toothpick to test the cobbler. Insert it into the batter; if it comes out clean, it’s ready. If it’s still wet, let it bake for a few more minutes. For the complete recipe, check out the [Full Recipe]. To get a fluffy coating, mix your batter gently. This keeps air in the mix. Do not overwork it. The batter should be smooth, not thick. When you pour it over the peaches, do not stir. This lets the batter rise while baking. To avoid soggy bottoms, you must use ripe peaches. They have more juice, which keeps the cobbler moist but not wet. You can also bake it on a lower rack. This helps the bottom cook better. A scoop of vanilla ice cream is a classic choice. It melts and mixes with the warm cobbler. Whipped cream also adds a nice touch. You can even mix in a bit of cinnamon for extra flavor. For special occasions, serve the cobbler in individual dishes. This adds a nice flair. You can also sprinkle a little mint on top for color and freshness. One mistake is overmixing the batter. This makes it tough instead of fluffy. Mix just until combined. Another common error is using unripe peaches. They do not have the same sweet flavor as ripe ones. Choose peaches that give a little when you press them. This means they are ready to eat. {{image_2}} You can switch up the fruit in your cobbler! Instead of peaches, try mixed berries. Blackberries, strawberries, and blueberries work well together. This mix adds a burst of color and flavor. Another fun option is to use tropical fruits. Pineapple, mango, or even banana can bring a sunny twist. These fruits change the cobbler's taste and make it feel like a vacation. Want to spice things up? Adding nutmeg or ginger gives your cobbler a warm kick. Just a pinch can enhance the flavor. Consider mixing in some nuts or oats, too. These add crunch and texture to your cobbler, making it extra special. You can serve your cobbler in fun ways! Mini cobblers in individual dishes make for cute servings. Everyone gets their own, and they’re perfect for parties. Or, try pancake-style peach cobbler. Just pour the batter into a skillet, then add the peaches. Cook it like a pancake for a unique breakfast treat. It’s a fun twist on the classic dish. For the full recipe, check out the [Full Recipe]. To keep your peach cobbler fresh, use an airtight container. Glass or plastic containers work well. You can store it in the fridge for up to four days. If you want to save it longer, freeze it. Wrap it tightly in plastic wrap and foil. It can last for three months in the freezer. When you're ready to enjoy your cobbler again, reheating it the right way matters. Preheat your oven to 350°F. Place the cobbler in an oven-safe dish. Cover it with foil to keep it soft. Heat for about 20 minutes. Check it occasionally. To avoid sogginess, do not add extra moisture when reheating. At room temperature, your cobbler can last for about two days. If you store it in the fridge, it will last up to four days. Refrigeration helps keep the flavors fresh. Always check for any signs of spoilage, especially if it sits out for too long. Enjoy your cobbler while it's fresh for the best taste! Yes, you can use frozen peaches. They are a great option if fresh peaches are not available. Using frozen peaches gives you the same sweet flavor and texture. Just remember to thaw them first. This helps with even baking. You may need to bake it a bit longer. Check for doneness after 50 minutes. The cobbler should be golden and firm. You can make this cobbler ahead of time. Prepare the peach mix and the batter separately. Store them in the fridge for a day. This keeps them fresh. When you are ready, layer them together in your baking dish. Bake as the recipe states. This method saves time on busy days. Yes, you can use other sweeteners. Honey and maple syrup are great options. They add unique flavors to your cobbler. However, using these sweeteners may change the texture. It can make the cobbler a bit denser. Adjust the amount to taste, starting with less than the sugar called for in the recipe. This cobbler recipe offers a simple way to enjoy fresh peaches. We covered ingredients, substitutions, and tips for making the perfect dish. Remember, ripe peaches make a big difference in taste. Also, avoid common mistakes like overmixing the batter. You can even experiment with other fruits and flavors. Whether serving at a gathering or enjoying at home, this dessert is sure to please. Happy baking, and enjoy each bite of your delicious peach cobbler!](https://therecipehatch.com/wp-content/uploads/2025/06/a21f6b18-f051-4b50-84ad-1d8eca1481ae.webp)
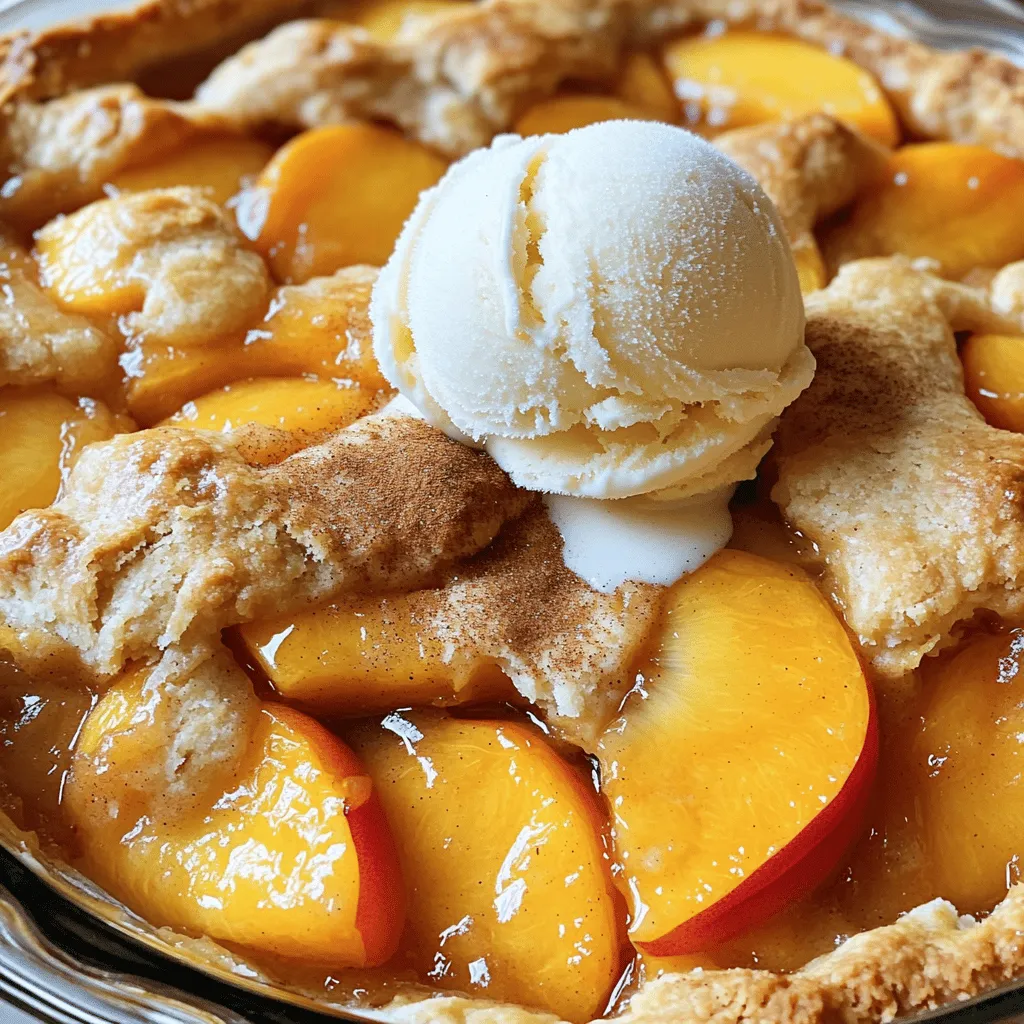
The Easiest Southern Peach Cobbler Simple and Sweet
Do you crave the taste of summer? This simple Southern Peach Cobbler brings that sweetness to your table. Using fresh peaches combined with just the