Desserts
![- 6 cups Rice Krispies cereal - 4 cups mini marshmallows - 3 tablespoons unsalted butter - 1 teaspoon vanilla extract - 1 cup orange candy melts - 12 green gummy worms - Cooking spray - 6 cups Rice Krispies cereal - 4 cups mini marshmallows - 3 tablespoons unsalted butter - 1 teaspoon vanilla extract - 1 cup orange candy melts - 12 green gummy worms The main ingredients create the base of our treats. Rice Krispies cereal gives them a light, crunchy texture. Mini marshmallows add sweetness and stickiness, while unsalted butter brings richness. Vanilla extract adds a warm flavor that ties everything together. For decorating, orange candy melts give our pumpkins their bright color. They also add a delicious chocolate-like taste. The green gummy worms serve as fun and playful stems for our pumpkin treats. Don't forget the cooking spray! It keeps everything from sticking to your bowls and pans. The key measurements ensure you have just the right amount of each ingredient. Stick to these amounts for perfect Rice Krispie Treat Pumpkins every time. If you want to try something new, you can mix in different treats or flavors, but this classic version is a hit! For the full recipe, check out the detailed instructions. - Prepare the pan: First, spray a large mixing bowl and a 9x13-inch baking dish with cooking spray. This keeps everything from sticking. - Melt the marshmallows: In a large saucepan over low heat, melt the unsalted butter. Once it's melted, add the mini marshmallows. Stir until they are all melted and smooth. Remove from heat and mix in the vanilla extract. - Mix marshmallow with Rice Krispies: Right away, add the Rice Krispies cereal to your melted marshmallow mix. Stir well until every piece is coated. - Shape the pumpkin balls: Transfer the mix to your greased baking dish. Spread it evenly and let it cool for about 10 minutes. Once cool enough, grab large handfuls and shape them into small pumpkin balls. Aim for about 2 inches in diameter. Place these on a parchment-lined baking sheet. - Melt the orange candy: In a microwave-safe bowl, melt the orange candy melts. Follow the package instructions to get a smooth texture. - Coat the pumpkin treats: Dip each Rice Krispie pumpkin into the melted orange candy. Make sure each one is fully coated. Then, set them back on the parchment-lined baking sheet to let the coating harden. - Add gummy worm stems: Once the orange coating is set, insert a green gummy worm into the top of each pumpkin. This gives them a cute, fun stem! These steps guide you through making delightful Rice Krispie Treat Pumpkins. For the full details, refer to the Full Recipe. To make smooth pumpkin shapes, work quickly when shaping the Rice Krispie mixture. Lightly grease your hands with cooking spray. This helps the mixture not stick to your hands. Form each ball gently, pressing the mixture just enough to hold its shape. If you want a more defined pumpkin shape, use your fingers to create small ridges. For the chocolate coating to stick well, ensure your pumpkin balls are slightly warm when you dip them. If they cool too much, the coating may not adhere properly. Dip each pumpkin fully into the melted orange candy and allow the excess to drip back into the bowl. This gives a nice, even coat. To store leftover treats, place them in an airtight container. Layer parchment paper between the pumpkins to keep them from sticking together. This method works well for keeping treats fresh and tasty. Store them in a cool, dry place, away from heat. For best freshness, consume the treats within a week. If you want to keep them longer, you can freeze them. Wrap each pumpkin in plastic wrap, then place them in a freezer-safe bag. They will stay good for up to a month in the freezer. Get creative when you present your treats! Use a festive platter or a pumpkin-shaped dish to add to the fun. You can also place them in small treat bags for kids to take home. Pair your Rice Krispie pumpkins with other Halloween-themed snacks. Consider adding spooky cookies or fruit shaped like ghosts. This variety makes your spread more exciting and colorful for everyone to enjoy! {{image_2}} You can make Rice Krispie Treat Pumpkins in fun shapes. Try shaping them into ghosts, mummies, or bats for Halloween. This adds more fun to your treats! You can use cookie cutters for these designs. Just press the mixture into the cutter for quick shapes. Kids love this part, and it makes your treats special. Want to mix up the flavor? You can add spices like cinnamon or nutmeg for warmth. This gives your treats a nice, cozy taste. Also, consider adding different extracts. Almond or maple extract can change the flavor profile. For a sweet crunch, mix in candies like M&Ms or chocolate chips. This adds color and flavor and makes the treats even more exciting. If you need gluten-free options, use gluten-free Rice Krispies. They work just as well and taste great! For a vegan twist, swap out the butter for coconut oil. You can also use vegan marshmallows instead of regular ones. These changes make your treats suitable for more diets and keep everyone happy. For the full recipe, check out the [Full Recipe]. Rice Krispie Treat Pumpkins are perfect for many fun events. They shine at Halloween parties, bringing smiles to kids and adults alike. Their bright color and fun shapes make them a hit. They also fit well at fall festivals, adding a festive touch to your table. Everyone loves a sweet treat while enjoying the autumn vibes. For a great experience, I suggest one pumpkin per person. These treats are fun and filling. If you host a larger gathering, just multiply the number of pumpkins. For example, if you have 20 guests, make about 20 pumpkins. They are easy to scale, so you can always make more if needed. Make your Rice Krispie Treat Pumpkins stand out on a festive serving platter. You can use colorful plates or even a Halloween-themed tray. For gifts, wrap each pumpkin in clear plastic bags tied with a ribbon. This makes them fun to give and receive. You can also display them in a pumpkin basket for a cute look that fits the season. Rice Krispie Treat Pumpkins last about 3 to 5 days if stored right. Keep them in an airtight container at room temperature. Don’t put them in the fridge; it makes them hard. Enjoy them fresh for the best taste! Yes, you can use any colors of candy melts! Try green for spooky Frankenstein or white for ghosts. Mix and match to make your treats fun and festive. The color choice adds a special touch to your treats. The best way to melt candy melts is in the microwave. Use a microwave-safe bowl and heat in short bursts of 30 seconds. Stir in between each burst until smooth. This method keeps the melts from burning and clumping. To make these treats more festive, add sprinkles or edible glitter on top. You can also use different candies for eyes or other decorations. You might even use mini chocolate chips for added flavor and fun! Yes, you can use regular marshmallows instead of mini ones. Just measure out the same amount by weight. Cut them into smaller pieces for easier melting. This will still give you that sweet, gooey base for your treats. For the full recipe, check out the detailed steps to create these yummy Rice Krispie Treat Pumpkins! In this blog post, we covered how to make fun Rice Krispie Treat Pumpkins. We explored the key ingredients, including Rice Krispies, mini marshmallows, and orange candy melts. I provided clear steps for preparation, combining, coating, and decorating your treats. Tips ensured you create the best pumpkin shapes and store them right. Try different shapes and flavors for variety. These treats are perfect for Halloween parties and other fall events. Enjoy making and sharing these festive snacks with friends and family!](https://therecipehatch.com/wp-content/uploads/2025/07/761e5f00-3c91-4ab5-b0be-94a26e3e4a23.webp)
Rice Krispie Treat Pumpkins Fun and Easy Recipe
Are you ready to bake up some fun this fall? My Rice Krispie Treat Pumpkins are a delightful twist on a classic treat. With just
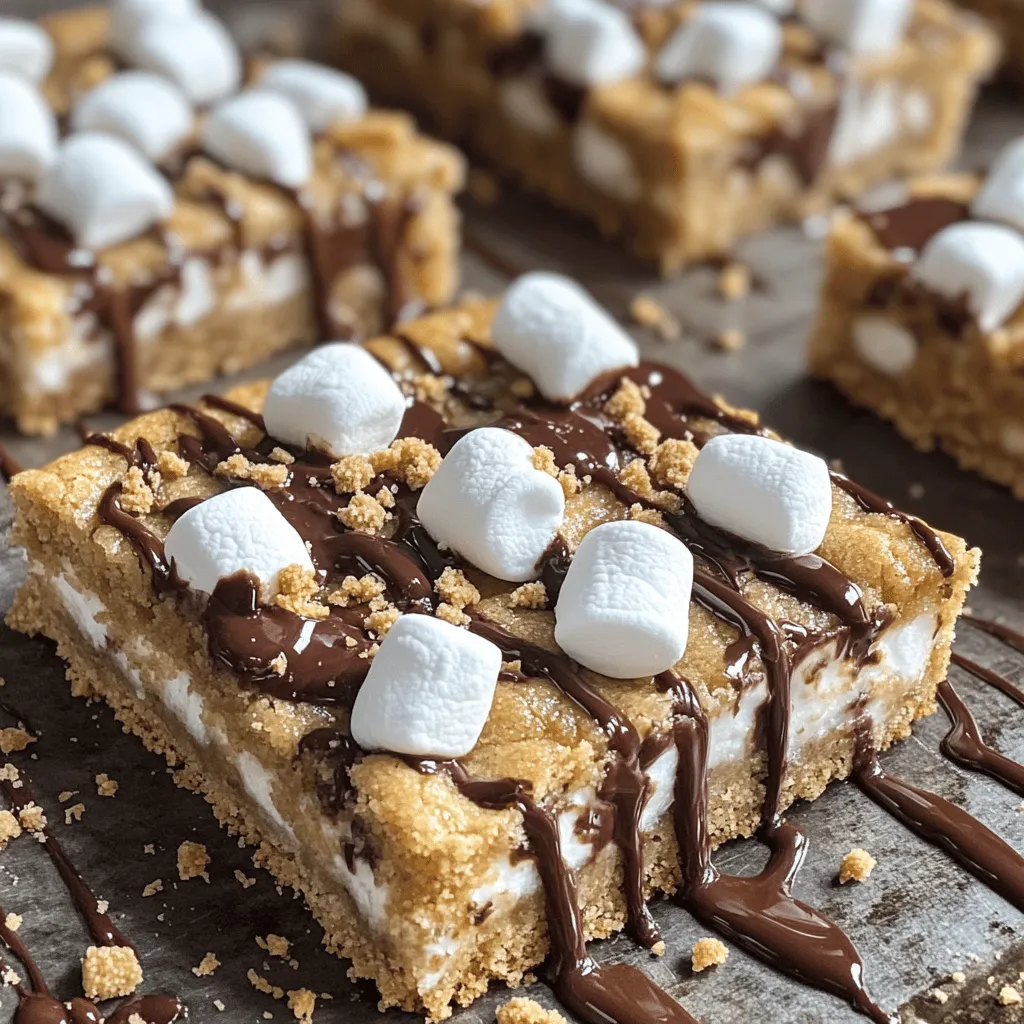
S’mores Cookie Bars Deliciously Simple and Fun Treat
Are you ready to indulge in a fun twist on a classic treat? S’mores Cookie Bars are the perfect blend of gooey chocolate, soft marshmallows,
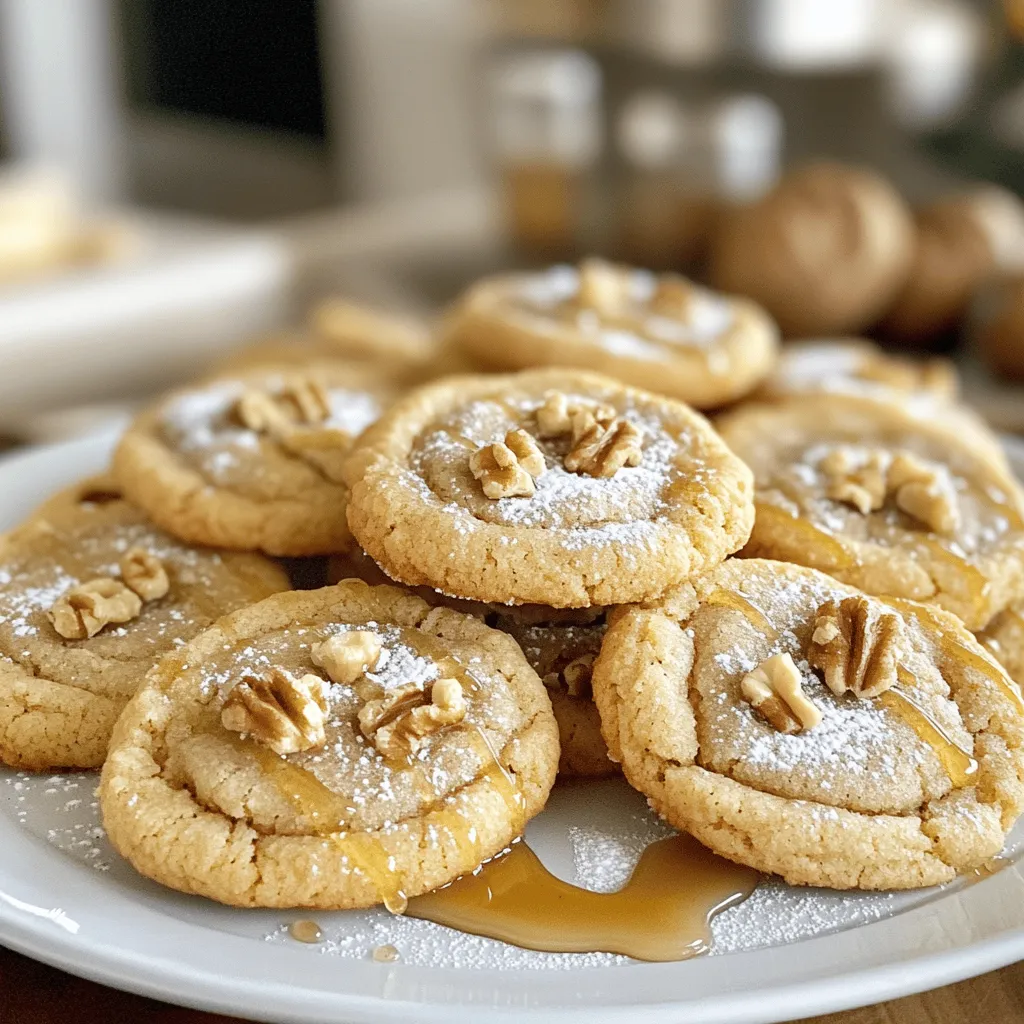
Maple Brown Sugar Cookies Tasty and Simple Treat
Craving something sweet? You’re in for a treat! Maple brown sugar cookies are easy to make and packed with flavor. In this post, I’ll guide
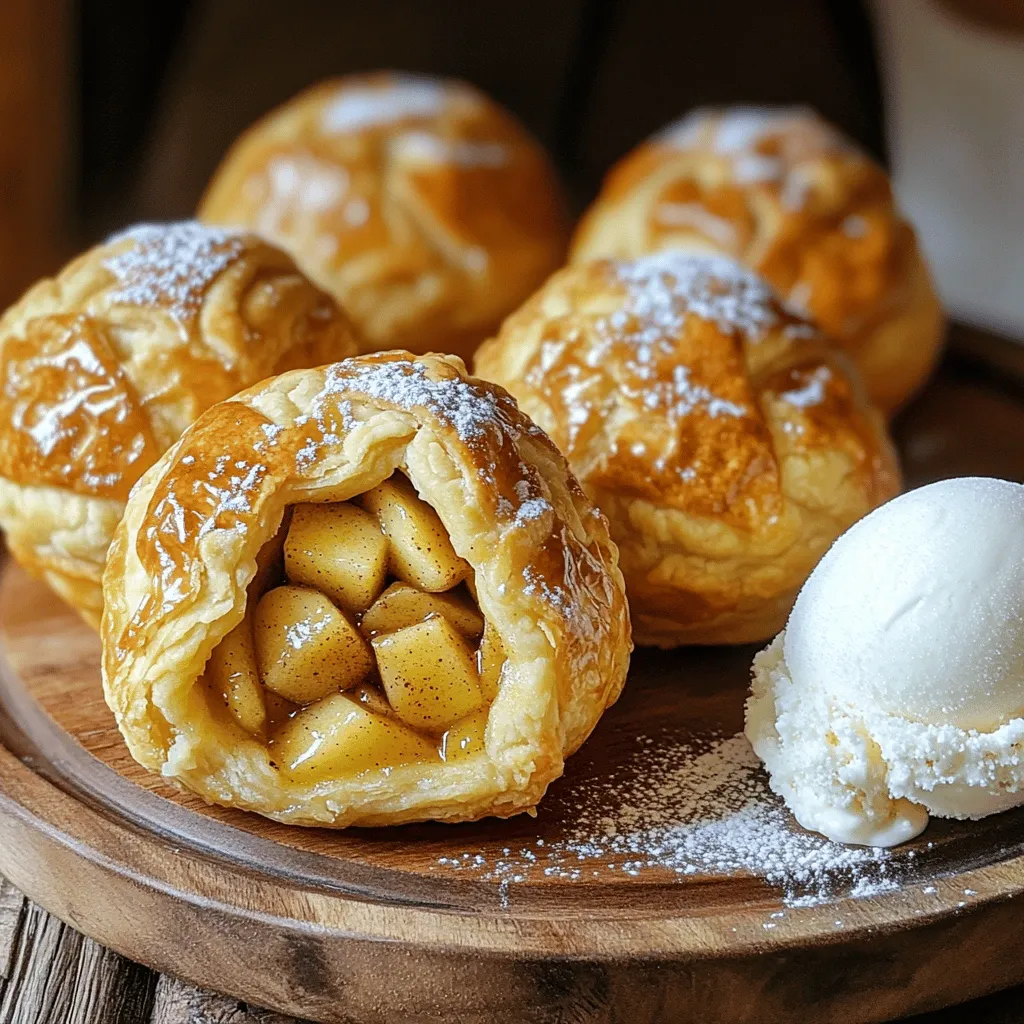
Air Fryer Apple Pie Bombs Delicious Dessert Treat
Craving a sweet treat that’s easy and fun to make? You’re in for a delight with these Air Fryer Apple Pie Bombs! Imagine biting into
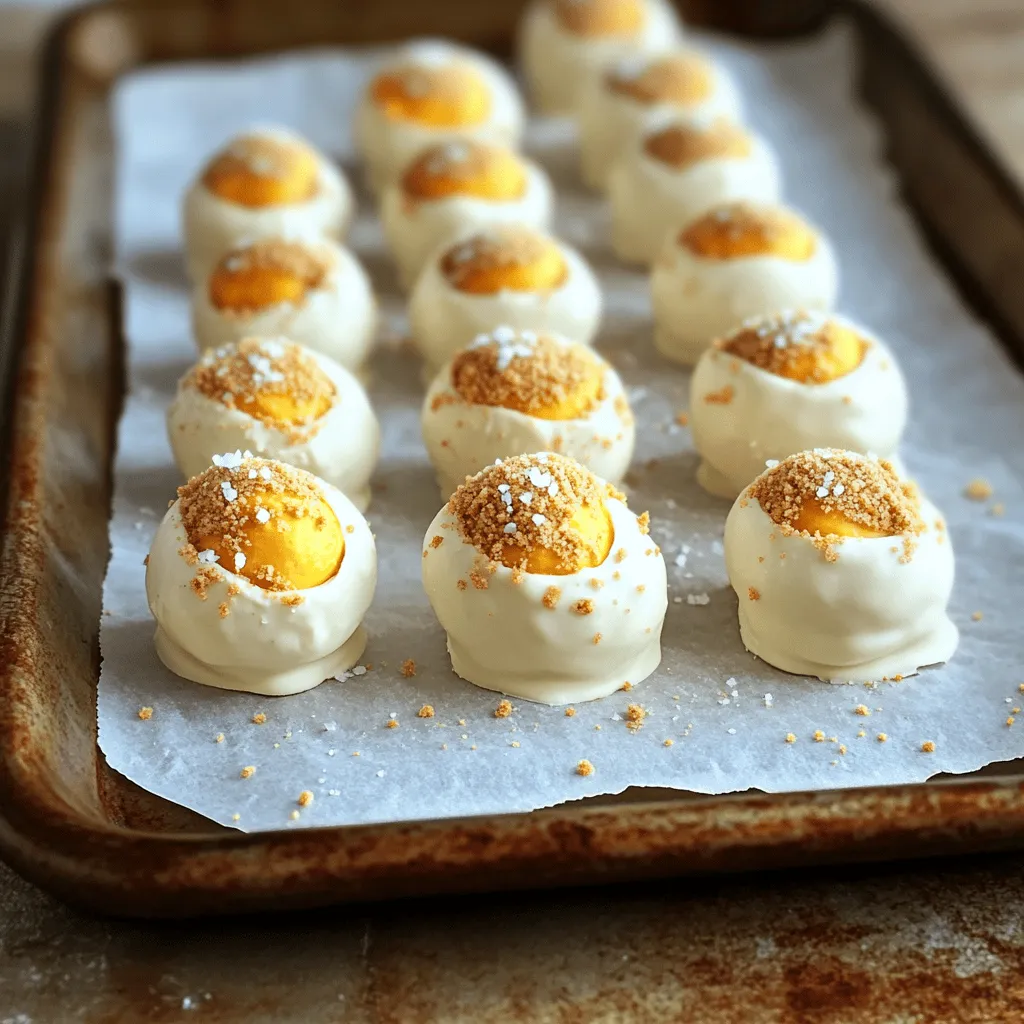
Pumpkin Cheesecake Truffles Irresistible Sweet Treat
Are you ready for a sweet fall treat that melts in your mouth? These Pumpkin Cheesecake Truffles are a delightful blend of creamy pumpkin and
. Enjoy the process of baking this tasty loaf! Preheating the Oven and Preparing the Pan Start by preheating your oven to 350°F (175°C). Grease a 9x5 inch loaf pan with cooking spray or butter. Lining the bottom with parchment paper helps with easy removal later. Mixing Dry Ingredients In a medium bowl, whisk together the dry ingredients. This includes 2 cups of all-purpose flour, 1 teaspoon of baking powder, 1 teaspoon of baking soda, 1 teaspoon of ground cinnamon, 1/4 teaspoon of ground nutmeg, and 1/4 teaspoon of salt. Set this bowl aside for later. Mixing Wet Ingredients In a large mixing bowl, cream 1/2 cup of softened unsalted butter and 1 cup of granulated sugar. Mix it until it’s light and fluffy. This should take about 2-3 minutes. Then, add 2 large eggs one at a time. Mix well after each egg. Now, stir in 1 cup of apple cider and 1 teaspoon of vanilla extract until everything is just combined. Creaming Butter and Sugar Creaming the butter and sugar is key. This step adds air to your batter. It helps the loaf rise and stay fluffy. Adding Eggs and Flavorings Adding the eggs one at a time is important. This keeps the mixture smooth. The apple cider gives the loaf its rich flavor. Incorporating Dry and Wet Mixtures Gradually mix the dry ingredients into the wet ingredients. Use a gentle hand to avoid overmixing. Once mixed, fold in 1 cup of finely diced apples. This adds a lovely texture. Pouring Batter into the Pan Pour the batter into the prepared loaf pan. Use a spatula to smooth the top. This helps it bake evenly. Preparing the Cinnamon Sugar Topping In a small bowl, mix 1/4 cup of brown sugar with 1/4 teaspoon of cinnamon. Sprinkle this mixture evenly over the batter in the pan. Baking Time and Doneness Bake your loaf in the preheated oven for 50-60 minutes. Check for doneness by inserting a toothpick into the center. If it comes out clean, it’s ready! The top should be golden brown. You can find the full recipe for the Moist Apple Cider Doughnut Loaf Cake in the recipe section. Enjoy! - Ensuring Moisture and Texture: Use fresh apple cider for the best taste. It adds flavor and moisture. Make sure to cream the butter and sugar until fluffy. This step helps keep your loaf light and airy. - Recommended Baking Time and Temperature: Bake your loaf at 350°F (175°C). Check it around 50 minutes. Your loaf should be golden brown and a toothpick should come out clean. - How to Check for Doneness: Insert a toothpick in the center. If it comes out clean, your loaf is done. If not, bake for a few more minutes and test again. - Choosing the Best Apples for Flavor: Opt for tart apples like Granny Smith or Honeycrisp. They balance sweetness and flavor in your cake. - Organic vs. Conventional Apples: Organic apples have fewer pesticides. They often taste better too. If you can, choose organic for your baking. - Serving Suggestions: Slice your loaf and serve warm. It pairs well with a scoop of vanilla ice cream. - Garnish Ideas: Dust the top with powdered sugar. Add a sprinkle of cinnamon for extra flair. You can also top it with warm apple slices for a delightful touch. {{image_2}} You can make this moist apple cider doughnut loaf cake even more fun. - Adding Nuts or Dried Fruits: Chopped walnuts or pecans add a nice crunch. You can also try raisins or dried cranberries for a sweet twist. Just fold them in gently when mixing the batter. - Incorporating Other Spices: If you love spice, add some ginger or allspice. A dash of cardamom can give it a warm flavor. Experiment and see what you like best. Some folks have different diets. Here are some easy swaps. - Gluten-Free Alternatives: Use gluten-free flour blends instead of regular flour. They work great in this recipe. Just make sure the blend has xanthan gum for the right texture. - Vegan Substitutions: To make it vegan, swap the butter for coconut oil or vegan butter. Instead of eggs, use flax eggs or applesauce. These changes keep the cake moist and tasty. This loaf cake is great for many occasions. - Pairing with Beverages: A hot cup of cider or coffee goes well with this cake. You can also serve it with herbal tea for a cozy treat. - Perfect Occasions for Serving: This cake is perfect for fall gatherings, brunch, or even as a sweet treat after dinner. It adds a warm touch to any table. Don't forget to check the Full Recipe for all the steps to make this delightful cake! You can store your loaf cake in two ways: at room temperature or in the fridge. If you plan to eat it within two days, keep it at room temp. Just wrap it in plastic wrap. This keeps it fresh and moist. If you want to save it longer, put it in the fridge. Use an airtight container to avoid drying out. The cold air in the fridge can make cakes lose moisture. To freeze the loaf, first, let it cool completely. Then, wrap it tightly in plastic wrap. You can also use aluminum foil for extra protection. This way, it won’t get freezer burn. For best results, eat it within three months. To thaw, move it to the fridge overnight. If you want to eat it warm, just pop it in the oven for a few minutes. This moist apple cider doughnut loaf cake lasts about three days at room temperature. In the fridge, it stays good for about a week. If frozen, it can last up to three months. Always check for signs of spoilage, like a sour smell or mold. Enjoy your delicious cake while it’s fresh for the best taste! You can find the full recipe above. Can I make this recipe in advance? Yes, you can make this loaf cake ahead of time. It tastes great after a day or two. Just store it in an airtight container. What should I do if my doughnut loaf is too dry? If your loaf is dry, try adding a bit more apple cider. You can also brush it with melted butter. This helps add moisture back into the cake. Can I use apple juice instead of apple cider? Apple juice can work, but it lacks the rich flavor of apple cider. If you use juice, consider adding a splash of vinegar for tang. How do I adapt baking recipes for high altitudes? At high altitudes, reduce sugar by one to two tablespoons. Increase flour by one to two tablespoons. You might also need to bake longer. What is the best way to prevent cakes from sticking to the pan? Greasing the pan well with butter or cooking spray helps. Line the bottom with parchment paper, too. This makes for easy removal. What can I use instead of butter? You can use vegetable oil or applesauce as a butter substitute. Both will keep your loaf moist and tasty. Is there a substitute for eggs in baking? Yes, you can use flaxseed meal or chia seeds mixed with water. This works well to bind your ingredients together. This blog covered all aspects of making a moist apple cider doughnut loaf. You learned about the ingredients, preparation steps, and tips for success. I shared variations and ways to store leftovers, ensuring your cake stays fresh. Baking is both an art and a science, so follow these tips closely. Enjoy sharing this delightful treat with friends and family. You now have the tools to bake a delicious loaf full of flavor. Happy baking!](https://therecipehatch.com/wp-content/uploads/2025/07/42b20169-2119-44ed-a59e-5122e6257bd2.webp)
Moist Apple Cider Doughnut Loaf Cake Delight Recipe
Fall is the perfect time for baking, and my Moist Apple Cider Doughnut Loaf Cake is a treat you don’t want to miss! Picture a

Amazing Italian Cream Cake Flavorful and Decadent Treat
If you crave a dessert that dances with flavor, the Amazing Italian Cream Cake is for you. Picture layers of fluffy cake smothered in rich

Chocolate Zucchini Muffins Delightfully Moist Treat
Get ready to enjoy a moist and rich treat: Chocolate Zucchini Muffins! I promise these muffins are a game-changer. Imagine sweet chocolate with a hint
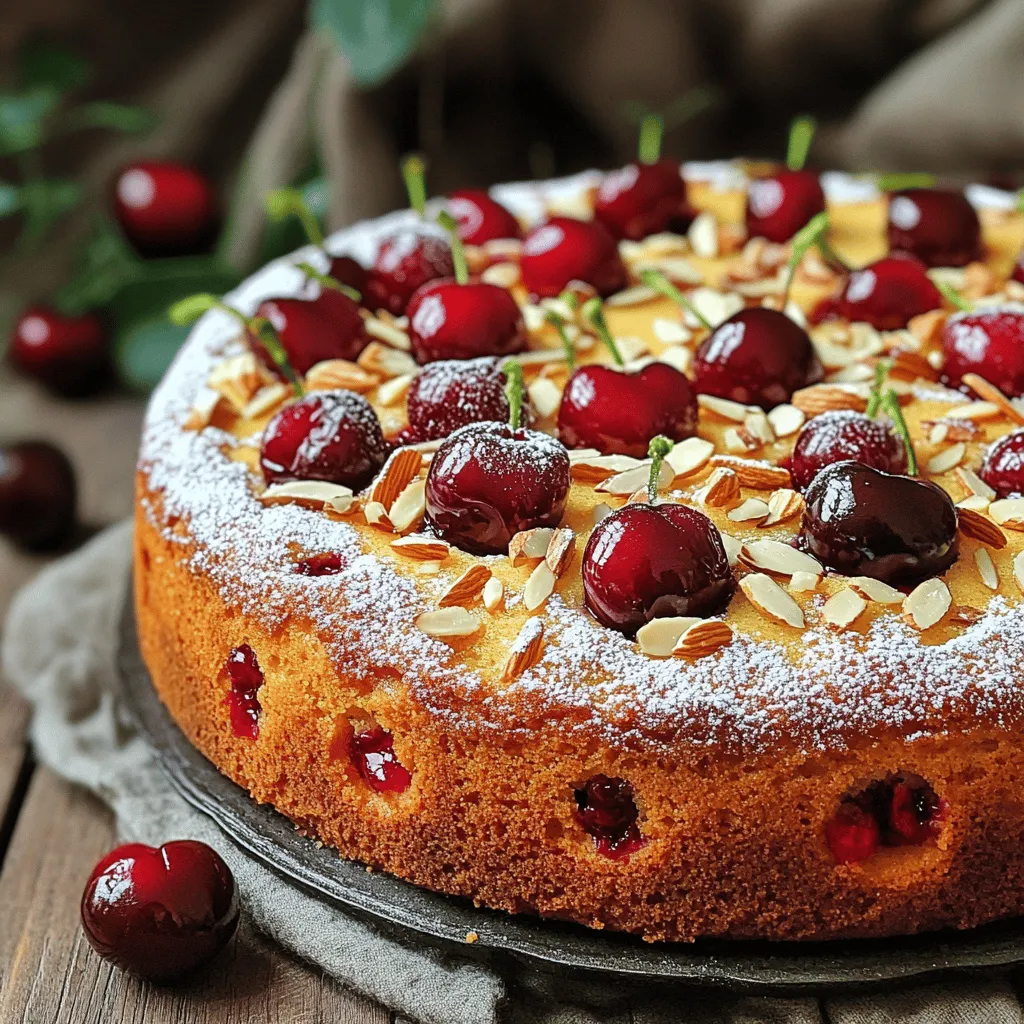
The Tasty Cherry Almond Cake Recipe You Need Today
Are you ready to bake a cake that delights every taste bud? This cherry almond cake is a must-try! I’ll show you how to mix
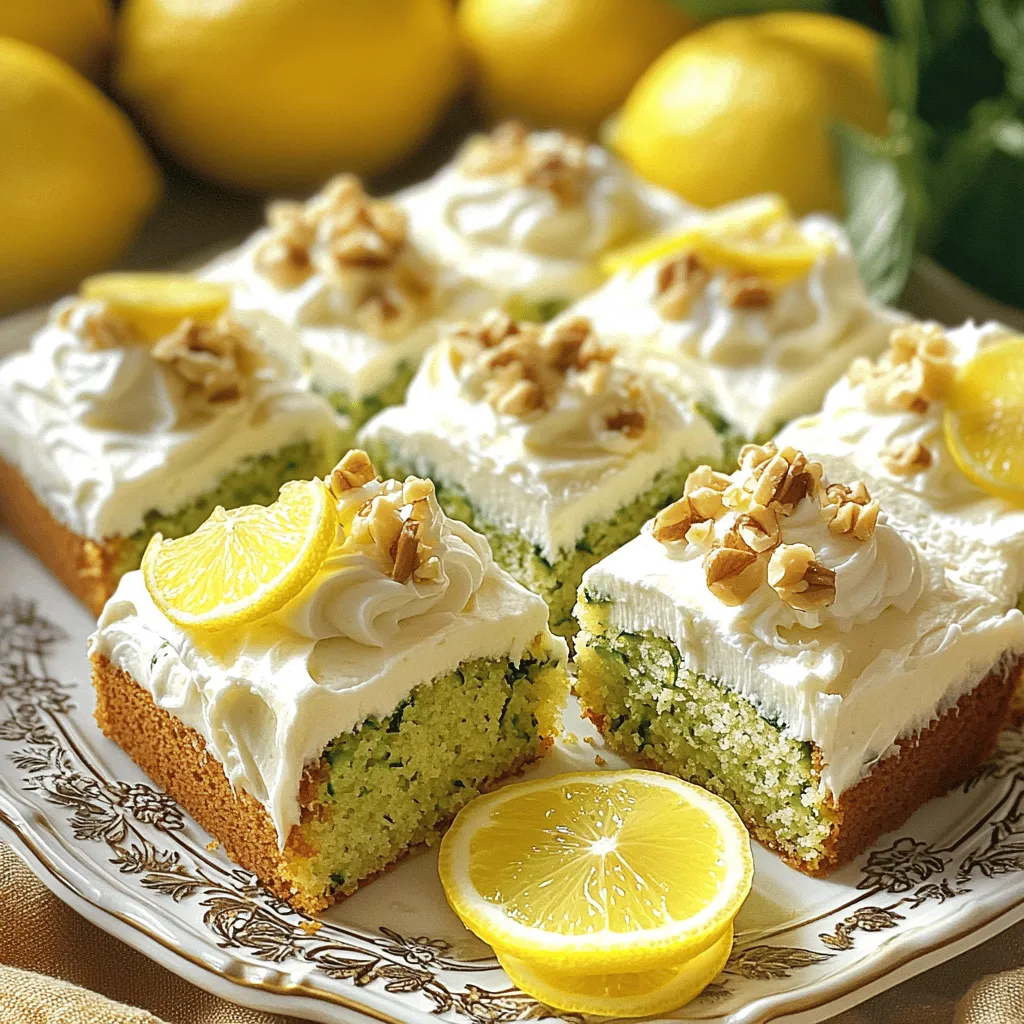
Zucchini Cake Delightful Moist and Flavorful Recipe
Looking for a delightful treat that’s both moist and flavorful? You’re in the right place! This Zucchini Cake recipe blends grated zucchini with sugars for