Desserts

Vegan Blueberry Ghost Hand Pies Flaky and Delicious
Get ready to impress your friends with my Vegan Blueberry Ghost Hand Pies! These treats are flaky, sweet, and fun for any occasion. In this
![- 3 cups rice Chex cereal - 2 cups corn Chex cereal - 1 cup pretzel twists I love starting with these main ingredients. Rice Chex and corn Chex give a great crunch. The pretzel twists add a nice salty bite. Together, they create a solid base for our mix. - 1 cup candy corn - 1 cup chocolate candies (M&M’s or similar) Now, let’s add some sweetness. Candy corn brings that classic Halloween flavor. The chocolate candies add a rich taste and fun colors. This mix of sweet and salty will keep you coming back for more. - 1/2 cup unsalted butter - 1/4 cup brown sugar - 1 teaspoon pumpkin spice - 1/2 teaspoon vanilla extract - 1/4 teaspoon sea salt These flavor enhancers tie everything together. Unsalted butter adds richness. Brown sugar gives it a lovely caramel note. Pumpkin spice brings that autumn warmth, while vanilla extract deepens the sweetness. A pinch of sea salt balances these flavors perfectly. For the full recipe, check out the section above. - Preheat your oven to 250°F. This low heat helps the mix bake evenly. - Line a baking sheet with parchment paper. This keeps the mix from sticking. - In a large bowl, mix the rice Chex, corn Chex, pretzel twists, candy corn, pumpkin seeds, and chocolate candies. - Make sure to toss gently. You want an even mix without breaking the cereal. - In a small saucepan, melt the unsalted butter over low heat. - Once melted, stir in the brown sugar, pumpkin spice, vanilla extract, and sea salt. - Cook this mix for 2-3 minutes. Stir constantly until it bubbles and becomes smooth. - Pour the melted butter mixture over your Chex blend. Mix well so every piece is coated. - Spread the mixture onto the prepared baking sheet in an even layer. - Bake in the preheated oven for 30 minutes. Stir every 10 minutes to keep it from burning. With these steps, you can create a tasty Halloween Harvest Hash Chex Mix. For the complete recipe, check the [Full Recipe]. To coat your Chex mix evenly, start by mixing the dry ingredients well. Use a large bowl to give enough space for tossing. Add the melted butter mixture slowly, pouring it over the dry mix. Stir gently but thoroughly. This helps ensure every piece gets coated. If you find some areas still dry, toss again until all pieces shine. Stirring the mix during baking is key. This step stops it from burning and helps it cook evenly. Aim to stir every ten minutes. Keep an eye on the color; it should turn a light golden brown when done. If it starts to smell nutty, it’s usually a good sign that it’s ready. For a festive touch, serve your Halloween Harvest Hash Chex Mix in bright bowls. Use bowls shaped like pumpkins or ghosts to match the theme. You can also sprinkle some extra candy corn on top for color. This makes the mix look even more inviting for guests. Try placing the bowls on a spooky tablecloth to enhance the fun! {{image_2}} You can change the nuts or seeds in this mix. Try almonds, walnuts, or sunflower seeds. Each nut adds a unique crunch and flavor. You can also swap in your favorite candy. Use gummy worms or spooky chocolate shapes for fun twists. For gluten-free options, check the labels on your Chex cereals. Many brands offer gluten-free rice and corn Chex. If you're vegan, replace the butter with coconut oil or a vegan butter substitute. You can also skip the chocolate candies or use dark chocolate chips. Make your mix seasonal by using flavors like apple or caramel. You can add colored candies to match Halloween themes. Think orange, black, and purple. Mixing in dried fruits can also bring extra color and taste. To keep your Halloween Harvest Hash Chex Mix fresh, use airtight containers. Glass jars work well. Zip-top bags are also a good choice. Make sure to seal them tightly after each use. This helps keep the mix crisp and tasty. At room temperature, your Chex Mix can last about two weeks. Keep it in a cool, dry place. Avoid direct sunlight, as heat can make it stale faster. If you notice any changes in texture or smell, it’s best to toss it. If your Chex Mix gets stale, don’t worry. You can bring back its crunch. Preheat your oven to 250°F (120°C). Spread the mix on a baking sheet. Bake it for about 10 minutes. This quick heat revives the crispiness without losing flavor. Enjoy this spellbinding treat once again! For the full recipe, check the details above. Yes, you can make this Chex mix a few days ahead. Just follow the full recipe. After baking, let it cool completely. Then, store it in an airtight container. This mix stays fresh for about a week. Making it early gives the flavors time to blend. You’ll have a tasty treat ready for Halloween fun! To keep your Chex mix fresh, use an airtight container. Glass jars or plastic bins work well. Store it at room temperature, away from light and heat. This helps maintain its crunch. Avoid leaving it out in the open, as air can make it stale. If sealed properly, it can last up to a week. Absolutely! You can change the sweetness or spice levels. If you want it sweeter, add more candy corn or chocolate. For more spice, increase the pumpkin spice or add a pinch of cinnamon. Taste as you mix to find your favorite balance. This recipe is flexible, and personal touches make it special! This blog post guided you through making a tasty Halloween Harvest Hash Chex Mix. You learned about the base ingredients, sweet additions, and flavor enhancers. I shared easy steps for mixing and baking, along with important tips for the best results. Don't forget, you can customize this mix to your taste and dietary needs. With proper storage, it stays fresh for weeks. I hope you enjoy making this fun treat as much as I do!](https://therecipehatch.com/wp-content/uploads/2025/07/0301b3d8-c8fc-4376-be39-1a7acddb5053.webp)
Halloween Harvest Hash Chex Mix Spellbinding Treat
Get ready for a tasty treat that’s perfect for Halloween! My Halloween Harvest Hash Chex Mix combines crunchy Chex cereals, pretzel twists, and sweet surprises
![To make this delicious pumpkin chip banana bread, gather these key items: - 1 cup ripe bananas, mashed (about 2-3 bananas) - 1 cup pumpkin puree (canned or fresh) - 1/2 cup granulated sugar - 1/2 cup brown sugar, packed - 1/2 cup vegetable oil or melted coconut oil - 2 large eggs - 1 teaspoon vanilla extract - 2 cups all-purpose flour - 1 teaspoon baking soda - 1/2 teaspoon salt - 1 teaspoon ground cinnamon - 1/2 teaspoon ground nutmeg - 1 cup chocolate chips (semi-sweet or dark) - 1/2 cup chopped walnuts or pecans (optional) Ripe bananas are important for flavor and moisture. They bring natural sweetness and a soft texture. Pumpkin puree adds richness and a warm, spiced taste. It also makes the bread moist. The sugars balance the flavors, while the chocolate chips give a delightful sweetness. Using nuts is optional, but they add crunch and extra nutrients. If you don’t have ripe bananas, try applesauce instead. It keeps the bread moist. For pumpkin, you can use butternut squash puree. If you want less sugar, reduce each type by a small amount. For a nut-free version, skip the walnuts or pecans. You can also swap chocolate chips for dried fruit or seeds to change the flavor. For the oil, you can use melted butter for a richer taste. For the complete recipe, check out the [Full Recipe]. Start by preheating your oven to 350°F (175°C). Grease a 9x5-inch loaf pan. If you prefer, line it with parchment paper for easy removal. Next, grab a large mixing bowl. In it, combine 1 cup of mashed ripe bananas, 1 cup of pumpkin puree, 1/2 cup of granulated sugar, and 1/2 cup of brown sugar. Add 1/2 cup of vegetable oil or melted coconut oil, 2 large eggs, and 1 teaspoon of vanilla extract. Whisk all these ingredients until the mixture is smooth. In a separate bowl, sift together 2 cups of all-purpose flour, 1 teaspoon of baking soda, 1/2 teaspoon of salt, 1 teaspoon of ground cinnamon, and 1/2 teaspoon of ground nutmeg. Gradually fold these dry ingredients into the wet mixture. Mix just until everything is combined. Avoid over-mixing, as this can make the bread dense. Finally, gently fold in 1 cup of chocolate chips and 1/2 cup of nuts if you want. Pour the batter into your prepared loaf pan. Use a spatula to smooth the top. Place it in the oven and bake for 60 to 70 minutes. Check for doneness by inserting a toothpick into the center. It should come out clean or with a few moist crumbs. Once baked, remove the bread from the oven. Let it cool in the pan for about 10 to 15 minutes. Then, transfer it to a wire rack to cool completely. Slice the banana bread and enjoy it warm. You can add a pat of butter or a sprinkle of cinnamon sugar on top. For extra flair, garnish with chocolate chips and a mint sprig. You can find the full recipe in the earlier section. To make your bread moist, use ripe bananas. They should be brown and soft. This gives a sweet flavor and adds moisture. Pumpkin puree also helps keep the bread soft. You can use canned or fresh pumpkin. Mix the wet and dry ingredients gently. Over-mixing can make the bread tough. One common mistake is not measuring ingredients correctly. Use measuring cups and spoons for accuracy. Another mistake is baking at the wrong temperature. Always preheat your oven to 350°F (175°C). Check for doneness by inserting a toothpick. If it comes out clean or with a few crumbs, your bread is ready. A good loaf pan is key. I recommend a 9x5-inch pan for even baking. Use a whisk for mixing wet ingredients. A spatula helps fold in the dry mix gently. If you want to save time, a stand mixer can be handy. For cooling, a wire rack is best. It allows air to circulate around the bread. For the complete recipe, check out the Full Recipe section. {{image_2}} If you want a nut-free version, just skip the nuts. This recipe tastes great without them. You still get a soft, moist bread with all the flavors. You can add a little extra chocolate chips if you want. They will add a nice crunch and sweetness. For more flavor, try adding spices. A pinch of ginger or cloves can work wonders. You could also add a splash of orange juice for a citrus twist. This can brighten the taste and make your bread unique. Another option is to mix in some coconut flakes for a tropical feel. Get creative with your add-ins! You can try dried fruits like cranberries or raisins. They add a chewy texture and fruity taste. If you love a bit of crunch, consider adding sunflower seeds or pumpkin seeds. These will give your bread a fun twist. Remember to keep the total amount of add-ins around 1 to 1.5 cups to maintain the bread's perfect texture. To keep your pumpkin chip banana bread fresh, wrap it tightly in plastic wrap. This helps keep moisture in. You can also place it in an airtight container. Store it at room temperature for up to three days. If you want it to last longer, put it in the fridge. It can stay good there for about a week. Freezing is a great option if you have extra bread. First, slice the bread into pieces. Wrap each piece in plastic wrap. Then, place the wrapped slices in a freezer bag. Make sure to remove as much air as possible. The bread can freeze for up to three months. When you’re ready to enjoy it, just thaw a slice at room temperature or in the microwave. For the best taste, reheat your pumpkin chip banana bread in the oven. Preheat your oven to 350°F (175°C). Place the bread on a baking sheet and heat for about 10-15 minutes. This helps it stay moist and brings back its fresh flavor. If you’re in a hurry, you can use the microwave. Heat a slice for about 10-15 seconds. Enjoy it warm for the best experience! Yes, you can use just pumpkin or just banana. However, this will change the taste. If you only use pumpkin, the bread will have a rich pumpkin flavor. If you only use banana, it will taste very sweet and fruity. I suggest using both for the best flavor and texture. They balance each other out well and create a moist bread. This combo adds depth and sweetness to your Pumpkin Chip Banana Bread. You can check the bread by using a toothpick. Insert it into the center of the loaf. If it comes out clean or with a few moist crumbs, your bread is done. The edges should also pull away from the pan slightly. Remember, every oven is different. It might take 60 to 70 minutes to bake. Keep an eye on it towards the end to avoid overbaking. You can serve this bread with fresh butter. A pat of butter melts into the warm bread perfectly. You might also try adding a sprinkle of cinnamon sugar on top. For a fun twist, serve it with whipped cream cheese. You can even top it with sliced bananas or a scoop of ice cream. These toppings create a delightful treat. Enjoy this bread with a cup of coffee or tea for a lovely snack! In this post, we explored the essential ingredients, steps, and tips for making perfect Pumpkin Chip Banana Bread. You learned about key ingredients, how to avoid mistakes, and creative variations to try. Remember to store leftovers properly and consider helpful reheating tips. Baking can be fun and tasty! Enjoy your bread and feel free to share your results. Happy baking!](https://therecipehatch.com/wp-content/uploads/2025/07/1a39a98b-5f6d-4687-b277-513246e6df0f.webp)
Pumpkin Chip Banana Bread Delicious and Easy Recipe
Are you ready to bake something truly special? My Pumpkin Chip Banana Bread is both tasty and simple. This recipe blends the warm flavors of
![- 4 large firm apples (Honeycrisp or Granny Smith) - 1/4 cup brown sugar - 1 teaspoon ground cinnamon - 1/2 teaspoon nutmeg - 1/4 cup chopped walnuts or pecans - 1/4 cup caramel sauce - 1/4 cup mini marshmallows (optional) - 2 tablespoons butter, melted - Vanilla ice cream (for serving) To make Bloomin' Grilled Apples, you need simple yet tasty ingredients. Start with four large apples. I love using Honeycrisp or Granny Smith. They hold their shape well and taste great when grilled. Next, grab a quarter cup of brown sugar. This sweet touch adds depth. You’ll also need one teaspoon of ground cinnamon and half a teaspoon of nutmeg. These spices bring warmth to the dish. For crunch, have a quarter cup of chopped walnuts or pecans ready. They add a nice texture. You can use caramel sauce for drizzling. A quarter cup will do. If you want extra sweetness, mini marshmallows are optional. Lastly, two tablespoons of melted butter will help everything stick together. Don’t forget the vanilla ice cream for serving. It’s the perfect match for warm apples. This recipe is not only easy but also fun to prepare. You’ll enjoy every step of making this delightful dish. Check out the Full Recipe for more details. - Step 1: Preheat your grill to medium heat. This makes sure the apples cook evenly. - Step 2: Core the apples. Start from the top and leave the bottom intact. This helps create the bloom effect. - Step 3: Prepare the sugar-nut mixture. In a small bowl, mix together the brown sugar, cinnamon, nutmeg, and chopped nuts. Set this aside for stuffing later. - Step 4: Stuff the apples. Pack the sugar-nut mixture into each apple generously. Let it overflow a bit for extra flavor. - Step 5: Wrap and grill the apples. Drizzle the melted butter over each apple, then wrap them in aluminum foil. Seal the foil tightly to keep moisture in. Place the wrapped apples on the grill and cook for 20-25 minutes, turning them occasionally. - Step 6: Add marshmallows and caramel sauce. In the last few minutes of grilling, carefully unwrap the foil. Sprinkle mini marshmallows on top if you want. Close the foil again for a couple of minutes to let them melt. Finally, drizzle caramel sauce over each apple once you remove them from the grill. This recipe is simple and brings a delightful twist to your apple dessert. You can find the [Full Recipe] for more details. Choose apples that are firm and fresh. Honeycrisp and Granny Smith are my favorites. These apples hold their shape while grilling. A soft apple will turn mushy and lose its charm. Firm apples give the best texture and flavor when grilled. Grilling time is key to a great dish. I suggest 20-25 minutes on medium heat. Check for tenderness by poking a fork into the apple. Use aluminum foil to trap heat and moisture. Wrap each apple snugly but leave some space for steam. This keeps the apples juicy and enhances their flavor. Bloomin' Grilled Apples pair well with vanilla ice cream. The cold ice cream balances the warm apples perfectly. You can also top them with whipped cream or extra caramel sauce. For a fun twist, serve them on a skewer for easy eating. Drizzle some chocolate sauce for added sweetness. {{image_2}} You can switch up your stuffing. Use different nuts or seeds like almonds or sunflower seeds. These add unique flavors and textures. You can also add chocolate chips. They melt and create a sweet surprise inside the apple. Grilling is fun, but there are more ways to cook these apples. You can use a cast iron skillet on the grill. This method gives the apples a nice char. Be sure to check them often to prevent burning. If you prefer, you can oven-bake the apples. Just wrap them in foil and bake at 350°F for about 30 minutes. Want a healthier version? You can reduce the sugar. Use less brown sugar or replace it with a sugar substitute. Options like stevia or monk fruit work well. This way, you keep the sweetness without the extra calories. Enjoying delicious Bloomin' Grilled Apples can still fit into your healthy eating plan! For the complete step-by-step guide, check out the Full Recipe. To store leftover Bloomin' Grilled Apples, let them cool first. Place them in an airtight container. They will stay fresh in the fridge for up to three days. Make sure to keep them covered to avoid drying out. When reheating, you can use the microwave or grill. For the microwave, heat for about 30 seconds. Check if they are warm enough. If not, heat in 10-second bursts. On the grill, wrap them in foil and heat for about 5 to 10 minutes. Can you freeze Bloomin' Grilled Apples? Yes, you can! Freezing is a great way to save them for later. To freeze, let the apples cool completely. Wrap each apple in plastic wrap or foil. Then, place them in a freezer bag. Make sure to remove as much air as possible. They can last up to three months in the freezer. To defrost, move the apples to the fridge overnight. For a quicker option, you can leave them at room temperature for a few hours. Once thawed, you can reheat them using the methods mentioned above. Enjoy your delicious treat anytime! To make Bloomin' Grilled Apples, first, you core large, firm apples. You leave the bottom intact for a blooming effect. Next, mix brown sugar, cinnamon, nutmeg, and nuts in a bowl. Stuff this mix into the apples, then drizzle melted butter on top. Wrap them tightly in foil and grill for 20-25 minutes. Unwrap and add marshmallows in the last minutes. Finally, drizzle caramel sauce over the warm apples. For the full recipe, check the complete list of steps. Bloomin' Grilled Apples pair well with several treats. A scoop of vanilla ice cream complements the warm apples perfectly. You can also serve them with whipped cream or yogurt for a lighter option. For a fun twist, try adding a sprinkle of chopped nuts on top. Yes, you can prep the apples ahead of time. Core and stuff the apples earlier in the day. Wrap them in foil and store them in the fridge. When you're ready to grill, just take them out and cook as directed. This saves you time and makes serving easy. For grilling, I recommend using firm apples. Honeycrisp and Granny Smith are great choices. They hold their shape and provide a nice balance of sweet and tart flavors. Other good options include Fuji and Braeburn apples. You should grill the apples for about 20-25 minutes. This ensures they become tender but still hold their shape. Make sure to turn them occasionally for even cooking. The exact time may vary based on your grill's heat. We covered everything you need to make tasty Bloomin' Grilled Apples. Start with firm apples and add sweet and nutty fillings. Then, grill them to perfection. You can even try fun twists like chocolate chips or healthier options with less sugar. Remember to store leftovers right and explore different serving ideas. These apples are a great treat for any gathering. Enjoy every sweet, warm bite!](https://therecipehatch.com/wp-content/uploads/2025/07/ff984ddc-bbe1-44a7-98df-c7a41b958b8e.webp)
Bloomin’ Grilled Apples Delightful and Simple Recipe
Are you ready to impress your friends and family with a tasty treat? Bloomin’ grilled apples offer a fun twist on traditional desserts. This easy

Pumpkin Rolls Recipe Simple and Delicious Delight
Are you ready to indulge in a cozy autumn treat? In this post, I’ll share my simple and delicious pumpkin rolls recipe that’s perfect for

Mini Pumpkin Pie Cups Delightful and Easy Recipe
Craving a sweet treat this fall? You’re in for a delight! These Mini Pumpkin Pie Cups are simple to make and packed with flavor. Imagine
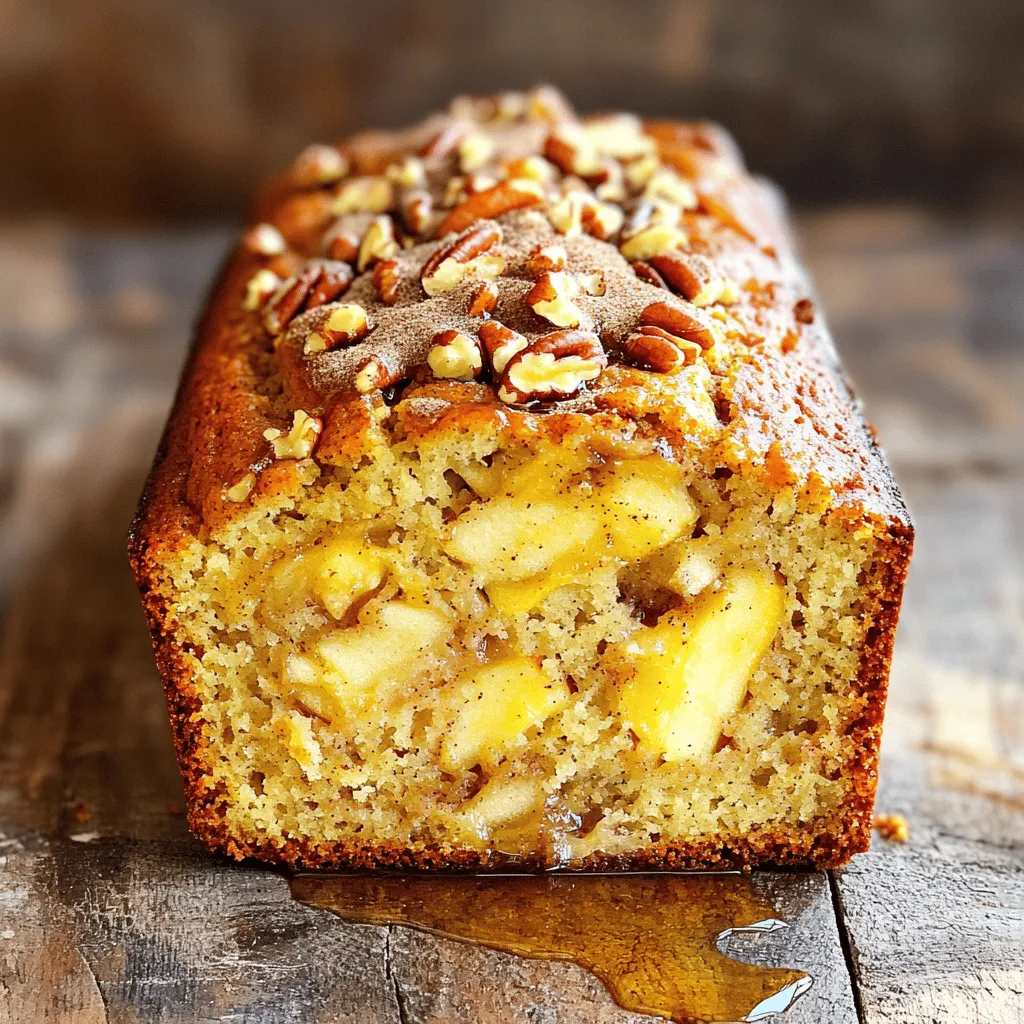
Apple Bread with Cinnamon Pecan Crunch Delight
Craving something warm and delicious? Let me introduce you to my Apple Bread with Cinnamon Pecan Crunch Delight. This recipe combines fresh apples, spicy cinnamon,
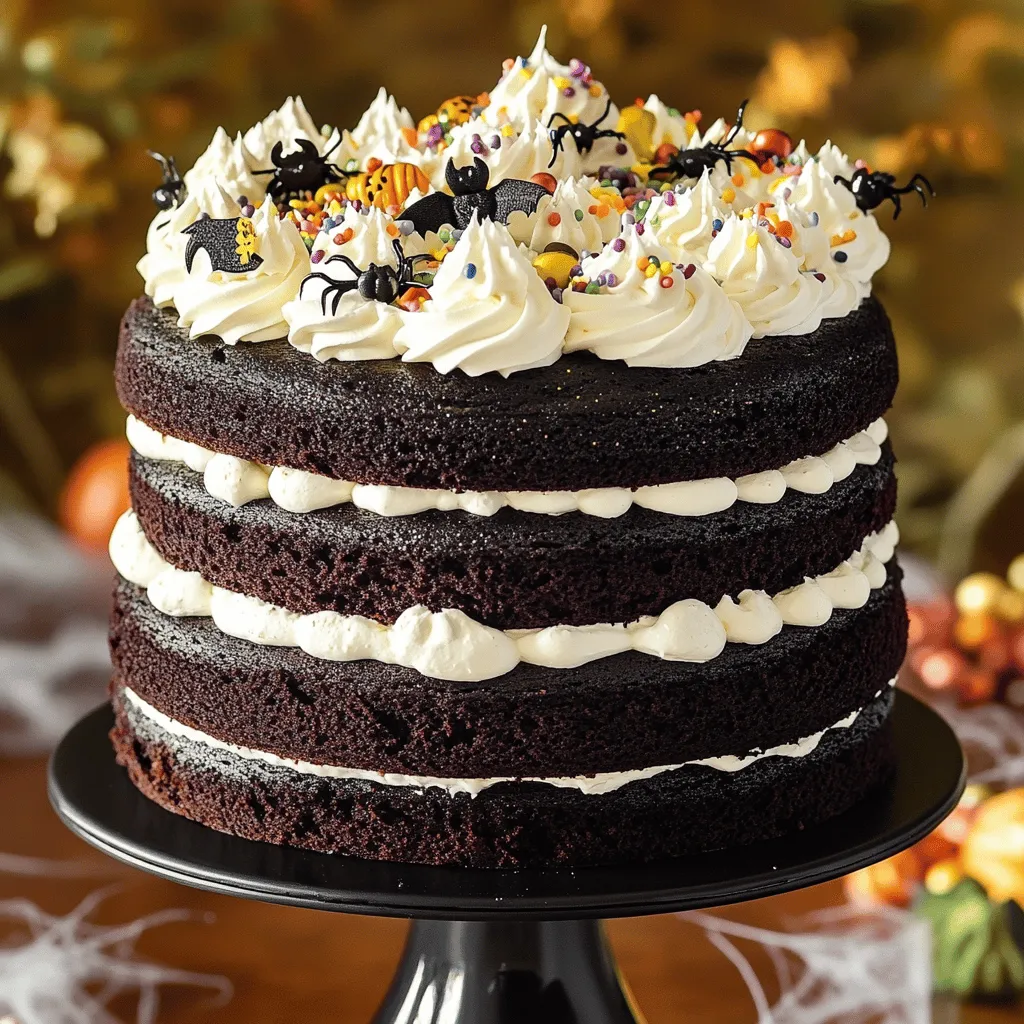
Black Velvet Halloween Cake Deliciously Spooky Treat
Ready to add a spooky twist to your Halloween treats? This Black Velvet Halloween Cake is both delicious and strikingly dark. I’ll guide you through

Apple Cider Cheesecake Delicious Fall Dessert Recipe
Fall is the perfect time for cozy treats, and this Apple Cider Cheesecake is a standout! It combines sweet apples and warm spices for a
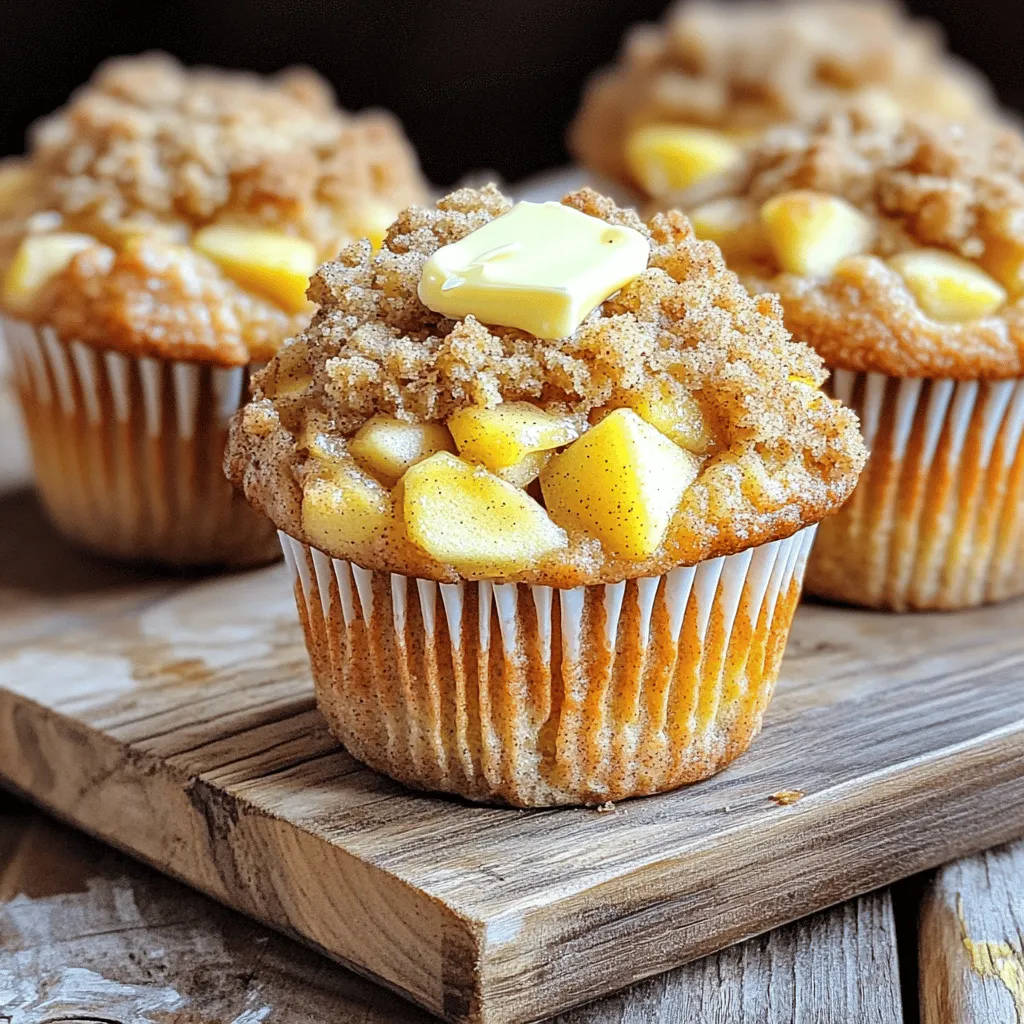
Apple Muffins with Crumb Topping Tasty and Easy Recipe
Craving a delightful treat that’s both easy to bake and satisfying to eat? Look no further than these Apple Muffins with Crumb Topping! You’ll love