Desserts
![- 2 cups all-purpose flour - 1 ½ teaspoons baking powder - 1 teaspoon baking soda - 1 teaspoon ground cinnamon - 1 teaspoon ground nutmeg - ½ teaspoon ground ginger - ½ teaspoon ground cloves - ½ teaspoon salt To start, you need the right dry ingredients. Flour is the base of the cake. I use all-purpose flour for a great texture. Baking powder and soda help the cake rise. The spices like cinnamon and nutmeg bring warmth and flavor. Ground ginger and cloves add a nice kick. Salt enhances all the flavors and balances the sweetness. - ¾ cup unsalted butter, softened - 1 cup brown sugar, packed - ½ cup granulated sugar - 3 large eggs - 1 teaspoon vanilla extract - 1 cup buttermilk Next, gather your wet ingredients. Softened butter makes it easy to cream with the sugars. Brown sugar gives a rich flavor, while granulated sugar adds sweetness. Eggs help bind everything together. Vanilla extract brings a lovely aroma. Buttermilk adds moisture and tang, making the cake tender. - 1 cup chopped walnuts or pecans If you like, add chopped nuts. Walnuts or pecans add crunch and flavor. They also make the cake more interesting. - 1 ½ cups powdered sugar - 2 tablespoons unsalted butter, softened - 3 tablespoons pure maple syrup - 1 tablespoon milk For the maple frosting, you need powdered sugar. It gives sweetness and a nice texture. Softened butter mixes well with the sugar. Pure maple syrup provides that classic flavor. Finally, milk helps achieve the right spreadable consistency. This recipe is packed with flavor and warmth. You can find the full recipe for the perfect Spice Cake Bundt with Maple Frosting to impress your friends and family. 1. Preheat the oven and prepare Bundt pan: Start by setting your oven to 350°F (175°C). Grease and flour your 10-cup Bundt pan. This step helps the cake release easily. 2. Mix dry ingredients and set aside: In a medium bowl, whisk together 2 cups of flour, 1 ½ teaspoons of baking powder, 1 teaspoon of baking soda, 1 teaspoon of cinnamon, 1 teaspoon of nutmeg, ½ teaspoon of ginger, ½ teaspoon of cloves, and ½ teaspoon of salt. This mix brings all the cozy spices together. 3. Cream butter and sugars until fluffy: In a large bowl, cream ¾ cup of softened unsalted butter, 1 cup of brown sugar, and ½ cup of granulated sugar. Use an electric mixer for about 3-4 minutes. You want it light and fluffy. 4. Add eggs and vanilla to the mixture: Add 3 large eggs, one at a time. Make sure to mix well after each egg. Then stir in 1 teaspoon of vanilla extract for extra flavor. 5. Gradually combine dry ingredients with buttermilk: Alternate adding the dry mix with 1 cup of buttermilk. Start and end with the dry mix. This keeps the batter smooth and well combined. 6. Fold in optional nuts, if desired: If you like, fold in 1 cup of chopped walnuts or pecans. This adds a nice crunch to your cake. 7. Pour batter into prepared pan and smooth: Pour the batter into your Bundt pan. Use a spatula to smooth the top. This helps it bake evenly. 8. Bake and check doneness with a toothpick: Bake your cake for 45-50 minutes. Insert a toothpick into the center. If it comes out clean, your cake is ready. 9. Cool cake in pan and then transfer to wire rack: Let the cake cool in the pan for about 10 minutes. Carefully invert it onto a wire rack to cool completely. 10. Prepare maple frosting ingredients and mix: In a medium bowl, mix 1 ½ cups of powdered sugar, 2 tablespoons of softened butter, 3 tablespoons of pure maple syrup, and 1 tablespoon of milk. Blend until smooth. Adjust the consistency if needed. 11. Drizzle or spread frosting over cooled cake: Once your cake is cool, drizzle or spread the maple frosting over the top. 12. Allow frosting to set before serving: Let the frosting set for a few minutes before you slice and serve. For the full recipe, check out the detailed instructions above. Enjoy this delightful spice cake with friends and family! Accurate measurements are key for your cake's success. Use dry measuring cups for flour. Spoon the flour into the cup, then level it with a knife. This way, you avoid packing it too tightly. To keep your cake moist, do not overmix the batter. Mix until just combined. Overmixing can make your cake dry and dense. Also, check for doneness in the oven. A toothpick should come out clean from the center. Adjust your frosting's thickness to your liking. If it's too thick, add a splash of milk. If it's too thin, add more powdered sugar. For a smooth finish, use a spatula or the back of a spoon. Start from the center and work your way out. This technique helps you cover the cake evenly. Garnish your cake for a stunning look. A sprinkle of ground cinnamon or a few chopped nuts adds charm. Place the cake on a decorative plate for a nice touch. To enhance flavor, serve your cake with whipped cream or ice cream. These add richness and balance the spice in the cake. Enjoy your beautifully presented treat! {{image_2}} You can bring new life to your spice cake by adding citrus zest. Lemon or orange zest adds a bright flavor. This contrast makes the cake even more enjoyable. You can also incorporate other spices like cardamom. Cardamom adds a warm, floral note. Mix it in with your other spices for a unique twist. If you need gluten-free options, try using almond flour or a gluten-free blend. These options keep your cake moist and tasty. For those who prefer vegan baking, there are simple swaps. Use flax eggs instead of regular eggs. Replace dairy with almond or coconut milk. These changes help everyone enjoy this delicious cake. While maple frosting is fantastic, there are other choices. Cream cheese frosting adds a tangy flavor that pairs well with spice cake. If you love chocolate, try a chocolate ganache. You can also jazz up the maple frosting. Add a splash of vanilla or almond extract for a deeper taste. This way, you can customize the cake to match your personal preference. For the complete recipe, check out the [Full Recipe]. To keep your spice cake fresh, wrap it tightly. Use plastic wrap or aluminum foil. This helps to lock in moisture. You can also store it in an airtight container. When slicing the cake, use a sharp knife. Cut even portions to avoid crumbling. Place any leftover slices in the container. If you want to save some cake, freezing works great. First, let the cake cool completely. Then, wrap it tightly in plastic wrap. For extra protection, add a layer of aluminum foil. Label it with the date. To reheat, let it thaw in the fridge overnight. You can warm it in the oven at 350°F for about 10 to 15 minutes. At room temperature, your cake stays fresh for about 3 to 4 days. Keep it away from direct sunlight or heat. If you see mold or an off smell, it's best to throw it away. Always check for signs of spoilage before enjoying your cake. To keep your cake moist, use the right ingredient ratios. The butter and sugars should be creamed well, as this adds air and moisture. Use room temperature ingredients for better mixing. Do not overmix when adding the dry ingredients. This can make the cake dense. Bake it for the right time. Check the cake at 45 minutes. A toothpick should come out clean. If it comes out wet, bake for a few more minutes. Yes, you can make this cake ahead of time. Bake the cake and let it cool completely. Wrap it tightly in plastic wrap. Store it in the fridge for up to three days. You can also freeze it for up to three months. Just remember to frost it after thawing. The frosting is best fresh, so make it on the day you serve the cake. If you don't have buttermilk, you can make your own. Mix one cup of milk with one tablespoon of vinegar or lemon juice. Let it sit for five minutes. You can also use yogurt or sour cream mixed with milk. These options keep the cake moist and add a nice flavor. You can tell when your cake is done by checking a few signs. First, look for a golden-brown color on top. The edges should pull away from the pan slightly. Insert a toothpick in the center; it should come out clean or with a few crumbs. If it comes out wet, give it a few more minutes in the oven. This blog post has covered how to make a delicious cake from scratch. We discussed the important dry and wet ingredients, unique add-ins, and how to create a tasty maple frosting. Following simple steps, you can bake, frost, and serve a delightful cake. Remember, measure your ingredients well and enjoy the process. Try variations like adding spices or nuts to make it your own. With proper storage, your cake will stay fresh for days. Enjoy sharing your homemade treat with friends and family!](https://therecipehatch.com/wp-content/uploads/2025/08/8e0ba9d4-0864-474f-b647-0c7c255705c0.webp)
Spice Cake Bundt with Maple Frosting Delightful Recipe
Are you ready to indulge in a delicious Spice Cake Bundt with Maple Frosting? This recipe combines warm spices with a sweet maple touch that
![- 2 cups all-purpose flour - 1 teaspoon baking powder - 1/2 teaspoon baking soda - 1/2 teaspoon salt - 1 teaspoon ground cinnamon - 1/2 cup granulated sugar - 1/4 cup brown sugar, packed - 1/2 cup unsalted butter, softened - 1 cup unsweetened applesauce - 1 1/2 cups peeled, diced apples (about 2 medium apples) - 1/2 cup chopped pecans - 1/2 cup chopped pecans - 1/4 cup brown sugar, packed - 1/2 teaspoon ground cinnamon - 2 tablespoons unsalted butter, melted When I make this Apple Bread with Cinnamon Pecan Crunch, I focus on quality ingredients. The all-purpose flour gives the bread its nice structure. Baking powder and baking soda help it rise well, making it fluffy. I use both granulated sugar and brown sugar for a sweet touch and rich flavor. For flavor, I love adding diced apples and chopped pecans. They bring texture and taste. Applesauce keeps the bread moist, which is key for a great loaf. The topping is a star feature. I mix more chopped pecans, brown sugar, and cinnamon for crunch. The melted butter helps it stick together. You can even add chocolate chips or dried fruit if you want to play with flavors. Finding the right mix is important. Each ingredient plays a role in making this bread delightful. For the full recipe, check [Full Recipe]. - Preheat the oven: Start by preheating your oven to 350°F (175°C). This step is key for even baking. Grease a 9x5-inch loaf pan or line it with parchment paper. This makes for easy removal later. - Mix dry ingredients: In a medium bowl, whisk together 2 cups of all-purpose flour, 1 teaspoon of baking powder, 1/2 teaspoon of baking soda, 1/2 teaspoon of salt, and 1 teaspoon of ground cinnamon. Set this bowl aside for now. - Creaming butter and sugars: In a large bowl, beat together 1/2 cup of softened butter, 1/2 cup of granulated sugar, and 1/4 cup of brown sugar. Use an electric mixer and beat until the mixture is light and fluffy. This creates a great base for your bread. - Adding eggs and vanilla: Next, add 2 large eggs one at a time. Mix well after each egg. Then, blend in 1 teaspoon of vanilla extract. This adds wonderful flavor to your bread. - Mixing dry and wet ingredients: Gradually add the dry ingredient mixture to the wet mixture. Stir until just combined. Be careful not to overmix; this keeps the bread light and fluffy. - Incorporating apples and pecans: Gently fold in 1 1/2 cups of peeled, diced apples and 1/2 cup of chopped pecans. This adds texture and flavor to the bread. - Pouring batter and prepping the topping: Pour the batter into your prepared loaf pan. In a small bowl, mix 1/2 cup of chopped pecans, 1/4 cup of brown sugar, and 1/2 teaspoon of ground cinnamon. Drizzle in 2 tablespoons of melted butter and mix well. Sprinkle this topping over the batter. - Baking time and checking doneness: Bake in your preheated oven for 55-65 minutes. Check doneness by inserting a toothpick into the center. If it comes out clean, your bread is ready. The top should look golden brown and crunchy. For the complete recipe, check the [Full Recipe]. To get the best texture, avoid overmixing your batter. When you combine the wet and dry ingredients, stir gently. Mix just until you see no flour. Overmixing leads to a dense bread, which isn't what you want. Cooling is also key. Let the bread cool in the pan for about 10 minutes. Then, transfer it to a wire rack. This helps it firm up and keeps the crust nice. You can boost flavors with spices. Besides cinnamon, try adding nutmeg or allspice. These spices add warmth and depth. You can also use extracts like almond or maple for a twist. Choosing the right apples matters, too. I recommend using tart apples like Granny Smith. They add a nice contrast to the sweetness of the bread. You can also mix different apples for more flavor. If you don’t have a loaf pan, you have options. You can use a round cake pan or even a muffin tin. Just remember to adjust your baking time. For smaller pans, reduce the bake time. Check for doneness by inserting a toothpick. If it comes out clean, your bread is ready. This way, you can enjoy your apple bread in many forms! For the complete recipe, check out the Full Recipe. {{image_2}} You can make this apple bread even more special. Adding dried fruits or nuts brings new flavors. Try raisins or cranberries for a sweet twist. You can also mix in walnuts or almonds for extra crunch. If you like spices, consider adding nutmeg or allspice. These spices pair well with apples. They add warmth and depth to the bread. Don't be afraid to experiment! Each new flavor can create a unique treat. Some people have dietary needs. This recipe can fit those needs easily. For a gluten-free option, use a gluten-free flour blend. Make sure it includes xanthan gum for the best texture. You can also adapt this recipe for vegans. Replace eggs with mashed bananas or flaxseed meal. Use plant-based butter instead of regular butter. These simple swaps keep the bread tasty and fluffy. Pair your apple bread with delicious spreads. Cream cheese or butter works well. You can also try honey or maple syrup for a sweet touch. These spreads enhance the flavor and add creaminess. Consider how you serve your apple bread. It’s great for breakfast or as a snack. For special occasions, slice it and arrange it on a wooden board. Add a sprinkle of cinnamon on top for a lovely look. This makes it perfect for gatherings or brunch. For the full recipe, check out the [Full Recipe]. To keep your apple bread fresh, store it in the fridge. Wrap it tightly in plastic wrap or foil to prevent it from drying out. You can also place it in an airtight container. This way, the bread stays moist for about a week. If you want to save some for later, freezing is a great option. Slice the bread first. Then, wrap each slice in plastic wrap. Place the wrapped slices in a freezer bag. You can freeze apple bread for up to three months without losing flavor. When it's time to enjoy leftovers, reheating is simple. The best method is to use the oven. Preheat it to 350°F (175°C). Place the bread on a baking sheet and heat for about 10 minutes. This method helps keep the crust crunchy. If you are in a hurry, you can use the microwave. Heat individual slices for about 20-30 seconds. Keep an eye on it to avoid making the bread too soft. For the best taste, eat the apple bread within one week when stored in the fridge. If kept at room temperature, consume it within three days. Signs of spoilage include a dry texture, an off smell, or visible mold. If you notice any of these signs, it's best to discard it. For frozen bread, the quality remains good for three months. After this, the flavor may fade, but it is still safe to eat. To stop your apple bread from sinking, avoid overmixing the batter. Overmixing adds too much air, which can cause the bread to rise and then fall. Make sure to fold in the apples and pecans gently. Also, check your oven temperature with a thermometer. An oven that's too cool can lead to sinking bread. Yes, you can use other fruits! Bananas, pears, or even berries work well. Just make sure the fruits are ripe and chopped into small pieces. Adjust the sugar if your chosen fruit is sweeter or more tart than apples. To check if your bread is done, stick a toothpick into the center. If it comes out clean or with a few crumbs, it’s ready. The top should be golden brown. If the toothpick has wet batter, bake for a few more minutes. Absolutely! To make mini loaves, divide the batter into smaller pans. Bake them for about 25 to 30 minutes. Keep an eye on them since they’ll bake faster than a large loaf. Check with a toothpick to see if they’re done. This post covered all the essential steps for making delicious apple bread. We explored ingredients like apples, pecans, and spices. I shared tips for perfecting texture and flavor. You can even make variations to meet your needs. Remember, storing leftovers correctly keeps your bread fresh longer. With the right methods, you can enjoy this treat for days. Now you have all the tools to bake an amazing loaf. Get started, and enjoy your homemade apple bread!](https://therecipehatch.com/wp-content/uploads/2025/08/449cff70-5b63-4076-8396-1b8383bacad1.webp)
Apple Bread with Cinnamon Pecan Crunch Delight
Are you ready to bake a delightful treat that warms the heart? My Apple Bread with Cinnamon Pecan Crunch is a must-try! This recipe combines
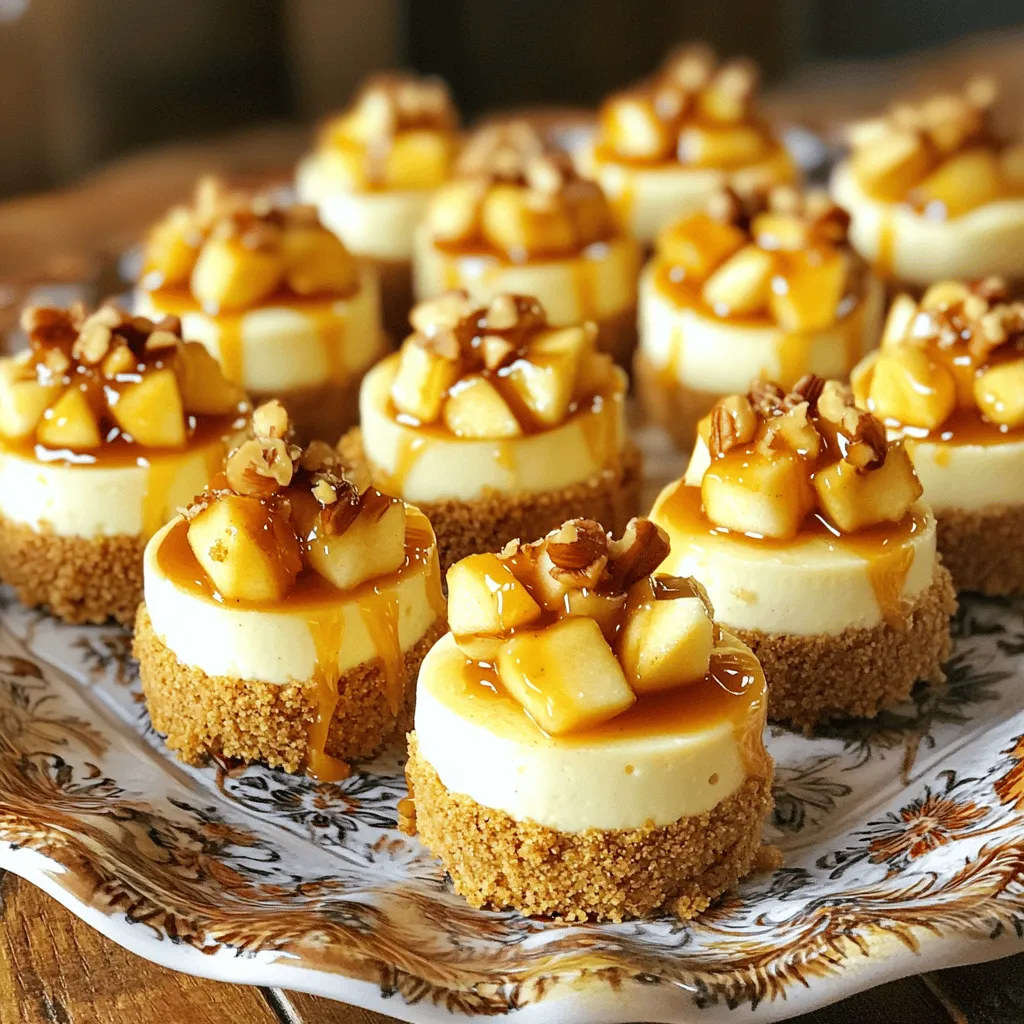
Mini Caramel Apple Cheesecake Bites Delightful and Easy
If you’re craving a sweet treat that’s both fun and easy to make, you’ve hit the jackpot! These Mini Caramel Apple Cheesecake Bites pack all
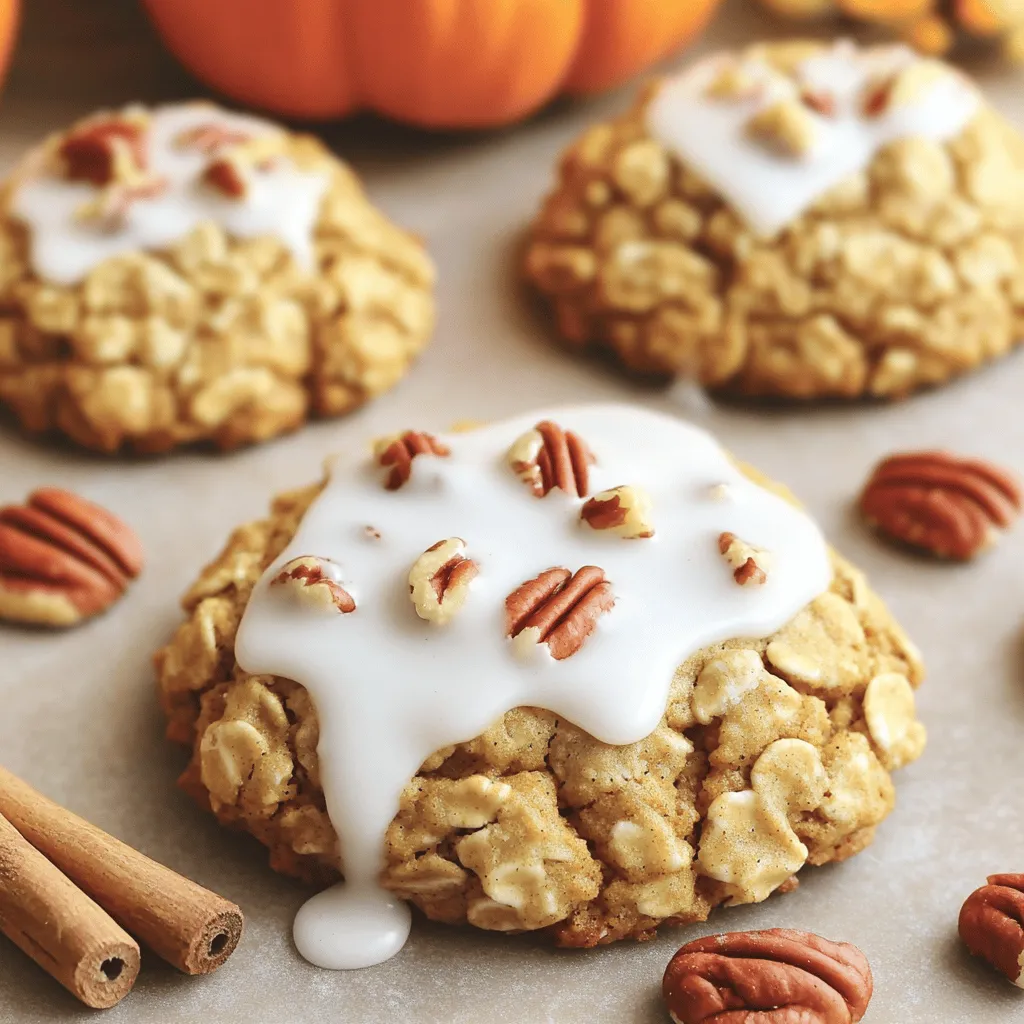
Iced Pumpkin Oatmeal Cookies Delightful Fall Treat
Fall is here, and what better way to celebrate than with Iced Pumpkin Oatmeal Cookies? These cookies blend rich pumpkin flavor with wholesome oats, creating
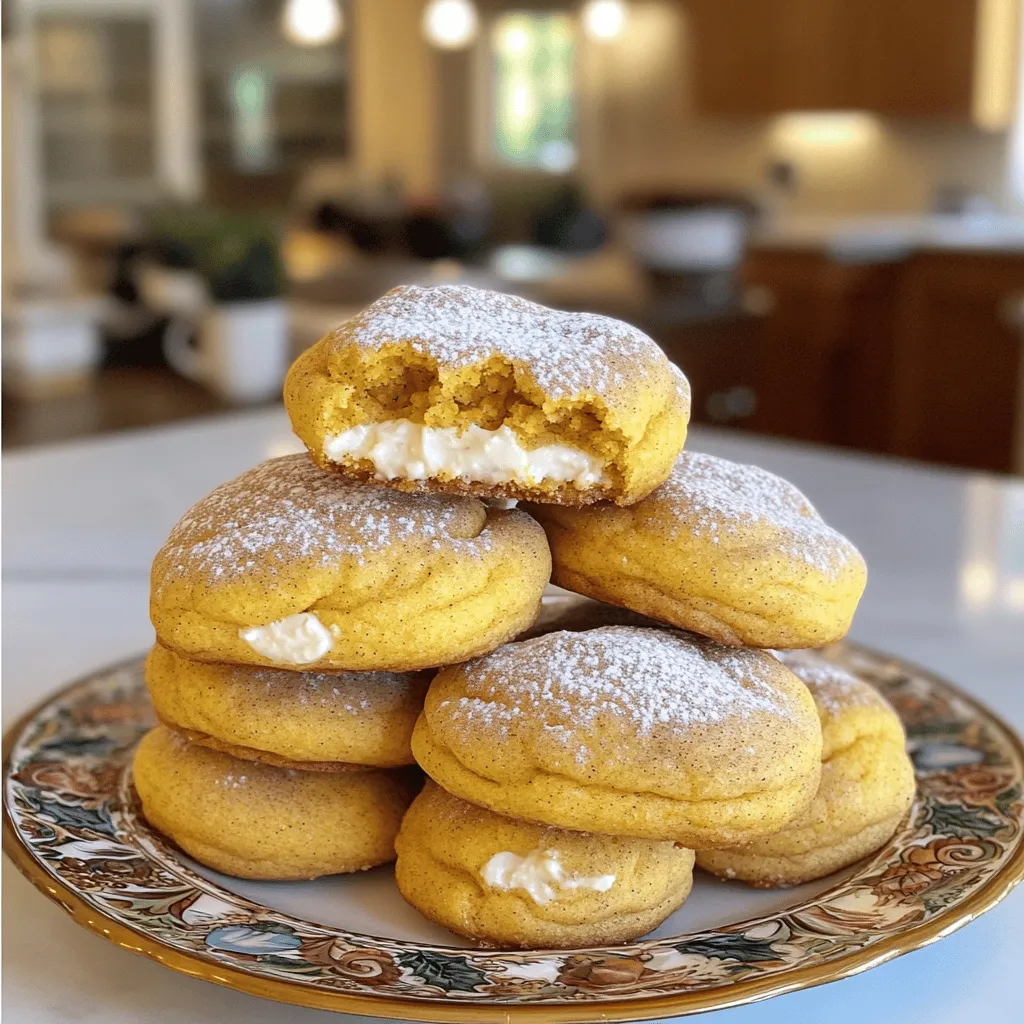
Pumpkin Cheesecake Snickerdoodles Delightful Treats
Welcome to the world of Pumpkin Cheesecake Snickerdoodles—where classic cookies meet cozy fall flavors! If you love the sweet and spiced taste of autumn, these
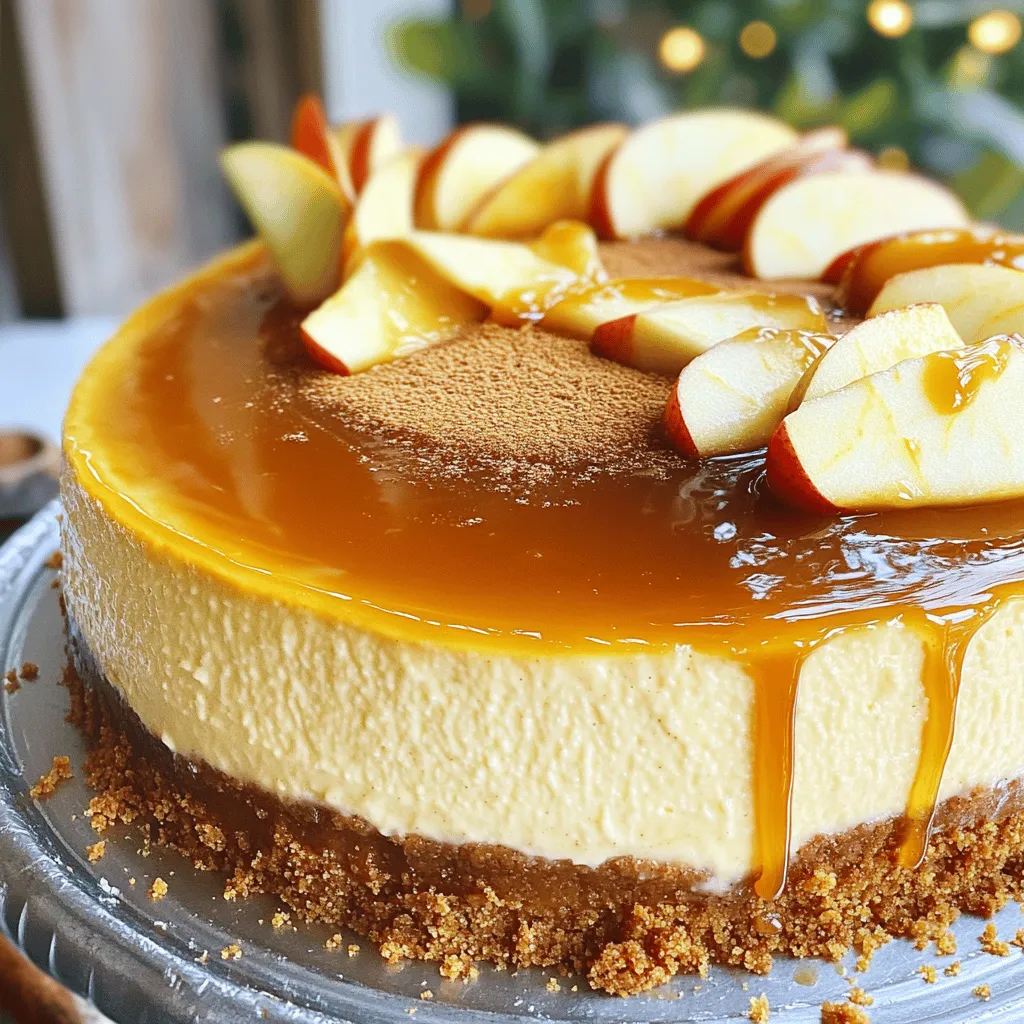
Apple Butter Cheesecake is a Tasty Holiday Hit
Are you looking for a show-stopping dessert this holiday season? This Apple Butter Cheesecake is your answer! With its creamy texture and warm spices, this
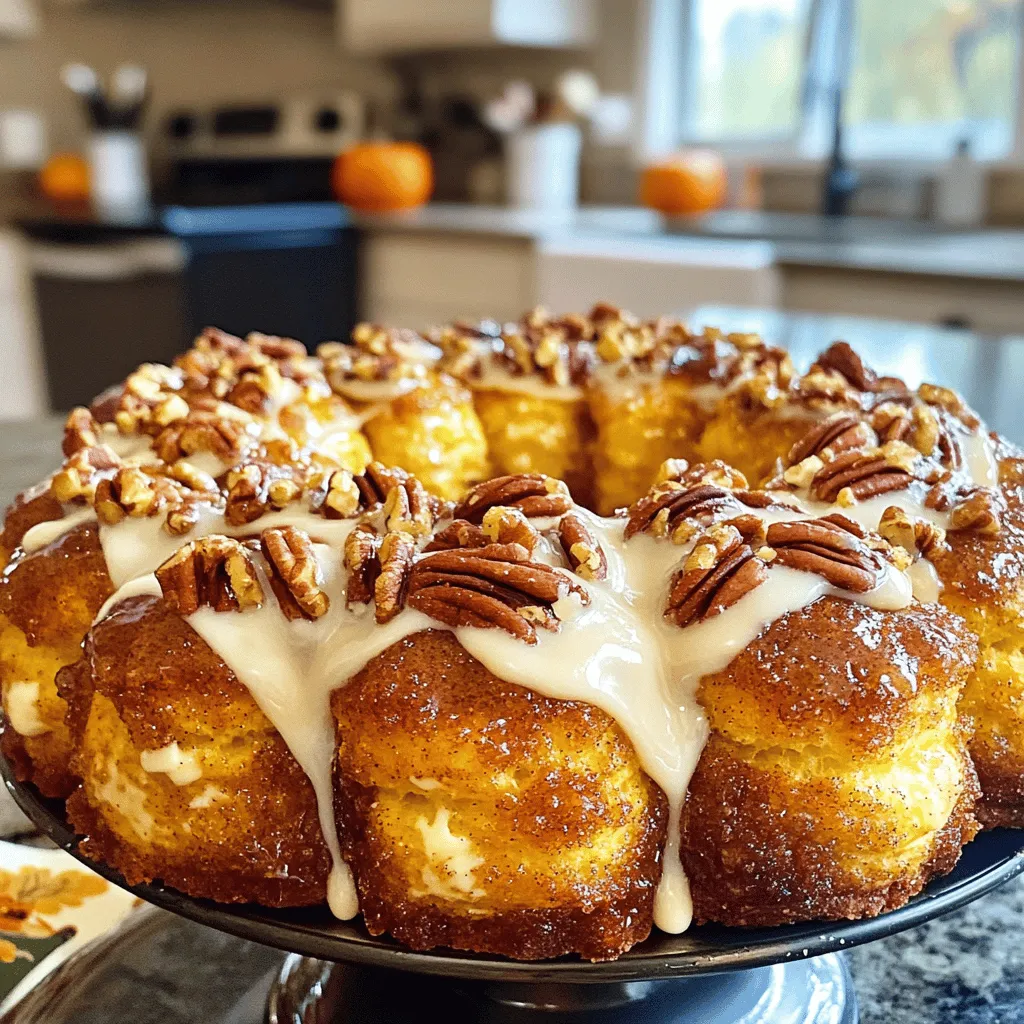
Pumpkin Spice Monkey Bread Recipe Easy and Tasty
Get ready to delight your taste buds with my easy and tasty Pumpkin Spice Monkey Bread Recipe! This scrumptious treat combines warm donuts of biscuit

Sweet Churro Donut Bites Perfectly Fried Treats
Ready for a sweet treat that’s easy and fun to make? You’ll love these Sweet Churro Donut Bites! Crispy on the outside and soft on
![To make the best blueberry muffins, you need a few simple ingredients. Here’s the full list: - 2 cups all-purpose flour - 1 cup granulated sugar - 1 tablespoon baking powder - 1/2 teaspoon baking soda - 1/2 teaspoon salt - 1/2 cup unsalted butter, melted - 2 large eggs - 1 teaspoon vanilla extract - 1 cup buttermilk (or milk + 1 tablespoon vinegar) - 2 cups fresh blueberries (or frozen, but thawed and drained) - Zest of 1 lemon (optional for flavor enhancement) These ingredients come together to create a soft and fluffy muffin bursting with blueberry flavor. If you need alternatives, don’t worry! Here are some options: - Dairy-Free: Use almond milk or oat milk instead of buttermilk. You can also swap butter for coconut oil. - Gluten-Free: Replace all-purpose flour with a gluten-free blend. Make sure it contains xanthan gum. - Lower Sugar: Reduce sugar to 3/4 cup or use a sugar substitute that measures cup-for-cup. These swaps can help you enjoy these muffins even if you have dietary needs. Fresh blueberries taste great. They have a juicy pop that adds a nice texture. However, frozen blueberries are also a good choice. They are often picked at peak ripeness and can be more affordable. When using frozen blueberries, remember to thaw and drain them first. This step helps keep the batter from turning purple. Both types work well, so choose what you have on hand! To make the best blueberry muffins, start with the ingredients. Gather your supplies and preheat your oven to 375°F (190°C). Line a 12-cup muffin tin with paper liners or grease it lightly. Next, mix your dry ingredients. In a large bowl, sift together 2 cups of all-purpose flour, 1 cup of granulated sugar, 1 tablespoon of baking powder, 1/2 teaspoon of baking soda, and 1/2 teaspoon of salt. This step helps to aerate the flour and mix the leavening agents evenly. Now, mix your wet ingredients. In another bowl, whisk together 1/2 cup of melted unsalted butter, 2 large eggs, 1 teaspoon of vanilla extract, and 1 cup of buttermilk. Make sure everything is well combined. Pour this mix into the dry ingredients. Use a spatula to gently fold them together. Be careful! Overmixing can make your muffins tough. A few flour pockets are okay. Add in the blueberries and optional lemon zest. Fold them in gently to keep the berries whole. Once mixed, scoop the batter into the muffin tin. Fill each cup about 2/3 full. Bake for 18-20 minutes. The muffins are done when a toothpick inserted in the center comes out clean. The tops should look golden brown. Let the muffins cool for 5 minutes in the pan. Then, move them to a wire rack to cool completely. - Prep Time: 15 minutes - Cooking Time: 18-20 minutes - Total Time: 35-40 minutes - Servings: This recipe makes 12 muffins. A visual guide helps you follow along. Look for images showing each step. This can include pictures of mixing the batter, filling the muffin cups, and the final baked muffins. Watching a video of the process can also guide you. It’s fun to see how the muffins rise and turn golden! Muffin baking can be tricky. Here are some mistakes to avoid: - Overmixing the batter: Mix just until wet. Small flour pockets are fine. - Not preheating the oven: Always preheat your oven. This helps muffins rise well. - Using old baking powder: Check the date. Fresh baking powder is key for fluff. Fluffiness is vital for great muffins. Here are my top tips: - Use room temperature ingredients: Eggs and buttermilk mix better when they’re warm. - Fold, don’t stir: Gently fold in dry and wet ingredients to keep air in the batter. - Add a splash of vinegar: A bit of vinegar with baking soda can boost fluffiness. Mixing well is crucial for tasty muffins. Follow these steps: - Sift dry ingredients: This adds air, making muffins light. - Combine wet and dry separately: Whisk wet and dry in separate bowls first. - Use a spatula: A spatula helps you fold gently without breaking blueberries. For more details, check the Full Recipe. {{image_2}} You can make blueberry muffins even better with a few tweaks. Adding lemon zest brightens the flavor. It gives a fresh and zesty kick. You can also try spices like cinnamon or nutmeg. These spices add warmth and depth to your muffins. Just a pinch can change everything! Want to mix things up? You can add more than just blueberries. Nuts like walnuts or pecans give a nice crunch. Chocolate chips are a fun choice, too. They melt and make the muffins extra sweet. You could even try coconut flakes for a tropical twist. The options are endless! You can change the recipe to fit your health goals. Use whole wheat flour instead of all-purpose flour. This adds fiber and nutrients. You can also lower the sugar by using a natural sweetener like honey or maple syrup. If you want to cut calories, try using applesauce instead of butter. These small changes keep the muffins tasty while making them healthier. For the full recipe, check here: [Full Recipe]. Once your blueberry muffins cool, store them in an airtight container. This keeps them fresh. Place parchment paper between layers to avoid sticking. You can also use a zip-top bag. Make sure to squeeze out as much air as possible. This method keeps your muffins soft and moist. Freezing is great for long-term storage. Muffins can last up to three months in the freezer. Wrap each muffin in plastic wrap, then place them in a freezer bag. This prevents freezer burn. Refrigerating muffins is okay but can dry them out. They last about one week in the fridge. If you want freshness, freezing is the best choice. To reheat muffins, use your oven for the best results. Preheat it to 350°F (175°C). Place muffins on a baking sheet for about 5-10 minutes. This brings back their warm, soft texture. If you’re in a hurry, use the microwave. Heat them for 15-20 seconds. Just be careful not to overheat, or they can become tough. Enjoy them warm for the best flavor! The best blueberry muffins are moist and fluffy. They have a perfect balance of sweetness and tartness. The secret lies in using fresh blueberries and good quality ingredients. Mixing wet and dry ingredients separately helps. This gives you a light texture. Adding lemon zest enhances the flavor. It adds a bright note that pairs well with blueberries. Yes, you can use other berries! Raspberries, blackberries, or strawberries work well. Just remember to adjust the amount slightly. Each berry has its own tartness and sweetness. Mixing different berries can give a fun twist to your muffins. Be sure to chop larger berries into smaller pieces for even baking. Check for a golden brown top. Insert a toothpick into the center. If it comes out clean, they are done. The muffins should spring back when lightly touched. If the toothpick has batter on it, bake for a few more minutes. Keep an eye on them to avoid overbaking. Each muffin has roughly 200 calories. They contain about 8 grams of fat. You will find around 30 grams of carbs and 3 grams of protein. The muffins also provide fiber, thanks to the blueberries. For exact numbers, it’s best to calculate based on the specific brands you use. In this article, we explored how to make the best blueberry muffins. We covered the key ingredients, baking steps, and useful tips to avoid common mistakes. You learned about storage options, healthy variations, and answers to frequently asked questions. Enjoy making these muffins with fresh or frozen berries. With the right approach, your muffins will be fluffy and delicious every time. Embrace your creativity and share your muffin masterpieces with others!](https://therecipehatch.com/wp-content/uploads/2025/07/5e21f498-af98-4649-bb50-dbc98ec91b7f.webp)
Best Blueberry Muffins Easy and Flavorful Recipe
If you’re craving a delicious treat that’s easy to make, this blueberry muffin recipe is for you! Here, I’ll share my best tips and tricks
![To make small batch pumpkin cinnamon rolls, you need fresh and simple ingredients. Here’s the list to get you started: - 1 cup all-purpose flour - 1/4 cup canned pumpkin puree - 1/4 cup milk - 2 tablespoons sugar - 1 tablespoon unsalted butter, melted - 1/2 teaspoon baking powder - 1/4 teaspoon baking soda - 1/4 teaspoon salt - 1 teaspoon ground cinnamon - 1/4 teaspoon nutmeg - 1 tablespoon brown sugar (for filling) - 1 tablespoon unsalted butter, softened (for filling) - 1/2 cup powdered sugar (for frosting) - 1 tablespoon milk (for frosting) - 1/2 teaspoon vanilla extract (for frosting) Using these ingredients, you can create warm, soft rolls that are perfect for any time. The pumpkin gives a nice flavor and moistness. Plus, the spices add warmth. This recipe is great for a cozy morning or a sweet treat. For the full recipe, check out the details above. 1. Mixing dry ingredients: Start by taking a mixing bowl. Add 1 cup of all-purpose flour, 1/2 teaspoon baking powder, 1/4 teaspoon baking soda, 1/4 teaspoon salt, 1 teaspoon ground cinnamon, and 1/4 teaspoon nutmeg. Whisk these ingredients together until they blend well. This mix adds flavor and structure to your rolls. 2. Combining wet ingredients: In another bowl, mix 1/4 cup of canned pumpkin puree, 1/4 cup milk, 2 tablespoons sugar, and 1 tablespoon melted unsalted butter. Stir until this mixture is smooth. The pumpkin gives moisture and richness. 3. Forming the dough: Gradually add the dry mix to the wet mix. Stir until a dough forms. If it's too sticky, add a little more flour. Once mixed, transfer it to a floured surface. Knead gently until smooth. This step brings everything together. 1. Rolling out the dough: Roll the dough into a rectangle about 1/4 inch thick. Make sure to keep the shape even. This helps your rolls cook evenly and look nice. 2. Spreading butter and sugar mixture: Take 1 tablespoon softened unsalted butter. Spread it evenly over the dough. Then sprinkle 1 tablespoon brown sugar and a little extra cinnamon on top. This mixture will create that sweet filling. 1. Slicing the dough: Starting from one edge, tightly roll the dough into a log shape. Pinch the seam to seal it. Then, slice the rolled dough into 4-6 equal pieces. Place these in a greased small baking dish. 2. Baking the rolls: Preheat the oven to 350°F (175°C). Bake the rolls for 15-18 minutes, or until they turn lightly golden brown. Keep an eye on them; you want a nice color. 3. Making the frosting: While the rolls bake, whisk together 1/2 cup powdered sugar, 1 tablespoon milk, and 1/2 teaspoon vanilla extract in a bowl. Mix until smooth. This sweet topping adds the perfect finish. These steps make the small batch pumpkin cinnamon rolls fresh and soft. For more detailed instructions, check out the Full Recipe. To make great pumpkin cinnamon rolls, dough consistency is key. You want your dough to be soft but not sticky. If your dough feels too wet, add a little more flour. When rolling the dough, keep it even. Dust your surface with flour to prevent sticking. Roll from one edge to the other, using gentle pressure. This helps keep the filling inside. These rolls taste great on their own. You can also serve them with cream cheese or maple syrup. A sprinkle of nuts adds a nice crunch. Pair them with a warm drink like apple cider or coffee for a cozy treat. Using the right tools helps make the process easy. A rolling pin is essential for flattening the dough. A sharp knife or dental floss works well for slicing the rolls. A small baking dish keeps the rolls snug as they rise and bake. For the frosting, a whisk is perfect for achieving a smooth texture. For the complete recipe, check the Full Recipe. {{image_2}} You can easily change the flavors of your pumpkin cinnamon rolls. Here are a few fun ideas: - Adding nuts or raisins: Chopped nuts like pecans or walnuts add a nice crunch. If you prefer a sweet touch, toss in some raisins. Simply sprinkle them on the filling before you roll the dough. - Using different spices: While cinnamon and nutmeg are classic choices, you can try other spices. Ginger or allspice can give your rolls a warm twist. Mix and match to find your favorite blend! Want to make these rolls gluten-free? It’s simple! Just swap the all-purpose flour for a gluten-free flour blend. Make sure to choose one that works well for baking. This change keeps the rolls soft and tasty without gluten. If you’re looking for a vegan option, you can easily modify this recipe. - Dairy-free alternatives for ingredients: Use almond milk or soy milk instead of regular milk. For the butter, try coconut oil or a vegan butter substitute. The rolls will still taste great! These variations make your small batch pumpkin cinnamon rolls even more exciting. Enjoy experimenting with flavors that you love! For the complete recipe, check out the [Full Recipe]. To keep your small batch pumpkin cinnamon rolls fresh, you have a few options. First, let them cool completely before storing. You can place them in an airtight container. This will help them stay soft. If you want to keep them for longer, try freezing them. Wrap each roll tightly in plastic wrap. Then, place them in a freezer bag. This keeps out air and helps prevent freezer burn. When you're ready to eat, just thaw them in the fridge overnight. Warming up your cinnamon rolls is easy and quick. You can use a microwave for fast results. Just place one roll on a plate and heat it for about 15-20 seconds. If you prefer a crispy texture, use an oven. Preheat it to 350°F (175°C). Place the rolls on a baking sheet and heat them for about 5-10 minutes. This way, they will be warm and soft. These delightful rolls stay fresh for about 2-3 days at room temperature. If you store them in the fridge, they can last up to a week. However, for the best taste, enjoy them within the first few days. If you freeze them, they can last for up to 3 months. Just remember to check for any signs of freezer burn before eating. Don't forget to check the [Full Recipe] for more details! What can I substitute for pumpkin puree? If you don't have pumpkin puree, you can use mashed sweet potato. You can also use butternut squash puree. Both options give a similar taste and texture. Can I make the dough in advance? Yes, you can make the dough ahead of time. Wrap it tightly in plastic wrap and store it in the fridge. Use it within 24 hours for the best results. How do I know when the rolls are done? The rolls are done when they are lightly golden brown. A toothpick inserted into the center should come out clean. Can I use a different frosting? Absolutely! You can use cream cheese frosting for a richer taste. A simple glaze of milk and powdered sugar works well too. What drinks pair well with cinnamon rolls? Cinnamon rolls pair great with coffee or chai tea. You can also enjoy them with warm apple cider for a cozy treat. Why did my rolls not rise? If the rolls did not rise, your yeast might be old. Always check the expiration date. Make sure your dough is in a warm place to rise. What can I do if the dough is too sticky? If the dough is too sticky, add a little more flour, one tablespoon at a time. Knead it gently until it feels smooth and manageable. Making pumpkin cinnamon rolls is both fun and rewarding. We covered the key ingredients, from flour to spices. I shared step-by-step instructions to guide you through mixing, rolling, and baking. Helpful tips enhanced your baking skills, while variations let you customize your rolls. Remember to store them right to enjoy for days. Whether you want to tweak flavors or substitute ingredients, there are options for everyone. Dive into this treat and enjoy the delicious results you've created. Delicious rolls are just a bake away!](https://therecipehatch.com/wp-content/uploads/2025/07/bdf25746-fc3a-49db-8d43-dca916243040.webp)
Small Batch Pumpkin Cinnamon Rolls Fresh and Soft
Get ready to indulge in the cozy flavors of fall with these Small Batch Pumpkin Cinnamon Rolls! I’ll guide you through easy steps to create