Desserts

To make these mini pumpkin cream cheese muffins, gather the following ingredients: - 1 cup pumpkin puree - 1 cup all-purpose flour - 1/2 cup brown sugar - 1/4 cup granulated sugar - 1/2 cup vegetable oil - 2 large eggs - 1 teaspoon baking soda - 1/2 teaspoon baking powder - 1 teaspoon pumpkin pie spice - 1/2 teaspoon cinnamon - 1/4 teaspoon salt - 4 oz cream cheese, softened - 1 tablespoon maple syrup - 1 teaspoon vanilla extract Each ingredient plays a key role. The pumpkin puree gives moisture and flavor. The sugars add sweetness and depth. The oils keep the muffins soft. Each spice brings warmth, while the cream cheese adds a delightful surprise. You can find these items at any grocery store. Make sure your cream cheese is soft for easy mixing. First, set your oven to 350°F (175°C). While it heats, get your mini muffin tin ready. You can line it with paper liners or grease it lightly. This step helps the muffins come out easily after baking. In a large bowl, add one cup of pumpkin puree, half a cup of vegetable oil, and both sugars. Crack in two large eggs and pour in one teaspoon of vanilla extract. Whisk these together until the mix is smooth and well combined. This mixture gives your muffins their rich flavor and moisture. In another bowl, sift one cup of all-purpose flour with one teaspoon of baking soda, half a teaspoon of baking powder, one teaspoon of pumpkin pie spice, half a teaspoon of cinnamon, and a quarter teaspoon of salt. Mixing dry ingredients separately helps ensure even distribution of spices and leavening agents. In a small bowl, take four ounces of softened cream cheese. Add one tablespoon of maple syrup and a pinch of cinnamon. Mix these until smooth. This will be the sweet surprise inside your muffins. Now it's time to fill your muffin tin. Pour pumpkin batter into each cup until it's halfway full. Next, add a small spoonful of your cream cheese mixture into the center of each cup. Top it off with more pumpkin batter, covering the filling completely. Place the muffin tin in the preheated oven. Bake for 12 to 15 minutes. To check if they are done, insert a toothpick into a muffin. If it comes out clean, they are ready. Let the muffins cool in the tin for about five minutes. Then, move them to a wire rack to cool completely. Enjoy your delicious mini pumpkin cream cheese muffins! Mixing is key, but be careful. Overmixing makes muffins tough. Stir the dry ingredients gently into the wet mix. Stop mixing once you see no dry flour. This keeps the muffins light and fluffy. The cream cheese filling makes these muffins special. Mix cream cheese, maple syrup, and a pinch of cinnamon. Use a small spoon to add the filling. Don’t overfill; just a dollop will do. Cover it with more pumpkin batter before baking. These muffins are great warm or at room temp. Pair with coffee or tea for a cozy treat. You can also serve them with whipped cream on the side. This adds a nice touch of sweetness. To make them look fancy, dust the muffins with powdered sugar. This adds charm and sweetness. Use a colorful plate to show off their bright orange hue. A small dollop of whipped cream on top makes them even more inviting. {{image_2}} You can make these muffins even better by adding nuts or chocolate chips. Walnuts or pecans add a nice crunch. Just fold in about half a cup before you pour the batter into the cups. If you love chocolate, try adding mini chocolate chips. They melt and give a sweet surprise. This way, each bite becomes a little more special. If you want a different flavor, you can swap out the pumpkin pie spice. Use cinnamon and nutmeg for a warm taste. Cardamom or ginger can add a unique kick. Play around with spices to find your favorite mix. Each blend will give your muffins a new twist. You can easily make these muffins gluten-free. Just replace the all-purpose flour with a gluten-free blend. Make sure the blend has xanthan gum for the right texture. For a vegan option, swap eggs with flaxseed meal or applesauce. Use a vegan cream cheese for the filling. Both options keep the muffins tasty and enjoyable for everyone. To keep your mini pumpkin cream cheese muffins fresh, store them in an airtight container. This helps to lock in moisture and flavor. If you plan to eat them within a few days, keep them at room temperature. For longer storage, refrigeration is a good option. Just remember, muffins can dry out in the fridge, so make sure they are sealed well. These muffins freeze well! Place them in a single layer on a baking sheet to freeze. Once frozen, transfer them to a freezer bag. They will keep for up to three months. When you want to enjoy a muffin, take one out and let it thaw at room temperature. For a warm treat, microwave it for about 20 seconds. You can also reheat them in an oven at 350°F for 5-7 minutes. Mini pumpkin cream cheese muffins stay fresh for about 3-4 days at room temperature. If they are in the fridge, they can last up to a week. Check for any signs of mold or off smells before eating. To ensure they stay tasty, avoid leaving them uncovered. Enjoy these delightful muffins while they are fresh for the best taste! Yes, you can use canned pumpkin. It saves time and is very convenient. Canned pumpkin has a smooth texture and great flavor. Just make sure it is pure pumpkin, not pumpkin pie filling. To make these muffins less sweet, reduce the brown sugar and granulated sugar. You can also add unsweetened applesauce for moisture without adding sweetness. Taste your batter before baking to find the right balance. If you want a cream cheese substitute, try Greek yogurt or ricotta cheese. Both give a creamy texture and work well with the spices. You can also use vegan cream cheese if you need a dairy-free option. Check if the muffins are done by inserting a toothpick in the center. If it comes out clean, they are ready. The tops should look golden brown and feel firm to the touch. Yes, you can use a standard muffin tin. Just adjust the baking time. Standard muffins take about 18 to 20 minutes to bake. Keep an eye on them to avoid overbaking. These pumpkin muffins are easy to make and taste great. We covered all the steps, from mixing your ingredients to baking them perfectly. With tips for texture and serving ideas, you'll impress your family or friends. Experiment with nuts or chocolate chips to make them your own. Storing and reheating are simple, so enjoy them fresh or later. Whether you want a sweet treat or a warm snack, these muffins shine every time. Enjoy the process and the delicious result!
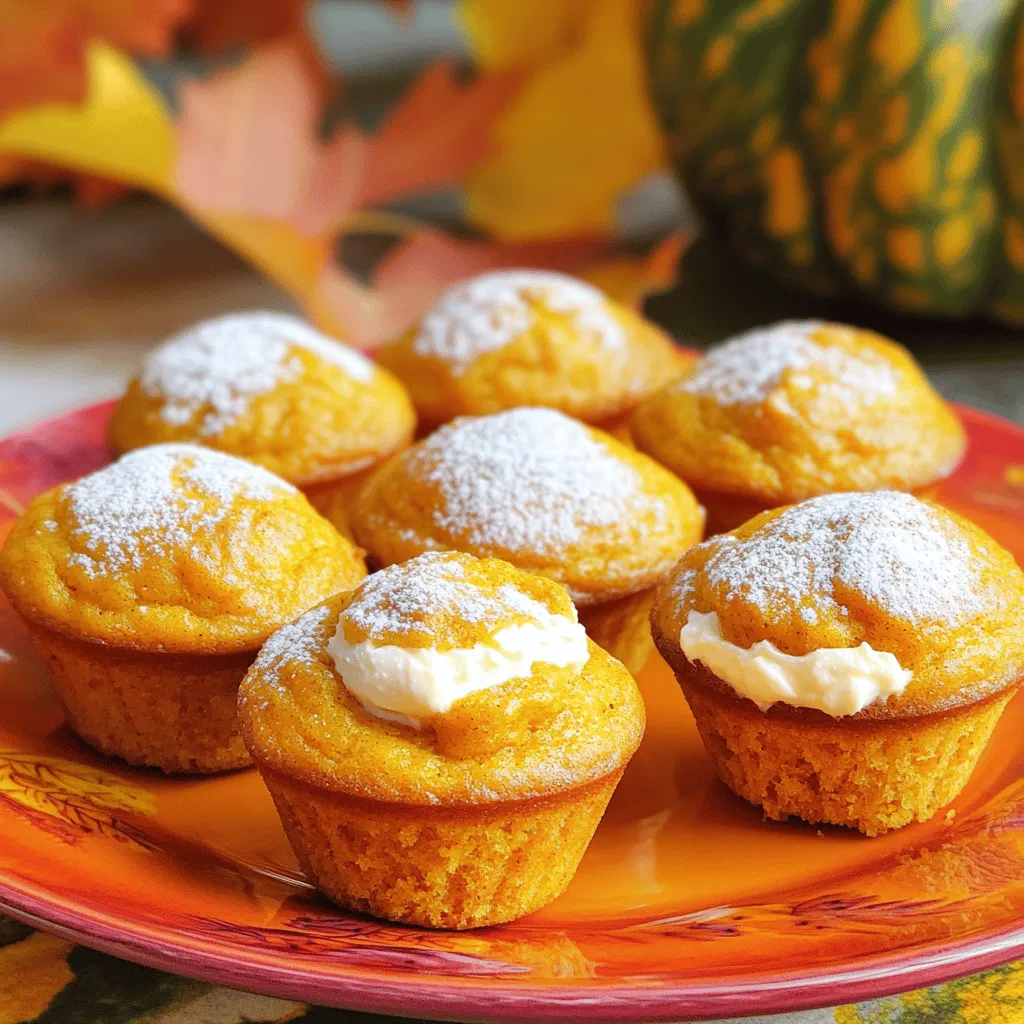
Mini Pumpkin Cream Cheese Muffins Easy and Tasty Treat
Pumpkin lovers, rejoice! These Mini Pumpkin Cream Cheese Muffins are your new fall favorite. Soft, moist, and filled with creamy goodness, they bring warmth and
To make a delicious Tiramisu Latte, gather these key ingredients: - 1 cup brewed espresso or strong coffee - 1 cup milk (any kind: whole, almond, oat, etc.) - 2 tablespoons mascarpone cheese - 1 tablespoon sugar (adjust to taste) - 1 teaspoon vanilla extract - 1 tablespoon cocoa powder (for dusting) These ingredients create a rich and creamy drink that feels like dessert. The espresso gives a strong coffee flavor. The milk adds creaminess, and mascarpone cheese brings a smooth texture. You can make your Tiramisu Latte special with these fun garnishes: - Chocolate shavings - Coffee beans Both add a nice touch to your drink. You can also try adding a sprinkle of cinnamon or nutmeg for a warm spice flavor. If you have dietary needs, don't worry! You can swap out some ingredients: - Use dairy-free milk like almond or oat for a vegan option. - Replace sugar with a sweetener like honey or agave. - Use a non-dairy mascarpone or cream cheese for a dairy-free version. These swaps keep the flavor while fitting your needs. Enjoy crafting a Tiramisu Latte that works for you! To start, brew one cup of espresso or strong coffee. You can use any method you like. A French press or Moka pot works well. If you prefer, use a coffee maker. The key is to make it strong. This gives your Tiramisu Latte its rich flavor. Once brewed, set your coffee aside and let it cool slightly. Next, grab a small saucepan. Pour in one cup of milk. You can use whole milk, almond, or oat milk. Heat the milk over medium heat. Stir it constantly to prevent it from boiling. When the milk gets warm, take it off the heat. Now, add two tablespoons of mascarpone cheese, one tablespoon of sugar, and one teaspoon of vanilla extract. Whisk everything together until it is smooth and creamy. This mixture adds the dessert touch to your coffee. Now, it’s time to put it all together. Pour the brewed espresso into a large mug or glass. Slowly, pour the creamy milk mixture over the espresso. Watch how they blend beautifully. If you wish, use a frother or a whisk to create some foam on top. Dust the drink with cocoa powder for a lovely finish. You can also add chocolate shavings or a few coffee beans for extra flair. Serve your Tiramisu Latte right away and enjoy every sip! Frothing milk can seem tricky, but it's fun to master. Here are my best tips: - Choose the right milk. Whole milk froths well, but almond or oat milk works too. - Heat milk gently. Warm it on medium heat. Avoid boiling, as it can ruin the texture. - Use a frother or whisk. A frother gives a nice, airy foam. If you don’t have one, a whisk works too! Just whisk fast until you see bubbles. - Froth the milk last. Make your milk foam right before serving. This keeps it fresh and fluffy. A Tiramisu Latte needs a perfect mix of flavors. Here’s how to get it right: - Start with strong coffee. Use a good espresso or strong coffee. This sets the base flavor. - Mix milk and mascarpone. This adds creaminess and richness. Stir well to blend. - Adjust sweetness. Add sugar little by little. Taste it until it’s sweet enough for you. - Add vanilla extract. This brings warmth to the drink. Use one teaspoon for a lovely flavor boost. Serving your Tiramisu Latte well makes it feel special. Here’s what I suggest: - Use a nice glass or mug. A clear glass shows off the layers. It looks great! - Garnish with cocoa powder. Dust some cocoa on top for a classic touch. You can also add chocolate shavings or coffee beans. - Serve immediately. Enjoy it fresh, while it’s warm and creamy. Pair it with a small dessert for extra delight! {{image_2}} To make a vegan version of the Tiramisu latte, swap the milk and mascarpone cheese. Use almond, soy, or oat milk instead. For the creamy texture, try using coconut cream or a vegan cream cheese. The flavors stay rich and delicious. Follow the main steps, but mix in your vegan choices. You’ll still get that sweet and coffee taste you love. Want a cool twist? Make an iced Tiramisu latte. Start with brewed espresso, but let it chill first. Use cold milk instead of warm. Mix the chilled espresso with milk, mascarpone, sugar, and vanilla. Pour it over ice. Dust with cocoa powder and add your favorite garnish. This drink is perfect for hot days. You can change up the flavors too! Add a splash of hazelnut syrup for a nutty touch. For a mocha kick, add a spoonful of chocolate syrup. You can even blend in some cinnamon for warmth. These simple changes bring new life to your Tiramisu latte while keeping it fun and tasty. If you have some Tiramisu Latte left over, don’t worry! You can store it in the fridge. Pour the latte into a sealed container. It will keep fresh for up to two days. Make sure to stir it before drinking again. The flavors blend better that way. You can save time by prepping ingredients ahead of time. Brew your espresso or strong coffee and let it cool. You can also mix the milk, mascarpone cheese, sugar, and vanilla in a bowl. Store this mixture in the fridge for quick use later. Just remember to whisk it again before using to make it creamy. To keep your Tiramisu Latte fresh, avoid adding cocoa powder until you’re ready to serve. Dusting it early can make it soggy. If you want to add chocolate shavings or coffee beans, do this just before serving. This way, your latte stays looking and tasting great! Tiramisu latte is a delicious drink that combines coffee and dessert flavors. It uses espresso and creamy milk. You mix in mascarpone cheese for richness. This drink is sweet and smooth, perfect for coffee lovers. The cocoa powder on top adds a nice touch. Yes, you can use instant coffee. Just make sure it's strong. Instant coffee won’t taste exactly the same as espresso. However, it can still create a tasty drink. Mix it with hot water to get the right strength. You may want to add a bit more sugar for sweetness. Tiramisu latte offers some health benefits. Espresso has caffeine, which can boost energy. The milk adds protein and calcium, good for bones. Mascarpone cheese provides some fats but also adds flavor. Just remember to enjoy it in moderation, as it contains sugar and calories. In this post, we explored the tasty world of Tiramisu Latte. We covered what ingredients you need, including key flavors and optional add-ons. I explained how to make it step-by-step, from brewing coffee to frothing milk. You learned tips for great flavor balance and fun serving ideas. We even touched on delicious variations, like vegan options and iced recipes. Finally, I shared how to store leftovers and answered common questions. Try making this drink at home; it’s a sweet treat that anyone can enjoy!
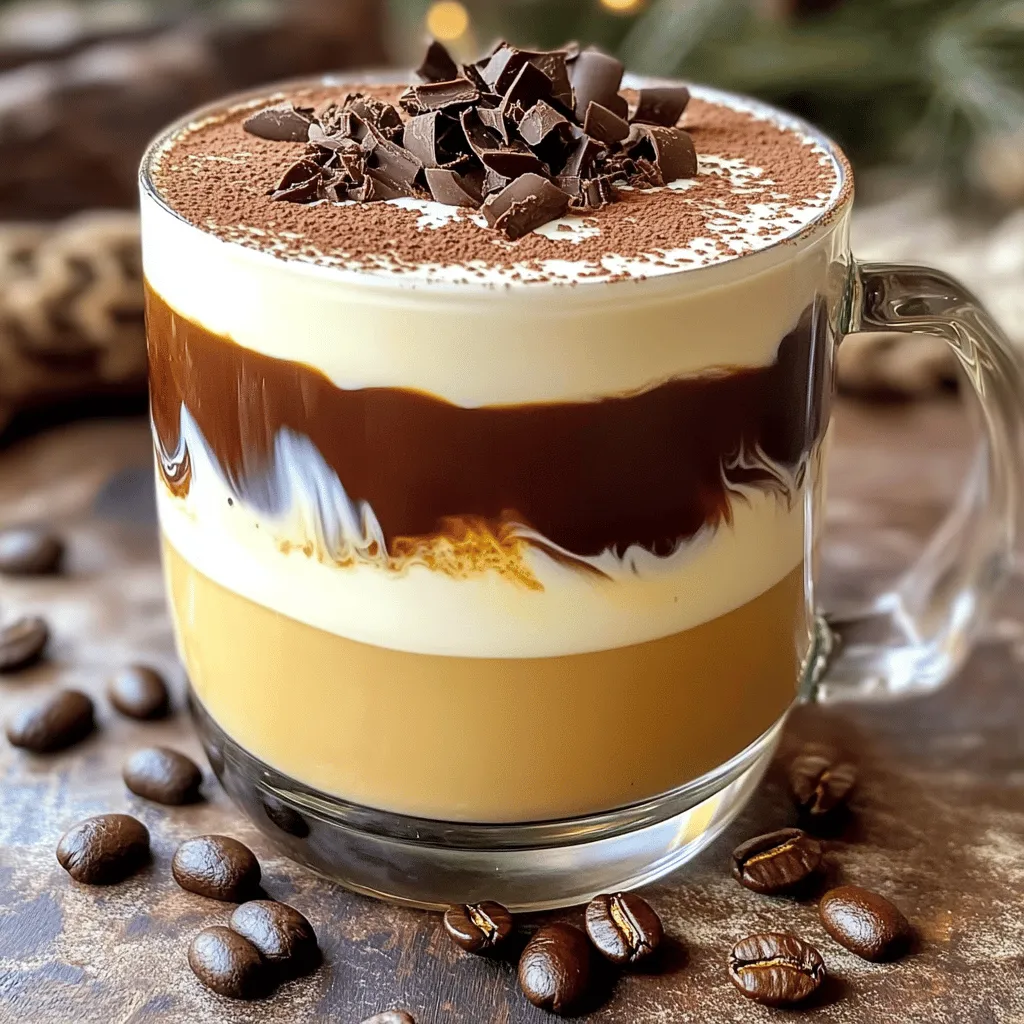
Tiramisu Latte Flavorful and Simple Recipe Guide
Are you ready to indulge in a delicious treat? Tiramisu Latte blends the rich flavors of coffee and dessert in one cup. In this guide,
- 1 ¾ cups all-purpose flour - 1 teaspoon baking soda - ½ teaspoon baking powder - 1 teaspoon ground cinnamon - ½ teaspoon ground nutmeg - ½ teaspoon ground ginger - ½ teaspoon salt - 1 cup granulated sugar - ½ cup light brown sugar, packed - ½ cup vegetable oil - 2 large eggs - 1 cup canned pumpkin puree - 1 teaspoon vanilla extract - ½ cup chopped walnuts or pecans (optional) - ½ cup chocolate chips (optional) To make this copycat Starbucks pumpkin bread, you need simple, fresh ingredients. Each one plays a key role in the flavor and texture. The flour gives the bread structure while the sugars add sweetness. The spices bring warmth and a cozy taste that reminds you of fall. Pumpkin puree is the star. It adds moisture and a rich, earthy flavor. Eggs help bind everything together, making the bread light and fluffy. You can add nuts or chocolate chips for extra texture and flavor, but these are optional. Using quality ingredients makes a big difference. Always choose fresh spices and good pumpkin puree. This helps the flavors shine through. Now, let's gather these ingredients and get ready to bake a delicious treat! - Preheat your oven to 350°F (175°C). This ensures even baking. - Grease and flour a 9x5-inch loaf pan. This helps the bread release easily after baking. - In a medium bowl, whisk together the following dry ingredients: - 1 ¾ cups all-purpose flour - 1 teaspoon baking soda - ½ teaspoon baking powder - 1 teaspoon ground cinnamon - ½ teaspoon ground nutmeg - ½ teaspoon ground ginger - ½ teaspoon salt - In a large bowl, combine the following wet ingredients and sugars: - 1 cup granulated sugar - ½ cup light brown sugar, packed - ½ cup vegetable oil - Mix until smooth. This creates a sweet base for your bread. - Add 2 large eggs, one at a time. Beat well after each addition. - Stir in 1 cup canned pumpkin puree and 1 teaspoon vanilla extract until the mixture is smooth. - Gradually add the dry mixture to the wet mixture. Stir until just combined. - Be careful not to overmix; this keeps the bread tender. - If you want, fold in optional ingredients like: - ½ cup chopped walnuts or pecans - ½ cup chocolate chips - Pour the batter into the prepared loaf pan, smoothing the top with a spatula. - Bake in the preheated oven for 60-70 minutes. A toothpick inserted into the center should come out clean. - If the top browns too fast, cover it loosely with foil. - Once done, let the bread cool in the pan for 10 minutes. This makes it easier to remove. - Transfer the bread to a wire rack to cool completely. This helps avoid sogginess. To get the best pumpkin bread, avoid overmixing. Overmixing makes the bread tough. When you combine wet and dry ingredients, stir just until mixed. This keeps the bread soft and fluffy. Also, use room temperature ingredients. If your eggs and pumpkin are cold, they don’t mix well. Room temperature helps everything blend smoothly. To boost the flavor, try adding more spices. Besides cinnamon, nutmeg, and ginger, you can add allspice or cloves for depth. You can also increase the amount of cinnamon for a bolder taste. For mix-ins, consider chopped nuts or chocolate chips. Walnuts add a nice crunch, while chocolate chips bring sweetness. Just fold them in gently after mixing the batter. Serve your pumpkin bread warm. A pat of butter on top makes it rich and tasty. For a fun twist, sprinkle extra cinnamon on top. Pair the bread with coffee or tea for a cozy treat. It’s perfect for breakfast or an afternoon snack. You can also serve it with a dollop of whipped cream for a dessert vibe. {{image_2}} You can make pumpkin bread healthier with a few simple swaps. First, consider using natural sweeteners instead of regular sugar. Honey or maple syrup can add sweetness without refined sugar. Just remember to reduce other liquids slightly to maintain the right texture. Another great option is to use whole wheat flour instead of all-purpose flour. Whole wheat adds fiber and nutrients, making the bread more filling. If you blend it with all-purpose flour, it keeps the bread light and fluffy while boosting its health benefits. Adding extra flavors can make your pumpkin bread unique. Try mixing in cranberries or raisins for a fruity twist. These dried fruits add chewy texture and a burst of sweetness in every bite. You can also play with spices. Besides cinnamon, nutmeg, and ginger, consider adding cardamom or allspice. Each spice brings a different warmth and depth to the bread, making it even more enjoyable. Don't be afraid to experiment! For those avoiding gluten, you can easily adjust the recipe. Use gluten-free flour blends, like Bob’s Red Mill or King Arthur Flour. These blends usually contain a mix of flours and starches that mimic all-purpose flour. When using gluten-free flour, you may need to add a bit of xanthan gum. This helps bind the ingredients together. Follow the package instructions for the right amount. These simple changes allow everyone to enjoy a slice of pumpkin bread! To keep your pumpkin bread fresh, store it in an airtight container. This helps keep moisture in and air out. You can also wrap it in plastic wrap or foil. If you want to keep it safe from drying out, try using a resealable plastic bag. Make sure the bread cools completely before you store it. This prevents steam from building up and making the bread soggy. If you want to enjoy your pumpkin bread later, freezing is a great option. First, let the bread cool down fully. Then, wrap it tightly in plastic wrap. After that, place it in a freezer-safe bag or container. This protects it from freezer burn. When you are ready to eat it, take it out and let it thaw in the fridge overnight. For a quick thaw, you can leave it on the counter for a few hours. Homemade pumpkin bread lasts up to a week when stored properly at room temperature. If you keep it in the fridge, it can last for about two weeks. Watch for signs of spoilage like mold or an off smell. If you see any green spots or feel that it has become too dry, it’s best to throw it away. Enjoy your pumpkin bread while it’s fresh for the best taste! To make pumpkin bread moist, focus on your ingredients and mixing. Here are some tips: - Use canned pumpkin puree. It adds moisture and flavor. - Add vegetable oil instead of butter. Oil keeps bread soft. - Don’t overmix the batter. Stir until just combined for a lighter texture. - Add yogurt or sour cream. A little helps keep it moist. These simple steps help create a soft and tasty pumpkin bread. Yes, you can use fresh pumpkin. Here’s how to prepare it: 1. Choose a small sugar pumpkin, also called a pie pumpkin. 2. Cut it in half and remove the seeds and stringy parts. 3. Roast the pumpkin halves face down on a baking sheet at 350°F (175°C) for about 45 minutes. 4. Once cool, scoop out the flesh and mash it. 5. Measure out one cup of the fresh puree for your recipe. Fresh pumpkin gives a great flavor and is fun to use. If you want a vegan option, there are easy substitutes for eggs: - Use 1/4 cup of unsweetened applesauce for each egg. - Try 1/4 cup of mashed banana. It adds sweetness. - Use flaxseed meal. Mix 1 tablespoon with 2.5 tablespoons of water for each egg you replace. Let it sit until it thickens. These options work well in pumpkin bread and keep it moist. Yes, you can double the recipe! Here’s how to do it: - Simply double all the ingredients. - Prepare two loaf pans instead of one. - Keep an eye on the baking time. It may take longer to bake through. - Start checking doneness after 70 minutes. Use a toothpick to test. Doubling is a great way to share this tasty bread with friends and family. This blog post covered everything you need to make delicious pumpkin bread. We explored the list of ingredients, step-by-step instructions, and helpful tips for the best results. You learned how to personalize the recipe with health alternatives and variations, plus how to store your bread for freshness. With these insights, you can bake pumpkin bread confidently and enjoy its rich flavor. Remember, experimenting with spices or mix-ins can make each loaf unique. Happy baking!
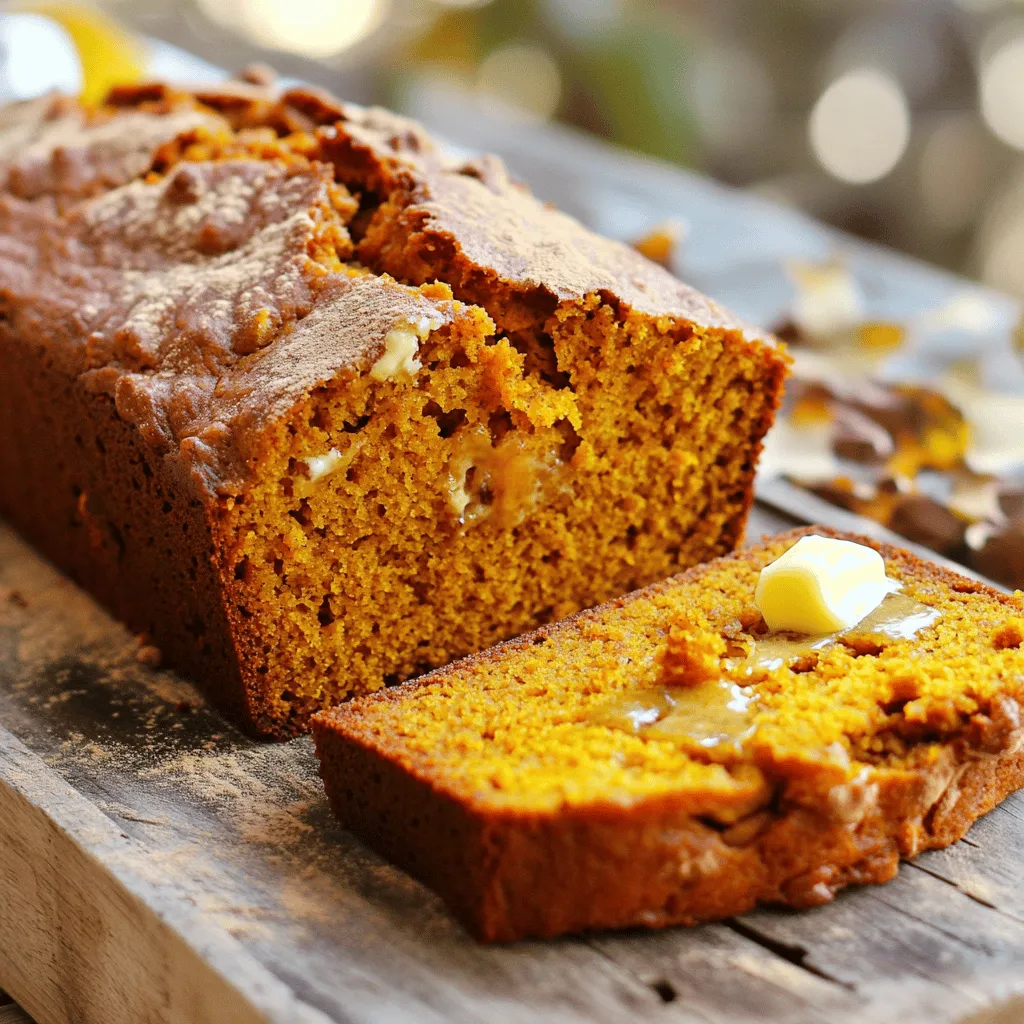
Copycat Starbucks Pumpkin Bread Delectable Homemade Treat
Do you crave that warm, spiced Pumpkin Bread from Starbucks? If you’re like me, you know that smell and flavor makes fall extra special. In
- Apples: I love using Granny Smith apples for their tartness. Peel and dice them into small pieces. This helps them cook evenly and blend well with the caramel. - Caramel sauce: You can use store-bought caramel for ease, but homemade caramel adds a special touch. If you choose to make it, just melt sugar until it turns golden, then add cream slowly. - Other essential ingredients: - 1 teaspoon cinnamon: This spice gives warmth and flavor. - 1 tablespoon lemon juice: This keeps the apples fresh and adds brightness. - 1 package (14 oz) refrigerated pie crusts: These save time and make the process easy. - 1 egg: Use this for an egg wash to create a golden crust. - 2 tablespoons sugar: Sprinkle this on top for a sweet finish. - Pinch of salt: This enhances all the flavors. - Preheat your oven to 400°F (200°C) and line a baking sheet with parchment paper. - In a medium bowl, mix the diced apples, caramel sauce, cinnamon, lemon juice, and a pinch of salt. Stir until the apples are well-coated. - Roll out the pie crusts on a lightly floured surface. Use a round cutter or a glass to cut out circles about 4-5 inches in diameter. You need around 8 circles in total. - On one half of each pie crust circle, spoon 1-2 tablespoons of the caramel apple filling. Be careful not to overfill! - Fold the other half of the crust over the filling to form a semi-circle. Press the edges down to seal. Crimp the edges with a fork for a nice touch. - Brush the tops of the hand pies with an egg wash made by whisking an egg in a small bowl. Sprinkle sugar on top for a sweet finish. - Cut a couple of small slits on top of each hand pie to let steam escape while baking. - Place the pies on the prepared baking sheet and bake for 20-25 minutes until golden brown. - Once baked, let them cool slightly before serving. For extra indulgence, drizzle some caramel sauce on top. - Avoiding overfilling: It’s easy to get carried away with filling. Use only 1-2 tablespoons of the caramel apple mixture. Too much filling can cause leaks during baking. Balance is key! - Sealing techniques: After filling, fold the crust over carefully. Press the edges down firmly. Use a fork to crimp the edges. This adds style and ensures a good seal. - Egg wash tips: Whisk your egg well for the best wash. Brush it lightly on the tops of the pies. This gives them a golden, shiny finish. - Sugar sprinkling methods: Sprinkle sugar evenly over the crust after applying the egg wash. This creates a sweet, crunchy layer. It adds a nice touch to your hand pies. - Pairing with ice cream: Serve warm hand pies with a scoop of vanilla ice cream. The cold ice cream contrasts nicely with the warm filling. It’s a delightful combination! - Drizzling caramel: For an extra treat, drizzle more caramel sauce over the top. This makes your hand pies even more tempting and delicious. {{image_2}} You can change the flavors for your hand pies. Use different fruits like pears or berries. You can mix apples with cranberries for a tart twist. For a more tropical touch, use pineapple or mango. Spices can also change the taste. Try adding nutmeg or ginger. A dash of vanilla can add depth too. Each fruit and spice gives a new flavor to enjoy. If you need gluten-free options, use gluten-free pie crusts. Many brands offer great choices. You can also make your own crust using almond or coconut flour. For vegan alternatives, skip the egg wash. Use plant milk as a wash instead. You can substitute the caramel sauce with a vegan version made from coconut cream and maple syrup. These adjustments keep the flavor while fitting your diet. To keep your hand pies fresh, store them in an airtight container. Place a piece of parchment paper between layers to prevent sticking. You can keep them at room temperature for up to two days. If you want them to last longer, refrigerate them. In the fridge, they will stay good for about a week. If you need to store them for an even longer time, consider freezing them. Wrapped tightly in plastic wrap, they can last up to three months in the freezer. When you're ready to enjoy your leftover hand pies, reheating is simple. The best method is using an oven. Preheat your oven to 350°F (175°C). Place the hand pies on a baking sheet and heat them for about 10 to 15 minutes. This keeps the crust crispy. If you're in a hurry, you can use a microwave. Heat them for 30 seconds to 1 minute. However, this may make the crust a bit soft. Enjoy your hand pies warm for the best taste! Can I use frozen pie crusts? Yes, you can use frozen pie crusts. They save time and are easy to work with. Just follow the package instructions to thaw them before rolling out. How long do these hand pies last? These hand pies last for about 3 days at room temperature. Keep them in an airtight container to keep them fresh. If you want to store them longer, consider freezing them. Can I make the filling in advance? Absolutely! You can make the filling a day ahead. Just mix the apples, caramel, cinnamon, lemon juice, and salt. Store it in the fridge until you are ready to assemble your hand pies. What should I serve with hand pies? Hand pies are great on their own but pair well with vanilla ice cream or whipped cream. A drizzle of caramel on top adds extra flavor. How can I make these hand pies healthier? To make these hand pies healthier, use whole wheat pie crust. You can also reduce the sugar in the filling or add more apples for natural sweetness. Consider using a sugar substitute in your caramel sauce if desired. You’ve learned how to make delicious caramel apple hand pies. We covered all the key ingredients, step-by-step instructions, and helpful tips. Remember to try different fillings or adjust for dietary needs. Storing and reheating your treats is easy, too. Making these hand pies is fun and a great way to impress. Now, get cooking and enjoy every bite!
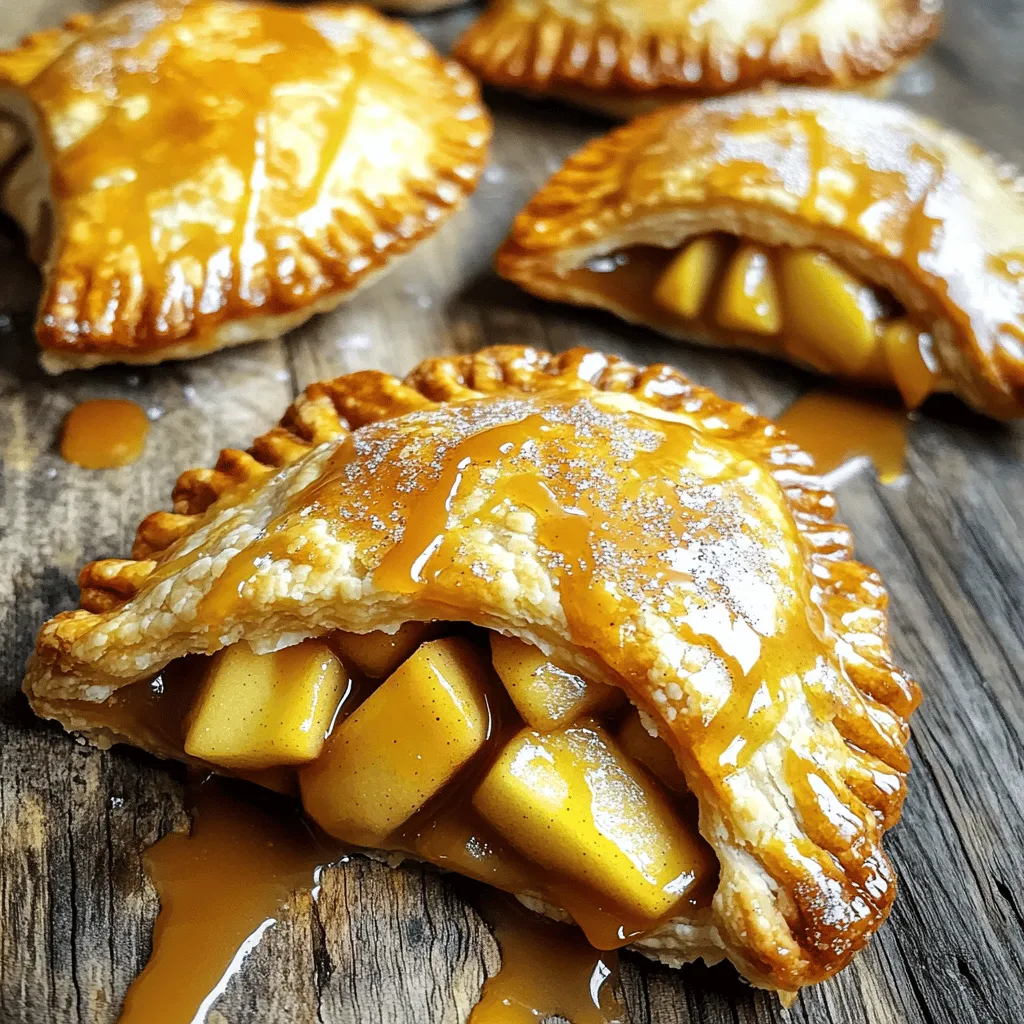
Caramel Apple Hand Pies Irresistible and Easy Recipe
Get ready to indulge in a sweet treat! Caramel Apple Hand Pies are a delightful blend of crisp apples and gooey caramel, all wrapped in
To make Crème Brûlée Cookies, you'll need the following ingredients: - 1 cup unsalted butter, softened - 1 cup granulated sugar - 1 cup packed brown sugar - 2 large eggs - 2 teaspoons vanilla extract - 3 cups all-purpose flour - 1 teaspoon baking soda - 1/2 teaspoon salt - 1/2 cup heavy cream - 1/4 cup granulated sugar (for caramelizing) If you're missing some ingredients, don't worry! Here are a few swaps you can use: - Unsalted butter: You can replace it with coconut oil for a dairy-free option. - Granulated sugar: Brown sugar can act as a substitute, but it may change the texture slightly. - Heavy cream: Use coconut cream or cashew cream for a dairy-free version. - All-purpose flour: You can try a gluten-free flour blend for a gluten-free cookie. Choosing the right ingredients makes a big difference in your cookies: - Butter: Use fresh unsalted butter for the best taste. Avoid margarine, as it changes flavor. - Sugars: Opt for high-quality granulated and brown sugars. They enhance sweetness and flavor. - Eggs: Buy farm-fresh eggs for a rich taste and good texture. - Vanilla extract: Pure vanilla extract always beats imitation. It brings out the best flavors. - Flour: Check that your all-purpose flour is fresh. Old flour can lead to dense cookies. These tips will help you create the best Crème Brûlée Cookies. Enjoy baking! Start by preheating your oven to 350°F (180°C). This step is key for even baking. Line a baking sheet with parchment paper. This helps the cookies not stick. In a large mixing bowl, add 1 cup of softened unsalted butter, 1 cup of granulated sugar, and 1 cup of packed brown sugar. Mix them together until light and fluffy. This should take about 2-3 minutes. This step adds air, making your cookies soft. Now, beat in 2 large eggs, one at a time. Then, add 2 teaspoons of vanilla extract. Mix until everything blends well. This adds richness and flavor to your cookies. In a separate bowl, whisk together 3 cups of all-purpose flour, 1 teaspoon of baking soda, and 1/2 teaspoon of salt. Gradually add this dry mix to your wet ingredients. Stir just until combined. Be careful not to overmix, or your cookies may become tough. Take a small saucepan and heat 1/2 cup of heavy cream over low heat. Do not let it boil. Once warm, remove it from the heat and let it cool slightly. This cream will create a delicious center in your cookies. Using a cookie scoop or tablespoon, drop dollops of dough onto your prepared baking sheet. Leave some space between each cookie to allow for spreading. Make an indentation in the center of each cookie with your thumb. Fill this with a small spoonful of the warm heavy cream. Be careful not to overfill. Bake these cookies for 12-15 minutes or until they are lightly golden. After baking, let them cool on the sheet for a few minutes before moving them to a wire rack. Enjoy making these delicious treats! To get the right texture, start by creaming your butter and sugars well. Mix them until they look light and fluffy. This takes about 2-3 minutes. Next, don’t mix the dough too much after adding the flour. Just blend until it is combined. This keeps your cookies soft and chewy. Caramelizing sugar is all about control. After baking, cool your cookies first. Sprinkle a thin layer of granulated sugar over each cookie. Use a kitchen torch to melt the sugar until it turns golden. If you don't have a torch, broil them in your oven. Watch closely to avoid burning. The sugar should bubble and turn crisp. If your cookies spread too much, try chilling the dough for 30 minutes. This helps them hold shape. If they are too hard, you might have overbaked them. Aim for a light golden color. Lastly, if the sugar doesn’t caramelize well, ensure you use enough and melt it evenly. {{image_2}} You can add chocolate to the mix for a rich twist. Just fold in one cup of chocolate chips into the dough after mixing in the dry ingredients. The chocolate adds depth and pairs perfectly with the creamy center. These cookies will be a hit with chocolate lovers. They retain that classic crème brûlée taste while offering a delightful chocolate surprise. Nutty flavors add a great crunch to your cookies. You can use chopped almonds or hazelnuts. Simply mix in half a cup of your chosen nuts after the dry ingredients. This not only enhances flavor but also gives added texture. The nuts bring a lovely contrast to the creamy filling, making each bite exciting. For a festive twist, try pumpkin spice or gingerbread spices. Add a teaspoon of pumpkin pie spice or a mix of cinnamon and ginger to your dry ingredients. This variation works great in the fall and winter. The spices will warm up the flavor and bring cozy vibes to your cookie jar. You can enjoy these cookies year-round by adjusting the spices for any season. To keep your Crème Brûlée Cookies fresh, store them in an airtight container. This will help keep the cookies soft. Make sure they are completely cool before you store them. If you stack them, put parchment paper between layers to avoid sticking. You can freeze these cookies for up to three months. Place cooled cookies in a single layer on a baking sheet. Freeze them until solid, then transfer to a freezer bag. Remove as much air as possible before sealing. This keeps them tasty and fresh. When you're ready to enjoy a cookie, preheat your oven to 350°F (180°C). Place cookies on a baking sheet. Heat for about 5-10 minutes until warm. This will revive their soft texture. If the sugar topping needs caramelizing again, use a kitchen torch for a quick finish. Enjoy your sweet treat! Crème brûlée cookies come from the famous French dessert called crème brûlée. This dessert features a creamy custard under a hard caramel shell. Bakers wanted to capture that same taste in a cookie form. Now, you can enjoy the rich flavors of vanilla and caramel in every bite. Yes, you can make these cookies gluten-free! Use a gluten-free all-purpose flour blend instead of regular flour. Make sure the blend includes a binding agent like xanthan gum. This way, you get the same great texture and taste without gluten. The cookies are done when they are lightly golden around the edges. The center should look slightly soft but not wet. You can also gently press the top with your finger. If it springs back, it's ready! If you don't have a kitchen torch, you can use your oven's broiler. After baking and cooling the cookies, sprinkle sugar on top. Place the cookies on a baking sheet under the broiler for a few minutes. Watch closely so they don’t burn. The sugar will melt and turn golden, just like with a torch. To make Crème Brûlée cookies, you need specific ingredients and careful steps. Start with the right butter and sugars for creaminess and flavor. Follow each step to create that perfect blend of texture and taste. Remember tips for caramelizing sugar to get that golden crust. With variations like chocolate or nutty options, there’s a cookie for everyone. Store them well, and you can enjoy them later. Now, you have all the tools to create delicious Crème Brûlée cookies. Happy baking!
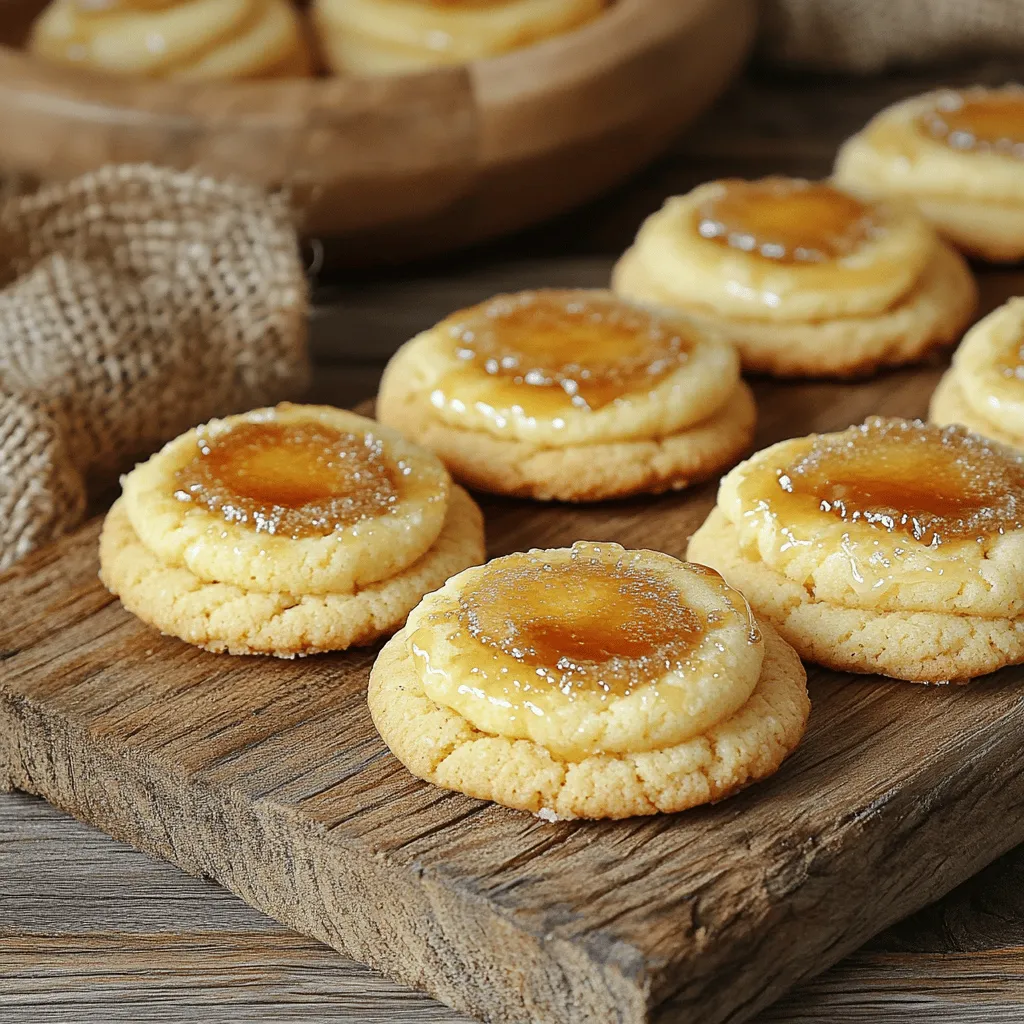
Crème Brûlée Cookies Irresistible Sweet Delight
Welcome to the world of Crème Brûlée Cookies! If you love the classic dessert, you’ll adore these cookies. They bring rich, creamy flavor and a
- 1 ½ cups all-purpose flour - 1 cup granulated sugar - 1 ½ teaspoons baking powder - ½ teaspoon baking soda - ½ teaspoon salt - 1 ½ teaspoons ground cinnamon - ½ teaspoon ground ginger - ¼ teaspoon ground cardamom - ¼ teaspoon ground cloves These dry ingredients create the base of your cupcakes. The flour gives structure, while sugar adds sweetness. Baking powder and baking soda help them rise. Salt enhances flavor and balances the sweetness. The spices bring the warm, cozy chai flavor that makes these cupcakes special. - ½ cup unsalted butter, softened - 2 large eggs - 1 cup buttermilk - 1 teaspoon vanilla extract - 1 cup brewed chai tea (cooled) The wet ingredients add moisture and richness. Softened butter mixes well with the eggs, creating a light batter. Buttermilk adds a nice tang and helps keep the cupcakes moist. The brewed chai tea infuses the cupcakes with that classic chai flavor. Vanilla rounds it all out with warmth. - 4 oz cream cheese, softened - 1 cup powdered sugar - 2 tablespoons milk - 1 teaspoon vanilla extract - Ground cinnamon (for garnish) The frosting is a creamy delight. Cream cheese gives it a rich texture. Powdered sugar sweetens it, while milk helps achieve the right consistency. More vanilla adds depth, and a sprinkle of ground cinnamon on top makes it look pretty. It’s the perfect finish for your chai latte cupcakes! 1. Preheat your oven to 350°F (175°C). Line a muffin tin with cupcake liners. This keeps the cupcakes from sticking. 2. In a large bowl, whisk together: - 1 ½ cups all-purpose flour - 1 cup granulated sugar - 1 ½ teaspoons baking powder - ½ teaspoon baking soda - ½ teaspoon salt - 1 ½ teaspoons ground cinnamon - ½ teaspoon ground ginger - ¼ teaspoon ground cardamom - ¼ teaspoon ground cloves These ingredients create a warm spice blend that makes the cupcakes special. 3. In another bowl, cream ½ cup softened unsalted butter until smooth. Add in: - 2 large eggs - 1 cup buttermilk - 1 teaspoon vanilla extract Mix these well until you have a smooth batter. 4. Gradually mix the wet ingredients into the dry ingredients. Stir gently until just combined. Be careful not to overmix. This keeps the cupcakes fluffy. 5. Fold in 1 cup of cooled brewed chai tea. This step adds that rich chai flavor we all love. 6. Divide the cupcake batter evenly among the liners, filling each about two-thirds full. This allows room for rising. 7. Bake in the preheated oven for 18-20 minutes. Use a toothpick to check doneness; it should come out clean. 8. Let the cupcakes cool in the pan for 5 minutes. Then, transfer them to a wire rack to cool completely. This step is key before frosting. - Avoid overmixing the batter. This keeps your cupcakes light and fluffy. - Check for doneness with a toothpick. Insert it into the center of a cupcake. If it comes out clean, they’re ready. Mixing the batter too much can create tough cupcakes. Stir until just combined. This helps keep the texture soft. - Achieve the perfect cream cheese consistency. Make sure your cream cheese is very soft. This helps it blend well with the sugar. - Tips for smooth frosting application. Use a spatula or a knife for spreading. Start at the center and work outward for a nice finish. For the best frosting, mix the cream cheese until it is smooth. Gradually add the powdered sugar, milk, and vanilla. This will help create a fluffy texture that spreads easily. - Garnishing suggestions with ground cinnamon. A sprinkle on top adds a lovely touch and enhances flavor. - Creative ways to serve chai latte cupcakes. Try serving them on a decorative plate or in cupcake boxes. You can also pair them with chai tea for a fun theme. These ideas will make your cupcakes look as good as they taste. A little attention to detail goes a long way in impressing your guests. {{image_2}} You can add chocolate or espresso to your chai latte cupcakes. Just mix in a half cup of cocoa powder or a shot of espresso. This twist gives a rich flavor that pairs well with the spices. You can also swap spices for a personal touch. Try nutmeg, star anise, or even vanilla bean for a different taste. For gluten-free options, swap all-purpose flour with a gluten-free blend. Make sure it has a good binding agent, like xanthan gum. To try vegan adaptations, replace eggs with flaxseed or apple sauce. You can also use almond or coconut milk instead of buttermilk. These changes keep the flavor while fitting dietary needs. Other frostings work well with chai latte cupcakes. Consider using chocolate or caramel frosting for a sweet contrast. You can also blend in flavors like maple or pumpkin spice in your cream cheese frosting. This adds more layers to your cupcakes, making them even more fun to eat! To keep your chai latte cupcakes fresh, use an airtight container. This helps seal in moisture. Place cupcakes at room temperature away from direct sunlight. If you live in a humid area, consider storing them in the fridge. This will help them last longer without drying out. You can freeze your cupcakes if you want to enjoy them later. Wrap each cupcake tightly in plastic wrap. Then, place them in a freezer-safe bag or container. This keeps them safe from freezer burn. When ready to eat, take them out and thaw them in the fridge overnight. For the best texture, let them sit at room temperature for a few minutes before serving. Chai latte cupcakes last about 2-3 days at room temperature. To enjoy them longer, store them in the fridge for up to a week. Just remember, the longer they sit, the less fresh they taste. Enjoy your cupcakes while they’re still fluffy and flavorful! To keep your cupcakes moist, use buttermilk in the batter. Buttermilk adds flavor and softens the texture. Another tip is to not overmix the batter. Mix just until combined to avoid dense cupcakes. Also, bake them right away after mixing. Letting the batter sit can dry them out. Finally, store your cupcakes in an airtight container after they cool. This keeps them fresh and moist. Yes, you can use various teas to make chai latte cupcakes. Earl Grey adds a nice bergamot flavor. Green tea can give a lighter taste. Even herbal teas like rooibos work well. Just remember to brew the tea and let it cool before adding it to your batter. This keeps your cupcakes fluffy and moist. Frosting cupcakes can be fun and easy. First, make sure your cupcakes are completely cool. This prevents the frosting from melting. Use a piping bag for a neat look. You can also use a knife for a rustic style. Start from the outside and work your way in. Finish by adding a sprinkle of cinnamon on top for a pretty touch. You can find chai latte cupcakes in many local bakeries and cafes. Some coffee shops also offer them, especially those focusing on unique flavors. If you want to try a specific place, check online for reviews. This helps you find the best spots near you. You can even ask your friends for their favorites! In this post, we explored how to make delicious chai latte cupcakes. We covered the essential dry and wet ingredients, shared step-by-step instructions, and offered useful tips. You can try different flavors and dietary options to make them your own. Remember to store them right for freshness. With these simple steps, you'll impress anyone with your baking. Enjoy every bite of your homemade chai latte cupcakes!
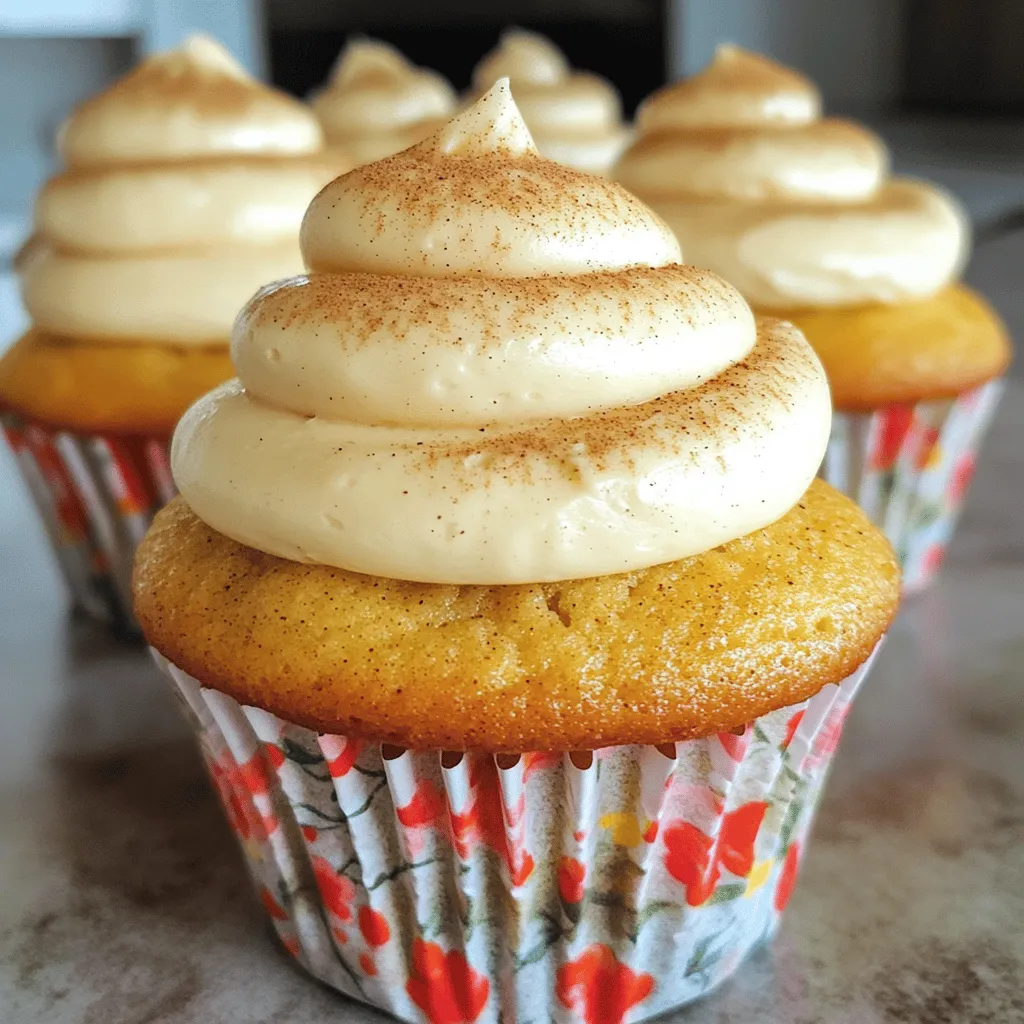
Chai Latte Cupcakes Fluffy and Flavorful Indulgence
If you love the warm, spicy taste of chai, you’ll adore these Chai Latte Cupcakes! Imagine a fluffy cupcake bursting with flavor, topped with creamy
To make this healthy pumpkin bread, you need a few key ingredients. Each one adds flavor and nutrition. Here’s what you need: - 1 cup canned pumpkin puree - 1/2 cup Greek yogurt - 1/4 cup honey or maple syrup - 1/4 cup coconut oil, melted - 2 large eggs - 1 teaspoon vanilla extract - 1 1/2 cups whole wheat flour - 1 teaspoon baking powder - 1 teaspoon baking soda - 1 teaspoon ground cinnamon - 1/2 teaspoon ground nutmeg - 1/4 teaspoon ground ginger - 1/4 teaspoon salt - 1/2 cup chopped walnuts or pecans (optional) - 1/2 cup dark chocolate chips (optional for added indulgence) These ingredients blend well to create a moist and tasty bread. The canned pumpkin puree gives it a rich flavor and adds moisture. Greek yogurt also makes the bread soft and adds protein. You can use honey or maple syrup for sweetness. Coconut oil keeps the bread moist and adds a hint of tropical taste. Whole wheat flour provides fiber and nutrients. The spices, like cinnamon, nutmeg, and ginger, give your bread that warm, cozy taste. You can also add nuts or dark chocolate chips for extra crunch and flavor. This recipe is perfect for fall but tasty all year round! 1. Preheat your oven to 350°F (175°C). Grease a 9x5-inch loaf pan or line it with parchment paper. 2. In a large bowl, mix 1 cup of canned pumpkin puree, 1/2 cup of Greek yogurt, 1/4 cup of honey or maple syrup, 1/4 cup of melted coconut oil, 2 large eggs, and 1 teaspoon of vanilla extract. Whisk until smooth and well mixed. 3. In another bowl, sift together 1 1/2 cups of whole wheat flour, 1 teaspoon of baking powder, 1 teaspoon of baking soda, 1 teaspoon of ground cinnamon, 1/2 teaspoon of ground nutmeg, 1/4 teaspoon of ground ginger, and 1/4 teaspoon of salt. 4. Gradually add the dry mix to the wet mix. Stir gently until just combined. Avoid overmixing, as this helps keep the bread light. 5. If you like, fold in 1/2 cup of chopped walnuts or pecans and 1/2 cup of dark chocolate chips for extra flavor. 6. Pour the batter into the loaf pan. Smooth the top with a spatula. 7. Bake in the preheated oven for 50-60 minutes. Check doneness by inserting a toothpick into the center. It should come out clean. 8. When done, remove the bread from the oven. Let it cool in the pan for 10 minutes. Then, transfer it to a wire rack to cool completely. To make your pumpkin bread fluffy, avoid overmixing. Mix the wet and dry ingredients gently. This helps keep the air in the batter. Use a light hand when you combine them. Choosing the right baking pan is key too. A 9x5-inch loaf pan works best. It helps the bread cook evenly. If you use a dark pan, check it a bit early. Dark pans can cook faster. You can swap out the whole wheat flour. Almond flour is a great choice. It adds a nutty flavor and is gluten-free. You can also use oat flour for a different taste. If you want to cut back on sugar, use applesauce instead of honey. Applesauce keeps the bread moist and sweet. You can also try stevia for a lower-calorie option. Add more spices for a flavor boost. Try a pinch of cloves or allspice for warmth. You can also add a splash of almond or coconut extract for a twist. For toppings, think outside the box! Spread some Greek yogurt on a slice. Or, sprinkle some pumpkin seeds for crunch. Dark chocolate chips are fun too! They add a sweet touch and melt nicely. {{image_2}} You can easily change the flavor of your pumpkin bread. Adding a bit of zest, like orange or lemon, makes it bright and fresh. Zest adds a nice contrast to the warm spices. You might also try adding seasonal spices. For instance, cumin or allspice can bring a unique twist. Mix and match to find your favorite flavor! If you need gluten-free options, swap the whole wheat flour for almond or coconut flour. This keeps the texture nice while making it gluten-free. For vegan substitutions, replace the eggs with flaxseed meal or applesauce. These swaps keep the bread moist and delicious without using eggs. When serving your pumpkin bread, think about spreads. Cream cheese or nut butter adds a creamy touch. For a sweet treat, try a bit of honey or maple syrup on top. Pair your bread with a warm drink too. Tea or cider complements the flavors well. Enjoy the cozy taste of fall with every bite! To keep your pumpkin bread fresh for up to a week, wrap it tightly. Use plastic wrap or aluminum foil. You can also place it in an airtight container. Store it at room temperature. Avoid exposing it to air, as this can dry it out. For long-lasting freshness, freezing is best. First, let the bread cool completely. Then, slice it for easy access later. Wrap each slice in plastic wrap. Place the wrapped slices in a freezer bag. Remove as much air as possible before sealing. The bread can last up to three months in the freezer. To enjoy your pumpkin bread again, reheat it gently. Preheat your oven to 350°F (175°C). Place the bread on a baking sheet. Heat for about 10-15 minutes. You can also use a microwave. Put a slice on a microwave-safe plate. Heat for 15-20 seconds. Enjoy warm for the best taste! This pumpkin bread is packed with nutritious ingredients. Here are some key components: - Canned pumpkin puree adds fiber and vitamins. - Greek yogurt gives protein and moisture. - Whole wheat flour boosts fiber content. - Natural sweeteners like honey or maple syrup reduce processed sugar. - Coconut oil provides healthy fats. - Spices such as cinnamon, nutmeg, and ginger add flavor and antioxidants. These ingredients work together to create a tasty treat that is also good for you. Yes, you can make this bread without eggs. Here are some egg alternatives: - Flaxseed meal: Mix 1 tablespoon with 3 tablespoons of water. Let it sit for a few minutes. - Chia seeds: Use the same method as flaxseed. - Applesauce: Replace each egg with 1/4 cup of applesauce. These options keep the bread moist and help it rise. You can tell if the pumpkin bread is done by looking for these signs: - The top is golden brown and firm. - A toothpick inserted into the center comes out clean. - The edges pull away slightly from the pan. If you see these signs, your bread is ready to enjoy! This blog post showed you how to make delicious pumpkin bread. We covered ingredients, simple steps, and tips for the best results. You learned about healthy swaps and storage advice too. In the end, pumpkin bread offers many ways to enjoy fall flavors. It can fit different diets and tastes. Follow the tips, get creative, and enjoy your tasty baking adventure!
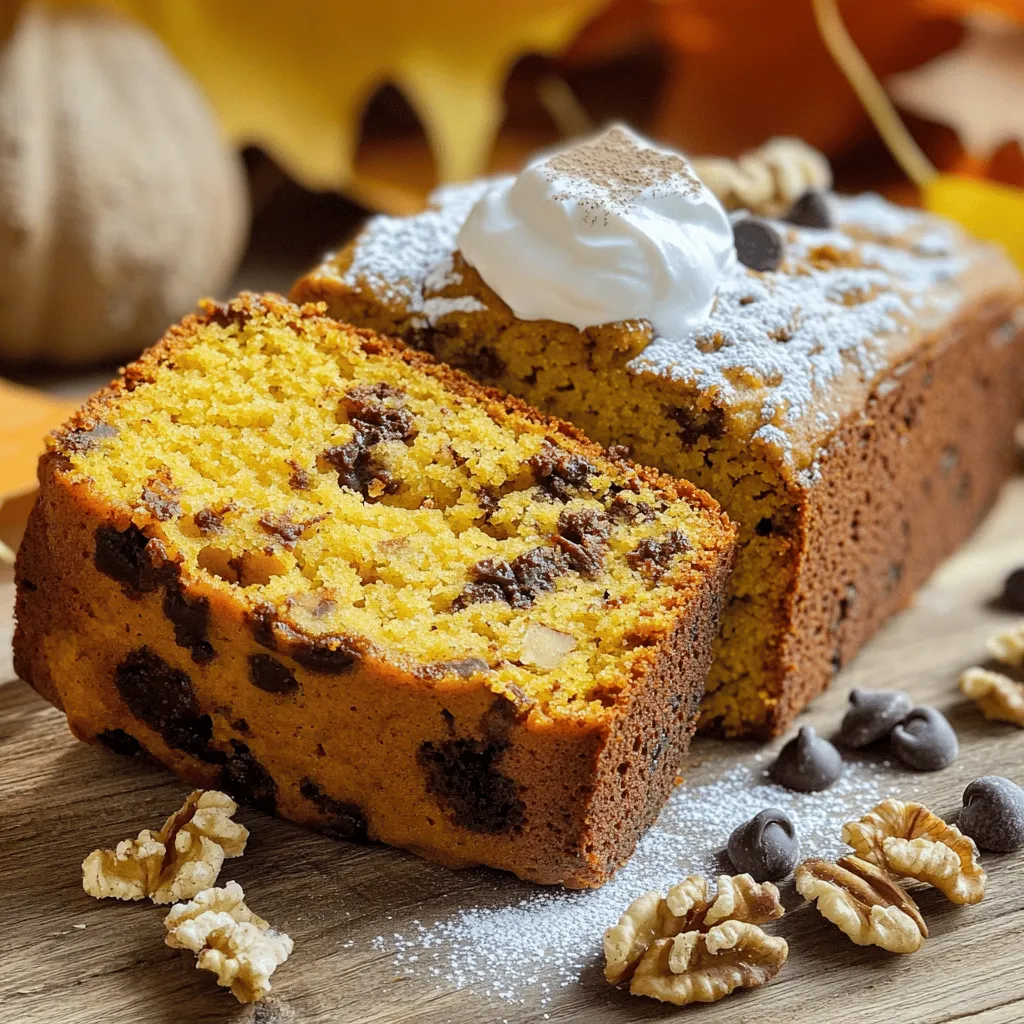
Healthy Pumpkin Bread Irresistibly Tasty Treat
Are you ready to enjoy a slice of guilt-free bliss? My Healthy Pumpkin Bread is the perfect treat for those who crave something sweet without
- 1 cup pumpkin puree - 1/2 cup unsalted butter, softened - 1 cup brown sugar, packed - 1/2 cup granulated sugar - 1 large egg - 1 teaspoon vanilla extract - 2 cups all-purpose flour - 1 teaspoon baking powder - 1 teaspoon baking soda - 1 teaspoon ground cinnamon - 1/2 teaspoon ground nutmeg - 1/2 teaspoon salt When making soft pumpkin cookies, I start with pumpkin puree. This ingredient gives the cookies a rich flavor and a moist texture. Use canned puree for convenience or make your own by roasting fresh pumpkin. Next, I use unsalted butter. It needs to be softened. This helps in mixing the butter with sugars. Brown sugar adds a deep sweetness, while granulated sugar gives a light crunch. Together, they create a lovely balance. I also add an egg. It binds the dough and helps the cookies rise. Vanilla extract adds a warm, sweet note that complements the pumpkin. For the dry mix, I choose all-purpose flour and leavening agents. Baking powder and baking soda work together to help the cookies rise. Spices like ground cinnamon and nutmeg give these cookies their warm, cozy flavor. A pinch of salt enhances all of the other flavors. - 4 oz cream cheese, softened - 1/4 cup unsalted butter, softened - 2 cups powdered sugar - 1 teaspoon vanilla extract - A pinch of salt Now, for the cream cheese frosting, I start with softened cream cheese. This gives the frosting a rich, tangy flavor. I mix in more softened unsalted butter. This adds creaminess and helps the frosting spread easily. Next, I add powdered sugar for sweetness and a smooth texture. The vanilla extract gives it a lovely aroma. Finally, a tiny pinch of salt balances the sweetness. You can find the full recipe for these delightful cookies in the Full Recipe section. Enjoy making these soft pumpkin cookies with cream cheese frosting! First, preheat your oven to 350°F (175°C). Line a baking sheet with parchment paper. This step helps prevent sticking and makes cleanup easy. In a large bowl, cream together 1/2 cup softened butter, 1 cup brown sugar, and 1/2 cup granulated sugar. Mix until the mixture is light and fluffy. Next, add in 1 cup pumpkin puree, 1 large egg, and 1 teaspoon vanilla extract. Stir well until everything is combined. In another bowl, whisk together 2 cups all-purpose flour, 1 teaspoon baking powder, 1 teaspoon baking soda, 1 teaspoon ground cinnamon, 1/2 teaspoon ground nutmeg, and 1/2 teaspoon salt. This step ensures that the spices and leavening agents are evenly distributed. Gradually mix the dry ingredients into the wet mixture. Stir gently until just combined. Be careful not to overmix; this keeps your cookies soft. Using a tablespoon or cookie scoop, drop dough onto the prepared baking sheet. Leave some space between each cookie, as they will spread while baking. Bake in the preheated oven for 12-15 minutes. You’ll know they’re done when the edges are set, and the tops look slightly cracked. After baking, let the cookies cool on the sheet for 5 minutes, then transfer them to a wire rack to cool completely. While the cookies cool, you can make the cream cheese frosting. In a medium bowl, combine 4 oz softened cream cheese and 1/4 cup softened butter. Beat them together until smooth. Then, add in 2 cups powdered sugar, 1 teaspoon vanilla extract, and a pinch of salt. Mix until the frosting is creamy and fluffy. Once the cookies are cool, it’s time to frost them. Use a spatula or piping bag to generously apply the cream cheese frosting on top of each cookie. For a lovely presentation, arrange the frosted cookies on a decorative plate. You can even sprinkle a light dusting of cinnamon on top for that extra touch. Enjoy your soft pumpkin cookies with cream cheese frosting. For the full recipe, check out the earlier section. To get the best soft pumpkin cookies, you must not overmix the dough. Mixing too much adds air and can make cookies tough. Gently combine the wet and dry ingredients until you see no dry flour. This keeps them soft and chewy. Also, adjust the bake time to ensure the right softness. Bake for 12 to 15 minutes. The edges should be set, but the top should look a bit cracked. If you want softer cookies, try taking them out a minute early. To keep your cookies fresh, store them in an airtight container. This helps prevent them from drying out. You can add a slice of bread to the container. The bread keeps the cookies soft. If you want to freeze your cookies, do it before frosting. Place them in a single layer on a baking sheet first. Once frozen, transfer them to a freezer bag. For the frosting, store it in a separate container. It can last in the fridge for about a week. Want to mix it up? You can add chocolate chips or nuts to the dough. These add great texture and flavor. You can also try different spices, like ginger or allspice, for a unique taste. A splash of maple extract can give a sweet twist that pairs nicely with pumpkin. Consider experimenting to find your favorite blend. For the cream cheese frosting, you can swap vanilla for almond extract for a different flavor. Enjoy the fun of creating your own version of these delightful cookies! {{image_2}} You can switch up the frosting for your pumpkin cookies. Cream cheese frosting pairs well with the spices. It adds a creamy, tangy taste. If you want something sweeter, try buttercream frosting. It is fluffy and rich. You could also use flavored cream cheese. Options like cinnamon or maple enhance the pumpkin flavor. Just mix in a bit of your favorite flavor with the cream cheese for a fun twist. If you need a gluten-free option, it's easy. Substitute all-purpose flour with a gluten-free blend. Many brands work well in cookies. Just make sure to check if your blend has xanthan gum. This ingredient helps with texture. Follow the same measurements as you would with regular flour. Your cookies will still be soft and delicious. For those who avoid eggs, there are great substitutes. You can use applesauce or mashed banana instead. A quarter cup will replace one egg. This keeps your cookies moist and adds flavor. If you want to cut down on sugar, reduce both sugars by a third. You can also use a sugar substitute like stevia. Just remember to adjust the amount based on the brand. Enjoy your cookies without worrying about your diet! You can find the Full Recipe for these delightful cookies in the ingredients section. To keep your unfrosted cookies fresh, use an airtight container. A plastic or glass container works well. Place a piece of parchment paper between layers to prevent sticking. These cookies can last for about one week at room temperature. If you want them to last longer, store them in the fridge for up to two weeks. For frosted cookies, it’s best to refrigerate them. Use a covered container to keep them from drying out. Frosted cookies can last in the fridge for about five days. When storing, place parchment paper between layers to avoid smearing the frosting. This method helps keep them soft and tasty. To freeze these cookies, first, ensure they are completely cool. Place them in a single layer on a baking sheet and freeze for about an hour. Once firm, transfer them to a freezer bag. Make sure to remove as much air as possible. They will stay fresh for about three months. When ready to eat, thaw them in the fridge overnight. For best results, enjoy them at room temperature. For the complete recipe, check the Full Recipe section. Soft pumpkin cookies get their texture from pumpkin puree and butter. The puree adds moisture, while the butter makes the cookies rich and tender. This combination helps create that soft, cake-like bite you crave. Yes, you can use homemade pumpkin puree. Just make sure it is smooth and thick. Homemade puree may vary in moisture. If it’s too wet, your cookies might spread too much. These cookies stay fresh for about 3 to 5 days when stored properly. Keep them in an airtight container at room temperature. If you want them to last longer, refrigerate them for up to a week. You can reduce the sugar, but it may change the taste and texture. Less sugar makes cookies less sweet and can make them drier. Try cutting the sugar by a quarter cup for a balanced flavor. Pumpkin cookies pair well with warm drinks, like chai or spiced coffee. You can also serve them with a scoop of vanilla ice cream for a tasty dessert. For a simple touch, sprinkle some extra cinnamon on top. For the full recipe, check out the detailed instructions and tips. Soft pumpkin cookies are easy to make with simple ingredients like pumpkin puree, spices, and butter. I shared step-by-step instructions for preparing the dough, baking the cookies, and making cream cheese frosting. You learned tips for texture and storage, plus fun variations. These cookies are perfect for fall gatherings or a cozy treat. Enjoy baking, experimenting with flavors, and sharing with others. The joy of making these cookies is as sweet as tasting them!
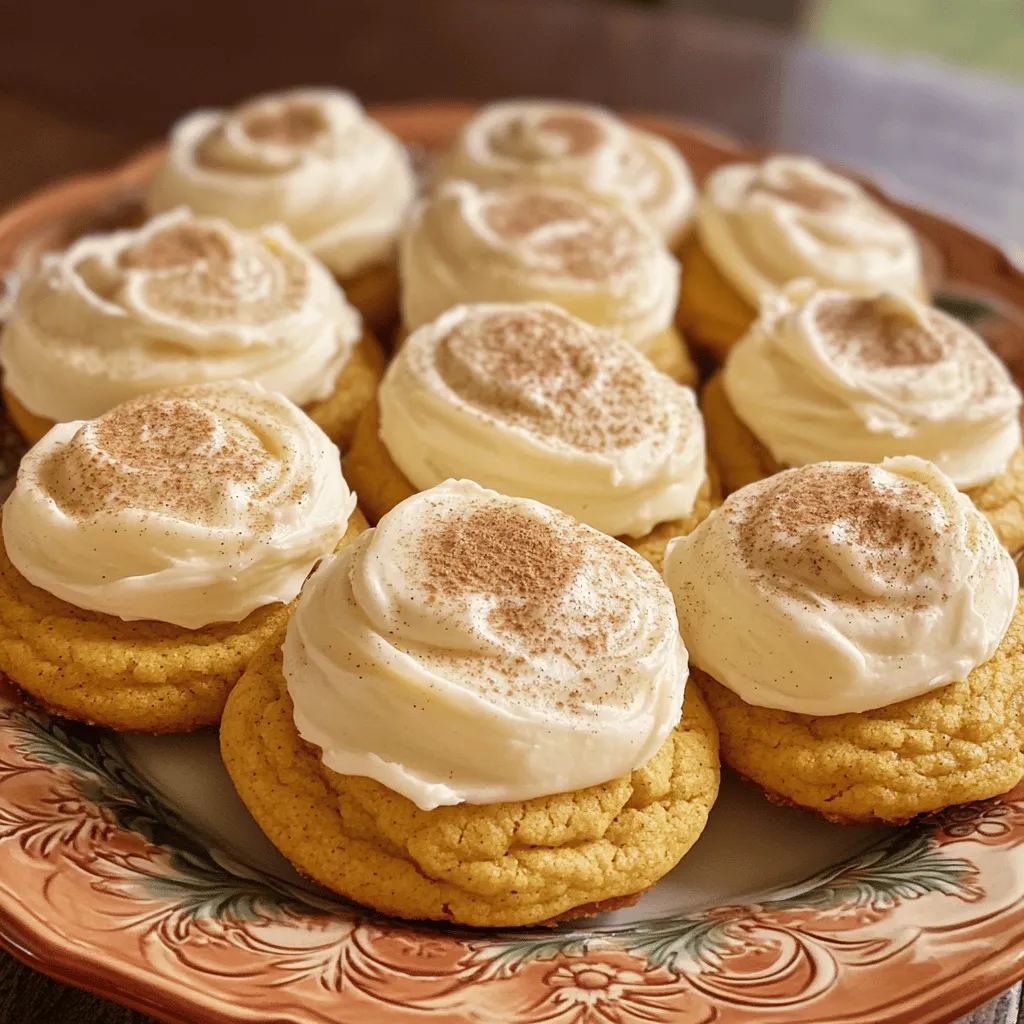
Soft Pumpkin Cookies with Cream Cheese Frosting Delight
If you love pumpkin treats, you’ll adore these Soft Pumpkin Cookies with Cream Cheese Frosting! They are fluffy, sweet, and packed with warm spices. Imagine
To make the Harry Potter Butterbeer Cake, you will need: - 2 cups all-purpose flour - 1 ½ cups granulated sugar - 1 tablespoon baking powder - ½ teaspoon salt - 1 cup buttermilk - ½ cup unsalted butter, melted - 3 large eggs - 2 teaspoons vanilla extract - 1 teaspoon butterscotch extract - 1 cup butterscotch chips - 1 cup heavy cream - ¼ cup powdered sugar - 1 teaspoon vanilla extract (for whipped cream topping) - Additional butterscotch sauce for drizzling Choosing fresh ingredients makes your cake taste better. Here are some tips: - Flour: Look for flour that is in a sealed bag. Check the date to ensure it is fresh. - Sugar: Granulated sugar should be free of clumps. Choose a brand you trust. - Buttermilk: Check the expiration date. Fresh buttermilk gives great flavor. - Butter: Select unsalted butter. It should be firm and cool to the touch. - Eggs: Choose eggs that feel heavy for their size. Check for cracks. - Extracts: Buy good quality vanilla and butterscotch extracts for best results. - Butterscotch Chips: Ensure the bag is not open. Check the date for freshness. If you can’t find certain ingredients, here are some swaps: - All-purpose flour: Use cake flour for a lighter cake texture. - Buttermilk: Make your own by mixing milk with vinegar or lemon juice. - Unsalted butter: Use salted butter but reduce the salt in the recipe. - Eggs: Use flaxseed meal mixed with water as a vegan substitute. - Butterscotch chips: Try chocolate chips for a different flavor. Using these tips and substitutions, you can create a delightful Butterbeer Cake that captures the magic of the wizarding world. For the full recipe, refer to the provided instructions. Start by preheating your oven to 350°F (175°C). Prepare two 9-inch round cake pans by greasing and flouring them. This step helps the cake come out easily. In a large bowl, mix the dry ingredients: flour, sugar, baking powder, and salt. Whisk them together well. In a separate bowl, combine the wet ingredients: buttermilk, melted butter, eggs, vanilla extract, and butterscotch extract. Mix until smooth. Be gentle when mixing the wet and dry ingredients. Over-mixing can make the cake tough. Once combined, fold in the butterscotch chips carefully. This keeps them intact in the batter. Pour the batter evenly into the prepared pans. Bake for 25-30 minutes. Check if they are done by inserting a toothpick. It should come out clean. Let the cakes cool for 10 minutes in the pans before moving them to a wire rack. When the cakes are cool, it’s time to assemble. Place one cake layer on a serving plate. Spread whipped cream on top. This adds a nice touch of sweetness. Then, place the second layer on top. Spread more whipped cream on the top layer and drizzle with butterscotch sauce. For extra flair, add butterscotch chips as a garnish. Enjoy this magical treat with friends or family. Check out the Full Recipe for more details on making this delightful cake! To ensure your Harry Potter Butterbeer Cake is moist, start with fresh buttermilk. Buttermilk adds creaminess and keeps the cake tender. Mix your wet and dry ingredients gently. Over-mixing can lead to a dry cake. Also, bake the cake just until a toothpick comes out clean. If you bake too long, the cake will dry out. Serve this cake with a big dollop of whipped cream. A drizzle of butterscotch sauce on top makes it even better. For a fun twist, pair it with a hot cup of cocoa or a glass of cold milk. You can also add extra butterscotch chips on the sides for a delicious crunch. One common mistake is not measuring your ingredients correctly. Use a kitchen scale for accuracy. Another mistake is skipping the cooling step. Let the cakes cool completely before frosting. Cutting into a warm cake will make it messy. Lastly, don't rush the baking time. Always check with a toothpick for doneness. These tips will help you create a perfect Butterbeer Cake every time. For a detailed guide, check the Full Recipe. {{image_2}} You can make this cake gluten-free! Use a gluten-free all-purpose flour blend. Replace the regular flour with this blend in a 1:1 ratio. This swap keeps the texture and taste close to the original. Always check that your baking powder is gluten-free too. While whipped cream is a great topping, you can try others. Cream cheese frosting adds a tangy twist. Just mix cream cheese, butter, and powdered sugar until smooth. You can also use a butterscotch frosting. Combine butter, powdered sugar, and butterscotch sauce for a rich flavor. Want to enhance your Butterbeer cake? Add spices like cinnamon or nutmeg to the batter. A splash of rum flavoring can also deepen the taste. You could even layer in caramel or chocolate ganache between the cake layers. For a fun twist, sprinkle in some toffee bits. Each variation makes the cake more magical! To keep your Harry Potter Butterbeer Cake fresh, store it in an airtight container. This will lock in moisture and keep the cake soft. If you don’t have a container, wrap the cake tightly in plastic wrap. Place it in a cool, dry spot away from sunlight. Avoid storing it in the fridge, as cold air can dry out your cake. Freezing leftovers is a great way to save your delicious cake for later. First, let the cake cool completely. Then, slice the cake into individual pieces. Wrap each piece in plastic wrap. After that, place the wrapped pieces in a freezer-safe bag. Freeze for up to three months. When you’re ready to enjoy, thaw the cake in the fridge overnight. Your Butterbeer Cake will stay fresh for about 3 to 4 days at room temperature. If stored properly in the fridge, it can last about a week. Check for signs of spoilage before eating. If you see mold or if the cake smells off, it’s best to throw it away. Always trust your senses when it comes to food safety. For more details, refer to the Full Recipe. Butterbeer is a magical drink from the Harry Potter books. It tastes sweet and creamy, with hints of butterscotch and vanilla. Fans of the series love it for its warm and cozy feel. You can enjoy Butterbeer hot or cold, and it has become a popular treat at Harry Potter-themed events. Yes, you can make this cake ahead of time! I often bake the layers a day before. Just store them in an airtight container. When you're ready to serve, whip up the cream and assemble the cake. This gives the flavors time to blend and makes it even tastier! You can find butterscotch extract at most grocery stores. Look in the baking aisle, near vanilla and other extracts. If you can't find it, check online. Many stores offer it, and you can even find it at specialty baking shops. It adds a great flavor to your cake! The full recipe can help you create this delightful treat with ease. In this post, we explored the key ingredients for your cake, focusing on freshness and substitutions. We walked through step-by-step instructions, from preparation to assembling, while sharing tips for moisture and serving. Variations like gluten-free options and frosting ideas can elevate your cake. We also discussed how to store it properly and answered common questions. Baking can be simple and fun. With practice, your cake will impress everyone. Keep experimenting and enjoy every bite!
Harry Potter Butterbeer Cake Delightful Baking Treat
Are you ready to transport your taste buds to the magical world of Harry Potter? This Butterbeer Cake brings the flavors of the famed wizarding
To make these tasty pumpkin brownies, you will need: - 1 cup canned pumpkin puree - 1/2 cup almond butter - 1/2 cup coconut sugar (or brown sugar) - 1/3 cup maple syrup - 2 large eggs - 1 teaspoon vanilla extract - 1 cup whole wheat flour - 1/2 cup unsweetened cocoa powder - 1 teaspoon baking powder - 1 teaspoon pumpkin spice (or a mix of cinnamon, nutmeg, and ginger) - 1/2 teaspoon salt - 1/2 cup chocolate chips (optional) If you don’t have some ingredients, don’t worry! Here are some easy swaps: - Almond butter: You can use peanut butter or sun butter. - Coconut sugar: Brown sugar works well as a substitute. - Maple syrup: Honey or agave syrup can also be used. - Whole wheat flour: All-purpose flour is a good choice if you prefer. - Pumpkin spice: A mix of cinnamon, nutmeg, and ginger gives great flavor. - Chocolate chips: You can skip them or use nuts instead. Each brownie is a treat that balances taste and health. Here’s what you get per serving: - Calories: About 150 - Protein: 3g - Fat: 6g - Carbohydrates: 24g - Fiber: 2g - Sugar: 8g These brownies pack a punch of flavor with less guilt! You can find the full recipe in the article. Enjoy baking! First, preheat your oven to 350°F (175°C). This helps the brownies bake evenly. Next, grab a 9x9-inch baking pan. You can grease it or line it with parchment paper. Lining it makes for easy removal later. In a large mixing bowl, add the following: - 1 cup canned pumpkin puree - 1/2 cup almond butter - 1/2 cup coconut sugar (or brown sugar) - 1/3 cup maple syrup - 2 large eggs - 1 teaspoon vanilla extract Mix these ingredients well until they are smooth. You want a nice, creamy blend. This mixture gives your brownies a rich flavor. Now, take another bowl and whisk together these dry ingredients: - 1 cup whole wheat flour - 1/2 cup unsweetened cocoa powder - 1 teaspoon baking powder - 1 teaspoon pumpkin spice (or a mix of cinnamon, nutmeg, and ginger) - 1/2 teaspoon salt Slowly add the dry mix to the wet mixture. Stir gently until just combined. Don’t overmix, or your brownies might turn out too tough. If you like, fold in 1/2 cup chocolate chips now. They will add a nice touch of sweetness. Pour the brownie batter into your prepared pan. Spread it evenly with a spatula. Place it in the oven and bake for 25-30 minutes. To check if they are done, insert a toothpick in the center. It should come out with a few moist crumbs, not wet batter. Once baked, let them cool in the pan for 10 minutes. After that, move them to a wire rack to cool completely. You can cut them into squares and enjoy your pumpkin brownies! For the complete recipe, check [Full Recipe]. To get that perfect texture in your pumpkin brownies, moisture is key. Use canned pumpkin puree for the best results. It adds moisture and flavor. Mix the wet ingredients well before adding the dry ones. This way, you avoid lumps. Do not overmix your batter. Just stir until everything is combined. Overmixing can lead to tough brownies. You want them soft and fudge-like. Spices bring warmth to your pumpkin brownies. Pumpkin spice is a great start, but you can add more. Try a dash of cinnamon or nutmeg for extra depth. Ginger also works well. You can even mix in a bit of vanilla extract. Each spice adds its own unique taste. Experiment with different combinations to find your favorite. Don't be afraid to play with flavors! Baking can be tricky. One common mistake is not measuring your ingredients correctly. Use measuring cups for accuracy. Too much flour can dry out your brownies. Another mistake is opening the oven door too early. This lets out heat and can ruin your bake. Always check for doneness with a toothpick. A few moist crumbs should stick to it, not wet batter. Follow these tips for a perfect batch. For the complete recipe, check out the Full Recipe section. {{image_2}} You can change the sweeteners in these brownies. Coconut sugar gives a rich taste. It has a lower glycemic index. Maple syrup adds a nice flavor and keeps the brownies moist. If you want a sugar-free option, use stevia or erythritol. These sweeteners can change the texture slightly, but they work well. You can make these brownies even better by adding extras. Chopped nuts like walnuts or pecans add crunch. Chocolate chips give a sweet surprise in every bite. I love using dark chocolate chips for more depth. Dried fruit, such as cranberries or raisins, adds a chewy texture. Feel free to mix and match based on your taste! If you need a gluten-free option, swap the whole wheat flour for almond or coconut flour. Both work great and keep the brownies rich. For a vegan version, use flax eggs instead of regular eggs. Just mix one tablespoon of ground flaxseed with three tablespoons of water. Let it sit for a few minutes to thicken. These changes keep the brownies tasty and satisfying. For the full recipe, check out the delicious pumpkin spice brownies! You can freeze pumpkin brownies to enjoy later. First, let them cool completely. Then, cut them into squares. Wrap each square tightly in plastic wrap. Place them in a freezer-safe bag or container. Make sure to label the bag with the date. They can stay fresh for up to three months in the freezer. To keep your pumpkin brownies fresh, store them in an airtight container. Place a piece of parchment paper between layers to prevent sticking. Keep the container in a cool, dry place. They will last up to five days at room temperature. If you want them to last longer, put them in the fridge. In the fridge, they can stay fresh for up to a week. When you want to enjoy your brownies again, reheating is simple. Preheat your oven to 350°F (175°C). Place the brownies on a baking sheet. Cover them with foil to keep moisture in. Heat for about 10 minutes. You can also use a microwave. Heat a brownie for 10-15 seconds. Be careful not to overheat, or they may dry out. Enjoy your delicious pumpkin brownies! For the full recipe, check out the details above. To check if your brownies are done, insert a toothpick in the center. If it comes out with a few moist crumbs, they’re ready. If it has wet batter on it, bake for a few more minutes. A good bake time is about 25 to 30 minutes at 350°F (175°C). Yes, you can make these brownies ahead of time. They store well for about 3 to 4 days in an airtight container. This makes them perfect for parties or family gatherings. You can also freeze them for up to three months. Just wrap them tightly in plastic wrap before freezing. For clean edges, use a sharp knife. First, let the brownies cool completely. Then, dip the knife in hot water and dry it off. This helps the knife glide through the brownies without sticking. Cut slowly and gently for nice, clean squares. Yes, you can substitute pumpkin puree. Applesauce works well for a lighter texture. Mashed bananas can also be a good choice, adding sweetness. If you want a different flavor, try using sweet potato puree. Each option gives a unique taste to your brownies. For the full recipe, check the complete instructions and enjoy these delightful treats. You now know all about making pumpkin brownies. We discussed the key ingredients and how to swap them if needed. I shared step-by-step guides for mixing and baking. I also covered tips for the best texture and avoiding common blunders. Don't forget the variations you can try, like adding nuts or making them vegan. Lastly, I gave you smart storage ideas. Enjoy these brownies with friends and family. They are sure to impress!
Pumpkin Brownies Delightful Easy Fall Treat
Nothing says fall like warm, gooey Pumpkin Brownies. In this easy recipe, you’ll learn how to whip up a delicious treat that’s perfect for cozy