Appetizers

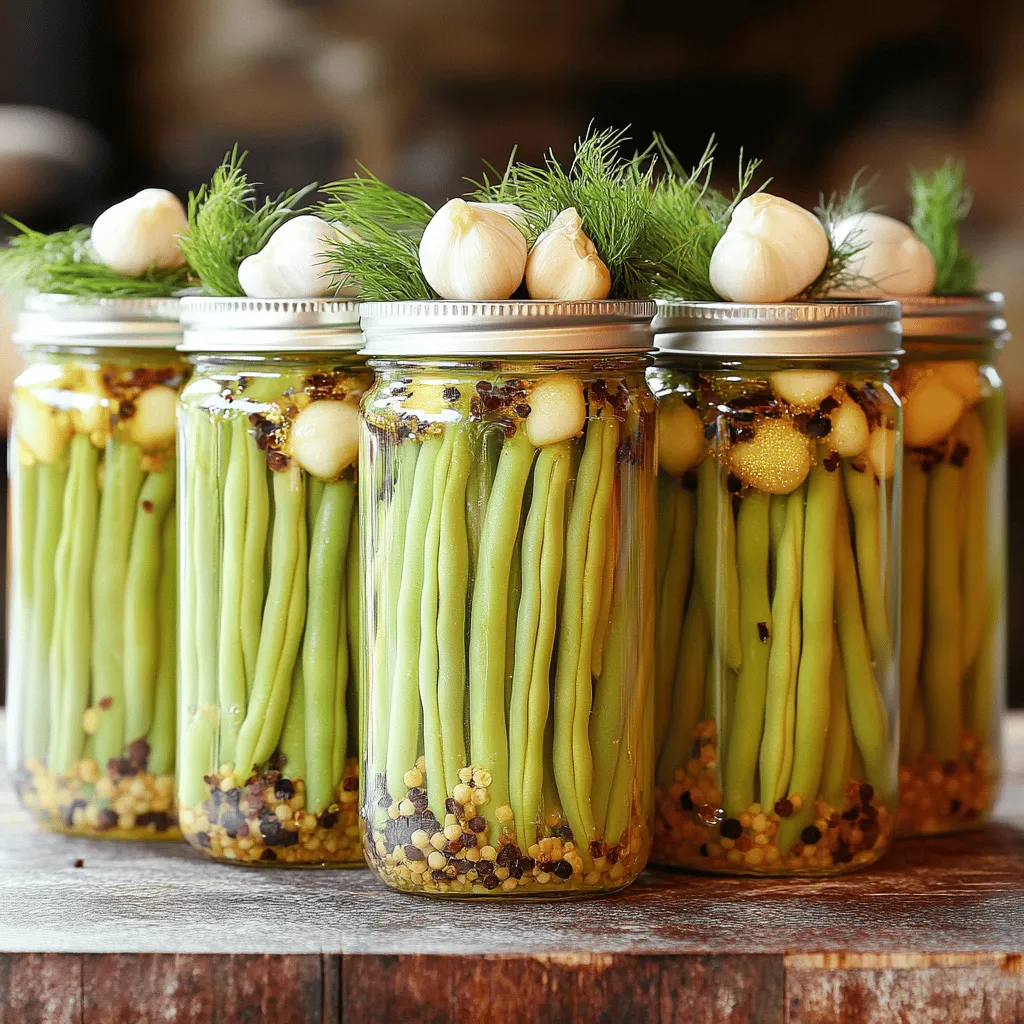
Refrigerator Dilly Beans Perfect for Your Pantry
Looking to spice up your pantry with a delightful, crunchy treat? Refrigerator dilly beans are the perfect solution! In just a few simple steps, you’ll

Figs in a Blanket Tasty and Simple Appetizer Delight
Looking for a simple yet delicious appetizer? Figs in a Blanket is your go-to choice! This tasty treat combines sweet figs with savory flavors, making

Air Fryer Chicken Mozzarella Wraps Tasty and Simple
Looking to spice up your dinner routine? These Air Fryer Chicken Mozzarella Wraps are both tasty and simple to make! With just a few fresh
![To make Incredible Hot Honey Chicken Wings, you need these simple items: - 2 lbs chicken wings - 1 tablespoon olive oil - 1 teaspoon garlic powder - 1 teaspoon onion powder - 1 teaspoon smoked paprika - ½ teaspoon cayenne pepper (adjust for heat level) - Salt and pepper to taste - ½ cup honey - 2 tablespoons apple cider vinegar - 1 tablespoon sriracha (optional, for added heat) - Fresh parsley, chopped (for garnish) You can swap some ingredients to fit your taste or what's in your pantry: - Chicken wings: Drumsticks or thighs work too. - Olive oil: Use vegetable oil or melted butter for a different flavor. - Honey: Try maple syrup or agave for a unique twist. - Apple cider vinegar: White vinegar or lemon juice can substitute here. - Sriracha: Use any hot sauce you like for heat. Quality ingredients make a difference in taste. Here are some quick tips: - Chicken: Choose fresh, organic wings if possible. They taste better. - Spices: Use fresh spices; they have more flavor than old ones. - Honey: Look for pure honey with no additives. It’s sweeter and richer. - Vinegar: Opt for raw apple cider vinegar for added health benefits. These tips will help you create wings that burst with flavor. For the complete recipe, refer to the Full Recipe. First, preheat your oven to 425°F (220°C). This step is key for crispy wings. Next, take 2 lbs of chicken wings and pat them dry using paper towels. This helps them crisp up nicely. Place the wings in a large bowl. Now, drizzle them with 1 tablespoon of olive oil. Sprinkle in 1 teaspoon each of garlic powder and onion powder. Add 1 teaspoon of smoked paprika and ½ teaspoon of cayenne pepper. Adjust the cayenne if you want less heat. Finally, add salt and pepper to taste. Mix everything well so the wings are fully coated. Line a baking sheet with foil for easy cleanup. Then, place a wire rack on top of the sheet. This rack allows air to flow around the wings. Arrange the coated wings in a single layer on the rack. Bake them in the preheated oven for about 40-45 minutes. Turn the wings halfway through to ensure even cooking. You will know they are done when they are golden brown and crispy. While the wings bake, start the hot honey sauce. In a small saucepan over medium heat, combine ½ cup of honey, 2 tablespoons of apple cider vinegar, and 1 tablespoon of sriracha if you want some extra heat. Stir the mix until it is well combined. Let it simmer for about 5 minutes. The sauce should thicken slightly. Once ready, remove it from the heat and set it aside. This step is crucial as the hot honey sauce adds a sweet and spicy kick to the wings. When the wings are done, toss them in this delicious sauce. Enjoy your Incredible Hot Honey Chicken Wings! For the full recipe, check the section above. To get those wings crispy, you need to dry them well. After washing, use paper towels to pat them dry. This step helps remove moisture that can make wings soggy. Next, coat the wings with olive oil and seasoning. This adds flavor while helping them crisp in the oven. Use a wire rack for baking. This allows hot air to circulate around the wings. Bake at 425°F (220°C) for 40-45 minutes. Flip them halfway for even cooking. Enhancing flavor is simple. Start with good spices like garlic powder and smoked paprika. You can also add cayenne for heat. Adjust this to your taste. For the hot honey sauce, mix honey with apple cider vinegar. This combo brings sweetness and tang. If you like heat, include sriracha. Let it simmer to thicken. This step intensifies the flavor. One common mistake is overcrowding the baking sheet. Wings need space to crisp up. If they touch, they will steam instead. Another mistake is not preheating the oven. An oven that isn’t hot enough won’t cook the wings well. Lastly, don’t skip the drying step. Moisture is the enemy of crispy wings. Follow these tips for a tasty and crispy result. For the full recipe, check out the Incredible Hot Honey Chicken Wings section. {{image_2}} To make BBQ hot honey chicken wings, start with the same base recipe. Use your favorite BBQ sauce mixed with honey for a sweet and smoky flavor. Just blend ½ cup of BBQ sauce with ½ cup of honey. Coat the wings in this mix before baking. The BBQ adds a nice twist to the sweet heat. For spicy garlic honey wings, add more garlic and some chili flakes. Mix 1 tablespoon of minced garlic into the hot honey sauce. You can also add 1 teaspoon of chili flakes for extra heat. This version gives you a robust garlic flavor with a spicy kick. It's perfect for garlic lovers! You can cook these wings in different ways. Baking is easy and healthier. It gives you crispy wings without much oil. Frying makes them extra crispy and is faster. If you fry, heat oil to 375°F (190°C) and cook wings for about 8-10 minutes. Both methods work great, so choose what you like best! For the full recipe, check out the Incredible Hot Honey Chicken Wings section. To store leftover wings, let them cool down first. Place the wings in an airtight container. You can also wrap them tightly in foil or plastic wrap. This keeps them fresh. Store the container in the fridge for up to four days. If you want to keep them longer, freezing is a good option. When it's time to eat the wings again, you can reheat them easily. The best way is in the oven. Preheat your oven to 375°F (190°C). Place the wings on a baking sheet. Heat them for about 15-20 minutes. This method helps them stay crispy. You can also use a microwave, but the wings may not be as crispy. If you use the microwave, heat them in short bursts. Check every minute until hot. If you wish to store wings for a long time, freezing is perfect. First, let the wings cool completely. Then, place them in a freezer-safe bag. Remove as much air as possible before sealing. Label the bag with the date. You can freeze them for up to three months. When ready to enjoy, thaw them in the fridge overnight. Then, reheat as described above. This keeps the wings tasty and ready to eat anytime. For the full recipe, check out the previous section! The best temperature to bake chicken wings is 425°F (220°C). This high heat helps wings become crispy on the outside while staying juicy inside. I find this temperature perfect for achieving that ideal texture. Just make sure to flip the wings halfway for even cooking. Yes, you can make the hot honey sauce in advance. Just store it in an airtight container in the fridge for up to a week. When you're ready to use it, heat it gently on the stove. This way, you save time on game day or dinner night. Several sides go great with hot honey chicken wings. Here are a few ideas: - Celery sticks - Carrot sticks - Blue cheese or ranch dressing for dipping - French fries - Cornbread These sides add a nice balance to the sweet and spicy flavors of the wings. You can mix and match based on what you enjoy! For the full recipe, check [Full Recipe]. This article covered how to make delicious hot honey chicken wings. We discussed ingredient lists, substitutions, and tips for quality. You learned step-by-step instructions for preparation, baking, and making the hot honey sauce. I shared tricks for crispy wings and flavor boosts while avoiding common mistakes. We explored tasty variations, storage, and reheating methods. Enjoy your cooking adventure with hot honey wings. With these tips, you’ll impress your family and friends!](https://therecipehatch.com/wp-content/uploads/2025/07/9d66e127-9a2c-4697-a170-c48e49622038.webp)
Incredible Hot Honey Chicken Wings Tasty and Simple
Are you ready to spice up your game day or dinner table? These Incredible Hot Honey Chicken Wings offer a perfect mix of heat and
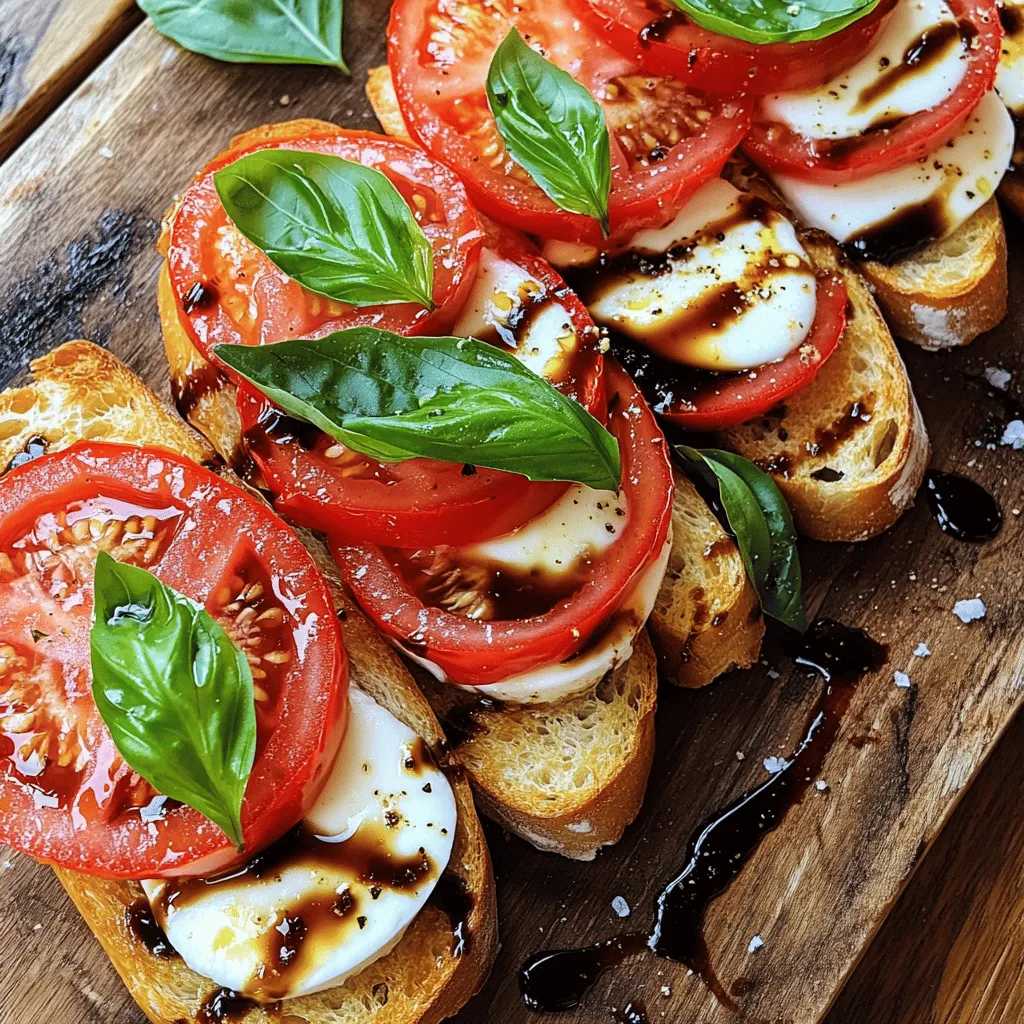
Baguette Caprese Salad Fresh and Flavorful Delight
Looking for a fresh and tasty dish? Try my Baguette Caprese Salad! With juicy tomatoes, creamy mozzarella, and fragrant basil, this salad bursts with flavor.

Crispy Zucchini Cakes Flavorful and Easy Recipe
If you’re craving a dish that’s both crispy and packed with flavor, look no further! My easy recipe for crispy zucchini cakes hits the spot
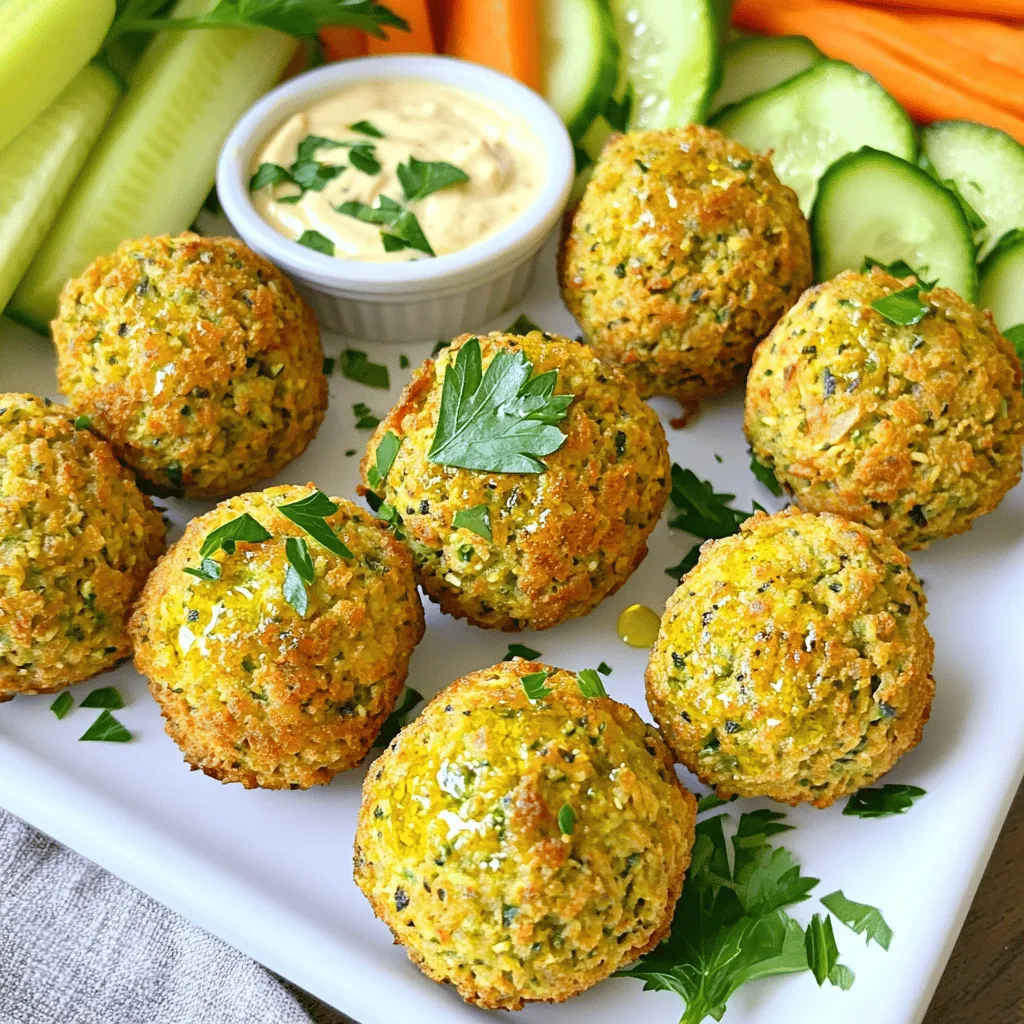
Golden Brown Baked Falafel Made Easy Recipe Today
Are you ready to whip up some delicious Golden Brown Baked Falafel that’s easy to make? This recipe brings you crispy, flavorful falafel without the
![- Chicken breast - Garlic - Parmesan cheese I use boneless, skinless chicken breast. It’s tender and cooks well. For flavor, fresh garlic is a must. I love using four cloves of minced garlic. It brings a strong taste to the dish. Grated Parmesan cheese adds a nice touch. I recommend half a cup for a rich flavor. - Greek yogurt - Lemon juice - Olive oil Greek yogurt helps keep the chicken moist. It also adds a tangy flavor. I use a quarter cup in the marinade. Fresh lemon juice is another key ingredient. It brightens the dish and adds zing. I use two tablespoons for the perfect balance. Olive oil rounds out the marinade. It adds richness and helps with grilling. I stick to one tablespoon for this recipe. - Dried oregano - Paprika - Salt and pepper Seasonings are vital for taste. I use one teaspoon of dried oregano. It gives an earthy flavor. Paprika adds a mild heat and color. I also use one teaspoon of it. Finally, I add salt and pepper to taste. These simple seasonings enhance all the flavors. For the full recipe, check the link provided. Marinating the chicken: Start by making the marinade. In a bowl, mix minced garlic, grated Parmesan, Greek yogurt, lemon juice, olive oil, dried oregano, paprika, salt, and pepper. Stir until it’s smooth. Next, add the chicken cubes. Toss them well to coat with the marinade. Cover the bowl and refrigerate it for at least 30 minutes. For a stronger flavor, let it marinate for up to 2 hours. Soaking skewers if wooden: If you use wooden skewers, soak them in water for about 30 minutes. This step helps prevent burning on the grill. It is a simple way to ensure that your skewers hold up during cooking. Preheating the grill: While the chicken marinates, it’s time to get the grill ready. Preheat your grill or grill pan to medium-high heat. A hot grill sears the chicken and gives it nice grill marks. Cooking time and checking doneness: Once the grill is hot, thread the marinated chicken onto the skewers. Leave a little space between each piece for even cooking. Place the skewers on the grill and cook for 10 to 12 minutes. Turn them occasionally. The chicken should reach an internal temperature of 165°F. This ensures it is safe to eat and juicy. Resting before serving: After grilling, take the skewers off the grill. Let them rest for a few minutes. This pause helps the juices settle in, making the chicken more tender. Presentation tips: For a beautiful serving, place the skewers on a wooden cutting board. Sprinkle extra Parmesan cheese on top for flavor. Garnish with fresh parsley and serve lemon wedges on the side. These little details make your dish look and taste amazing. For the complete recipe, check out the [Full Recipe]. To get the best flavor, marinate your chicken for at least 30 minutes. If you have time, aim for 2 hours. This longer time helps the chicken soak up all the tasty flavors. You can also mix in some fresh herbs like thyme or basil for extra taste. A splash of hot sauce can add a fun kick too! To cook your skewers evenly, keep your grill at a steady medium-high heat. Make sure to leave space between each piece of chicken on the skewers. This space helps the heat reach every side. Avoid common mistakes like flipping too often. Just turn them every few minutes for great grill marks. These skewers pair well with many side dishes. Try serving them with a fresh salad or warm pita bread. Dipping sauces make a great addition too! A simple garlic aioli or tangy yogurt dip can enhance the meal. Get creative and enjoy your Garlic Parmesan Chicken Skewers! For the full recipe, check out the link. {{image_2}} You can switch up the protein in these skewers. Shrimp makes a great choice. It cooks fast and absorbs flavors well. Tofu is also a nice option for a vegetarian meal. Both shrimp and tofu work well with the garlic and Parmesan. For cheese, try using feta or mozzarella. Feta adds a tangy touch, while mozzarella gives a creamy texture. Each cheese brings its own flavor, making the dish fun and fresh. Want a kick? Add chili flakes to the marinade. This will spice up the skewers nicely. You can also use fresh herbs like basil or thyme. They can give the dish a bright, aromatic twist. Experimenting with herbs can change the whole vibe of your meal. You can cook these skewers in different ways. Grilling gives them a nice char and smoky flavor. It’s perfect for outdoor cooking. If you prefer indoors, oven-baking is a good choice. Just set your oven to 400°F and bake the skewers for about 15-20 minutes. You can also use a skillet on your stovetop. Heat it over medium-high and cook for about 10-12 minutes, turning to brown all sides. Each method offers a unique taste, so feel free to try them all! For the full recipe, check out the details above! To keep your Garlic Parmesan Chicken Skewers fresh, store them in the fridge. Place the skewers in an airtight container. They will stay good for about 3 to 4 days. If you want to save them for longer, consider freezing. Wrap the skewers tightly in plastic wrap, then put them in a freezer bag. They can last for up to 3 months in the freezer. When you’re ready to enjoy leftovers, reheating them properly is key. Use an oven or skillet to retain moisture. Preheat your oven to 350°F (175°C). Place the skewers on a baking sheet and cover with foil. Heat for about 10-15 minutes. If using a skillet, add a splash of water and cover. This helps avoid a rubbery texture. Aim for heated chicken that stays juicy and flavorful. Knowing how long your dish lasts is important. In the fridge, Garlic Parmesan Chicken Skewers are best eaten within 3 to 4 days. If stored in the freezer, they can be safe for up to 3 months. Watch for any signs of spoilage. If you see an off smell, changed color, or slimy texture, it's time to toss them. Always prioritize food safety to enjoy your meal! For more detailed instructions, check out the Full Recipe. For the best flavor, marinate the chicken for at least 30 minutes. If you have time, let it sit for up to 2 hours. This helps the chicken absorb all the tasty garlic and Parmesan flavors. If you marinate too long, the acid in the lemon juice can change the chicken's texture. So, keep that in mind! Yes, you can prepare the skewers ahead of time! Marinate the chicken and thread it onto skewers. Cover and store them in the fridge for up to 24 hours. When you are ready to cook, just take them out and grill. This makes meal prep easy and fun! These skewers pair well with many side dishes. Here are some great options: - A fresh garden salad with lemon vinaigrette - Creamy mashed potatoes for a comforting touch - Grilled vegetables for more color and flavor - Rice pilaf to soak up extra sauce For more ideas, check out the Full Recipe! Enjoy your cooking! In this guide, we explored how to make tasty Garlic Parmesan Chicken Skewers. We covered the main ingredients like chicken, garlic, and Parmesan cheese, along with a simple marinade using Greek yogurt and lemon juice. I also shared tips for grilling, serving, and storing your skewers. Whether you choose to grill or bake, these skewers are easy and fun. Try various flavors to keep things fresh. Enjoy your cooking and impress your friends and family with this delicious dish!](https://therecipehatch.com/wp-content/uploads/2025/07/e5e7de84-01f2-45c2-9102-83e47d218022.webp)
Garlic Parmesan Chicken Skewers Simple and Tasty Meal
Looking for a quick, tasty meal? Garlic Parmesan Chicken Skewers are your answer! This dish combines tender chicken, rich garlic, and cheesy goodness. It’s simple
Grandma’s Crispy Garlic Dilly Beans Flavorful Snack
Are you ready to take snack time up a notch? Grandma’s Crispy Garlic Dilly Beans are not just tasty; they are a crunchy delight packed

Deviled Eggs with Cowboy Caviar Tasty Party Appetizer
Looking for the perfect party appetizer that wows? Try my Deviled Eggs with Cowboy Caviar! This tasty twist on a classic combines creamy, seasoned eggs