Appetizers

- 1 ½ cups all-purpose flour - 1 tablespoon baking powder - ½ teaspoon salt - 1 teaspoon dried oregano - 1 teaspoon garlic powder - 1 large egg - ¾ cup milk - ¼ cup olive oil - 1 cup shredded mozzarella cheese - ½ cup mini pepperoni slices - ½ cup marinara sauce (plus extra for dipping) To start, gather all your dry ingredients. You need flour, baking powder, salt, oregano, and garlic powder. These form a great base for your muffins. Each one adds flavor and helps the muffins rise. Next, for the wet ingredients, crack a large egg into a bowl. Then add milk and olive oil. These ingredients keep the muffins moist and fluffy. Now, let’s talk about the mix-ins. The shredded mozzarella cheese gives a gooey texture. The mini pepperoni slices add that classic pizza flavor. Don't forget the marinara sauce. It enhances taste and serves as a dip! For the full recipe, check out the complete instructions. This blend of flavors makes a snack that everyone will love. - Preheat your oven to 400°F (200°C). - Line the muffin tin with paper liners or grease it well. - Combine 1 ½ cups of all-purpose flour, 1 tablespoon of baking powder, ½ teaspoon of salt, 1 teaspoon of dried oregano, and 1 teaspoon of garlic powder. - Whisk until blended evenly. - Stir in 1 cup of shredded mozzarella cheese and ½ cup of mini pepperoni slices. - In a separate bowl, mix 1 large egg, ¾ cup of milk, and ¼ cup of olive oil. - Pour the wet mix into the dry mix. Stir gently until just combined. - Spoon the batter into the muffin tin, filling each cup about ¾ full. - Add a small dollop of marinara sauce on top of each muffin before baking. - Bake for 15-18 minutes or until golden brown. A toothpick should come out clean. - Let the muffins cool in the tin for 5 minutes, then move them to a wire rack to cool completely. You can find the full recipe to guide you through each step with more details. To get your muffins just right, avoid overmixing the batter. This keeps them light and fluffy. Use room temperature ingredients for better mixing. It helps the batter blend smoothly. You can boost the flavor of your muffins by adding extra toppings. Try grated Parmesan cheese or some Italian herbs. These add depth and richness. Serving fresh basil on the side gives a bright burst of flavor. To keep your muffins fresh, store them in an airtight container. They will stay good for up to three days. If you want them crispy again, reheat them in the oven. This brings back that lovely texture. {{image_2}} You can make your pepperoni pizza muffins even more fun by trying different variations. If you want a veggie twist, replace the pepperoni. Use sliced olives or bell peppers. These add great flavor and color. You can mix in spinach for extra greens. This option is tasty and healthy. For a gluten-free version, swap regular flour for gluten-free all-purpose flour. This change keeps the muffins soft and tasty. Make sure to check the other ingredients too, as some may contain gluten. You can experiment with different cheeses to change the flavor. Try using cheddar or pepper jack for a spicy kick. Mixing cheeses can create a unique taste every time you bake. Keep your pepperoni pizza muffins in an airtight container at room temperature for up to 3 days. This keeps them fresh and tasty. You can grab one as a quick snack or lunch item. To save these muffins for later, freeze them in a zip-lock bag. They can stay good for up to 2 months. When you're ready to enjoy them, simply thaw at room temperature. You can also reheat them directly from the freezer if you prefer a warm snack. For the best taste, reheat the muffins in the oven. Set your oven to 350°F (175°C) and warm them for 5-10 minutes. This helps restore their crispy tops and soft insides. Enjoy your delicious pepperoni pizza muffins! For the full recipe, click here. Yes, you can prepare the batter and refrigerate it before baking. This saves time later. Just mix the dry and wet ingredients, then store them separately. When you're ready, combine them and bake. It's that easy! A toothpick inserted into the center should come out clean. This means the muffins are cooked through. If the toothpick has batter on it, bake them for a few more minutes. Keep checking every minute or so until they are ready. Yes, you can substitute with cooked sausage or ham if preferred. Both options add great flavor. You can mix and match based on what you like. Just make sure the meat is cooked before adding it to the batter. Pair them with a side salad or serve them as an appetizer with marinara sauce for dipping. The sauce adds a nice touch. You can also add some veggies for a fresh crunch. These muffins are perfect for snacks or parties! In this post, we covered how to make delicious pepperoni pizza muffins. We discussed ingredients, steps for baking, and tips for perfect texture. You learned how to store these muffins for later. Plus, we explored tasty variations, like vegetarian and gluten-free options. Remember, these muffins are great for any meal or snack. Enjoy making them fresh and experimenting with different flavors. You'll impress everyone with your cooking skills!
Pepperoni Pizza Muffins Easy and Tasty Snack Recipe
Are you craving a delicious snack that’s both easy to make and full of flavor? Look no further! These Pepperoni Pizza Muffins are your perfect
To make easy mini corn dog muffins, gather these tasty ingredients: - 1 cup cornmeal - 1 cup all-purpose flour - 1 tablespoon baking powder - 1/2 teaspoon salt - 1/4 teaspoon black pepper - 1 cup milk - 1 large egg - 2 tablespoons honey - 1 cup hot dog, diced into small pieces - 1/2 cup cheddar cheese, shredded - Cooking spray or muffin liners These ingredients create a fun and yummy treat. The cornmeal gives a sweet taste, while the hot dogs add a savory bite. You can jazz up your mini corn dog muffins with these optional items: - 1/4 cup diced onions - 1/4 cup diced jalapeños - Spices like paprika or garlic powder Adding these can boost the flavor. Onions add sweetness, and jalapeños give a nice kick. If you have dietary needs, try these substitutes: - Use gluten-free flour for a gluten-free option. - Swap hot dogs for veggie dogs or cooked sausage. - Replace milk with almond or oat milk for a dairy-free version. These swaps ensure everyone can enjoy this snack. It’s all about making the recipe fit your needs. First, gather all your ingredients. You will need: - 1 cup cornmeal - 1 cup all-purpose flour - 1 tablespoon baking powder - 1/2 teaspoon salt - 1/4 teaspoon black pepper - 1 cup milk - 1 large egg - 2 tablespoons honey - 1 cup hot dog, diced into small pieces - 1/2 cup cheddar cheese, shredded - Cooking spray or muffin liners Next, preheat your oven to 375°F (190°C). If you use muffin liners, place them in a mini muffin tin. Lightly spray them with cooking spray to stop sticking. This is key for easy removal later. Now, in a large mixing bowl, mix the dry ingredients. Combine cornmeal, flour, baking powder, salt, and black pepper. Stir them until they are well mixed and free of lumps. In another bowl, whisk the wet ingredients. Mix milk, egg, and honey until smooth. Make sure the honey blends well. Pour the wet mix into the dry mix. Stir gently until just combined. Do not overmix! A few lumps are fine. This keeps your muffins light and fluffy. Lastly, fold in the diced hot dog pieces and shredded cheddar cheese. This adds flavor and texture. Now, spoon the batter into the mini muffin tin. Fill each cup about 2/3 full. Place the muffin tin in your preheated oven. Bake for 12-15 minutes. You want them to be golden brown. Keep an eye on them as they bake. The smell will be amazing! To check doneness, insert a toothpick into the center of a muffin. If it comes out clean, they are done. If not, bake for a few more minutes. Once baked, remove the muffins from the oven. Allow them to cool in the pan for a few minutes. Then, transfer them to a wire rack. Let them cool completely before serving. Checking doneness is crucial for perfect muffins. A toothpick is your best friend here. Insert it gently into the center. If it comes out clean, your muffins are ready. If you see wet batter, give them more time. Keep checking every minute after the first 12 minutes. This helps you avoid overbaking. Overbaking can make them dry. You can also look at the tops. They should be golden brown and slightly springy to the touch. If they look too dark, check them right away. For the best taste, serve them warm with mustard or ketchup. Enjoy your tasty mini corn dog muffins! For a full recipe, refer to the previous section. When making mini corn dog muffins, watch for a few common mistakes. First, avoid overmixing the batter. This can lead to tough muffins. Mix just until the ingredients combine. Second, do not skip the cooking spray or muffin liners. This step helps prevent sticking. Lastly, keep an eye on baking time. If you bake too long, muffins can dry out. For the best mini corn dog muffins, follow these tips. Use fresh ingredients for great flavor. Measure your cornmeal and flour accurately. Too much flour can make the muffins dense. Bake them at the right temperature. Preheating the oven ensures even cooking. If you want a cheesy kick, add extra cheddar on top before baking. This gives a nice crust and flavor. To keep your mini corn dog muffins fresh, store them properly. Let them cool completely before putting them away. Use an airtight container for best results. They can last up to three days at room temperature. If you want to save them longer, freeze them. Wrap each muffin in plastic wrap, then place in a freezer bag. They can last up to three months frozen. When ready to eat, just reheat them in the oven or microwave. Enjoy your tasty treat at any time! For the full recipe, see the section above. {{image_2}} You can easily switch up the flavor of your mini corn dog muffins. Try adding diced jalapeños for a spicy kick. Chopped green onions give a fresh taste. You can also mix in cooked bacon bits for a smoky flavor. Want a cheesy twist? Add different types of cheese, like pepper jack or gouda. Each of these options makes your muffins more fun and tasty. If you want a vegetarian version, swap the hot dogs for diced veggies. Try bell peppers or zucchini for a great crunch. For a gluten-free option, use gluten-free all-purpose flour. Then, use a gluten-free cornmeal mix. This way, everyone can enjoy these muffins, no matter their diet. Serve these mini corn dog muffins in fun ways. Place them in a colorful basket with dipping sauces on the side. You can use mustard, ketchup, or even ranch dressing. For a party, make a platter with different flavors and dips. This adds variety and excitement to your snack time. Don’t forget to garnish with parsley for a pop of color! You can find the full recipe for these delicious muffins above. After you enjoy these mini corn dog muffins, store any leftovers in an airtight container. Keep them at room temperature for up to two days. If you want them to last longer, place them in the fridge. They will stay fresh for about one week. To freeze these muffins, first, let them cool completely. Then, place them in a single layer on a baking sheet. Freeze them for about an hour. Once frozen, transfer the muffins to a freezer bag or container. They can last for up to three months in the freezer. To reheat muffins, use an oven or microwave. For the oven, preheat it to 350°F (175°C). Place the muffins on a baking sheet and heat for about 10 minutes. If using a microwave, warm them for 15 to 20 seconds. Always check the center to make sure they are heated through. Enjoy your tasty mini corn dog muffins with your favorite dipping sauce! Yes, you can make mini corn dog muffins ahead of time. Just bake them and let them cool. Store them in an airtight container in the fridge for up to three days. When you're ready to eat, simply reheat them in the oven or microwave. This makes them a great snack for busy days or parties! If you want to switch up the flavor, there are many great options. You can use turkey dogs or chicken sausage for a leaner choice. For a meat-free option, try diced veggies like bell peppers or zucchini. You could also use cheese cubes for a cheesy twist. The key is to keep the pieces small for even cooking. To make these muffins healthier, you can use whole wheat flour instead of all-purpose flour. This adds fiber and nutrients. You can also reduce the amount of honey or use a natural sweetener like maple syrup. Adding veggies, like shredded carrots or spinach, boosts the nutrition without losing flavor. Enjoy your fun snack while keeping it healthy! You learned about making delicious muffins using simple, clear steps. We covered all the ingredients, baking methods, and tricks to avoid mistakes. You can also explore fun variations and how to store your muffins for longer freshness. Remember, baking is all about trying new things. Feel free to add your personal touch. Enjoy the process and share your tasty results with others!
Easy Mini Corn Dog Muffins Tasty and Fun Snack
Looking for a fun snack that’s easy to make? Let’s dive into these Easy Mini Corn Dog Muffins! They’re tasty, kid-friendly, and perfect for any
- 10 tomatillos, husked and halved - 1/2 large white onion, quartered - 2 cloves garlic, unpeeled - 2 jalapeños, halved (adjust based on spice preference) - 1/4 cup fresh cilantro, chopped - 1 tablespoon lime juice - Salt to taste Salsa verde needs fresh and bright ingredients. Tomatillos give the salsa its unique tang. Make sure to husk them before use. The onion adds sweetness and depth. Use a white onion for a milder flavor. Garlic adds a warm, rich taste. Keep them unpeeled while roasting for a softer flavor. Jalapeños bring heat, and you can adjust them to your liking. Fresh cilantro adds a burst of freshness. Lime juice brightens the salsa and gives it a zing. Salt is key to enhancing all the flavors. - Baking Sheet - Blender - Measuring Cups You need a few tools to make this salsa. A baking sheet is essential for roasting the veggies. Use a blender to mix everything into a smooth sauce. Measuring cups help you get the right amount of lime juice and salt. With these tools, you are ready to create a tasty salsa verde. For the full recipe, check out Sizzling Tomatillo Tango Salsa Verde. 1. Preheat the oven Set your oven to 425°F (220°C). This high heat helps to roast the veggies fast. 2. Husk and halve tomatillos Remove the husks from the tomatillos. Cut them in half. This lets them roast evenly. 3. Quartering the onion Take half a large white onion and cut it into quarters. Each piece should be large enough to hold up while roasting. 1. Arranging ingredients on the baking sheet Spread the halved tomatillos, quartered onion, unpeeled garlic cloves, and halved jalapeños on a baking sheet. Make sure they are in a single layer for even cooking. 2. Drizzling olive oil and sprinkling salt Drizzle a bit of olive oil over the veggies. Sprinkle salt on top. This adds flavor and helps with roasting. 3. Roasting time and temperature Place the baking sheet in the oven. Roast for about 15 minutes. Watch for soft, slightly charred tomatillos. 1. Cooling period before blending Once roasted, take the baking sheet out of the oven. Let the veggies cool for a few minutes. This keeps you safe while blending. 2. Adding cilantro and lime juice Transfer the roasted items to a blender. Add the chopped fresh cilantro and a tablespoon of lime juice for brightness. 3. Achieving desired consistency Blend until smooth or chunky, based on your taste. Add more salt or lime juice if needed. Enjoy this quick and tasty salsa verde with chips or on your favorite dishes! For the complete recipe, check out Sizzling Tomatillo Tango Salsa Verde. To make your salsa verde shine, taste it as you go. Start with the basics. After blending, try a small spoonful. If it needs more flavor, add salt. You can also tweak the acidity. A splash of lime juice brightens the salsa. If it's too tart, balance it with a pinch of sugar. Adjust the spice level based on your taste. If you love heat, add more jalapeños. For a milder version, remove the seeds. This salsa verde is versatile. Serve it warm or cool. I love using a colorful bowl for a pop. Pair it with tortilla chips for a classic snack. It also works great on tacos, grilled meats, or roasted veggies. Drizzle it over eggs for a tasty breakfast. You can even use it as a marinade for chicken or fish. Store any leftovers in an airtight container. This keeps it fresh and tasty. Salsa verde lasts about a week in the fridge. You can freeze it too! Just pour it into a freezer bag. It’s best to use it within three months. When you're ready, thaw it in the fridge overnight. Give it a good stir before serving. For more detailed steps, check the Full Recipe. {{image_2}} You can make this salsa hot by adding more jalapeños. You can also try other peppers. Serrano and habanero peppers add a nice kick. Just remember, start small and taste as you go. You can always add more heat but can’t take it away! Get creative with your salsa! Try adding fresh herbs like oregano or basil for extra flavor. You can also mix in fruits like mango or peach. These fruits add sweetness and balance the heat. Just chop them up and add them to the blender with the other ingredients. You don’t have to roast in the oven. You can use a stovetop or grill for a smoky flavor. Charring on the grill adds depth to your salsa. Just heat the ingredients until they get nice grill marks. This method works well for summer cookouts. For the full recipe, check out the Sizzling Tomatillo Tango Salsa Verde. This salsa verde is quick and easy to make. Prep time takes just 5 minutes. The total time is 20 minutes. You can serve this recipe to 4-6 people. For the full recipe details, check out Sizzling Tomatillo Tango Salsa Verde. To make this salsa, you need a few fresh ingredients. Here’s the complete list: - 10 tomatillos, husked and halved - 1/2 large white onion, quartered - 2 cloves garlic, unpeeled - 2 jalapeños, halved (adjust based on spice preference) - 1/4 cup fresh cilantro, chopped - 1 tablespoon lime juice - Salt to taste Gather these ingredients before you start. Fresh tomatillos give the best flavor. Each ingredient plays a key role in the taste. The tomatillos provide tartness, while the jalapeños add heat. The onion and garlic bring depth. Fresh cilantro and lime juice add brightness. This salsa is perfect for dipping chips or drizzling over tacos. It is vibrant and full of flavor. Enjoy making this delightful roasted tomatillo salsa verde! Can I use canned tomatillos instead of fresh? Yes, you can use canned tomatillos. They save time and still taste good. Just drain them first. You may need to adjust the salt and lime juice since canned tomatillos can be softer and saltier. How long does homemade salsa verde last? Homemade salsa verde lasts about one week in the fridge. Keep it in an airtight jar. If you want it to last longer, freeze it. Can I freeze salsa verde? Yes, you can freeze salsa verde. Use a freezer-safe container and leave space for expansion. It stays good for up to three months. Just thaw it in the fridge before serving. What dishes pair well with salsa verde? Salsa verde goes well with many dishes. Try it with tacos, grilled chicken, or fish. It also adds great flavor to enchiladas and burritos. How can I adjust the spice level in my salsa? To change the spice level, add more or fewer jalapeños. Remove the seeds for less heat. You can also add other mild peppers or mix in a bit of sugar to balance the heat. For more details on making this delicious salsa, check out the Full Recipe. Salsa verde is simple and delicious. You learned about key ingredients like tomatillos and cilantro, plus useful tools for preparation. We covered step-by-step instructions for roasting and blending. I shared tips to perfect your flavor and discussed fun variations. Now you can make salsa verde that impresses everyone. Enjoy experimenting in your kitchen with fresh flavors and combinations!
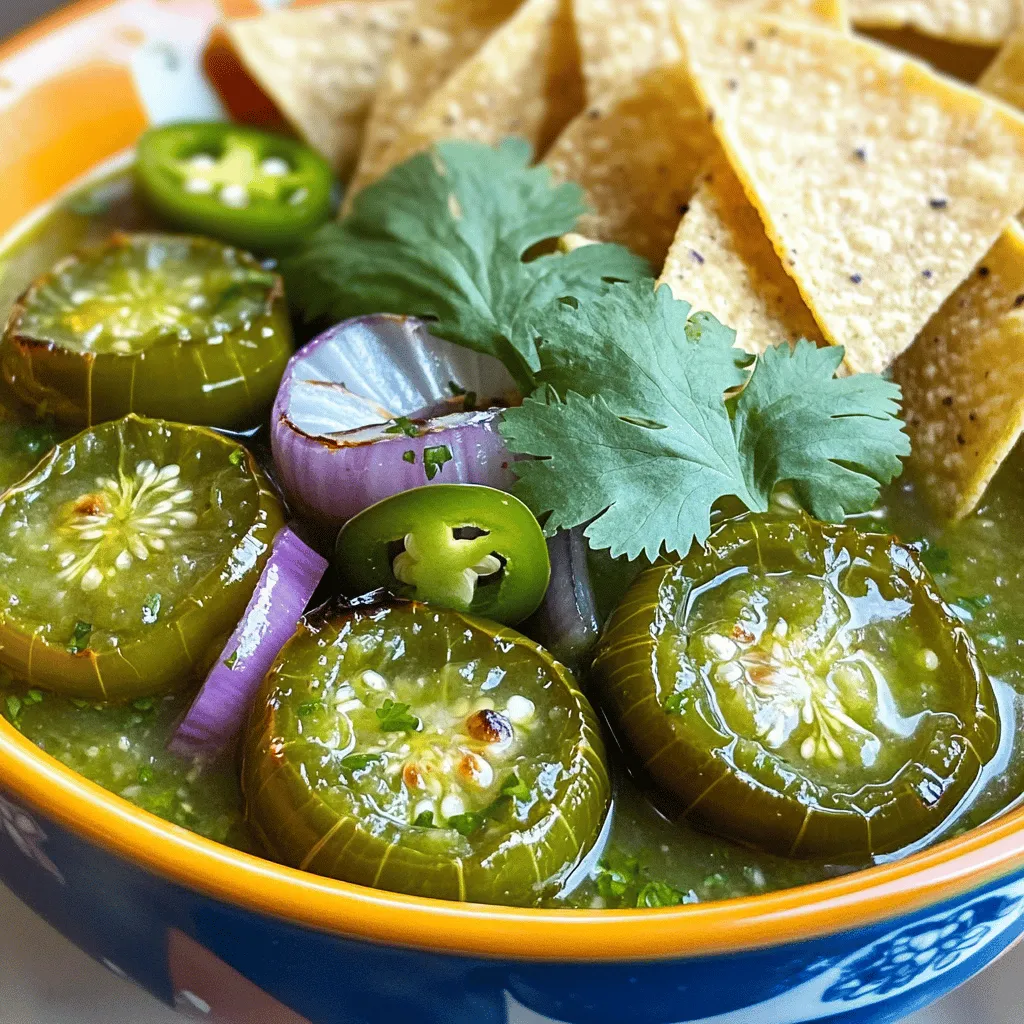
20 Minute Roasted Tomatillo Salsa Verde Delight
Are you ready to spice up your meals? In just 20 minutes, you can whip up a fresh, vibrant Roasted Tomatillo Salsa Verde that’ll elevate
To make a tasty chicken quesadilla, gather these key items: - 2 cups cooked chicken, shredded - 1 cup mixed bell peppers, diced - 1 small red onion, finely chopped - 1 jalapeño, deseeded and minced - 1 teaspoon cumin - 1 teaspoon smoked paprika - 1 teaspoon garlic powder - Salt and pepper to taste - 1 cup shredded cheddar cheese - 1 cup shredded Monterey Jack cheese - 4 large flour tortillas - 2 tablespoons olive oil These ingredients create a great base for your quesadilla. The cooked chicken gives it protein, while the bell peppers and onion add crunch and flavor. You can enhance your quesadilla with these optional ingredients: - Corn for sweetness - Black beans for extra protein - Avocado slices for creaminess - Lime juice for a zesty kick Adding these extras can take your dish to the next level. Feel free to mix and match based on what you enjoy. To make your meal even better, consider these garnishes and sides: - Fresh cilantro, chopped - Sour cream - Salsa - Guacamole These garnishes add freshness and creaminess. They also provide balance to the spiciness of the quesadilla. For the full recipe, you can follow the steps to create a perfect dish. To start, gather your ingredients. In a large bowl, combine: - 2 cups cooked chicken, shredded - 1 cup mixed bell peppers, diced - 1 small red onion, finely chopped - 1 jalapeño, deseeded and minced - 1 teaspoon cumin - 1 teaspoon smoked paprika - 1 teaspoon garlic powder - Salt and pepper to taste Mix these well. This blend gives your quesadilla its rich flavor. You can adjust the spices to fit your taste. If you want more heat, add more jalapeño. Next, heat 1 tablespoon of olive oil in a large skillet over medium heat. Place one tortilla in the skillet. Spread half of the chicken mixture on one half. Sprinkle half of the cheddar and Monterey Jack cheese on top. This cheese melts perfectly and adds creaminess. Now, fold the tortilla in half. Press down gently with a spatula. Cook for 3-4 minutes until golden brown. Carefully flip and cook for another 3-4 minutes. You want the cheese melted and the outside crispy. Repeat this step for the second quesadilla. Once cooked, cut each quesadilla into wedges. Garnish with freshly chopped cilantro for a pop of color. Serve hot with sour cream and salsa on the side. These add extra flavor and creaminess. Enjoy your cheesy fiesta chicken quesadillas! For detailed steps, check the Full Recipe. To get a crispy quesadilla, use medium heat. Too high heat can burn the tortilla. Use enough oil in the skillet to coat the bottom well. I like to use two tablespoons for four quesadillas. Cook each side for about three to four minutes. Flip gently to keep the filling inside. A heavy spatula helps press down the tortilla. This makes it crispier. A key mistake is overfilling your quesadilla. When you add too much filling, it spills out. This can make a mess and lead to soggy edges. Another mistake is not letting the cheese melt. If the heat is too low, the cheese won’t melt well. Also, avoid using cold tortillas. Warming them up helps them stay flexible and easy to fold. Spice up your quesadilla with different seasonings. Besides cumin and paprika, try chili powder for heat. You can add oregano or even taco seasoning for a twist. For a fresh taste, mix in lime juice or zest. If you love herbs, cilantro or parsley can add a nice touch. Experiment and find what you enjoy most in your quesadilla. For the full recipe, check out the Cheesy Fiesta Chicken Quesadillas. {{image_2}} You can switch up the protein in your quesadilla. If you crave beef, use ground beef instead of chicken. Just cook it with the same spices. For a seafood twist, shrimp works great. Cook the shrimp until pink and tender, then mix it with the veggies. You can also go vegetarian. Use black beans, corn, or mushrooms for a hearty filling. Each protein brings its own taste and fun! Cheese makes quesadillas extra tasty. Instead of cheddar and Monterey Jack, try different cheeses. Pepper Jack adds a nice kick. Gouda offers a creamy texture, while feta gives a unique flavor. Mix and match cheeses for fun results. The cheese melts beautifully, creating a gooey filling that everyone will love. Tortillas are not just flour. You can use corn tortillas for a gluten-free option. Spinach or tomato-flavored tortillas add color and taste. For cooking methods, try baking your quesadillas. Brush them with a bit of olive oil and bake until crispy. Grilling them gives them a smoky flavor. Each method changes the taste and crunch. Explore these options for a fun twist on your classic quesadilla. For the full recipe, check out the Cheesy Fiesta Chicken Quesadillas. Storing leftover chicken quesadillas is easy. First, let them cool down. Wrap each quesadilla in plastic wrap or foil. Place them in an airtight container. Make sure to keep them in the fridge. They will stay fresh for up to three days. This method helps keep them tasty for your next meal. You can freeze chicken quesadillas for a quick meal later. First, let them cool completely. Wrap each one tightly in plastic wrap. Then, place them in a freezer bag. Make sure to remove as much air as possible. Label the bag with the date. They can stay in the freezer for up to two months. When you're ready to eat, just thaw them in the fridge overnight. To reheat chicken quesadillas, use a skillet for the best texture. Heat the skillet over medium heat. Place the quesadilla in the pan and cover it. This keeps the heat in and melts the cheese. Heat for about 3-4 minutes on each side. You can also use an oven. Preheat it to 350°F (175°C) and bake the quesadillas for 10-15 minutes. This way, they stay crispy and tasty. Enjoy your meal! The best cheese for quesadillas is a blend of cheddar and Monterey Jack. Cheddar gives a sharp taste, while Monterey Jack melts beautifully. You could also use other cheeses like mozzarella or pepper jack for a spicier kick. Mixing cheeses adds depth to the flavor and creaminess to every bite. Yes, you can make chicken quesadillas ahead of time. Prepare the filling and store it in the fridge for up to two days. When ready to cook, just assemble the quesadillas and grill them. You save time and still enjoy a tasty meal. If you want to freeze them, wrap each quesadilla well and store them for up to three months. You can customize your quesadilla filling easily. Start with the base of cooked chicken. Then, add your favorite veggies like spinach, mushrooms, or corn. You can also mix in different spices to change the flavor. Want a kick? Add some diced jalapeños or hot sauce. You can even swap the chicken for beef, shrimp, or beans for a vegetarian option. The choices are endless! In this article, I shared key ingredients for chicken quesadillas. I covered preparation steps, cooking tips, and how to achieve a crispy texture. I also discussed variations, storage, and answered common questions. Remember, you can customize fillings and experiment with flavors. Enjoy making your quesadillas unique. Each bite can bring joy and satisfaction. So, gather your ingredients and start cooking today. Your perfect quesadilla awaits!
Chicken Quesadilla Flavorful Recipe for All Tastes
Are you ready to spice up your meal? Chicken quesadillas are a tasty treat everyone loves. In this post, I’ll share a flavorful recipe that
To make popcorn chicken, you need the following main ingredients: - 1 lb (450g) boneless chicken breast, cut into bite-sized pieces - 1 cup buttermilk - 1 teaspoon paprika - 1 teaspoon garlic powder - 1 teaspoon onion powder - 1 teaspoon salt - ½ teaspoon black pepper - 1 cup all-purpose flour - ½ cup cornmeal - 1 teaspoon baking powder - ½ teaspoon cayenne pepper (optional for heat) - Oil for frying These ingredients create a flavorful and crunchy experience. The buttermilk and spices tenderize the chicken. Together, they add depth to the taste. You can enhance your popcorn chicken with optional ingredients. These add more spice and flavor: - ½ teaspoon cayenne pepper for a kick - Hot sauce for those who love heat - Garlic salt for a savory boost - Fresh herbs like parsley for a fresh touch For dipping, consider these sauces: - Honey mustard for sweetness - Ranch dressing for creaminess - Spicy ketchup for a tangy kick Using these optional ingredients can elevate your dish. You can choose based on your taste preferences. Check out the Full Recipe for more details! First, let’s make the marinade. In a large bowl, mix 1 cup of buttermilk with spices. Add 1 teaspoon of paprika, 1 teaspoon of garlic powder, 1 teaspoon of onion powder, 1 teaspoon of salt, ½ teaspoon of black pepper, and cayenne pepper if you like heat. Whisk the mixture until it is smooth. Next, add the chicken pieces. Make sure every piece is covered in the buttermilk mix. Cover the bowl and put it in the fridge. Let the chicken marinate for at least 1 hour. For the best flavor, leave it overnight. Now, let’s prepare the coating. In another bowl, mix together 1 cup of flour, ½ cup of cornmeal, and 1 teaspoon of baking powder. This mix gives the chicken a great crunch. After marinating, take the chicken out of the fridge. Let any extra buttermilk drip off. Dredge each piece in the flour-cornmeal mix. Make sure every piece is well-coated. This step is key for that crunchy texture! For frying, choose a good oil. I recommend vegetable oil or peanut oil. Heat the oil in a deep skillet over medium heat. Aim for about 350°F (175°C). You want enough oil to cover the chicken halfway. Fry the chicken in small batches. Avoid crowding the pan. Cook each side for about 4-5 minutes. The chicken should be golden brown and cooked through. Once done, use a slotted spoon to lift the chicken out. Place it on a plate lined with paper towels. This helps to drain any extra oil. Enjoy your crispy popcorn chicken hot! For the full recipe, check out the details above. To get the best crunch, choose homemade coatings. They allow you to control flavor and texture. Store-bought coatings can lack the freshness and taste you want. Here are some tips for perfect texture: - Use buttermilk for marinating. It helps keep the chicken moist. - Let the chicken sit in the coating for a few minutes. This forms a thicker layer. - Fry in hot oil, around 350°F (175°C). This helps create that crispy bite. Many people make mistakes while cooking popcorn chicken. Overcooking can lead to dry pieces. Keep an eye on the cooking time, about 4-5 minutes per side. Another mistake is mismanaging oil temperature. If the oil is not hot enough, the chicken absorbs too much oil. This makes it greasy. Also, don’t rush the marinating process. Allowing chicken to sit in the buttermilk for at least 1 hour enhances the flavor. Overnight is even better. When it comes to serving popcorn chicken, pair it with fun sides and drinks. Here are some ideas: - Serve with fries or a fresh salad for a complete meal. - Try pairing with lemonade or iced tea for refreshing drinks. - For a fun twist, use colorful bowls or baskets. Line them with parchment paper to catch crumbs. You can even create a dipping sauce bar. Offer honey mustard, ranch, or spicy ketchup to impress your guests. Explore your creativity in serving! {{image_2}} To make spicy popcorn chicken, you can add cayenne pepper or hot sauce. This gives your chicken a nice kick. Start by mixing cayenne into your buttermilk marinade. You can adjust the amount based on your taste. If you prefer a milder spice, use just a pinch. For more heat, add extra hot sauce to the mix. This way, you control the spice level. Your guests will love the fiery crunch! If you're looking for gluten-free options, you can easily swap out the flour and cornmeal. Use almond flour or chickpea flour instead. These alternatives provide a nice texture and flavor. You can also use crushed gluten-free cornflakes for an extra crunch. To prepare a gluten-free coating, mix the flour with your spices. Make sure everything is mixed well before dredging your chicken pieces. Using an air fryer for popcorn chicken is quick and easy. First, preheat your air fryer to 400°F (200°C). Prepare your chicken just like in the full recipe. Dredge the pieces in the coating mixture. Place them in the air fryer basket in a single layer. Cook for about 10-12 minutes, flipping halfway through. This method cuts down on oil while still giving you a crispy chicken. Enjoy a healthier version of your favorite snack! To keep your popcorn chicken fresh, cool it down first. Place it on a wire rack. This lets air circulate and keeps it crispy. Once it’s cool, pack it in an airtight container. Use parchment paper to separate layers. This helps keep the coating from getting soggy. To enjoy your popcorn chicken again, reheating is key. The best way to keep it crunchy is to use an oven. Preheat your oven to 400°F (200°C). Place the chicken on a baking sheet. Heat for about 10-15 minutes. This will make it crispy again. You can also use a microwave, but it may not keep the crunch. If you use this method, heat it in short bursts. Check every 30 seconds to avoid overcooking. If you have extra popcorn chicken, freezing is a great option. First, let it cool completely. Then, lay the pieces on a baking sheet and freeze them for an hour. Once frozen, move them to a freezer bag. Remove as much air as possible to prevent freezer burn. To thaw frozen chicken, leave it in the fridge overnight. When ready to eat, reheat in the oven for the best results. This keeps the crunch and flavor intact. To make popcorn chicken crispy, you need a few key techniques. First, marinate your chicken in buttermilk and spices. This step makes the meat tender and adds flavor. Let the chicken sit for at least one hour. For the coating, use a mix of flour and cornmeal. This combo gives a nice crunch. Dredge the marinated chicken well. Make sure to shake off any extra mix. Fry in hot oil, around 350°F (175°C). Fry in small batches to keep the temperature steady. This way, you get that perfect crunch every time. Yes, you can bake popcorn chicken. Preheat your oven to 400°F (200°C). After coating the chicken, place it on a baking sheet. Use parchment paper for easy cleanup. Spray the chicken lightly with cooking oil. Bake for 20-25 minutes, flipping halfway through. This method will still give you a tasty result, though it may not be as crunchy as frying. Popular dipping sauces for popcorn chicken include honey mustard, ranch, and spicy ketchup. You can also try making your own. Mix mayonnaise with sriracha for a spicy dip. Another option is a simple garlic aioli using mayonnaise and minced garlic. Experiment with flavors to find your favorite! You can store popcorn chicken in the fridge for up to three days. Make sure it cools down first. Place it in an airtight container. For longer storage, freeze it. It stays good for about three months in the freezer. Just remember to let it thaw in the fridge before reheating. Popcorn chicken can be high in calories and fat due to frying. However, you can make it healthier. Use lean chicken breast and bake instead of fry. You can also control the amount of oil used. Serve with fresh veggies or a salad for a balanced meal. Enjoy it in moderation, and it can fit into a healthy diet. For the complete guide to making this crunchy treat, check out the Full Recipe. Popcorn chicken is a fun dish you can easily prepare at home. We covered the essential ingredients, marinade tips, and proper frying techniques for a crunchy result. Remember to avoid common mistakes to keep that texture just right. You can experiment with flavors by adjusting spices or trying gluten-free options. Lastly, knowing how to store and reheat your leftovers will keep them fresh. Enjoy making popcorn chicken that impresses your friends and family.
Popcorn Chicken Crunchy and Flavorful Recipe Guide
Ready to take your snacking game to the next level? In this guide, I’ll show you how to make crunchy and flavorful popcorn chicken that
To make easy baked ham and cheese pinwheels, gather these items: - 1 package of refrigerated puff pastry (2 sheets) - 8 oz deli ham, sliced - 8 oz cream cheese, softened - 1 cup fresh spinach, chopped - 1 cup shredded cheddar cheese - 1 teaspoon garlic powder - 1 teaspoon onion powder - Salt and pepper to taste - 1 egg, for egg wash These ingredients blend well to create a tasty snack or meal. The puff pastry gives a light and flaky texture. The ham and cheese provide a savory flavor that makes these pinwheels irresistible. You can add more taste to your pinwheels with these extras: - 1 tablespoon Dijon mustard for a tangy kick - ½ teaspoon smoked paprika for a hint of smokiness - Chopped herbs like parsley or chives for freshness These optional ingredients can elevate your dish. They add depth and personality that can impress your guests. I recommend using these brands for the best results: - Puff Pastry: Pepperidge Farm is a reliable choice. - Deli Ham: Boar's Head offers high-quality, flavorful ham. - Cream Cheese: Philadelphia cream cheese has a rich and creamy texture. - Cheddar Cheese: Cabot or Tillamook provide great shredded cheese options. Using these brands enhances the quality of your pinwheels. They help create a dish that shines in taste and presentation. For the complete recipe, check the Full Recipe link. First, you need puff pastry. Take one package with two sheets. Lay one sheet on a clean, floured surface. Roll it out gently into a rectangle. Aim for about ¼ inch thick. This helps the pastry rise well when baked. Next, grab a medium bowl. Add the softened cream cheese and mix in the chopped spinach. Then, sprinkle in the garlic powder, onion powder, salt, and pepper. Stir this mixture until it is smooth. This creamy filling will make each bite delicious. Now, take your rolled-out pastry. Spread half of the cream cheese mixture evenly over it. Layer the deli ham slices on top, then sprinkle on some shredded cheddar cheese. Starting from one edge, roll the pastry tightly into a log. Do this for the second sheet too. Once you have two logs, slice them into 1-inch rounds with a sharp knife. Preheat your oven to 400°F (200°C). Line a baking sheet with parchment paper. Place the pinwheels on the baking sheet, leaving space between them. Beat an egg in a small bowl and brush it on top of each pinwheel. This gives them a nice golden color when baked. Bake for 15-20 minutes, or until they puff up and turn golden brown. Let them cool slightly before serving. For the full recipe, check the earlier section. To make the best ham and cheese pinwheels, use cold puff pastry. Cold dough rolls better and puffs more. Always roll it to about ¼ inch thick. A thicker layer makes it hard to slice. Use a sharp knife for clean cuts. This keeps the filling inside. Space them out on the baking sheet. This helps them bake evenly. One common mistake is overfilling the pinwheels. Too much filling makes them hard to roll. Another mistake is not sealing the edges well. If they are not sealed, the filling may leak out. Also, don’t skip the egg wash. This gives a nice golden color. Lastly, avoid opening the oven too soon. This can cause them to sink. To get that perfect golden brown finish, brush each pinwheel with an egg wash. Mix one egg with a splash of water for best results. Apply it generously on top before baking. Bake them in a preheated oven at 400°F (200°C). Keep an eye on them after 15 minutes. They should puff up and turn golden. For a crispier finish, bake them a bit longer if needed. {{image_2}} You can mix up the fillings in your pinwheels to keep things fresh. Try adding cooked chicken or turkey instead of ham. You can also use roasted vegetables for a tasty twist. Spicy ingredients, like jalapeños or pepperoni, can add a kick. For a sweet touch, consider adding a layer of fig jam or apple slices. While cheddar is great, many other cheeses work well too. Try Swiss cheese or gouda for a smooth flavor. Cream cheese adds richness, while mozzarella gives a stretchy texture. Feta can bring a tangy touch, and pepper jack adds some heat. Mixing different cheeses will create unique flavors. You can easily make these pinwheels vegetarian or vegan. Replace the ham with mushrooms, bell peppers, or zucchini. Use a plant-based cream cheese for the filling. Nutritional yeast can add a cheesy flavor without dairy. Always check the puff pastry for vegan options, as some may contain butter. For the full recipe, please check the section above. To keep your leftover pinwheels fresh, place them in an airtight container. This will help prevent them from drying out. You can store them in the fridge for up to three days. If you notice any moisture, add a paper towel inside to absorb it. This method keeps the pinwheels tasty and ready for your next snack! When you're ready to enjoy your pinwheels again, preheat your oven to 350°F (175°C). Place the pinwheels on a baking sheet. Heat them for about 10-15 minutes. This will help them regain their crispiness. You can also microwave them for about 30 seconds, but they may not be as crispy. I recommend using the oven for the best result. Freezing pinwheels is a great way to save them for later. After baking, let them cool completely. Then, wrap each pinwheel in plastic wrap. Place the wrapped pinwheels in a freezer-safe bag or container. They can stay in the freezer for up to two months. When you're ready, just thaw in the fridge overnight before reheating. Enjoy your delicious pinwheels anytime! Pinwheels can last about 3 days in the fridge. Store them in an airtight container. This keeps them fresh and tasty. If you want to enjoy them longer, consider freezing them. Yes, you can make pinwheels ahead of time! Prepare them a day before and store them in the fridge. You can bake them just before serving. This way, they stay warm and flaky. Many dips pair well with ham and cheese pinwheels. Honey mustard is a popular choice. You can also try ranch dressing or a creamy garlic dip. These add extra flavor and fun. Absolutely! You can use crescent roll dough or even tortillas. Puff pastry gives a nice crunch, but other options work well too. Just adjust the baking time as needed. Yes, these pinwheels are perfect for a party platter! They are fun to eat and easy to share. Serve them warm, and they will impress your guests. For more details, check the Full Recipe. You've seen how to make tasty pinwheels step by step. We covered the ingredients, preparation, baking, and even tips to avoid mistakes. Remember to try different fillings for fun flavors. Store any leftovers properly, so they stay fresh. Pinwheels are easy, delicious, and perfect for any event. Enjoy your cooking and impress your friends!
Easy Baked Ham and Cheese Pinwheels Simple Delight
Are you ready to impress your family and friends with a tasty snack? These Easy Baked Ham and Cheese Pinwheels are your new go-to treat.
To make roasted tomato salsa, you need fresh, vibrant ingredients. Here’s what you will need: - 4 large ripe tomatoes, halved - 1 red onion, quartered - 2 cloves of garlic, unpeeled - 1 jalapeño, halved and deseeded - 2 tablespoons olive oil - Salt and pepper to taste - 1/4 cup fresh cilantro, chopped - Juice of 1 lime These fresh ingredients create a bold and tasty salsa. The tomatoes add sweetness, while the jalapeño gives a nice kick. The red onion and garlic enhance the flavor. Cilantro and lime juice add brightness to the mix. Using quality ingredients makes all the difference in this recipe. You can find the full recipe [here]. Enjoy preparing this flavorful delight! Start by preheating your oven to 400°F (200°C). This step is crucial for roasting. Next, gather your ingredients. You need four large, ripe tomatoes, a red onion, and garlic cloves. Don't forget the jalapeño! Halve it and remove the seeds if you want less heat. Place the tomatoes and onion on a baking sheet. Add the garlic, keeping it unpeeled for a richer flavor. Drizzle everything with two tablespoons of olive oil. Sprinkle some salt and pepper to taste. Now it’s time to roast. Place the baking sheet in the oven. Roast for about 25 to 30 minutes. You want the tomatoes to blister and get soft. The onions should caramelize, adding sweetness. Keep an eye on them. The smell will fill your kitchen, making your mouth water. Once done, carefully take the baking sheet out and let it cool for a few minutes. After cooling, peel the garlic cloves if you want a milder flavor. Now, move the roasted veggies to a food processor. Add a quarter cup of chopped cilantro and the juice of one lime. Pulse everything until you reach your favorite texture. Smooth or chunky, it’s up to you! Taste your salsa and adjust the flavors. Add more salt, pepper, or lime juice if needed. This is your chance to make it perfect. Enjoy your roasted tomato salsa! For the full details, check the Full Recipe. For the best flavor, select ripe tomatoes. Look for large, firm tomatoes. They should feel heavy for their size. A deep red color indicates ripeness. If they have a few blemishes, that’s okay; just ensure they are mostly intact. Roasting brings out the natural sweetness in tomatoes. Set your oven to 400°F (200°C). Spread the tomatoes, onions, garlic, and jalapeño on a baking sheet. Drizzle with olive oil and season with salt and pepper. Roast for about 25-30 minutes. Watch for blistering skins and soft veggies. This process enhances the flavors, creating a rich base for salsa. You can customize your salsa with different flavors. Try adding roasted bell peppers for sweetness. For a zesty twist, mix in some diced mango or pineapple. If you like heat, toss in more jalapeños or a pinch of cayenne pepper. Fresh herbs like basil or oregano can also add depth. Get creative and make it your own! For the full recipe, check out the details above. {{image_2}} To make a spicy version, add more jalapeños. You can also use serrano peppers for extra heat. Roast the peppers alongside the tomatoes. This will bring out their rich flavor. Blend everything together for a tasty kick. Adjust the spice to fit your taste buds. To create a smoky salsa, add smoked paprika or chipotle peppers. These will give your salsa a deep, rich flavor. Use the same roasting method. The heat from the oven enhances the smoky taste. Blend the roasted veggies with your choice of smoky spice. This salsa pairs well with grilled meats or tacos. For a fresh twist, add herbs like basil or oregano. Chop the herbs finely and mix them in after blending. You can also try adding parsley or dill for a different flavor. Each herb will offer a unique touch to your salsa. It’s a fun way to explore new tastes and aromas. Enjoy this vibrant salsa with chips, salads, or as a topping for your favorite dishes. Explore the [Full Recipe] for detailed instructions on how to make the base Roasted Tomato Salsa. After making Roasted Tomato Salsa, let it cool down. Store any leftovers in an airtight container. Place it in the fridge. It stays fresh for 3 to 5 days. If you want it to last longer, follow the freezing tips below. You can freeze Roasted Tomato Salsa for even longer storage. First, let it cool completely. Then, transfer it to a freezer-safe container or bag. Leave some space at the top, as the salsa will expand when frozen. It will keep well for up to 3 months. When you're ready to enjoy it, thaw it in the fridge overnight. Serve Roasted Tomato Salsa chilled or at room temperature. It pairs well with tortilla chips, tacos, or grilled meats. You can also use it as a topping for eggs or salads. For a fresh twist, add extra cilantro or lime juice just before serving. This salsa is versatile and adds a burst of flavor to any dish. Check out the Full Recipe for more tips. Yes, you can use canned tomatoes. Choose whole or diced tomatoes for best results. Drain them well to avoid excess liquid. Roasting fresh tomatoes adds a rich flavor. Canned tomatoes will give you a different taste but can still be tasty. Roasted Tomato Salsa lasts for about 5 days in the fridge. Store it in an airtight container. If you want to keep it longer, consider freezing it. Just remember to thaw it before serving. You can serve this salsa with many dishes. It pairs well with tortilla chips for a crunchy snack. Try it on tacos or grilled chicken for added flavor. It also works great as a topping on quesadillas or burritos. For a fun twist, add it to your breakfast eggs! This blog post guided you through making delicious roasted tomato salsa. We covered all the key ingredients, like ripe tomatoes and fresh cilantro. I shared step-by-step instructions to help you master roasting and blending. We explored tips for choosing the right tomatoes and ways to mix up flavors. Lastly, I provided storage advice to keep your salsa fresh. Enjoy making this salsa your own and share it with friends! Your kitchen is about to get more vibrant and tasty.
Roasted Tomato Salsa Bold and Flavorful Delight
Are you ready to spice up your meals? This Roasted Tomato Salsa is a bold and flavorful delight that will transform your dishes. With just
When making Easy Kids' Lunch Pizza Roll Ups, you need some simple and tasty ingredients. Here’s what you will need: - 4 large tortillas - 1 cup pizza sauce - 2 cups shredded mozzarella cheese - 1 cup sliced pepperoni - 1/2 cup bell peppers, finely chopped (optional) - 1 teaspoon Italian seasoning - 1/4 teaspoon garlic powder - Olive oil for brushing - Parmesan cheese for topping (optional) These ingredients make the roll-ups fun and delicious. You can also add other toppings your kids love. Think about veggies like mushrooms or olives. This keeps it exciting each time you make them. The key is to use fresh toppings for the best taste. You can find most of these at your local store. For the full recipe, check the details above. First, you need to preheat your oven to 400°F (200°C). This step is important because it ensures your pizza roll-ups cook evenly. Next, lay a tortilla flat on a clean surface. Take 1/4 cup of pizza sauce and spread it evenly over the tortilla. Leave a small space around the edges so the sauce doesn’t spill out when you roll it. Now, sprinkle 1/2 cup of shredded mozzarella cheese on top of the sauce. Add a few slices of pepperoni next. If you want, you can also add some finely chopped bell peppers for extra crunch. Finally, sprinkle a pinch of Italian seasoning and garlic powder over the toppings. This will add great flavor. Starting from one edge, gently roll the tortilla into a tight log shape. Repeat these steps for the rest of the tortillas. After you have rolled all the tortillas, it’s time to bake. Place the rolled tortillas seam-side down on a baking sheet lined with parchment paper. This helps prevent sticking and makes cleanup easier. Now, put the baking sheet in the preheated oven. Bake for 15-20 minutes. Keep an eye on them until they turn golden brown and the cheese is bubbly. When the pizza roll-ups are done baking, remove them from the oven. Let them cool for a few minutes before you slice them into pinwheels. To make them extra tasty, brush the tops lightly with olive oil. If you like, sprinkle some Parmesan cheese on top for added flavor. For the best enjoyment, serve these fun treats with a small bowl of extra pizza sauce for dipping. This recipe is not only easy but also a hit with kids! You can easily change up the fillings in your pizza roll-ups. Try using different meats like ham or chicken. You can also add veggies, such as mushrooms, olives, or spinach. These ideas let you mix flavors and keep lunch fun! If you need gluten-free options, look for gluten-free tortillas. They work just as well and taste great, too. Your kids won’t even notice the difference! To ensure tight rolls, start at one edge of the tortilla. Roll it up slowly and keep it snug. This helps hold all the tasty fillings inside. If the roll is loose, the toppings may spill out while baking. Cheese spills can be a mess! To avoid this, use less cheese or spread it evenly. This way, each bite stays cheesy but not too messy. Plus, keeping the edges clean after spreading sauce helps hold everything together. {{image_2}} You can mix up your Easy Kids' Lunch Pizza Roll Ups in fun ways. For a vegetarian version, leave out the meat and add more veggies. Try using spinach, mushrooms, or olives. These additions give a fresh taste and are packed with nutrients. You can even add different cheeses like cheddar or feta. For meat lovers, pile on the toppings! Use more pepperoni, sausage, or even cooked bacon. You can mix and match meats to create your perfect pizza flavor. This way, every bite is filled with tasty goodness. Pairing your roll-ups with the right dips makes lunch even better. A small bowl of pizza sauce is a classic choice. Kids love to dip! You can also try ranch dressing or garlic butter. These sauces add extra flavor and fun to each bite. If you want a zesty kick, serve with marinara sauce or pesto. You can even offer a sweet dipping sauce like honey mustard. It’s all about what your kids enjoy. Get creative with sides too. Think salad, carrot sticks, or fruit slices. These sides balance the meal and make it more colorful. You can find the full recipe easily to get started on this tasty treat! To keep your Easy Kids' Lunch Pizza Roll Ups fresh, store them properly. First, let them cool to room temperature. Then, wrap each roll-up in plastic wrap or foil. This keeps them moist and prevents drying out. You can also place them in an airtight container. If you have many left, consider freezing some. Refrigeration: Store in the fridge for up to three days. The cool air helps keep them fresh. Freezing: If you freeze them, they last for about one month. Wrap them tightly to avoid freezer burn. To enjoy your pizza roll-ups again, reheating is key. For the best results, use an oven. Preheat your oven to 350°F (175°C). Place the roll-ups on a baking sheet. Heat for about 10-15 minutes. This warms them evenly and keeps them crispy. If you use a microwave, place the roll-ups on a microwave-safe plate. Heat for about 30-60 seconds. They may become soft, but they will still taste good. For a tasty option, dip them in extra pizza sauce as you enjoy! Can I use different types of cheese? Yes, you can use different types of cheese. Cheddar, provolone, or a blend works well. Mixing cheeses can add fun flavors. Just make sure to use a cheese that melts nicely. How long do these stay fresh? These pizza roll-ups stay fresh for about three days in the fridge. Store them in an airtight container. They may get soft after a day but will still taste great. Can I make them ahead of time? Yes, you can make them ahead. Prepare the roll-ups and keep them in the fridge. Bake them just before serving for the best taste. You can also freeze them for later. What to do if they’re too soggy? If they’re too soggy, bake them a bit longer. This will help get rid of excess moisture. You can also try using less sauce next time. Ensure you leave some space around the edges when you spread the sauce. How to prevent burning? To prevent burning, keep an eye on them as they bake. If they brown too fast, cover them loosely with foil. Make sure your oven is set at the right temperature. Using parchment paper also helps avoid sticking and burning. You now have a tasty recipe to make pizza roll-ups. We covered all the key parts, from ingredients to the baking steps. You can customize your roll-ups to suit your tastes. Don't forget to store leftovers correctly to keep them fresh. With these tips, you can enjoy this meal again and again. Now, it’s time to gather your ingredients and have fun in the kitchen! Enjoy creating your pizza roll-ups!
Easy Kids’ Lunch Pizza Roll Ups Fun and Tasty Treats
Are you tired of the same old boring lunches for your kids? Let’s switch things up with Easy Kids’ Lunch Pizza Roll Ups! These fun
For Cheesy Pepperoni Roll-Ups, gather these simple ingredients: - 1 package refrigerated pizza dough - 1 cup shredded mozzarella cheese - 1/2 cup sliced pepperoni - 1/4 cup softened cream cheese - 1 teaspoon Italian seasoning - 1 tablespoon olive oil - 1/2 teaspoon garlic powder - Marinara sauce for dipping (optional) These ingredients create a tasty and fun snack. The dough forms the base, while cheese and pepperoni add flavor. Cream cheese makes it creamy, and the spices bring it all together. You can easily find these items at your local grocery store. When you prepare this dish, feel free to adjust the amounts. Want more cheese? Go for it! Prefer fewer pepperoni? That works too! The key is to have fun and make it your own. For the full recipe, check the details in the next section. Enjoy your cooking! - Preheat your oven to 400°F (200°C). Line a baking sheet with parchment paper. - Roll out the pizza dough on a floured surface. Aim for a rectangle shape, about 1/4 inch thick. - Spread the softened cream cheese evenly over the dough. Leave a small border around the edges. - Layer the shredded mozzarella cheese on top of the cream cheese. Add the sliced pepperoni next. - Starting from one long side, roll the dough into a tight log. Pinch the seams to seal it well. - Use a sharp knife to slice the roll-up into 1-inch thick pieces. Place them cut-side up on the baking sheet. - Brush the tops of the roll-ups with olive oil for a nice golden finish. - Bake in the preheated oven for 15-20 minutes. They are ready when golden brown and the cheese bubbles. - Remove from the oven and let them cool for a few minutes. Serve warm with marinara sauce for dipping. Check out the Full Recipe for more details! To make your Cheesy Pepperoni Roll-Ups truly delicious, focus on even layers. Spread the cream cheese smoothly. This helps the flavors mix well. Layer the mozzarella cheese and pepperoni evenly on top. You want each bite to taste great. Sealing the dough is key. After rolling, pinch the seams tightly. This keeps the filling inside while baking. If you notice any gaps, use a little water to help seal them. A good seal keeps all that cheesy goodness in! Dipping sauce enhances the roll-ups. I recommend marinara sauce. It adds a nice touch and pairs perfectly with the cheese. You can also try ranch or garlic sauce for variety. For presentation, place the roll-ups on a colorful plate. Sprinkle fresh herbs, like basil or parsley, on top. This adds color and freshness. You can even serve them with a side salad for a complete meal. If you have leftovers, store them properly. Place the roll-ups in an airtight container. They stay fresh for up to three days in the fridge. To reheat, preheat your oven to 350°F (175°C). Place the roll-ups on a baking sheet. Bake for about 10 minutes. This keeps them crispy and warm. Enjoy your tasty snack anytime! {{image_2}} You can make Cheesy Pepperoni Roll-Ups even better by adding different cheeses. Try cheddar, gouda, or provolone for a unique taste. Mixing cheeses adds depth and richness. You can also add vegetables. Spinach or bell peppers brighten the flavor and add nutrition. For meat lovers, swap in salami or cooked sausage for a fun twist. Using homemade pizza dough gives you control over the flavor and texture. It's fun to make, but store-bought dough saves time. If you're watching carbs, try gluten-free dough. Low-carb options help those on special diets enjoy these tasty snacks too. Want some heat? Add sliced jalapeños to your roll-ups. They bring a nice kick that pairs well with the cheese. If you prefer a sweet twist, think about making a dessert version. Use Nutella and banana slices for a fun treat. You can create savory or sweet snacks with just a few changes! Bake Cheesy Pepperoni Roll-Ups for about 15 to 20 minutes at 400°F (200°C). You want them golden brown and bubbly. Check them around the 15-minute mark. If they look done, take them out. If not, give them a few more minutes. Yes, you can freeze Cheesy Pepperoni Roll-Ups. After baking, let them cool completely. Place them in a single layer on a tray and freeze for a few hours. Once frozen, transfer them to a freezer bag. Remove as much air as you can. They can last up to three months in the freezer. When ready to eat, thaw in the fridge and reheat in the oven. If you need a substitute for cream cheese, try ricotta or sour cream. Both work well and add a nice creaminess. You can also use Greek yogurt for a healthier option. Each will change the flavor slightly, but they will still taste great. Cheesy Pepperoni Roll-Ups are quick and fun to make. You need just 15 minutes to prep and 20 minutes to bake. This recipe serves 12 roll-ups, perfect for sharing! Key notes on ingredients and preparation process: - Refrigerated pizza dough serves as the base. It’s easy to work with and saves time. - Cream cheese adds richness and helps hold the filling together. - Mozzarella cheese provides that gooey, melty texture we love. - Sliced pepperoni gives a spicy and savory kick. - Italian seasoning and garlic powder enhance the overall flavor. - Don’t forget to brush the tops with olive oil for a golden finish. When rolling the dough, make sure to keep it tight. This helps the roll-ups hold their shape. After baking, let them cool briefly. Serve them warm with marinara sauce for dipping. You can find the Full Recipe in the previous section. In this post, I shared a simple recipe for Cheesy Pepperoni Roll-Ups. You learned the essential ingredients, step-by-step instructions, and valuable tips for making them perfect. Don’t forget you can customize flavors and even try different doughs. Storage and reheating tips will help you enjoy these tasty bites later. As you make these roll-ups, remember: practice makes them even better. Enjoy the process, and happy cooking!
Cheesy Pepperoni Roll-Ups Simple and Tasty Snack
Looking for a quick and delicious snack? Let’s talk about Cheesy Pepperoni Roll-Ups! These tasty bites combine gooey cheese, savory pepperoni, and soft pizza dough
To make cheesy hot dog bites, you need simple ingredients. Here’s the list: - 6 hot dogs, cut into bite-sized pieces - 1 cup shredded cheddar cheese - 1 cup all-purpose flour - 2 teaspoons baking powder - 1/2 teaspoon garlic powder - 1/2 teaspoon paprika - 1/2 teaspoon salt - 1/2 cup milk - 1 large egg - 1/4 cup melted butter - Optional: mustard or ketchup for dipping These ingredients come together to create a snack that everyone loves. The hot dogs bring a savory taste, while the cheese adds creaminess. The flour and baking powder help create a fluffy texture. This recipe is so easy! You can find the full recipe in the article. Feel free to play around with the spices! If you like heat, add some cayenne pepper. You can even switch the cheese for something like mozzarella. Enjoy making this fun snack for any occasion! - Preheat your oven to 375°F (190°C). Line a baking sheet with parchment paper. - In a mixing bowl, combine the flour, baking powder, garlic powder, paprika, and salt. Stir well. - In a second bowl, whisk together the milk, egg, and melted butter until smooth. - Gradually pour the wet mixture into the dry mixture. Stir gently until just mixed. Don’t overmix! - Fold in the shredded cheddar cheese evenly throughout the batter. - Add the hot dog pieces. Gently fold until they are well coated. - Use a small cookie scoop or spoon to drop portions of the mixture onto the prepared baking sheet. Leave space between each one. - Bake in the preheated oven for about 15-20 minutes. They should be golden brown and a toothpick should come out clean. - Let them cool for a few minutes before serving. Enjoy these tasty bites! For the full recipe, check the complete guide on how to make these cheesy hot dog bites. To make your cheesy hot dog bites perfect, focus on two main points: avoiding overmixing and ensuring even cooking. - Avoiding overmixing: When you mix your wet and dry ingredients, do it gently. Overmixing will make the bites tough. You want a light, fluffy texture. Just stir until everything is combined, and stop there. - Ensuring even cooking: Make sure to space out the bites on the baking sheet. This helps them cook evenly. If they are too close, they may stick together and not bake well. Serving and presentation can take your cheesy hot dog bites to the next level. Here are some ideas to enhance their look and taste. - Ideas for serving and dipping sauces: Place your cheesy bites on a nice platter. Add small bowls of mustard and ketchup for dipping. You can also try BBQ sauce or ranch dressing. - Garnishing for visual appeal: Sprinkle some chopped parsley over the bites. This adds color and freshness. You could also use a few slices of green onions for a pop of flavor and color. To prepare these cheesy hot dog bites, you need a few essential tools. - Mixing bowls: Use two bowls, one for dry and one for wet ingredients. - Whisk: A whisk helps you mix the wet ingredients well. - Spoon or cookie scoop: This tool helps you portion the mixture easily. - Baking sheet: Use a baking sheet lined with parchment paper for easy cleanup. - Oven: Preheat your oven to 375°F (190°C) to bake the bites evenly. For the full recipe, check the recipe section above. These tips will help you create tasty cheesy hot dog bites that everyone will love! {{image_2}} You can switch up the cheese for your hot dog bites. Mozzarella melts well and adds a nice stretch. Pepper jack gives a spicy kick. Gouda offers a rich flavor, while Swiss cheese adds a nutty taste. Each cheese choice changes the bites in a fun way. Try different cheeses to find your favorite mix! Spice it up with more than just garlic and paprika. Add chili powder for heat or cumin for a warm flavor. Italian herbs like oregano and basil can bring a fresh taste. For a smoky twist, try smoked paprika. Experimenting with seasonings can turn these bites into a new treat every time! You can make Cheesy Hot Dog Bites gluten-free by using gluten-free flour. Look for hot dogs that are gluten-free too. For vegan bites, swap the cheese for a plant-based option and use a flax egg instead of a regular egg. You can still enjoy all the fun, no matter your dietary needs! Check out the Full Recipe for more ideas. To keep your leftover hot dog bites fresh, place them in an airtight container. You can store them in the fridge for up to three days. Make sure they have cooled completely before sealing. This will prevent moisture from building up and making them soggy. When you’re ready to enjoy your cheesy hot dog bites again, reheating is key. Preheat your oven to 350°F (175°C). Place the bites on a baking sheet and heat for about 10 minutes. This method keeps them crispy and delicious. You can also use a microwave for quick reheating, but they may become soft. If you want to save some for later, freezing is a great option. First, let the hot dog bites cool completely. Then, arrange them in a single layer on a baking sheet. Freeze them for about an hour. Once frozen, transfer them to a freezer bag. Make sure to remove as much air as possible. They can last for up to three months. To thaw, place them in the fridge overnight before reheating. Enjoy your cheesy hot dog bites anytime! You can prepare the cheesy hot dog bites ahead of time. Make the batter and fill the baking sheet as directed. Then, cover it with plastic wrap and keep it in the fridge for up to 24 hours. When you are ready, bake them straight from the fridge. This way, you save time and still enjoy a fresh snack. Yes, you can use turkey or veggie hot dogs. They will work just as well in this recipe. Just cut them into bite-sized pieces like regular hot dogs. This makes the recipe versatile for different diets and preferences. There are many great sauces to try! Here are a few ideas: - BBQ sauce - Ranch dressing - Honey mustard - Sriracha mayo These sauces can add a fun twist to your cheesy hot dog bites. To make more bites, simply double the ingredients. You can use 12 hot dogs and adjust the other ingredients accordingly. Just ensure you have a larger baking sheet or multiple sheets ready. This way, you can feed a crowd easily. Cheesy hot dog bites go well with a variety of sides. Here are some tasty options: - Coleslaw - Potato chips - Veggie sticks and dip - Fruit salad These sides can round out your snack table nicely. For the full recipe, check the earlier section. You now have a simple recipe for cheesy hot dog bites. We covered ingredients, preparation, and baking steps. I shared tips to perfect your bites and variations to try. Remember to store leftovers correctly and explore reheating options. You can also find answers to common questions about this recipe. Give this fun dish a try for your next gathering. Enjoy making these bites your own!
Cheesy Hot Dog Bites Tasty Snack for Any Occasion
Looking for a quick and fun snack? Cheesy Hot Dog Bites are perfect for any occasion! With just a few simple ingredients, you can whip