Appetizers

You need one sheet of puff pastry for this recipe. Make sure it is thawed before using. Puff pastry creates a light and flaky texture. You can find it in the freezer section of most grocery stores. I recommend using a large Granny Smith or Honeycrisp apple. These apples are tart and sweet. They hold their shape well when baked. Peel and thinly slice the apple for the best results. Using one cup of shredded sharp cheddar cheese adds a rich flavor. The sharpness of the cheese balances the sweetness of the apples. You can also try other cheeses like gouda or cream cheese for different tastes. Add one tablespoon of brown sugar to sweeten the apples. A teaspoon of cinnamon enhances the flavor beautifully. You can also include a pinch of salt to balance the sweetness. For a crunchy texture, mix in chopped walnuts or pecans if you like. First, set your oven to 400°F (200°C). This heat helps the puff pastry puff up nicely. Line a baking sheet with parchment paper. This keeps the pinwheels from sticking. Next, take your thawed puff pastry. Place it on a lightly floured surface. Roll it out gently to remove any creases. You want it slightly larger to hold more filling. Now, grab a mixing bowl. Add the thinly sliced apple, brown sugar, cinnamon, and a pinch of salt. Stir these together until the apples are coated well. This mix brings out the sweet and spicy flavors. Spread the shredded cheddar cheese evenly over the puff pastry. Leave a small margin around the edges. Then, layer the apple mixture over the cheese. If you like, sprinkle some chopped walnuts or pecans for a crunch. Starting from one edge, roll the puff pastry tightly into a log. Keep the filling inside as you roll. Once rolled, use a sharp knife to slice the log into 1-inch pinwheels. Place these cut-side up on the prepared baking sheet with space in between. Brush the tops of each pinwheel with the beaten egg for a golden finish. Bake in the oven for 15-20 minutes. Look for them to puff up and turn golden brown. Once done, remove them from the oven and let them cool for a few minutes before serving. For these pinwheels, I love using Granny Smith or Honeycrisp apples. Granny Smith has a tart flavor that pairs well with cheese. Honeycrisp is sweet and crunchy, adding a nice texture. Both types hold their shape during baking. Choose apples that are firm and fresh for the best taste. To get a nice golden color, brush the tops with beaten egg before baking. The egg wash helps them brown beautifully. Bake at 400°F (200°C) for 15-20 minutes. Keep an eye on them. Once they puff up and turn golden, they are ready to come out. When rolling the puff pastry, start at one edge and roll tightly. Make sure the filling stays inside as you roll. If the pastry tears, gently pinch it back together. Slice the log into 1-inch pinwheels with a sharp knife. This keeps them even and helps them bake uniformly. Serve these pinwheels warm for the best experience. Arrange them on a rustic wooden board. Garnish with fresh apple slices and a sprinkle of cinnamon. You can also pair them with a sweet dip like honey or a savory one like ranch. These add extra flavor and fun! {{image_2}} You can add some nuts for extra crunch. Walnuts and pecans work well. Chop them up and sprinkle them over the apples. This adds a nice texture and flavor. Nuts pair well with both apple and cheese. They bring a delightful twist to this treat. Try mixing in some nuts next time you make these pinwheels. If you want a change, try different cheeses. Gouda has a rich, creamy taste. It melts nicely and gives a unique flavor. Cream cheese offers a tangy twist and makes the pinwheels extra creamy. Spread it thinly on the puff pastry for a smooth base. Both choices can elevate your pinwheel game. For a sweeter touch, consider adding caramel or honey. Drizzle caramel over the apples for a rich, sweet layer. Honey adds natural sweetness and pairs well with apples and cheese. You can brush a little honey on top before baking. This will create a glossy finish and enhance the flavor. Sweet additions make these pinwheels even more delightful. To keep your apple cheddar puff pastry pinwheels fresh, place them in an airtight container. You can store them in the fridge for up to three days. Make sure they cool completely before sealing. This helps prevent sogginess. For best taste, enjoy them within two days. You can freeze the pinwheels for a later treat. First, let them cool completely. Then, place them in a single layer on a baking sheet. Freeze until solid, about one hour. Once frozen, transfer them to a freezer bag. They can stay in the freezer for up to three months. When ready to eat, thaw them overnight in the fridge. Reheat your pinwheels for the best taste. Preheat your oven to 375°F (190°C). Place them on a baking sheet. Heat for about 10 minutes or until warm. This helps restore the crispiness of the pastry. Avoid using the microwave, as it may make them soggy. Enjoy your tasty treat warm! Yes, you can use store-bought apple filling. It saves time and still tastes great. Choose a filling that has good flavor without too much liquid. This helps keep the pinwheels crisp. You can prepare the pinwheels and store them in the fridge. Just roll them, slice them, and place them on a baking sheet. Cover them with plastic wrap. Bake them when you’re ready. They stay fresh for a day. Apple Cheddar Puff Pastry Pinwheels taste good with many dips. Try a honey mustard sauce for a sweet kick. A creamy ranch dip also works well. You could even serve them with a warm caramel sauce for dessert. Yes, you can make these pinwheels gluten-free. Use gluten-free puff pastry instead of regular. Check the label to ensure it fits your needs. The filling remains the same, so enjoy those yummy flavors! These apple cheddar puff pastry pinwheels are tasty and fun to make. We explored the key ingredients, from puff pastry to apple varieties and cheese. I gave you simple steps for prep and baking. You learned tips for making the best pinwheels and how to store leftovers, too. Feel free to try different flavors and share them with friends. Enjoy experimenting in the kitchen!
Apple Cheddar Puff Pastry Pinwheels Delightful Treat
Get ready to impress your friends and family with Apple Cheddar Puff Pastry Pinwheels! These delightful treats combine sweet, crisp apples and rich cheddar cheese,
- 2 lbs chicken wings - 2 tablespoons baking powder - 1 tablespoon lemon pepper seasoning - 1 teaspoon garlic powder - 1 teaspoon onion powder - 1 teaspoon salt - ½ teaspoon black pepper - 1 tablespoon olive oil - Zest of 1 lemon - Fresh parsley, chopped (for garnish) The main ingredients for crispy lemon pepper air fryer wings are simple yet powerful. Chicken wings are the star of the dish. Baking powder helps create that crispy texture we all love. Lemon pepper seasoning adds bright flavor. Garlic and onion powders deepen the taste. Salt and black pepper enhance all the flavors. Olive oil gives moisture and helps the seasoning stick. Lemon zest adds a fresh kick. Finally, fresh parsley brightens the dish as a garnish. If you want to mix things up, there are great alternatives. - Alternative seasonings: You can use Cajun spice for a kick. Or try a simple blend of paprika, cayenne, and lemon zest. - Recommended oils: Instead of olive oil, you can use avocado oil. It has a high smoke point and works well in air fryers. These substitutions let you customize the flavor while keeping the wings crispy and delicious. First, you need to pat the chicken wings dry with paper towels. This step is key to getting that perfect crispiness. Removing excess moisture helps the skin become crunchy in the air fryer. If you skip this, your wings might turn out soggy. Next, let’s focus on the seasoning. In a large bowl, mix together the baking powder, lemon pepper seasoning, garlic powder, onion powder, salt, and black pepper. This blend gives the wings their amazing flavor. Then, add the chicken wings to the bowl. Drizzle them with olive oil and lemon zest. Toss everything well to coat the wings evenly. Every bite should burst with flavor! Now, it’s time to air fry your wings. Preheat your air fryer to 375°F (190°C) for about 5 minutes. This step ensures your wings cook evenly. Place the wings in a single layer in the air fryer basket. Avoid overcrowding, as this can affect crispiness. Cook the wings for 25 to 30 minutes. Make sure to flip them halfway through cooking. This helps both sides get that golden brown color. To make your wings super crispy, baking powder is key. It helps dry out the wings and adds crunch. Make sure to sprinkle it evenly during seasoning. This will make a big difference! Airflow is also important when using the air fryer. Arrange the wings in a single layer. If they overlap, they won’t crisp up. Give them space to breathe! Dipping sauces can elevate your crispy lemon pepper wings. Try ranch, blue cheese, or a spicy mayo. Each adds a tasty twist that complements the lemon flavor. For side dishes, consider celery sticks or a fresh salad. They balance the rich wings well. You can also serve with crispy fries or onion rings for a hearty meal. One common mistake is overcrowding the air fryer basket. This can lead to uneven cooking and soggy wings. Always ensure the wings have space. Another mistake is not patting the wings dry enough. Removing excess moisture is crucial for crispiness. Take a moment to dry them thoroughly with paper towels before seasoning. {{image_2}} You can spice up your crispy lemon pepper air fryer wings in fun ways. - Spicy Lemon Pepper Wings: Add heat with cayenne pepper or hot sauce. Mix it into your seasoning blend. This will give your wings a nice kick. - Garlic Parmesan Version: Swap lemon pepper for garlic and parmesan cheese. Toss cooked wings in melted butter, garlic, and parmesan for a rich flavor. Not everyone has an air fryer, and that's okay! - Oven-Baked Version for Crispy Wings: Preheat your oven to 425°F (220°C). Place wings on a baking tray lined with foil. Bake for 40-45 minutes, flipping halfway. This will give you crispy wings without an air fryer. - Grilling for a Smoky Flavor: Marinate wings with your seasoning and grill over medium heat. Cook for about 20-25 minutes, turning often. This adds a nice smoky flavor to your wings. You can easily adjust this recipe to fit your diet. - Gluten-Free Adjustments: Make sure your lemon pepper seasoning is gluten-free. Check labels to avoid hidden gluten in store-bought mixes. - Low-Carb Options: Use a low-carb seasoning blend. You can skip the baking powder if you're avoiding carbs. This keeps your wings tasty and fits your diet. After enjoying your crispy lemon pepper wings, let them cool down. This helps keep their texture. Place the wings in a shallow dish. Use airtight containers to keep them fresh. Glass or plastic containers work great. You can also use heavy-duty freezer bags. Just make sure to squeeze out air before sealing. To reheat, you have two choices: microwave or air fryer. The air fryer gives the wings a crispier texture. Preheat your air fryer to 350°F (175°C). Heat the wings for about 5-8 minutes. Flip them halfway for even heating. If you use a microwave, place the wings on a microwave-safe plate. Heat them for 1-2 minutes. Check to avoid overheating, which makes them tough. To freeze wings, wrap them tightly in plastic wrap. Then, put them in a freezer bag. Label the bag with the date. Frozen wings can last up to three months. To thaw, place them in the fridge overnight. For quick thawing, you can use the microwave. After thawing, reheat in the air fryer for best results. This keeps the wings crispy and tasty. To make air fryer wings crispy, start by drying them well. Moisture creates steam, which makes wings soggy. Use paper towels to pat them dry. Next, coat the wings with a mix of baking powder, salt, and seasonings. Baking powder helps crisp the skin. Avoid overcrowding the air fryer basket. Give each wing space to cook evenly. Flip the wings halfway through cooking. This ensures both sides get that golden crunch. Yes, you can use frozen chicken wings. However, there are a few adjustments. First, you must increase the cooking time. Instead of 25-30 minutes, cook for about 35-40 minutes. Also, do not thaw the wings before cooking. They can go straight from the freezer to the air fryer. This may affect the crispiness, so make sure to follow the same drying and seasoning steps. Lemon pepper wings go well with many sides. Try serving them with crispy fries or a fresh salad. Coleslaw adds a nice crunch and tang. You can also offer dipping sauces like ranch or blue cheese. These flavors complement the lemon pepper nicely. For a fun twist, add some celery and carrot sticks. They are perfect for dipping too! Cooked wings last about 3-4 days in the fridge. To store them, let them cool first. Place the wings in an airtight container or cover them tightly with plastic wrap. This keeps them fresh and prevents drying out. If you want to keep them longer, consider freezing them. Cooked wings can last up to 2-6 months in the freezer when stored properly. You can make perfect lemon pepper chicken wings with just a few steps. We covered essential ingredients, key preparation tips, and air frying methods to ensure crispiness. Remember to avoid common mistakes, like overcrowding the basket or skipping seasoning. Variations can keep your meals exciting, from spicy wings to gluten-free options. With proper storage tips, your leftovers will stay delicious. Enjoy experimenting with flavors and techniques for tasty results every time. Make your next gathering fun and flavorful with these wings!
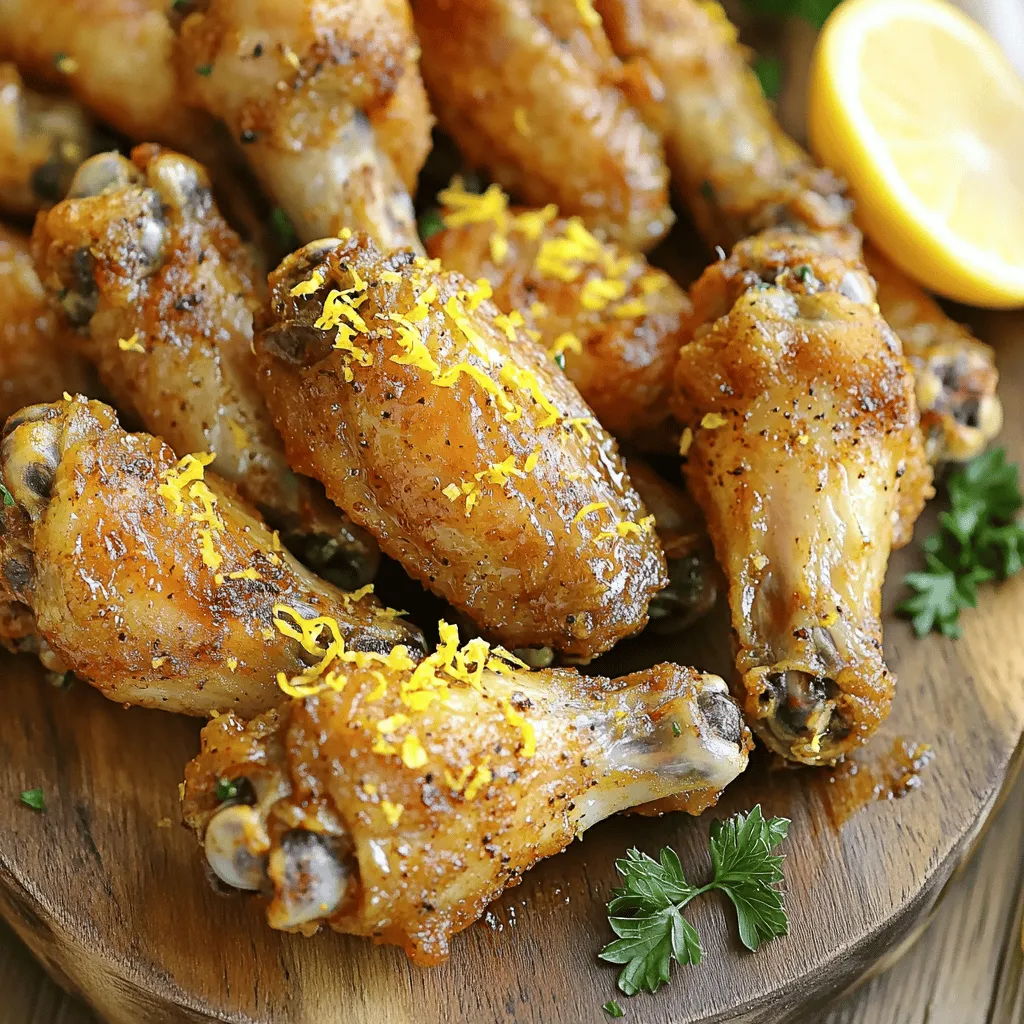
Crispy Lemon Pepper Air Fryer Wings Recipe Delight
Are you ready to impress your friends with a finger-licking appetizer? In this blog post, I’ll guide you through making crispy lemon pepper air fryer
- 2 medium zucchinis, cut into sticks - 1 cup breadcrumbs (preferably panko for extra crispiness) - ½ cup grated Parmesan cheese - 2 large eggs, beaten - 1 teaspoon garlic powder - 1 teaspoon Italian seasoning - Salt and pepper to taste - Olive oil spray For these Air Fryer Parmesan Zucchini Sticks, start with fresh zucchinis. I use two medium-sized ones. Slice them into sticks, about half an inch thick. This shape helps them cook evenly and get crispy. I prefer panko breadcrumbs for a crunchier texture. They really elevate the dish. Next, you need grated Parmesan cheese. This cheese adds a rich, savory flavor that works perfectly with zucchini. Don't skip the eggs; they help the breadcrumbs stick well. For seasoning, garlic powder and Italian seasoning are key. They bring out the best in the zucchini. Salt and pepper, as always, enhance all the flavors. Lastly, have your olive oil spray ready. This helps give the zucchini sticks a nice golden color without adding too much fat. With these ingredients, you are ready to make a tasty and crispy snack! Start by washing the zucchinis. This step removes dirt and any chemicals. Cut off the ends and slice them into sticks. Aim for about ½ inch thick, like fries. After cutting, pat them dry with a paper towel. This helps the coating stick better. If they are wet, the coating may not be crispy. Next, set up your breading station. You will need two bowls. In one bowl, mix the breadcrumbs, grated Parmesan, garlic powder, Italian seasoning, salt, and pepper. This blend adds great flavor. In the second bowl, beat the eggs until they look smooth. This egg mixture helps the breadcrumbs stick. Now, it’s time to coat the zucchini sticks. First, dip each stick into the egg. Make sure it is fully coated. Then, dredge it in the breadcrumb mix. Press gently to make sure the crumbs stick well. Place the coated sticks on a plate or baking sheet. This preparation helps keep things neat before cooking. Before cooking, preheat your air fryer. Set it to 400°F (200°C) for about 5 minutes. Preheating ensures even cooking. It helps the zucchini sticks turn out crispy and golden brown. Spray the air fryer basket lightly with olive oil. Arrange the zucchini sticks in a single layer. If your air fryer is small, you may need to cook them in batches. This prevents overcrowding, which can lead to soggy sticks. After placing them, spray the tops lightly with olive oil. Once done, remove the zucchini sticks from the air fryer. Serve them hot for the best taste. They pair wonderfully with marinara sauce or a creamy dip. For a nice presentation, arrange them on a colorful plate. Add a sprinkle of extra Parmesan on top for a gourmet touch. - Use panko breadcrumbs instead of regular ones. They are lighter and crispier. - Spray a light coat of olive oil on your zucchini sticks. This helps them fry evenly. - Try adding paprika or onion powder for a twist in taste. - If you want a different cheese, use mozzarella or pecorino for great results. - Do not overcrowd the air fryer. It stops air from flowing properly. - Always dry the zucchini well before coating. This step helps them get crispy. {{image_2}} If you love some heat, try adding cayenne or chili flakes. Just a pinch can transform your zucchini sticks. Mix them into your breadcrumb mix before coating. Adjust the amount based on your spice level. For a mild kick, use 1/4 teaspoon. For more heat, go for 1/2 teaspoon. This small change makes a big difference. Fresh herbs can brighten the flavor of your zucchini sticks. Consider adding basil, thyme, or parsley to the breadcrumb mix. Dried herbs work well, too. Just make sure to crush them slightly to release their oils. This simple addition adds depth and freshness. You can also try spices like smoked paprika for a unique twist. You can explore different cheese types to mix things up. Mozzarella adds a gooey texture, while cheddar brings sharpness. Mix mozzarella with Parmesan for a melty, cheesy delight. You can also try a blend of cheeses for a rich flavor. Just remember to adjust the amount to match your taste. This makes your zucchini sticks even more delicious! To store any leftovers, let the zucchini sticks cool first. Place them in an airtight container. They can last up to three days in the fridge. Make sure to keep them dry to avoid sogginess. You can also layer paper towels between the sticks to absorb moisture. The best way to reheat your zucchini sticks is in the air fryer. Set it to 350°F (175°C). Place the sticks in the basket, making sure they are in a single layer. Heat for about 5 minutes. This helps regain their crispiness without drying them out. To freeze, let the zucchini sticks cool completely. Arrange them in a single layer on a baking sheet and freeze for about 1-2 hours. Once frozen, transfer them to a freezer bag. They can last up to three months in the freezer. When ready to eat, defrost in the fridge overnight before reheating. These tasty zucchini sticks last about 3 to 5 days in the fridge. Make sure to store them in an airtight container. This keeps them fresh and ready to eat. Reheating them in the air fryer helps to regain some crispiness. Yes! You can use gluten-free breadcrumbs instead of regular breadcrumbs. Almond flour or crushed cornflakes also work well. Just make sure whatever you choose is certified gluten-free for safety. Absolutely! You can try eggplant, carrots, or sweet potatoes. Just cut them into sticks like the zucchini. Each vegetable will bring a new and fun flavor to the dish. These sticks pair great with marinara sauce or ranch dressing. You can also serve them with a side salad or roasted veggies for a full meal. They make a perfect snack for game day too! The blog post covers how to make Air Fryer Parmesan Zucchini Sticks. We’ve discussed essential ingredients like zucchini, breadcrumbs, and cheese. I shared step-by-step instructions, tips for crispiness, and tasty variations. Remember to avoid common mistakes, like overcrowding the fryer. Proper storage keeps leftovers fresh. Lastly, feel free to explore gluten-free options and other vegetables. These sticks are not just a snack; they are a delicious way to enjoy vegetables!
Air Fryer Parmesan Zucchini Sticks Crispy and Tasty
Craving a guilt-free snack that’s both crispy and flavorful? You’re in the right place! Air Fryer Parmesan Zucchini Sticks offer the perfect blend of crunch
- 2 medium zucchinis, thinly sliced - ½ cup grated Parmesan cheese - ½ cup breadcrumbs (preferably whole wheat) - 1 large egg, beaten - 1 teaspoon garlic powder - 1 teaspoon paprika - 1 teaspoon Italian seasoning - Salt and pepper to taste - Aioli - Marinara - Ranch dressing To make Air Fryer Parmesan Zucchini Chips, you need some key ingredients. The base is zucchini. I like to use medium zucchinis, as they slice well and stay crunchy. Grated Parmesan cheese adds a rich flavor and helps the chips crisp up nicely. Whole wheat breadcrumbs give a nice texture and extra taste. You also need one large egg to help the coating stick. Seasonings are where you can get creative. I suggest garlic powder for a savory touch. Paprika adds a lovely hint of color and warmth. Italian seasoning mixes well and gives a comforting flavor. Salt and pepper are vital to enhance the taste, so don't skip these. Dipping sauces make your chips even better. Aioli offers a creamy, garlic kick. Marinara gives you that classic Italian flavor. Ranch dressing is a favorite for many and pairs well with the chips. These simple but tasty ingredients make Air Fryer Parmesan Zucchini Chips a must-try snack. - Washing and Cutting Start by washing the zucchinis under cold water. This step is key to removing dirt. Next, cut off both ends of the zucchinis. Slice them into thin rounds, about ¼ inch thick. This thickness helps them become crispy. - Tips for Optimal Thickness Try to keep all slices uniform. This ensures even cooking. If you don’t have a knife, use a mandoline for perfect cuts. - Mixing Dry Ingredients Grab a bowl and combine the grated Parmesan cheese, breadcrumbs, garlic powder, paprika, Italian seasoning, salt, and pepper. Mix these dry ingredients well. This blend gives the chips their yummy flavor. - Beating the Egg In another bowl, crack open the large egg and beat it until smooth. This egg will help the coating stick to the zucchini slices. - Proper Coating Technique Dip each zucchini slice into the beaten egg. Let any extra egg drip off. Next, coat it in the Parmesan breadcrumb mix. Press gently so it sticks well to the slice. - Arranging on Tray Place the coated zucchini chips on a plate or tray. Make sure they don’t touch each other. This spacing helps them fry evenly. - Preheating Tips Before you cook, preheat your air fryer to 380°F (193°C). This step takes about 5 minutes. Preheating helps the chips cook evenly and become crisp. - Cooking Time and Temperature Arrange the zucchini chips in a single layer in the air fryer basket. Do not overlap them. Cook for 10-12 minutes. Flip the chips halfway through for even crispiness. - How to Maintain Crispiness When the chips are done, take them out and place them on a cool rack. This helps keep them crispy as they cool. - Best Serving Suggestions Serve your chips warm with your favorite dipping sauce. Aioli, ranch, or marinara work great. Enjoy your tasty snack! To get the best crispiness, avoid overlapping the zucchini slices in the air fryer. If they touch, they will steam instead of crisping. Cook them in batches if needed. Preheating your air fryer is also key. Set it to 380°F (193°C) for about 5 minutes before cooking. This helps the chips cook evenly and become crunchy. If you want a dairy-free option, you can use nutritional yeast instead of Parmesan cheese. For a gluten-free option, choose gluten-free breadcrumbs. Both substitutes keep the flavors rich and maintain texture. You can try adding more spices to your zucchini chips. Consider using cayenne pepper for heat or smoked paprika for a deeper flavor. Mixing in some fresh herbs, like basil or thyme, can take your chips up a notch. Don’t be afraid to experiment with different seasoning blends for a unique snack. {{image_2}} You can spice up your zucchini chips in fun ways. To make spicy zucchini chips, add cayenne pepper or red pepper flakes to your breading mix. This gives your chips a nice kick. You can also try different cheese. Instead of Parmesan, use sharp cheddar for a bold taste. Nutritional yeast is a great option too. It's dairy-free and gives a cheesy flavor. Don’t stop at zucchini! You can make sweet potato chips in the air fryer. Just slice them thin and coat them the same way. They turn crispy and sweet. Eggplant chips are another tasty choice. Slice the eggplant, season, and air fry for a unique snack. Want to add extra flavor? Try adding cooked bacon to the zucchini chips. Just chop it up and mix it into your breading. The smoky flavor will make them irresistible. You can also use fresh herbs. Chopped basil or parsley adds a fresh twist. Sprinkle them on top after cooking for a burst of flavor. To keep your zucchini chips fresh, store them in an airtight container. This will help prevent moisture, which can make them soggy. You can use glass or plastic containers. If you have a lot, consider layering them with parchment paper to avoid sticking. For best quality, eat them within three days. To bring back that crispiness, reheat your chips in the air fryer. Set it to 350°F (175°C) for about 5 minutes. This method revives their crunch. If you don't have an air fryer, you can use an oven. Set it to 350°F (175°C) and bake for 10 minutes. Keep an eye on them to avoid burning. If you want to save some for later, freezing is a great option. First, let the chips cool completely. Then, place them in a single layer on a baking sheet. Freeze them for about an hour. Once frozen, transfer them to a freezer-safe bag or container. This method helps keep them crispy. When you're ready to eat them, thaw the chips in the fridge overnight. For best results, reheat them in the air fryer for a crunchy snack! Yes, air fryer Parmesan zucchini chips are healthy. They use fresh zucchini, which is low in calories. The air fryer cooks with less oil than frying, reducing fat content. Parmesan adds flavor and protein. Whole wheat breadcrumbs boost fiber. This snack is nutritious and a great alternative to regular chips. Air fryer zucchini chips last about 2-3 days in the fridge. Store them in an airtight container. They may lose some crispiness over time. For the best taste, enjoy them fresh. If they become soft, reheat them in the air fryer for a few minutes to restore crunch. Yes, you can make zucchini chips in a conventional oven. Preheat your oven to 425°F (220°C). Place the breaded zucchini chips on a baking sheet lined with parchment paper. Bake for 20-25 minutes, flipping halfway through. Watch closely to ensure they do not burn. Enjoy the same crispy goodness! If your zucchini chips are soggy, there are a few fixes. First, ensure you cut the zucchini into thin slices. This helps them cook evenly. If they are already soggy, try reheating them in the air fryer. This should help them regain their crispiness. You can also bake them in the oven to dry them out. Customizing the recipe is easy! You can add different spices like cayenne for heat or herbs like dill for freshness. Try using different cheeses, like cheddar or nutritional yeast. You can also mix in seeds or nuts for added crunch. Make it your own by playing with flavors! This article shared ways to make tasty Air Fryer Parmesan Zucchini Chips. We covered essential ingredients and how to prepare them. You learned about seasoning options and dipping sauces that enhance flavor. Following our step-by-step guide, you now know how to achieve perfect crispiness. For the best results, don't hesitate to experiment with flavors and ingredient swaps. Whether you enjoy them fresh or store leftovers, these chips are a fun snack. Enjoy creating your own variations and savoring every bite!
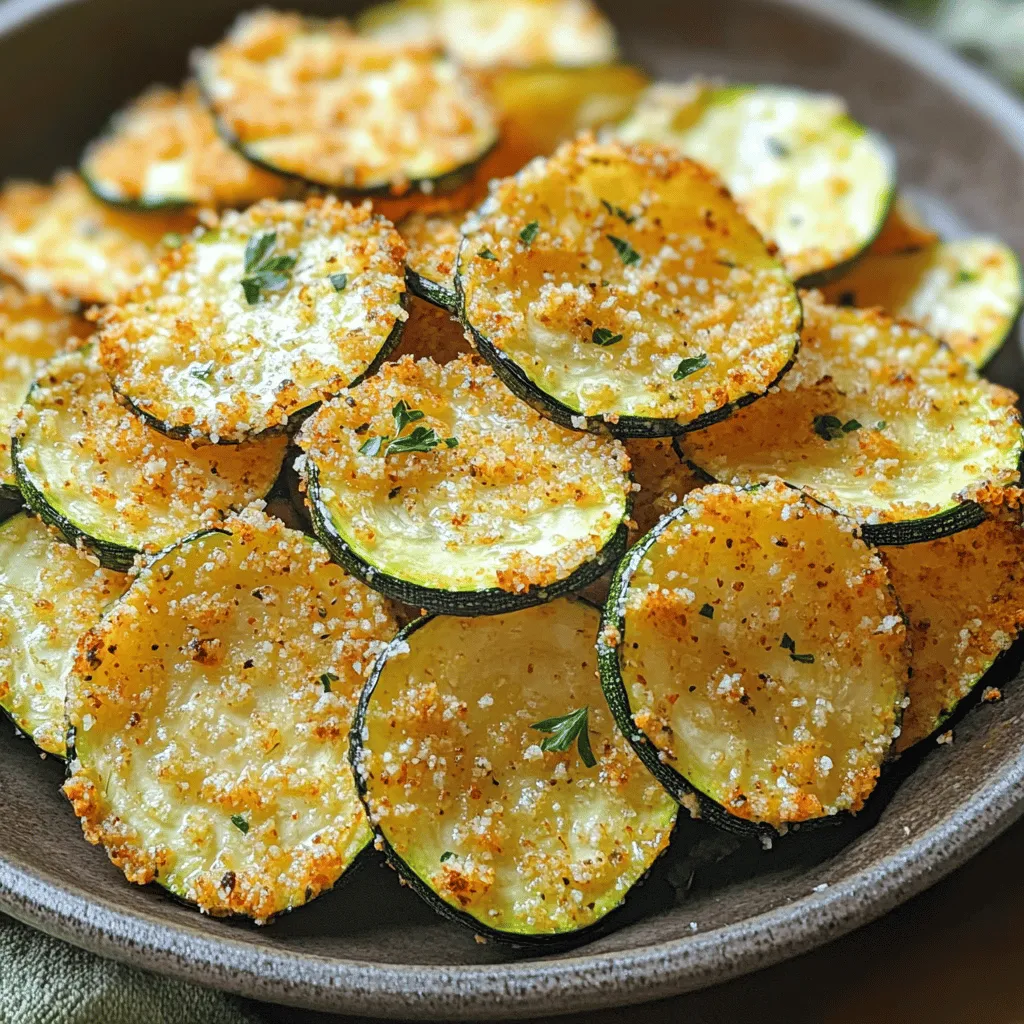
Air Fryer Parmesan Zucchini Chips Crispy and Tasty Snack
Looking for a delicious snack that’s easy to make? You’ll love these Air Fryer Parmesan Zucchini Chips! They’re perfectly crispy, packed with flavor, and a
You need 1 pound of fresh green beans. Make sure they are bright green and firm. Trim the ends to prepare them for cooking. Rinse the beans under cold water and dry them with a paper towel. For the garlic butter mix, gather these ingredients: - 3 tablespoons unsalted butter, melted - 4 cloves garlic, minced - 1 teaspoon lemon zest - 1 teaspoon garlic powder - ½ teaspoon salt - ¼ teaspoon black pepper Melt the butter in the microwave or on the stove. Then, mix all the other ingredients into the melted butter. Finally, you’ll want fresh parsley for garnish. Chop up about 1 tablespoon of parsley. This adds a pop of color and fresh taste to your dish. These simple ingredients create a flavorful and tasty side dish that everyone will love. First, set your air fryer to 350°F (175°C). Let it preheat for about 5 minutes. This step is key for even cooking. Next, rinse 1 pound of fresh green beans under cold water. Trim the ends to remove any tough parts. Then, pat them dry with a paper towel. Dry beans help the garlic butter stick better. In a small bowl, mix together 3 tablespoons of melted unsalted butter, 4 minced garlic cloves, 1 teaspoon of lemon zest, 1 teaspoon of garlic powder, ½ teaspoon of salt, and ¼ teaspoon of black pepper. Stir until all ingredients blend well. This mixture adds great flavor. Take a large mixing bowl and add your prepared green beans. Pour the garlic butter mixture over the beans. Toss them well to coat each bean with the mixture. This helps every bite taste amazing. Place the coated green beans in the air fryer basket. Make sure they lay in a single layer. If your air fryer is small, you may need to cook in batches. Air fry the beans for 8-10 minutes. Shake the basket halfway through to cook them evenly. They should be tender and slightly crispy. When the green beans are done, take them out of the air fryer. Put them in a serving dish. For a pop of color and taste, sprinkle 1 tablespoon of chopped fresh parsley on top before serving. Enjoy! To make crispy green beans, follow these steps: - Dry the Beans: Make sure to pat the green beans dry after rinsing. - Single Layer: Place the beans in a single layer in the air fryer. - Shake the Basket: Shake the basket halfway through cooking to help them crisp up. - Adjust Time: If you want them crispier, add a few more minutes. Each air fryer can cook differently. Keep these tips in mind: - Check Your Manual: Some air fryers may need less time. - Start at 8 Minutes: Begin with 8 minutes and check for doneness. - Use a Food Thermometer: The beans should be tender and have a slight crunch. To ensure your green beans have great flavor, try these techniques: - Coat Evenly: Toss the green beans well in the garlic butter mix. - Mix Seasonings: Consider mixing your seasonings before adding them to the beans. - Garnish Last: Add fresh parsley after cooking to keep it vibrant and fresh. {{image_2}} You can make garlic butter air fryer green beans a full meal by adding protein. Try adding cooked chicken, shrimp, or tofu. Just toss your choice of protein with the green beans in the garlic butter mixture. Cook everything together in the air fryer for a tasty dish. Feel free to switch up the flavors. Instead of garlic powder, try onion powder or smoked paprika. You can also add red pepper flakes for some heat. Lemon pepper seasoning adds a bright twist. Experiment to find what you love best! Want to add more veggies? Green beans pair well with bell peppers, zucchini, or asparagus. Cut them into similar sizes for even cooking. Toss them in the garlic butter mix just like the green beans. This adds color and flavor to your dish. To store your garlic butter air fryer green beans, first let them cool. Then, place the beans in an airtight container. They can stay fresh in the fridge for up to three days. Make sure to seal the container well to keep out air and moisture. When you’re ready to eat your leftovers, reheat them in the air fryer. Set it to 350°F (175°C) for about 5 minutes. This method brings back their crispness. You can also use a microwave, but they may not stay as crunchy. If you want to freeze the green beans, first let them cool completely. Next, place them in a freezer-safe bag. Try to remove as much air as possible before sealing. They can last in the freezer for up to three months. To use them later, thaw them in the fridge overnight before reheating. Yes, you can use frozen green beans. They are a great time-saver. Just remember to thaw and drain them first. This helps avoid excess water. Frozen beans may need a little extra cooking time. Check them after 10 minutes to see if they are tender. You can mix in many flavors. Try adding red pepper flakes for some heat. Lemon juice gives a fresh taste. For a nutty flavor, add toasted almonds. You can also use herbs like thyme or rosemary. Feel free to experiment with spices you love. Check the green beans after 8 minutes. They should be bright green and tender. If you want a crispier bite, cook them for another 2 minutes. Shake the basket halfway through cooking for even results. This helps them cook perfectly all around. Absolutely! Cheese adds a creamy touch. Parmesan is a great choice. Just sprinkle it on right after cooking. The heat will melt it slightly. You can also try feta for a tangy flavor. Cheese makes this dish even more delicious. This article covers all you need for tasty garlic butter green beans. We discussed fresh green beans, homemade garlic butter, and the right seasonings. You learned how to air fry the beans and achieve the perfect crunch. I shared tips for different air fryers and cooking techniques. We also explored fun variations, like adding proteins and different veggies. Finally, I provided simple storage and reheating methods. With these steps, your garlic butter green beans will shine at any meal!
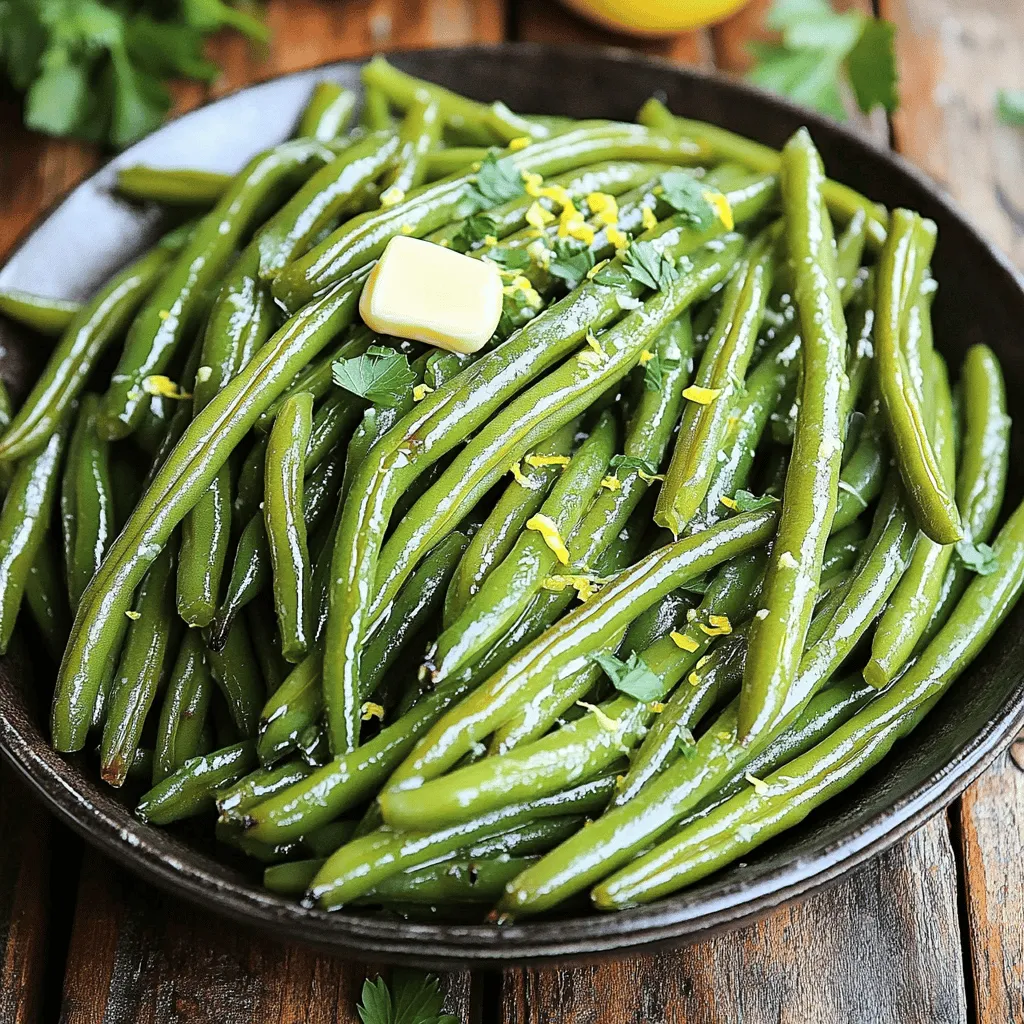
Garlic Butter Air Fryer Green Beans Delicious Recipe
Are you ready to elevate your veggie game? This Garlic Butter Air Fryer Green Beans recipe is simple, fast, and packed with flavor. With just
- 1 lb Brussels sprouts, trimmed and halved - 4 cloves garlic, minced - 3 tablespoons olive oil - 1/2 cup grated Parmesan cheese - 1 teaspoon salt - 1/2 teaspoon black pepper - 1/2 teaspoon crushed red pepper flakes (optional for heat) - Zest of 1 lemon - Fresh parsley, chopped for garnish - Variations in cheeses, such as Pecorino Romano or Asiago - Additional spices like garlic powder or onion powder The main ingredients form the heart of this dish. Brussels sprouts are the star, bringing a nice crunch. Garlic adds a delightful aroma and flavor. Olive oil helps achieve that crispy texture. Parmesan cheese creates a rich, savory finish. For seasoning, salt and black pepper provide balance. If you enjoy a kick, crushed red pepper flakes work well. Lemon zest brightens the dish, adding freshness. Chopped parsley not only looks nice but also adds a hint of herbiness. If you want to switch things up, try different cheeses. Pecorino Romano offers a saltier taste, while Asiago brings a nutty flavor. You can also mix in spices to enhance the taste. Garlic powder adds depth, while onion powder gives sweetness. This simple list of ingredients makes a delicious side dish. You can easily adapt it to suit your taste. 1. First, preheat your oven to 400°F (200°C). This helps cook the Brussels sprouts evenly. 2. Next, trim the ends off the Brussels sprouts and cut them in half. This makes them cook faster and absorb flavors better. 1. In a large bowl, combine the halved Brussels sprouts and minced garlic. Mix well to spread the garlic. 2. Drizzle 3 tablespoons of olive oil over the Brussels sprouts. Toss them to coat evenly with oil. 3. Add 1 teaspoon of salt, 1/2 teaspoon of black pepper, and 1/2 teaspoon of crushed red pepper flakes if you like some heat. Toss again until all ingredients blend well. 1. Spread the Brussels sprouts mixture in a single layer on a baking sheet lined with parchment paper. This prevents sticking and makes cleanup easy. 2. Roast in the preheated oven for 20-25 minutes. Stir halfway through to ensure even cooking and crispness. Look for a golden brown color. 1. Once done, remove the baking sheet from the oven. Immediately sprinkle 1/2 cup of grated Parmesan cheese over the hot Brussels sprouts. The heat will help the cheese melt slightly. 2. Add the zest of one lemon and toss gently to mix all the flavors together. This brightens the dish. 3. Transfer the Brussels sprouts to a serving dish and garnish with freshly chopped parsley. This adds a nice touch and flavor. To get the best roast, set your oven to 400°F (200°C). This temperature works well for Brussels sprouts, making them crispy and tender. To ensure they stay crispy, spread the sprouts in one layer on your baking sheet. If they are crowded, they will steam instead of roast. When using minced garlic, add it with the sprouts and oil. This lets the garlic cook and develop flavor. If you prefer whole garlic cloves, roast them in the oven with the sprouts. The cloves will soften and sweeten, adding a nice touch to the dish. Add the grated Parmesan cheese right after taking the sprouts out of the oven. This timing allows the cheese to melt without burning. Use a good quality Parmesan for the best flavor. Freshly grated cheese melts better than pre-packaged options. {{image_2}} You can easily change up the taste of your roasted garlic Parmesan Brussels sprouts. One great option is to add balsamic vinegar. Just drizzle a bit over the sprouts before roasting. The vinegar adds a sweet tang that pairs well with the savory garlic and cheese. Mixing in other vegetables also works well. Try adding carrots or bell peppers. These veggies roast nicely and add color to your dish. If you need a vegan option, there are simple swaps. Use a vegan Parmesan substitute. Many brands offer a tasty, dairy-free alternative. It melts well and still gives that cheesy flavor. For gluten-free options, this recipe is already safe! All the ingredients are naturally gluten-free. Just make sure to check any packaged items, like Parmesan, for hidden gluten. When serving these Brussels sprouts, think about side dish pairings. They go great with grilled chicken or baked fish. The flavors complement each other nicely. You can also incorporate them into main courses. Toss them into pasta dishes or grain bowls. They add a hearty touch to any meal. Store leftovers in an airtight container. Glass or plastic containers work well. Make sure to cool the sprouts first. Refrigerate them within two hours of cooking. They can stay fresh for up to three days. You can reheat in two ways: the oven or the microwave. For the oven, preheat to 350°F (175°C). Place the sprouts on a baking sheet and heat for about 10 minutes. This keeps them crispy. In the microwave, use a microwave-safe dish. Heat for one to two minutes, stirring halfway. This is quick but may soften the texture. To freeze, let the sprouts cool completely first. Place them in a freezer-safe bag or container. Remove as much air as possible. They can be frozen for up to three months. To thaw, move them to the fridge overnight. Reheat them in the oven or microwave as mentioned above. This keeps their taste and texture nice. Brussels sprouts take about 20 to 25 minutes to cook. The key is to roast them until they turn golden brown and crispy. You know they are done when they are tender inside and have a nice caramelized exterior. Stir them halfway through cooking for even browning. You can use frozen Brussels sprouts, but fresh ones taste better. Frozen sprouts are often softer and may lose some crunch. If you use frozen, add a few extra minutes to the cooking time. Make sure to thaw them first, then follow the same steps for seasoning and roasting. These Brussels sprouts pair well with many dishes. Consider serving them with roasted chicken or salmon for a complete meal. You can also enjoy them alongside pasta or a grain salad. For more ideas, try them with garlic mashed potatoes or a light soup to balance flavors. This blog post dives into making delicious Roasted Garlic Parmesan Brussels Sprouts. We covered main ingredients and spices to bring out the best flavors. Step-by-step instructions guide you from prep to serving. I shared tips on achieving a perfect roast and variations to suit your taste. Remember, leftovers can be easily stored and reheated. Try these recipes as sides or in main courses. Enjoy cooking and make these sprouts a new favorite dish!
Roasted Garlic Parmesan Brussels Sprouts Delightful Side
Are you looking for a tasty and easy side dish? Roasted Garlic Parmesan Brussels Sprouts combine rich flavors and crunch. These sprouts will steal the
To make Air Fryer Buffalo Cauliflower Bites, you need a few key items: - 1 large head of cauliflower, cut into bite-sized florets - 1 cup all-purpose flour - 1 cup water - 1 cup buffalo sauce (store-bought or homemade) These ingredients work together to create a tasty and crispy snack. The cauliflower is the star, bringing great texture. The flour and water make a batter that coats the florets well. Seasonings add flavor to the bites. Here are the ones you will use: - 1 teaspoon garlic powder - 1 teaspoon onion powder - 1/2 teaspoon smoked paprika - 1/2 teaspoon salt - 2 tablespoons olive oil Garlic and onion powders give depth. Smoked paprika adds a nice touch of warmth. Salt enhances all the flavors, making each bite delicious. For a full experience, consider these options: - Chopped green onions - Celery sticks These add freshness and crunch. They are perfect to serve alongside the spicy cauliflower bites. The coolness of celery balances the heat, making it a great pairing. Start by washing the cauliflower. Cut it into bite-sized florets. Uniform sizes help them cook evenly. You want each piece to be crisp and tender. In a large bowl, mix 1 cup of flour with 1 cup of water. Add 1 teaspoon of garlic powder, 1 teaspoon of onion powder, 1/2 teaspoon of smoked paprika, and 1/2 teaspoon of salt. Whisk until smooth. The batter should be thick enough to coat the florets well. Preheat your air fryer to 375°F (190°C). Arrange the cauliflower bites in a single layer in the basket. Do not overcrowd them. Air fry for 12 to 15 minutes. Shake the basket halfway to ensure even cooking. The bites should be golden brown and crispy. Once the cauliflower is done, take it out of the air fryer. Place the bites in a large bowl and drizzle 1 cup of buffalo sauce over them. Toss gently so each piece gets coated evenly in the sauce. For extra crunch, you can air fry the cauliflower again. Return the coated bites to the air fryer. Cook for an additional 3 to 5 minutes at the same temperature. This step enhances the crispiness of the bites. Take the buffalo cauliflower out of the air fryer and let it cool for a minute. Serve warm. I like to add chopped green onions and celery sticks on the side. They add a nice crunch and freshness to the dish. Enjoy your flavorful delight! To get crispy cauliflower, make sure to cut the florets evenly. This helps them cook at the same speed. After coating them with batter, shake off any extra. Too much batter can make them soggy. Air fry them in a single layer. Overcrowding leads to steaming rather than crisping. If they look golden, they’re probably ready! You can make your buffalo cauliflower as spicy as you want. If you like it mild, use less buffalo sauce. You can mix in a bit of honey or butter to cool it down. If you love heat, add some cayenne pepper to the batter. Always taste the sauce before you toss it. This way, you can adjust it to your liking. Creating your own buffalo sauce is easy and fun! Combine hot sauce with melted butter. You can add garlic powder and a bit of vinegar for extra flavor. If you want a tangy twist, mix in some lemon juice. Taste it as you go to find the right balance. Homemade sauce can take your cauliflower bites to a new level! {{image_2}} You can easily make this recipe vegan. Just replace the all-purpose flour with chickpea flour. Chickpea flour gives a nice taste and is also gluten-free. Use plant-based buffalo sauce. This option ensures everyone can enjoy the dish. To create a gluten-free version, swap the all-purpose flour for a gluten-free flour blend. You can find these blends at most grocery stores. Make sure the buffalo sauce is gluten-free as well. This way, you keep the crunch and flavor without the gluten. Want to switch things up? Try different flavors! For BBQ bites, use BBQ sauce instead of buffalo sauce. For Garlic Parmesan, mix garlic powder with some grated Parmesan cheese in the batter. These variations keep your meals fun and exciting, so you never get bored. You can keep leftover buffalo cauliflower bites in the fridge. Place them in an airtight container. They will stay fresh for about 3 to 4 days. When you want to eat them again, just pull them out and reheat! If you have extra bites, freezing is a great option. First, let them cool completely. Then, arrange them in a single layer on a baking sheet. Freeze for about 1 to 2 hours. Once frozen, transfer the bites to a freezer-safe bag. They can last up to 2 months in the freezer. To reheat, you can use the air fryer or an oven. For the air fryer, set it to 375°F (190°C) and cook for about 5 to 7 minutes. If using an oven, preheat it to 400°F (200°C). Bake for 10 to 15 minutes, or until they are hot and crispy again. Enjoy them just like fresh! Use a large head of fresh cauliflower. Look for firm, tight florets with no brown spots. Organic cauliflower often has better flavor and texture. Choose cauliflower that feels heavy for its size. This ensures a juicy bite. Yes, you can bake these cauliflower bites. Preheat the oven to 450°F (232°C). Arrange the coated florets on a lined baking sheet. Bake for 20-25 minutes or until crispy. Flip them halfway for even browning. Store any leftovers in an airtight container. Place them in the fridge for up to three days. For longer storage, freeze them. They will keep well for about a month. Reheat in the air fryer for best results. These bites pair well with celery sticks and blue cheese dressing. You can also serve them with ranch dressing for a creamy dip. Add some carrot sticks for extra crunch. They make a great snack or appetizer. To serve more people, simply double the ingredients. Use two large heads of cauliflower. You may need to cook in batches to avoid overcrowding the air fryer. This keeps each piece crispy and delicious. In this post, we explored how to make delicious Air Fryer Buffalo Cauliflower Bites. We covered the main ingredients, perfect seasonings, and optional ways to serve. You learned step-by-step how to prepare, batter, and air fry the cauliflower. I shared tips for ensuring they stay crispy and adjusting the spice. We also discussed variations and how to store leftovers. These bites are tasty and easy to adapt. Enjoy experimenting with flavors and sharing them with friends.
Air Fryer Buffalo Cauliflower Bites Flavorful Delight
Get ready for a tasty treat with these Air Fryer Buffalo Cauliflower Bites! They’re packed with flavor and super easy to make. Whether you’re a
To make Garlic Parmesan Roasted Brussels Sprouts, gather these items: - 1 lb Brussels sprouts, trimmed and halved - 4 tablespoons olive oil - 4 cloves garlic, minced - 1/2 cup grated Parmesan cheese - 1 teaspoon salt - 1/2 teaspoon black pepper - 1/4 teaspoon crushed red pepper flakes (optional) - Fresh parsley, chopped (for garnish) These ingredients form the base of this tasty dish. The Brussels sprouts offer a unique crunch, while the garlic and Parmesan give a rich flavor. You can add a few optional ingredients to boost the taste: - Balsamic vinegar for a tangy twist - Lemon zest for brightness - Bacon bits for a savory touch - Chopped nuts like almonds or walnuts for crunch These additions can make your dish even more exciting and flavorful. Feel free to mix and match based on your taste. Each serving of Garlic Parmesan Roasted Brussels Sprouts provides: - Calories: About 200 - Protein: 6g - Fat: 15g - Carbohydrates: 12g - Fiber: 4g This dish is not only tasty but also nutritious. The Brussels sprouts provide fiber and vitamins, while olive oil adds healthy fats. Enjoy this dish guilt-free! Start by washing the Brussels sprouts well under cool water. Trim off the tough ends. Then, cut each sprout in half. This helps them cook evenly. You can remove any loose outer leaves if they look yellow or wilted. Place the halved sprouts in a large bowl. In the same bowl, drizzle in the olive oil. Add the minced garlic, salt, black pepper, and crushed red pepper flakes. Toss everything well. Make sure each sprout is coated with the tasty mix. This step adds flavor to every bite. Preheat your oven to 400°F (200°C). Line a large baking sheet with parchment paper. Spread the sprouts in a single layer, cut side down. This helps them caramelize nicely. Roast for 20 minutes. Then, sprinkle the grated Parmesan cheese on top. Return the baking sheet to the oven. Roast for another 10-15 minutes. Look for a golden brown color and bubbly cheese. Let them cool for a few minutes before serving. Garnish with fresh parsley for a pop of color. Enjoy your delicious Garlic Parmesan Roasted Brussels Sprouts! To get crispy Brussels sprouts, use a high heat. Preheat your oven to 400°F (200°C). Cut the sprouts in half and place them cut side down. This helps brown them better. Spread them out on your baking sheet. Don’t crowd them; give them space to breathe. For extra crispiness, try using a bit more olive oil. You can make these sprouts even tastier. Add a splash of lemon juice before serving. It brightens the flavors. Try adding balsamic vinegar for a sweet touch. You can also mix in some bacon bits or nuts for a crunch. For a spicy kick, increase the crushed red pepper flakes. One mistake is not trimming the sprouts well. Always trim the ends and remove any yellow leaves. Another error is using too little oil; this can make them dry. Be careful not to overcook them, or they will become mushy. Lastly, remember to let them cool a bit before serving. This helps keep them from steaming and losing crispiness. {{image_2}} You can switch up the cheese in this recipe. While Parmesan is classic, try using Pecorino Romano for a sharper bite. Goat cheese adds creaminess and tang. For a rich flavor, use aged cheddar. Each cheese brings its own taste, making your Brussels sprouts unique. Mixing in other veggies makes this dish even better. Carrots, bell peppers, or sweet potatoes roast nicely alongside Brussels sprouts. Just cut them into similar sizes for even cooking. This adds color and nutrition to your meal. Plus, it makes it look beautiful on your plate. If you love heat, increase the crushed red pepper flakes. Start with one teaspoon for a good kick. You can also add cayenne pepper for more spice. For a milder taste, leave out the red pepper flakes. Adjusting spice lets you make this dish your own. To keep your Garlic Parmesan Roasted Brussels Sprouts fresh, store them in an airtight container. Let them cool to room temperature before sealing. They can last in the fridge for about three to four days. Avoid stacking them too high to prevent squishing. If you want to keep them crispy, store them without the cheese on top. When you’re ready to enjoy leftovers, preheat your oven to 350°F (175°C). Spread the Brussels sprouts on a baking sheet. Heat them for about 10-15 minutes. This method keeps them crispy. If you’re short on time, you can also use a microwave. Heat in short bursts, stirring between each. This way, you prevent them from getting soggy. You can freeze these sprouts if you have too many leftovers. First, let them cool completely. Then, place them on a baking sheet in a single layer. Freeze them for about an hour until firm. Once frozen, transfer them to a freezer bag. They can stay good for up to three months. To eat, just reheat them from frozen, following the same oven method for best results. Yes, you can prepare the Brussels sprouts in advance. Trim and halve them, then mix with olive oil, garlic, salt, and pepper. Store this mixture in the fridge for up to a day. When you are ready to cook, spread them on a baking sheet and roast. This helps save time on busy days. These sprouts pair well with many dishes. You can serve them with roasted chicken or grilled fish. They also go great with pasta or a fresh salad. For a fun twist, try them with a creamy risotto. Their flavors add a nice crunch and zest to your meal. Brussels sprouts are done when they turn golden brown. They should be tender when you poke them with a fork. The cheese should be melted and bubbly on top. If you want extra crispiness, roast them a bit longer. Just keep an eye on them to avoid burning. In this post, we covered everything needed to make Garlic Parmesan Roasted Brussels Sprouts. We explored key ingredients, a simple step-by-step guide, helpful tips, delicious variations, and storage info. These sprouts can be a perfect side dish or snack. Remember to experiment with flavors and textures. Enjoy crisp, tasty Brussels sprouts anytime. Follow the steps to impress yourself and others!
Garlic Parmesan Roasted Brussels Sprouts Recipe Delight
Are you ready to transform Brussels sprouts into a crispy, flavorful delight? In this Garlic Parmesan Roasted Brussels Sprouts Recipe Delight, I’ll show you how
- 1 lb ground beef (or mix of beef and pork) - 1/2 cup breadcrumbs - 1/4 cup grated Parmesan cheese - 1/4 cup chopped green onions - 1 large egg - 2 cloves garlic, minced To make these meatballs, you need a good base. Ground beef gives them flavor and texture. A mix of beef and pork adds more taste. Breadcrumbs help bind everything together. Parmesan cheese adds a nice salty kick. Green onions give a fresh crunch. The egg helps hold the meatball shape, while garlic brings a rich aroma. - 1/2 teaspoon salt - 1/4 teaspoon black pepper - 1 cup sweet chili sauce - 1 tablespoon soy sauce - 1 tablespoon rice vinegar - 1 tablespoon sriracha (to taste) Seasoning is key for flavor. Salt and pepper enhance the meat's taste. Sweet chili sauce is the main ingredient, giving it a sweet and spicy vibe. Soy sauce adds depth, while rice vinegar brightens it up. Sriracha is perfect for spice lovers. Adjust it based on how spicy you want your dish. - Sesame seeds - Extra chopped green onions Garnishing makes the dish pop. Sesame seeds add a nutty flavor and crunch. Extra green onions not only look nice but also add freshness. These simple touches make your meatballs fun and inviting. - Mix all meatball ingredients in a bowl. - The ingredients are ground beef, breadcrumbs, Parmesan cheese, green onions, egg, garlic, salt, and pepper. - Be gentle when mixing. You want it well blended but not tough. - Form the mixture into small meatballs, about 1 inch wide. - Place each meatball on a baking tray. Aim for about 20-24 meatballs. - In a separate bowl, whisk together the sauce ingredients. - The sauce includes sweet chili sauce, soy sauce, rice vinegar, and sriracha. - Adjust the sriracha amount based on how spicy you like it. - Lightly coat the bottom of your crockpot with cooking spray or olive oil. - Arrange the meatballs in the crockpot in a single layer. - Pour the sauce over the meatballs. Ensure they are well coated. - Cover the crockpot and cook on low for 4-5 hours or high for 2-3 hours. - Check that the meatballs are cooked through and tender before serving. To make great meatballs, you must not overwork the meat. This keeps them tender. Mix the ingredients until they just come together. A few lumps are okay. When forming meatballs, aim for about one inch in size. This helps them cook evenly. Cooking time may vary. If you like softer meatballs, cook them on low for 5 hours. For firmer meatballs, cook on high for 2-3 hours. Adding extra spices can boost flavor. Consider paprika for a smoky touch. You can also add dried oregano for freshness. If you want heat, sriracha is your friend. Start with one tablespoon, then taste. Add more if you like it spicy. This way, you control the heat level. For a beautiful dish, garnishing is key. Sprinkle sesame seeds on top for crunch. Add extra chopped green onions for color. Serve the meatballs in a nice dish. You can also drizzle sauce over them before serving. This makes them look appealing and appetizing. Serve them with toothpicks for easy eating at parties. {{image_2}} You can switch up the protein in the meatballs. Ground turkey or chicken works great. These meats are lean and tasty. For a meatless option, try plant-based meat. It holds flavor well and keeps the dish fun. You can play with the sweet chili sauce too. Consider using a homemade version for more control. Mix honey and soy sauce for a sweet twist. Or add garlic and ginger for a kick. Adjusting the sauce ingredients gives you a new flavor each time! How you serve these meatballs can change the game. Try them in a sub with melted cheese. They make great appetizers too. You can serve them over rice or noodles for a hearty meal. Each style offers a new way to enjoy the dish! To store leftovers, let the meatballs cool first. Place them in an airtight container. You can keep them in the fridge for up to three days. Make sure to cover the meatballs with some sauce to keep them moist. If you want to freeze your meatballs, wait until they cool completely. Arrange them in a single layer on a baking sheet. Freeze them for about an hour until firm. Then, move them to a freezer bag. They can last up to three months in the freezer. Remember to remove as much air as you can from the bag. To reheat, you have a few options. For the best flavor, heat them in a pot on the stove. Add a splash of water or sauce to keep them moist. You can also use a microwave. Heat them in short bursts, stirring in between. Check to make sure they are hot all the way through. Enjoy your sweet chili flavor again! You can serve these meatballs with many sides. Rice is a great choice. It soaks up the sauce well. You can also serve them with noodles for a fun twist. A fresh salad can balance the meal nicely. Try adding steamed veggies for color and crunch. Yes, you can make these meatballs ahead! You can mix the meatball mixture and form the balls. Then, store them in the fridge for up to a day. You can also cook them and save for later. They keep well in the fridge for a few days. To serve more, just double the ingredients. For fewer servings, cut the recipe in half. This dish is flexible. You can easily scale it up or down based on your needs. Just keep an eye on cooking time if you change the amount. Yes, you can make this recipe gluten-free! Use gluten-free breadcrumbs instead of regular ones. Check the soy sauce label for gluten-free options. This way, you can enjoy the meatballs without worry. Leftovers will last about 3 to 4 days in the fridge. Make sure to store them in an airtight container. If you want to keep them longer, consider freezing. Frozen meatballs can last for up to 3 months. Just thaw and reheat when you’re ready to eat! In this blog post, we explored how to make sweet chili crockpot meatballs. We covered all the main ingredients and the step-by-step method for cooking. I shared tips for perfecting your meatballs and variations to suit your taste. Remember, you can easily change proteins or sauces based on what you have. Enjoy these meatballs as a snack, meal, or fun appetizer. With proper storage, leftovers will stay fresh. Get creative and make this tasty dish your own!
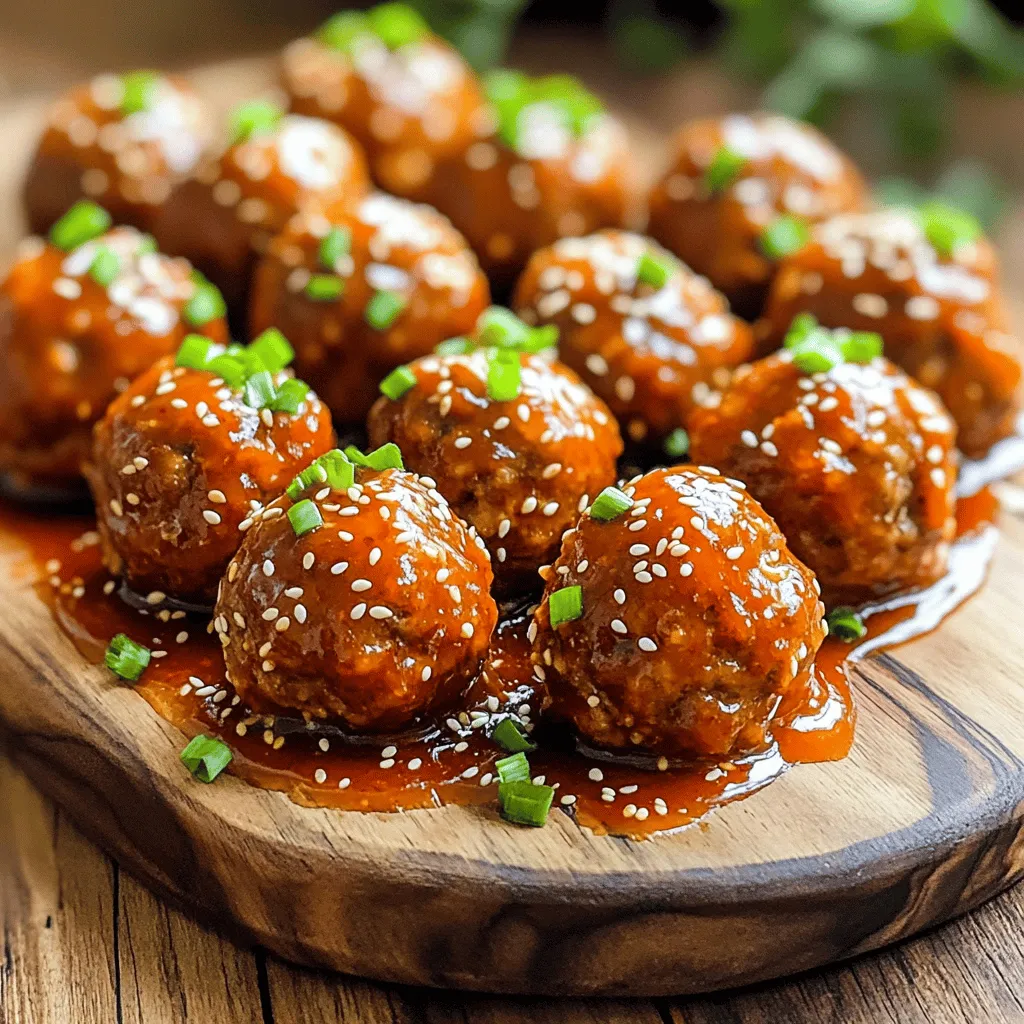
Sweet Chili Crockpot Meatballs Easy Dinner Delight
Looking for an easy dinner that packs a flavor punch? Try my Sweet Chili Crockpot Meatballs! With just a handful of simple ingredients, you can
- 2 cups cooked shredded chicken - 1 (8 oz) package cream cheese, softened - 1/2 cup Greek yogurt - 1/2 cup buffalo sauce - 1 cup shredded cheddar cheese - 1/2 cup blue cheese crumbles (optional) - 1/4 cup green onions, chopped - Salt and pepper to taste - Tortilla chips or celery sticks for serving If you want to change things up, here are some great swaps. - Alternative for cream cheese: You can use mascarpone or a dairy-free cream cheese. Both options will still keep your dip creamy and tasty. - Low-fat yogurt options: Swap Greek yogurt for low-fat sour cream or a plant-based yogurt for a lighter version. - Other cheese varieties: Try pepper jack for some heat or mozzarella for a milder flavor. This can add a fun twist to your dip. Remember, each change will give your dip a unique spin. Have fun with these swaps! 1. Preheating the oven First, set your oven to 350°F (175°C). This step heats the oven so the dip cooks evenly. 2. Mixing the cream cheese and Greek yogurt In a large bowl, add 8 ounces of softened cream cheese and 1/2 cup of Greek yogurt. Use a fork or spatula to mix them together until the mixture is smooth and creamy. This mix creates a rich base for your dip. 1. Adding chicken and buffalo sauce Next, add 2 cups of cooked shredded chicken to the bowl. Pour in 1/2 cup of buffalo sauce, adjusting the amount based on your spice preference. Stir well to coat the chicken in the sauce. 2. Stirring in cheeses and seasonings Now, add 1 cup of shredded cheddar cheese, 1/2 cup of blue cheese crumbles (if you like), and 1/4 cup of chopped green onions. Season with salt and pepper to taste. Mix everything until fully combined. 1. Preparing the baking dish Spread the buffalo chicken mixture evenly in a baking dish. For extra cheesy goodness, sprinkle a bit more cheddar cheese on top. 2. Baking time and temperature Place the dish in your preheated oven. Bake for about 20-25 minutes, or until the dip is bubbly around the edges. When it’s done, take it out and let it cool slightly before serving. Enjoy! To make your buffalo chicken dip truly creamy, I suggest using Greek yogurt. It adds a nice tang and smoothness. You can also use sour cream if you prefer a richer taste. When mixing, start with the softened cream cheese. Blend it well with the yogurt until it's smooth. Use a hand mixer for a fluffier texture. This helps avoid lumps and ensures every bite is creamy. If you want to adjust the spice level, you can modify the buffalo sauce. Start with half a cup, then taste. If you like it hotter, add more sauce a tablespoon at a time. For a milder dip, mix in more yogurt or cream cheese. This softens the heat without losing flavor. Remember, the heat scale varies by brand, so taste as you go. For a beautiful presentation, garnish your dip with fresh green onions. Chop them finely and sprinkle them on top just before serving. You can also add extra cheddar cheese for a nice look. Serve the dip hot in a bowl surrounded by tortilla chips or celery sticks. This setup makes it easy for guests to dive in. Adding a colorful platter makes it more inviting too! {{image_2}} You can mix up the cheese in your buffalo chicken dip. Spicy cheese blends add a kick. Try mixing pepper jack cheese for a fun twist. Cheddar cheese is classic, but mozzarella works too. You can even go wild with gouda or smoked cheese. Each cheese brings its own flavor and texture. If you want a lighter dip, swap cream cheese with low-fat options. You can also use cottage cheese for a protein boost. Greek yogurt is great for creaminess and lower calories. For a vegetarian twist, replace chicken with chickpeas or lentils. These options keep the dip tasty and filling. Add ranch seasoning to boost flavor. It gives a nice herby touch. You can mix in different hot sauces too. Try garlic sauce for a rich taste. For extra tang, add some lime juice. These small changes can make a big difference in flavor. Buffalo chicken dip lasts about 3 to 4 days in the fridge. Store it in an airtight container. This keeps it fresh and safe to eat. Before serving, check for any off smells or changes in texture. You can freeze buffalo chicken dip before or after baking. If you freeze it before baking, use a freezer-safe container. When you’re ready to bake, let it thaw in the fridge overnight. Bake it straight from the fridge. If frozen after baking, cool it first. Wrap it tightly and store it. When reheating, place it in the oven at 350°F (175°C) until warmed through. This usually takes about 20 minutes. Stir it halfway for even heating. You can also microwave it in short bursts, stirring in between. Enjoy your dip hot! Yes, you can make buffalo chicken dip ahead of time. Here’s how: - Prep the dip: Mix all your ingredients as usual, but do not bake it yet. - Storage: Place the unbaked dip in an airtight container. Seal it well. - Refrigerate: Store it in the fridge for up to 24 hours before baking. When you're ready to bake, just take it out and pop it in the oven. You may need to add a few extra minutes to the bake time since it starts cold. This makes it easy for parties! Buffalo chicken dip pairs well with many snacks. Here are my favorites: - Tortilla chips: Crunchy and perfect for scooping. - Celery sticks: A fresh and crisp option that adds a nice crunch. - Carrot sticks: Sweet and crunchy, these add a bit of color. - Crackers: Choose your favorite type for a nice bite. You can also serve it with sliced baguette or pita chips for a twist. Yes, you can make buffalo chicken dip gluten-free. Here are some options: - Gluten-free tortilla chips: Many brands offer these now. - Vegetable sticks: Use celery, carrot, or bell pepper for dipping. - Rice crackers: These can be a great crunchy option too. These alternatives ensure everyone can enjoy this tasty dip! This blog post shared a tasty buffalo chicken dip recipe and useful tips. You learned about the ingredients, alternatives, and step-by-step instructions for easy prep. We covered how to make it creamy, adjust spice levels, and present it well. Plus, I offered variations for health-conscious options and storage guidelines. Buffalo chicken dip is simple and fun to make. This snack will impress friends at any gathering. Try it out, and enjoy every bite!
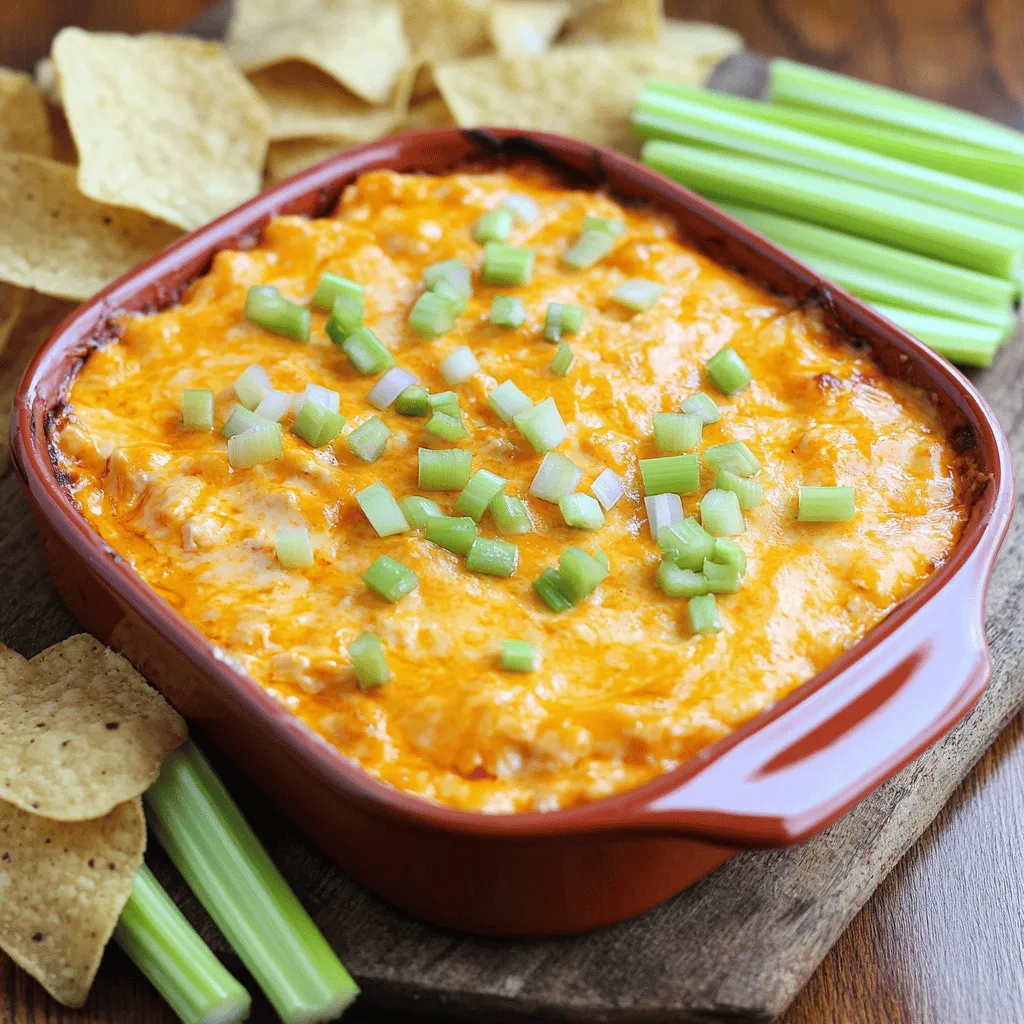
Buffalo Chicken Dip Creamy and Comforting Recipe
Are you ready to dive into the ultimate comfort food? This Buffalo Chicken Dip is creamy, flavorful, and perfect for any gathering. With easy steps