Appetizers

To make tasty cheeseburger sliders, you need simple, fresh ingredients. Here’s what you’ll need: - 1 lb ground beef (use 80/20 blend for juiciness) - 1 teaspoon garlic powder - 1 teaspoon onion powder - Salt and black pepper, to taste - 6 slider buns - 6 slices of sharp cheddar cheese - 1/2 cup mayonnaise - 1/4 cup ketchup - 1/4 cup yellow mustard - 1 cup shredded iceberg lettuce - 1 medium tomato, sliced thin - Dill pickle slices, for garnishing You can get creative with toppings and sauces. Here are some ideas: - Crispy bacon strips - Sliced jalapeños for heat - Avocado or guacamole - BBQ sauce for a sweet twist - Sautéed onions or mushrooms Pair your sliders with drinks that enhance their taste. Some tasty choices include: - Classic soda or root beer - Iced tea with lemon - A light lager or pale ale - Sparkling water with lime - Lemonade for a refreshing option {{ingredient_image_2}} To start, gather your ingredients. You need ground beef, garlic powder, onion powder, salt, and black pepper. In a bowl, mix the ground beef with the garlic and onion powder, salt, and pepper. Use your hands but don’t overwork the meat. Shape the mixture into six equal patties. Make a small dent in the middle of each patty with your thumb. This helps them cook evenly. Preheat your grill or skillet to medium-high heat. You want it hot before adding the patties. Place the patties on the grill or skillet. Cook them for about 3-4 minutes on each side. If you like your burger medium-rare, this timing works well. In the last minute, add a slice of cheddar cheese on top of each patty. Let it melt while finishing cooking. While the patties cook, slice the slider buns in half. Toast them lightly on the grill or skillet until golden brown. This adds flavor and makes them sturdy. In a bowl, mix mayonnaise, ketchup, and mustard for a tasty sauce. Spread this sauce on the bottom half of each bun. Place a cheeseburger patty on top, then add lettuce, a slice of tomato, and dill pickles. Top each slider with the other half of the bun. Enjoy your sliders with fries or a salad! To get a great burger texture, use ground beef with a fat content of 80/20. This blend keeps your sliders juicy and tasty. When mixing the meat, add garlic powder, onion powder, salt, and black pepper. Use your hands gently to combine. Overworking the meat makes it tough. Shape each portion into a patty, and press a small dent in the center. This helps keep the burgers flat as they cook. Customize your sliders to match your taste. You can add spices like smoked paprika or cayenne for heat. Try different cheeses, like pepper jack or gouda, for a twist. Top them with unique ingredients, such as avocado, crispy bacon, or sautéed mushrooms. The sauce can change too. Mix mayo, ketchup, and mustard, or use BBQ sauce for a zing. The options are endless! Grilling gives your sliders a smoky flavor. Preheat your grill to medium-high heat. Cook the patties for 3-4 minutes on each side. Add cheese during the last minute to melt it perfectly. If you use a skillet, make sure it’s hot before adding the patties. Both methods work well, but grilling adds a special taste. Remember to toast the buns lightly for the best texture. Pro Tips Use Quality Beef: Choosing an 80/20 blend of ground beef ensures your sliders are juicy and flavorful. Don't Overwork the Meat: When mixing your beef with seasonings, handle it gently to maintain tenderness in your patties. Toast the Buns: Lightly toasting the slider buns adds flavor and prevents them from getting soggy once assembled. Customize Your Toppings: Feel free to experiment with different cheeses and toppings to personalize your sliders to your taste. {{image_4}} If you want a meat-free option, try using black beans or chickpeas. Mash them well and mix in spices like cumin and paprika. You can also use store-bought veggie patties. For a vegan choice, skip the cheese and use vegan mayo. You can add sliced avocado for creaminess. Want to spice things up? Try a BBQ slider! Add BBQ sauce to the beef mixture for a smoky taste. You could also mix in some diced jalapeños for heat. For a gourmet twist, try goat cheese with caramelized onions. This adds a rich, sweet flavor to your sliders. You can make sliders smaller for parties or larger for a meal. For mini sliders, divide the beef into smaller patties. They cook faster and are perfect for appetizers. If you want big sliders, use larger buns and make larger patties. This way, everyone gets a hearty bite! To keep your leftover sliders fresh, wrap them tightly in plastic wrap or foil. You can also place them in an airtight container. Store them in the fridge for up to three days. This helps maintain their taste and texture. If you want to save them longer, freeze the sliders. Just make sure to freeze them without any toppings. They will last for about three months in the freezer. To reheat your sliders, the oven works best. Preheat your oven to 350°F (175°C). Place the sliders on a baking sheet. Cover them with foil to keep them moist. Heat for about 10-15 minutes until warm. If you prefer the microwave, use it for a quick option. Just pop one slider in for about 30 seconds. But remember, the microwave can make the buns soggy. To avoid soggy sliders, follow a few tips. First, toast the buns lightly before adding the fillings. This adds a nice crunch. Use a thin layer of sauce so it does not soak in too much. You can also pat the lettuce dry before adding it. Lastly, keep the toppings separate until you serve the sliders. This keeps everything fresh and tasty! Yes, you can use ground turkey or chicken. These options are leaner than beef. They may dry out if cooked too long. To keep them moist, add a bit of olive oil. Use the same spices to keep the flavor strong. The best cheese is sharp cheddar. It melts well and adds great flavor. You can also try American cheese for a classic taste. Swiss cheese provides a nice, nutty flavor too. You can prepare the patties ahead of time. Shape them and store them in the fridge. Cook them just before serving to keep them fresh. You can also toast the buns early. Store them in an airtight container until ready to use. Yes, many stores sell gluten-free slider buns. Look for ones made from rice or almond flour. You can also use lettuce wraps as a fun, low-carb alternative. Cheeseburger sliders are fun and easy to make. You learned about the main ingredients, optional toppings, and drink pairings. I shared tips on cooking methods and how to assemble them perfectly. You can even customize the sliders to fit your taste. If you have leftovers, I explained how to store and reheat them. Remember, these tasty bites work for any event. Now, go make your sliders and enjoy every bite!
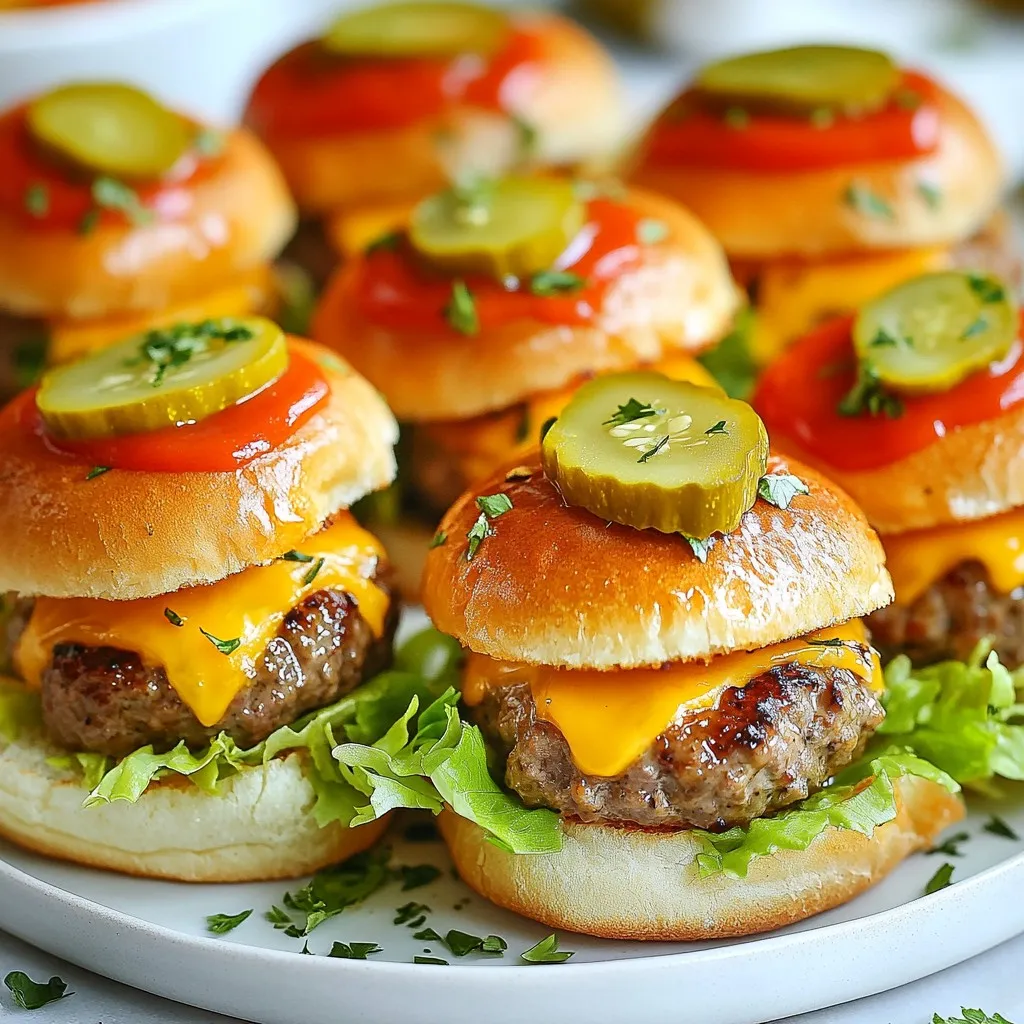
Cheeseburger Sliders Flavorful and Simple Recipe
Craving a fun and tasty meal? You’re in the right spot! I’m excited to share my simple and flavorful cheeseburger sliders recipe. These little bites
Making Rotisserie Chicken Nachos is simple. You only need a few key items to create this tasty dish. Here’s what you will need: - 2 cups rotisserie chicken, shredded - 1 bag tortilla chips (approximately 10-12 oz) - 1 cup shredded cheddar cheese - 1 cup black beans, drained and rinsed - 1 medium tomato, diced finely - 1 jalapeño, thinly sliced (optional) - 1/2 cup sour cream - 1/3 cup fresh cilantro, chopped - 1/4 cup green onions, sliced - 1/4 cup pickled jalapeños (optional) - 1 ripe avocado, diced - 1 tablespoon lime juice - Salt and pepper to taste These ingredients blend well together. The rotisserie chicken adds flavor and protein. The tortilla chips provide crunch. Black beans give extra texture. Fresh vegetables like tomatoes and avocados add freshness. Toppings like sour cream and cilantro enhance the taste. Feel free to adjust ingredients based on your preferences. Enjoy the mix of flavors in every bite! {{ingredient_image_2}} 1. Preheat your oven to 375°F (190°C). This step gets your oven hot and ready. 2. In a large bowl, mix the shredded rotisserie chicken with 1 tablespoon of lime juice. Add salt and pepper to taste. This adds flavor and brightness. 3. On a large baking sheet, spread out the tortilla chips in a single layer. Make sure there are no gaps. This helps the toppings stay put. 4. Evenly distribute the seasoned chicken over the chips. Cover as many chips as you can with chicken. 5. Sprinkle the drained black beans on top of the chicken. This adds texture and protein. 6. Next, add the diced tomatoes, jalapeño slices, and diced avocado. Arrange them nicely for a colorful look. 7. Finally, sprinkle the shredded cheddar cheese over everything. This is key for that melty, cheesy goodness. 1. Place the baking sheet in the preheated oven. Bake for about 10-15 minutes. Keep an eye on the cheese. 2. Look for cheese that is melted and bubbly with a slight golden hue. This means the nachos are ready. 3. Carefully take the nachos out of the oven. Let them cool for about a minute. This helps avoid burns when serving. 4. Top the nachos with dollops of sour cream. Add chopped cilantro, sliced green onions, and pickled jalapeños if you like extra heat. 5. Serve these nachos hot and cheesy for the best experience! Enjoy the burst of flavors and textures in every bite. To make your rotisserie chicken shine, try these seasoning ideas: - Cumin: Adds warmth and earthiness. - Paprika: Gives a slight smokiness. - Chili powder: Adds a nice kick. Mix these spices with lime juice for a vibrant boost! When it comes to cheese, you want melty goodness. Here are the best options: - Cheddar: Classic choice for that gooey texture. - Monterey Jack: Creamy and melts beautifully. - Pepper Jack: Adds spice and flavor. Presentation matters, even for nachos! Here are some serving suggestions: - Baking sheet: Serve right on the sheet for a fun vibe. - Large platter: Transfer for a more elegant look. To make your nachos pop, try these garnish ideas: - Extra cilantro: Adds fresh color and flavor. - Lime wedges: A bright touch that guests can squeeze on top. With these tips, your rotisserie chicken nachos will not only taste great but look amazing too! Pro Tips Use Fresh Ingredients: Opt for ripe avocados and fresh cilantro for the best flavor. Fresh ingredients enhance the overall taste and presentation of your nachos. Layering Technique: To prevent soggy chips, layer the toppings strategically. Start with cheese, then chicken, and finish with fresh toppings like tomatoes and cilantro. Customize Your Heat: Adjust the spiciness by varying the amount of jalapeños or adding hot sauce. This way, you can cater to different heat preferences. Serve Immediately: Nachos are best enjoyed fresh out of the oven. Serve them right away to keep the chips crispy and the cheese melty for the ultimate experience. {{image_4}} You can easily switch up the protein in your nachos. Instead of rotisserie chicken, try shredded beef or pulled pork. These meats add a new flavor and texture. For a lighter option, use shredded turkey. If you want a vegan or vegetarian version, replace the chicken with black beans or lentils. You can also use grilled veggies like peppers and zucchini. This keeps it hearty while being plant-based. Want some heat? Add diced jalapeños for a spicy kick. You can also sprinkle on some chili powder or cayenne pepper for an extra boost. For more fun toppings, consider fresh corn or olives. Pickled onions or a drizzle of hot sauce can also add flavor. Try different combinations to make your nachos unique! After enjoying your rotisserie chicken nachos, store any leftovers right away. You want to keep them fresh. First, let the nachos cool down to room temperature. Then, transfer them to an airtight container. This helps prevent sogginess. You can also wrap them tightly in plastic wrap. Storing them this way keeps them good for 2 to 3 days in the fridge. Just remember, the longer they sit, the softer the chips may get. When you're ready to enjoy your leftovers, reheating them properly is key. Preheat your oven to 350°F (175°C). Spread the nachos on a baking sheet in a single layer. This helps them heat evenly. Bake for about 10 minutes. This method keeps the chips crispy while melting the cheese once more. If you’re in a hurry, you can microwave them for 1-2 minutes. However, this may make the chips a bit chewy. For the best flavor and texture, the oven is your best bet. Enjoy your nacho goodness! Can I use store-bought nacho cheese? Yes, you can use store-bought nacho cheese for a quick option. Just warm it up and drizzle it over your nachos after baking. It adds a creamy texture and a cheesy flavor that many love. How can I make these nachos spicy? To make your nachos spicy, add more jalapeños. You can use fresh or pickled ones. You may also mix in some diced green chilies or sprinkle chili powder over the chicken. For extra heat, try adding hot sauce or spicy cheese. What are the best sides to serve with nachos? Some great sides for nachos include guacamole, salsa, or a fresh salad. You can also serve with a bowl of refried beans for added protein. These sides will balance the flavors and make your meal more filling. You have learned how to make tasty nachos using simple ingredients and steps. We covered everything from choosing the right toppings to baking tips. Remember to experiment with flavors and variations to make the dish your own. Proper storage and reheating keep your leftovers delicious. With this knowledge, you can serve great nachos anytime. Enjoy the fun of creating and sharing this snack!
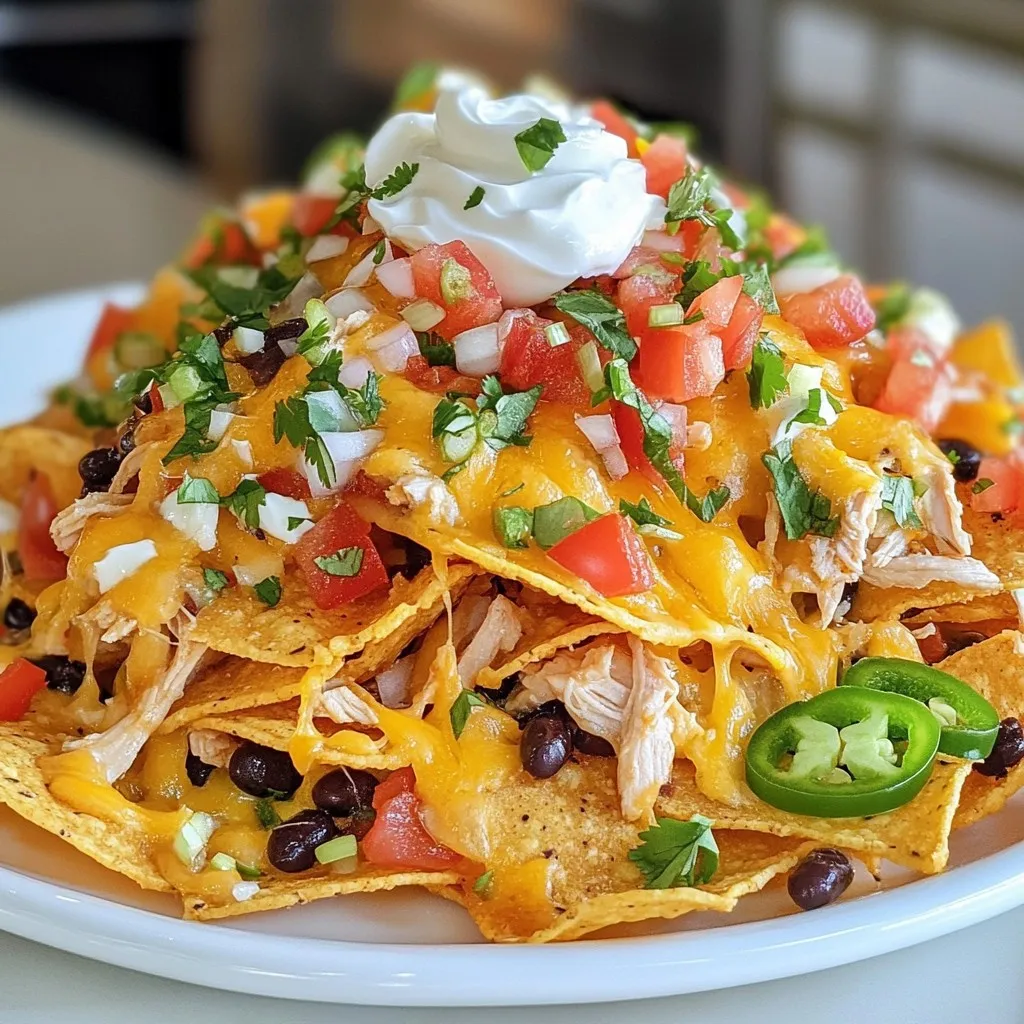
Rotisserie Chicken Nachos Quick and Tasty Meal
Looking for a quick meal that packs a punch? You’ve found it with rotisserie chicken nachos! This tasty dish uses simple ingredients and saves you