Appetizers
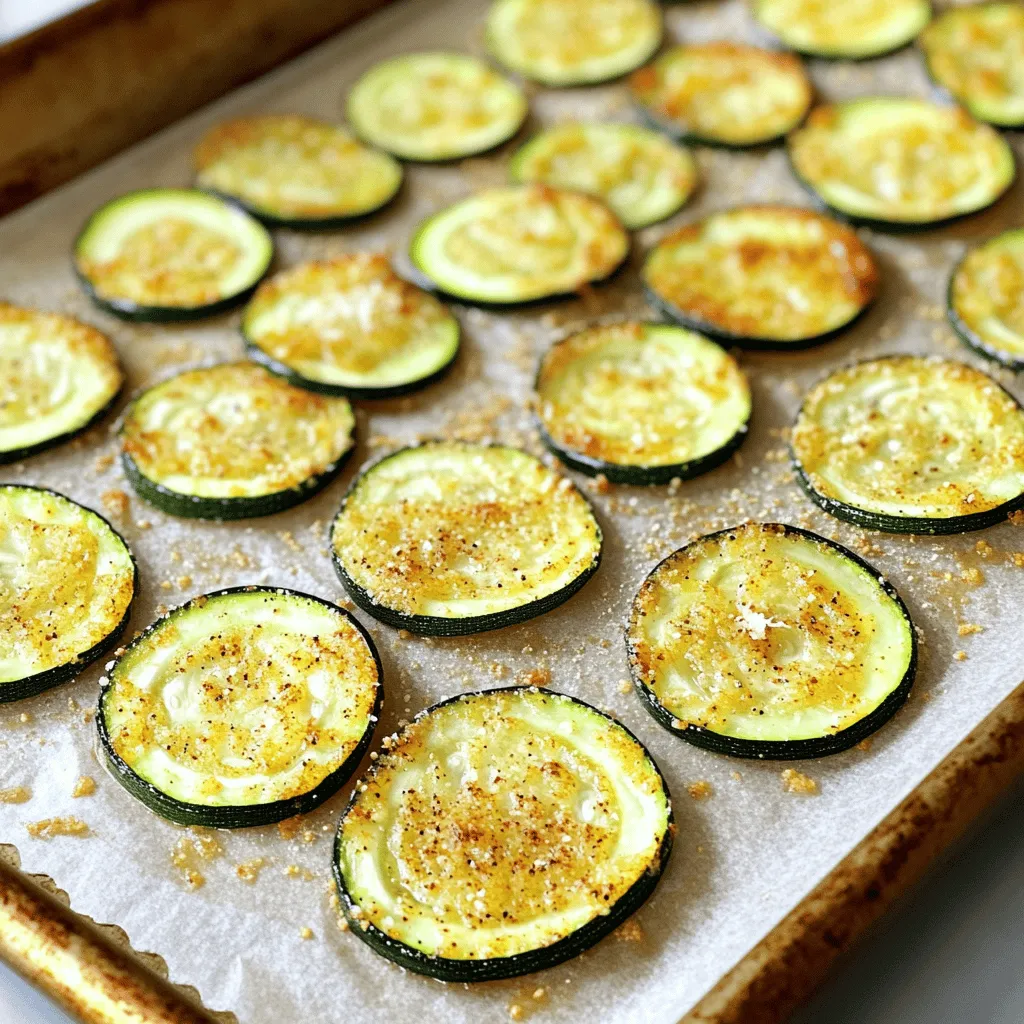
Best Crunchy Zucchini Chips Flavorful and Easy Treat
Are you looking for a tasty snack that’s simple to make? You’re in the right place! I’ll show you how to create the best crunchy
. - Slicing the onions properly Start by peeling the onions. Use a sharp knife to slice them thinly. Aim for about 1/8 inch thick. This way, they will cook evenly and get crispy. - Combining dry ingredients for optimal coating In a bowl, mix the flour, garlic powder, paprika, salt, black pepper, and cayenne pepper. Stir well until it's even. This blend gives the onions a bold flavor and a nice crunch. - Preheating the air fryer Preheat your air fryer to 375°F (190°C). This step is key for getting a crispy texture. Wait about 5 minutes for it to heat up. - Dredging and oiling the onions In a separate bowl, pour the buttermilk over the sliced onions. Toss until they are well coated. Next, take the onions and dredge them in the flour mixture. Press gently to ensure they stick. Finally, drizzle olive oil over the onions. Toss again for even oil coverage. - Cooking time and temperature Place the coated onions in a single layer in the air fryer basket. Cook for 12-15 minutes. Shake the basket halfway through to ensure even cooking. Look for a golden brown color to know they are done. - How to present the crispy onions Serve the crispy onions on a nice platter. They look great piled high. You can also sprinkle some fresh herbs on top for a pop of color. - Ideal dipping sauces to pair Pair your crispy onions with tasty dipping sauces. Ranch dressing is a classic choice. For a spicy kick, try spicy mayo. These add extra flavor and make your snack even better. Check out the Full Recipe for a detailed guide on making these crispy onions! To get those onions super crispy, oil is key. It helps the coating stick and fry well. Just drizzle a tablespoon of olive oil over the coated onions. Toss them gently so they are evenly covered. This will help create a great crunch. Each air fryer cooks a bit differently. You may need to adjust the cook time. Start with 12 minutes at 375°F. Check around the halfway mark. If they are not golden yet, add a few extra minutes. One big mistake is overcrowding the air fryer basket. If you stack the onions, they cook unevenly. This leads to soggy spots. Always place them in a single layer. If needed, cook in batches to keep them crispy. Also, watch your temperature settings. Too low might not crisp them enough. Too high can burn them. Stick to 375°F for the best results. Want to kick up the flavor? Try adding extra spices! A pinch of cayenne adds heat. You can also mix in some dried herbs like thyme or oregano. This gives your crispy onions a tasty twist. Feel free to get creative. You can even sprinkle some grated Parmesan cheese for a cheesy flavor. Experiment with different seasonings to find your favorite! {{image_2}} To spice things up, you can add more cayenne pepper. This will give your crispy onions a nice kick. You can also mix in hot sauce when coating the onions. This adds bold flavor and heat. Just adjust the amount based on your taste. Herbs can add a fresh taste. Try using dried thyme or oregano for a new twist. You can also mix in Parmesan cheese. This adds a rich layer of flavor to your onions. Both options make for a tasty snack. Don’t just stick to regular onions. You can explore different types of onions like sweet, red, or shallots. Each type has its own unique taste. Sweet onions are mild, while red onions have a sharper flavor. Shallots offer a nice balance between the two. Each variety will change the snack's taste and texture. For more details, check the Full Recipe. To keep your crispy onions fresh, store them in an airtight container. This helps maintain their crunch. Use a glass jar or a plastic container with a tight lid. Avoid using bags, as they can trap moisture. If you have extra crispy onions, let them cool completely first. This keeps steam from making them soggy. When you want to enjoy leftover crispy onions, you need to regain that crunch. The best way is to use the air fryer again. Preheat it to 350°F (175°C). Place the onions in the basket for about 3-5 minutes. This method works well to avoid sogginess. You can also use an oven. Spread them on a baking sheet and heat at 350°F (175°C) for 5-7 minutes. Crispy onions can last up to one week in the fridge. Make sure they are in an airtight container. If you want them to last longer, consider freezing them. Place cooled crispy onions in a freezer-safe bag. This way, they can last for up to three months. When you’re ready to eat them, just reheat as mentioned above. Enjoy your bold and flavorful snack anytime! For the full recipe, check the earlier sections. Yes, you can use different types of onions like sweet, red, or yellow. Sweet onions add a mild taste. Red onions give a nice color and a bit of bite. Yellow onions are the classic choice and have great flavor. Each type changes the taste, so feel free to explore! Look for a golden brown color and a crispy texture. You should hear a crunch when you bite into them. If they appear dry and light, they are ready. Shake the basket halfway through cooking to ensure even crispness. Yes, you can make crispy onions in the oven. Preheat your oven to 400°F (200°C). Spread the coated onions on a baking sheet in a single layer. Bake for 20-25 minutes, flipping halfway. Keep an eye on them so they don’t burn. Each serving has about 150 calories, 7g fat, and 2g protein. Using less oil or skipping the buttermilk can reduce calories. If you swap flour for a gluten-free option, check the nutrition label for details. This recipe offers room for healthy swaps! In this blog post, we explored the key ingredients for making crispy onions. We discussed preparation, cooking steps, and serving suggestions. I shared tips for maximum crispiness and common mistakes to avoid. You can also try spicy or herbed variations to mix things up. Remember, storing leftovers properly keeps them fresh longer. With these insights, you can create a tasty snack or topping. Enjoy your crispy onions, and feel free to experiment with flavors!](https://therecipehatch.com/wp-content/uploads/2025/05/b059fe0e-1daa-4f86-a949-cb5a95aeebdc.webp)
Air Fryer Crispy Onions Bold and Flavorful Snack
Are you ready to elevate your snacking game? In this post, I’ll show you how to make Air Fryer Crispy Onions that burst with bold

How to Make Chicken Taco Dip Flavorful and Easy
Are you ready to whip up a tasty treat that will impress all your friends? This Chicken Taco Dip is not only packed with flavor

Air Fryer Cheeseburger Wraps Tasty and Easy Meal
Looking for a quick and tasty meal? Air Fryer Cheeseburger Wraps are the answer! They combine the best flavors of a classic cheeseburger into a
![- 8 lasagna noodles - 1 cup ricotta cheese - 1 cup shredded mozzarella cheese - 1/2 cup grated Parmesan cheese - 1 teaspoon dried oregano - 1 teaspoon garlic powder - Salt and pepper to taste - 1 cup breadcrumbs - 1 egg, beaten - Olive oil spray To make Easy Air Fryer Lasagna Fritta, you need simple yet tasty ingredients. First, the main ingredients create a rich and creamy filling. The lasagna noodles serve as the base for these bites. You will mix ricotta, mozzarella, and Parmesan for a cheesy delight. Let's talk about seasonings. Dried oregano and garlic powder add a nice flavor. You can adjust salt and pepper to your taste. The breadcrumbs give a crunchy coating, while the beaten egg helps them stick. This recipe uses olive oil spray for cooking. It helps the bites get crispy without extra fat. You can find all these ingredients at your local store or pantry. For the full details, check the Full Recipe section. To start, boil the lasagna noodles in salted water. Cook them until they are al dente, which means they are firm to the bite. This usually takes about 8 to 10 minutes. Once cooked, drain the noodles in a colander. Lay them flat on a baking sheet to cool slightly. This step helps prevent them from sticking together. Now, let’s make the cheese filling. In a mixing bowl, combine 1 cup of ricotta cheese, 1 cup of shredded mozzarella cheese, and 1/2 cup of grated Parmesan cheese. Add in 1 teaspoon of dried oregano, 1 teaspoon of garlic powder, and sprinkle in some salt and pepper to taste. Mix everything well until it is smooth and blended. This filling will give your bites a creamy and rich flavor. Next, it’s time to assemble the bites. Cut each lasagna noodle in half. Take one half and place about a tablespoon of the cheese filling on it. Then, place another half on top, forming a sandwich. Press gently to seal the edges. This keeps the filling inside while cooking. To prepare for air frying, set up a station. In one bowl, beat 1 egg. In another bowl, spread out 1 cup of breadcrumbs. Dip each lasagna bite in the egg. Make sure to coat it well, then roll it in the breadcrumbs. This gives the bites a nice crispy texture when they cook. For the full recipe, check this out: [Full Recipe]. To get that perfect crunch, always preheat your air fryer. Preheating helps the bites cook evenly. I also recommend using olive oil spray. A light mist before cooking adds extra crunch and flavor. One big mistake is overfilling the bites. If you add too much filling, they can burst open. Another mistake is skipping the cooling step for the noodles. If the noodles are too warm, the filling might spread out. If you make a larger batch, adjust the cook time. You may need to add a few extra minutes. For optimal settings, cook at 375°F (190°C). This temperature gives you that golden, crispy outer layer. {{image_2}} You can change up the cheese in this recipe. Instead of just mozzarella and ricotta, try using cheddar or feta. Cheddar adds a sharp taste that can brighten the dish. Feta brings a salty flavor that pairs well with the other ingredients. Mix and match to find your favorite blend! Want to make your lasagna fritta even more special? Add some spinach or mushrooms to the cheese filling. These ingredients bring extra nutrition and flavor. Chopped sausage can also give a hearty touch. Experiment with these additions to suit your taste and make the dish your own. While marinara is a classic choice, don’t shy away from other dipping sauces. Try ranch or garlic aioli for a creamy twist. A spicy arrabbiata sauce can add a kick. You can even serve them with a sweet chili sauce for a fun dip. The right sauce can take your bites to a whole new level. To store leftovers, let the lasagna fritta cool first. Place them in an airtight container. You can keep them in the fridge for up to three days. This way, they stay fresh and tasty for later. If you want to freeze the bites, wrap each one in plastic wrap. Then, place them in a freezer bag. Make sure to remove as much air as possible. They can last in the freezer for about two months. This keeps them ready for a quick snack or meal. When reheating, the air fryer is your best friend. Preheat it to 350°F (175°C). Place the bites in the basket and heat for about 5-7 minutes. This method keeps them crispy. You can also use an oven if you don’t have an air fryer. Just bake at the same temperature for 10-15 minutes. Enjoy the crunch! Yes, you can use no-boil lasagna noodles. They save time and effort. No-boil noodles soak up moisture during cooking. This helps them become tender without boiling. Just layer them as you would regular noodles. Keep in mind, they may change texture slightly. You may need to adjust cooking time, so check for doneness. If you lack an air fryer, you can bake these bites. Preheat your oven to 375°F (190°C). Place the bites on a baking tray lined with parchment paper. Bake them for 15-20 minutes. They should be golden brown and crispy. You can also pan-fry them in a skillet with a bit of oil. Just make sure to flip them to avoid burning. These bites pair well with many sides. Here are some great options: - Garlic bread: A classic choice that complements Italian dishes. - Caesar salad: The crisp greens balance the richness of the bites. - Steamed vegetables: Broccoli or green beans add freshness. - Marinara sauce: Use it as a dip for extra flavor. Try these sides for a complete and tasty meal! In this article, we covered how to make easy air fryer lasagna fritta. We discussed the key ingredients, including noodles and cheese, and steps for making and assembling the bites. I gave tips for crispiness and shared storage advice. Remember, variations can keep your dish fun and fresh. These bites are tasty and simple to create, making cooking enjoyable. Now, it's time to gather your ingredients and try this recipe for yourself! Enjoy your cooking!](https://therecipehatch.com/wp-content/uploads/2025/05/332b4607-c1e3-46d4-9d62-1f25b7c3fcb8.webp)
Easy Air Fryer Lasagna Fritta Crispy and Delicious Treat
Craving a crispy, cheesy treat? Let me introduce you to Easy Air Fryer Lasagna Fritta! This fun twist on classic lasagna delivers all the comfort
![To make tasty Air Fryer Buffalo Cauliflower, you need these main ingredients: - 1 medium head of cauliflower, cut into bite-sized florets - 1 cup all-purpose flour - 1 cup water - 1 teaspoon garlic powder - 1 teaspoon onion powder - 1 teaspoon paprika - ½ teaspoon salt - ½ teaspoon black pepper - ½ cup buffalo sauce (mild or hot, based on preference) - 1 tablespoon olive oil These ingredients come together to create a crunchy and spicy snack. If you want to boost the flavor, consider adding: - 1 teaspoon smoked paprika for a smoky taste - 1 tablespoon nutritional yeast for a cheesy flavor - 1 tablespoon hot sauce for extra heat - Fresh herbs like parsley or chives for garnish These options can make your dish even more exciting! For the best flavor, I recommend using: - Frank's RedHot for buffalo sauce, as it gives a classic taste - King Arthur Flour for all-purpose flour, known for its quality These brands help ensure your Air Fryer Buffalo Cauliflower turns out delicious every time. For the full recipe, check out the details above. First, wash and dry your cauliflower. This step is key to getting crispy bites. Cut the cauliflower into bite-sized florets. Aim for even sizes so they cook well. Smaller pieces will cook faster, while larger ones may take longer. In a large bowl, mix the flour, garlic powder, onion powder, paprika, salt, and black pepper. Use a whisk to blend these dry ingredients. Now, slowly add water while whisking. Keep mixing until you have a smooth, thick batter. This batter will coat the cauliflower and give it a crunchy texture. Dip each floret into the batter. Make sure they’re fully coated. Let the excess batter drip off before placing them in the air fryer basket. Preheat your air fryer to 375°F (190°C) for about 5 minutes. Arrange the coated cauliflower in a single layer. Avoid overcrowding for even cooking. Lightly spray with olive oil to enhance crispiness. Air fry for about 15 minutes. Shake the basket halfway through cooking. After the first cook, toss the cauliflower in buffalo sauce until evenly coated. Return them to the air fryer for an extra 5 minutes. This final cook helps the sauce stick and adds crunch. For the full details, check out the [Full Recipe]. To get the best results, cut your cauliflower into uniform pieces. Aim for bite-sized florets. This way, they cook evenly and finish at the same time. When you fill the air fryer, arrange the florets in a single layer. This helps hot air circulate around them. If you crowd the basket, some will cook slower than others. Crispy bites are the goal! To achieve this, make sure you coat the florets well. After you coat them in batter, let any excess dribble off. Lightly spray them with olive oil before air frying. This creates a golden and crispy texture. Remember to shake the basket halfway through cooking. This helps all sides crisp up nicely. Buffalo sauce can be mild or hot. Choose your heat level based on your taste. If you want a milder flavor, use less sauce or opt for a milder brand. For extra heat, add more sauce after cooking. Toss the cooked cauliflower in the sauce for a great flavor boost. You can always serve extra sauce on the side for dipping too. {{image_2}} To make this dish vegan, you can easily swap the all-purpose flour with a chickpea flour blend. Mix chickpea flour and water in the same way. This will give you a nice, thick batter. You can also use any plant-based buffalo sauce. Look for brands that do not use dairy. This keeps your snack dairy-free and just as tasty. For a gluten-free version, replace all-purpose flour with a gluten-free blend. Many brands offer a 1:1 ratio for baking. You can also use almond flour or coconut flour. Just remember that these flours may change the texture slightly. Mix in the same way as with regular flour. The outcome will still be crunchy and full of flavor. While buffalo sauce is classic, don't be afraid to get creative. Try a honey mustard sauce for a sweet kick. You can also use sriracha for a spicy twist. Barbecue sauce will add a smoky flavor. Experiment with your favorite sauces to find your best combination. Each option brings its unique taste to the cauliflower bites. To keep your leftover buffalo cauliflower fresh, place it in an airtight container. Store it in the fridge for up to three days. Make sure it cools down completely before sealing. This helps keep the bites crispy and tasty. When reheating, use the air fryer for best results. Set it to 350°F (175°C). Heat for about 5 to 7 minutes. This keeps the cauliflower crunchy. You can also use a regular oven, but the air fryer is quicker. You can freeze buffalo cauliflower for up to a month. Place the cooled bites in a single layer on a baking sheet. Freeze them for about an hour. Once frozen, transfer to a freezer bag. This method prevents them from sticking together. To enjoy, just reheat them in the air fryer straight from the freezer. It takes about 30 minutes to cook Air Fryer Buffalo Cauliflower. You spend 10 minutes prepping and about 20 minutes cooking. You air fry the cauliflower for 15 minutes, then toss it with sauce and cook for 5 more minutes. This makes the bites crispy and full of flavor. Yes, you can make Air Fryer Buffalo Cauliflower in advance. You can prepare the cauliflower and batter earlier in the day. Just keep them in the fridge until you are ready to cook. This way, you save time when you want a quick snack or side dish. Buffalo Cauliflower pairs well with many foods. Here are some great options: - Celery sticks - Carrot sticks - Ranch dressing - Blue cheese dressing - Fresh herbs like parsley or green onions These sides add crunch and balance the heat of the cauliflower. You can also serve it with your favorite dip for extra flavor. For the full recipe, check out the provided link. In this post, we covered how to make Air Fryer Buffalo Cauliflower from scratch. We discussed the main and optional ingredients needed for great flavor. I shared step-by-step instructions, helpful tips for cooking, and variations for different diets. Lastly, we addressed how to store and reheat leftovers. Buffalo cauliflower is easy and fun to make. You can enjoy it as a snack or side dish. With these tips, you’ll serve up crispy, tasty bites in no time.](https://therecipehatch.com/wp-content/uploads/2025/05/3edddf38-a01b-41ba-8cee-d44c5fc020bf.webp)
Air Fryer Buffalo Cauliflower Spicy and Flavorful Snack
Craving a spicy, crispy snack? Let me introduce you to Air Fryer Buffalo Cauliflower, the perfect bite-sized treat! With its bold flavors and easy prep,
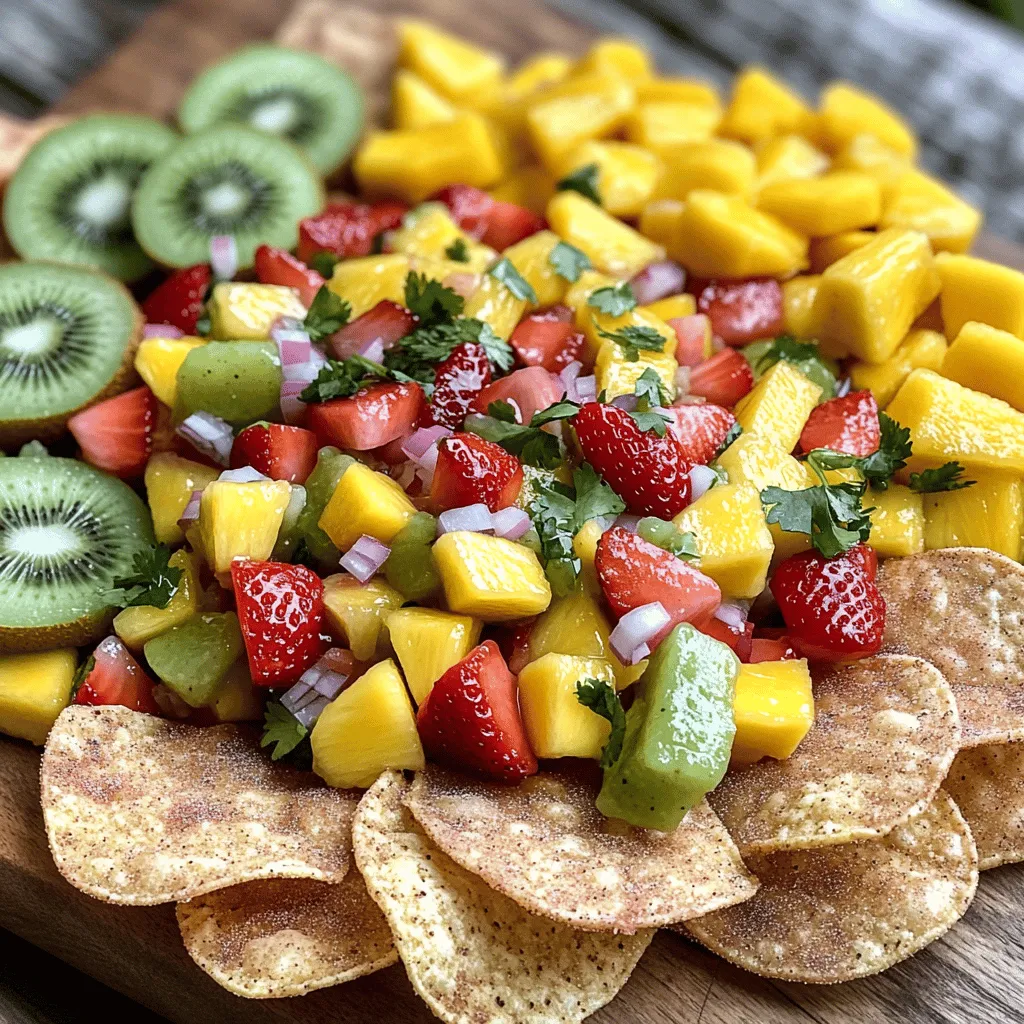
Fruit Salsa with Cinnamon Sugar Chips Delight
Get ready to elevate your snack game with my Fruit Salsa with Cinnamon Sugar Chips Delight! This bright, flavorful treat combines fresh fruits like strawberries
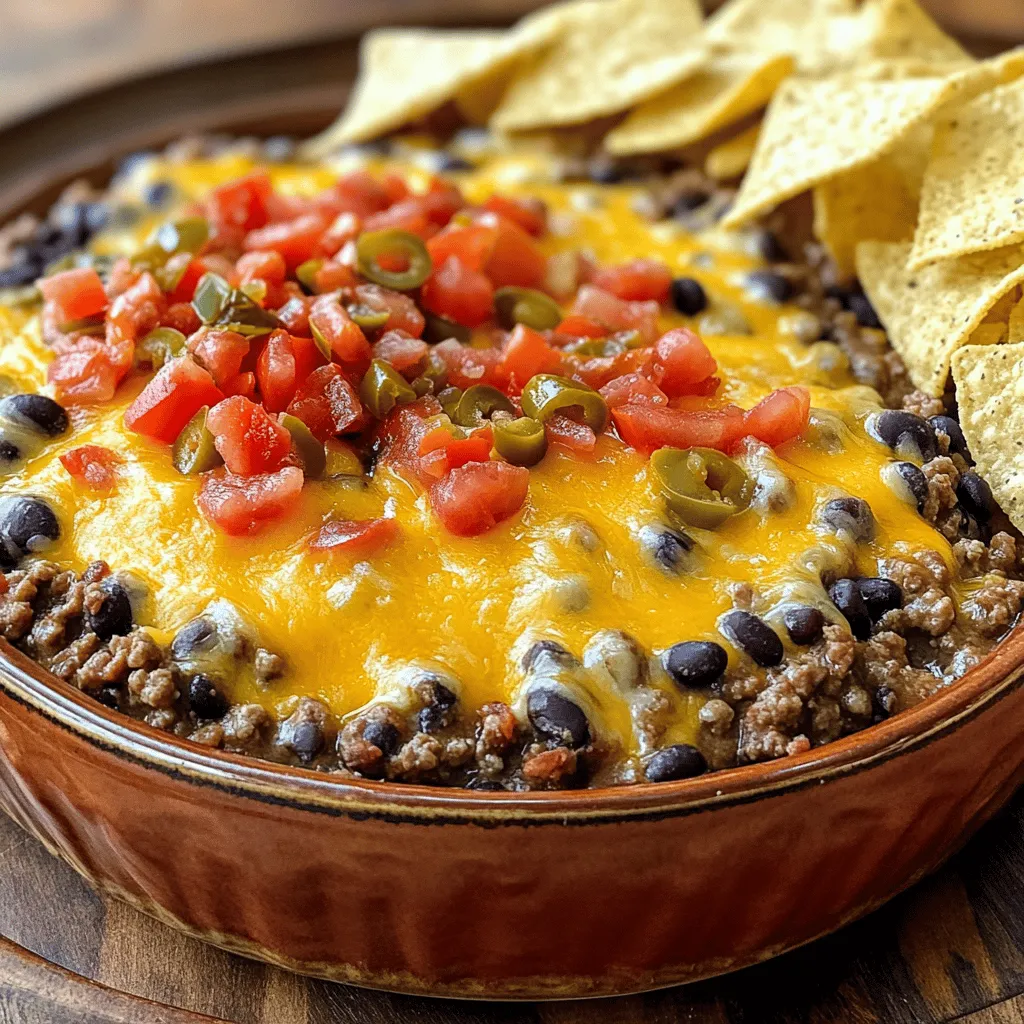
Meaty Texas Trash Dip Savory and Easy Crowd Pleaser
If you’re searching for the ultimate crowd-pleaser, look no further than Meaty Texas Trash Dip. This savory, cheesy dip combines rich flavors and easy-to-find ingredients.
![To make Honey Butter Skillet Corn, you need: - 4 cups fresh corn kernels (or frozen, thawed) - 4 tablespoons unsalted butter - 2 tablespoons honey - 1 teaspoon garlic powder - 1/2 teaspoon smoked paprika - Salt and pepper to taste These ingredients create a sweet and savory flavor. The corn gives a nice crunch, while the butter and honey add richness. You can add some fun touches with these garnishes: - Chopped fresh cilantro - Chopped fresh parsley These herbs add a pop of color and a fresh taste. They make the dish look great. Honey Butter Skillet Corn goes well with many dishes. You can serve it with: - Grilled chicken - Barbecue ribs - Tacos - Fish tacos These pairings make your meal feel complete. Each option brings out the sweet notes in the corn. If you want to dive deeper into the recipe, check out the Full Recipe. To start, gather all your ingredients. You need four cups of corn. Fresh corn tastes best, but frozen works too. Next, measure out four tablespoons of unsalted butter and two tablespoons of honey. Also, get your seasonings ready: one teaspoon of garlic powder and half a teaspoon of smoked paprika. Don’t forget salt and pepper for taste! Finally, chop some fresh cilantro or parsley for garnish. 1. Grab a large skillet and set it on medium heat. 2. Add the butter to the skillet and let it melt. 3. Once melted, pour in the honey. Stir it well so they mix. 4. Now, add the corn kernels to the skillet. Toss them in the honey butter. 5. Sprinkle in the garlic powder, smoked paprika, salt, and pepper. Mix everything until it’s combined. 6. Cook the corn for about 8 to 10 minutes. Stir it occasionally. You want the corn to be tender and lightly caramelized. 7. Taste the corn. Adjust the seasoning if you need to. 8. When the corn is done, remove it from the heat. Garnish it with the chopped cilantro or parsley. For great caramelization, keep the heat at medium. If it's too high, the corn may burn. Stir the corn every few minutes to cook evenly. Using fresh corn gives a sweet and juicy taste. If you want more color, let it cook a bit longer. Just watch it closely! The right caramelization adds depth and flavor to your dish. For the full recipe, check out the [Full Recipe]. When you choose corn, look for ears with bright green husks. The silk should be golden and fresh. Press the kernels with your thumb; they should feel firm and juicy. Avoid any ears with dry or brown husks. If you can, smell the corn. Fresh corn has a sweet scent. This ensures you get the best taste for your Honey Butter Skillet Corn. When mixing honey and butter, use room temperature butter. This helps the honey blend in smoothly. Melt the butter in a skillet over medium heat. Once melted, take it off the heat before adding honey. Stir until they are well combined. This method keeps the honey from losing its flavor. Remember, mixing well makes the dish rich and tasty. A common mistake is overcooking the corn. This can make it mushy instead of crisp. Cook it just until tender and caramelized. Another mistake is not tasting the dish. Always check if it needs more salt or pepper. Lastly, don’t skip the garlic powder and smoked paprika. These spices add a depth of flavor that makes your dish shine. For more tips, try the full recipe to guide you through the process. {{image_2}} You can easily add a kick to your dish. Just mix in some diced jalapeños. Start with one pepper, and taste as you go. You can also sprinkle in cayenne pepper or red pepper flakes. This brings heat and depth to your sweet corn. Adding more veggies boosts taste and nutrition. Bell peppers or zucchini work great here. Dice them up and sauté with the corn. You can also try peas or diced tomatoes for color and flavor. This makes your skillet corn a full meal. If you prefer a dairy-free option, use coconut oil instead of butter. It adds a sweet flavor that pairs well with honey. You can also try nut-based butter for a creamy texture. Just keep the same cooking steps for great results. For the full recipe, check out the steps above. Enjoy experimenting with these ideas! To store leftover Honey Butter Skillet Corn, let it cool down first. Place it in an airtight container. This keeps the corn fresh and tasty. Stored this way, it will last for up to three days in the fridge. When you’re ready to eat the leftovers, you can reheat them easily. Just put the corn in a skillet over medium heat. Stir it often to warm it evenly. You can also add a small bit of butter to keep it rich and moist. Heat for about five minutes or until warm. Yes, you can freeze Honey Butter Skillet Corn! Just place it in a freezer-safe bag or container. Make sure to remove as much air as possible before sealing. It can stay frozen for up to three months. When you're ready to eat it, thaw it in the fridge overnight. Reheat it in a skillet as mentioned above. Enjoy the sweet and rich flavors again! For the full recipe, check out the details above. Yes, you can use canned corn. Just drain and rinse it well before cooking. Canned corn is convenient and saves time. However, fresh corn gives a better taste and texture. If using frozen corn, make sure to thaw it first. Honey Butter Skillet Corn lasts about three to four days in the fridge. Store it in an airtight container. When you want to eat it, just reheat it on the stove or microwave. Honey Butter Skillet Corn pairs well with many dishes. Try serving it with grilled chicken or fish. It also goes great with BBQ ribs. For a complete meal, add a fresh salad or some rice. For the full recipe, check out the details above! This blog post covered how to make Honey Butter Skillet Corn. You learned about the main ingredients, optional garnishes, and perfect pairings. I shared cooking steps and tips for caramelization. You explored tricks for selecting fresh corn and mixing honey and butter. We discussed tasty variations and how to store leftovers. In closing, this dish is simple and fun. You can adapt it to fit your taste. Enjoy cooking and sharing this delicious corn dish with friends and family!](https://therecipehatch.com/wp-content/uploads/2025/05/eb6d7b26-e741-48a9-a3da-132d9e2439f3.webp)
Honey Butter Skillet Corn Rich and Flavorful Dish
If you love sweet and savory dishes, then you’ll adore Honey Butter Skillet Corn. This rich and flavorful treat pairs perfectly with any meal. It’s

Pizza Grilled Cheese Delight for Your Taste Buds
Are you ready to treat your taste buds? This Pizza Grilled Cheese combines cheesy goodness with classic pizza flavors. Picture crispy sourdough, gooey mozzarella, and