Appetizers
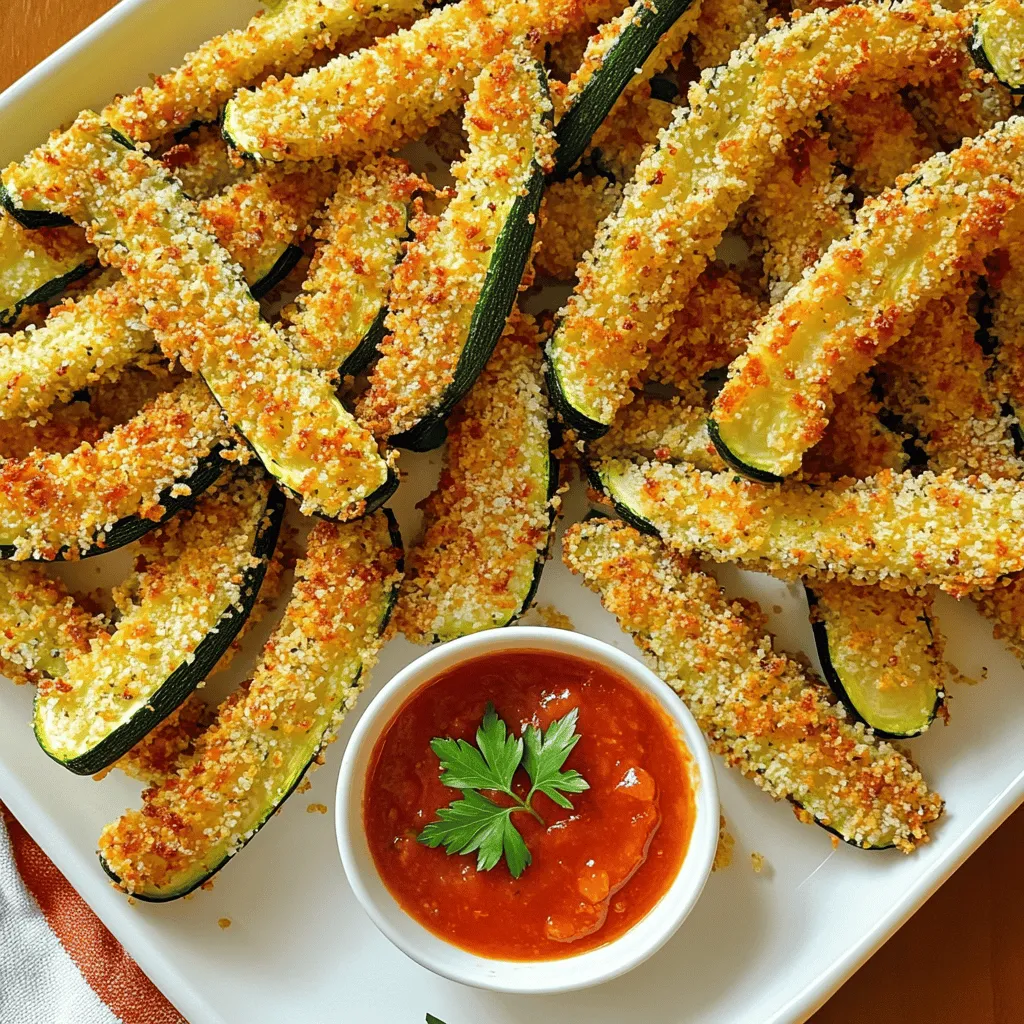
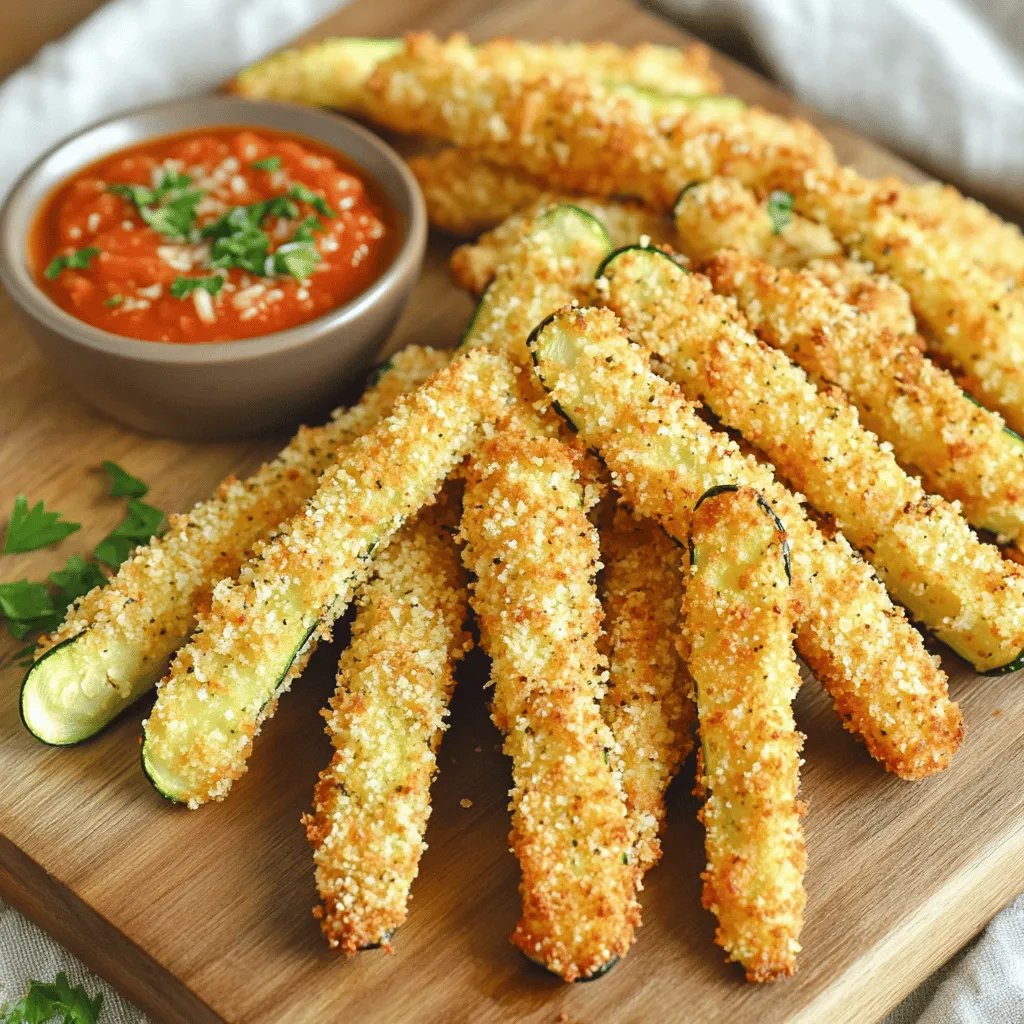
![- 2 medium zucchinis, sliced into thin strips - 1 cup whole wheat breadcrumbs - 1/2 cup grated Parmesan cheese (optional) - 1 teaspoon garlic powder - 1 teaspoon onion powder - 1 teaspoon Italian seasoning - Salt and pepper to taste - 2 eggs, beaten - Cooking spray or olive oil spray To make these healthy air fryer zucchini fries, start with fresh zucchinis. Look for ones that are firm and bright. Slice them into thin strips. This helps them cook evenly. You can choose to add Parmesan cheese for a cheesy twist. Next, gather your seasonings. Garlic powder, onion powder, and Italian seasoning add flavor. Don’t forget salt and pepper! These simple ingredients boost the taste of your fries. For the coating, use whole wheat breadcrumbs. They add a nice crunch and are healthier than regular breadcrumbs. The eggs will help the breadcrumbs stick to the zucchini. Finally, cooking spray or olive oil spray is key. It helps achieve that crispy texture we all love. Now, you are ready to make these delicious zucchini fries! For the full recipe, check out the steps to get the perfect crunch. - Preheat to 400°F (200°C). Preheating helps to cook the zucchini fries evenly. A hot air fryer gives you that crispy texture. - Mix dry ingredients in a bowl. In a shallow bowl, combine: - 1 cup whole wheat breadcrumbs - 1/2 cup grated Parmesan cheese (optional) - 1 teaspoon garlic powder - 1 teaspoon onion powder - 1 teaspoon Italian seasoning - Salt and pepper to taste Mix these ingredients well. This mixture adds flavor and crunch to your fries. - Beat eggs in a separate bowl. In another bowl, crack and beat 2 eggs. This will help the breadcrumbs stick to the zucchini. - Coating process. Take a zucchini strip and dip it into the egg. Let any excess egg drip off. Next, place it in the breadcrumb mixture. Press gently to make sure it sticks. Repeat for all zucchini strips. - Place zucchini fries in the air fryer basket. Arrange the coated zucchini fries in a single layer. Do not overcrowd the basket. This allows hot air to circulate for even cooking. - Cooking duration and flipping. Air fry the zucchini fries for about 10-12 minutes. Flip them halfway through for even browning. Look for a golden brown color for the perfect crisp. Enjoy your healthy air fryer zucchini fries! For the complete recipe, check the Full Recipe section. To get that perfect crisp, avoid overcrowding the air fryer basket. If you crowd them, they won't cook evenly. Give each fry space to breathe. This helps hot air circulate around them. Also, use cooking spray to add extra crispness. A light mist on top makes a big difference. When selecting zucchinis, look for firm and fresh ones. They should feel heavy for their size. Avoid any with soft spots or blemishes. Fresh zucchinis taste better and hold up well during cooking. Cut the zucchini into thin strips for even cooking. Aim for about ¼ inch thick. This size allows them to cook through but still stay crunchy. Consistent sizes also mean they’ll cook at the same rate. If you follow these tips, you're sure to have delicious zucchini fries. Want the full recipe? Check out the [Full Recipe]. {{image_2}} You can change the texture of your zucchini fries by using different coatings. Almond flour is a great choice for those who want a low-carb option. It gives a nutty taste and a nice crunch. Gluten-free breadcrumbs also work well. They keep the fries crispy without gluten. Simply swap out the whole wheat breadcrumbs for either option. Adding spices makes your zucchini fries even better. Try paprika for a smoky flavor or cayenne pepper for some heat. You can mix these spices into your coating mixture. Just one teaspoon of either spice can make a big difference. Feel free to experiment with other spices too. This way, you can create a flavor that fits your taste. Cheese can turn a good dish into a great one. If you love cheese, sprinkle some on your fries before cooking. Parmesan cheese adds a nice salty flavor. You can also try mozzarella for a gooey texture. Just remember to adjust the cooking time if you add cheese. With so many options, you can make these fries your own. For the full recipe, refer back to the beginning of this article. To store cooked zucchini fries, first let them cool down. Place them in an airtight container. Make sure to use parchment paper to separate layers. This keeps them from getting soggy. You can store these fries in the fridge for up to three days. For best taste, eat them within two days. To reheat zucchini fries, use the air fryer for best results. Set it to 350°F (175°C). Heat the fries for about 5 minutes. This helps them stay crispy. You can also use a regular oven. Just spread them out on a baking sheet. Bake at 350°F (175°C) for 10 minutes. Avoid using a microwave, as it will make them soft. To freeze zucchini fries, prep them first. After coating, spread them on a baking sheet in a single layer. Freeze for about 1 hour. Once frozen, transfer them to a freezer bag. Remove as much air as possible. You can freeze them for up to three months. When ready to cook, you can air fry them straight from the freezer. Just add a few extra minutes to the cooking time. Try this method to enjoy crispy zucchini fries anytime! Yes, you can use regular breadcrumbs. They will give you a different taste and texture. Whole wheat breadcrumbs add more fiber. This makes the fries healthier. Regular breadcrumbs are often lighter and crispier. If you want a healthier option, stick with whole wheat. You can use several egg substitutes. Try using unsweetened applesauce or mashed banana. You can also use a mix of ground flaxseed and water. Just combine one tablespoon of flaxseed with two and a half tablespoons of water. Let this sit for a few minutes. This mixture acts like an egg for coating. Zucchini fries go great with many sauces. You can serve them with classic ketchup or ranch dressing. For a twist, try a garlic aioli or spicy mayo. You can also mix Greek yogurt with lemon and herbs for a fresh dip. These sauces will enhance the flavor of your crispy fries. This guide covered everything you need to make tasty air fryer zucchini fries. You learned about the main ingredients, step-by-step prep, and tips for the perfect crunch. Remember to pick fresh zucchinis and avoid overcrowding your air fryer. Experiment with different coatings and flavors to make each batch unique. Enjoy crispy, healthy fries with your favorite dipping sauce. Now you can create these delicious snacks anytime!](https://therecipehatch.com/wp-content/uploads/2025/07/c682ba1a-b1a4-4bc8-89f1-97c3f7fdf3d2.webp)
Healthy Air Fryer Zucchini Fries Crunchy and Simple
Looking for a delicious snack that’s packed with flavor and good for you? These Healthy Air Fryer Zucchini Fries are just what you need! With
![- 2 medium zucchinis - 1 teaspoon salt - 1/2 cup all-purpose or whole wheat flour - 1/4 cup grated Parmesan cheese - 2 large eggs - 1/4 cup fresh parsley - 2 green onions - 1 teaspoon garlic powder - 1/2 teaspoon black pepper - Olive oil for frying To create these zucchini fritters, you need fresh ingredients. Start with two medium zucchinis. They should feel firm and look shiny. Salt helps remove excess moisture from the zucchini. You can use all-purpose flour or whole wheat flour. Parmesan cheese adds a nice flavor. Eggs bind the fritters together. Fresh parsley gives color and taste. Green onions add a mild onion flavor. Garlic powder enhances the dish with a warm taste. Black pepper adds a bit of spice. Finally, use olive oil for frying. Zucchini is a superfood. It's low in calories and high in water content. This means you can enjoy it without guilt. It's rich in vitamins A and C, which are great for your skin and immune health. Zucchini is also a source of fiber. Fiber helps with digestion and keeps you full longer. Antioxidants in zucchini help protect your body from free radicals. Eating zucchini fritters gives you a tasty way to enjoy these health benefits. For the full recipe, check out the [Full Recipe]. First, start by grating the zucchinis. Use a box grater or a food processor for speed. Place the grated zucchini in a colander. Sprinkle one teaspoon of salt over it. This salt helps draw out excess moisture. Let the zucchini sit for about 15 minutes. After that, rinse the zucchini under cold water. This step removes the salt. Next, take a clean kitchen towel and squeeze the zucchini. Remove as much moisture as you can. This is key for making crispy fritters. Too much moisture will make them soggy. In a large bowl, combine the grated zucchini, flour, Parmesan cheese, eggs, parsley, green onions, garlic powder, and black pepper. Mix these ingredients until they blend well. You want a thick batter but not dry. If it seems too wet, add a little more flour. This will help your fritters hold their shape. Now it's time to cook! Heat a skillet over medium heat. Add enough olive oil to coat the bottom of the pan. You want a nice layer for frying. Once the oil is hot, scoop a heaping tablespoon of the zucchini mixture. Carefully place it in the skillet. Press it down gently to form a fritter. Fry the fritters for about 3 to 4 minutes on each side. Look for a golden brown color. This means they are crispy and ready to eat. Remove them from the pan and place them on a paper towel-lined plate. This helps absorb any extra oil. Continue frying the remaining batter, adding more oil as needed. For the full recipe, refer to the recipe section. Enjoy your crispy and flavorful zucchini fritters! To make crispy zucchini fritters, moisture removal is key. Start by grating your zucchinis and sprinkling them with salt. Let them sit for about 15 minutes. This step helps draw out excess water. Rinse the zucchinis to remove the salt, then squeeze them in a towel. You want them as dry as possible. The frying temperature matters too. Heat your skillet over medium heat. Add enough olive oil to coat the bottom. If the oil is too hot, the fritters will burn. If it’s too cool, they will turn soggy. Aim for a nice golden brown on each side. I love serving zucchini fritters with a dollop of Greek yogurt. It adds a creamy texture that complements the crunch. You can also try sour cream or a tangy dip. A sprinkle of fresh parsley brightens the dish and adds color. Serve them warm for the best flavor. Pair the fritters with a light salad or roasted veggies. This adds a fresh element to the meal. You can also stack them up for a fun presentation. One common mistake is overmixing the batter. This can make the fritters tough. Mix until just combined to keep them light and fluffy. Another mistake is undercooking the fritters. They should be golden brown and crispy on the outside. If they look pale, give them more time. Always ensure they are cooked through for the best taste and safety. For the full recipe, check out the section above. Enjoy making your delicious, healthy fritters! {{image_2}} You can switch up the veggies in your fritters. Try using carrots, sweet potatoes, or even spinach. These options add different flavors and colors. For a gluten-free option, replace the all-purpose flour with almond flour or chickpea flour. Both work well and keep the fritters tasty. Adding herbs and spices can change the whole dish. Fresh dill or basil brings a nice touch. You might also try a pinch of cayenne pepper for some heat. Cheese can also boost the flavor. Feta or goat cheese adds a creamy texture. You can mix it in or sprinkle it on top just before serving. You can serve fritters as a main dish or a side. If you want a filling meal, pair them with a protein like chicken or fish. Fritters go great with salads and dips. A fresh cucumber salad or a yogurt dip complements them well. Try out these combinations to find your favorite. To store your leftover zucchini fritters, allow them to cool first. Place them in an airtight container. This keeps them fresh and tasty. You can use glass or plastic containers for this. Make sure the container seals well to prevent air from getting in. Your fritters will stay good in the fridge for up to three days. You can freeze fritters before or after cooking. If you freeze them before cooking, spread them in a single layer on a baking sheet. Once frozen, transfer them to a freezer bag. When you want to eat them, you can cook them straight from the freezer. If they are cooked, let them cool first, then wrap them tightly. To reheat, bake them at 375°F for about 15 minutes. This will make them warm and crispy again. For freshness, store fritters in the fridge. They last about three days. If you freeze them, they are good for up to three months. If you notice any off smells or discoloration, it is best to discard them. Always trust your senses. If the fritters look or smell strange, do not eat them. You can use alternatives like almond flour, chickpea flour, or ground oats. These options work well for binding. Simply replace the flour in the recipe with any of these choices. Each will add its own flavor and texture. Yes, you can bake zucchini fritters! Preheat your oven to 400°F (200°C). Place the fritters on a baking sheet lined with parchment paper. Brush them lightly with olive oil. Bake for about 20-25 minutes, flipping halfway through. They may not be as crispy, but they will still taste great! Zucchini fritters pair well with many sides. Try serving them with Greek yogurt or sour cream. A fresh salad or homemade tomato salsa adds a nice touch too. You can also serve them with a light dip, like tzatziki, for extra flavor. Look for a golden brown color and a crispy texture. When you press on them, they should feel firm. If they fall apart or feel mushy, they need more time. Cooking for 3-4 minutes on each side usually gives perfect fritters. Enjoy your cooking adventure with the Full Recipe! Zucchini fritters are easy and fun to make. You learned about key ingredients and their benefits. We covered how to prep zucchini and mix the batter for crispiness. Remember to remove moisture and avoid overmixing. You can try different veggies and spices to change the flavor. Store leftovers properly so you can enjoy them later. Follow these steps, and you will have delicious fritters every time. Now, it's time to get cooking and enjoy your tasty creations!](https://therecipehatch.com/wp-content/uploads/2025/07/57f0098e-98e8-43cc-9aed-d06eaf2ba2d6.webp)
Healthy Zucchini Fritters Crisp and Flavorful Treat
Looking for a tasty way to eat more vegetables? Try my Healthy Zucchini Fritters! They’re crisp, flavorful, and packed with nutrition. Zucchini is low in
Air Fryer Zucchini Crispy and Flavorful Recipe
Are you ready to elevate your snacking game? My Air Fryer Zucchini Crispy and Flavorful Recipe delivers perfectly crispy fries without the extra oil. With
Air Fryer Zucchini Crispy and Flavorful Snack Recipe
Looking for a tasty snack that’s quick and easy? Air fryer zucchini fries are your answer! Crispy on the outside and soft inside, they’re the
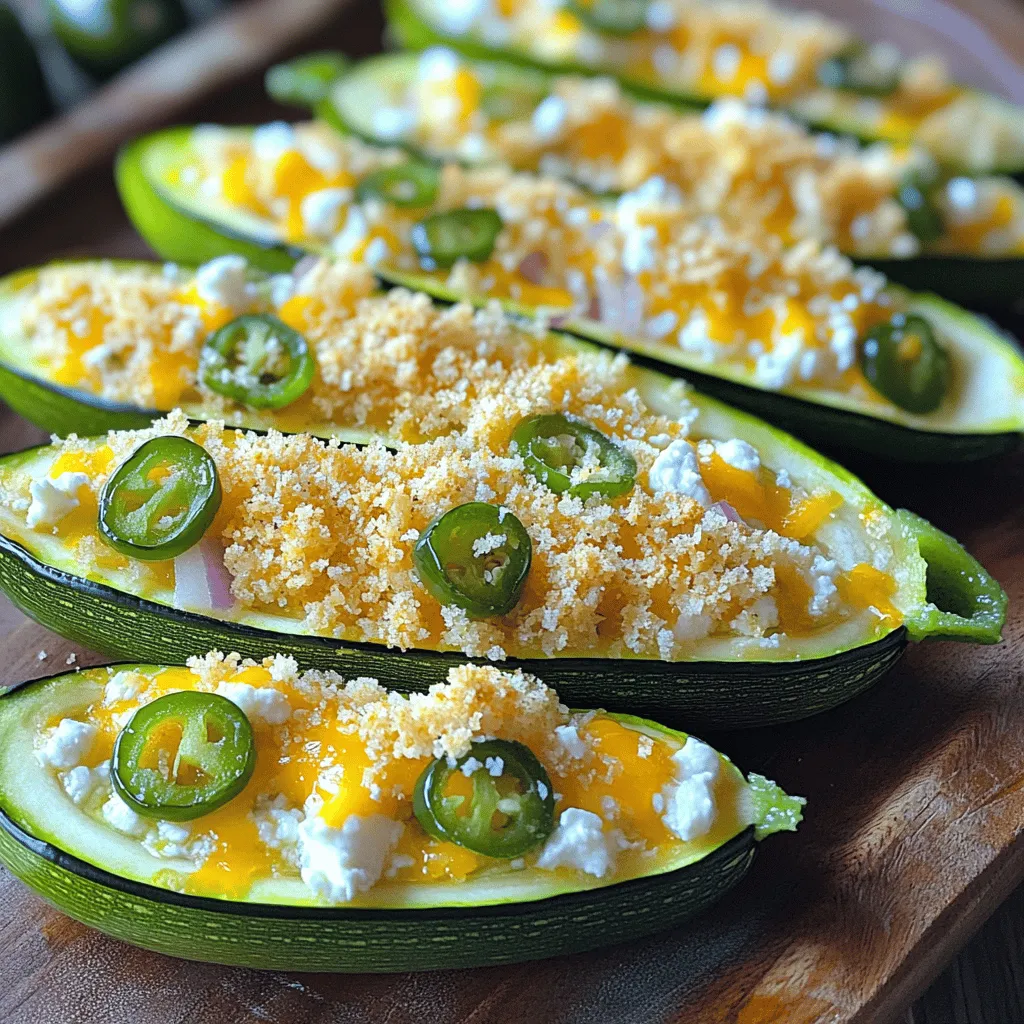
Jalapeno Popper Zucchini Boats Flavorful and Easy Dish
Are you ready to spice up your weeknight dinners? Jalapeno Popper Zucchini Boats are a fun, tasty treat that packs bold flavors and is super
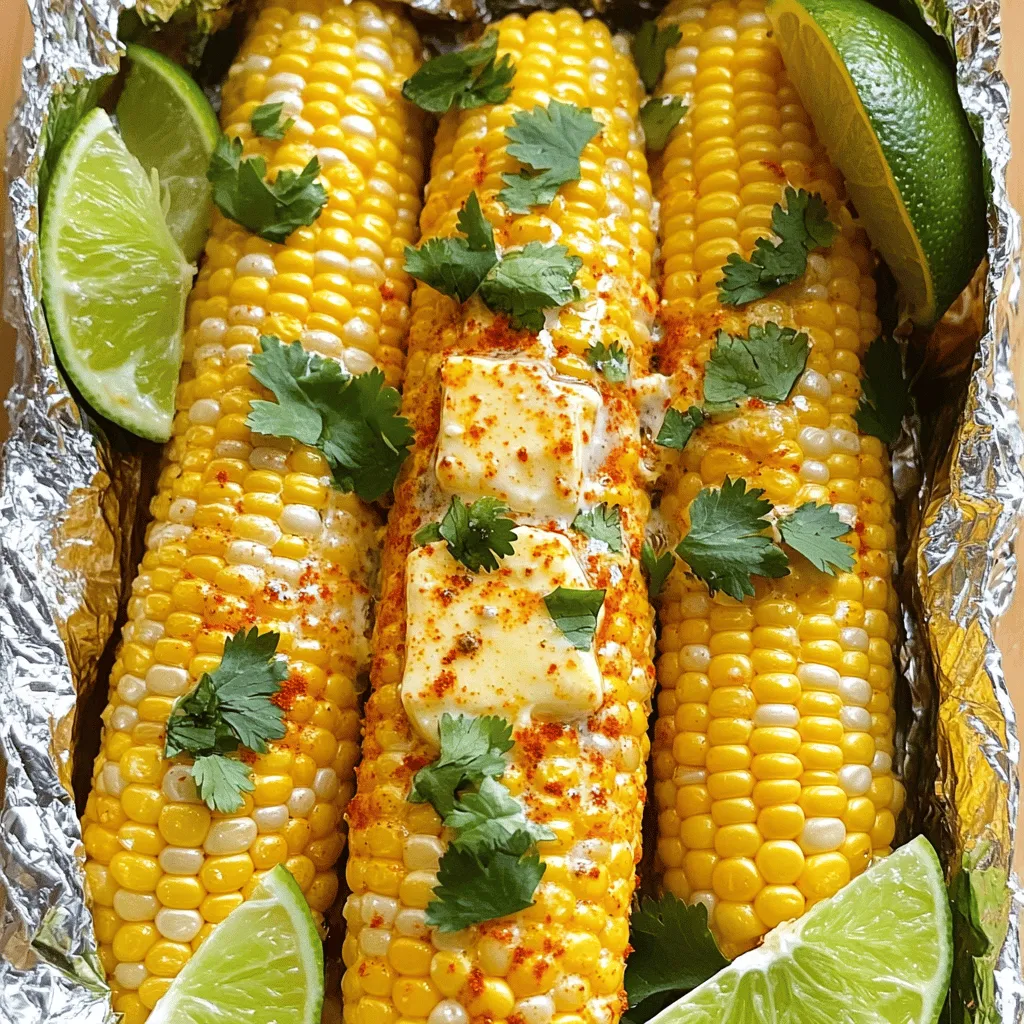
Oven-Roasted Corn on the Cob Savory and Simple Recipe
Are you ready to enjoy sweet, juicy corn on the cob without the grill? Oven-roasting corn is a game-changer! With just a few simple steps,
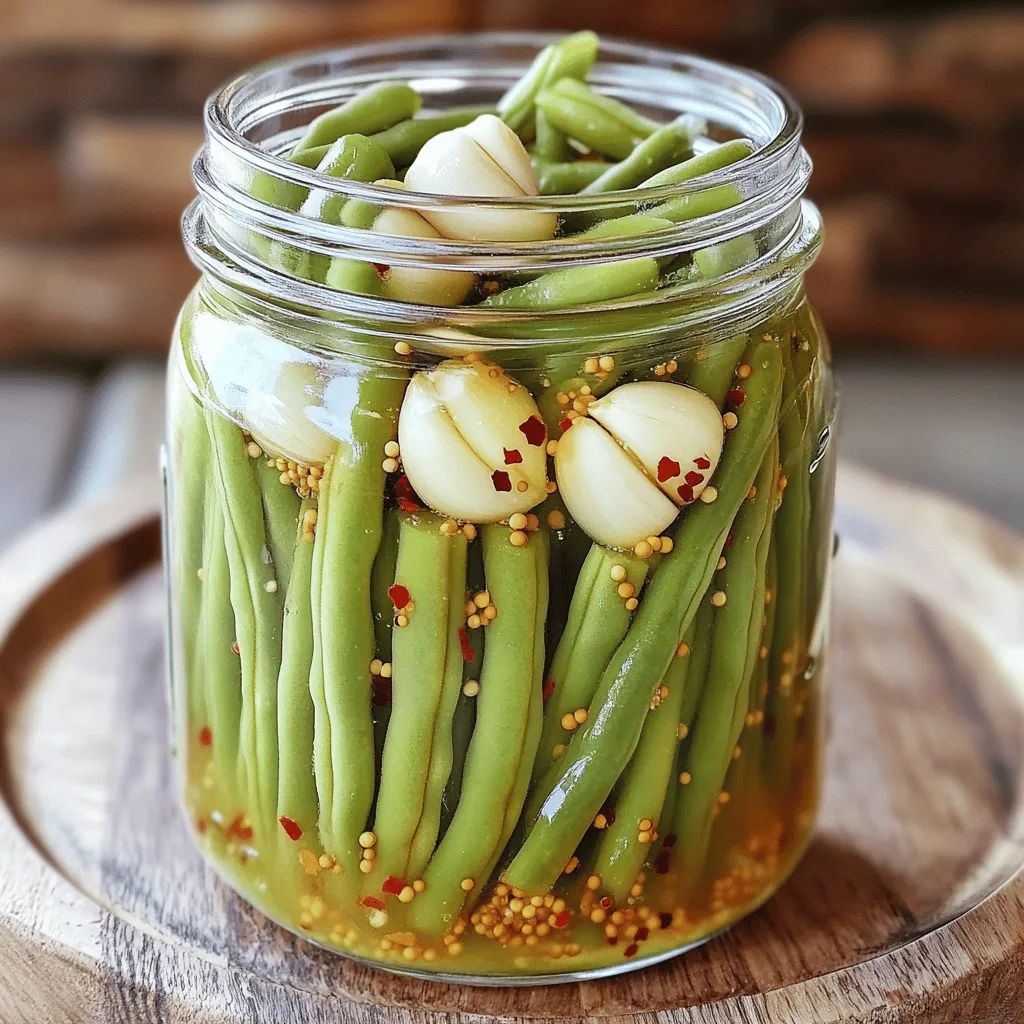
Quick Pickled Green Beans Easy and Flavorful Recipe
Looking for a quick and tasty way to enjoy green beans? My Quick Pickled Green Beans recipe brings vibrant flavor and crunch to your table
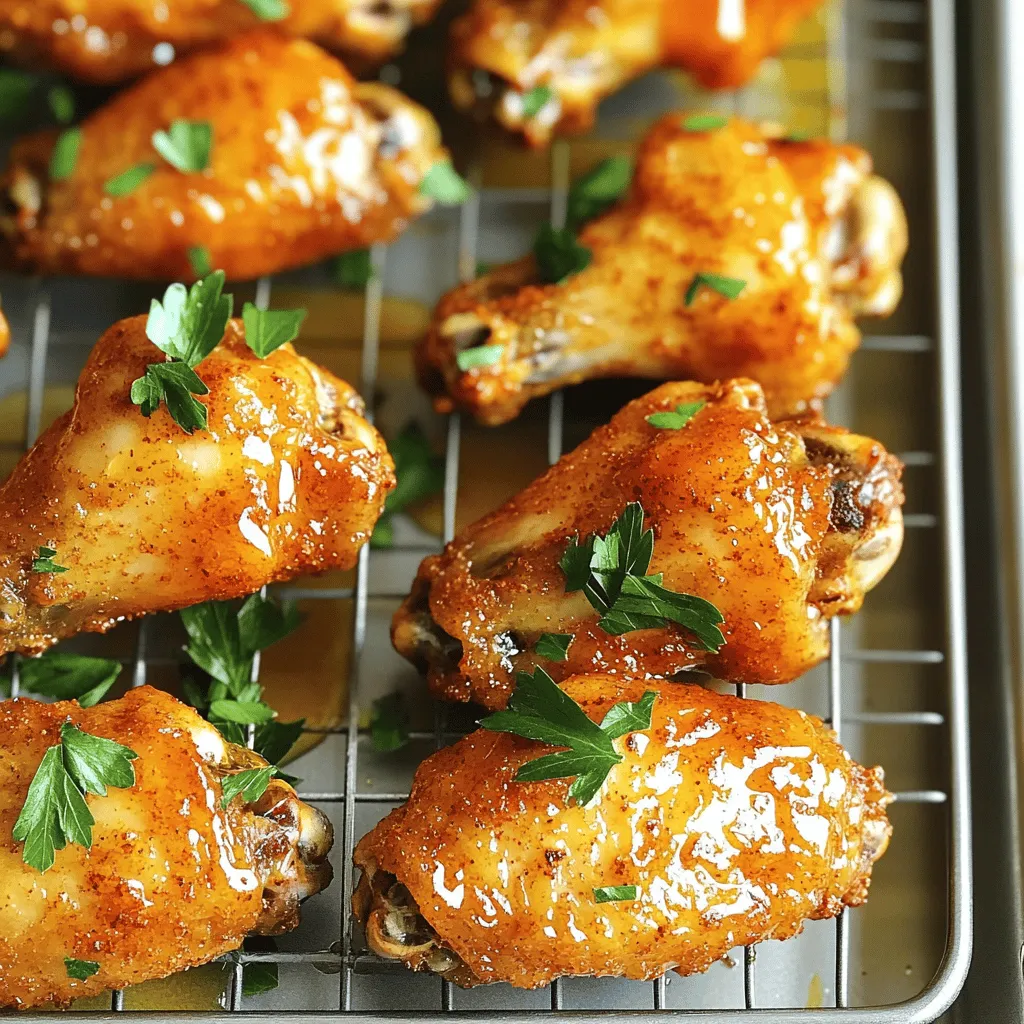
Cajun Spiced Chicken Wings Flavorful and Crispy Dish
Are you ready to spice up your game day? Dive into the world of Cajun spiced chicken wings, where each bite bursts with flavor and
. First, get your corn ready. You want to husk the corn and take off all the silk. This step is key for even grilling. Make sure you rinse the corn under cold water to remove any dirt. It’s a good idea to dry the corn with a towel. Now, heat your grill to medium-high. This temperature helps the corn cook well. Place the husked corn on the grill. Turn the corn every few minutes. You want it charred all over. The corn usually takes about 10 to 15 minutes to grill. Look for a nice golden-brown color for the best taste. Once the corn is done, let it cool a bit. In the meantime, mix the toppings. Take a small bowl and combine mayonnaise, chili powder, smoked paprika, garlic powder, lime juice, salt, and pepper. Use a brush or spoon to coat each ear of corn with this mix. Sprinkle crumbled cotija cheese on top. Finish with fresh cilantro and a bit more chili powder. Serve your corn warm with lime wedges on the side. For the full recipe, check out the complete instructions. Grilling corn is simple, but a few tips can help. Always start with fresh corn. Look for bright green husks and plump kernels. This will give you the best flavor. Preheat your grill to medium-high heat. This helps create a nice char. Turn the corn every few minutes while grilling. This ensures even cooking and browning all around. To boost the taste, mix your toppings well. Use creamy mayonnaise and zesty lime juice for a tangy base. Add chili powder and smoked paprika for heat and depth. Cotija cheese adds a savory touch. If you want more zest, squeeze fresh lime juice over the corn before serving. Fresh cilantro gives a bright finish, enhancing every bite. Avoid these mistakes to perfect your grilled corn. First, don’t skip husking the corn. Leaving husks can lead to uneven cooking. Also, don’t let the corn sit too long on the grill. This can cause it to dry out. Finally, don’t hold back on the toppings. Generous layers of sauce and cheese make the flavor pop. For the full recipe, check out the Spicy Fiesta Grilled Mexican Street Corn . Enjoy the process and the burst of flavors! {{image_2}} You can mix up the flavors for grilled Mexican street corn. Try adding some fresh herbs. Chopped basil or parsley can bring a new twist. You can also use different spices. For a smoky taste, try adding cumin or smoked paprika. Some people like a bit of sweetness. A drizzle of honey or agave syrup can do the trick. You can even use flavored mayonnaise. Chipotle mayo adds a nice kick. Cotija cheese is traditional, but there are great alternatives. Feta cheese works well if you can't find cotija. It has a similar salty flavor. Parmesan cheese can also be a great choice. It melts nicely and adds a rich taste. If you want a creamier texture, try goat cheese. It has a tangy flavor that pairs well with corn. You can also sprinkle some shredded cheddar for a different bite. Spice levels can be adjusted to fit your taste. If you like it spicy, add more chili powder or some cayenne pepper. For a milder flavor, reduce the chili powder. You can also leave it out and focus on the cheese and lime. To cool it down, add more mayonnaise or sour cream. This will balance the heat and make it creamy. Don’t forget to taste as you go. This way, you can find the perfect spice level for you. To store leftover grilled corn, wait for it to cool down. Wrap each ear in plastic wrap or foil. You can also place it in an airtight container. This way, it stays fresh for up to three days in the fridge. When you are ready to eat the corn, you can reheat it easily. Preheat your grill or a skillet to medium heat. Place the corn on the grill or skillet for about five minutes, turning it often. This helps it regain its charred flavor and keeps it juicy. If you want to freeze grilled corn, wrap it tightly in plastic wrap. Then, place it in a zip-top bag. Remove as much air as possible before sealing. Grilled corn can last up to three months in the freezer. When you are ready to eat it, thaw it in the fridge overnight before reheating. The best corn for grilling is sweet corn. Look for fresh ears with bright green husks. The kernels should be plump and firm. My favorite variety is the bi-color corn, which has a mix of yellow and white kernels. This corn is sweet, juicy, and perfect for grilling. Always choose corn that feels heavy for its size. Freshness makes a big difference in taste. Yes, you can prepare grilled Mexican street corn ahead of time. Grill the corn and let it cool. Once cooled, wrap it in foil or store it in an airtight container. Keep it in the fridge for up to two days. When you're ready to serve, simply reheat it on the grill or in the oven. This method keeps the flavor intact while saving time. You can grill corn without a grill! Use a stovetop grill pan or an oven. If using a grill pan, heat it over medium-high heat. Cook the corn for about 10-15 minutes, turning often. For the oven, place husked corn on a baking sheet. Roast it at 400°F for about 25 minutes, turning halfway. Both methods give you that delicious char flavor found in grilled corn. Grilled Mexican street corn is a fun and tasty dish. We explored the key ingredients, helpful tips, and various ways to customize your corn. Remember to choose the right corn and toppings for the best flavor. Experiment with different spices and cheeses to find your favorite combination. Store your leftovers correctly to enjoy later. Grilled corn is easy to make and so delicious. Try it out, and enjoy this vibrant treat at your next meal!](https://therecipehatch.com/wp-content/uploads/2025/06/b61b6c63-d7ea-4852-aaf2-990e39d0e239.webp)
Grilled Mexican Street Corn Flavorful and Easy Recipe
Are you ready to elevate your summer BBQs? Grilled Mexican Street Corn is a must-try! This flavorful and easy recipe combines smoky grilled corn with
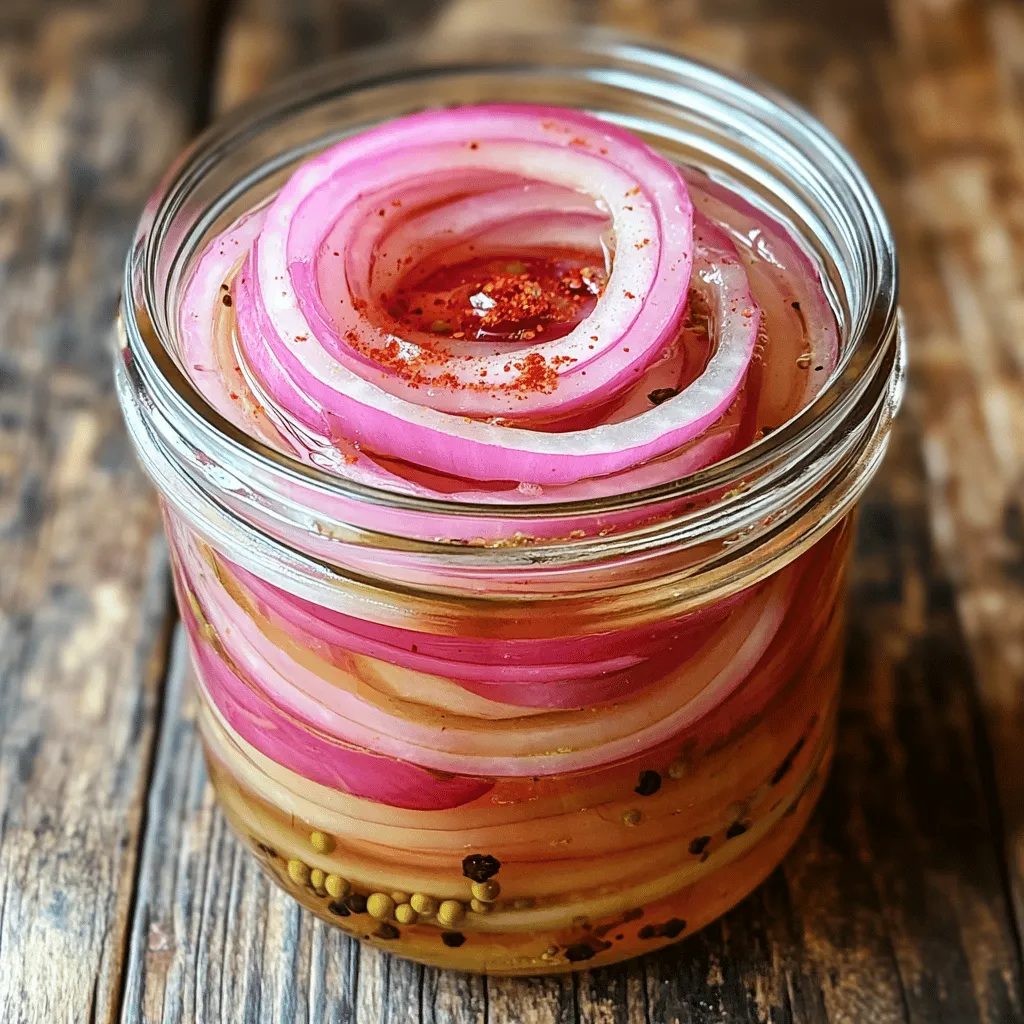
Gordon Ramsay Pickled Onions Flavorful and Tangy Treat
Are you ready to elevate your meals with a burst of flavor? Gordon Ramsay’s pickled onions are the perfect blend of tangy and sweet, and