Baked Cottage Cheese Eggs Simple Flavorful Delight
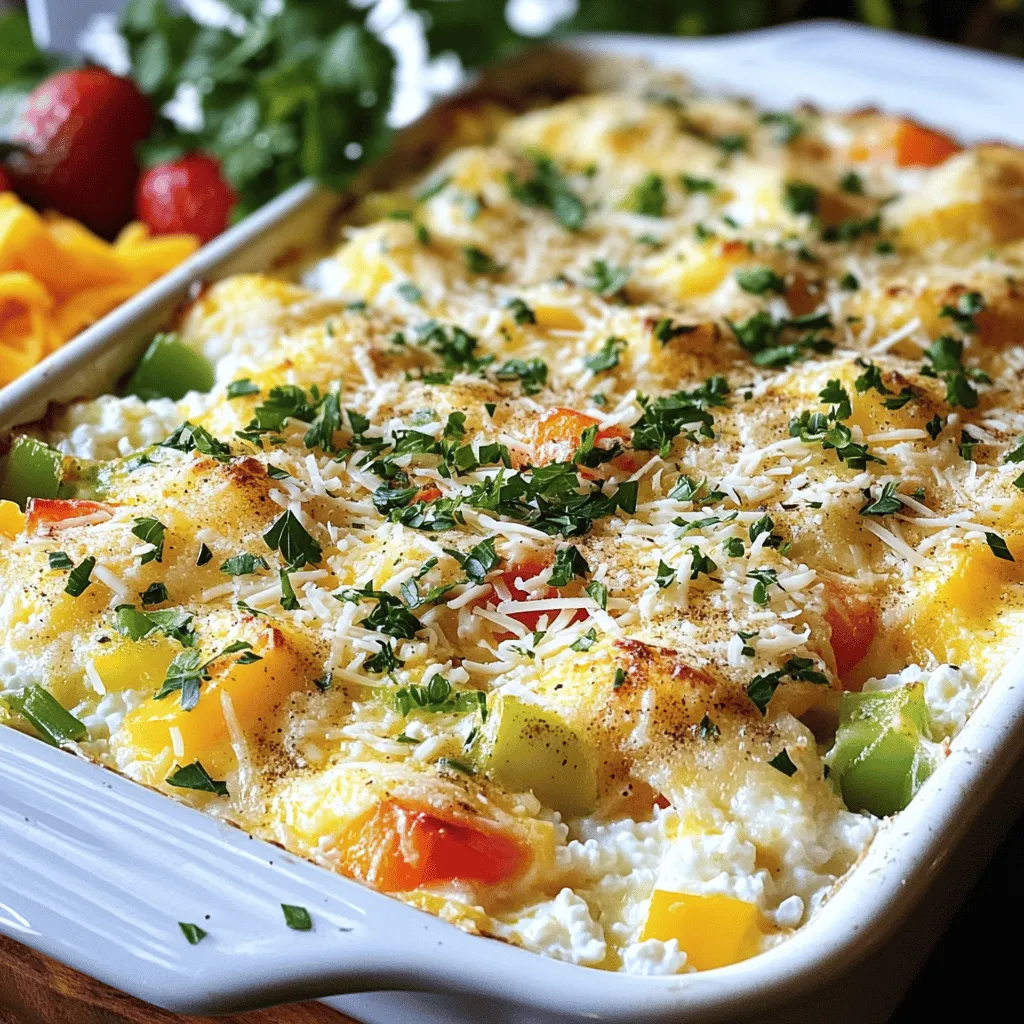
Are you ready to whip up a dish that’s easy, tasty, and packed with protein? Baked Cottage Cheese Eggs are your answer! With just a handful of ingredients—cottage cheese, eggs, …
Are you ready to whip up a dish that’s easy, tasty, and packed with protein? Baked Cottage Cheese Eggs are your answer! With just a handful of ingredients—cottage cheese, eggs, …
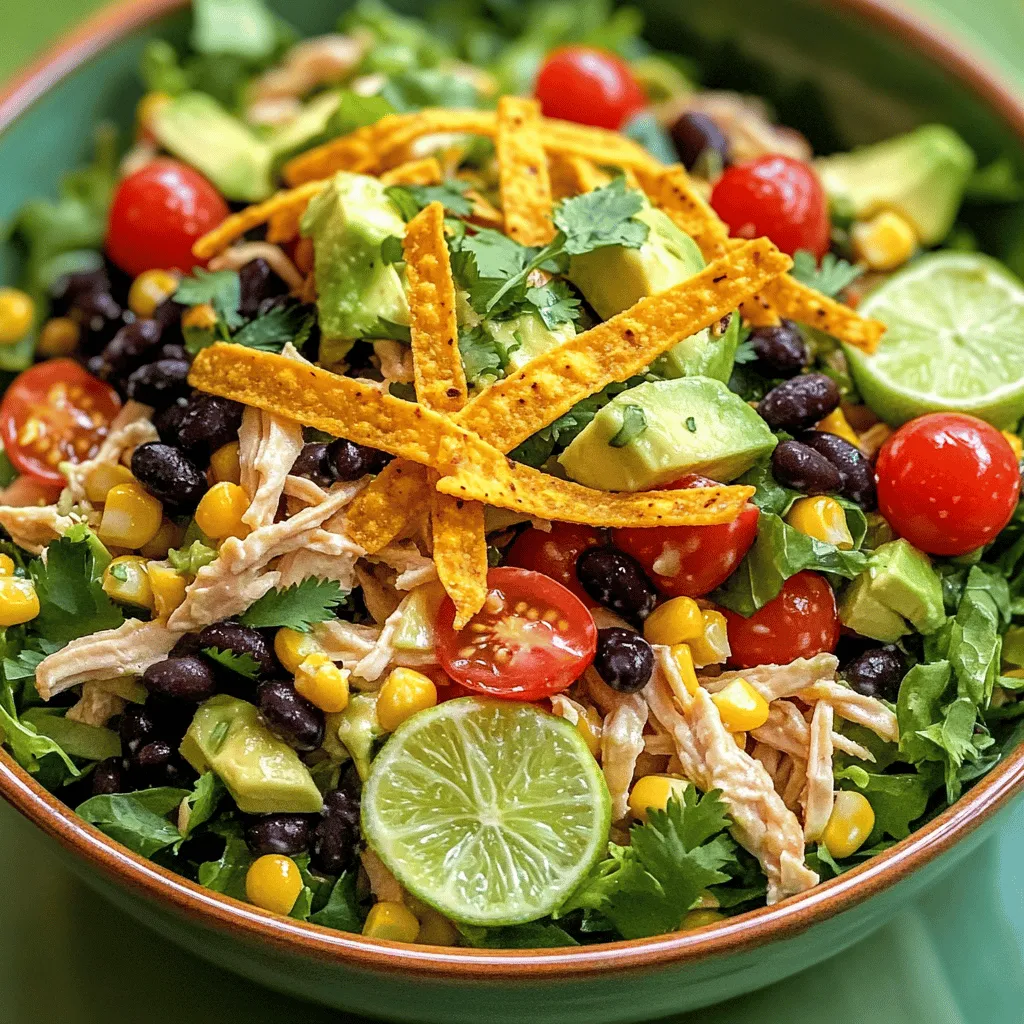
Looking for a dish that’s quick, packed with flavor, and easy to make? My Zesty Southwest Chicken Salad is just what you need! This salad combines fresh ingredients and bold …
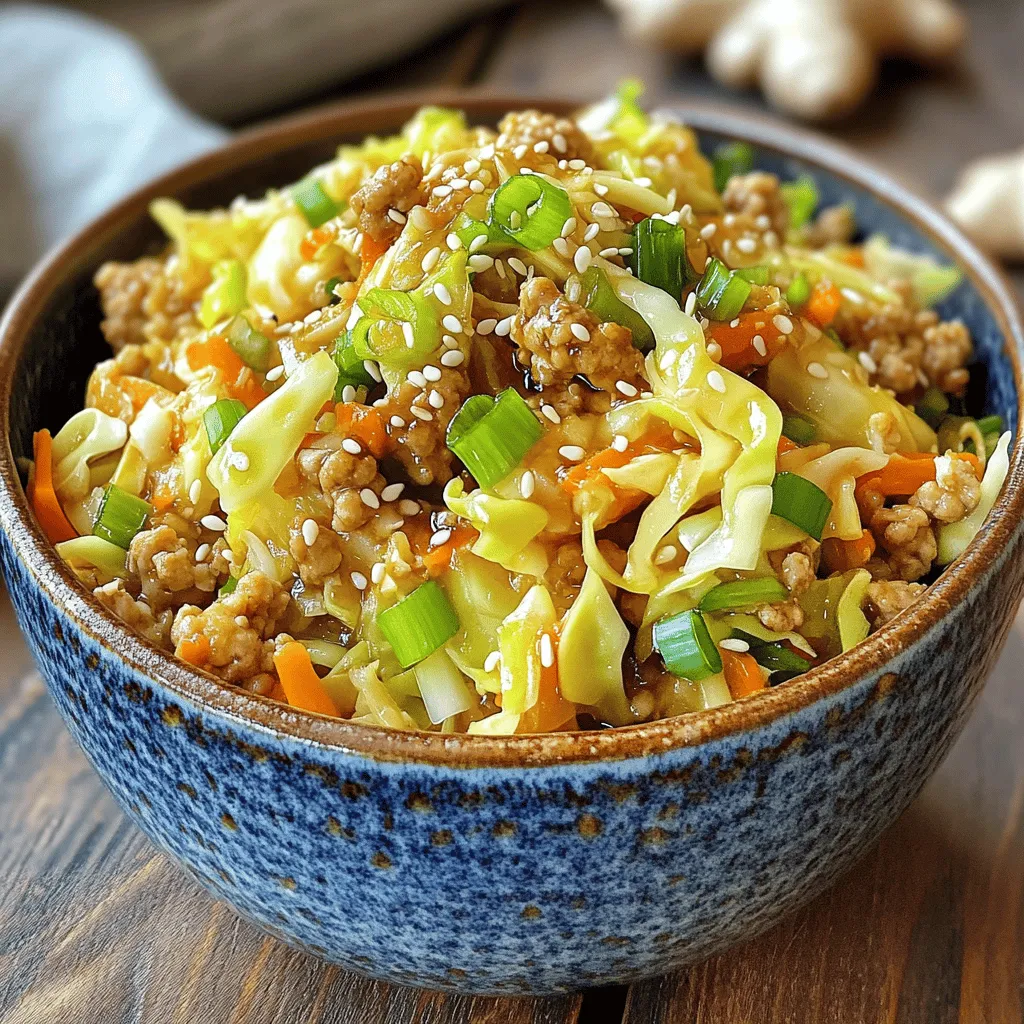
Are you ready to enjoy a tasty meal without a ton of mess? My Egg Roll in a Bowl recipe is quick, easy, and packed with flavor. With just a …
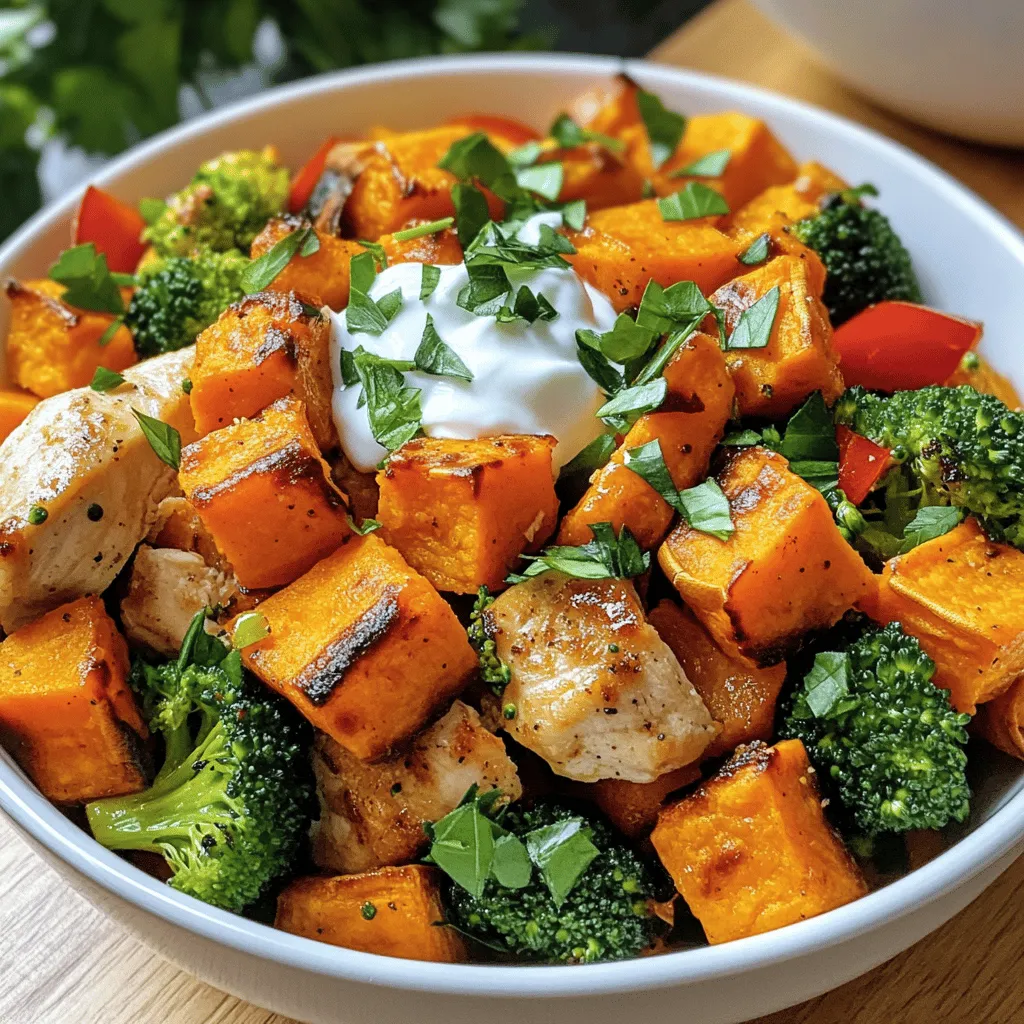
Looking for a quick and healthy meal? Savory Chicken and Sweet Potato Bowls pack a punch! They combine tender chicken, roasted sweet potatoes, and fresh veggies with delicious seasonings. In …
![For this tasty dish, you need just a few main ingredients. Here’s the list: - 1 lb baby carrots, peeled and trimmed - 3 tablespoons unsalted butter - 2 tablespoons honey - 4 cloves garlic, minced - 1 teaspoon fresh thyme leaves (or ½ teaspoon dried thyme) - Salt and pepper to taste - Fresh parsley, chopped (for garnish) These ingredients create a sweet and savory flavor that makes the carrots shine. Start by measuring your baby carrots. Make sure they are about the same size for even cooking. Peel and trim them if needed. Next, measure the butter, honey, and garlic. Mince the garlic finely to get the best flavor. If you use fresh thyme, wash and dry it before measuring. You can add more flavor if you like. Try adding a pinch of red pepper flakes for heat. A squeeze of lemon juice can brighten the dish too. Fresh herbs like dill or rosemary also work well. For garnish, fresh parsley adds a nice touch. You can make this dish your own with these ideas! First, you need to preheat your oven to 400°F (200°C). This heat will help the carrots roast nicely. While the oven warms up, grab a baking sheet and line it with parchment paper. This will keep the carrots from sticking and make cleanup easy. Next, melt 3 tablespoons of unsalted butter in a small saucepan over medium heat. Once the butter is melted, stir in 2 tablespoons of honey and 4 minced garlic cloves. Cook this mix for about 1-2 minutes until the garlic smells great. Then, remove the saucepan from the heat. In a large bowl, add 1 pound of peeled and trimmed baby carrots. Pour the honey garlic butter mixture over the carrots. Toss them well so every carrot gets coated. Now, sprinkle in 1 teaspoon of fresh thyme leaves, along with salt and pepper to taste. Toss again to mix everything. Spread the coated carrots in a single layer on the prepared baking sheet. Roast the carrots in the oven for 25-30 minutes. Flip them halfway through to make sure they cook evenly. After 25-30 minutes, check if the carrots are tender and caramelized. They should be soft but not mushy. Once they are done, take them out of the oven and sprinkle freshly chopped parsley on top for a pretty touch. Enjoy your sweet and savory Honey Garlic Butter Roasted Carrots! For the full recipe, check out the [Full Recipe]. To get those sweet, caramelized bits, choose fresh baby carrots. Their size helps them cook evenly. Spread the carrots out in a single layer on the baking sheet. Crowding them will steam rather than roast. Flip the carrots halfway through cooking. This ensures all sides get nice and golden brown. If you want extra caramelization, roast them a bit longer. Just watch them closely to prevent burning. Honey is sweet, but you can adjust it. Use less honey if you prefer a less sweet dish. You can also add a pinch of cayenne pepper for some heat. If you love herbs, try adding rosemary or dill for a fresh touch. Taste the mix before roasting. You can always add more salt or pepper to make it just right for you. To save time, wash and peel the carrots ahead of time. Store them in water in the fridge to keep them fresh. You can also make the honey garlic butter in advance and store it. Just warm it up before tossing it with the carrots. If you’re really short on time, use pre-cut carrots. They may not be as sweet, but they will work well in this recipe. For the full recipe, click here. {{image_2}} You can add a kick to your Honey Garlic Butter Roasted Carrots by using spices. Try adding a pinch of cayenne pepper for heat. Paprika gives a smoky touch. Cinnamon adds warmth and sweetness. Mix and match spices to find your favorite blend. Just remember, start with a small amount. You can always add more if needed! Carrots are great, but you can switch things up. Try using parsnips for a sweeter taste. Sweet potatoes work well too; they add a creamy texture. If you're feeling adventurous, use Brussels sprouts. Chop them in half and follow the same method. Each veggie brings its own unique flavor! If you want a vegan twist, use coconut oil instead of butter. It melts well and adds a nice flavor. For honey, try maple syrup or agave nectar. Both give a sweet touch without using honey. These swaps keep the dish tasty while fitting your diet! After you enjoy your Honey Garlic Butter Roasted Carrots, you may want to save some. Let the carrots cool to room temperature first. Then, place them in an airtight container. This keeps them fresh. Store the container in the fridge. Use these leftovers within three to five days for the best taste. To warm up your carrots, use the oven for the best flavor. Preheat your oven to 350°F (175°C). Spread the carrots on a baking sheet. Heat them for about 10-15 minutes. This helps keep them tender and tasty. You can also use a microwave. Place the carrots in a microwave-safe dish. Cover it with a damp paper towel. Heat them in short bursts, checking often. You can freeze the roasted carrots if you want to save them longer. Allow the carrots to cool completely. Then, spread them on a baking sheet in a single layer. Freeze them for about an hour. Once they are firm, transfer the carrots to a freezer-safe bag. Remove as much air as possible. They can last up to three months in the freezer. When ready to eat, thaw them in the fridge overnight, then reheat. Enjoy this sweet and savory dish again! For the full recipe, check out the link above. Roasted carrots take about 25 to 30 minutes to cook. You want them tender and caramelized. Start by preheating your oven to 400°F (200°C). Spread the carrots evenly on a baking sheet. Flip them halfway through for even cooking. Always check for doneness by poking them with a fork. If they slide off easily, they are ready. Yes, you can use regular carrots instead of baby carrots. Just peel and cut them into similar sizes. This way, they will cook evenly. Regular carrots may take a bit longer, so check for doneness after 30 minutes. The flavor will still be sweet and delicious. These roasted carrots pair well with many dishes. They complement roasted chicken, fish, or pork nicely. You can also serve them with grains like rice or quinoa for a full meal. Adding them to a salad gives it a sweet touch. Don't forget to enjoy them with your favorite herbs or cheeses! For the full recipe, check out the detailed instructions above. In this article, we explored how to make Honey Garlic Butter Roasted Carrots. We covered the ingredients, step-by-step instructions, and helpful tips. You learned how to achieve caramelized carrots and how to customize flavors. We also discussed storage options and answered some common questions. Enjoy this tasty dish as a side or main feature. Feel free to experiment with your favorite flavors. Happy cooking!](https://therecipehatch.com/wp-content/uploads/2025/06/71104ed4-cfe9-495d-9f41-f7d73aef3a0f.webp)
Looking for an easy side dish that bursts with flavor? You’re in for a treat! In this post, I’ll share my recipe for Honey Garlic Butter Roasted Carrots. These sweet …
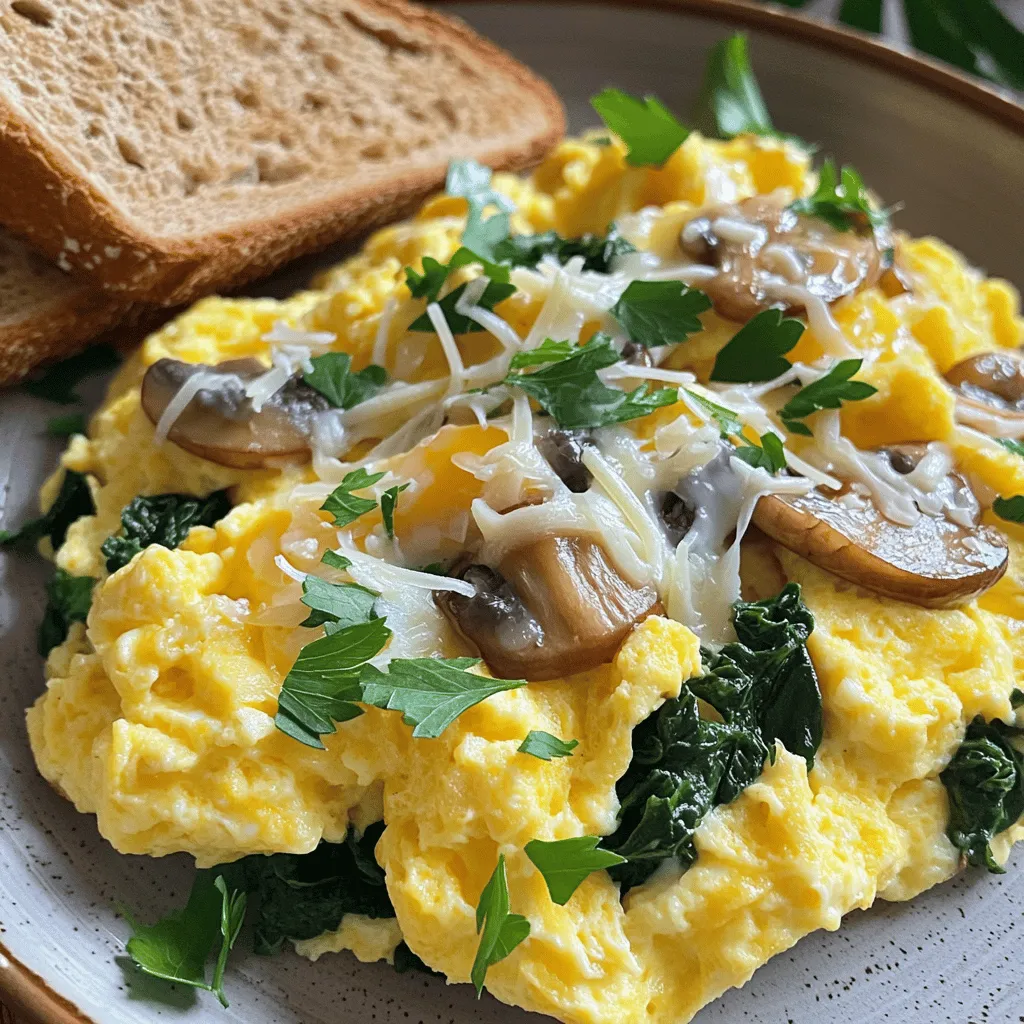
Looking for a quick, tasty meal to brighten your weekday? Try my Mushroom-Spinach Scrambled Eggs! This dish is packed with flavor and easy to make, perfect for busy mornings or …
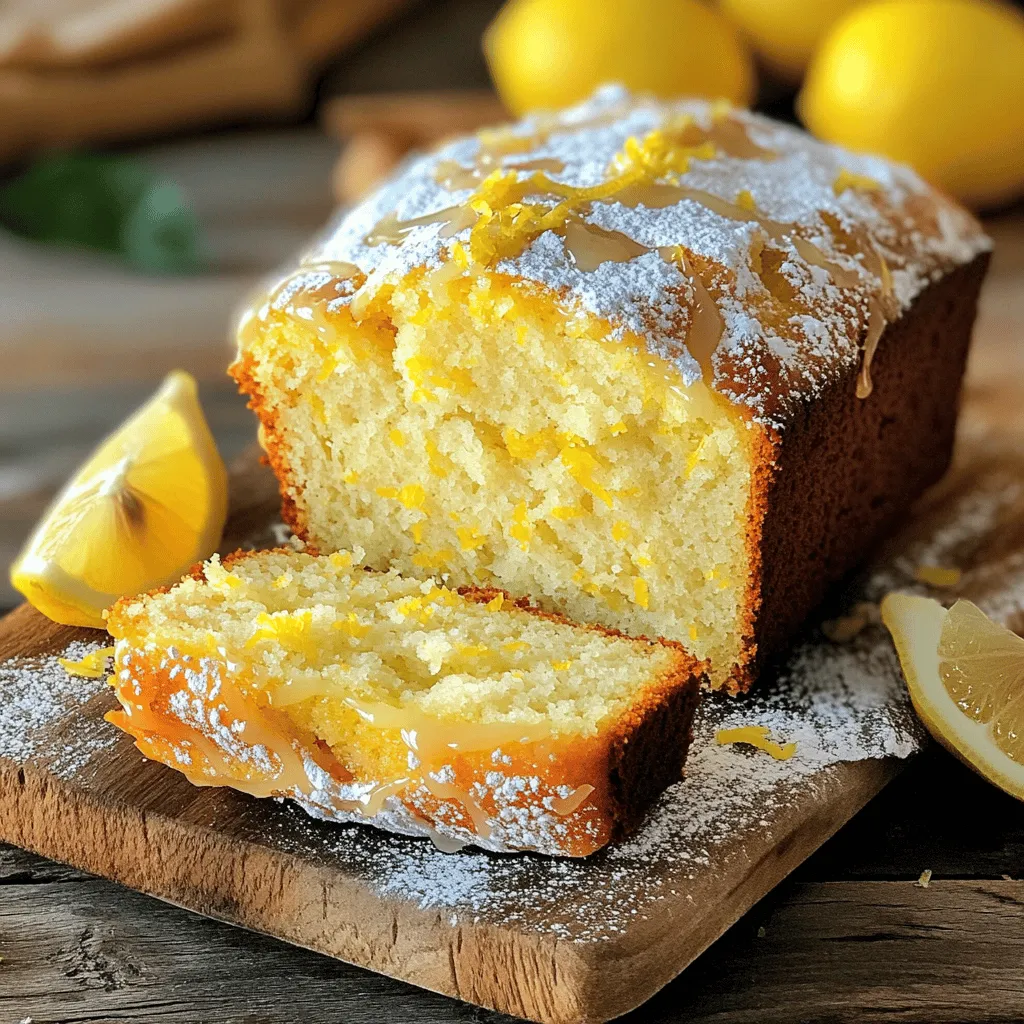
Love the tangy sweetness of Starbucks’ lemon loaf? You’re in for a treat! In this post, I’ll share a luscious and simple recipe to recreate that delightful flavor at home. …
![To make a yummy yogurt cake, you will need a few key ingredients: - 1 cup plain yogurt (preferably Greek) - 1 cup granulated sugar - 3 large eggs - 1/3 cup vegetable oil - 1 tablespoon lemon zest (about 1 lemon) - 1/4 cup freshly squeezed lemon juice - 1 teaspoon vanilla extract - 1 ½ cups all-purpose flour - 2 teaspoons baking powder - 1/2 teaspoon baking soda - 1/4 teaspoon salt These ingredients work together to create a moist and flavorful cake. The yogurt keeps it tender, while the lemon adds a bright taste. You can make your yogurt cake even better with some fun add-ins: - Fresh berries like blueberries or raspberries add sweetness and color. - Nuts such as almonds or walnuts can add a nice crunch. - A sprinkle of cinnamon or nutmeg brings warmth and spice. Feel free to get creative! These extras can make your cake unique and tasty. If you want to swap out some ingredients, here are a few ideas: - Use honey or maple syrup instead of granulated sugar for a natural sweetener. - Substitute coconut oil for vegetable oil for a different flavor. - You can use almond flour or gluten-free flour for a gluten-free option. These substitutions can fit your diet or taste without losing the cake's charm. For the full recipe, check out the details above! Start by gathering your ingredients. You will need yogurt, sugar, eggs, oil, lemon zest, lemon juice, vanilla, flour, baking powder, baking soda, and salt. Preheat your oven to 350°F (175°C). Grease a 9-inch round cake pan or line it with parchment paper. This step helps prevent the cake from sticking. In a large bowl, whisk together the yogurt and sugar. Mix until you get a smooth and creamy texture. Next, add the eggs, vegetable oil, lemon zest, lemon juice, and vanilla extract. Blend these ingredients well until they are fully combined. In a separate bowl, mix the flour, baking powder, baking soda, and salt. Gradually add this dry mix to the wet ingredients. Stir gently until everything is just combined. Be careful not to overmix; this keeps the cake light and fluffy. Pour the batter into your prepared cake pan. Use a spatula to smooth the top. Place the pan in your preheated oven. Bake for 30 to 35 minutes. To check if it is ready, insert a toothpick in the center. If it comes out clean, your cake is done! Let it cool in the pan for about 10 minutes. After that, transfer it to a wire rack to cool completely. Enjoy the process and watch your cake rise beautifully! To get a moist and soft yogurt cake, use room temperature ingredients. Cold items can lead to dense cake. Mix just until combined. Overmixing makes the cake tough. If you want a lighter cake, you can fold in whipped egg whites. This adds air and helps the cake rise. One common mistake is not measuring your ingredients correctly. Use a kitchen scale for accuracy. Another error is opening the oven door too soon. This can cause the cake to sink. Always wait until the baking time is almost up to check. You can serve yogurt cake plain or dress it up. Dust powdered sugar on top for a simple touch. Fresh berries or lemon slices also add a nice pop of color. Try serving it with whipped cream or a scoop of ice cream for fun. Pairing it with a cup of tea or coffee makes it even better. For more ideas, check out the Full Recipe for inspiration! {{image_2}} You can play with flavors in yogurt cake. Try adding berries like blueberries or raspberries. These fruits give a sweet and tart taste. You can also use coconut for a tropical twist. Mix in shredded coconut to the batter for a fun texture. Chocolate lovers can add cocoa powder or chocolate chips. This makes the cake rich and indulgent. Make yogurt cake fit your diet. For a gluten-free option, swap all-purpose flour with almond or coconut flour. This change gives a nutty flavor and keeps it moist. If you want a vegan version, replace eggs with flaxseed meal or applesauce. Use plant-based yogurt and oil for a delicious dairy-free treat. Get creative with add-ins. You can mix in nuts like walnuts or almonds for crunch. Chopped nuts add a great texture. Spices can also elevate your cake. Try adding cinnamon or nutmeg for warmth. A pinch of cardamom gives an exotic touch. You can also add a swirl of jam or chocolate sauce to create a marbled effect. For more ideas, check out the full recipe for zesty lemon yogurt cake. To keep your yogurt cake fresh, wrap it tightly in plastic wrap. Place it in an airtight container. Store it at room temperature for up to two days. If you need to keep it longer, the fridge is a good option. Just make sure it’s covered well. Freezing yogurt cake is easy! Cut the cake into slices. Wrap each slice in plastic wrap, then place them in a freezer bag. This keeps them safe from freezer burn. Label the bag with the date. You can freeze the cake for up to three months. To enjoy your frozen yogurt cake, let it thaw in the fridge overnight. If you want it warm, heat slices in the microwave. Use medium power for about 15 to 20 seconds. Keep an eye on it to avoid overheating. You can also use the oven to reheat it. Set the oven to 300°F (150°C) and warm for about 10 minutes. This keeps the cake soft and tasty. For the full recipe of this delightful cake, check out the [Full Recipe]. Homemade yogurt cake lasts about three to four days at room temperature. Make sure to store it in an airtight container. If you keep it in the fridge, it can last up to a week. The cake may dry out after a few days, so enjoy it fresh! Yes, you can use different types of yogurt. Greek yogurt gives a rich taste and texture. Regular yogurt works well too. You can even use flavored yogurt for a fun twist. Just remember, the flavor may change based on the yogurt you choose. Yogurt cake can be healthier than regular cake. Yogurt adds protein and calcium, which is good for you. It also uses less oil, making it lighter. However, it still has sugar, so enjoy it in moderation. Balance is key when enjoying desserts! You can serve yogurt cake with fresh fruit. Berries like strawberries, blueberries, and raspberries add color and taste. A dollop of whipped cream or a scoop of vanilla ice cream pairs nicely too. For an extra touch, drizzle some honey or a fruit sauce over the cake. You can find the Full Recipe if you want to try it! Yogurt cake is simple and fun to make. We explored key ingredients, optional additions, and substitutions. You learned step-by-step how to prepare, mix, and bake your cake. I shared tips to get the right texture and avoid mistakes. We also looked at variations to suit different diets and tastes. In closing, yogurt cake is versatile and enjoyable. Try it with your favorite flavors to create something unique. With the right care, it can stay fresh for days. Enjoy the process, and happy baking!](https://therecipehatch.com/wp-content/uploads/2025/06/854bd10a-4a56-4328-a616-a4adc1a122a9.webp)
Craving something easy and delicious? Let’s make a yogurt cake! This cake is moist, tasty, and fun to bake. I’ll share simple steps and key ingredients, plus tips for perfecting …
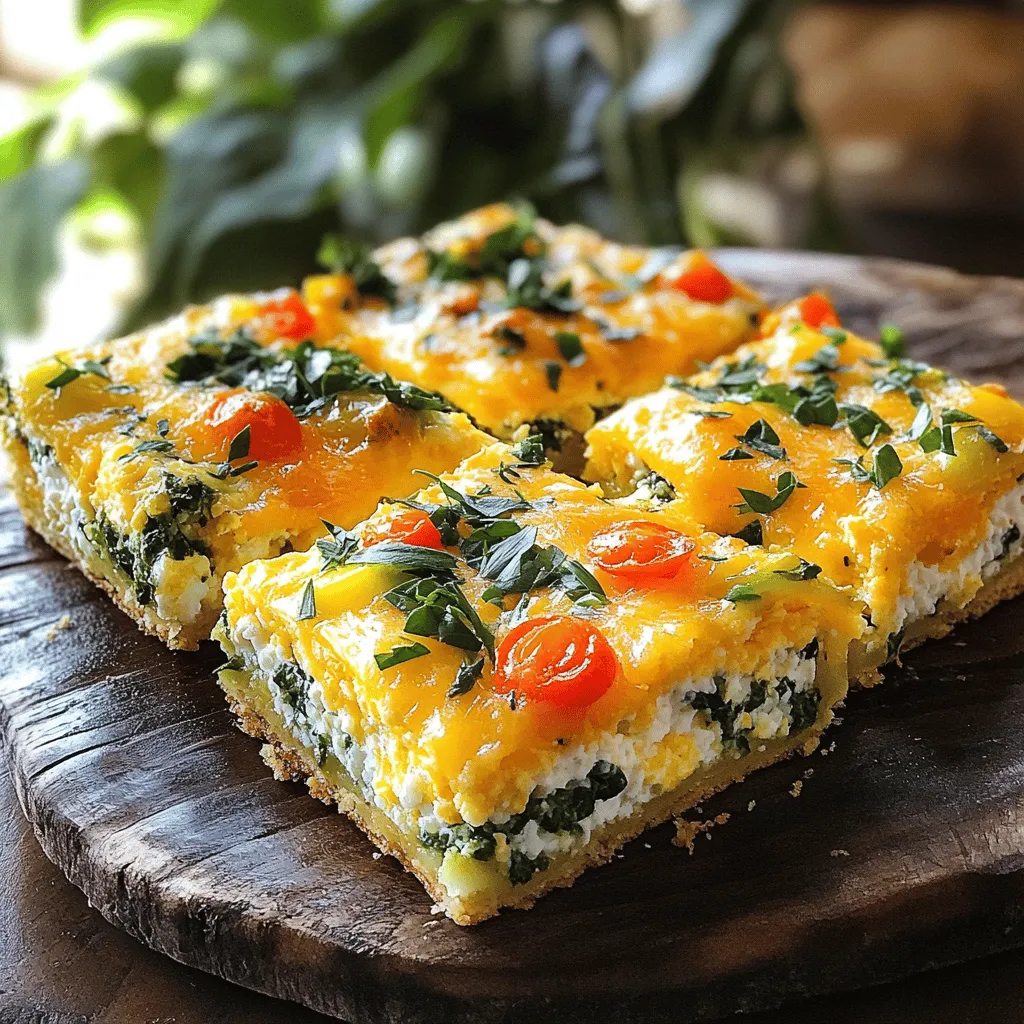
Are you looking for a meal that’s both tasty and packed with nutrients? Look no further than this Cottage Cheese Egg Bake! This dish combines simple ingredients like cottage cheese, …
![- 1 cup almond flour - 1 cup shredded unsweetened coconut - 1/2 cup honey or maple syrup - 1/4 cup coconut oil, melted - 2 cups fresh raspberries - 1 teaspoon vanilla extract - 1/4 teaspoon salt - 1/4 teaspoon baking powder - Optional: 1/4 cup chopped nuts for added crunch - Coconut flour vs. almond flour: Coconut flour absorbs more liquid. Use less if you switch. - Alternative sweeteners: You can use agave or stevia for a different taste. - Dairy-free options: For coconut oil, you can use another plant oil like avocado oil. - Fresh vs. frozen raspberries: Fresh raspberries taste better. They stay firm when baked. Frozen raspberries can be used but might make the squares soggier. - Ensuring quality of coconut products: Look for organic or non-GMO labels. Fresh, high-quality coconut products enhance the flavor and texture of your squares. 1. First, preheat your oven to 350°F (175°C). Line an 8x8 inch baking pan with parchment paper. Leave some paper over the edges. This helps with easy removal later. 2. In a mixing bowl, combine 1 cup of almond flour, 1 cup of shredded coconut, 1/4 teaspoon of salt, and 1/4 teaspoon of baking powder. Mix these dry ingredients well. 3. In another bowl, whisk together 1/4 cup of melted coconut oil, 1/2 cup of honey or maple syrup, and 1 teaspoon of vanilla extract. Make sure it’s smooth. 1. Press the dough evenly into the lined baking pan. This forms the base layer for your squares. 2. Now, evenly distribute 2 cups of fresh raspberries on top of the base layer. Gently press some raspberries into the dough. 1. Bake your squares in the preheated oven for 25-30 minutes. Look for golden brown edges and bubbling raspberries. 2. Once baked, remove the pan from the oven. Let it cool for about 15 minutes in the pan. Then, lift the parchment paper to remove the squares. Cool them fully on a wire rack. These steps make it easy to create Raspberry Coconut Squares. Follow along to enjoy a tasty treat! For the complete recipe, check the Full Recipe section. To get a crumbly yet cohesive base, use almond flour. It binds well with coconut. Mix the dry ingredients thoroughly before adding wet ones. This helps the squares hold together. To avoid sogginess, bake at 350°F for 25-30 minutes. Check for golden edges and bubbling raspberries. If they look too wet, bake a few minutes longer. This ensures a nice, firm texture. Add spices like cinnamon or nutmeg for extra taste. Just a little can make a big difference. Choose pure vanilla extract over imitation. It gives a richer flavor to your squares. For serving, cut the squares into neat pieces. You can dust them with powdered sugar for a nice look. Garnish with fresh raspberries or mint leaves for color. Pair these squares with a cup of tea or coffee. They also go well with a scoop of vanilla ice cream. Enjoy sharing them with friends! {{image_2}} You can spice up your Raspberry Coconut Squares. Try swapping raspberries with blueberries or strawberries. Each berry brings a new taste and color. You can also mix different berries for a fruity blend. It adds fun and excitement to your squares. Another great idea is to add citrus zest. Lemon or lime zest gives a bright and fresh flavor. Just a little bit can change everything. It wakes up the taste and makes every bite special. If you need a gluten-free option, almond flour works great. It gives the same texture without gluten. Make sure to check the labels to avoid any hidden gluten. For those who follow a vegan diet, honey is easy to replace. Use maple syrup instead to keep it sweet. You can also try agave nectar. It keeps the squares moist and delicious while being fully plant-based. In summer, you can use fresh fruits that are in season. Consider peaches or cherries for a juicy twist. They blend well with the coconut and create a great flavor. During the holiday season, try adding spices like nutmeg or cinnamon. These spices can make your squares feel festive. You can even drizzle some dark chocolate on top for a special touch. Each season brings its own flavors, making your squares exciting all year long. For the complete recipe, check the [Full Recipe]. To keep your Raspberry Coconut Squares fresh, use airtight containers. Glass or plastic containers work well. Avoid leaving them out at room temperature for long. If you plan to enjoy them within a few days, room temperature is fine. For longer storage, refrigeration keeps them fresh and tasty. Freezing these squares is easy! First, cut them into squares. Place them in a single layer on a baking sheet. Freeze them for about an hour. After that, move them to a freezer-safe bag. They can stay in the freezer for up to three months. When you want to eat them, just take them out and let them thaw at room temperature. Raspberry Coconut Squares stay fresh for about five days in the fridge. After that, they may lose taste and texture. Look for signs of spoilage like mold or an off smell. If they feel dry or hard, it’s time to toss them. For best results, enjoy them while they’re fresh! Raspberry Coconut Squares last about 4 to 5 days when stored properly. Keep them in an airtight container at room temperature. If you want them to last longer, you can refrigerate them for up to a week. Remember, storing them in the fridge may change their texture slightly, making them a bit firmer. Yes, you can use frozen raspberries. However, they may change the texture. Frozen fruits release more juice as they bake. This can make your squares a bit wetter. If you use frozen raspberries, try to thaw and drain them before adding them to the mix. This helps keep the squares from getting too soggy. You can serve Raspberry Coconut Squares with various treats. A scoop of vanilla ice cream pairs great with them. Whipped cream or yogurt can also enhance the flavor. For a refreshing twist, try serving them with fresh mint leaves. They also work well with a warm cup of tea or coffee. Yes, Raspberry Coconut Squares can be a healthy treat. They contain almond flour, which is high in protein and healthy fats. Unsweetened coconut adds fiber and essential minerals. Raspberries are rich in vitamins and antioxidants. Using honey or maple syrup provides natural sweetness without refined sugar. Overall, they make a nutritious snack or dessert option. Raspberry Coconut Squares are simple to make and full of flavor. We covered the key ingredients, step-by-step instructions, and handy tips. You can modify them to fit your taste, whether adding different berries or adjusting for dietary needs. Store them well to keep them fresh. These squares are a tasty treat, perfect for any occasion. Try them out and enjoy the wholesome goodness they bring to your table!](https://therecipehatch.com/wp-content/uploads/2025/06/eb88154e-b34f-4b2a-9cb5-e820f327571e.webp)
Are you ready to whip up a treat that’s both tasty and easy? These Raspberry Coconut Squares are a perfect blend of sweet and tangy. With just a handful of …