Cowboy Butter Steak Grilled to Perfection Every Time
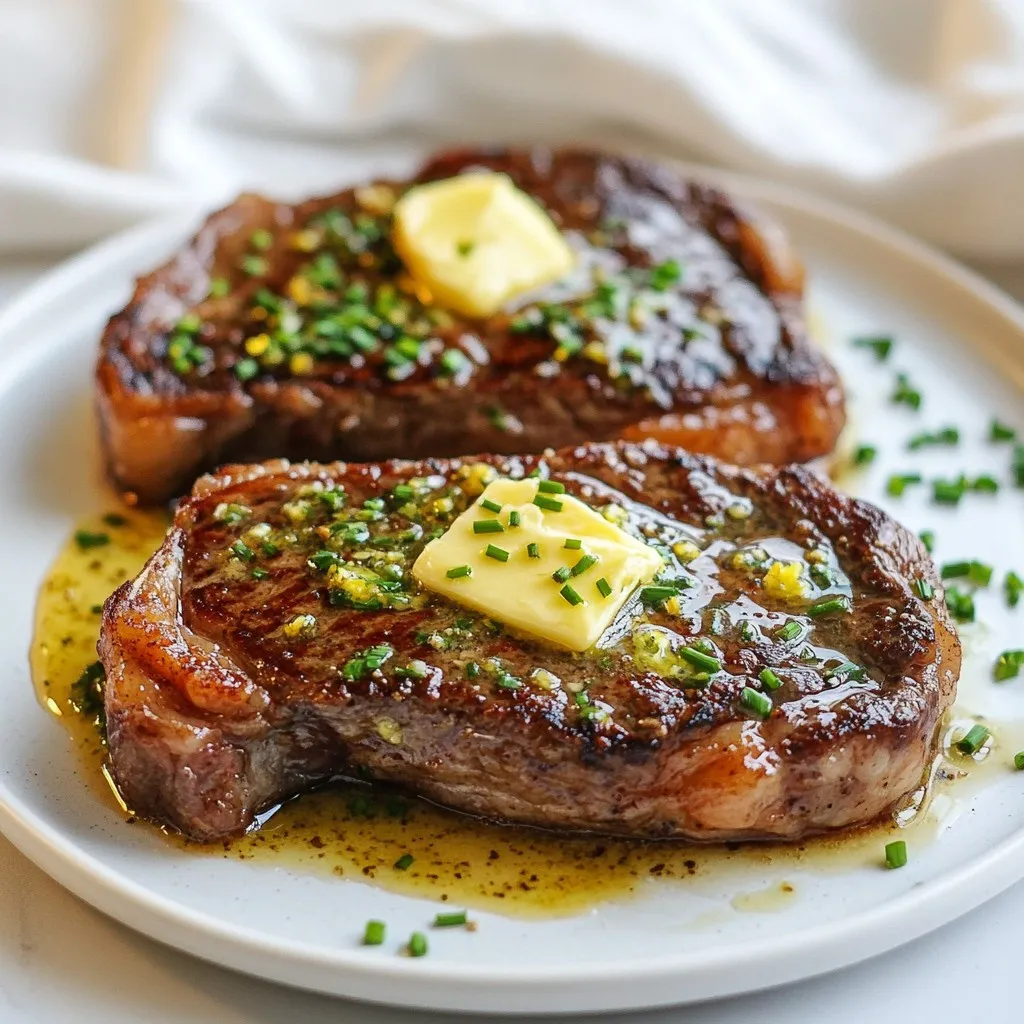
Are you ready to take your grilling game to the next level? In this article, I’ll show you how to make Cowboy Butter Steak that is grilled to perfection every …
Are you ready to take your grilling game to the next level? In this article, I’ll show you how to make Cowboy Butter Steak that is grilled to perfection every …

Are you ready to elevate your dessert game? This Peaches and Cream Pie is the perfect blend of fresh peaches and creamy goodness. With easy steps and simple ingredients, you …

Craving a spicy twist on a classic? This Buffalo Chicken Cheesesteak is flavorful and easy to make. With tender shredded chicken slathered in zesty buffalo sauce, sautéed veggies, and gooey …

Are you ready to whip up a tasty treat with ease? My Easy Zucchini Bread recipe is your go-to solution! You’ll need just a few simple ingredients to create a …
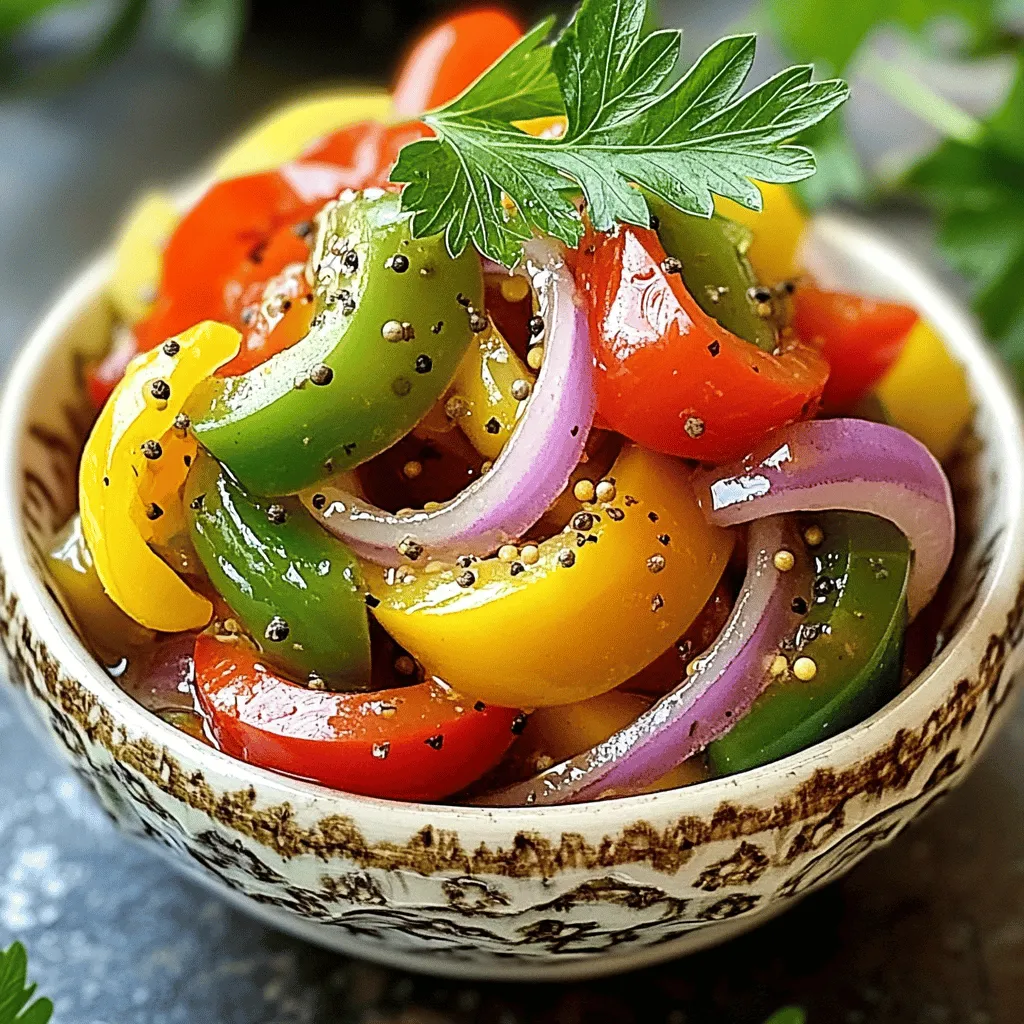
Looking to add a zesty kick to your meals? My Tangy Pickled Pepper & Onion Relish is the perfect solution! In this guide, I’ll share essential tips for enhancing flavors, …
![- 4 chicken thighs, skin-on and bone-in - 1 tablespoon olive oil - 1 cup mushrooms, sliced - 1 medium onion, diced - 2 cloves garlic, minced - 1 cup chicken broth - 1 tablespoon tomato paste - 1 teaspoon dried thyme - 1 teaspoon dried rosemary - 1 tablespoon fresh parsley, chopped (for garnish) - Salt and pepper to taste I love using chicken thighs for this recipe. They stay moist and full of flavor. The skin adds a nice crunch too. You can use olive oil for cooking, but other oils work too. Olive oil gives a nice taste. Mushrooms and onions are key ingredients. They add depth to the sauce. Make sure to slice the mushrooms thinly for even cooking. Dice the onion small so it cooks well. Garlic brings out the taste in all the ingredients. Use fresh garlic for the best flavor. Chicken broth is the base of the sauce. It adds richness. If you want, you can use vegetable broth or beef broth instead. Tomato paste gives a slight sweetness. The dried thyme and rosemary add earthy notes. For the final touch, sprinkle fresh parsley on top. This adds color and a fresh taste. Don’t forget to season with salt and pepper. It brings all the flavors together. - Chicken thighs vs. breast: Chicken breast can work, but it may dry out. - Fresh herbs vs. dried herbs: You can use fresh herbs if you have them. Just use more if they’re fresh. - Alternative broth options: Any broth will work. Make sure it matches your taste. - Calories per serving: About 350 calories. - Breakdown of macronutrients: Each serving has protein, fats, and carbs. - Dietary considerations: This dish is gluten-free and can fit many diets. For the full recipe, check the details above. Enjoy making Chicken Chasseur! - Preheating the oven Start by preheating your oven to 375°F (190°C). This ensures the chicken cooks evenly. - Searing chicken thighs In a large skillet, heat 1 tablespoon of olive oil over medium-high heat. Place 4 chicken thighs skin-side down in the pan. Sear for about 4-5 minutes until the skin turns golden brown. Flip the chicken and cook for another 3-4 minutes. Remove the chicken and set it aside. - Sautéing vegetables In the same skillet, add 1 diced onion and 1 cup of sliced mushrooms. Sauté for about 5 minutes. The onions should be soft and look translucent. - Adding broth and seasoning Stir in 2 minced garlic cloves and cook for 1 more minute. Then, add 1 cup of chicken broth, 1 tablespoon of tomato paste, 1 teaspoon of dried thyme, 1 teaspoon of dried rosemary, and salt and pepper to taste. Mix well and bring to a simmer. - Nestling chicken into the sauce Now, nestle the seared chicken thighs back into the skillet, skin-side up. Spoon some of the sauce over the chicken to keep it moist. - Ideal cooking temperature and time Transfer the skillet to your preheated oven. Bake for 25-30 minutes, or until the chicken reaches an internal temperature of 165°F (74°C). This step ensures your chicken is safe to eat and juicy. For the full recipe, check out the Chicken Chasseur Delight section above. Enjoy this hearty dish! Resting your chicken is key. After cooking, let it sit for 5-10 minutes. This time helps the juices spread throughout the meat. Checking the internal temperature is also important. Aim for 165°F (74°C) for safety. Use a meat thermometer for accuracy. To boost flavor, try adding herbs like basil or tarragon. A splash of white wine can add depth too. Cooking with wine gives a nice acidity. If you choose broth, pick one that adds more flavor. Homemade broth is often richer than store-bought. Avoid overcrowding the pan. This can lead to steaming instead of browning. Give each piece space to get that crispy skin. Also, don’t rush the browning phase. Allow the chicken to brown well before flipping. This step enhances the taste in your dish. {{image_2}} You can easily make Chicken Chasseur vegetarian. Just swap the chicken for tofu or mushrooms. Tofu is a great choice because it absorbs flavors well. For a heartier dish, use portobello mushrooms. These mushrooms have a meaty texture. Cook them just like you would the chicken. This way, you keep the dish rich and tasty. If you need gluten-free options, check your sauces and stocks. Some chicken broths contain gluten. Look for brands that say "gluten-free." You can also make your own broth from scratch. Just use bones, water, and veggies. This way, you control what goes in. Your Chicken Chasseur will be safe and still delicious. Chicken Chasseur pairs well with many sides. You can serve it over rice, pasta, or with crusty bread. Rice soaks up the sauce nicely. Pasta adds a nice texture, too. Crusty bread helps you enjoy every bit of the sauce. Try all three to see what you like best! For the full recipe, check [Full Recipe]. To store leftover Chicken Chasseur, first let it cool down. Place it in an airtight container. Make sure to eat it within three days for the best taste. If you want to keep it longer, freezing is a great option. To freeze Chicken Chasseur, let it cool completely. Then, transfer it to a freezer-safe container or a heavy-duty freezer bag. Be sure to remove as much air as possible. Label the bag with the date. You can freeze it for up to three months. To defrost, move the container from the freezer to the fridge. This should take about 24 hours. For quick reheating, you can use the microwave. Heat it in short bursts, stirring in between. Alternatively, warm it on the stove over low heat. Stir often until hot. Enjoy this hearty dish again! For the complete recipe, check the Full Recipe. Chicken Chasseur is a classic French dish. It means "hunter's chicken." The dish has roots in rustic cooking. It features chicken, mushrooms, and fresh herbs in a rich sauce. Traditionally, cooks used what they had on hand. This dish is special because it brings together simple flavors. It warms you up and fills you up after a long day. Yes, you can prepare Chicken Chasseur in advance. Cook it fully, then cool it down. Store it in the fridge for up to three days. When ready to serve, reheat it gently on the stove. Add a splash of chicken broth if the sauce is too thick. This can save time on busy nights. To make Chicken Chasseur in a slow cooker, start by searing the chicken thighs. This adds flavor and color. Place the chicken in the slow cooker. Add sliced mushrooms, diced onions, and minced garlic. Pour in the chicken broth, tomato paste, thyme, and rosemary. Cook on low for about 6 hours or high for 3 hours. The chicken will be tender and full of flavor. Chicken Chasseur can be healthy when made with fresh ingredients. Chicken thighs provide protein and iron. The mushrooms and onions add vitamins and minerals. Using low-sodium broth can help reduce salt intake. You can also serve it with veggies for a well-rounded meal. Enjoying this dish in moderation is key to a balanced diet. In this blog post, I covered the ingredients, steps, and tips for making Chicken Chasseur. You'll learn how to create this delicious dish using simple methods and ingredients. Remember, cooking is all about experimenting and making it your own. By understanding substitutions and storage options, you can enjoy Chicken Chasseur anytime. Whether you stick to the classic recipe or try a variation, you can savor every bite without stress. Happy cooking!](https://therecipehatch.com/wp-content/uploads/2025/06/864e9ed7-cd31-4f20-b37e-78d91c368a94.webp)
Welcome to a feast for your senses with Chicken Chasseur— a flavorsome and hearty dinner recipe that’s sure to impress. This mouthwatering dish combines tender chicken thighs with rich herbs …
![To make quick refrigerator pickled okra, you need fresh okra and some basic items from your pantry. Here’s what you will need: - 1 pound fresh okra, stems trimmed - 1 cup white vinegar - 1 cup water - 2 tablespoons sea salt - 1 tablespoon sugar Fresh okra gives your pickles a crunchy texture. The vinegar adds the tangy flavor that makes pickles pop. Water helps dilute the vinegar so it's not too strong. Seasoning is key to making flavorful pickled okra. Here are the extras you will need to enhance the taste: - 4 cloves garlic, peeled and crushed - 1 teaspoon black mustard seeds - 1 teaspoon dill seeds - 1 teaspoon red pepper flakes (adjust for spice level) - 1 bay leaf Garlic adds a nice depth of flavor. Mustard seeds and dill seeds bring a delightful crunch and aroma. Red pepper flakes let you control the heat level. The bay leaf rounds out the taste, making each bite savory. Using these ingredients, you create a tangy and crunchy snack. You can find the full recipe in the link provided. First, choose clean jars with lids. Glass jars work best because they don’t react with the brine. You can use one large jar or multiple small jars, depending on your preference. Make sure the jars are sterilized. To do this, wash them in hot, soapy water. Rinse well and then place them in a hot oven for about 10 minutes. This step keeps your pickled okra safe and fresh. Now, let’s make the brine. In a medium saucepan, combine one cup of white vinegar, one cup of water, two tablespoons of sea salt, and one tablespoon of sugar. Stir these ingredients well. Turn the heat to medium and bring the mixture to a boil. Once it boils, keep stirring until the salt and sugar dissolve. Remove the pan from the heat. Allow the brine to cool for about five to ten minutes. This cooling time is important for the okra’s crunch. While the brine cools, prepare the okra. Take one pound of fresh okra and trim the stems. Stand the okra upright in your prepared jar. This helps them pickle evenly. Next, add the crushed garlic, black mustard seeds, dill seeds, red pepper flakes, and a bay leaf. You can adjust the red pepper flakes to make it spicier or milder. Once everything is in the jar, carefully pour the warm brine over the okra. Make sure they are fully submerged. If needed, add a bit more vinegar or water to cover the okra completely. Seal the jar tightly with its lid. Let it cool to room temperature before putting it in the fridge. For the best taste, wait at least 24 hours before enjoying your crunchy pickled okra. For the full recipe, check out the [Full Recipe]. To make your pickled okra stand out, try adding a few extra flavors. You can use fresh herbs like dill or thyme. A splash of lemon juice adds brightness. If you love heat, add more red pepper flakes. Experiment with spices too. Try coriander seeds or cumin for a unique twist. Each addition changes the taste, so enjoy the fun of mixing flavors. Crunchy okra is key to a great snack. Here are some tips to keep them crisp. First, use fresh okra that is firm and bright green. Avoid soft or bruised pods. When you pack the jar, stand the okra upright. This helps them stay crunchy as they soak in the brine. Make sure the brine covers the okra completely. If not, add more vinegar or water. Avoid a few common pitfalls when making your pickled okra. First, don't skip the sterilization step. Clean jars prevent bacteria. Also, be careful with the salt. Too much can make the okra too salty. Follow the recipe closely to keep the balance. Finally, don’t rush the pickling process. Let them sit in the fridge for at least 24 hours. This time helps the flavors develop fully. For the full recipe, click here. {{image_2}} Want to kick up the heat? Add more red pepper flakes! You can use up to two teaspoons. If you love spice, try adding sliced jalapeños or habaneros to the jar. This will give your pickles a fiery twist. The spice mixes well with the tangy brine. It’s a great way to enjoy a crunchy snack with a kick! Herbs can add a fresh flavor to your pickled okra. Try adding fresh dill or cilantro to your jar. You can also use thyme or oregano. Simply place a few sprigs among the okra before adding the brine. The herbs will infuse their taste into the okra over time. This makes for a unique and tasty snack! Don’t stop at okra! Many veggies can be pickled for a tasty treat. Try cucumbers, carrots, or radishes. Cauliflower and bell peppers also work well. The same brine recipe will work for these veggies. Just adjust the pickling time based on their size. This way, you can enjoy a rainbow of crunchy, tangy snacks! For the full recipe, check out Quick and Zesty Refrigerator Pickled Okra. Each variation allows you to explore new flavors while keeping the process simple and fun! Store your pickled okra in the fridge. Use a clean, airtight jar. Keep it whole and packed tight. This way, the okra stays fresh and crunchy. Always use a clean utensil when taking some out. This helps avoid germs and keeps your snack safe. Refrigerator pickled okra can last up to 3 months. The flavors get better over time. Try to eat it within this time for the best taste. If you notice any changes, check for signs of spoilage. Check your pickled okra for any off smells. If it smells bad, throw it away. Look for any cloudiness in the jar or a change in color. If the okra is slimy or mushy, it’s time to toss it. Always trust your senses. When in doubt, don’t eat it. It takes at least 24 hours to pickle okra. The longer you wait, the more flavor you get. If you want a quick taste, you can eat them after just a few hours. However, I recommend waiting for the best crunch and tang. Yes, you can reuse the brine for another batch of pickles. Just strain it to remove any bits. Make sure it is still fresh and not cloudy. If it looks off, it’s best to make a new batch. This way, you save time and reduce waste. Pickled okra adds a zing to many dishes. It pairs great with sandwiches and salads. You can also serve it as a snack with cheese and crackers. For a fun twist, add it to tacos or burgers. The tangy flavor makes every bite better. Check out the Full Recipe for more ideas! We covered how to pickle okra, from ingredients to storage. You learned about using fresh okra and pantry staples, plus seasonings for extra flavor. I shared tips to achieve crunch and avoid common mistakes. We explored spicy variations and other veggies you can pickle. Proper storage ensures your pickles last, and I answered key questions about the process. Pickling okra can be fun and tasty. Enjoy the process and the delicious results!](https://therecipehatch.com/wp-content/uploads/2025/06/e8df0f33-cf54-4251-8cd7-da4bae15a940.webp)
Looking for a fun, crunchy snack? Quick Refrigerator Pickled Okra brings a burst of flavor to your plate! This easy recipe transforms fresh okra into a tangy treat that’s perfect …

Summer is the perfect time to enjoy sweet, ripe peaches, and what better way to celebrate than with a fresh peach cobbler? This delightful dessert combines juicy peaches with a …
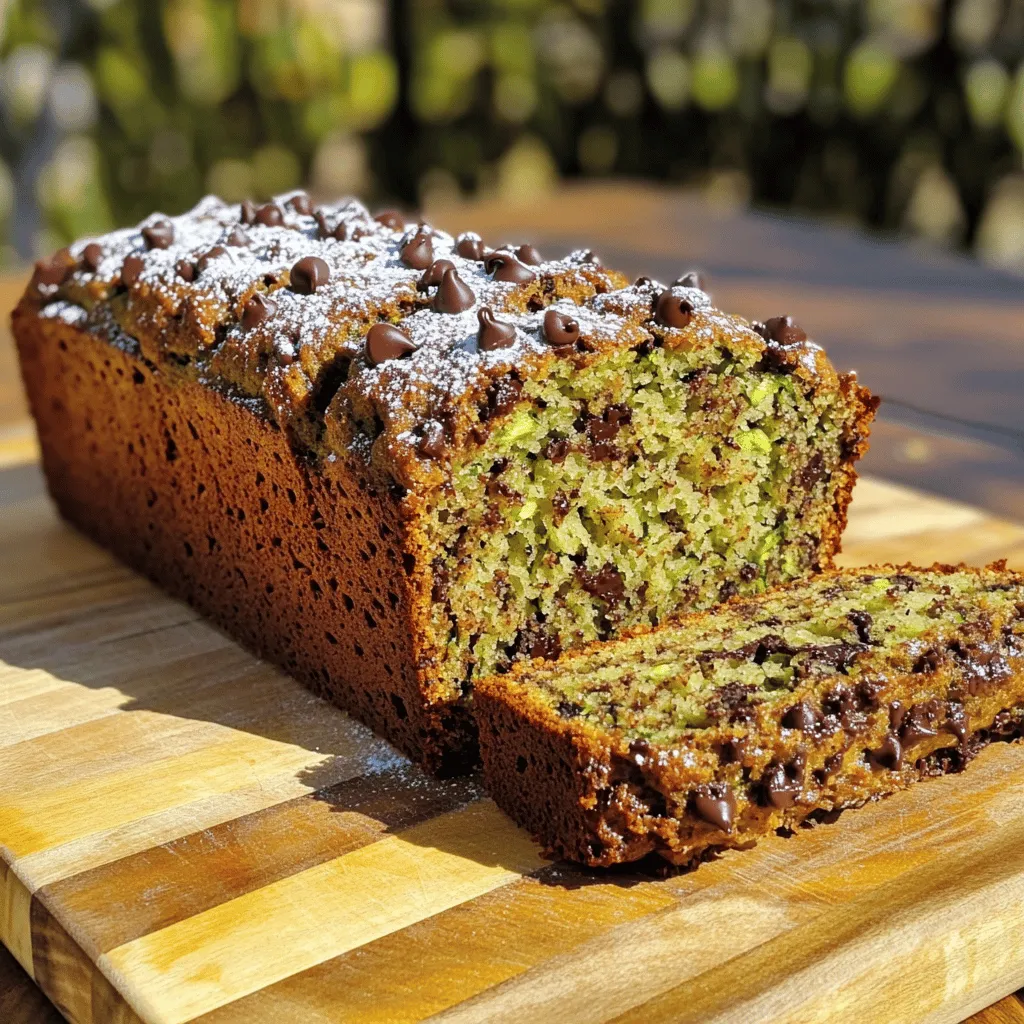
Are you ready to elevate your baking game? This is more than just a recipe; it’s a guide to making the best chocolate chip zucchini bread that’ll impress everyone. With …

Looking for a hearty dinner that’s simple yet packed with flavor? Creamy Smothered Chicken and Rice is your answer! This dish combines tender chicken thighs, rich cream, and fluffy rice, …