Skip to content
The Recipe Hatch
  • Home
  • Appetizers
  • Desserts
  • Salads
  • Breakfast
  • Dinner
  • Privacy Policy
  • Contact
  • About

Chef Owen

Best Peach Pie Ever Delightful Recipe to Try

June 23, 2025 by Chef Owen
- 6 cups fresh peaches, peeled and sliced - 1 cup granulated sugar - 1/4 cup all-purpose flour - 1 teaspoon ground cinnamon - 1/4 teaspoon nutmeg - 1 tablespoon lemon juice - 1 tablespoon butter, diced - 1 tablespoon vanilla extract - 1 package refrigerated pie crusts (or homemade if preferred) - 1 egg, beaten (for egg wash) - Fresh herbs or spices for added flavor - Alternative sweeteners for a healthier option When making the best peach pie ever, fresh peaches are key. Choose ripe, juicy peaches. They should feel soft but not mushy. The sugar will balance the tartness of the peaches. Flour thickens the filling as it bakes. Cinnamon and nutmeg add warmth and depth. A splash of lemon juice brightens the flavors. The butter melts into the filling, making it rich. Vanilla extract enhances the sweetness. Using a pie crust, store-bought saves time. If you want, making a homemade crust adds a personal touch. Some like to add fresh herbs or spices to mix things up. You can also use honey or agave syrup instead of sugar for a healthier option. These choices can make your pie unique. You can find the Full Recipe with all the steps to create this delightful dessert. Enjoy your cooking journey! To start, you need fresh peaches. I suggest using ripe peaches for the best flavor. Wash them well and peel off the skin. Then, slice the peaches into thin pieces. Aim for about 1/4 inch thick. Next, place the sliced peaches into a large bowl. Add 1 cup of granulated sugar, 1/4 cup of flour, 1 teaspoon of ground cinnamon, and 1/4 teaspoon of nutmeg. Pour in 1 tablespoon of lemon juice and 1 tablespoon of vanilla extract. Mix all the ingredients gently until the peaches are well coated. Let this mixture sit for about 30 minutes. This allows the flavors to blend and the juices to form. Now, it is time to prepare your pie crust. If you use store-bought crusts, roll out one crust and fit it into a 9-inch pie dish. Trim any excess crust hanging over the edges. Make sure it covers the bottom well. Once your crust is ready, pour the peach filling into it. Spread the filling evenly. For extra richness, dot the top with small pieces of butter. After this, roll out the second pie crust. Place it over the filled pie. You can cut slits for steam vents or create a lattice design. Trim and fold the edges of the crust together, crimping them to seal well. Preheat your oven to 425°F (220°C). This high heat helps create a nice, golden crust. Before baking, brush the top crust with a beaten egg. This gives it a shiny look. Place the pie on a baking sheet to catch drips. Bake it for 45-50 minutes. You will know the pie is done when the crust is golden brown and the filling bubbles. For the best taste, let the pie cool for at least 2 hours before slicing. This waiting helps the filling set nicely. You can find the Full Recipe above for all the details. To make the best peach pie, start with ripe peaches. Ripe peaches feel slightly soft but not mushy. Their color should be bright, with no green spots. Overripe peaches can taste too sweet and mushy, which won't work in your pie. Always trust your senses when choosing peaches. Smell them! A sweet aroma means they are likely ripe. Sourcing local peaches can make a big difference. Visit farmers' markets or local farms. They often sell fresh, in-season peaches. Fresh peaches taste better than store-bought ones. Look for farms that practice sustainable farming. You can find unique flavors and varieties this way. Getting a perfect golden crust is key to a great peach pie. Start by preheating your oven to 425°F (220°C). This high heat helps the crust brown nicely. Use an egg wash for a shiny finish. Brush the top crust with beaten egg before baking. To prevent a soggy bottom crust, use a few tricks. First, let the peach filling sit for about 30 minutes. This allows excess juice to drain away. Also, sprinkle a little flour or cornstarch on the bottom crust. This will soak up some juice as it bakes. Lastly, place your pie on a baking sheet. This way, any drips won’t mess up your oven. Peach pie pairs wonderfully with vanilla ice cream or whipped cream. The cold cream complements the warm pie perfectly. For a twist, try serving it with cinnamon ice cream. You can also add a sprinkle of fresh herbs like mint for a pop of flavor. If you have leftovers, don’t worry. Slice up the pie and store it in the fridge. You can reheat slices in the oven for a warm treat. For a quick option, use the microwave. Just heat for about 20 seconds. Enjoy your peach pie in different ways! {{image_2}} You can make your peach pie crust in many ways. If you want to skip store-bought crusts, try a simple homemade version. Here are some ideas: - Butter Crust: Mix flour, salt, and cold butter. Add water until it forms dough. Chill before rolling. - Graham Cracker Crust: Crush graham crackers and mix with melted butter and sugar. Press into a pie dish. - Almond Flour Crust: Combine almond flour, coconut oil, and egg. Press into the pan for a gluten-free option. Want to mix things up? You can add different fruits or spices. Here are some tasty ideas: - Berry Mix: Add blueberries or raspberries for a fresh twist. They pair well with peaches. - Citrus Zest: Try adding lemon or orange zest for a bright flavor. It lifts the pie. - Spices: Cinnamon is great, but nutmeg or ginger can add warmth and depth. Just a pinch can change the flavor. You can make your peach pie just a bit healthier without losing taste. Here are some swaps: - Lower Sugar: Use less sugar or try natural sweeteners like honey or maple syrup. - Gluten-Free: Use almond flour or rice flour for the crust. You can also thicken the filling with cornstarch instead of flour. These variations help you create a pie that suits your taste and needs. Enjoy exploring these options while making your best peach pie ever! For the full recipe, check back on the main article! To keep your best peach pie ever fresh, here are some simple tips: - Short-term storage at room temperature: If you plan to eat the pie within two days, cover it with plastic wrap or a clean kitchen towel. Keep it on the counter away from direct sunlight. This helps maintain its wonderful flavor and texture. - Long-term refrigeration or freezing tips: For longer storage, place the pie in the fridge for up to five days. Wrap it well to prevent it from drying out. If you want to save it for later, freeze the pie. Wrap it tightly in plastic wrap and then foil. It can last up to three months in the freezer. When you're ready to enjoy your pie, here’s how to reheat it: - Tips for reheating slices in the oven: Preheat your oven to 350°F (175°C). Place the pie slices on a baking sheet. Cover them lightly with foil to keep them from burning. Heat for about 15-20 minutes, or until warm and fragrant. - Microwave options for quick warming: If you need a faster option, use the microwave. Place a slice on a microwave-safe plate. Heat it for 30 seconds to 1 minute, checking every 30 seconds. This method is quick but can make the crust a bit soft. Enjoy your pie warm, and don't forget the ice cream! Homemade peach pie lasts about 3 to 4 days at room temperature. You should cover it with plastic wrap or foil. If you place it in the fridge, it can last up to a week. Just make sure it is in an airtight container to keep it fresh. Yes, you can use frozen peaches. Just make sure to thaw them first. Drain any extra juice before mixing them with the other ingredients. This will help the pie stay firm and not too runny. To prevent a runny filling, use a bit of flour or cornstarch. This helps to thicken the juices from the peaches. Let the peach mixture sit for 30 minutes before pouring it into the crust. This allows the flavors to meld and helps to thicken the filling. You can make the pie ahead of time. Just bake it and let it cool completely. Cover it well and store it in the fridge. It will taste great for up to a week. If you want to freeze it, wait until it cools, then wrap it tightly. You can find the Full Recipe for the Best Peach Pie Ever in the main article. It includes all the steps and tips you need to make this delicious pie! Making a peach pie is simple and fun. We covered how to choose ripe peaches, prepare the filling, and assemble the pie. Tips on baking and serving make it even better. Plus, you now know about variations and storage options for fresh pie. Enjoying your homemade peach pie is the best part. Share it with friends or savor it all yourself. You have all the tools for a great dessert. Dive in and bake one today!

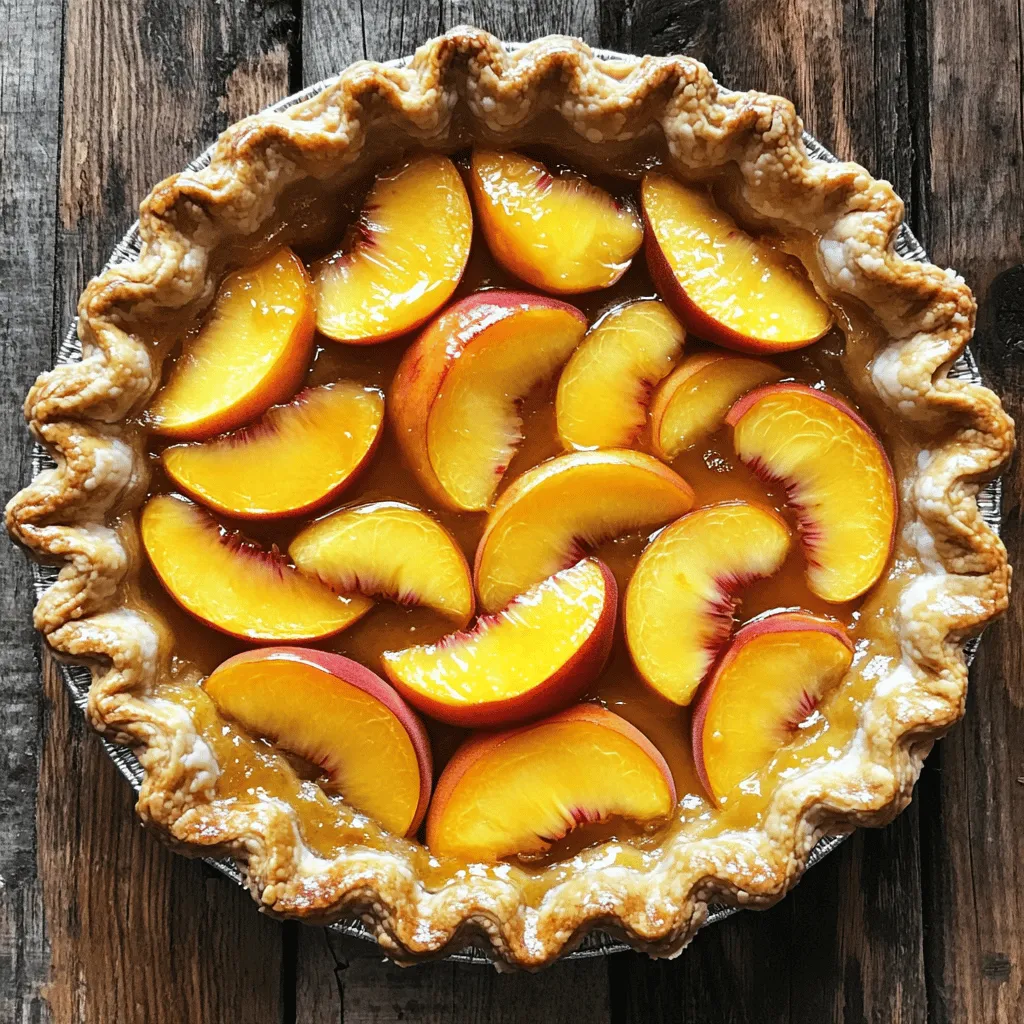
If you love the sweet, juicy taste of summer, you have to try my Best Peach Pie Ever. This simple, delightful recipe uses fresh peaches and common pantry items to …

Read more

Categories Desserts

Cucumber Sandwiches Fresh and Flavorful Delight

June 23, 2025 by Chef Owen
- 1 large cucumber, thinly sliced - 8 slices of whole grain bread - 4 ounces cream cheese, softened - 1 tablespoon dill, chopped - 1 tablespoon fresh lemon juice - 1 teaspoon garlic powder - Salt and pepper to taste - 1 cup arugula or mixed greens - Radish slices for garnish Cucumber sandwiches are simple yet full of flavor. The main ingredients bring freshness and creaminess together. I love using a large cucumber. Thin slices add crunch and a refreshing taste. Whole grain bread gives a hearty base. Cream cheese adds richness, making each bite delightful. For seasoning, I combine dill, lemon juice, and garlic powder. This mix brightens the flavor. A pinch of salt and pepper enhances everything. Feel free to adjust the seasoning to suit your taste. Optional garnishes like arugula or mixed greens add color and freshness. They also add a nice peppery note. If you want, add radish slices on top. They give a nice crunch and look great. You can find the Full Recipe for crispy cucumber delight sandwiches at the end of this article. Enjoy making these tasty treats! Start by mixing the cream cheese in a bowl. Add chopped dill, fresh lemon juice, garlic powder, and a pinch of salt and pepper. Stir until everything blends smoothly. This mixture gives the sandwiches great flavor. Lay out your slices of bread on a clean surface. Spread a good amount of the cream cheese mixture on each slice. On half of the slices, layer the thin cucumber slices evenly. Make sure the cucumbers cover the cream cheese well. Next, add a handful of arugula or mixed greens on top of the cucumbers. Finally, place the other slices of bread on top, cream cheese side down, to create your sandwiches. To make your sandwiches look nice, trim the crusts off the edges with a sharp knife. Cut each sandwich into quarters for easy eating. If you want, you can add radish slices on top of the cucumbers for extra crunch and a pop of color. This simple touch makes the sandwiches even more appealing. Enjoy your crispy cucumber delight sandwiches! For the full recipe, see above. Choosing the right cucumber makes a big difference. Go for English cucumbers. They are long, thin, and have fewer seeds. This means less water and a crisp bite. When you slice your cucumber, keep your cuts even. Aim for thin slices, about a quarter-inch thick. This will help the texture stay uniform. To make your sandwiches pop, think about herbs and spices. Fresh dill is a classic choice, but you can also try mint or chives. These add a fresh taste. Want a kick? Add some cayenne pepper or a splash of hot sauce. Pair your sandwiches with a light salad or a cup of soup for a full meal. How you serve your sandwiches can impress your guests. Use a colorful serving plate to make them stand out. You can also cut the sandwiches into fun shapes using cookie cutters. Triangles or circles look great and are easy to handle. For a final touch, add radish slices on top for color and a nice crunch. For the full recipe, check out the Full Recipe section. {{image_2}} Cucumber sandwiches are fun! You can mix things up in many ways. Here are some tasty variations to try. The classic cucumber sandwich is simple. It needs just a few fresh ingredients. Start with thinly sliced cucumbers on soft bread. Spread cream cheese on the bread. This recipe is quick and easy. You can make it in just 15 minutes. If you want more flavor, add veggies! Try ripe tomatoes or creamy avocados. They taste great with cucumbers. You can also switch to vegan cream cheese for a plant-based option. This makes the sandwich lighter and fresh, perfect for a sunny day. Why not play with bread types? You can use rye or gluten-free bread. Each type adds a different taste. You can also flavor the cream cheese. Mix in herbs like chives or spices like paprika. These small changes give your cucumber sandwiches a new twist. Get ready to enjoy these fresh and flavorful delights! For the full recipe, check out the details above! To keep cucumber sandwiches fresh in the fridge, wrap them tightly in plastic wrap. This keeps air out and prevents them from drying. Place them in an airtight container for added protection. Make sure to store them in the vegetable crisper drawer. This area stays cool, which helps maintain freshness. Freezing cucumber sandwiches is not ideal, but you can do it. To freeze, prepare the sandwiches without cucumbers. Place the sandwiches in a single layer in a freezer-safe bag. Seal the bag, removing as much air as possible. When you want to eat them, thaw the sandwiches in the fridge overnight. Then, add fresh cucumber slices before serving. Prepared cucumber sandwiches last about 1-2 days in the fridge. After this time, the bread can become soggy. If you freeze them, they can stay good for up to a month. Just remember, the texture may change once thawed. For the best taste, eat them fresh. Try the Full Recipe for a delightful treat! To enhance the flavor of your cucumber sandwiches, consider adding fresh herbs. Dill and chives work well. You can also mix in lemon zest for a bright kick. If you want a little heat, try adding a sprinkle of crushed red pepper. Another fun twist is to use flavored cream cheese. You might try garlic and herb cream cheese for a rich taste. These changes make each bite exciting and fresh. Yes, you can make cucumber sandwiches ahead of time! To keep them fresh, store them in an airtight container. Place parchment paper between layers to avoid sogginess. I recommend making them no more than a day in advance. This way, the cucumbers stay crisp. If you plan to serve them later, wait to add the cucumbers until just before serving. This keeps the bread from getting wet. Whole grain bread is a great choice for cucumber sandwiches. It adds a nutty flavor and good texture. White bread is classic and soft, making it easy to bite into. Rye bread gives a unique taste but can be denser. Gluten-free bread is perfect for those with dietary needs. Each type of bread affects the taste and feel, so choose what you enjoy most. In this post, I covered how to make tasty cucumber sandwiches. I shared the right ingredients, seasoning, and tips for a perfect bite. You learned easy steps for preparation, how to store your sandwiches, and simple variations to try. Remember, fresh ingredients shine here. Don’t hesitate to get creative with flavors. These sandwiches are great for snacks or parties, so enjoy making and sharing them!

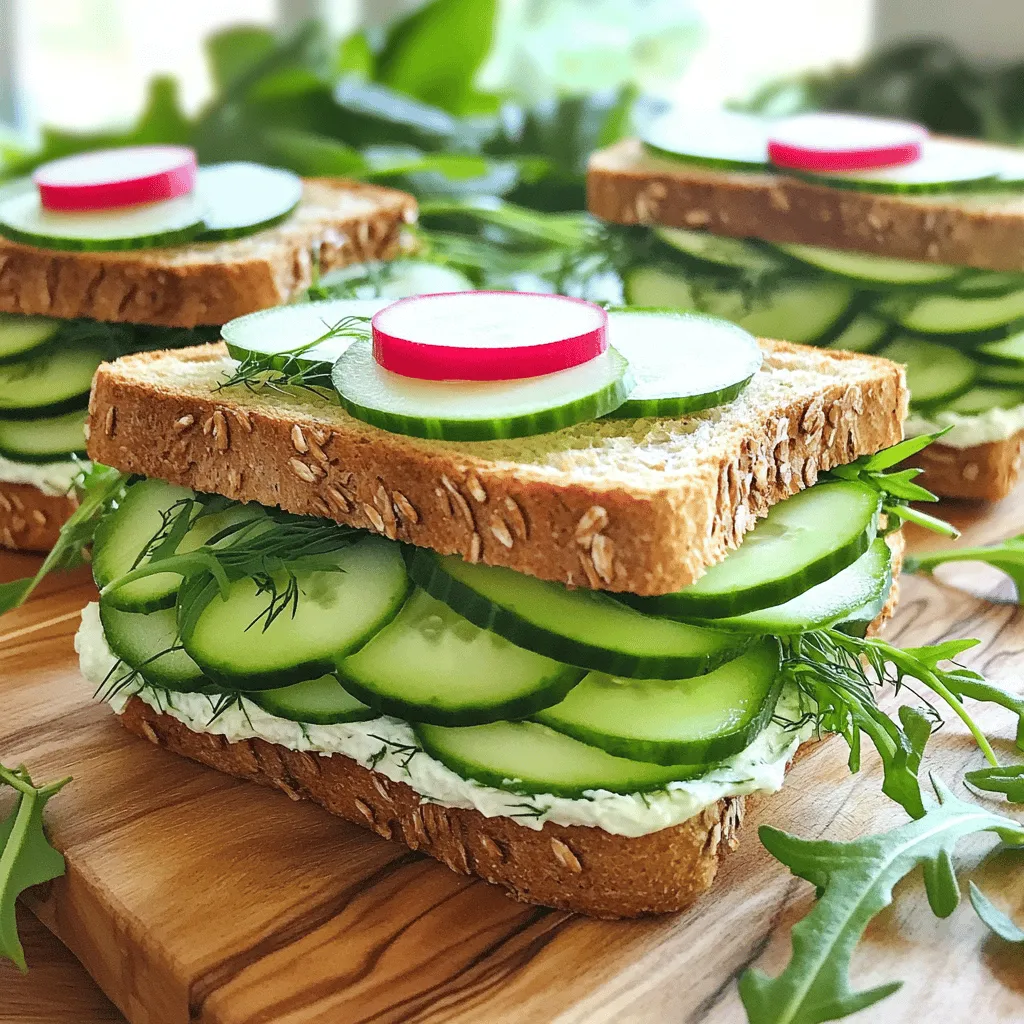
Cucumber sandwiches are a simple yet delicious treat that can brighten any meal. With just a few fresh ingredients, you can create a flavorful delight that’s perfect for snacks or …

Read more

Categories Appetizers

Cheesy Chicken Bake Simple and Delicious Recipe

June 23, 2025 by Chef Owen
To create a delicious Cheesy Chicken Bake, you need a few simple ingredients. Each one plays a key role in making this dish creamy and tasty. Here’s what you’ll need: - 2 cups cooked chicken, shredded - 1 cup cooked quinoa - 1 cup broccoli florets, steamed - 1 cup cheddar cheese, shredded - ½ cup cream cheese, softened - ½ cup Greek yogurt - 2 cloves garlic, minced - 1 teaspoon paprika - ½ teaspoon salt - ½ teaspoon black pepper - 1 tablespoon olive oil - ¼ cup green onions, chopped (for garnish) These ingredients mix together to bring out rich flavors. The chicken gives you protein, while the quinoa adds texture. Broccoli packs in nutrients, and cheese brings the gooey goodness that everyone loves. For the full recipe, visit the [Full Recipe]. - Preheat your oven to 375°F (190°C). - In a large bowl, mix the cooked chicken, quinoa, and steamed broccoli. - In another bowl, blend the cream cheese, Greek yogurt, minced garlic, paprika, salt, and black pepper until smooth. - Pour the cream cheese mixture over the chicken and quinoa mix. Stir well to coat everything. - Grease a baking dish with olive oil. Then, transfer the chicken mixture into the dish and spread it evenly. - Top the mixture with the remaining shredded cheddar cheese. - Bake for 25-30 minutes until the cheese is bubbly and golden brown. - Once done, take it out and let it cool for 5 minutes. - Garnish with chopped green onions before serving. For the complete details, check the Full Recipe. Enjoy your cheesy chicken bake! To achieve the right cheese consistency, use freshly shredded cheese. Pre-shredded cheese has additives that can change the melt. Grate your cheese right before using it. This keeps it creamy and gooey. For shredding chicken easily, try using two forks. Pull the chicken apart while it’s still warm. If you have a stand mixer, a paddle attachment works well too. Just mix on low speed for a minute, and your chicken will be perfectly shredded. Ovens can vary in heat. Always check your bake at the minimum time. If your cheese isn’t bubbly after 25 minutes, give it a few more minutes. This way, you avoid overcooking your dish. Managing portion sizes also matters. Use a standard measuring cup to scoop out servings. This helps everyone enjoy the dish without overeating. It also makes it easier to store leftovers. Pair your Cheesy Chicken Bake with a fresh salad. A side of roasted vegetables adds color and nutrition. You can also serve it with garlic bread for a comforting meal. For plating, use a white dish to show off the colors. Garnish with green onions for a pop of color. This makes your meal look fancy and inviting. For the complete recipe, refer to [Full Recipe]. {{image_2}} You can switch up the chicken in many ways. If you want to use turkey, that works great. For a lighter option, try using shredded rotisserie chicken. You can even use tofu for a unique twist. As for cheese, feel free to mix it up too! Try mozzarella for a milder taste. For a sharper bite, use pepper jack. Each swap brings a new flavor to the dish. Making this cheesy chicken bake gluten-free is simple. Just choose gluten-free quinoa or rice instead of regular. For a vegan version, skip the chicken and cheese. Use chickpeas or lentils for protein. Swap cream cheese with vegan cream cheese and Greek yogurt with a plant-based yogurt. You can still enjoy a hearty meal with these changes. To boost the taste, add fresh herbs like thyme or parsley. Sprinkle in some oregano for an Italian twist. You can also kick it up with spices like cayenne or chili powder. Adding veggies like bell peppers or spinach can make it more colorful and nutritious. Each enhancement helps create a dish that’s not just cheesy, but also bursting with flavor. To store leftovers correctly, let the cheesy chicken bake cool first. Then, place it in an airtight container. This keeps it fresh and prevents drying out. For long-term storage, consider freezing. Cut the bake into portions, wrap them tightly in plastic wrap, then place them in a freezer-safe bag. This way, you can enjoy this tasty dish later! For optimal reheating, use an oven. Preheat it to 350°F (175°C). Place the cheesy chicken bake in a baking dish and cover it with foil. Heat for about 20 minutes or until warm. This method keeps the texture and flavor intact. You can also microwave it. Use a microwave-safe dish and heat in short bursts, stirring in between. Just be careful not to overheat, or the cheese may become rubbery. In the fridge, your cheesy chicken bake lasts about 3 to 4 days. Keep an eye on any signs of spoilage, such as off smells or mold. If you see these signs, it’s best to toss it out. Storing it correctly helps ensure you enjoy every bite of this delicious dish! For the full recipe, visit the recipe section. Can I make this dish ahead of time? Yes, you can prepare the cheesy chicken bake in advance. Just mix all the ingredients and store them in the fridge. When you're ready to bake, just pop it in the oven. This makes it perfect for busy nights. Is this recipe suitable for meal prep? Absolutely! This dish is great for meal prep. You can divide it into individual servings. Just reheat each portion when you need it. It tastes just as good, even after a few days. Can I use frozen vegetables? Yes, frozen vegetables work well in this dish. They save time and are just as nutritious. Just thaw them before mixing to ensure even cooking. What kind of chicken works best? Any cooked chicken is great for this recipe. You can use rotisserie chicken or leftovers from another meal. Shredded chicken blends perfectly with the other ingredients. Can I cook it in an air fryer? You can make this dish in an air fryer! Just adjust the temperature to 350°F (175°C) and cook for about 20 minutes. Check for bubbly cheese before serving. How to adjust cooking time for different ovens? Oven temperatures can vary. Always check your dish a few minutes early. If the cheese isn't bubbly yet, add a few more minutes. This way, you'll get the perfect cheesy chicken bake every time. This cheesy chicken bake is easy and fun to make. You start with basic ingredients like chicken, quinoa, and broccoli, then mix them with creamy cheese. I shared tips for perfecting your bake and ways to store it well. You can switch ingredients for different flavors and healthier options. Overall, this dish is great for meals and leftovers. You can get creative with your sides and plates. Enjoy your cooking adventure, and don’t hesitate to try new variations that suit your taste!

Craving comfort food that’s easy to make? You’re in the right place! This Cheesy Chicken Bake is simple, delicious, and packed with flavor. With just a few steps and wholesome …

Read more

Categories Dinner

Creamy Pasta Salad Flavorful Twist for Summer Meals

June 23, 2025 by Chef Owen
To make a tasty creamy pasta salad, you need these key ingredients: - 2 cups rotini pasta - 1 cup cherry tomatoes, halved - 1 cup cucumber, diced - 1/2 cup red bell pepper, chopped - 1/4 cup red onion, finely chopped - 1 cup cooked and cooled chickpeas - 1/2 cup Greek yogurt - 1/4 cup mayonnaise - 2 tablespoons lemon juice - 1 tablespoon Dijon mustard - 1 teaspoon garlic powder - Salt and pepper to taste - Fresh parsley for garnish These ingredients combine to create a colorful and fresh meal that shines in summer. You can change your pasta salad based on what you like. Here are some fun options: - Feta cheese: Adds a salty kick. - Olives: Brings a briny flavor. - Spinach or arugula: Adds a peppery taste and more greens. - Avocado: Makes it creamier and adds healthy fats. - Bacon bits: For a crunchy and savory twist. Feel free to mix and match these options for a unique dish every time. Seasoning can take your salad to the next level. Consider these suggestions: - Italian seasoning: A blend of herbs that adds depth. - Red pepper flakes: For some heat. - Chopped nuts: Almonds or walnuts add crunch. - Lemon zest: Brightens the flavor. Garnish with fresh parsley for a pop of color. These ideas make your creamy pasta salad even more special. For the full recipe, check the details above. Start by boiling water in a big pot. Once it bubbles, add 2 cups of rotini pasta. Cook it for about 8 to 10 minutes until it's al dente. This means it should be firm but not hard. Drain the pasta in a colander. Rinse it under cold water. This stops the cooking and keeps it from getting mushy. While the pasta cools, wash and cut your veggies. Use 1 cup of cherry tomatoes and cut them in half. Dice 1 cup of cucumber into small pieces. Chop 1/2 cup of red bell pepper and finely chop 1/4 cup of red onion. Add 1 cup of cooked and cooled chickpeas for protein. Mix all these in a large bowl. In a separate bowl, make the creamy dressing. Start with 1/2 cup of Greek yogurt and 1/4 cup of mayonnaise. Add 2 tablespoons of lemon juice and 1 tablespoon of Dijon mustard. Sprinkle in 1 teaspoon of garlic powder. Season with salt and pepper to taste. Whisk it all together until smooth. Now, pour the creamy dressing over the pasta and veggie mix. Stir gently to coat everything well. Make sure every piece is covered in that tasty dressing. Taste it and add more salt and pepper if you need to. Cover the bowl with plastic wrap. Place it in the fridge for at least 30 minutes. This chilling time helps the flavors mix better. When you’re ready to serve, take it out and stir it again. Garnish with fresh parsley for a pop of color. Enjoy your creamy pasta salad! Check the Full Recipe for more details. To get a creamy pasta salad, mix Greek yogurt and mayonnaise. This blend gives a rich taste. Use equal parts for balance. Add lemon juice for a touch of zest. It brightens the flavor and keeps it fresh. If the dressing is too thick, stir in a bit of pasta water. This adds moisture without losing texture. Always mix the dressing into the pasta while it’s still warm. It helps the pasta absorb the creaminess better. Serve your creamy pasta salad cold on a hot day. It pairs well with grilled chicken or fish. You can also serve it as a side at barbecues. For a fun twist, add olives or feta cheese. These ingredients add nice saltiness. Garnish with fresh parsley for a pop of color. You can also sprinkle some nuts for crunch. This adds texture and makes it more filling. One common mistake is overcooking the pasta. Cook it just until al dente to keep it firm. Rinse it under cold water to stop the cooking. Another mistake is not chilling the salad long enough. Let it sit in the fridge for at least 30 minutes. This allows the flavors to blend. Lastly, be careful with salt. Taste your salad before adding more. Some ingredients, like olives and chickpeas, can be salty. For the full recipe, check out Creamy Pasta Salad Delight. {{image_2}} Pasta salad is great because you can change it up in many ways. Here are some fun variations to try. You can use many pasta shapes for this salad. I love rotini, but here are some other options: - Penne - Fusilli - Farfalle - Shell pasta Each shape holds the dressing well. Choose what you like best! Want to make it vegetarian? Just skip the meat. You can use more veggies or add beans. Here are some ideas: - Use black beans or kidney beans for protein. - Add more chopped veggies, like bell peppers or broccoli. - Swap Greek yogurt for a plant-based yogurt to make it vegan. This way, everyone can enjoy the dish! If you want to add protein, there are many tasty options. Here are some ideas: - Cooked chicken or turkey adds great flavor. - Shrimp works well too. Just boil or grill it first. - Try diced ham or salami for a different taste. Mix and match to find your favorite! For the complete recipe, check out the Full Recipe section. To keep your creamy pasta salad fresh, store it in an airtight container. Make sure to seal it well. This will help keep the flavors intact. You can store it in the fridge for up to three days. If you see any signs of spoilage, toss it out. Always check for freshness before digging in. You can freeze creamy pasta salad, but it may change the texture. To freeze, place it in a freezer-safe container. Leave some space at the top, as the salad will expand. It’s best to eat it within one month for the best taste. When you're ready to eat, move it to the fridge overnight to thaw. Reheating creamy pasta salad isn’t always necessary. If you prefer it warm, do so gently. You can warm individual portions in the microwave for 20-30 seconds. Stir well to avoid hot spots. Always taste it after reheating. You might want to add a bit more dressing or seasoning for flavor. For best results, enjoy the salad cold or at room temperature. For the full recipe, refer back to the beginning. To make creamy pasta salad vegetarian, just skip any meat or seafood. Focus on fresh veggies like bell peppers, cucumbers, and tomatoes. You can add chickpeas or beans for protein. For the dressing, use Greek yogurt and mayonnaise, which are both vegetarian-friendly. This still gives you that rich, creamy taste without meat. Yes, you can use different types of dressing. Ranch, Italian, or even a balsamic vinaigrette can work well. If you prefer, try a homemade dressing with olive oil, vinegar, and herbs. This lets you change the flavor and keep things exciting. Feel free to experiment to find your favorite mix! Creamy pasta salad can last up to three days in the refrigerator. Store it in an airtight container to keep it fresh. If you notice any change in smell or texture, it’s best to toss it out. Always check before serving, especially if it’s been a few days. For the best taste, enjoy it within the first couple of days. We covered key ingredients and step-by-step instructions to create a creamy pasta salad. I shared tips to achieve the best texture and avoid common errors. You also learned about fun variations, storage methods, and answered common questions. Enjoy creating your own creamy pasta salad, tailored to your taste. With practice, you’ll impress friends and family with your skills. Happy cooking!

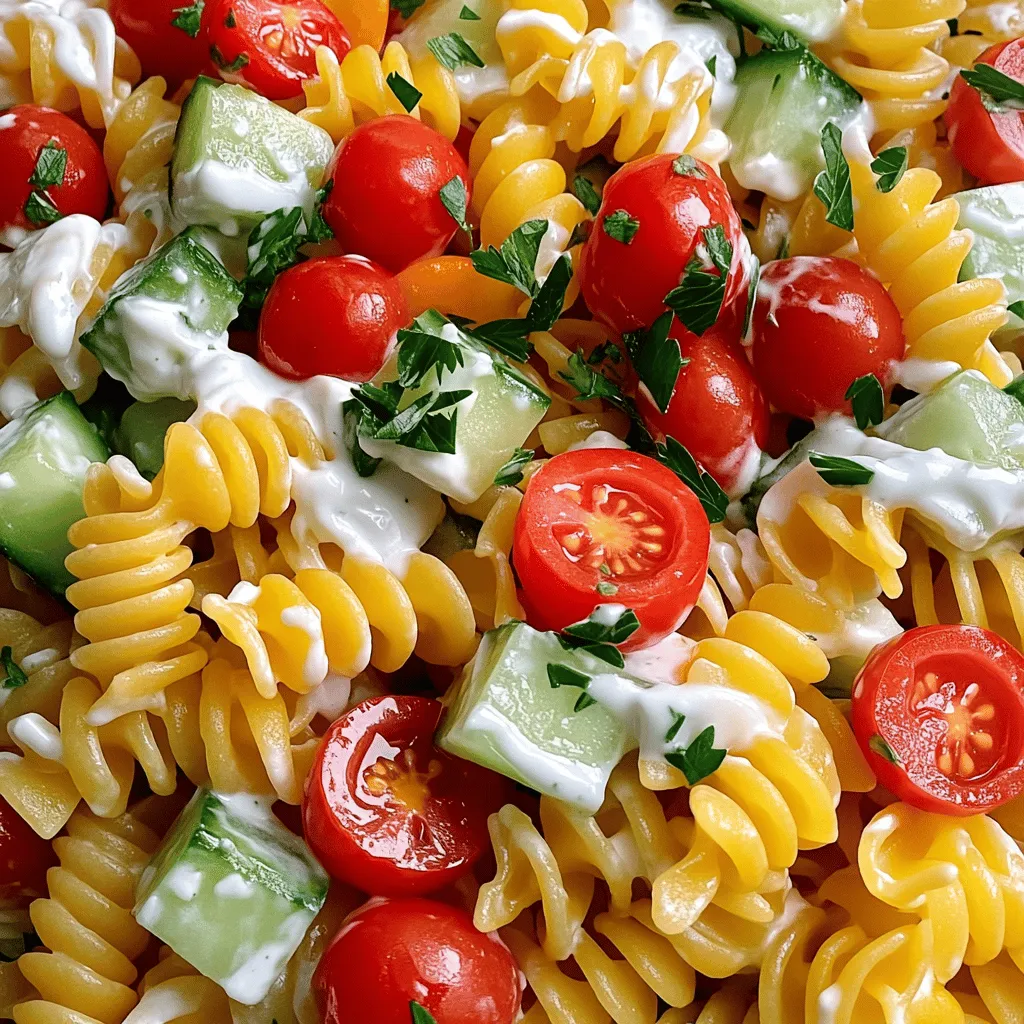
Summer is here, and what better way to celebrate than with a creamy pasta salad? This dish packs a punch of flavor and can be customized to fit your taste. …

Read more

Categories Salads

Honey Garlic Chicken Breasts Easy and Flavorful Dish

June 23, 2025 by Chef Owen
To make honey garlic chicken breasts, you need a few key items. Here is what you should have on hand: - 4 boneless, skinless chicken breasts - 1/2 cup honey - 1/4 cup soy sauce - 4 cloves garlic, minced - 1 tablespoon fresh ginger, grated - 1 tablespoon apple cider vinegar - 2 tablespoons olive oil - Salt and pepper to taste - Sesame seeds for garnish - Chopped green onions for garnish These ingredients create a simple yet tasty dish. The honey gives it a nice sweetness, while the soy sauce adds depth. You can add some extras to make this dish your own. Here are some ideas: - Chili flakes for heat - Fresh herbs like cilantro or basil - Pineapple chunks for a tropical twist - Bell peppers for added crunch Feel free to experiment with these options. This way, you can adjust the flavors to fit your taste. Choosing the right chicken is key for great flavor. Here are some tips: - Look for fresh chicken breasts that feel firm to the touch. - Avoid any with a strange smell or discoloration. - If possible, buy organic or free-range chicken for better quality. The better your chicken, the better your honey garlic chicken will taste. Trust me, it makes a big difference! First, we need to marinate the chicken. This step is key for great flavor. In a large bowl, mix the honey, soy sauce, minced garlic, grated ginger, and apple cider vinegar. The honey gives sweetness, while the soy sauce adds a salty kick. After mixing, keep some of the marinade aside—about 1/4 cup. This will be used later for glazing. Place the chicken breasts in the bowl and coat them well. Cover the bowl and let it chill in the fridge for at least 30 minutes. If you have time, letting it sit for up to 2 hours makes it even tastier. Now, let’s cook the chicken. Heat olive oil in a large skillet over medium-high heat. Once the oil is hot, take the chicken out of the marinade. Be sure to toss the leftover marinade that touched raw chicken. Place the chicken breasts in the skillet. Cook them for about 5 to 7 minutes on each side. You want them to be golden brown and fully cooked. Check the internal temperature; it should reach 165°F (75°C). This ensures your chicken is safe to eat and tasty. Once the chicken is done cooking, it’s time to add that reserved marinade. Pour it into the skillet and let it simmer for a couple of minutes. This thickens the sauce and coats the chicken nicely. For a beautiful finish, remove the skillet from heat. Sprinkle sesame seeds and chopped green onions over the chicken. This adds a nice crunch and color. Serve the chicken hot, ideally on a bed of fluffy rice or with sautéed veggies. For more details, check out the Full Recipe. When making honey garlic chicken, I see a few common mistakes. First, don’t skip marinating. It helps the chicken soak up all the flavors. Second, don’t rush the cooking. If you cook it too fast, the chicken can dry out. Always check the internal temperature. It should reach 165°F (75°C) for safe eating. Lastly, avoid using the marinade that touched raw chicken. This keeps your dish safe and healthy. To boost flavor, try adding spices like red pepper flakes or black pepper. These spices add a nice kick. You can also mix in other sauces, such as teriyaki or hoisin, for a twist. For texture, sear the chicken until golden brown. This gives a nice crunch outside while keeping it juicy inside. If you want a thicker glaze, let the sauce simmer longer. This adds depth and richness to each bite. Presentation is key! After cooking, plate the chicken on a bed of fluffy rice. This makes the dish look inviting. Drizzle the thickened glaze over the chicken for a shiny finish. Then, sprinkle sesame seeds and chopped green onions on top. This adds color and a fresh touch. You can also serve the chicken with bright veggies for contrast. This makes your meal not only tasty but also beautiful. For the full recipe, check out the detailed steps above. {{image_2}} You can switch out the chicken for other proteins. Try using shrimp, tofu, or pork. Each protein brings its own flavor. Shrimp cooks fast and soaks up the sauce well. Tofu absorbs the honey garlic taste nicely. Pork adds a rich, savory taste. Adjust the cooking time based on what you choose. For shrimp, a few minutes on each side works. For pork, ensure it reaches 145°F (63°C). If you have dietary needs, don’t worry! You can make simple swaps. Use low-sodium soy sauce if you want less salt. For a gluten-free option, choose tamari or coconut aminos. Honey can be swapped for maple syrup for a vegan option. Use vegetable oil instead of olive oil if you prefer. Each swap keeps the dish tasty while meeting your needs. Pair your honey garlic chicken with fun side dishes. Steamed rice is a classic choice. It soaks up the sauce perfectly. You can also serve it with sautéed vegetables for color and crunch. Try roasted broccoli or stir-fried bell peppers. They add fresh flavors. A simple salad with vinaigrette works well too. Feel free to mix and match to create your perfect meal. For the full recipe, check out the instructions above. After you enjoy your honey garlic chicken, store leftovers right away. Place the chicken in an airtight container. Make sure it cools down first, but don’t leave it out for too long. You can keep it in the fridge for up to three days. This way, it stays safe to eat later on. When you want to eat your leftover chicken, you can reheat it easily. The best way is to use a skillet. Heat it over medium heat and add a splash of water. This keeps the chicken moist. Cover the pan to trap the steam and heat for about 5-7 minutes. You can also use a microwave. Just place it on a plate and cover it. Heat it for 1-2 minutes, checking to see if it's warm throughout. If you have extra chicken, freezing is a great option. Wrap each piece in plastic wrap and then put it in a freezer bag. This prevents freezer burn. You can freeze the chicken for up to three months. When ready to eat, thaw it in the fridge overnight. Then, you can reheat it as mentioned above. By following these tips, you get to enjoy your honey garlic chicken later without losing any flavor. For the full recipe, check the earlier sections of this article. Cooking honey garlic chicken takes about 30 to 35 minutes. First, you need 30 minutes to marinate the chicken. After that, cooking it in the skillet takes around 10 to 15 minutes. The chicken should have a golden brown color and reach an internal temperature of 165°F (75°C). This ensures it is safe to eat and juicy. Yes, you can use frozen chicken breasts, but it requires a bit more time. Always thaw the chicken before marinating. You can do this in the fridge overnight or use the defrost setting on your microwave. Once thawed, follow the same marinating and cooking steps from the Full Recipe. This will give you the best flavor and texture. Honey garlic chicken pairs nicely with many side dishes. Here are a few ideas: - Steamed rice: It absorbs the sauce well. - Sautéed vegetables: Broccoli, bell peppers, and carrots add color and nutrition. - Mashed potatoes: They create a creamy contrast to the sauce. - Quinoa: This grain adds a nutty flavor and is a healthy option. These sides complement the chicken and make for a complete meal. Making honey garlic chicken at home is simple and fun. You learned about key ingredients, from chicken to optional flavors. I shared step-by-step tips for marinating and cooking. Mistakes to avoid help you create juicy chicken, while presentation ideas add flair. Don’t shy away from variations, like using different proteins or sides. Plus, I covered how to store leftovers for later enjoyment. With this guide, you can master honey garlic chicken. Enjoy your cooking journey and impress your family and friends!

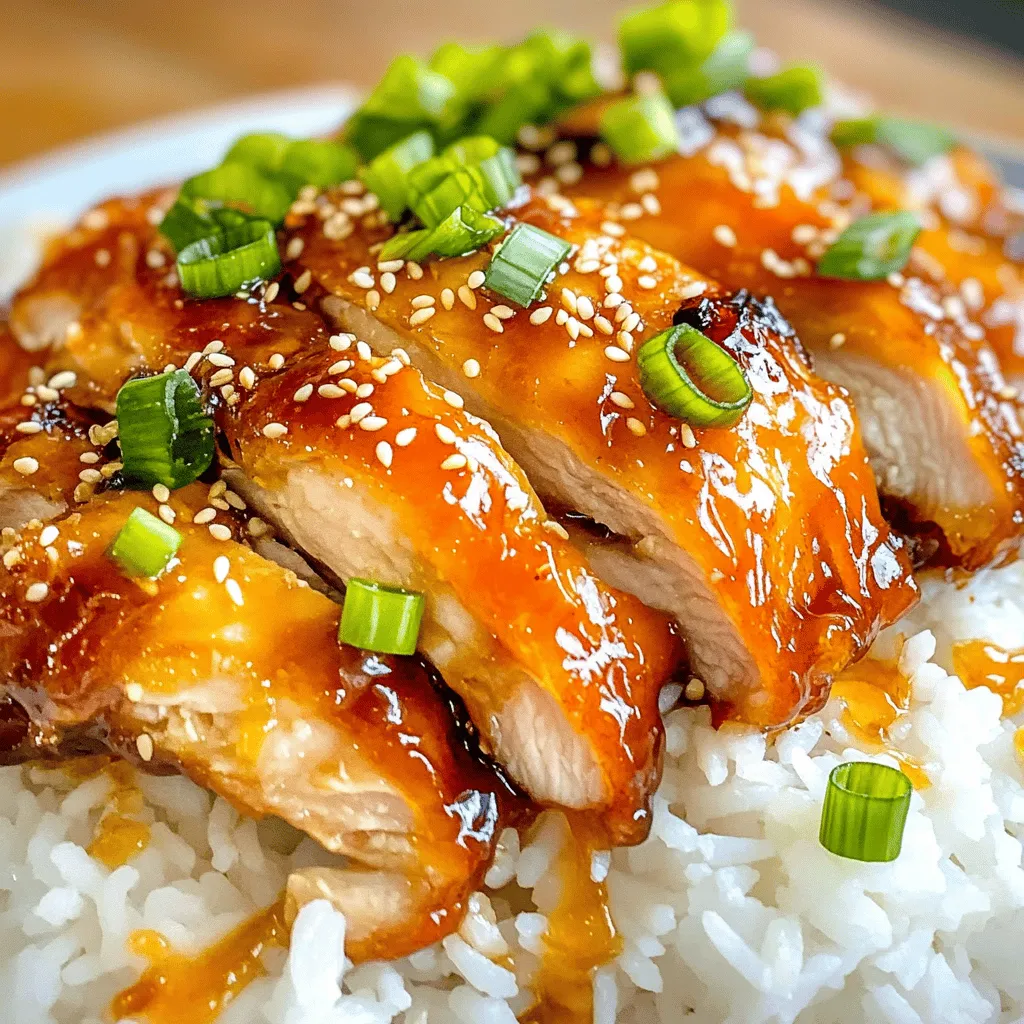
Are you ready to impress your family with a dish that’s both simple and packed with flavor? Honey Garlic Chicken Breasts is your answer! This recipe is easy to follow …

Read more

Categories Dinner

Easy Tomato Galette Flavorful and Simple Delight

June 23, 2025 by Chef Owen
To make a tasty Easy Tomato Galette, you will need: - 1 sheet of store-bought puff pastry or homemade pie crust - 4-5 ripe tomatoes, sliced (combine different varieties for color) - 1 cup shredded mozzarella cheese - 1/2 cup ricotta cheese - 2 tablespoons fresh basil, chopped - 1 tablespoon olive oil - 1 teaspoon garlic powder - Salt and pepper to taste - 1 egg (for egg wash) You can swap some ingredients if needed. Use goat cheese instead of ricotta for a tangy taste. If you don't have mozzarella, try cheddar or feta. For fresh basil, you can use dried herbs like oregano or thyme. If you want a gluten-free option, use gluten-free puff pastry. Fresh ingredients make a big difference in flavor. Ripe tomatoes bring sweetness and depth to the galette. Fresh herbs add brightness and aroma. Using high-quality cheese enhances the creaminess. When you pick fresh items, you create a dish that tastes better. It feels good to know you used the best ingredients. A simple dish like this shines when you focus on quality. To start, gather your ingredients. You will need: - 1 sheet of store-bought puff pastry or homemade pie crust - 4-5 ripe tomatoes, sliced - 1 cup shredded mozzarella cheese - 1/2 cup ricotta cheese - 2 tablespoons fresh basil, chopped - 1 tablespoon olive oil - 1 teaspoon garlic powder - Salt and pepper to taste - 1 egg (for egg wash) First, preheat your oven to 400°F (200°C). This step warms the oven for a nice, even bake. Next, take your puff pastry or pie crust. Roll it out on a floured surface into a 12-inch circle. It should be thin. Transfer this to a baking sheet lined with parchment paper. This helps with cleanup later. In a bowl, mix the ricotta cheese, half of the mozzarella, chopped basil, garlic powder, salt, and pepper. Stir until it is well combined. Spread this mixture over the pastry, leaving a 2-inch border. This border will hold the filling in. Now, layer the sliced tomatoes on top of the cheese mixture. Overlap them nicely for good looks. Drizzle olive oil over the tomatoes and sprinkle the rest of the mozzarella cheese on top. Next, fold the edges of the pastry over the tomatoes. You want to pleat the crust to give it a rustic look. This makes your galette more charming. Beat the egg in a small bowl. Brush it over the crust edges for a golden finish. Now, it’s time to bake! Place your galette in the oven and bake for 30-35 minutes. Keep an eye on it. The crust should turn golden, and the tomatoes will look slightly shriveled. This shows they are ready. For a great galette, use ripe tomatoes. They bring a lot of flavor. You can mix different tomato varieties for color and taste. Also, don’t skip the egg wash. It makes the crust shiny and crisp. If you want a flakier crust, keep your pastry cold. You can even chill it for 15 minutes before baking. This helps create layers. Lastly, let the galette cool for a few minutes after baking. This helps the filling set, making it easier to slice. You can find the full recipe for this Easy Tomato Galette above. Enjoy making this delightful dish! To get a flaky crust, keep your ingredients cold. Use chilled butter or margarine. When rolling out the dough, work quickly. The warmer it gets, the less flaky it becomes. I also recommend using a light touch when handling the dough. Lastly, let the crust rest in the fridge for about 30 minutes before baking. This step helps the gluten relax and results in a better texture. One common mistake is not seasoning the filling. Salt pulls out moisture and boosts flavor. Without it, your galette may taste flat. Another mistake is cutting tomatoes too thick. If they are too thick, they may not cook evenly. Avoid overloading the filling as well. Too much can make the crust soggy. Lastly, don't skip the egg wash. It gives the crust a beautiful golden color. Serve your easy tomato galette warm or at room temperature. It's great as a light meal or side dish. Pair it with a fresh salad for a nice balance. You could also add a drizzle of olive oil or balsamic glaze for extra flavor. For fun, try adding some fresh herbs on top right before serving. This adds color and brightness to the dish. For the full recipe, check out the recipe section above. {{image_2}} You can play with cheese in your galette! Instead of mozzarella, try goat cheese for a tangy kick. Feta cheese also adds a nice saltiness. If you love rich flavors, use aged cheddar or Gruyère. Mixing cheeses can create a well-rounded taste. Just remember to balance the flavors so they don’t overpower the tomatoes. Want to make your galette heartier? Add more veggies! Spinach, zucchini, or bell peppers work great. Slice them thin so they cook evenly. You can also add proteins like cooked chicken or bacon. This makes the dish filling and adds new flavors. Just be careful not to overload it, or the crust may get soggy. Seasonal produce can change your galette game. In summer, ripe tomatoes shine. In fall, swap tomatoes for butternut squash or pumpkins. Winter brings hearty greens like kale or Swiss chard. Spring is great for asparagus or fresh peas. Each season offers new tastes, so let them inspire you. Try these variations, and feel free to experiment. Cooking is about having fun and making it your own! For the full recipe, check out the Easy Tomato Galette. After you enjoy your Easy Tomato Galette, store leftovers properly. First, let the galette cool. Then, wrap it tightly in plastic wrap or foil. This keeps the crust from getting soggy. You can also place it in an airtight container. Store it in the fridge for up to three days. This way, you can enjoy it again! To reheat your galette, preheat your oven to 350°F (175°C). Place the galette directly on the oven rack or on a baking sheet. Heat for about 10-15 minutes. This makes the crust crispy again. You can also use a microwave, but the crust may not stay crunchy. For best results, stick with the oven. If you want to save some galette for later, freezing is a great option. Wrap it well in plastic wrap and then in foil. This helps prevent freezer burn. You can freeze it for up to two months. When you're ready to eat it, thaw it in the fridge overnight before reheating. Enjoy your galette whenever you like! For the full recipe, check out the Easy Tomato Galette section. To make a homemade pie crust, you need simple ingredients. You will need: - 1 1/4 cups all-purpose flour - 1/2 cup cold unsalted butter, cubed - 1/4 teaspoon salt - 4-5 tablespoons cold water Start by mixing the flour and salt in a bowl. Add the cold butter and mix until it looks like crumbs. Next, add cold water, one tablespoon at a time. Mix until the dough forms. Wrap the dough in plastic wrap and chill it in the fridge for at least 30 minutes. This chill time helps the crust stay flaky. Yes, you can use many fruits and vegetables. For fruits, try peaches, apples, or berries. For vegetables, you can use zucchini, bell peppers, or even squash. Just remember to slice them thinly. This ensures they cook evenly. Mixing different types can also add fun flavors and colors. To reheat a tomato galette, preheat your oven to 350°F (175°C). Place the galette on a baking sheet. Cover it loosely with foil to keep it from browning too much. Heat for about 10-15 minutes, or until it is warm. This method keeps the crust crispy. You can also use a microwave, but it may make the crust a bit soft. Enjoy your delicious galette with your favorite side! In this article, we explored the key ingredients for a delicious galette, highlighting their importance. We shared step-by-step instructions and tips to ensure a perfect bake. You also learned about fun variations and how to store leftovers. With these insights, you can create your own galette that impresses everyone at the table. Remember, the secret lies in using fresh ingredients and avoiding common mistakes. Enjoy your baking adventure!

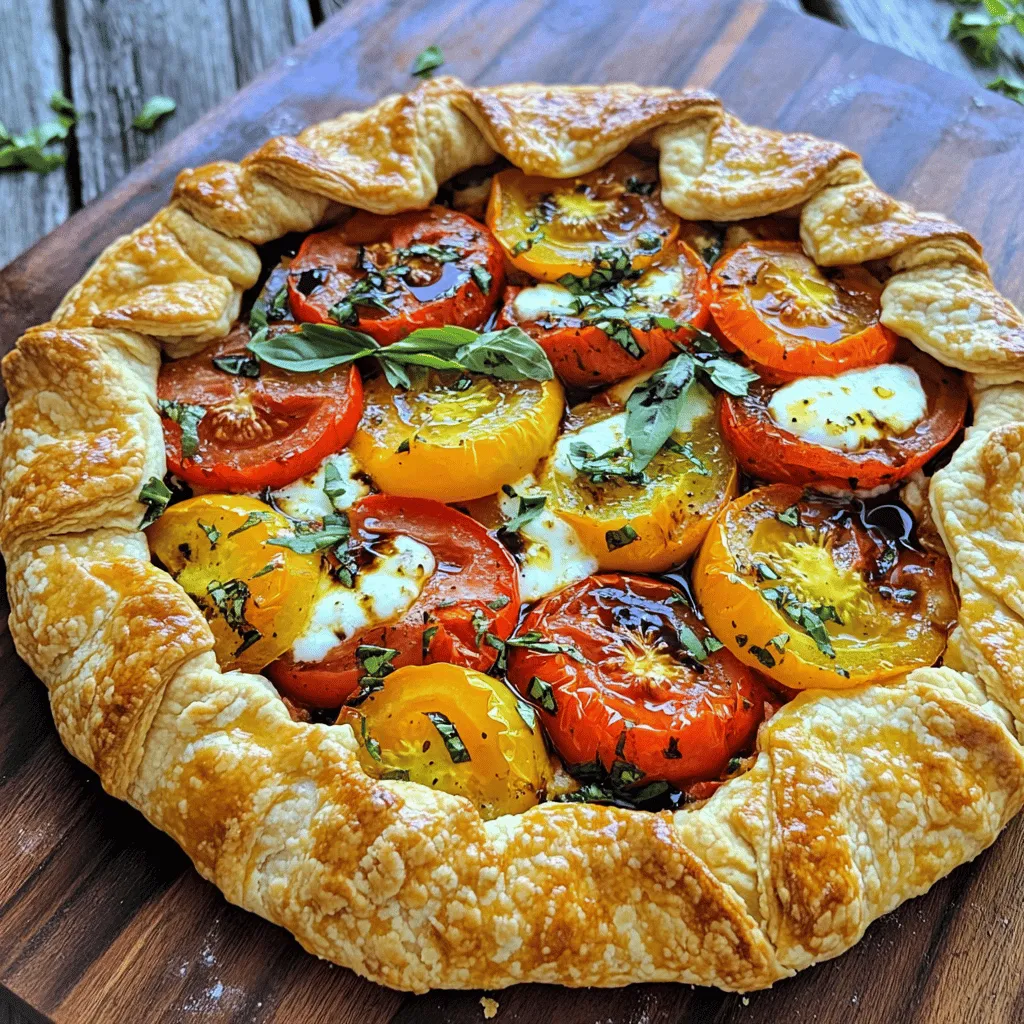
Are you ready to impress your friends with an Easy Tomato Galette? This flavorful dish is simple to make, and it highlights fresh ingredients beautifully. You can whip it up …

Read more

Categories Dinner

Crispy Baked Chicken Tenders Easy and Fast Recipe

June 22, 2025 by Chef Owen
To make crispy baked chicken tenders, you will need these key ingredients: - 1 lb chicken breast, cut into strips - 1 cup buttermilk - 1 cup all-purpose flour - 1 cup Panko breadcrumbs - 1 teaspoon garlic powder - 1 teaspoon onion powder - 1 teaspoon smoked paprika - 1/2 teaspoon cayenne pepper (optional for heat) - Salt and pepper to taste - Cooking spray or olive oil for drizzling You can swap some ingredients if needed. Here are a few options: - Instead of buttermilk, use plain yogurt or milk with a bit of lemon juice. - Use whole wheat flour in place of all-purpose flour for a healthier option. - If you don’t have Panko breadcrumbs, regular breadcrumbs work too but may be less crunchy. - For a spicy kick, add more cayenne pepper or use a different spice blend like chili powder. When selecting chicken, freshness is key. Here’s how to ensure you get the best: - Look for chicken with a pink color and no dark spots. - Check the sell-by date to ensure it’s fresh. - Choose chicken that feels firm to the touch. - Avoid chicken that has a strong odor; this can indicate spoilage. - If possible, buy chicken from a local butcher or trusted source for quality and taste. By using these tips and ingredients, you set yourself up for success in making crispy baked chicken tenders. Start by cutting your chicken breast into strips. Aim for uniform sizes to cook evenly. Place the strips in a bowl and cover them with buttermilk. Make sure they’re fully submerged. This step adds flavor and tenderness. Let the chicken marinate in the fridge for at least 30 minutes. If you have time, overnight soaking works best for deep flavor. For the breading, you need three bowls. In the first bowl, mix flour with garlic powder, onion powder, smoked paprika, salt, and pepper. This blend gives a nice taste. In the second bowl, pour in the Panko breadcrumbs. Panko adds crunch, making your chicken extra crispy. Remove the chicken from the buttermilk. Let the excess drip off. First, coat each strip in the flour mix. Then, dip it in Panko, pressing down to help it stick. Place the coated strips on a baking sheet lined with parchment paper. Preheat your oven to 400°F (200°C). This temperature helps the chicken cook fast and get crisp. Lightly spray or drizzle the top of the tenders with cooking spray or olive oil. This adds even more crunch. Bake for 15-20 minutes, flipping halfway through. Check that they turn golden brown and reach an internal temperature of 165°F (75°C). Let them cool for a minute before serving. This ensures they stay crispy. For the full recipe, check out the instructions earlier. To get that perfect crunch, use Panko breadcrumbs. They are lighter and crispier than regular breadcrumbs. You should also coat the tenders well. Make sure to press the breadcrumbs onto the chicken. This way, they stick better and give you a nice texture when baked. For the best results, use cooking spray or olive oil. I recommend using an oil spray for a fine mist. This helps the tenders get crispy without soaking them in oil. If you prefer, drizzle a little olive oil on top. Just don’t overdo it; too much oil can lead to greasy chicken. To avoid soggy tenders, keep the chicken strips spaced out on the baking sheet. If they touch, steam builds up and makes them soggy. Also, bake them on parchment paper to allow airflow. This keeps the bottoms nice and dry. Lastly, flipping them halfway through ensures even crispiness all around. {{image_2}} You can elevate your crispy baked chicken tenders with fun flavors. Try adding herbs or spices to the breading mix. Here are some ideas: - Italian Twist: Add dried oregano, basil, and Parmesan cheese to the Panko. - Buffalo Kick: Mix hot sauce into the buttermilk for a spicy soak. - Sweet and Spicy: Blend honey and sriracha for a tasty glaze. These additions can make your tenders stand out. Experiment to find what you love best! If you need gluten-free chicken tenders, I have you covered. Substitute all-purpose flour with almond flour or a gluten-free blend. Use gluten-free Panko breadcrumbs instead of regular ones. This way, you can still enjoy crispy tenders without the gluten. You can cook chicken tenders in an air fryer or oven. Both methods work well, but they give different results. - Air Fryer: This method cooks faster and gives a crispier texture. Set it to 400°F (200°C) and cook for 10-15 minutes. Flip halfway for even browning. - Oven: Baking is simple and perfect for larger batches. Preheat to 400°F (200°C) and bake for 15-20 minutes. Flip them halfway for great color. Choose the method that suits your kitchen setup and time. Both ways will yield delicious chicken tenders. For the complete recipe, check out the [Full Recipe]. You can store leftover chicken tenders easily. Let them cool down first. Place them in an airtight container. Keep them in the fridge for up to three days. Make sure to cover them well to avoid moisture loss. This helps keep the tenders crispy for your next meal. To reheat your chicken tenders, use an oven for best results. Preheat your oven to 375°F (190°C). Place the tenders on a baking sheet. Bake for about 10 minutes or until they are hot. This keeps them crispy. You can also use a microwave, but the tenders may get soggy. If you choose the microwave, heat them for 1-2 minutes, checking often. If you want to save the chicken tenders for later, freezing works great. First, let them cool completely. Then, wrap each tender in plastic wrap. Place the wrapped tenders in a freezer bag. Squeeze out any air before sealing. They can stay in the freezer for up to three months. When you are ready to eat, thaw them in the fridge overnight. Then reheat as mentioned above for a tasty meal. For the full recipe, check the earlier section. Yes, you can use chicken thighs. They have more fat, which adds flavor. Thighs stay juicy and tender while cooking. Cut them into strips, just like breasts. Adjust cooking time slightly if needed, as thighs may take a minute longer to cook through. To keep the coating on, follow a few steps. First, marinate the chicken in buttermilk. This helps the coating stick. Next, press the breadcrumbs firmly onto the chicken. Finally, avoid flipping the tenders too soon while baking. Let them cook until golden brown for the best hold. Many sauces go great with chicken tenders. Here are some tasty options: - Honey mustard - BBQ sauce - Ranch dressing - Sweet and sour sauce - Buffalo sauce Each sauce adds a unique flavor. Try different ones to find your favorite! For the full recipe, check out the detailed instructions above. In this blog post, I covered key aspects of making chicken tenders. We explored the best ingredients, how to prep and bake them for crispiness, and tips for flavor. I also shared storage ideas and answered common questions. Remember, choosing fresh chicken and using the right cooking method can make a big difference. Experiment with flavors and cooking options to find what you love. With these steps, you’ll enjoy tender, crunchy chicken every time.

Are you ready to make crispy baked chicken tenders that will wow your taste buds? I’ve got an easy and fast recipe that’s perfect for busy weeknights or fun gatherings. …

Read more

Categories Appetizers

Baked Frittata with Roasted Peppers Simple and Tasty

June 22, 2025 by Chef Owen
Here are the ingredients you need for the baked frittata with roasted peppers: - 6 large eggs - 1 cup milk - 1 cup roasted red peppers, chopped - 1/2 cup onion, finely chopped - 1 cup fresh spinach, chopped - 1 cup feta cheese, crumbled - 1/2 teaspoon garlic powder - 1/2 teaspoon paprika - Salt and black pepper to taste - 2 tablespoons olive oil - Fresh parsley for garnish When measuring the ingredients, use dry measuring cups for solids. Use liquid measuring cups for milk. This helps keep your frittata balanced. For the chopped veggies, make sure they are uniform in size. This ensures even cooking. If you don’t have some ingredients, here are easy swaps: - Use almond milk or oat milk instead of regular milk. - Swap feta cheese for goat cheese or mozzarella. - If you don't have roasted red peppers, use fresh bell peppers. Just roast them first. - For spinach, you can use kale or Swiss chard. Just chop them small. These substitutes let you enjoy the dish even with what you have. Begin by gathering your ingredients. You will need: - 6 large eggs - 1 cup milk - 1 cup roasted red peppers, chopped - 1/2 cup onion, finely chopped - 1 cup fresh spinach, chopped - 1 cup feta cheese, crumbled - 1/2 teaspoon garlic powder - 1/2 teaspoon paprika - Salt and black pepper to taste - 2 tablespoons olive oil - Fresh parsley for garnish Next, chop the onion, spinach, and roasted peppers. Make sure to measure everything out. This will help the cooking go smoothly. Start by preheating your oven to 375°F (190°C). Heat a large skillet over medium heat. Add the olive oil and let it warm up. Once hot, add the chopped onion. Cook until it turns soft and clear, about 5 minutes. Now, mix in the spinach. Stir it for about 2-3 minutes until it wilts. After that, remove the skillet from heat and let it cool a bit. In a mixing bowl, whisk together the eggs, milk, garlic powder, paprika, salt, and pepper. Make sure it is mixed well. Add in the sautéed onion and spinach, the roasted peppers, and feta cheese. Gently stir everything together. Now, it's time to bake! Grease a 9-inch round baking dish or pie pan. Pour the frittata mixture into the dish. Place it in the oven and bake for 25-30 minutes. You know it’s done when the center is set and the top is lightly golden. After baking, take it out and let it cool for a few minutes. This helps it set further. Garnish with fresh parsley before slicing it into wedges. Serve and enjoy this simple and tasty baked frittata! For the full recipe, check the earlier section. To make the best frittata, use fresh eggs. The fresher the eggs, the better the taste. Whisk your eggs well to mix air in. This helps the frittata rise. Use a mix of vegetables for flavor. Roasted peppers add sweetness. Spinach gives a nice green touch. Crumbled feta adds a salty bite. One common mistake is overcooking the frittata. Bake it just until the center is set. If it puffs too much, you may have added too much air. Another mistake is not greasing the pan well. This can make it hard to serve. Also, don’t skip the seasoning. Salt and pepper enhance all the flavors. Serve your frittata warm or at room temperature. It pairs well with a simple salad. Fresh herbs like parsley add a pop of color. You can also serve it with crusty bread. For a brunch, add fresh fruit on the side. For the full recipe, check out the complete instructions. {{image_2}} You can easily change the flavor of your frittata by adding different veggies. Try using zucchini, mushrooms, or diced tomatoes. Each veggie adds its own taste and texture. If you like a kick, add jalapeños or spicy peppers. Just remember to chop them small for even cooking. While feta cheese is tasty, you can switch it up. Use cheddar for a sharp flavor or mozzarella for a mild, creamy touch. Goat cheese adds a tangy twist. If you want to skip cheese, try nutritional yeast for a cheesy flavor without the dairy. You can make this frittata gluten-free by ensuring all ingredients are certified gluten-free. For a vegetarian option, skip any meat and load up on veggies. To make it dairy-free, use plant-based milk and cheese alternatives. These changes keep the dish delicious and friendly for different diets. For the full recipe, check out the complete details above. After enjoying your baked frittata, it's important to store any leftovers properly. Let the frittata cool completely at room temperature. Then, cover it tightly with plastic wrap or foil. You can also use an airtight container. This helps keep the flavors fresh and prevents drying out. Store it in the fridge for up to three days. When you're ready to eat the leftovers, reheating is easy. Preheat your oven to 350°F (175°C). Place a slice of frittata on a baking sheet. Cover it with foil to avoid burning the top. Heat for about 10-15 minutes until warm. You can also use a microwave. Place a slice on a microwave-safe plate. Heat it for about one minute. Check to make sure it’s warm enough. If you want to keep your frittata longer, freezing is a great option. Cut the frittata into slices. Wrap each slice in plastic wrap. Then, put the slices in a freezer-safe bag or container. Be sure to label it with the date. You can freeze the frittata for up to two months. When ready to eat, thaw it in the fridge overnight. Reheat as mentioned above. This way, you can enjoy a tasty meal anytime! For the full recipe, check out the Baked Frittata with Roasted Peppers . The best pan for baking a frittata is a non-stick pie dish or a round baking dish. These pans help the frittata slide out easily. A 9-inch pan works great. You can also use a cast-iron skillet. A cast-iron skillet gives a nice crisp edge. Just make sure to grease it well before adding the frittata mix. Yes, you can make a frittata ahead of time. It stores well in the fridge for about three days. You can bake it and let it cool. Then cover it tightly with plastic wrap or foil. Reheat it in the oven or microwave when you’re ready to eat. This makes it a great meal for busy mornings. You can tell a frittata is done when it is set in the center. It should look firm and slightly golden on top. You can also insert a toothpick in the middle. If it comes out clean, your frittata is ready. Let it cool for a few minutes before slicing. Enjoy your tasty baked frittata with roasted peppers from the Full Recipe! In this blog post, we covered the essentials for making a great frittata. We explored ingredients, preparation steps, and helpful tips. You learned about substitutions and variations to match your taste and diet. Plus, we discussed storage methods for leftovers. Remember, a perfect frittata is all about balance and practice. Use what you have, and don't be afraid to experiment. Enjoy making your frittata—a simple dish that can impress anyone!

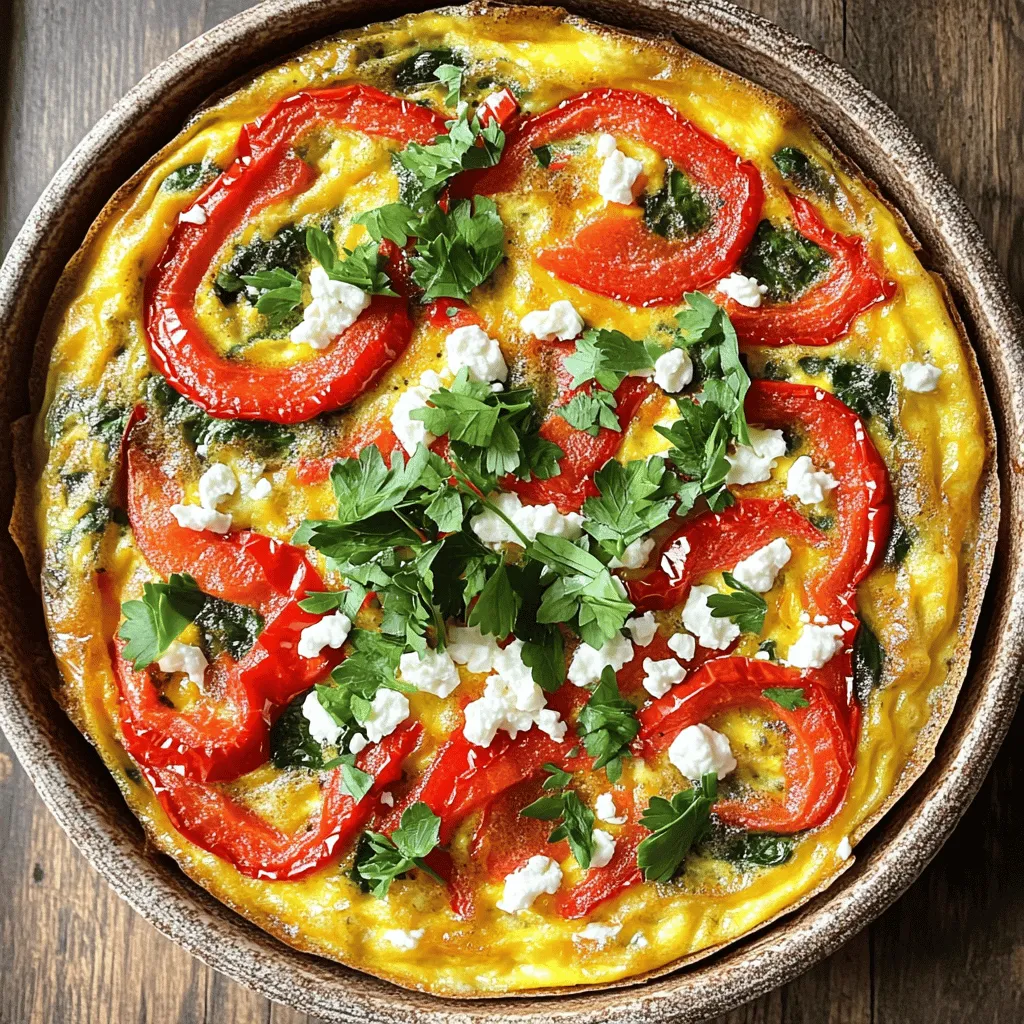
Are you ready to whip up something simple and tasty? Let me introduce you to the baked frittata with roasted peppers. This dish is perfect for breakfast, lunch, or dinner. …

Read more

Categories Breakfast

Homemade Chicken Nuggets Crunchy and Simple Recipe

June 22, 2025 by Chef Owen
To make tasty homemade chicken nuggets, gather these simple ingredients: - 2 boneless, skinless chicken breasts, cut into bite-sized pieces - 1 cup all-purpose flour - 2 large eggs - 1 cup breadcrumbs (preferably panko for extra crunch) - Oil for frying (vegetable or canola) These items will give you the base for your crunchy chicken nuggets. Spices add flavor to your nuggets. Here’s what you need: - 1 teaspoon garlic powder - 1 teaspoon onion powder - 1 teaspoon paprika - 1 teaspoon dried thyme - 1 teaspoon dried oregano - Salt and pepper to taste These spices make your nuggets taste great. You can adjust the amounts based on your likes. If you need to swap ingredients, here are some ideas: - Use almond flour instead of all-purpose flour for a gluten-free option. - Try egg replacers like flaxseed meal or applesauce if you want to skip eggs. - You can use crushed cornflakes or crushed crackers instead of breadcrumbs for a different crunch. These alternatives let you customize your nuggets, making them fit your diet or taste. For the full recipe, check out the details outlined above. Start by taking the chicken breasts. Cut them into bite-sized pieces. In a bowl, mix the chicken with salt, pepper, garlic powder, onion powder, paprika, thyme, and oregano. This step adds great flavor. Let the chicken marinate for 20 minutes. This wait makes a big difference. Now, grab three shallow dishes. Place the flour in the first dish. In the second dish, beat the eggs until smooth. Pour the breadcrumbs into the third dish. I prefer using panko breadcrumbs for extra crunch. This setup helps with even coating and makes the process easy. Heat oil in a large skillet over medium-high heat. You want about 1 inch of oil. Check the temperature; it should be around 350°F (175°C). Carefully add a few chicken nuggets to the hot oil. Don’t overcrowd the pan, or they won’t fry properly. Fry each side for about 4-5 minutes. Look for a golden brown color. When done, use a slotted spoon to take them out. Place them on a paper towel-lined plate to soak up excess oil. Enjoy the crunch! To make your chicken nuggets super crunchy, use panko breadcrumbs. They are larger and give a great texture. For more flavor, add some grated Parmesan cheese to the breadcrumbs. You can also double dip the chicken. First, coat it in flour, then egg, and again in breadcrumbs. This extra layer makes them crispier. One big mistake is overcrowding the pan. If you add too many nuggets, they won’t fry well. This can make them soggy instead of crispy. Make sure the oil is hot enough before you start frying. If it's not hot, the chicken will absorb too much oil and become greasy. Lastly, don’t skip the marinating step. It helps the chicken absorb all those tasty spices. For frying, use a heavy skillet or a deep fryer. A cast-iron skillet works great for even heat. You’ll also need a slotted spoon to remove the nuggets safely. Use a meat thermometer to check that your oil is at 350°F. This ensures perfect cooking. A wire rack is handy for cooling the nuggets after frying. It lets air circulate and keeps them crispy. You can find the full recipe for these crunchy herb-infused chicken nuggets online. {{image_2}} You can make chicken nuggets fun and tasty by adding different flavors. Here are a few easy ideas: - Crispy Parmesan: Add grated Parmesan cheese to the breadcrumbs. This gives a rich and cheesy flavor. - Spicy Kick: Mix cayenne pepper or chili powder into your spice blend. This adds heat for those who love spice. - Sweet and Sour: Add a bit of honey to your egg wash. This will make a sweet crust when you fry the nuggets. - Herb Medley: Try adding different herbs like basil or parsley. Fresh herbs can bring a new taste to the nuggets. Both baking and frying work well, but they offer different results. - Frying: - Pros: Fried nuggets have a golden color and crunchy texture. - Cons: Frying adds more oil and calories. You need to watch the temperature closely. - Baking: - Pros: Baking is healthier and easier. It requires less oil. - Cons: Baked nuggets may not be as crispy. You can spray them with oil for better crunch. You can easily adapt this chicken nugget recipe for different diets. Here are some swaps: - Gluten-Free: Use gluten-free flour and breadcrumbs. This helps keep the nuggets safe for those with gluten issues. - Dairy-Free: Omit any cheese and use non-dairy milk for the egg wash. This makes it suitable for dairy-free diets. - Low-Carb: Substitute chicken with cauliflower for a veggie nugget. This is great for low-carb diets and adds a new twist. Feel free to explore these variations. Each change can make your homemade chicken nuggets unique and delicious! For the full recipe, check out the Crunchy Herb-Infused Chicken Nuggets. To keep your homemade chicken nuggets fresh, let them cool first. Place them in an airtight container. Layer parchment paper between nuggets to prevent sticking. Store them in the fridge for up to three days. When you're ready to enjoy leftovers, heat them up. Preheat your oven to 375°F (190°C). Place nuggets on a baking sheet and bake for 10-15 minutes. This method keeps them crispy and tasty. You can also use an air fryer at 350°F (175°C) for about 8 minutes. Freezing is a great option for long-term storage. Once cooled, place nuggets in a single layer on a baking sheet. Freeze them for about an hour until firm. Then, transfer them to a freezer bag or container. They can last up to three months in the freezer. To cook, bake directly from frozen, adding a few extra minutes to your cooking time. For detailed steps, refer to the Full Recipe. To make chicken nuggets from scratch, start with fresh chicken. Cut two boneless, skinless chicken breasts into small pieces. In a bowl, mix the chicken with salt, pepper, garlic powder, onion powder, paprika, thyme, and oregano. Let it marinate for about 20 minutes. This step adds great flavor. Next, set up your breading station. Use three shallow dishes. Place flour in the first dish, beat eggs in the second, and pour breadcrumbs into the third. Now, take each chicken piece and dip it into the flour first. Shake off any excess. Then, dip it into the eggs, letting the extra drip off. Finally, coat it in breadcrumbs, pressing down to stick well. Once all chicken pieces are coated, heat oil in a large skillet over medium-high heat. When the oil is hot, fry the nuggets for about 4-5 minutes on each side. They should turn golden brown. Use a slotted spoon to take them out, placing them on a paper towel to remove excess oil. Enjoy your homemade chicken nuggets! For more details, check the Full Recipe. Yes, you can bake chicken nuggets instead of frying. Baking is a great way to make them healthier. To bake, preheat your oven to 400°F (200°C). After breading the chicken pieces, place them on a baking sheet lined with parchment paper. Spray or brush them lightly with oil for crispiness. Bake for about 20-25 minutes, flipping them halfway through. Ensure they turn golden brown and are fully cooked inside. Baking gives you a crunchy texture with less oil. Dipping sauces can elevate your chicken nugget experience. Here are some popular choices: - Honey mustard - Barbecue sauce - Ranch dressing - Sweet and sour sauce - Ketchup - Buffalo sauce - Garlic aioli Feel free to mix and match or create your own unique sauces! Enjoy trying different flavors with your homemade chicken nuggets. You can make tasty homemade chicken nuggets with simple ingredients and easy steps. We covered the main ingredients, spices, and even alternatives. I shared tips for perfect crunch and common mistakes to avoid. Plus, you learned about variations, storage, and reheating techniques. Now, you have all the tools to create your delicious chicken nuggets. Enjoy experimenting with flavors and impressing everyone at your table. Happy cooking!

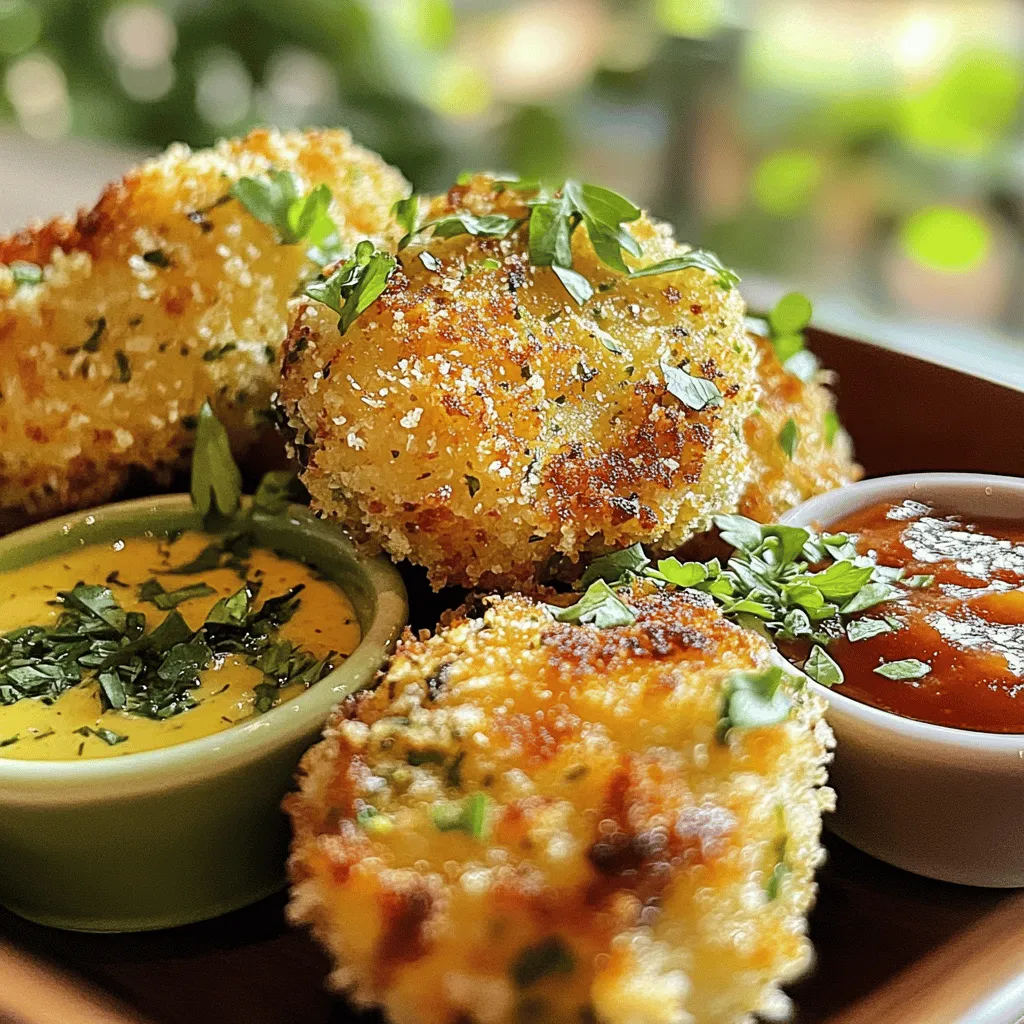
Are you craving crispy, homemade chicken nuggets that are easy to make? You’re in just the right place! I’ll guide you through a simple recipe that delivers crunch every time. …

Read more

Categories Appetizers

15-Minute Garlic Parmesan Chicken Quick and Easy Meal

June 22, 2025 by Chef Owen
To make this tasty dish, you need key ingredients. Here’s what you will need: - 2 boneless, skinless chicken breasts - 3 tablespoons olive oil - 4 cloves garlic, minced - 1/2 cup grated Parmesan cheese - 1 teaspoon Italian seasoning - Salt and pepper to taste - Fresh parsley, chopped (for garnish) - Lemon wedges (for serving) These ingredients work perfectly together. The chicken gives protein and texture. Olive oil adds richness. Garlic gives that great flavor. Parmesan cheese adds a salty, nutty taste. You can change this dish by adding some optional ingredients. Here are a few ideas: - Red pepper flakes for heat - Fresh herbs like basil or thyme - Lemon juice for extra zing - Sun-dried tomatoes for a sweet, tangy twist These extras can make your meal unique. Feel free to mix and match based on your taste. To cook this meal quickly, you will need some tools. Here’s a list: - A large skillet - A cutting board - A sharp knife - A spatula or tongs - Measuring spoons Using the right tools helps you cook faster and easier. Keep everything handy for smooth cooking. For the full recipe, check out the complete steps and tips. Start by drying the chicken breasts with a paper towel. This helps the seasonings stick. Next, season both sides with salt, pepper, and Italian seasoning. Use your hands to rub the spices in well. This step adds flavor and makes the chicken taste amazing. Heat a large skillet over medium-high heat. Add two tablespoons of olive oil when the pan is hot. Place the chicken breasts in the pan. Cook each side for about 5-6 minutes. Look for a golden-brown color. Once cooked, remove the chicken and set it aside. In the same skillet, add one tablespoon of olive oil and minced garlic. Sauté the garlic for 1-2 minutes until you smell its rich aroma. Make sure not to burn it! Lower the heat to medium-low, add the chicken back, and sprinkle with grated Parmesan cheese. Let the cheese melt for about 2 minutes. To serve, place the chicken on a plate. Drizzle the garlic sauce over the top. This adds flavor and looks great. Garnish with fresh parsley for a pop of color. Serve with lemon wedges on the side. The lemon adds a fresh zing to every bite. For the full recipe, check out the detailed instructions above. To get tender and juicy chicken, start with fresh, high-quality meat. Use boneless, skinless breasts for quick cooking. Pat them dry before seasoning. This helps the salt stick better. Always season well with salt and pepper. Searing the chicken in hot oil locks in juices. Cook each side for six minutes until golden brown. Garlic can easily burn, so keep an eye on it. Sauté minced garlic in oil for just one to two minutes. You want it fragrant, not brown. Adding it back to the pan with chicken gives a strong garlic taste. The Parmesan cheese adds a creamy texture and enhances the garlic flavor. This recipe serves two, but it’s easy to make more. Simply double the ingredients for four servings. You can cook multiple chicken breasts at once in a larger skillet. Adjust the cooking time slightly if you add more chicken. Just ensure the chicken is cooked through. Use a meat thermometer to check for 165°F in the center. {{image_2}} You can swap out some ingredients for a healthier meal. Use skinless chicken thighs instead of breasts for more flavor. Choose whole wheat pasta or zucchini noodles as a side. You can also replace olive oil with avocado oil. If you want to cut calories, use nutritional yeast instead of Parmesan cheese. This keeps the flavor but cuts down on fat. Fresh spinach or kale can add vitamins. Toss them in during the last minute of cooking. You can make this dish in many ways. Grilling adds a nice smoky taste. Just marinate the chicken with garlic and oil before grilling. Bake the chicken at 400°F for about 20 minutes. This keeps it juicy and tender. If you want to use an air fryer, cook it at 380°F for 12-15 minutes. Each method gives you a unique flavor and texture. Want to spice things up? Add red pepper flakes to the garlic sauce. This gives your meal a nice kick. You can also use fresh herbs like thyme or rosemary for a fragrant touch. Try adding lemon zest for a bright, fresh flavor. If you love Asian flavors, use soy sauce and ginger. This gives the dish a fun twist. Each option lets you express your taste. You can find the full recipe for 15-Minute Garlic Parmesan Chicken and explore these variations easily. After enjoying your 15-Minute Garlic Parmesan Chicken, store leftovers in an airtight container. This helps keep the chicken fresh. Make sure to let it cool first. If you leave it too warm, it can create steam and make the chicken soggy. To reheat, use a skillet over medium heat. Add a splash of olive oil to keep it moist. Heat for about 5 minutes, turning occasionally. This method helps the chicken stay juicy and keeps the garlic flavor strong. You can also use the microwave, but it may not keep the texture as nice. If you want to save the chicken for later, freezing works well. Wrap each piece tightly in plastic wrap. Then, place them in a freezer bag. This prevents freezer burn and keeps the chicken tasty. It can last up to three months in the freezer. When ready to use, thaw it overnight in the fridge before reheating. For the best flavor, do not freeze the garlic sauce separately; it may not taste as good once thawed. You can find the Full Recipe for 15-Minute Garlic Parmesan Chicken at the beginning of this article. Yes, you can use frozen chicken for this recipe. However, you need to thaw it first. Place the frozen chicken in the fridge overnight or use a microwave for quick thawing. This step is key for even cooking. Once thawed, follow the recipe as usual. Cooking time may vary slightly, so always check the internal temperature. To make Garlic Parmesan Chicken gluten-free, simply use gluten-free Italian seasoning. Check the Parmesan cheese label too. Most brands are gluten-free, but it's smart to confirm. You can also serve the chicken with gluten-free sides like rice or a salad. This way, you keep the meal safe and tasty for everyone. This dish pairs well with many sides. You can serve it with steamed veggies or a fresh salad. Mashed potatoes or rice also fit nicely. For a light option, try zucchini noodles or cauliflower rice. Each choice complements the garlic and cheese flavors well. This blog post covered the essentials for making 15-Minute Garlic Parmesan Chicken. We explored key ingredients and cooking tools you need. I shared step-by-step instructions to ensure tasty results. Tips and tricks helped you achieve tender chicken and rich flavor. In the end, whether you follow the recipe or try variations, you can create a delicious meal. Enjoy your cooking adventure!

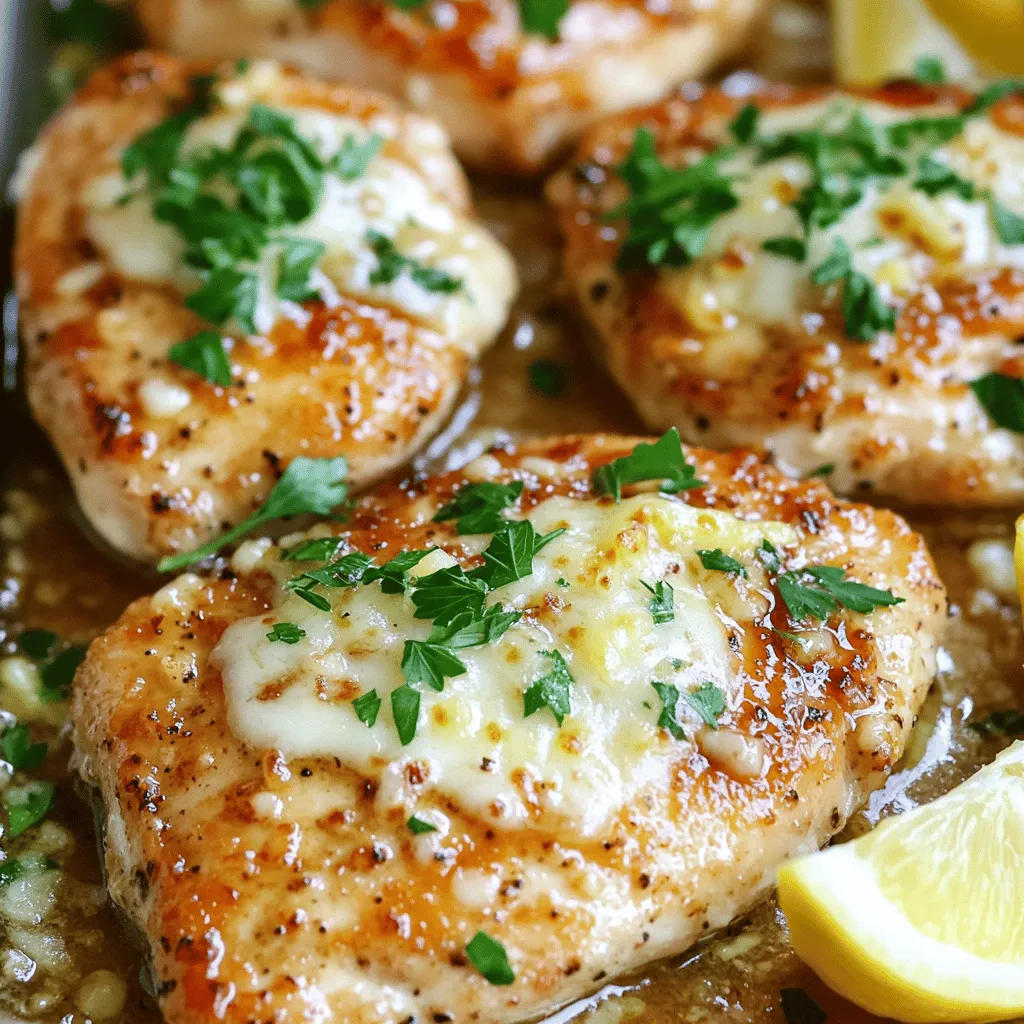
Are you ready for a quick meal that’s delicious and easy? This 15-Minute Garlic Parmesan Chicken is your solution! With just a few ingredients, you can whip up a tasty …

Read more

Categories Dinner
Older posts
Newer posts
← Previous Page1 … Page90 Page91 Page92 … Page125 Next →

THE RECIPE HATCH

Where tasty ideas take flight! 🚀🐣 Fresh, easy recipes hatched daily to make cooking simple and flavorful.

PAGES

Home About Contact Privacy Policy Terms & Conditions Cookie Policy GDPR Policy Copyright Policy Disclaimer

CATEGORIES

Appetizers Desserts Salads Breakfast Dinner

Contact

  • Pinterest
  • Mail
Copyright © 2026 The Recipe Hatch. All rights reserved.