Skip to content
The Recipe Hatch
  • Home
  • Appetizers
  • Desserts
  • Salads
  • Breakfast
  • Dinner
  • Privacy Policy
  • Contact
  • About

Chef Owen

Garlic Bread Grilled Cheese Delightfully Cheesy Dish

January 13, 2026June 26, 2025 by Chef Owen
- 4 slices of artisanal garlic bread - 2 cups shredded mozzarella cheese - 1 cup sharp cheddar cheese, shredded - 2 tablespoons unsalted butter - Fresh parsley for garnish - Marinara sauce for dipping - 2 cloves garlic, minced - Salt and pepper to taste The main ingredients make this dish shine. The garlic bread adds flavor and crunch. I love using artisanal bread, but store-bought works too. The mozzarella melts well, and the sharp cheddar gives it a nice bite. For the optional ingredients, I recommend using unsalted butter. It helps create a rich, golden crust. Garnish with fresh parsley for color and taste. A side of marinara sauce is perfect for dipping. The seasoning essentials are simple but key. Fresh garlic brings bold flavor. Salt and pepper balance the dish. Adjust to your taste. These ingredients ensure every bite is full of cheesy goodness. {{ingredient_image_2}} To start, you need to make garlic butter. In a small bowl, mix together: - 2 tablespoons unsalted butter, softened - 2 cloves garlic, minced - 1 tablespoon fresh parsley, finely chopped - Salt and pepper to taste Stir these ingredients until they blend well. Your kitchen will smell amazing! Next, take two slices of garlic bread. Spread half of the garlic butter on one side of each slice. Make sure to cover it well for good flavor. On the unbuttered side of one slice, layer: - 1 cup shredded mozzarella cheese - ½ cup shredded sharp cheddar cheese Spread the cheese evenly so it melts nicely. Place the second slice of garlic bread on top with the buttered side facing up. Now, it’s time to cook! Preheat a skillet over medium heat. Once hot, carefully place your sandwich in the pan. Cook for about 3-4 minutes on each side. You want the bread to turn golden brown and the cheese to melt inside. After cooking, let the sandwich rest for a minute. Slice it diagonally for easy eating. Enjoy your tasty creation! To get that golden brown crisp, use a good skillet. Preheat it on medium heat. Use unsalted butter to coat your bread. Butter both sides of the bread for a richer flavor. Cook for 3-4 minutes on each side. Keep an eye on it to avoid burning. If needed, lower the heat for a slower cook. This helps the cheese melt inside while the outside crisps up nicely. For the best melt, use a mix of cheeses. Mozzarella gives you that stretchy pull, while sharp cheddar adds a nice tang. Shred your cheese fresh for the best results. Pre-shredded cheese has additives that can affect melting. Layer the cheeses evenly, covering the bread fully. This ensures every bite is cheesy and gooey. You can boost the taste with extra seasonings. Try adding a pinch of red pepper flakes for warmth. A sprinkle of Italian herbs can also add depth. For fun, top your grilled cheese with sliced tomatoes or fresh spinach. These toppings add flavor and nutrition. Serve with marinara sauce for dipping to elevate your dish even more. Pro Tips Use Fresh Ingredients: Always opt for fresh garlic and parsley to enhance the flavor of your garlic butter mixture. Perfectly Melted Cheese: For an even melt, allow the cheese to come to room temperature before layering it on the bread. Control the Heat: If the bread browns too quickly, lower the heat to ensure the cheese melts thoroughly without burning the bread. Experiment with Cheeses: Feel free to mix different cheeses like fontina or gouda for a unique flavor profile. {{image_4}} You can easily change up your garlic bread grilled cheese. Adding spinach and tomatoes gives a fresh taste. Just sauté spinach until it wilts. Thinly slice ripe tomatoes and layer them on your sandwich. These veggies add color and nutrition. You can also try roasted peppers or artichokes. Each ingredient brings new flavors and textures. Get creative and find your favorite mix! If you want a vegan option, you can swap regular cheese for plant-based cheese. Many brands offer great vegan cheeses that melt well. You can also use vegan butter for spreading. This way, you still get that rich, buttery flavor. Try adding avocado for creaminess. It makes a tasty and satisfying meal while meeting dietary needs. You have two great ways to cook your garlic bread grilled cheese. Skillet cooking gives you a nice, crispy crust. Just heat your skillet to medium and cook each side for about four minutes. If you prefer oven-baked, preheat your oven to 400°F. Place the sandwiches on a baking sheet and bake for about 10-12 minutes. This method can cook several sandwiches at once. Both methods produce delicious results, so choose what works best for you! To store leftover garlic bread grilled cheese, wrap each sandwich in plastic wrap. Place it in an airtight container. This keeps the sandwich fresh. You can store it in the fridge for up to three days. When you want to eat it again, you’ll have tasty leftovers. To reheat your garlic bread grilled cheese, use a skillet on low heat. This helps keep the bread crispy while warming the cheese. Cook each side for about two to three minutes. You can also use the oven. Preheat it to 350°F (175°C) and bake for about 10 minutes. This method makes the bread nice and warm without losing its crunch. Yes, you can freeze grilled cheese! Wrap each sandwich tightly in plastic wrap. Then, place it in a freezer-safe bag. This keeps out air and prevents freezer burn. You can freeze them for up to three months. To enjoy, thaw in the fridge overnight, then reheat as mentioned above. This way, you can savor your garlic bread grilled cheese anytime! To make garlic bread grilled cheese from scratch, follow these steps: 1. Make Garlic Butter: In a small bowl, mix 2 tablespoons of softened butter, 2 cloves of minced garlic, and 1 tablespoon of finely chopped parsley. Add a pinch of salt and pepper. Stir until smooth. 2. Prepare the Bread: Take 4 slices of artisanal garlic bread. Spread half of the garlic butter on one side of each slice. 3. Add Cheese: On the unbuttered side of one slice, layer 1 cup of shredded mozzarella cheese and ½ cup of sharp cheddar cheese. 4. Assemble the Sandwich: Place another slice of garlic bread on top, buttered side up. 5. Cook: Heat a skillet over medium heat. Cook the sandwich for 3-4 minutes on each side until golden brown and the cheese melts. 6. Serve: Let it cool for a minute, then slice and enjoy! Yes! You can use various cheeses for your grilled cheese. Here are some ideas: - Provolone: Adds a mild, creamy flavor. - Gouda: Offers a rich and smoky taste. - Fontina: Melts beautifully for a gooey texture. - Pepper Jack: Adds a spicy kick. Feel free to mix and match your favorites for a unique flavor! Grilled cheese is great with many sides. Here are some tasty options: - Tomato Soup: A classic pairing that complements the cheese. - Pickles: The crunch and tang are refreshing. - Salad: A simple green salad adds freshness. - Chips: Crunchy chips add texture and fun. These sides make your meal more complete and enjoyable! In this post, I covered how to make delicious garlic bread grilled cheese. We explored essential ingredients like garlic bread and various cheeses. I provided clear steps for preparation, assembly, and cooking. You learned tips for perfect crispiness and flavor enhancement. We discussed fun variations and proper storage techniques. This dish is simple and can be tailored to fit your taste. Enjoy crafting your own tasty grilled cheese masterpiece!

Are you ready to elevate your sandwich game? This Garlic Bread Grilled Cheese is your new go-to comfort food. With four slices of artisanal garlic bread, tons of gooey cheese, …

Read more

Categories Dinner

Savory Spinach Stuffed Chicken Breasts Recipe Guide

June 26, 2025 by Chef Owen
To make spinach stuffed chicken breasts, gather these items: - 4 boneless, skinless chicken breasts - 2 cups fresh spinach, chopped - 1 cup ricotta cheese - 1/2 cup mozzarella cheese, shredded - 1/4 cup grated Parmesan cheese - 2 cloves garlic, minced - 1 teaspoon dried Italian herbs (oregano, basil, thyme) - Salt and pepper to taste - 2 tablespoons olive oil - 1 tablespoon lemon juice - Toothpicks or kitchen twine for securing You may want to adjust your recipe based on how many people you serve. Here’s a quick guide: - For 2 servings: Use 2 chicken breasts, and cut the other ingredients in half. - For 6 servings: Use 6 chicken breasts, and increase the other ingredients by 1.5 times. - For 8 servings: Use 8 chicken breasts, and double all ingredients. This way, your meal will always be just right for your guests! When choosing ingredients, I always prefer fresh. Fresh spinach gives a vibrant flavor and great texture. It also has more nutrients. Use frozen spinach if fresh isn’t available. Just make sure to thaw and drain it well. This prevents excess water in your filling. For cheeses, fresh ricotta and mozzarella melt better. They enhance the overall taste. Grated cheeses may be convenient, but they often lack freshness. Always choose quality for the best results. When you follow these tips, your spinach stuffed chicken breasts will shine with flavor! For the full recipe, click here. 1. Preheat the oven: Start by setting your oven to 375°F (190°C). This step prepares it for baking your chicken. 2. Make the filling: In a medium bowl, mix together 2 cups of chopped spinach, 1 cup of ricotta cheese, 1/2 cup of shredded mozzarella, 1/4 cup of grated Parmesan, 2 minced garlic cloves, 1 teaspoon of dried Italian herbs, and some salt and pepper. Stir until everything is well blended. 3. Prepare the chicken: Take 4 boneless, skinless chicken breasts. Use a sharp knife to cut a pocket in each breast. Be careful not to cut all the way through. Season the chicken with salt and pepper for added flavor. 4. Stuff the chicken: Spoon the spinach mixture into each chicken pocket. Press it in gently to ensure it stays inside. If needed, secure the opening with toothpicks or kitchen twine. 5. Sear the chicken: In a large, oven-safe skillet, heat 2 tablespoons of olive oil over medium-high heat. Add the stuffed chicken breasts and sear them for about 3-4 minutes per side until they turn golden brown. 6. Bake the chicken: Drizzle 1 tablespoon of lemon juice over the chicken. Then, transfer the skillet to the oven. Bake for 20-25 minutes, or until the chicken reaches an internal temperature of 165°F (75°C). 7. Rest before serving: Once done, take the skillet out of the oven and let the chicken rest for 5 minutes. This helps keep it juicy. - Consider visiting my blog for images of each step. You will find helpful visuals that show the entire cooking process and the final dish. Each image highlights the key steps. - Use a meat thermometer for accuracy. This tool ensures your chicken is fully cooked. - Let the chicken rest after baking. This step allows the juices to redistribute, making it tender. - If your filling leaks, try using more toothpicks or twine. This extra support helps keep everything secure. By following these steps, you will create a delicious spinach stuffed chicken breast. Enjoy this dish with family or friends! For the full recipe, check out the earlier section. For great stuffed chicken, start with plump, fresh chicken breasts. Look for breasts that are thick and even. Thicker pieces hold the filling better. Check for a pale pink color and smooth skin. Avoid any that appear slimy or have a strong odor. Organic or free-range chicken often tastes better, too. To stop the filling from leaking, cut a deep pocket in the chicken. Make sure not to cut all the way through. Pack the filling tightly into the pocket. If the opening is loose, use toothpicks or kitchen twine to secure it. Searing the chicken before baking helps seal in the juices. Having the right tools makes cooking easier. Use a sharp knife for cutting pockets. A medium bowl is perfect for mixing the filling. A large oven-safe skillet works great for searing. Don't forget a meat thermometer to check the chicken’s doneness. Lastly, keep your kitchen tidy with a cutting board and measuring cups. For a complete cooking experience, refer to the Full Recipe for more guidance. {{image_2}} You can change the filling based on your taste. Add cooked mushrooms for a rich flavor. Sun-dried tomatoes can give a sweet and tangy kick. For a spicy twist, try adding chopped jalapeños or red pepper flakes. You can also mix in feta cheese for a salty bite. Experimenting with different herbs like dill or cilantro can also make a big difference. Each choice adds its own flair to the spinach stuffed chicken. Baking is the most common method. It cooks the chicken evenly and keeps it juicy. Grilling gives a smoky flavor. Just be careful to not overcook the chicken on the grill. Slow cooking is great for a tender result. Just set the chicken in your slow cooker with the filling and let it cook low and slow. Each method can lead to a tasty meal, so choose based on your time and taste preferences. If you need a gluten-free option, you’re in luck! This recipe is naturally gluten-free. For a dairy-free version, swap the cheeses with vegan alternatives. You can use cashew cheese or a tofu-based filling. Always check labels to ensure no hidden gluten or dairy. These swaps allow everyone to enjoy delicious spinach stuffed chicken breasts, no matter their dietary needs. For the full recipe, check out the detailed instructions above. After you enjoy your spinach stuffed chicken breasts, store any leftovers right away. Place the chicken in an airtight container. This keeps moisture in and bacteria out. Make sure to cool the chicken to room temperature first. Do not leave it out for more than two hours. Store leftovers in the fridge for up to three days. To reheat your stuffed chicken, preheat your oven to 350°F (175°C). Place the chicken in an oven-safe dish and cover it with foil. This helps keep the chicken moist. Heat for about 20 minutes or until it reaches 165°F (75°C). You can also use the microwave; just heat for one to two minutes. Check often to avoid overcooking. If you want to save spinach stuffed chicken breasts for later, freezing is a great option. Wrap each stuffed chicken breast in plastic wrap first. Then, place them in a freezer-safe bag or container. You can freeze them for up to three months. When ready to eat, thaw them in the fridge overnight before reheating. This keeps the chicken tasty and safe to eat. You can tell if the chicken is done by using a meat thermometer. The thickest part of the breast should reach 165°F (75°C). If you don’t have a thermometer, cut into the chicken. The meat should be white, not pink. Juices should run clear. Cooking time varies based on the size of the chicken breasts. Always check a few pieces if cooking multiple. Yes, you can prep these chicken breasts ahead of time. Stuff them and store them in the fridge for up to 24 hours. This saves time on busy nights. Just remember to bring them to room temperature before cooking. This helps them cook evenly. You can also freeze them before cooking. Just wrap them well and store them for up to three months. Thaw in the fridge overnight before cooking. Spinach stuffed chicken breasts go well with many sides. Here are some tasty options: - Garlic mashed potatoes - Roasted vegetables - Quinoa salad - Steamed green beans - Caesar salad These sides add color and flavor to your meal. They also balance the rich filling of the chicken. For more ideas, try pairing with a light pasta dish, or a fresh fruit salad. Enjoy exploring these combinations with your stuffed chicken! We explored how to make delicious spinach stuffed chicken breasts. You learned about ingredients, cooking steps, and tips for success. Remember to try different stuffing options and cooking methods to keep your meals fresh. Storing leftovers properly can save you time later. With these guidelines, you can enjoy a tasty and healthy dish anytime. Happy cooking!

Are you ready to impress your family with a delicious meal? This Savory Spinach Stuffed Chicken Breasts Recipe Guide will show you how to make a tasty dinner that’s easy …

Read more

Categories Dinner

Corn and Cherry Tomato Quiche Flavorful and Easy Recipe

June 26, 2025 by Chef Owen
To make a great Corn and Cherry Tomato Quiche, you need a few key items. Here’s what you should gather: - 1 pre-made pie crust (9-inch) - 1 cup fresh corn kernels (you can also use frozen) - 1 cup cherry tomatoes, halved These ingredients form the base of your quiche. The pie crust holds everything together. Fresh corn adds sweetness, and cherry tomatoes bring a burst of flavor. Next, we need some creamy and rich ingredients. These will enhance the taste and texture of your quiche. Gather these: - 3 large eggs - 1 cup heavy cream - 1 cup shredded Gruyère cheese The eggs and cream create a smooth filling. Gruyère cheese adds a nutty flavor that pairs well with the vegetables. Herbs and spices elevate the quiche to new heights. Here’s what to include: - 1 tablespoon fresh basil, chopped (or 1 teaspoon dried basil) - 1 teaspoon garlic powder - Salt and pepper to taste Fresh basil gives a bright, aromatic taste. Garlic powder adds depth, while salt and pepper balance the flavors. For the complete recipe, check out the Full Recipe. Enjoy creating this delicious dish! First, preheat your oven to 375°F (190°C). This step is key for a perfect quiche. While the oven heats, grab a skillet. Heat 1 tablespoon of olive oil over medium heat. Add 1 cup of fresh corn kernels. If you use frozen corn, that works too! Sauté for about 3-4 minutes. You want the corn to be tender, so keep an eye on it. Season with salt, pepper, and 1 teaspoon of garlic powder. Once done, take the skillet off the heat. Now, let’s make the egg filling. In a mixing bowl, whisk together 3 large eggs and 1 cup of heavy cream. This mix makes your quiche rich and creamy. Add 1 tablespoon of fresh chopped basil or 1 teaspoon of dried basil for flavor. Season with a pinch of salt and pepper. Whisk until the mixture is smooth and well combined. Next, it’s time to assemble. Take your pre-made 9-inch pie crust and place it in a pie dish. Use a fork to poke several holes in the bottom. This helps avoid a soggy crust. Evenly spread the sautéed corn and halved cherry tomatoes—1 cup—in the crust. Pour the egg and cream mix over the veggies until just covered. Finally, sprinkle 1 cup of shredded Gruyère cheese on top. Now, bake your quiche in the preheated oven for 35-40 minutes. Look for a set filling and a slightly golden top. To check doneness, gently shake the pie dish. If it wobbles in the center, let it bake a bit longer. Once done, take it out and let it cool for about 10 minutes before slicing. Enjoy your tasty Corn and Cherry Tomato Quiche! For the full recipe, check out the recipe section above. To avoid a soggy crust, bake the crust for a few minutes before adding filling. This step helps set the base and keeps it crisp. Make small holes with a fork in the crust to let steam escape. For a fluffier texture, whisk the eggs well. Use room temperature eggs and heavy cream for a smoother mix. You can add different cheeses to make your quiche unique. Try feta for a tangy bite or cheddar for a sharp flavor. Mixing in more vegetables also boosts taste and nutrition. Spinach, bell peppers, or zucchini work great. Just sauté them first to reduce moisture. Garnish your quiche with extra chopped basil for a fresh look. You can also add a sprinkle of cheese on top before serving. Pair your quiche with a simple green salad for a light meal. A citrus vinaigrette adds a nice zing. For a heartier option, serve with roasted potatoes or a grain salad. For the full recipe, check the earlier section. {{image_2}} You can change up the flavors in your Corn and Cherry Tomato Quiche by using different vegetables. Try adding spinach, bell peppers, or zucchini. Each gives a new taste and color. You can also mix in some sautéed onions for a sweet touch. If you want to add meat or protein, consider diced ham or cooked bacon. These options give your quiche a heartier feel. For a vegetarian twist, use chickpeas or tofu for protein. The key is to balance the flavors and keep the filling moist. For those who need gluten-free options, you can make a crust using almond flour or gluten-free flour. This keeps your quiche tasty while meeting dietary needs. You can also use a crustless version. Just pour the filling directly into a greased pie dish. If you need dairy-free alternatives, swap out heavy cream for coconut milk or almond milk. You can also use vegan cheese or nutritional yeast in place of Gruyère cheese. These swaps keep the quiche creamy and flavorful without dairy. Feel free to explore these variations and make the quiche your own! For a detailed guide on the basic recipe, check out the Full Recipe. To keep your Corn and Cherry Tomato Quiche fresh, store it in the fridge. Wrap it tightly in plastic wrap or place it in an airtight container. This helps to keep moisture in and flavors strong. It will last for 3 to 5 days in the fridge. When you're ready to reheat, use an oven or toaster oven. Preheat it to 350°F (175°C). Place the quiche on a baking sheet and cover it with foil. Heat for about 15-20 minutes, or until warm throughout. This method keeps the crust crispy and the filling creamy. You can freeze this quiche for later, which is great for meal prep. Let the quiche cool completely before freezing. Wrap it tightly in plastic wrap and then in aluminum foil. This double layer prevents freezer burn. You can store it in the freezer for up to 3 months. To thaw, place the quiche in the fridge overnight. This allows it to defrost slowly and evenly. After thawing, reheat the quiche in the oven at 350°F (175°C) for about 20-25 minutes. Remove the foil during the last 10 minutes for a crispy top. If you want to enjoy this dish later, consider following the Full Recipe to ensure the best results. If you don't have Gruyère cheese, you can use other types. Swiss cheese works well. Cheddar cheese can add a sharp flavor. You might also try mozzarella for a milder taste. Each cheese brings its unique flavor. This change can slightly alter the taste of your quiche. Yes, you can make this quiche ahead. Prepare it, bake it, and let it cool. After that, cover it tightly. Store it in the fridge for up to three days. When ready to eat, reheat in the oven. This keeps the crust crispy and the filling warm. A few signs tell you when the quiche is done. The top should be golden brown. The filling should be set, not jiggly. You can check the center with a knife. If it comes out clean, it’s ready. For safety, the internal temperature should reach 165°F (74°C). You can create a delicious corn and cherry tomato quiche with simple steps. Start with a premade crust and fresh ingredients like corn and tomatoes. Mix eggs, cream, and cheese for a rich filling. Sauté the corn and layer everything nicely before baking. Experiment with herbs and spices to enhance flavor. Remember, you can customize ingredients to suit your taste. Follow my tips to avoid soggy crusts and achieve a fluffier texture. With proper storage, enjoy this dish again later. Quiche is versatile and perfect for any meal. Happy cooking!

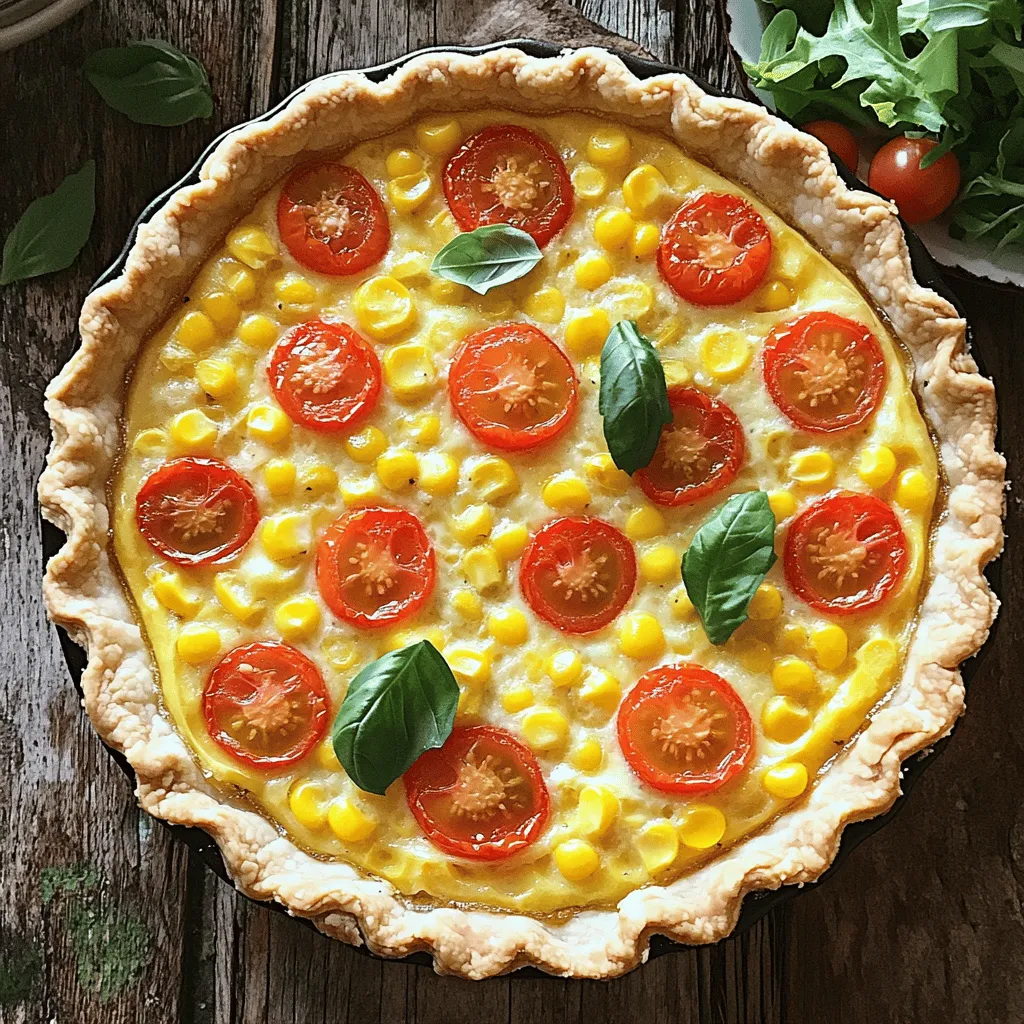
Looking for a delicious dish that’s both easy to make and will impress your family? This Corn and Cherry Tomato Quiche is packed with fresh flavors and simple ingredients. With …

Read more

Categories Dinner

Peach Pudding Delight Creamy and Sweet Dessert Recipe

June 26, 2025 by Chef Owen
- Ripe peaches - Granulated sugar - Almond milk (or milk of choice) The main ingredients are crucial for making this dessert. Ripe peaches give the pudding its sweet and fruity flavor. I love using fresh, juicy peaches. They make the dish pop! Granulated sugar adds sweetness and enhances the natural peach flavor. Almond milk keeps the pudding creamy and dairy-free. You can use any milk you prefer. - Cornstarch - Vanilla extract - Ground cinnamon Cornstarch is the key to a thick, creamy pudding. It helps bind the ingredients together. Vanilla extract brings out the sweetness and adds depth. Ground cinnamon gives a warm, cozy flavor. This mix of tastes makes the pudding extra special. - Whipped cream - Fresh mint leaves Garnishes can really elevate your dish. A dollop of whipped cream adds a light touch on top. Fresh mint leaves give a nice green pop and a hint of freshness. You can also add a slice of peach for a beautiful look. These little touches make your Peach Pudding even more delightful. Check out the Full Recipe for more details on how to create this sweet treat. First, peel and dice the ripe peaches into small pieces. Use a sharp knife for this task to make it easier. Place the diced peaches in a medium bowl. Add 1/4 cup of granulated sugar and 1 tablespoon of lemon juice. Stir gently to mix. Let this sit for about 10 minutes. This time allows the peaches to soften and release their natural juices. The sugar will help create a sweet syrup. Next, take a separate bowl. In it, combine 2 tablespoons of cornstarch, 1/4 teaspoon of salt, 2 cups of almond milk, the remaining 1/4 cup of sugar, and 1/4 teaspoon of ground cinnamon. Whisk these ingredients together until the mixture is smooth. This will be the base of your pudding. Now, place the saucepan with the prepared peaches over medium heat. Cook for about 5 minutes, stirring occasionally. You want the mixture to start bubbling. Once it bubbles, slowly pour in the cornstarch mixture you prepared earlier. Keep stirring as you pour. Continue to cook for 5 to 7 minutes or until the mixture thickens. It should have a pudding-like consistency. Once ready, remove the saucepan from the heat and stir in 1 teaspoon of vanilla extract. Allow the pudding to cool for a few minutes. Then, transfer it into bowls or ramekins. Cover with plastic wrap and refrigerate for at least 2 hours. This will help the pudding set and chill perfectly. For the full recipe, check the detailed instructions provided above. Whisking the cornstarch mixture is key to a smooth pudding. Mix it well to avoid lumps. Cook the mixture until it bubbles. This shows it is thickening nicely. If you rush this step, the pudding can turn out too runny. You can add spices to boost the taste. A pinch of nutmeg or ginger works wonders. If you want a different sweetener, try honey or maple syrup. They add a unique twist to the flavor. Serve each pudding with a dollop of whipped cream. It adds creaminess and a nice look. For a pop of color, add sliced peaches on top. Fresh mint leaves also make a lovely garnish. {{image_2}} You can change peach pudding into a peach bread pudding. For this, use bread instead of cornstarch. Use about 4 cups of cubed bread. Mix the bread with the diced peaches, sugar, and some milk. Let it soak for a while. Then bake it instead of cooking on the stove. This gives a different texture and flavor. You might enjoy this twist on the classic dish. If you prefer, you can make peach cobbler instead. Cobbler uses a biscuit or cake-like topping instead of a pudding base. The cooking method is different too. You bake it in the oven. The result is a warm, sweet dessert with a crunchy top. It pairs well with ice cream or whipped cream. This is a great option if you want something baked. Feel free to experiment with flavors. You can add berries like blueberries or raspberries. They mix well with peaches and add a nice tartness. Other fruits like apples or pears work too. Try combining different fruits for a unique flavor. You can also add spices like nutmeg or ginger for an extra kick. This way, you can create many tasty versions of your peach pudding. For the full recipe, check out Peachy Dream Pudding. To keep your peach pudding fresh, use airtight containers. Glass or plastic containers work well. If you have small servings, use smaller containers for easy access. Store the pudding in the fridge. It stays good for up to three days. Reheat your peach pudding gently. Use the microwave for quick heating. Start with 20 seconds, then check if it’s warm. Stir well to avoid hot spots. You can also use a small saucepan on low heat. Stir frequently until warm. You can freeze peach pudding for later. First, let it cool completely. Then, transfer it to a freezer-safe container. Leave some space at the top for expansion. It can last for up to three months in the freezer. Thaw it overnight in the fridge before serving again. To make Peach Pudding vegan, swap the almond milk for a plant-based milk. You can use oat milk, soy milk, or coconut milk. Instead of granulated sugar, try using maple syrup or agave nectar. These swaps keep the pudding creamy and sweet. If you don’t have peaches, you can use other fruits. Fresh or frozen strawberries, blueberries, or ripe bananas work well. You can also try mangoes or apricots for a fun twist. Each fruit brings its own flavor to the pudding. Peach Pudding stays fresh in the fridge for about three days. Store it in an airtight container for the best results. This helps keep it cool and tasty. Enjoy it cold for a refreshing treat! Peach pudding is easy and fun to make with just a few key ingredients. You begin with ripe peaches, sugar, and your choice of milk. Mixing these with cornstarch and spices creates a delicious treat. You can even try variations like peach bread pudding. Remember to store leftovers well and enjoy your pudding for days. With these tips, you can create a delightful dessert that everyone loves. Enjoy your cooking journey!

Get ready to treat yourself to a delightful dessert! This Peach Pudding is creamy, sweet, and packed with flavor. With just a few simple ingredients like ripe peaches, sugar, and …

Read more

Categories Desserts

Grilled Mexican Street Corn Flavorful and Easy Recipe

June 26, 2025 by Chef Owen
To make this dish, gather these key ingredients: - 4 ears of corn, husked - 1/2 cup mayonnaise - 1/2 cup crumbled cotija cheese (or feta cheese) - 1 tablespoon chili powder - 1 teaspoon smoked paprika - 1/2 teaspoon garlic powder - 2 tablespoons fresh lime juice - 2 tablespoons chopped fresh cilantro - Salt and pepper to taste - Lime wedges for serving These ingredients combine to create the rich and zesty flavors of grilled Mexican street corn. Each item plays a vital role in making the dish tasty and fun. You can personalize your grilled corn with these options: - Hot sauce for extra heat - Avocado, sliced or diced - Fresh herbs like parsley or green onions - Additional cheeses like queso fresco Feel free to mix and match these ingredients. This allows you to create a version of the dish that suits your taste. Each serving of grilled Mexican street corn contains: - Calories: 350 - Total Fat: 22g - Saturated Fat: 4g - Cholesterol: 15mg - Sodium: 300mg - Total Carbohydrates: 30g - Dietary Fiber: 4g - Sugars: 6g - Protein: 8g This information helps you understand what you eat. Enjoy this delight while keeping an eye on your dietary needs. You can find the full recipe [here](#). First, get your corn ready. You want to husk the corn and take off all the silk. This step is key for even grilling. Make sure you rinse the corn under cold water to remove any dirt. It’s a good idea to dry the corn with a towel. Now, heat your grill to medium-high. This temperature helps the corn cook well. Place the husked corn on the grill. Turn the corn every few minutes. You want it charred all over. The corn usually takes about 10 to 15 minutes to grill. Look for a nice golden-brown color for the best taste. Once the corn is done, let it cool a bit. In the meantime, mix the toppings. Take a small bowl and combine mayonnaise, chili powder, smoked paprika, garlic powder, lime juice, salt, and pepper. Use a brush or spoon to coat each ear of corn with this mix. Sprinkle crumbled cotija cheese on top. Finish with fresh cilantro and a bit more chili powder. Serve your corn warm with lime wedges on the side. For the full recipe, check out the complete instructions. Grilling corn is simple, but a few tips can help. Always start with fresh corn. Look for bright green husks and plump kernels. This will give you the best flavor. Preheat your grill to medium-high heat. This helps create a nice char. Turn the corn every few minutes while grilling. This ensures even cooking and browning all around. To boost the taste, mix your toppings well. Use creamy mayonnaise and zesty lime juice for a tangy base. Add chili powder and smoked paprika for heat and depth. Cotija cheese adds a savory touch. If you want more zest, squeeze fresh lime juice over the corn before serving. Fresh cilantro gives a bright finish, enhancing every bite. Avoid these mistakes to perfect your grilled corn. First, don’t skip husking the corn. Leaving husks can lead to uneven cooking. Also, don’t let the corn sit too long on the grill. This can cause it to dry out. Finally, don’t hold back on the toppings. Generous layers of sauce and cheese make the flavor pop. For the full recipe, check out the Spicy Fiesta Grilled Mexican Street Corn . Enjoy the process and the burst of flavors! {{image_2}} You can mix up the flavors for grilled Mexican street corn. Try adding some fresh herbs. Chopped basil or parsley can bring a new twist. You can also use different spices. For a smoky taste, try adding cumin or smoked paprika. Some people like a bit of sweetness. A drizzle of honey or agave syrup can do the trick. You can even use flavored mayonnaise. Chipotle mayo adds a nice kick. Cotija cheese is traditional, but there are great alternatives. Feta cheese works well if you can't find cotija. It has a similar salty flavor. Parmesan cheese can also be a great choice. It melts nicely and adds a rich taste. If you want a creamier texture, try goat cheese. It has a tangy flavor that pairs well with corn. You can also sprinkle some shredded cheddar for a different bite. Spice levels can be adjusted to fit your taste. If you like it spicy, add more chili powder or some cayenne pepper. For a milder flavor, reduce the chili powder. You can also leave it out and focus on the cheese and lime. To cool it down, add more mayonnaise or sour cream. This will balance the heat and make it creamy. Don’t forget to taste as you go. This way, you can find the perfect spice level for you. To store leftover grilled corn, wait for it to cool down. Wrap each ear in plastic wrap or foil. You can also place it in an airtight container. This way, it stays fresh for up to three days in the fridge. When you are ready to eat the corn, you can reheat it easily. Preheat your grill or a skillet to medium heat. Place the corn on the grill or skillet for about five minutes, turning it often. This helps it regain its charred flavor and keeps it juicy. If you want to freeze grilled corn, wrap it tightly in plastic wrap. Then, place it in a zip-top bag. Remove as much air as possible before sealing. Grilled corn can last up to three months in the freezer. When you are ready to eat it, thaw it in the fridge overnight before reheating. The best corn for grilling is sweet corn. Look for fresh ears with bright green husks. The kernels should be plump and firm. My favorite variety is the bi-color corn, which has a mix of yellow and white kernels. This corn is sweet, juicy, and perfect for grilling. Always choose corn that feels heavy for its size. Freshness makes a big difference in taste. Yes, you can prepare grilled Mexican street corn ahead of time. Grill the corn and let it cool. Once cooled, wrap it in foil or store it in an airtight container. Keep it in the fridge for up to two days. When you're ready to serve, simply reheat it on the grill or in the oven. This method keeps the flavor intact while saving time. You can grill corn without a grill! Use a stovetop grill pan or an oven. If using a grill pan, heat it over medium-high heat. Cook the corn for about 10-15 minutes, turning often. For the oven, place husked corn on a baking sheet. Roast it at 400°F for about 25 minutes, turning halfway. Both methods give you that delicious char flavor found in grilled corn. Grilled Mexican street corn is a fun and tasty dish. We explored the key ingredients, helpful tips, and various ways to customize your corn. Remember to choose the right corn and toppings for the best flavor. Experiment with different spices and cheeses to find your favorite combination. Store your leftovers correctly to enjoy later. Grilled corn is easy to make and so delicious. Try it out, and enjoy this vibrant treat at your next meal!

Are you ready to elevate your summer BBQs? Grilled Mexican Street Corn is a must-try! This flavorful and easy recipe combines smoky grilled corn with zesty toppings. Perfect for impressing …

Read more

Categories Appetizers

Shrimp Frittata Flavorful and Easy Breakfast Option

June 26, 2025 by Chef Owen
When making a shrimp frittata, gather these simple ingredients: - 8 large eggs - 1 cup cooked shrimp, chopped - 1 cup fresh spinach, roughly chopped - 1 medium onion, finely chopped - 1/2 cup bell pepper, diced (any color) - 1/2 cup cherry tomatoes, halved - 1/4 cup grated Parmesan cheese - 2 tablespoons olive oil - Salt and pepper to taste - Fresh parsley, chopped (for garnish) These ingredients create a tasty meal that is rich in protein and full of flavor. The eggs serve as a great base. They hold everything together, giving you a fluffy texture. The shrimp adds a lovely seafood taste. The spinach, onions, and peppers bring in color and nutrients. Cherry tomatoes add a burst of sweetness. Lastly, the Parmesan cheese gives a savory kick. A serving of this shrimp frittata offers a balanced meal. Each serving contains about: - Calories: 320 - Protein: 25g - Carbohydrates: 8g - Fat: 22g This meal is high in protein and healthy fats. It keeps you full and satisfied. To make the shrimp frittata, you'll need a few key tools: - Large skillet - Mixing bowl - Whisk - Oven-safe spatula - Oven Using the right tools helps make the cooking process smooth. A large skillet ensures even cooking. A mixing bowl and whisk help you blend the eggs well. An oven-safe spatula is handy for flipping and serving. These tools make your cooking experience easier and more fun. For the full recipe, check out the steps in the recipe section. Start by gathering all your ingredients. You need: - 8 large eggs - 1 cup cooked shrimp, chopped - 1 cup fresh spinach, roughly chopped - 1 medium onion, finely chopped - 1/2 cup bell pepper, diced (any color) - 1/2 cup cherry tomatoes, halved - 1/4 cup grated Parmesan cheese - 2 tablespoons olive oil - Salt and pepper to taste - Fresh parsley, chopped (for garnish) Next, preheat your oven to 375°F (190°C). This step warms the oven for baking later. Chop the shrimp, spinach, onion, bell pepper, and tomatoes as listed above. Set your chopped veggies aside in a bowl. Heat the olive oil in a large skillet over medium heat. Once hot, add the chopped onion and bell pepper. Sauté for about 4-5 minutes until they soften. You want to see them get a bit tender. Now add the chopped spinach and halved cherry tomatoes. Cook for another 2 minutes until the spinach wilts. Stir the mixture occasionally. This step builds great flavor and color in your frittata. In a mixing bowl, whisk together the eggs, salt, and pepper. Then, stir in the chopped shrimp and grated Parmesan cheese. Make sure everything combines well. Pour the egg mixture over the sautéed vegetables in the skillet. Cook on the stovetop for about 3-4 minutes. You will notice the edges starting to set. Carefully transfer the skillet to your preheated oven. Bake for 10-12 minutes. The frittata should puff up and feel firm in the center when done. Once it’s cooked, remove the skillet from the oven. Let the frittata cool for a couple of minutes. This resting time makes slicing easier. Finally, slice into wedges, garnish with fresh parsley, and serve warm. Enjoy your delicious shrimp frittata! For a detailed guide, check the Full Recipe. When choosing shrimp, freshness is key. Look for shrimp that smell clean and mild. If you can, buy shrimp that is wild-caught. This type often has better taste. You can choose large or medium shrimp, depending on your preference. Always check for a firm texture and avoid shrimp with black spots. To get the best texture, don’t overcook the shrimp. Cook them just until they turn pink. This usually takes about 2-3 minutes. If you use frozen shrimp, thaw them beforehand. You can quickly run them under cold water. Once cooked, mix them gently into the egg mixture. This helps keep them tender. Seasoning makes a big difference in your frittata. Start with salt and pepper, but feel free to experiment. You can add a pinch of paprika for warmth or a dash of cayenne pepper for spice. Fresh herbs like dill or chives add a nice touch too. Don’t forget to sprinkle some extra Parmesan on top before baking. This gives a great crust and extra flavor. For a full guide, check the Full Recipe. {{image_2}} You can change up the veggies in your shrimp frittata easily. Use what you have! Try adding mushrooms, zucchini, or asparagus. You can also toss in some broccoli or kale for extra greens. Each veggie gives a new taste and texture. Just remember to chop them small so they cook well. Sauté them with the onion and bell pepper to bring out their flavors. If shrimp isn’t your thing, no worries! You can swap it for other proteins. Cooked crab, diced ham, or even bacon work great. For a vegetarian twist, try using chickpeas or tofu. Each option adds its own flair. Just make sure you cook any raw protein before adding it to the eggs. Cheese can take your frittata to the next level. While Parmesan is a classic choice, you can try others too. Feta cheese adds a tangy flavor. Cheddar gives a bold taste. Goat cheese offers creaminess that melts beautifully. Mix and match cheeses for a fun twist. Just keep the amount similar to the Parmesan in the full recipe. To store leftover shrimp frittata, let it cool first. Cut it into slices. Place the slices in an airtight container. You can keep it in the fridge for up to three days. This way, you can enjoy your frittata later! When you want to eat your leftovers, take out a slice. You can reheat it in the microwave for about one to two minutes. If you prefer, you can also warm it in a skillet over low heat. This keeps the frittata nice and tasty. If you want to keep shrimp frittata longer, freezing is a great option. Wrap each slice tightly in plastic wrap. Then, place them in a freezer-safe bag. You can freeze them for up to three months. To eat, thaw it overnight in the fridge and reheat as usual. Enjoying shrimp frittata is easy and fun, even days later! For the full recipe, check out the earlier section. You can serve many things with shrimp frittata. Fresh fruit adds a bright touch. Toast pairs well for a crunch. A light salad gives a nice balance. Try avocado for creaminess. You could even add a dollop of salsa for a spicy kick. These sides make the meal more colorful and fun. Yes, you can make a shrimp frittata ahead of time. It keeps well in the fridge for about three days. Just let it cool and wrap it tightly. You can reheat it in the oven or microwave. It tastes great warm or at room temperature. This makes it a great option for busy mornings. Yes, you can make a frittata without eggs. Use chickpea flour instead to create a similar dish. Mix chickpea flour with water and spices to form a batter. This mixture can be cooked like a regular frittata. It gives you a tasty and egg-free option. You can still add shrimp and veggies for flavor. For the full recipe, check out the Shrimp & Spinach Frittata section. A shrimp frittata is simple and tasty. We covered the key ingredients, cooking steps, and storage tips. You learned how to choose shrimp and enhance flavors. Plus, we explored variations to suit your taste. Use these ideas to create your own frittata. Enjoy making this dish for meals or snacks. It’s a great way to share healthy food with friends and family. Let your creativity shine in the kitchen!

Looking for a quick and tasty breakfast? Try my Shrimp Frittata! It’s packed with flavor and so easy to make. You’ll love the combination of shrimp, fresh veggies, and cheese. …

Read more

Categories Breakfast

Cornmeal Cheddar Tomato Cobbler Tasty Comfort Dish

June 26, 2025 by Chef Owen
- 4 cups ripe tomatoes, chopped - 1 tablespoon olive oil - 1 teaspoon sugar - 1 teaspoon salt - 1/2 teaspoon black pepper - 1 teaspoon dried oregano - 1/2 teaspoon garlic powder - 1 cup cornmeal - 1 cup all-purpose flour - 1 tablespoon baking powder - 1/2 teaspoon baking soda - 1 cup shredded sharp cheddar cheese - 1 cup buttermilk or milk - 1/4 cup unsalted butter, melted - Fresh basil, for garnish The key to a great Cornmeal Cheddar Tomato Cobbler is in the fresh ingredients. I love using ripe tomatoes because they bring sweetness. The olive oil adds richness, while salt and sugar balance the flavors. I like to sprinkle in black pepper and dried oregano for a punch of taste. Garlic powder rounds it out nicely. For the batter, cornmeal gives it a nice texture. I mix it with all-purpose flour to make it light. Baking powder and baking soda help it rise and get fluffy. Sharp cheddar cheese adds a wonderful flavor and creaminess. I always use buttermilk for its tangy taste and moisture. Finally, butter makes everything taste better. These ingredients work together to create a comforting dish. If you want to try making this yourself, you can check the Full Recipe for all the steps. Enjoy the process and the delicious results! To start, heat olive oil in a large skillet over medium heat. Add the chopped tomatoes, sugar, salt, black pepper, dried oregano, and garlic powder. Cook this mixture for about 5-7 minutes. You want the tomatoes to soften and let their juices flow. This step is key. It builds a rich flavor base for your cobbler. Once ready, remove the skillet from the heat and set the mixture aside. In a separate bowl, combine the cornmeal, all-purpose flour, baking powder, and baking soda. Whisk these dry ingredients together until they blend well. Next, stir in the shredded sharp cheddar cheese. This adds a nice cheesy flavor and texture. In another bowl, mix the buttermilk (or milk) with the melted butter. Pour this wet mixture into the dry ingredients. Stir gently until just combined. Avoid overmixing; this keeps the cornbread light and fluffy. Grab a greased baking dish, about 9x13 inches. Pour the tomato mixture into the dish first. It’s important to spread it evenly. Next, spoon the cornbread batter over the tomato layer. Spread it gently to cover as much as possible. Now, it’s time to bake! Place the dish in a preheated oven at 400°F (200°C). Bake for 25-30 minutes. The top should turn golden brown. To check for doneness, insert a toothpick in the center. If it comes out clean, your cobbler is ready. Let it cool slightly before serving, and enjoy this tasty comfort dish! To make your Cornmeal Cheddar Tomato Cobbler even tastier, add fresh herbs. Basil and thyme work wonders. You can also use dried herbs like oregano, which add depth. For spices, a pinch of red pepper flakes brings a nice kick. When it comes to cheese, sharp cheddar is your best bet. Its bold flavor shines through. You can also mix in Monterey Jack for creaminess. If you love blue cheese, just a little can add a unique twist. Preventing sogginess is key for a great cobbler. First, use firm, ripe tomatoes. Remove extra seeds and juice before cooking. This keeps your filling from getting too watery. Cook the tomatoes just until soft, not mushy. To achieve a golden brown top, make sure your oven is fully preheated. Bake at 400°F (200°C) for 25-30 minutes. If the top isn't browning, switch to broil for a minute. Watch closely to avoid burning. For the full recipe, refer to the earlier section. {{image_2}} You can switch up the tomatoes and cheese in this dish. If you want a twist, use roasted red peppers or sun-dried tomatoes instead of fresh tomatoes. For cheese, try mozzarella or a milder cheddar. These swaps will change the taste, making it fun to experiment. If you need a gluten-free option, use gluten-free flour instead of all-purpose flour. Almond flour or a blend of rice and chickpea flour works well too. Just keep in mind that the texture may vary slightly with these alternatives. You can go sweet or savory with this cobbler. If you like sweet, add a bit of honey or maple syrup to the batter. This sweetness pairs well with tomatoes. For a savory twist, mix in some cooked bacon or sausage into the tomato layer. Adding spices like cayenne pepper can also give it a nice kick. Want to boost the veggie game? Toss in spinach, zucchini, or bell peppers with the tomatoes. These will add color and nutrition. Just make sure to chop them small and cook them a bit before adding. This keeps the cobbler from getting too watery. To keep your cornmeal cheddar tomato cobbler fresh, store it in the fridge. Place it in an airtight container. This helps prevent it from drying out. You can keep it for about 3-4 days. If you want to store it longer, freezing is a great option. For freezing, make sure it cools completely first. Cut it into slices for easy thawing later. Wrap each slice tightly in plastic wrap. Then, place them in a freezer-safe bag. This way, you can enjoy it for up to three months. When it's time to enjoy your cobbler again, reheating is key. The best method is using an oven. Preheat the oven to 350°F (175°C). Place the cobbler in a baking dish and cover it with foil. This keeps it moist. Heat for about 15-20 minutes or until warmed through. You can also use a microwave. Just place a slice on a microwave-safe plate. Heat it for about 1-2 minutes. Keep an eye on it to avoid overcooking. Regardless of the method, aim to maintain the texture and flavor. The crust should stay slightly crispy, and the tomatoes juicy. Enjoy your delicious leftovers! For the full recipe, check the earlier sections. What sides pair well with this dish? This cobbler is rich and hearty. I suggest pairing it with a simple green salad. A light vinaigrette will add a fresh taste. You could also serve it with roasted vegetables or a tangy slaw. These sides balance the flavors nicely. Can I make it ahead of time? Yes, you can prepare the tomato mixture in advance. Store it in the fridge for up to two days. You can also make the cornbread batter ahead of time. Just mix it right before baking to keep it fresh. How to know when it's done cooking? Check for a golden brown top. Insert a toothpick in the center; it should come out clean. The cobbler should be firm and not jiggly. If it is still wet, give it a few more minutes in the oven. Is it possible to use canned tomatoes? Yes, canned tomatoes work well for this dish. Drain them to avoid excess liquid. Choose whole or diced tomatoes for best results. They will still give you that rich flavor without the hassle of fresh ones. For the full recipe, check out the earlier section. This blog post covered everything you need for a delicious Cornmeal Cheddar Tomato Cobbler. We discussed key ingredients, step-by-step cooking instructions, and helpful tips to enhance flavor and texture. You can also explore ingredient variations and smart storage tips. Remember, small changes can make a big difference. Experiment with flavors and enjoy this cozy dish. Happy cooking!

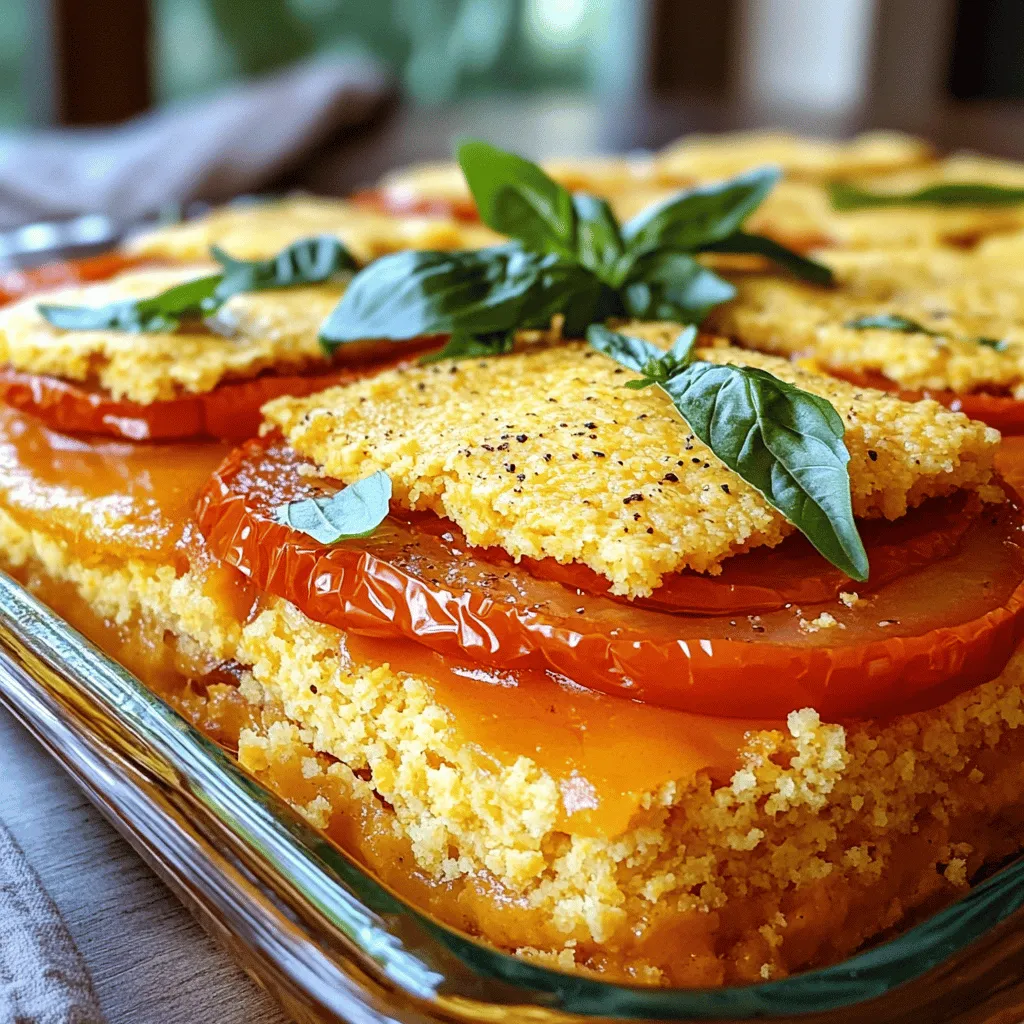
If you’re craving comfort food that bursts with flavor, you’ve come to the right place. This Cornmeal Cheddar Tomato Cobbler is a savory dish that combines fresh tomatoes, rich cheese, …

Read more

Categories Dinner

Savory Tomato Mozzarella Pie Simple and Satisfying

June 26, 2025 by Chef Owen
To make a delicious Tomato Mozzarella Pie, gather these simple ingredients: - 1 pre-made pie crust (store-bought or homemade) - 4 medium ripe tomatoes, thinly sliced - 1 cup fresh mozzarella cheese, sliced - 1/4 cup fresh basil leaves, chopped - 2 tablespoons olive oil - Salt and pepper to taste - 1/2 teaspoon garlic powder - 1/2 teaspoon dried oregano - 1 tablespoon balsamic glaze (optional for drizzling) To boost the flavor of your pie, consider adding: - A sprinkle of red pepper flakes for heat. - Fresh thyme leaves for an earthy taste. - A dash of lemon zest to brighten the dish. These small touches can transform your pie from good to great. If you can't find fresh items, don't worry! You can swap ingredients easily: - Use canned tomatoes if fresh ones aren't available. - Try burrata cheese instead of mozzarella for creaminess. - Substitute dried basil for fresh, using one teaspoon instead. These swaps keep the recipe easy while still tasting amazing. Start by preheating your oven to 400°F (200°C). If you use a frozen pie crust, let it thaw first. Fit the crust into a 9-inch pie dish. Prick the bottom with a fork. This step stops bubbles from forming. You can use a store-bought crust or make your own if you prefer. In a large bowl, mix the sliced tomatoes with olive oil, garlic powder, oregano, salt, and pepper. Make sure to coat the tomatoes well. Layer half of this tomato mixture in the pie crust. Then, add half of the mozzarella slices and half of the chopped basil. Repeat these layers with the remaining ingredients. You want a nice stack of flavors. Place the assembled pie in the oven. Bake for 30 to 35 minutes. You'll know it's ready when the tomatoes are soft and the cheese is bubbly. The top should look slightly golden. After baking, let it cool for 5 to 10 minutes. If you like, drizzle some balsamic glaze on top for extra flavor. Now, slice and serve it warm or at room temperature. Enjoy your delicious Tomato Mozzarella Delight Pie! For the complete recipe, check [Full Recipe]. Choose ripe tomatoes for the best flavor. Look for tomatoes that feel heavy for their size. The skin should be smooth and firm. A little give when you squeeze them is fine. Heirloom tomatoes are colorful and tasty. They add great flavor and beauty to your pie. Try to use fresh tomatoes in season for the best taste. For a great melt, use fresh mozzarella. This cheese is soft and creamy, which helps it melt perfectly. Slice it thin, so it melts evenly. To make it even better, let the cheese sit at room temperature for about 30 minutes before use. This helps it melt faster and adds rich flavor. To keep your crust crispy, start with a pre-baked crust. Pricking the bottom with a fork helps too. This allows steam to escape and prevents sogginess. Another trick is to use a layer of cheese on the bottom of the crust. This acts as a barrier against moisture from the tomatoes. Be sure to follow the Full Recipe for the best results. {{image_2}} You can add fun toppings to your Tomato Mozzarella Pie. Try sliced olives for a briny touch. Fresh spinach adds color and nutrition. For a spicy kick, sprinkle red pepper flakes on top. You can also layer in roasted peppers or artichokes for extra flavor. Each add-on changes the taste and makes it your own. This pie is great for vegetarians. You can make it vegan by using plant-based cheese. Many brands offer delicious mozzarella-style cheese made from nuts. You can also replace the pie crust with a vegan option. Use a veggie crust made from cauliflower or almond flour. These swaps keep the dish tasty and plant-based. Switching ingredients with the seasons can change your pie. In summer, use juicy heirloom tomatoes for a burst of flavor. In fall, try butternut squash slices for sweetness. You can even mix in seasonal herbs like thyme or rosemary. These swaps keep your dish fresh and exciting all year. For the full recipe, check out the [Full Recipe]. To store your leftover pie, let it cool first. Place it in an airtight container. You can also cover it tightly with plastic wrap or foil. Keep it in the fridge. It will stay fresh for up to three days. This way, you can enjoy your pie later without losing flavor. When you are ready to eat, preheat your oven to 350°F (175°C). Place the pie on a baking sheet. Cover it with foil to keep it from drying out. Heat for about 15-20 minutes. Check if the cheese is warm and bubbly. This method keeps the crust crisp and the filling tasty. You can freeze the Tomato Mozzarella Pie for later enjoyment. First, slice the pie into portions. Wrap each slice in plastic wrap and foil. Place wrapped slices in a freezer-safe bag. Label the bag with the date. You can freeze it for up to three months. To enjoy, thaw in the fridge overnight, then reheat in the oven. This keeps the pie nearly as fresh as the day you made it. Yes, you can use other cheeses. Try cheddar, gouda, or feta for a twist. Each cheese brings a unique flavor. Cheddar adds sharpness, while gouda offers creaminess. Feta gives a tangy bite. Mixing cheeses can also enhance the taste! Baking takes about 30 to 35 minutes. Your pie is ready when the cheese bubbles and turns golden. The tomatoes should be soft and juicy. Keep an eye on it to avoid burning. This pie pairs well with salads and crusty bread. A fresh green salad adds a light touch. Garlic bread complements the pie’s flavors nicely. You can also serve it with a side of roasted vegetables for extra color. Tomato Mozzarella Pie has roots in Italian cuisine. It showcases fresh, simple ingredients. The dish reflects Italy’s love for tomatoes and cheese. Many regions in Italy have their own twist on this classic. To make it gluten-free, use a gluten-free pie crust. Many stores offer great options. You can also make your own crust with almond flour or oat flour. Just ensure all other ingredients are gluten-free. Yes, you can prepare the pie ahead of time. Assemble it and store it in the fridge. Bake it just before serving for the best taste. This makes it easy for gatherings or busy nights. For the full recipe, check the details above! In this article, we explored how to make a tasty Tomato Mozzarella Pie. We covered ingredients, step-by-step instructions, and essential tips to get it just right. You learned about storage options and variations to customize your dish. Remember, fresh ingredients make a big difference. Enjoy experimenting with flavors and textures. This dish is fun to make and share. With these steps, you'll create something delicious every time. Happy baking!

Are you ready to dive into a dish that bursts with flavor and is simple to make? My Savory Tomato Mozzarella Pie is a delightful blend of fresh tomatoes and …

Read more

Categories Dinner

Gordon Ramsay Pickled Onions Flavorful and Tangy Treat

June 26, 2025 by Chef Owen
- 2 large red onions, thinly sliced - 1 cup apple cider vinegar - 1 cup water - 1 tablespoon sugar - 1 tablespoon sea salt - 1 teaspoon black peppercorns - 1 teaspoon mustard seeds - 1 teaspoon crushed red pepper flakes (optional for spice) - 2 cloves garlic, crushed Gordon Ramsay's pickled onions are a simple yet delicious treat. You need just a few basic ingredients to make them. The red onions give a lovely color and sweet taste. Apple cider vinegar adds a nice tang. Sugar and salt help balance the flavors. The spices bring warmth and depth to the mix. - Fresh herbs (such as dill or coriander) - Additional spices (like cumin or bay leaves) If you want to add more flavor, consider fresh herbs like dill or coriander. They give a nice herbal note. You can also try different spices like cumin or bay leaves for a twist. Each option brings a new layer to the flavor. Experimenting with these add-ins can make your pickled onions even more special. For the full recipe, click here. - Peel and thinly slice onions using a sharp knife or mandoline. - Set sliced onions aside in a bowl. - Combine apple cider vinegar, water, sugar, and sea salt in a saucepan. - Heat and stir until sugar and salt dissolve. - Add black peppercorns, mustard seeds, and garlic to the saucepan. - Bring to a gentle simmer for 2-3 minutes before cooling. - Layer sliced onions in a clean, sterilized jar. - Pour the warm pickling liquid over the onions. - Allow the jar to cool to room temperature. - Seal and refrigerate for at least 24 hours. You can find the Full Recipe for Gordon Ramsay's pickled onions above. Enjoy this tangy treat! To get the best taste from your pickled onions, try using different vinegars. Red wine or white vinegar can change the flavor. You can also change the sugar and salt amounts. This way, you can make them sweeter or saltier based on your taste. Pickled onions work great with many dishes. They add a nice tang to tacos, sandwiches, and salads. You can even use them as a garnish for burgers or charcuterie boards. They give a pop of color and flavor to any meal. Make your pickled onions stand out by using colorful jars. It adds charm to your kitchen or table. You can also serve them in small dishes. This makes a vibrant and inviting presentation for your guests. The visual appeal makes the meal even more enjoyable. For the complete recipe, check out Gordon's Zesty Pickled Onions. {{image_2}} For a sweeter taste, you can add more sugar or flavored syrups. This will change the flavor profile nicely. You might also try adding fruits like peaches or cherries. These fruits will give your pickled onions a fun twist. The sweetness pairs well with the tangy vinegar. If you enjoy heat, increase the crushed red pepper flakes. This simple change adds a kick to your onions. You can also add sliced jalapeños or habaneros for an extra spice level. This variation is perfect for those who love bold flavors in their dishes. Fresh herbs can bring a new layer of flavor to your pickled onions. Try including herbs like dill or thyme in the mix. You can also use herbal tea for the pickling liquid. This adds a unique taste that makes the onions stand out. Experiment with different herbs to find your favorite blend. These variations allow you to customize Gordon Ramsay's pickled onions to fit your taste. Don't be afraid to mix and match! You can find the full recipe to guide you through the process. Store your pickled onions in an airtight container. This keeps them fresh and tasty. You can keep them in the refrigerator for up to 2-3 weeks. Make sure the onions stay submerged in the pickling liquid. This helps maintain their crispness and flavor. If you want your pickled onions to last longer, consider canning them. Canning makes them shelf-stable and great for long-term use. Use sterilized jars to prevent spoilage. Proper canning techniques are key. Always follow safe practices to ensure your pickled onions stay delicious and safe to eat. Watch for signs of spoilage in your pickled onions. Check for off-flavors, discoloration, or any strange odor. If you notice any of these signs, discard the jar immediately. It’s always better to be safe than sorry when it comes to food safety. Pickled onions last up to 2-3 weeks if stored properly. Keep them in a sealed jar. This helps maintain their crunch and flavor. Make sure your fridge stays cold to keep them fresh longer. Yes, you can omit sugar for a lower-calorie option. Some people prefer the tangy taste without added sweetness. If you want some sweetness, you can try a sugar substitute. Yes, yellow or white onions can also be used. Each type of onion has a different flavor. Red onions are sweeter and colorful, while yellow onions are more pungent. Choose based on your taste. Pickled onions are great on tacos, sandwiches, and salads. They also shine on charcuterie boards. Their tangy taste brightens up rich dishes. Try adding them to burgers for a pop of flavor. Yes, you can can pickled onions for long-term storage. Follow proper canning procedures to ensure safety. Use sterilized jars and a boiling water bath. This method allows you to enjoy them for months. For the full recipe, check out Gordon's Zesty Pickled Onions. In this post, we explored how to make delicious pickled onions. We covered the main ingredients, step-by-step instructions, and tips for success. You learned how to customize flavors and serve them in fun ways. Remember, pickled onions add a tasty crunch to many dishes. With a little practice, you'll create your own unique versions. Try this recipe and make it your own! You’ll enjoy the fresh flavors and have fun experimenting in the kitchen. Happy pickling!

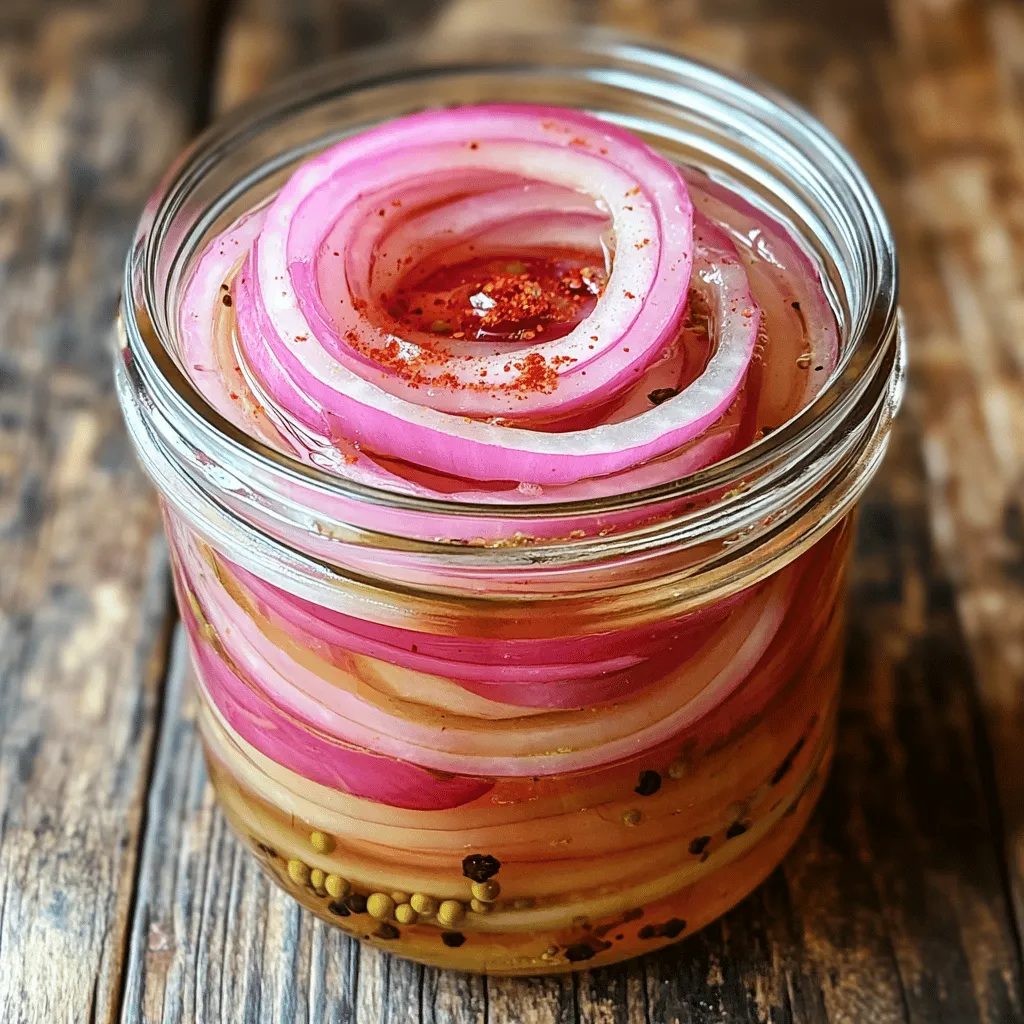
Are you ready to elevate your meals with a burst of flavor? Gordon Ramsay’s pickled onions are the perfect blend of tangy and sweet, and they’re surprisingly easy to make! …

Read more

Categories Appetizers

Paleo Southwest Frittata Flavorful and Healthy Meal

June 26, 2025 by Chef Owen
For a tasty frittata, you need fresh ingredients. Here’s what to gather: - 8 large eggs - 1/2 cup almond milk - 1 red bell pepper, diced - 1 green bell pepper, diced - 1 small onion, finely chopped - 1 cup spinach, chopped - 1 cup cherry tomatoes, halved - 1 jalapeño, seeded and minced The eggs provide protein and richness. The nut milk adds creaminess without dairy. The veggies bring color, flavor, and nutrients. Spices make this dish pop. You will need: - 1 teaspoon cumin - 1 teaspoon paprika - Salt and pepper to taste Cumin gives a warm, earthy taste. Paprika adds a hint of sweetness. Salt and pepper enhance all the flavors. For a beautiful finish, use: - 2 tablespoons olive oil - Fresh cilantro for garnish Olive oil helps cook the veggies and keeps the frittata moist. Fresh cilantro adds a bright touch on top. For the full recipe, check out the instructions to create this delightful meal. 1. Preheat Oven and Prepare Baking Dish Set your oven to 375°F (190°C). Grab an oven-safe skillet for cooking. This will help save time and dishes later. 2. Whisking the Egg Mixture In a large bowl, crack open 8 large eggs. Add 1/2 cup of almond milk, 1 teaspoon of cumin, 1 teaspoon of paprika, and a pinch of salt and pepper. Whisk until everything mixes well. A smooth egg mix makes for a fluffy frittata. 3. Cooking the Vegetables Heat 2 tablespoons of olive oil in your skillet over medium heat. Add the finely chopped onion first. Cook it for about 4 minutes until it turns translucent. Next, toss in the diced red and green bell peppers and minced jalapeño. Sauté these for 3-4 minutes until they soften. Finally, add 1 cup of chopped spinach and 1 cup of halved cherry tomatoes. Cook for 2 more minutes until the spinach wilts. 1. Combining Eggs and Vegetables Pour your egg mixture evenly over the cooked veggies in the skillet. Stir gently to combine. This helps the flavors blend well together. 2. Initial Stovetop Cooking Cook on the stovetop for about 2-3 minutes. You will see the edges start to set. This step is key to get that nice, fluffy texture. 3. Transferring to Oven Carefully transfer the skillet to your preheated oven. Bake for 15-20 minutes until the frittata is set and the top is slightly golden. When it's done, let it cool for a few minutes. Use a spatula to lift it out of the skillet. Garnish with fresh cilantro for a pop of color and flavor. This process gives you a tasty and healthy Paleo Southwest Frittata. If you want the full details, check the Full Recipe! Choosing the right skillet is key for a great frittata. I use a 10-inch oven-safe skillet. A non-stick skillet also works well. This helps the frittata slide out easily after cooking. Cooking times and temperature matter too. Preheat your oven to 375°F (190°C). Cook the frittata on the stovetop for 2-3 minutes. This helps set the edges before baking. Bake for 15-20 minutes. The frittata should be firm and slightly golden on top. To check for doneness, insert a knife in the center. If it comes out clean, your frittata is ready. If not, return it to the oven for a few more minutes. You can add great flavors with suggested add-ins. Try diced zucchini or mushrooms for more texture. Avocado slices on top boost the creaminess. You can even add cooked sausage or bacon for extra protein. Optimal seasoning blends make a big difference. Besides cumin and paprika, try garlic powder or chili powder. Fresh herbs like basil or oregano can brighten the dish. Experiment with different spices to find your perfect mix. For the complete recipe, check out the [Full Recipe]. {{image_2}} You can easily change the frittata to suit your taste. For a creamy base, swap almond milk for coconut milk. This will add a subtle sweetness and a tropical twist. If you want to avoid dairy, you can skip milk entirely. The eggs still work great on their own. Adding more veggies can change the flavor profile too. Try adding zucchini, mushrooms, or broccoli. These veggies not only add color but also pack in nutrition. You can mix and match based on what you have. If you follow Whole30, just change a few items. Use only whole ingredients and avoid any added sugars. Stick with the ingredients in the Full Recipe, and you'll have a compliant meal. For a keto-friendly version, keep the egg count high. Reduce the number of tomatoes and peppers to lower carbs. You can also add in cheese for added flavor, but make sure it fits your diet. This will keep your frittata low in carbs while still being tasty. To keep your Paleo Southwest Frittata fresh, store it in the fridge. Use an airtight container. This helps the frittata stay moist and tasty. It will last for about 3 to 4 days in the fridge. If you want to keep it longer, freezing is a great option. For freezing, cut the frittata into portions. Wrap each piece tightly in plastic wrap or foil. Then, place them in a freezer-safe bag. This helps prevent freezer burn. The frittata can stay in the freezer for up to 2 months. When you’re ready to eat your frittata, you can choose to reheat it in the oven or microwave. The oven method helps keep the texture nice. Preheat your oven to 350°F (175°C). Place the frittata on a baking sheet and cover it with foil. Heat for about 15-20 minutes. If you’re in a hurry, the microwave works too. Place a slice on a microwave-safe plate. Cover it with a damp paper towel to keep it moist. Heat it for about 30-60 seconds. Regardless of the method, always check the frittata to make sure it’s heated through. Enjoy your meal! For the full recipe, check out the instructions above. What can I substitute for almond milk in the recipe? You can use coconut milk or cashew milk. These options keep the frittata creamy. Regular milk also works if you are not following a paleo diet. How do I know when the frittata is fully cooked? Look for a firm top and edges that are slightly golden. A toothpick inserted in the center should come out clean. If it jiggles a lot, it needs more time. Can this frittata be made ahead of time? Yes, you can make this frittata in advance. Cook it, then cool and store it in the fridge. It stays fresh for about three days. What are the calorie and protein counts? This frittata has about 200 calories per serving and 12 grams of protein. It is a filling meal that helps you stay energized. Is this recipe suitable for people with nut allergies? No, this recipe uses almond milk. For nut-free options, choose coconut milk or oat milk instead. Always check labels to avoid cross-contamination. For the full recipe, check the earlier sections. Enjoy making this tasty dish! In this post, we explored how to make a delicious frittata. We covered essential ingredients like eggs and veggies, and I gave you step-by-step instructions for baking. You learned tips for perfecting flavors and various adaptations for special diets. We also discussed how to store and reheat your frittata. Remember, frittatas are flexible, so feel free to experiment with different ingredients. Enjoy making your own unique dish at home!

Are you searching for a tasty, healthy dish that fits your Paleo diet? Look no further! My Paleo Southwest Frittata is packed with fresh veggies, vibrant spices, and wholesome ingredients. …

Read more

Categories Breakfast
Older posts
Newer posts
← Previous Page1 … Page87 Page88 Page89 … Page125 Next →

THE RECIPE HATCH

Where tasty ideas take flight! 🚀🐣 Fresh, easy recipes hatched daily to make cooking simple and flavorful.

PAGES

Home About Contact Privacy Policy Terms & Conditions Cookie Policy GDPR Policy Copyright Policy Disclaimer

CATEGORIES

Appetizers Desserts Salads Breakfast Dinner

Contact

  • Pinterest
  • Mail
Copyright © 2026 The Recipe Hatch. All rights reserved.