Healthy Blueberry Zucchini Muffins Nutritious and Tasty
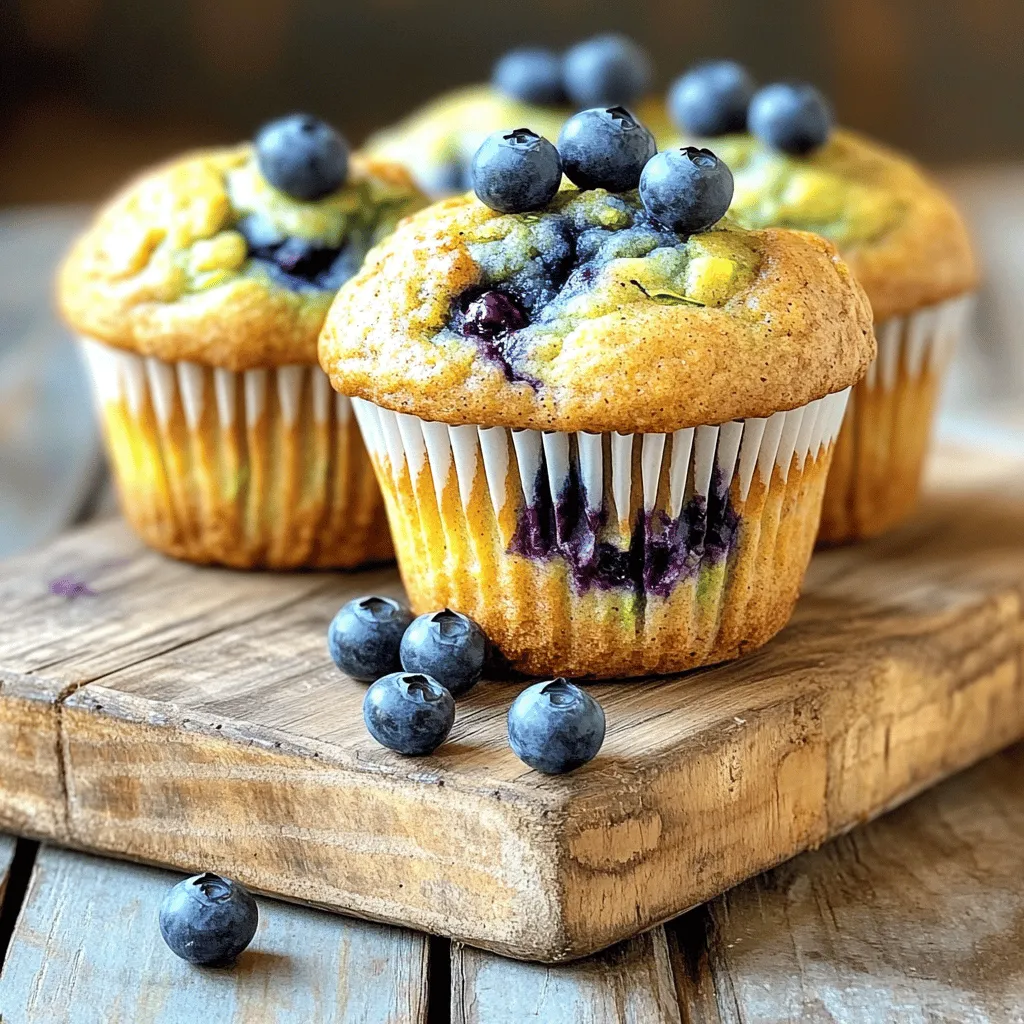
Looking for a delicious way to sneak more veggies into your diet? These Healthy Blueberry Zucchini Muffins are your answer! Packed with nutrients, these muffins blend sweet blueberries and moist …

![- 2 boneless, skinless chicken breasts - 1/2 cup all-purpose flour - 1/4 cup buttermilk - 1 teaspoon paprika - 1 teaspoon garlic powder - 1 teaspoon onion powder - 1/2 teaspoon dried thyme - 1/2 teaspoon dried rosemary - Salt and pepper, to taste - 2 tablespoons olive oil - 1 tablespoon butter - Fresh parsley, chopped (for garnish) Gathering these ingredients is key to making a tasty meal. Start with the chicken breasts. They are the star of the show. Use boneless and skinless for easy cooking. Next, the all-purpose flour gives the chicken a nice crust. The buttermilk is important too. It helps the flour stick and adds flavor. For spices, paprika adds a warm color. Garlic and onion powders give a savory taste. Thyme and rosemary bring a nice herbal note. Salt and pepper are must-haves for seasoning. When it comes to cooking, olive oil and butter create a rich flavor. The butter also helps the chicken brown nicely. Finally, fresh parsley adds a pop of color when you serve the dish. Check the Full Recipe for a detailed guide on how to use these ingredients to make a delicious pan-fried chicken breast. - Butterfly the chicken if necessary. This means slicing thick breasts in half. It helps them cook evenly and stay juicy. - Whisk together the dry ingredients. In a bowl, mix flour, paprika, garlic powder, onion powder, thyme, rosemary, salt, and pepper. This mix adds great flavor. - Dip each chicken breast in buttermilk. Let the extra buttermilk drip off. - Dredge the chicken in the flour mix. Press gently to coat it well. This creates a nice crust. - Heat olive oil and butter in a skillet over medium-high heat. Wait until the oil shimmers. - Cook the chicken breasts in the skillet. Cook for 6-7 minutes on each side until golden brown. The chicken should reach an internal temperature of 165°F. - Let the chicken rest for 5 minutes on a plate. This helps keep the juices inside. - Slice the chicken and garnish with chopped parsley. This adds a fresh touch. Enjoy your delicious meal! Check out the [Full Recipe] for more details. To get that perfect crispy skin, you need hot oil. Heat your oil until it shimmers. This helps the chicken brown nicely. Next, do not overcrowd the pan. Cook in batches if needed. This allows each piece to fry well. Butterflying thick breasts is key. Cut them in half horizontally to make them thinner. This helps them cook evenly. Always let the chicken rest before slicing. This keeps the juices inside, making each bite tender. Adjust spices to fit your taste. You can add more garlic or use less salt. Fresh herbs can really boost flavor. Try adding parsley, thyme, or rosemary for a fresh twist. These simple changes can make a big difference. For the full recipe, check the section above. {{image_2}} I love to change up the flavors of my pan-fried chicken. One great option is a lemon herb version. Just add lemon zest to your seasoning mix. This brightens the dish and adds a fresh taste. Another fun twist is the spicy version. Simply mix in cayenne pepper to the flour. It brings heat and excitement to each bite. For a crunchier crust, try using panko breadcrumbs. They give the chicken a nice texture. If you need a gluten-free option, you can use gluten-free flour instead. This still creates a lovely coating that sticks well to the chicken. Serve your pan-fried chicken with a side salad. The crisp greens balance the rich flavors of the chicken. You can also pair it with mashed potatoes or rice. These sides soak up the juices and make each meal more filling. For the full recipe, check out the details above. Let your chicken cool down before you store it. This step keeps the chicken from steaming and getting soggy. Place the cooled chicken in an airtight container. This helps keep it fresh and tasty for later meals. The best way to reheat pan-fried chicken is in a skillet. Heat a little oil over medium heat and add your chicken. Cook until it’s warm. If you need a quicker method, use the microwave. Just place your chicken on a microwave-safe plate and heat it for short bursts until warm. You can freeze leftover chicken for up to three months. Wrap each piece individually in plastic wrap. This makes it easy to grab just what you need later. When you’re ready to eat, thaw in the fridge overnight for the best results. To check if your chicken is done, use a meat thermometer. The safe internal temperature is 165°F or 75°C. Insert it into the thickest part of the chicken. If it reads this temperature, your chicken is ready to eat. This step keeps your meal safe and tasty. Yes, you can cook chicken breasts without flour. However, the texture might change. The flour gives a nice, crispy crust. Without it, the chicken may not have the same crunch. You could try using breadcrumbs or cornmeal for a different texture. You have many options for sides. Consider serving your chicken with a fresh salad. Rice dishes are also a great match. Steamed or roasted vegetables add color and flavor. These sides balance the meal and make it more filling. For more ideas, check out the Full Recipe. In this post, we explored the essentials for cooking juicy, crispy chicken breasts. You learned about main ingredients, seasoning tips, and cooking steps. We also discussed ways to store leftovers and offered variations to keep meals exciting. Cooking can be simple and fun. Remember to adjust flavors to your taste and try different sides. Each detail helps you create a delicious dish. Happy cooking!](https://therecipehatch.com/wp-content/uploads/2025/07/cbe6bd7e-838c-4914-98b5-a3f75bbe6b20.webp)

![- 1 ½ cups grated zucchini - 1 cup all-purpose flour - ½ cup whole wheat flour - ½ cup crumbled feta cheese - 2 large eggs - ¾ cup plain yogurt (or buttermilk) - ¼ cup olive oil - 1 teaspoon baking powder - 1 teaspoon baking soda - ½ teaspoon salt - ¼ teaspoon black pepper - ¼ teaspoon garlic powder - ¼ teaspoon dried oregano - Optional: Chopped fresh herbs (like dill or parsley) These ingredients come together to make delicious feta zucchini muffins. The zucchini adds moisture and a fresh taste. Feta cheese brings a salty and creamy flavor, which makes these muffins special. You can use fresh herbs for a bright twist. For the full recipe, check out the [Full Recipe]. Gather these ingredients, and let’s get cooking! 1. Preheat your oven to 350°F (175°C). Line a 12-cup muffin tin with paper liners or grease it with cooking spray. 2. Grate 1 medium zucchini until you have 1 ½ cups. Place it in a bowl, sprinkle with a pinch of salt, and let it sit for about 10 minutes. This helps draw out excess moisture. After 10 minutes, take a clean kitchen towel and gently squeeze the zucchini to remove as much liquid as possible. 1. In a large bowl, crack 2 large eggs. Add ¾ cup plain yogurt and ¼ cup olive oil. Whisk until well combined. 2. Now, fold in the drained grated zucchini and ½ cup crumbled feta cheese. Mix gently to keep the feta intact. 1. In another bowl, whisk together 1 cup all-purpose flour, ½ cup whole wheat flour, 1 teaspoon baking powder, 1 teaspoon baking soda, ½ teaspoon salt, ¼ teaspoon black pepper, ¼ teaspoon garlic powder, and ¼ teaspoon dried oregano. 2. Gradually add the dry mixture to the wet mixture. Stir gently until just combined. Remember, a few lumps are okay! Follow these steps, and you’ll have a wonderful batter ready for baking. For the complete recipe, check out the Full Recipe section. To bake perfect muffins, avoid overmixing the batter. Overmixing makes muffins tough. Stir gently until you see no dry flour. A few lumps are okay; they won't hurt your muffins. Using room temperature ingredients is key. When your eggs and yogurt are at room temperature, they mix better. This helps create a light and fluffy muffin. Don't be afraid to experiment with different herbs. Fresh dill, parsley, or basil can change the taste. Each herb brings its own flavor, making your muffins unique. You might also try adding spices for extra flavor. A pinch of cayenne pepper or paprika can give a nice kick. Just remember, start with a small amount. You can always add more next time. Garnish your muffins with fresh herbs for a pop of color. A sprinkle of chopped parsley looks great on top. It also adds a fresh taste. Serve the muffins with yogurt for added freshness. A dollop of plain yogurt on the side makes a nice contrast. It also adds a creamy texture that pairs well with the muffins. For the full recipe, check out [Full Recipe]. {{image_2}} For those who need gluten-free options, you can swap regular flour for gluten-free flour. This change keeps the muffins light and fluffy. Just make sure to choose a good gluten-free blend. If you want a vegan version, use flax eggs instead of regular eggs. To make flax eggs, mix one tablespoon of ground flaxseed with three tablespoons of water. Let it sit for a few minutes until it thickens. Also, replace the yogurt with plant-based yogurt for creaminess. You can add sun-dried tomatoes or olives for a burst of flavor. Both ingredients give the muffins a savory twist. If you want a different cheese taste, try goat cheese or even a sharp cheddar. These options can change the flavor profile while keeping it delicious. You can make mini muffins for bite-sized treats. This is great for parties or snacks. Just adjust the baking time to about 12-15 minutes. For a heartier option, go for large bakery-style muffins. They make a great breakfast or lunch option and still bake nicely in the same way as standard-sized muffins. For the full recipe, check out the details above. Store your feta zucchini muffins at room temperature. Place them in an airtight container. They will stay fresh for up to three days. If you want to keep them soft, add a slice of bread into the container. The bread helps keep the muffins moist. For long-term storage, freeze your muffins. Allow them to cool completely. Wrap each muffin in plastic wrap, then place them in a freezer bag. Label the bag with the date. These muffins can last up to three months in the freezer. When you're ready to enjoy one, just take it out and let it thaw. Reheat your muffins in the oven for the best taste. Preheat the oven to 350°F (175°C). Place the muffins on a baking sheet. Heat them for about 10 minutes. You can also use a microwave. Heat each muffin for about 30 seconds. Enjoy them warm for the best flavor. For the full recipe, check out the complete guide on feta zucchini muffins! You can check if the muffins are done in a few ways. The tops should look golden brown and firm to the touch. You can also gently press the center; it should spring back. If you want to be sure, use a toothpick. Insert it into the center. If it comes out clean or with a few crumbs, your muffins are ready. Yes, you can use frozen zucchini. Just make sure to thaw and drain it well. Frozen zucchini has more water, so be careful. Squeeze out the extra moisture using a clean towel. This will help your muffins stay fluffy and not soggy. Fresh zucchini is best, but frozen works in a pinch. If you don’t have feta cheese, there are great options. You can use goat cheese for a creamy texture. Or try ricotta for a mild flavor. Another choice is queso fresco, which adds a nice touch. Each cheese brings a different taste, so feel free to experiment. You can find the full recipe [here](insert link). This blog post covers how to make delicious zucchini muffins. We discussed the main and additional ingredients, including grated zucchini and feta cheese. I provided clear steps for mixing, baking, and enhancing flavors. You learned tips for perfect muffins and variations to suit your needs. In summary, these muffins are tasty, easy to make, and adaptable. You can enjoy them fresh or store them for later.](https://therecipehatch.com/wp-content/uploads/2025/07/0c8ebd3a-92d0-41c3-a33e-2f598465133e.webp)
![- 2 medium zucchinis, grated - 1 cup granulated sugar - 1/2 cup brown sugar, packed - 1/2 cup vegetable oil - 3 large eggs - 1 teaspoon vanilla extract - 1 1/2 cups all-purpose flour - 1 teaspoon baking powder - 1/2 teaspoon baking soda - 1/2 teaspoon salt - 1/2 teaspoon ground cinnamon - 1/2 cup unsweetened cocoa powder - 1/2 cup semi-sweet chocolate chips - 1/2 cup chopped walnuts (optional) When making this chocolate marble zucchini bread, pay close attention to your ingredients. Fresh zucchinis are best for moisture and flavor. Grate them finely. This helps blend them well into the batter. Use granulated and brown sugars for a nice balance of sweetness. The brown sugar adds a hint of caramel flavor. Vegetable oil keeps the bread moist, while eggs give it structure. The flour is the base of the bread. Make sure to measure it correctly. Too much flour can make your bread dry. Baking powder and baking soda are key for rising. They keep the bread light and fluffy. Salt and cinnamon enhance the flavors. The cocoa powder is what makes the chocolate swirl. Semi-sweet chocolate chips add richness, and walnuts add crunch. You can swap out some ingredients if needed. For example, use whole wheat flour for more fiber. If you want to cut sugar, reduce the granulated sugar slightly. For fresh versus dried ingredients, always choose fresh zucchinis. Dried ingredients should be in good shape. Check the dates on your baking powder and soda. They should be fresh for the best results. For the full experience, check out the Full Recipe. It guides you through each step to make this delightful treat. 1. Preheat your oven to 350°F (175°C). This step is key for even baking. 2. Grease and flour a 9x5 inch loaf pan. This helps the bread come out easily. 3. In a large bowl, mix the grated zucchini, granulated sugar, brown sugar, and vegetable oil. Stir until everything blends well. 4. Add three large eggs, one at a time. Mix well after each egg. Then, stir in 1 teaspoon of vanilla extract for flavor. 1. In a separate bowl, combine 1 1/2 cups of all-purpose flour, 1 teaspoon of baking powder, 1/2 teaspoon of baking soda, 1/2 teaspoon of salt, and 1/2 teaspoon of ground cinnamon. Whisk these dry ingredients together. 2. Gradually add the dry mix to your zucchini mixture. Mix just until combined. You want it moist but not over-mixed. 3. Divide the batter in half. To one half, stir in 1/2 cup of unsweetened cocoa powder. Mix until it's well blended. 1. Pour the plain zucchini batter into the loaf pan. 2. Dollop spoonfuls of chocolate batter on top of the plain batter. Use a knife to gently swirl the two batters together. This creates a lovely marbled effect. 3. If you like, sprinkle 1/2 cup of semi-sweet chocolate chips and 1/2 cup of chopped walnuts on top of the batter. 4. Bake in the preheated oven for 55-65 minutes. Check doneness by inserting a toothpick into the center. It should come out clean. Enjoy the rich taste of your Chocolate Marble Zucchini Bread! For the complete recipe, check the [Full Recipe]. Grating zucchini is simple but needs care. Here are my best tips: - Choose fresh zucchinis: Select firm zucchinis without soft spots. Fresh ones have better flavor. - Use a box grater: A box grater works well to get fine, even shreds. - Squeeze out excess moisture: After grating, place the zucchini in a clean towel. Twist the towel to remove water. This step keeps your bread from becoming soggy. Creating a beautiful marble effect adds fun to your loaf. Here’s how: - Divide the batter evenly: Split your batter into two bowls before adding cocoa powder. This way, you have equal amounts of both flavors. - Dollop carefully: Pour spoonfuls of plain and cocoa batter into your pan. Alternate between the two batters. - Swirl gently: Use a knife to swirl the batters together. Too much mixing will blend them completely, so be light-handed. Just a few gentle swirls give a lovely marbled look. Baking can be tricky, but I have tips to help avoid mistakes: - Preheat your oven: Always preheat your oven to 350°F (175°C) before baking. This helps the bread rise well. - Check your measurements: Use dry measuring cups for flour and cocoa. Too much flour can make the bread dense. - Test for doneness: Stick a toothpick into the center. If it comes out clean, your bread is ready. If not, bake a few more minutes. By following these tips, you will bake a perfect Chocolate Marble Zucchini Bread. For the full recipe, check the recipe section. Enjoy your baking! {{image_2}} You can make this chocolate marble zucchini bread a bit healthier. One way is to use whole wheat flour. Whole wheat flour adds fiber and nutrients. It also gives a nutty flavor to the bread. Just swap it with all-purpose flour in equal amounts. Another swap is to reduce the sugar. You can cut the granulated sugar to 3/4 cup. This change makes a lighter loaf but still keeps it sweet. You might not even notice the difference! To boost the flavor, try adding spices. Nutmeg or cloves work great in this recipe. These spices add warmth and depth to the taste. Just add about 1/4 teaspoon of either to the dry mix for a nice kick. You can also experiment with different types of chocolate. Use dark chocolate or white chocolate instead of semi-sweet. Each type brings its own unique taste to the bread. It’s a fun way to change things up! Mix-ins can really change your bread. You might want to try different nuts or seeds. Pecans or sunflower seeds can add a crunchy texture. Just make sure to chop them up a bit before adding. Dried fruits are another great option. Raisins or cranberries can add sweetness and chewiness. They pair well with chocolate and zucchini. Just add about 1/2 cup of your choice to the batter. For more details, you can check the [Full Recipe]. Store your chocolate marble zucchini bread at room temperature for up to three days. Keep it in an airtight container. This helps to keep the bread moist and fresh. If you want to store it longer, refrigerate it. Wrap it tightly in plastic wrap or foil. This keeps out air and moisture. To freeze your zucchini bread, follow these steps: - Cool it completely: Let the bread cool on a wire rack. - Wrap it well: Use plastic wrap, then foil for extra protection. - Label and date: Mark the wrapping with the date to track freshness. For thawing, take it out of the freezer and leave it in the fridge overnight. You can also let it sit at room temperature for a few hours. This way, you can enjoy the rich flavors of your chocolate marble zucchini bread anytime. Grab the full recipe and try making this delightful treat today! Yes, you can make this bread gluten-free. Use a gluten-free flour blend as a substitute. Ensure the blend includes xanthan gum for proper texture. This swap keeps the bread moist and tasty. To check if the bread is baked, insert a toothpick into the center. If it comes out clean, the bread is done. If it has batter on it, bake for a few more minutes. Chocolate marble zucchini bread stays fresh for about three days at room temperature. Store it in an airtight container to keep it moist. You can also refrigerate it for up to a week. Yes, you can use yellow squash or even butternut squash. Both will bring different flavors but work well in this recipe. Just grate them as you would zucchini and follow the same steps. Yes, you can make this bread dairy-free. Replace the semi-sweet chocolate chips with dairy-free ones. Also, check that your vegetable oil is dairy-free. This way, you can enjoy the bread without dairy. For the full recipe, check out the details provided earlier. This blog post shared how to make delicious Chocolate Marble Zucchini Bread. I covered the key ingredients, mixing steps, and baking tips. You learned about fun variations to try and storage methods to keep your bread fresh. Remember, using fresh zucchini and practicing the marble swirl are key. With these tips, you can bake a tasty treat that’s both sweet and healthy. Now, gather your ingredients and get started on your baking adventure!](https://therecipehatch.com/wp-content/uploads/2025/07/5ff45348-8a13-42e7-ae77-9db0e7e8a47c.webp)
 for more ideas and instructions! To keep your French butter cake fresh, store it in an airtight container. This helps retain moisture and flavor. If you do not have a container, wrap it tightly in plastic wrap. Keep the cake at room temperature for up to three days. If you want to keep it longer, refrigeration is an option. Just note that the cake might dry out a bit in the fridge. You can freeze this cake for later use. First, let the cake cool completely. Then, wrap it in plastic wrap and aluminum foil. This double-layer helps prevent freezer burn. The cake can last in the freezer for up to three months. When you are ready to enjoy it, move it to the fridge overnight to thaw. If you want it faster, leave it at room temperature for a few hours. If you want to enjoy warm cake, reheating is easy. Place a slice in the microwave for about 10-15 seconds. This warms the cake without drying it out. You can also use the oven. Preheat it to 350°F (175°C) and heat the cake in a foil-covered dish for about 10-15 minutes. This method keeps the cake moist and tasty. This cake can last up to five days. Store it in an airtight container at room temperature. If you want to keep it fresh longer, place it in the fridge. However, this may change the cake's texture a bit. You can also freeze the cake for up to three months. Just wrap it well in plastic wrap and foil. To enjoy it later, let it thaw in the fridge overnight. Yes, you can make this cake a day before your event. It tastes great even after a night of resting. Just let it cool completely. Then, wrap it in plastic wrap to keep it moist. You can also prepare the batter a few hours ahead. Just keep it in the fridge and bake it when you are ready. This will save time and let you enjoy the fun of your gathering. If your cake sinks in the middle, it may be due to overmixing. Mixing too much can add air, making the cake rise, then collapse. Also, ensure your oven is at the right temperature. An oven that is too hot can cause the cake to rise too fast. If your cake still sinks, try using less baking powder next time. This way, you can avoid the issue and enjoy a perfect cake. You now know the main ingredients needed for a delicious cake, from butter to eggs. I shared useful tips to enhance flavor and ensure even baking. You learned how to store and freeze your cake, plus how to tackle common baking issues. Remember, baking should be fun and creative. Experiment with flavors and variations to make it your own. With these steps and insights, you can bake a fantastic cake that impresses everyone. Enjoy your tasty creations!](https://therecipehatch.com/wp-content/uploads/2025/07/f7d89e5b-54f0-412e-a6ae-bd09f23e49b5.webp)
![To make Rosemary Cheddar Squash Bread, gather these simple ingredients: - 1 cup butternut squash puree (cooked and mashed) - 1 cup shredded sharp cheddar cheese - 2 cups all-purpose flour - 1/2 cup sugar (or coconut sugar for a healthier option) - 1 tablespoon fresh rosemary, finely chopped - 1 tablespoon baking powder - 1/2 teaspoon baking soda - 1/2 teaspoon salt - 1/2 cup milk (dairy or plant-based) - 1/4 cup olive oil - 2 large eggs You can swap some ingredients if needed. Use pumpkin puree instead of squash. This gives a similar taste. If you want a lighter bread, try almond flour in place of all-purpose flour. For a dairy-free option, use nutritional yeast instead of cheese. If sugar is a concern, replace it with honey or maple syrup. Fresh ingredients make a big difference in this bread. Fresh rosemary adds a bright flavor that dried herbs can’t match. Using freshly cooked squash gives the bread a rich texture. Quality cheese melts better and enhances the taste. Always choose the best you can find for the best results. Freshness leads to a more vibrant flavor and a lovely aroma in your kitchen. First, you want to preheat your oven to 350°F (175°C). Greasing a loaf pan (9x5 inches) helps the bread release easily after baking. You can also line it with parchment paper if you prefer. This step ensures your bread does not stick and makes cleanup easy. In a large bowl, add the cooked butternut squash puree and shredded cheddar cheese. Mix them together until they are well combined. In another bowl, whisk together the flour, sugar, baking powder, baking soda, salt, and chopped rosemary. This mix brings all the flavors together. Now, in a separate bowl, whisk the milk, olive oil, and eggs until smooth. Pour this wet mix into the squash-cheese mixture. Stir until just blended. It’s okay if there are a few lumps; do not overmix. Now, pour the batter into your prepared loaf pan and spread it evenly. Bake in your preheated oven for 50-60 minutes. You can check if it’s done by inserting a toothpick into the center. If it comes out clean, the bread is ready. Once baked, take it out and let it cool in the pan for 10 minutes. Then, transfer it to a wire rack to cool completely. Enjoy your Rosemary Cheddar Squash Bread! For the complete instructions, check the Full Recipe. To achieve the best texture for your Rosemary Cheddar Squash Bread, use fresh butternut squash puree. This keeps the bread moist and soft. Make sure to mix the dry and wet ingredients gently. Overmixing can lead to a dense loaf. Also, don’t skip the resting time after baking. It helps the flavors meld together. One common mistake is using too much flour. Always measure your flour correctly. Spoon it into the measuring cup and level it off with a knife. Another mistake is not checking your oven temperature. An oven thermometer can help you bake at the right heat. Lastly, don’t forget to grease your pan well. Sticking can ruin the loaf. Adding herbs can boost the taste of your bread. Aside from rosemary, try thyme or sage for a different twist. You can also mix in spices like black pepper or garlic powder. This adds depth to every bite. For a fun twist, consider adding a pinch of cayenne pepper. It gives a subtle heat that pairs well with cheese. For the full recipe, check the previous section. {{image_2}} You can switch up the cheese in this recipe. Try using gouda or mozzarella for a different taste. Both cheeses melt well and add nice flavors. If you want a sharper bite, use blue cheese or goat cheese. They give a bold kick and pair well with the squash. Feel free to get creative with add-ins! Chopped nuts like walnuts or pecans add crunch. Sun-dried tomatoes or olives bring a savory twist. If you like sweet, add chocolate chips or dried cranberries. Each choice gives you a new flavor to enjoy. For a gluten-free version, swap all-purpose flour with a gluten-free blend. Look for one that contains xanthan gum for better texture. This option keeps the bread soft and moist. Your friends won’t even know it’s gluten-free! Check the [Full Recipe] for more details. To keep your Rosemary Cheddar Squash Bread fresh, wrap it tightly in plastic wrap or foil. You can also place it in an airtight container. Store it at room temperature for up to three days. If you want to keep it longer, the fridge works, but it may dry out a bit. Freezing is a great option if you have extra bread. First, let the bread cool completely. Then, slice it into pieces for easy use. Wrap each slice in plastic wrap, then place them in a freezer-safe bag. This way, it will stay fresh for up to three months. Just remember to label the bag with the date. When you’re ready to enjoy the bread again, take out a slice or two. You can reheat it in the oven at 350°F (175°C) for about 10-15 minutes. Alternatively, use a toaster for a quick warm-up. Enjoy it while it’s warm for the best flavor! For the full recipe, check the section above. If you don't have butternut squash puree, you can use pumpkin puree instead. Both have a similar texture and flavor. Sweet potato puree also works well. Just make sure it's smooth and creamy for the best results. To check if the bread is done, insert a toothpick into the center. If it comes out clean, your bread is ready. You can also look for a golden-brown crust and a firm top. The bread should feel springy when you press it lightly. Yes, you can make this bread a day ahead. Allow it to cool completely, then wrap it tightly in plastic wrap. Store it at room temperature or in the fridge. This allows the flavors to deepen, making it even more delicious. For the full recipe, check the detailed instructions above. This guide covered essential ingredients, including substitutions and the need for freshness. You learned the step-by-step process for making your dish, along with tips for great texture and flavor. We also explored variations, storage, and answered common questions. Remember, using fresh ingredients and avoiding mistakes greatly improves your dish. Enjoy experimenting with flavors and make it your own. Happy cooking!](https://therecipehatch.com/wp-content/uploads/2025/07/3671c4a5-0228-4f27-9b86-43213462590a.webp)