Crispy Zucchini Cakes Flavorful and Easy Recipe

If you’re craving a dish that’s both crispy and packed with flavor, look no further! My easy recipe for crispy zucchini cakes hits the spot every time. With just a …
If you’re craving a dish that’s both crispy and packed with flavor, look no further! My easy recipe for crispy zucchini cakes hits the spot every time. With just a …
![To make these moist chocolate zucchini muffins, gather the following key ingredients: - 1 cup grated zucchini (squeezed dry) - 1 cup all-purpose flour - 1/2 cup unsweetened cocoa powder - 1 teaspoon baking soda - 1/2 teaspoon baking powder - 1/4 teaspoon salt - 1/2 cup granulated sugar - 1/4 cup brown sugar, packed - 1/2 cup vegetable oil - 2 large eggs - 1 teaspoon vanilla extract These ingredients work together to create a soft and rich muffin. The grated zucchini adds moisture and a subtle texture that you won't taste, making these muffins a sneaky way to include veggies in your diet. For an extra treat, consider these optional add-ins: - 1/2 cup chocolate chips (dark or semi-sweet) - 1/4 cup chopped walnuts Chocolate chips give a burst of flavor in each bite. Walnuts add a nice crunch and healthy fats. You can mix and match based on your taste! Each muffin contains about 180 calories. Here’s a simple breakdown of the macronutrients: - Fat: 8g - Carbohydrates: 25g - Protein: 3g These muffins are not only delicious but also provide some nutrients. The zucchini adds fiber and vitamins, making them a better choice than many other snacks. Enjoy these muffins knowing they’re a tasty way to sneak in some veggies! For the complete recipe, check out the Full Recipe section. 1. Preheat your oven to 350°F (175°C). This helps the muffins bake evenly. 2. Prepare your muffin tin. Grease it or line it with cupcake liners. This makes for easy removal. 3. Mix dry ingredients. In a medium bowl, whisk together: - 1 cup all-purpose flour - 1/2 cup unsweetened cocoa powder - 1 teaspoon baking soda - 1/2 teaspoon baking powder - 1/4 teaspoon salt 1. Mix wet ingredients. In a large bowl, beat together: - 1/2 cup granulated sugar - 1/4 cup brown sugar, packed - 1/2 cup vegetable oil 2. Add eggs. Mix in 2 large eggs, one at a time. Stir in 1 teaspoon vanilla extract. 3. Incorporate zucchini. Gently fold in 1 cup of grated zucchini. Make sure it mixes well. 4. Combine wet and dry. Gradually add the dry mix to the wet mix. Stir just until combined. Do not overmix. 5. Add chocolate chips. Fold in 1/2 cup chocolate chips and 1/4 cup chopped walnuts if you like. 1. Fill the muffin cups. Divide the batter evenly, filling each cup about 2/3 full. 2. Bake. Place in the oven and bake for 18-20 minutes. 3. Check for doneness. Insert a toothpick in the center. It should come out clean. 4. Cool the muffins. Let them sit in the tin for 5 minutes. Then, transfer to a wire rack to cool completely. You can find the full recipe for these decadent Chocolate Zucchini Muffins to enjoy! How to properly squeeze zucchini To get the best results, start with fresh zucchini. Grate it using a box grater. Once grated, place the zucchini in a clean kitchen towel. Twist the towel to remove excess moisture. You want it dry but not completely. This step keeps your muffins from becoming too soggy. Tips for achieving a moist texture Use a blend of sugars, like granulated and brown sugar. Brown sugar adds depth and moisture. Also, don’t overmix your batter. Mix just until combined. Overmixing can lead to dry muffins. Lastly, add chocolate chips for extra flavor and moisture. Ideas for garnishing or pairing Serve your muffins warm. A light dusting of powdered sugar looks great. You can also spread a bit of cream cheese on them. For a fun twist, try pairing them with fresh fruit like strawberries or raspberries. They add a nice contrast to the rich chocolate. Alternatives to powdered sugar dusting If you want something different, try a drizzle of melted chocolate. This adds extra sweetness and makes them look fancy. You could also top them with a sprinkle of sea salt. This gives a lovely sweet and salty flavor that many enjoy. Best types of muffin tins Use a non-stick muffin tin for easy release. Silicone muffin cups are also great. They make it simple to pop out the muffins. Ensure your muffin tin has a good depth to hold the batter well. Tools for easy mixing and measuring A set of measuring cups and spoons is key. Use a whisk for combining dry ingredients. For wet ingredients, a large mixing bowl works best. A spatula is perfect for folding in the zucchini and chocolate chips. These tools make your baking experience smooth. For the full recipe, check out the [Full Recipe]. {{image_2}} You can make chocolate zucchini muffins even better for you. Try using whole wheat flour instead of all-purpose flour. This adds fiber and makes them heartier. If you're looking for a gluten-free option, coconut flour works well, too. Reducing sugar is another smart choice. You can cut the sugar in half and still enjoy great flavor. For a sweet twist, use sugar substitutes like stevia or monk fruit. These options help you enjoy muffins without all the calories. Want to kick up the flavor? Adding spices can make a big difference. Try mixing in a teaspoon of cinnamon or nutmeg. These spices add warmth and depth to your muffins. You can also get creative with mix-ins! Adding dried fruit like raisins or cranberries gives a nice chew and natural sweetness. You can change your muffins with the seasons. In the fall, try making pumpkin chocolate muffins. Just swap some zucchini for pumpkin puree. This keeps the muffins moist and adds a cozy flavor. Don’t forget about other veggies! You can integrate carrots or sweet potatoes for a fun twist. These add nutrition and keep the muffins delicious. Whatever you choose, each variation opens a door to new flavors and fun! Check out the Full Recipe for more ideas. To keep your chocolate zucchini muffins fresh, store them in an airtight container. This helps keep moisture in and prevents them from drying out. I prefer using a glass container with a tight lid. If you plan to eat them within a few days, just place them on the kitchen counter. Always let the muffins cool completely before putting them away. This avoids extra moisture that can cause sogginess. Freezing muffins is simple. Here’s how to do it: 1. Cool the Muffins: Make sure your muffins are completely cool. 2. Wrap Individually: Wrap each muffin in plastic wrap. This prevents freezer burn. 3. Place in a Bag: Put the wrapped muffins in a freezer bag. Remove as much air as possible before sealing. 4. Label and Date: Write the date on the bag. This helps you keep track of freshness. To thaw them, just take out a muffin and leave it at room temperature for about 30 minutes. You can also microwave it for about 15 seconds for a quick warm-up. At room temperature, your chocolate zucchini muffins last about 3 to 4 days. If you store them in the fridge, they can last up to a week. Watch for signs they have gone bad. If you see mold or notice a sour smell, it’s time to toss them. Enjoy your baking adventures, and remember to check out the Full Recipe for more tips! Can I use frozen zucchini in this recipe? Yes, you can use frozen zucchini. Just thaw it first and squeeze out the water. This will help keep your muffins moist. Frozen zucchini works well, but fresh is always best if you have it. How can I make these muffins gluten-free? To make gluten-free muffins, substitute all-purpose flour with a gluten-free flour blend. This blend usually has starches and binders that mimic regular flour. Be sure to check that your chocolate chips are also gluten-free. What to do if the muffins come out dry? If your muffins turn out dry, it may be due to overbaking or too much flour. Make sure to measure flour accurately. If they are dry, try adding a bit of yogurt or applesauce next time for extra moisture. How to adjust baking time for mini muffins? Mini muffins bake faster than regular ones. Cut the baking time to about 10-15 minutes. Always check them with a toothpick to see if they are done. They should come out clean when baked right. Can I substitute oil for applesauce? Yes, you can replace oil with unsweetened applesauce. This swap reduces fat and adds natural sweetness. Use the same amount of applesauce as the oil in the recipe. What can I use instead of eggs? If you need an egg substitute, try using flaxseed meal or chia seeds. Mix 1 tablespoon of either with 2.5 tablespoons of water. Let it sit for a few minutes to thicken before adding it to your batter. You now know how to make delicious chocolate zucchini muffins. We covered key ingredients like grated zucchini, cocoa powder, and add-ins like chocolate chips and walnuts. I shared tips on baking and storage to keep your muffins fresh. You can even try healthier alternatives or seasonal twists. Remember, muffins are easy to bake and can be customized. Enjoy these tasty treats, and don't hesitate to experiment with your favorite flavors. Happy baking!](https://therecipehatch.com/wp-content/uploads/2025/07/7a894583-5470-4e1b-9055-48101af01285.webp)
Ready to bake something delicious and healthy? Our Chocolate Zucchini Muffins are moist, simple, and packed with flavor. You’ll find them a hit for breakfast or a snack. This recipe …
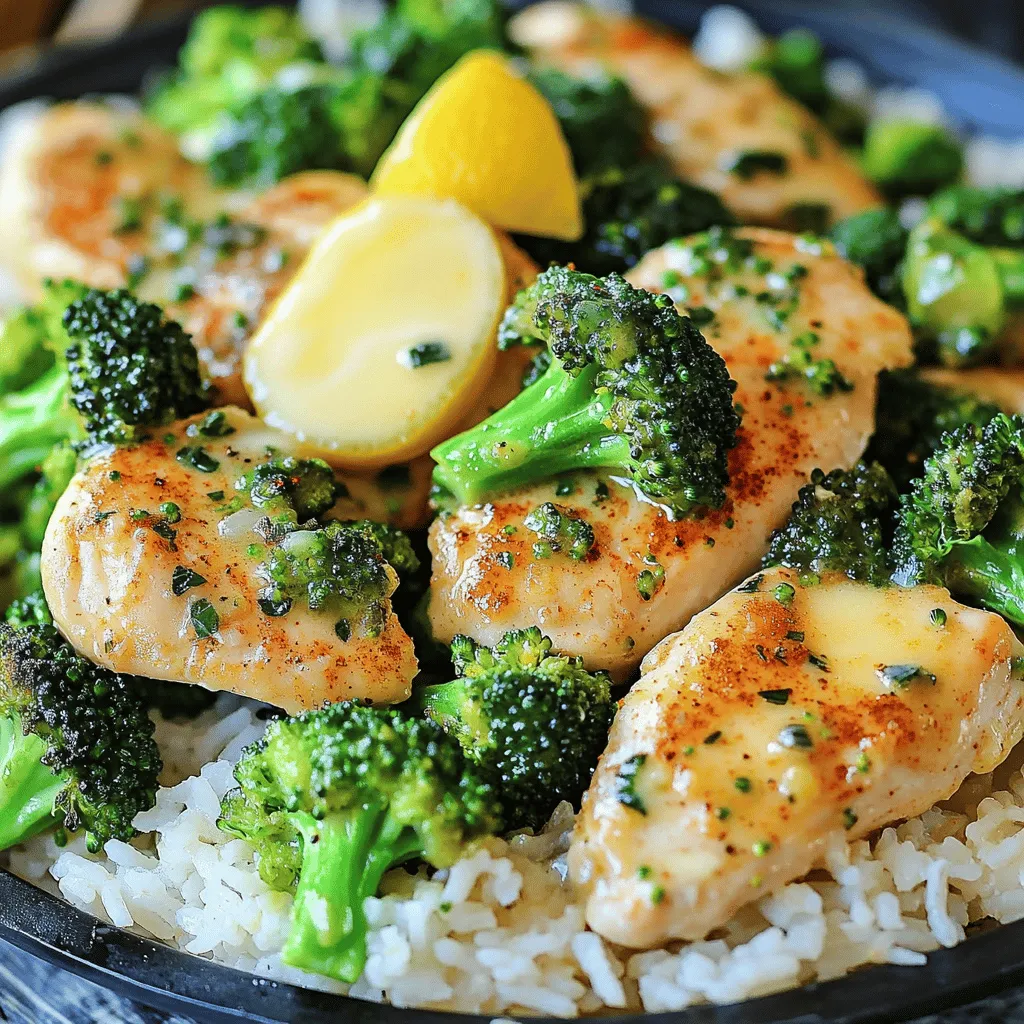
Looking for a quick, tasty dinner? You’ve found it! Garlic Butter Chicken & Broccoli is the perfect weeknight meal that’s easy to make and packed with flavor. This dish combines …
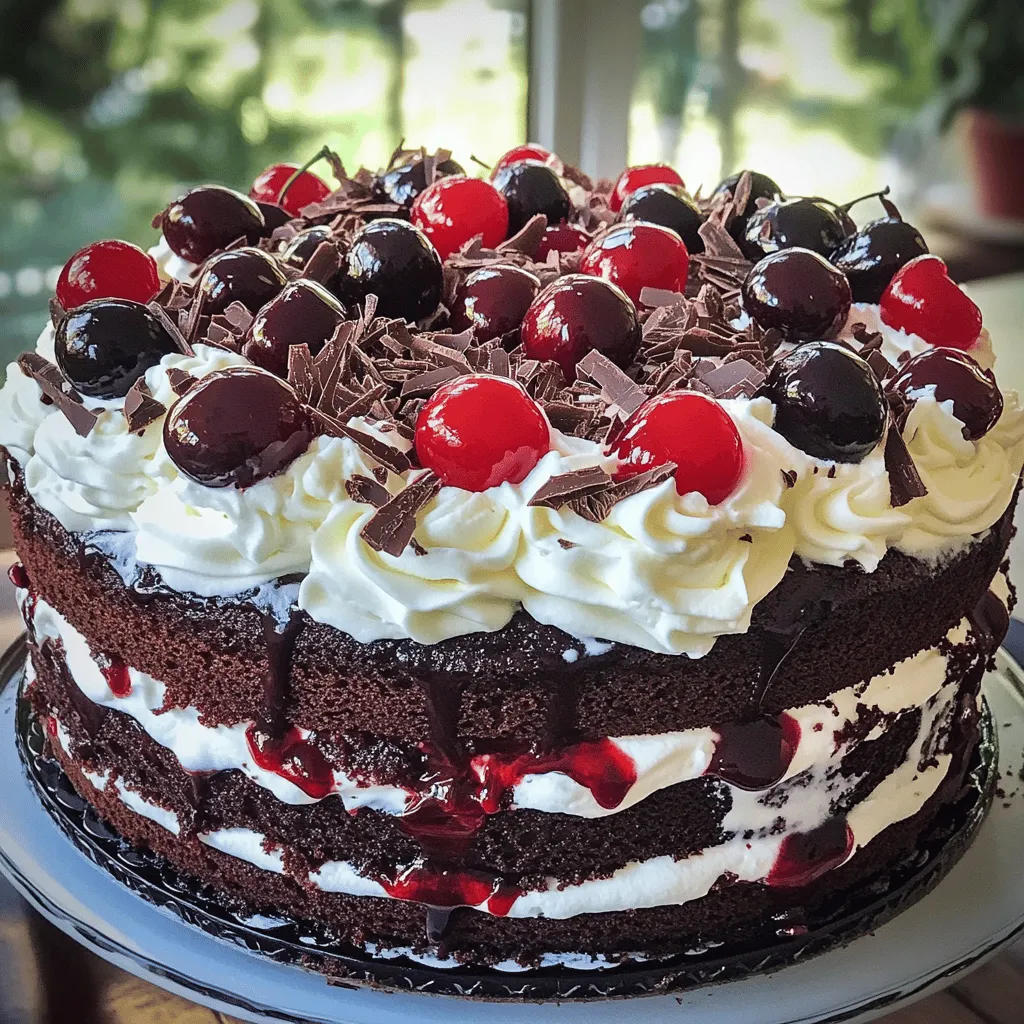
If you crave something rich and delicious, then you’re in the right place! This Decadent Black Forest Cake recipe is simple to follow and perfect for any occasion. With layers …

If you love donuts but want a fun twist, you’re in the right place! My Chocolate Zucchini Donut Recipe offers a deliciously moist treat that hides veggies in a sweet …
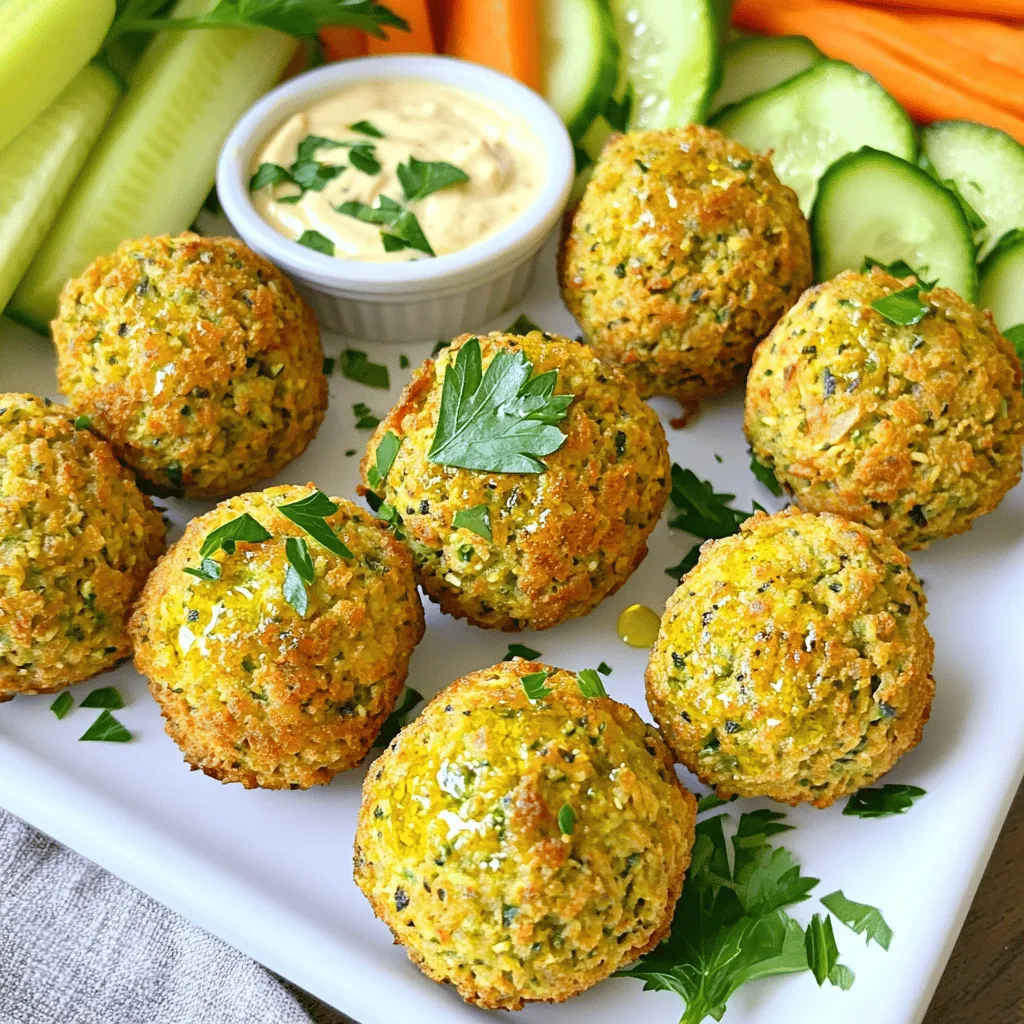
Are you ready to whip up some delicious Golden Brown Baked Falafel that’s easy to make? This recipe brings you crispy, flavorful falafel without the fuss. You only need simple …
![- Chicken Breasts: Use 2 boneless, skinless chicken breasts for this dish. They stay juicy and tender when grilled. - Marinade Components: The marinade includes olive oil, lemon zest, lemon juice, minced garlic, fresh rosemary, and thyme. This mix brings bright and fresh flavors. - Bowls' Filling Ingredients: For the bowls, you'll need cooked quinoa or brown rice, halved cherry tomatoes, diced cucumber, and sliced avocado. Fresh parsley adds a nice touch. - How to Measure Olive Oil and Lemon Juice: Use a liquid measuring cup for olive oil. For lemon juice, squeeze fresh lemons and measure the juice in the same cup. - Chopping Vegetables: Dice the cucumber into small cubes. Halve the cherry tomatoes for easy eating. Slicing the avocado should be done just before serving to keep it fresh. - Preparing Herbs for Marinade: Chop fresh rosemary and thyme finely. This helps release their oils and flavor into the marinade. You can use a sharp knife or kitchen scissors for this task. This recipe is quick and easy, perfect for a fresh meal. For the full recipe, check [Full Recipe]. How to Create the Marinade To make the marinade, mix olive oil, lemon zest, lemon juice, minced garlic, chopped rosemary, thyme, salt, and pepper in a bowl. The olive oil adds moisture. Lemon gives it a bright taste. Fresh herbs bring depth to the flavor. This simple mix makes chicken tender and tasty. Best Practices for Marinating Chicken Use a resealable bag for marinating. Place the chicken breasts inside and pour the marinade over them. Seal the bag tightly. This method ensures the chicken gets coated well. Let it sit in the fridge for at least 30 minutes. For more flavor, try marinating for up to 2 hours. Prepping the Grill Before you start grilling, preheat your grill or grill pan to medium-high heat. A hot grill sears the chicken, giving it nice grill marks. This step also locks in the juices. Tips for Perfectly Grilled Chicken Breast Remove the chicken from the marinade and shake off the excess. Grill each breast for 6-7 minutes on each side. Check that the internal temperature reaches 165°F (75°C). Once done, let the chicken rest for 5 minutes. This helps keep it juicy when you slice it. Layering Ingredients Properly Start with a base of cooked quinoa or brown rice. Top it with sliced grilled chicken. Then, add halved cherry tomatoes, diced cucumber, and sliced avocado. Each ingredient brings its own flavor and texture. This makes your bowl colorful and appealing. Garnishing Tips for Presentation Drizzle any leftover marinade or a splash of lemon juice on top. This adds brightness. Finally, sprinkle fresh parsley over each bowl. It adds a pop of green and makes the dish look fresh. For the full recipe, check the instructions above. To get the most flavor from your grilled lemon herb chicken, timing is key. Marinating for at least 30 minutes is a must. However, if you can, let it sit for up to 2 hours. This longer time allows the herbs and lemon to soak deep into the meat. You will taste the difference. After grilling, resting the chicken is just as important. Let it rest for 5 minutes before slicing. This helps keep the juices inside. Juicy chicken tastes better and feels tender in your mouth. If you're not grilling, you can cook the chicken on the stovetop or in the oven. For stovetop cooking, use a skillet over medium heat. Cook each side for about 6-7 minutes until it reaches 165°F (75°C). In the oven, preheat to 375°F (190°C). Place the chicken on a baking sheet. Bake for about 25-30 minutes until cooked through. Using a meat thermometer is a smart move. It ensures the chicken is perfectly done. Insert it in the thickest part of the breast. When it reads 165°F (75°C), it's safe to eat. When it comes to serving, how you arrange your bowl matters. Start with a base of quinoa or brown rice. Next, add the sliced grilled chicken. Scatter cherry tomatoes and diced cucumber for color. Finish with avocado slices on top. For pairings, consider adding a simple green salad or a light vinaigrette. It adds freshness and balances the rich flavors of the chicken. You can find the full recipe for more details on creating this delicious meal. {{image_2}} You can easily switch up the protein in your grilled lemon herb chicken bowls. If you want a meat-free option, try tofu. It soaks up the marinade well. For seafood lovers, shrimp is another great choice. Just be sure to adjust the cooking time, as shrimp cooks faster than chicken. For grains or bases, you have options too! Instead of quinoa or brown rice, consider using couscous. It cooks quickly and adds a nice texture. You can also try farro or barley for a nutty flavor that pairs well with the lemon herb notes. If you like a little heat, add red pepper flakes to the marinade. This will give your dish a spicy kick. You can also try smoked paprika for a deeper flavor. Incorporating seasonal vegetables can elevate your bowls. Add bell peppers in the summer or roasted butternut squash in the fall. These veggies not only taste great but also add vibrant colors to your meal. If you're looking for gluten-free options, use quinoa or rice as your base. They are both naturally gluten-free. Also, you can use tamari instead of soy sauce in the marinade for a gluten-free flavor. For low-calorie substitutes, swap out the olive oil for a low-calorie cooking spray. This will reduce the fat content but still keep your chicken moist. You can also skip the avocado or use less to cut calories while still enjoying the dish. You can find the full recipe for grilled lemon herb chicken bowls in the earlier sections. Enjoy experimenting with these variations! To keep your grilled lemon herb chicken bowls fresh, refrigerate them in airtight containers. This keeps moisture in and prevents odors from other foods. Make sure to store the chicken and veggies separately from the grains. This helps maintain their texture. Leftovers stay good for three to four days in the fridge. For safe reheating, use the microwave or oven. When using the microwave, cover the bowl with a damp paper towel. This keeps the chicken moist. Heat in short bursts, stirring between to warm evenly. If you use the oven, preheat it to 350°F (175°C). Place the bowl in the oven covered with foil for about 15 minutes. Planning ahead makes weeknight meals easier. You can marinate the chicken the night before. This infuses more flavor and saves time. Cook a batch of quinoa or brown rice at the start of the week. Store it in the fridge for quick assembly. When prepping veggies, wash and chop them in advance. Store each type in separate containers. This keeps them fresh and crisp. Slice the avocado just before serving to prevent browning. With these tips, you can enjoy fresh bowls all week long. For more detailed steps, check out the Full Recipe. For the best taste, marinate chicken for at least 30 minutes. This time allows the flavors to soak in. If you have more time, up to 2 hours works great. Just remember, don’t go over 2 hours, or the chicken may get too salty. If you want a different flavor, try lime or orange juice. Both give a fresh taste. You can also use grapefruit for a twist. Each fruit adds a unique taste profile to your dish. Yes! Grilled chicken is super versatile. You can use it in salads, wraps, or sandwiches. Slice it up and toss it on top of greens for a quick lunch. - Ideas for Leftover Grilled Chicken - Add to pasta or grain salads. - Mix into tacos with fresh toppings. - Use in stir-fries with seasonal veggies. - Versatility of Grilled Chicken Bowls Grilled chicken bowls can change with the season. Swap out veggies or grains based on what's fresh. This keeps meals exciting! You can also check the Full Recipe for more ideas on how to enjoy your grilled chicken. This blog post covered how to make delicious chicken bowls from start to finish. We explored essential ingredients, how to measure and prepare them, and detailed steps for marinating and grilling. We also shared tips for serving and storage, as well as creative variations to suit your tastes. In the end, preparing chicken bowls is simple and fun. With these steps, you can create meals that are tasty and adaptable. Enjoy your cooking journey and the tasty bowls you’ll make!](https://therecipehatch.com/wp-content/uploads/2025/07/8a401de4-040a-42da-bb67-4386f8b4bf77.webp)
Are you ready to spice up your dinner routine? These Grilled Lemon Herb Chicken Bowls are bursting with flavor and freshness. Perfect for any night, they combine juicy grilled chicken, …
![- Chicken breast - Garlic - Parmesan cheese I use boneless, skinless chicken breast. It’s tender and cooks well. For flavor, fresh garlic is a must. I love using four cloves of minced garlic. It brings a strong taste to the dish. Grated Parmesan cheese adds a nice touch. I recommend half a cup for a rich flavor. - Greek yogurt - Lemon juice - Olive oil Greek yogurt helps keep the chicken moist. It also adds a tangy flavor. I use a quarter cup in the marinade. Fresh lemon juice is another key ingredient. It brightens the dish and adds zing. I use two tablespoons for the perfect balance. Olive oil rounds out the marinade. It adds richness and helps with grilling. I stick to one tablespoon for this recipe. - Dried oregano - Paprika - Salt and pepper Seasonings are vital for taste. I use one teaspoon of dried oregano. It gives an earthy flavor. Paprika adds a mild heat and color. I also use one teaspoon of it. Finally, I add salt and pepper to taste. These simple seasonings enhance all the flavors. For the full recipe, check the link provided. Marinating the chicken: Start by making the marinade. In a bowl, mix minced garlic, grated Parmesan, Greek yogurt, lemon juice, olive oil, dried oregano, paprika, salt, and pepper. Stir until it’s smooth. Next, add the chicken cubes. Toss them well to coat with the marinade. Cover the bowl and refrigerate it for at least 30 minutes. For a stronger flavor, let it marinate for up to 2 hours. Soaking skewers if wooden: If you use wooden skewers, soak them in water for about 30 minutes. This step helps prevent burning on the grill. It is a simple way to ensure that your skewers hold up during cooking. Preheating the grill: While the chicken marinates, it’s time to get the grill ready. Preheat your grill or grill pan to medium-high heat. A hot grill sears the chicken and gives it nice grill marks. Cooking time and checking doneness: Once the grill is hot, thread the marinated chicken onto the skewers. Leave a little space between each piece for even cooking. Place the skewers on the grill and cook for 10 to 12 minutes. Turn them occasionally. The chicken should reach an internal temperature of 165°F. This ensures it is safe to eat and juicy. Resting before serving: After grilling, take the skewers off the grill. Let them rest for a few minutes. This pause helps the juices settle in, making the chicken more tender. Presentation tips: For a beautiful serving, place the skewers on a wooden cutting board. Sprinkle extra Parmesan cheese on top for flavor. Garnish with fresh parsley and serve lemon wedges on the side. These little details make your dish look and taste amazing. For the complete recipe, check out the [Full Recipe]. To get the best flavor, marinate your chicken for at least 30 minutes. If you have time, aim for 2 hours. This longer time helps the chicken soak up all the tasty flavors. You can also mix in some fresh herbs like thyme or basil for extra taste. A splash of hot sauce can add a fun kick too! To cook your skewers evenly, keep your grill at a steady medium-high heat. Make sure to leave space between each piece of chicken on the skewers. This space helps the heat reach every side. Avoid common mistakes like flipping too often. Just turn them every few minutes for great grill marks. These skewers pair well with many side dishes. Try serving them with a fresh salad or warm pita bread. Dipping sauces make a great addition too! A simple garlic aioli or tangy yogurt dip can enhance the meal. Get creative and enjoy your Garlic Parmesan Chicken Skewers! For the full recipe, check out the link. {{image_2}} You can switch up the protein in these skewers. Shrimp makes a great choice. It cooks fast and absorbs flavors well. Tofu is also a nice option for a vegetarian meal. Both shrimp and tofu work well with the garlic and Parmesan. For cheese, try using feta or mozzarella. Feta adds a tangy touch, while mozzarella gives a creamy texture. Each cheese brings its own flavor, making the dish fun and fresh. Want a kick? Add chili flakes to the marinade. This will spice up the skewers nicely. You can also use fresh herbs like basil or thyme. They can give the dish a bright, aromatic twist. Experimenting with herbs can change the whole vibe of your meal. You can cook these skewers in different ways. Grilling gives them a nice char and smoky flavor. It’s perfect for outdoor cooking. If you prefer indoors, oven-baking is a good choice. Just set your oven to 400°F and bake the skewers for about 15-20 minutes. You can also use a skillet on your stovetop. Heat it over medium-high and cook for about 10-12 minutes, turning to brown all sides. Each method offers a unique taste, so feel free to try them all! For the full recipe, check out the details above! To keep your Garlic Parmesan Chicken Skewers fresh, store them in the fridge. Place the skewers in an airtight container. They will stay good for about 3 to 4 days. If you want to save them for longer, consider freezing. Wrap the skewers tightly in plastic wrap, then put them in a freezer bag. They can last for up to 3 months in the freezer. When you’re ready to enjoy leftovers, reheating them properly is key. Use an oven or skillet to retain moisture. Preheat your oven to 350°F (175°C). Place the skewers on a baking sheet and cover with foil. Heat for about 10-15 minutes. If using a skillet, add a splash of water and cover. This helps avoid a rubbery texture. Aim for heated chicken that stays juicy and flavorful. Knowing how long your dish lasts is important. In the fridge, Garlic Parmesan Chicken Skewers are best eaten within 3 to 4 days. If stored in the freezer, they can be safe for up to 3 months. Watch for any signs of spoilage. If you see an off smell, changed color, or slimy texture, it's time to toss them. Always prioritize food safety to enjoy your meal! For more detailed instructions, check out the Full Recipe. For the best flavor, marinate the chicken for at least 30 minutes. If you have time, let it sit for up to 2 hours. This helps the chicken absorb all the tasty garlic and Parmesan flavors. If you marinate too long, the acid in the lemon juice can change the chicken's texture. So, keep that in mind! Yes, you can prepare the skewers ahead of time! Marinate the chicken and thread it onto skewers. Cover and store them in the fridge for up to 24 hours. When you are ready to cook, just take them out and grill. This makes meal prep easy and fun! These skewers pair well with many side dishes. Here are some great options: - A fresh garden salad with lemon vinaigrette - Creamy mashed potatoes for a comforting touch - Grilled vegetables for more color and flavor - Rice pilaf to soak up extra sauce For more ideas, check out the Full Recipe! Enjoy your cooking! In this guide, we explored how to make tasty Garlic Parmesan Chicken Skewers. We covered the main ingredients like chicken, garlic, and Parmesan cheese, along with a simple marinade using Greek yogurt and lemon juice. I also shared tips for grilling, serving, and storing your skewers. Whether you choose to grill or bake, these skewers are easy and fun. Try various flavors to keep things fresh. Enjoy your cooking and impress your friends and family with this delicious dish!](https://therecipehatch.com/wp-content/uploads/2025/07/e5e7de84-01f2-45c2-9102-83e47d218022.webp)
Looking for a quick, tasty meal? Garlic Parmesan Chicken Skewers are your answer! This dish combines tender chicken, rich garlic, and cheesy goodness. It’s simple to make and perfect for …
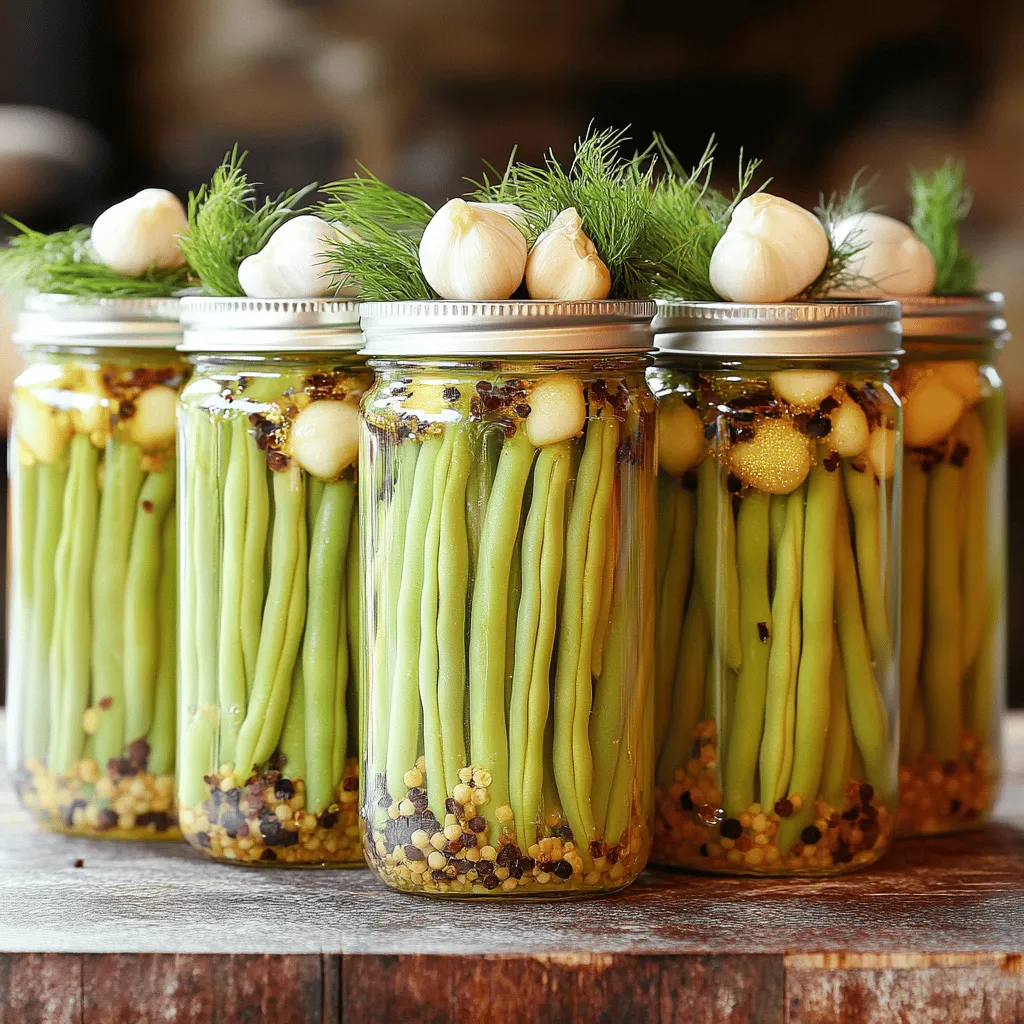
Are you ready to take snack time up a notch? Grandma’s Crispy Garlic Dilly Beans are not just tasty; they are a crunchy delight packed with flavor. In this article, …
![For this cake, you need 2 cups of fresh strawberries. Make sure they are ripe and sweet. Remove the green tops and slice them. This step brings out their juicy goodness. Mixing them with sugar makes them even better. Let them sit for about 30 minutes. This will make them soft and juicy. You will need 1 cup of heavy cream and 1/2 cup of granulated sugar. The cream must be chilled for the best results. This will help you whip it to stiff peaks. The sugar sweetens the cream and helps it hold its shape. Add 1 teaspoon of vanilla extract for a nice touch of flavor. For the cake, gather these ingredients: - 1 1/2 cups all-purpose flour - 1/2 teaspoon baking powder - 1/4 teaspoon salt - 1/2 cup unsalted butter, softened - 2 large eggs The flour gives the cake structure. Baking powder helps it rise. Salt enhances all the flavors. Beat the softened butter with the sugar until fluffy. Then add the eggs, mixing them in one at a time. This cake base is light and soft. You can find the Full Recipe for more details on the steps! Start by hulling and slicing 2 cups of fresh strawberries. Place them in a bowl. Add 1/4 cup of granulated sugar to the berries. Let them sit for about 30 minutes. This step helps make the strawberries soft and juicy. The sugar draws out their natural juices. It creates a sweet syrup that enhances the mousse. In a small bowl, sprinkle 1 tablespoon of unflavored gelatin over 3 tablespoons of cold water. Let it bloom for about 5 minutes. Meanwhile, in a mixing bowl, beat 1 cup of chilled heavy cream until soft peaks form. Gradually add the remaining 1/4 cup of sugar and 1 teaspoon of vanilla extract. Continue whipping until stiff peaks form. Gently fold in the macerated strawberries. Melt the bloomed gelatin in the microwave for about 10 seconds. Fold the gelatin into the mixture until well combined. Preheat your oven to 350°F (175°C). In a bowl, sift together 1 1/2 cups of all-purpose flour, 1/2 teaspoon of baking powder, and 1/4 teaspoon of salt. In another bowl, cream 1/2 cup of softened unsalted butter with the remaining sugar until light and fluffy. Beat in 2 large eggs, one at a time. Gradually add the dry ingredients. Mix until just combined. Pour the batter into a greased 9-inch round cake pan. Bake for 20-25 minutes. Check with a toothpick; it should come out clean. Let it cool completely in the pan. Once cool, slice the cake in half horizontally. Place one layer on a serving plate. Spread half of the strawberry mousse over it. Top with the second layer and spread the remaining mousse on top. Refrigerate the assembled cake for at least 2 hours. This helps the mousse set properly. When ready, slice the cake and serve it chilled. You can garnish with fresh strawberries on top for a beautiful touch. Enjoy the delightful flavors of your strawberry mousse cake! For the complete recipe, refer to [Full Recipe]. To get the best texture for your mousse, start with cold cream. I chill my mixing bowl and beaters in the fridge. This helps the cream whip up nicely. When you whip the cream, stop when soft peaks form. Then, add sugar and vanilla. Keep whipping until you see stiff peaks. Gently fold in your strawberries. This keeps the mousse light and airy. For a fluffy cake, use room temperature butter and eggs. Cream the butter and sugar until it's light and fluffy. This adds air into your batter. Sift the flour, baking powder, and salt together. This helps mix them evenly. When you add dry ingredients, mix until just combined. Over-mixing can make your cake dense. When serving your cake, slice it with a sharp knife. For a clean cut, dip the knife in hot water and wipe it dry. Garnish each slice with fresh strawberries or a sprig of mint. You can add a dollop of whipped cream on the side. This makes each bite even better. For a fun twist, try adding a drizzle of chocolate sauce. Enjoy this delightful Strawberry Mousse Cake with your friends and family! For the complete recipe, check out the Full Recipe. {{image_2}} You can add chocolate to your strawberry mousse cake for a rich twist. Start by melting 4 ounces of dark chocolate. Mix this chocolate into the mousse after folding in the strawberries. This change makes the cake taste decadent and adds a lovely color contrast. Top it with chocolate shavings for a beautiful finish. To make a vegan version, swap heavy cream for coconut cream. Use 2 cans of full-fat coconut milk. Chill them overnight and scoop out the thick part. For the gelatin, use agar-agar as a plant-based alternative. This keeps the cake creamy without any dairy. Even non-vegans will love this version! For a gluten-free cake, replace all-purpose flour with a gluten-free blend. Ensure it has xanthan gum for better texture. You can also use almond flour or coconut flour. These options give the cake a unique flavor and texture. Always check labels to avoid hidden gluten. This way, everyone can enjoy your strawberry mousse cake! To keep your strawberry mousse cake fresh, wrap it tightly in plastic wrap. You can also use an airtight container. This prevents air from drying out the cake. Store it in the fridge. Enjoy it within three days for the best taste. If you want to save some cake for later, freezing works well. First, slice the cake into portions. Wrap each piece in plastic wrap. Then, place the wrapped slices in a freezer bag. Remove as much air as possible. Your cake will stay fresh for up to three months. When ready to eat, thaw in the fridge overnight. The shelf life of your strawberry mousse cake depends on storage. In the fridge, it lasts about three days. If frozen, it can last up to three months. Always check for any signs of spoilage before serving. Enjoy your cake at its best! For the full recipe, refer to the earlier sections. Yes, you can use frozen strawberries. Just thaw them first. Drain excess liquid before adding them to the mousse. This helps keep the mousse from being too watery. Fresh strawberries do taste better, but frozen ones work in a pinch. Check the cake with a toothpick. Insert it in the center of the cake. If it comes out clean, the cake is done. You can also lightly press the top; it should spring back. Underbaking can lead to a soggy texture, so watch closely. Absolutely! You can make the mousse a day ahead. Just store it in the fridge. It needs time to set, so making it early helps. Just remember to fold it into the cake layers when you assemble. You can find Strawberry Mousse Cake at bakeries or dessert shops. Many grocery stores also sell them in the frozen section. For a special occasion, consider ordering from a local bakery. They often make fresh cakes to your liking. Use a sharp knife to slice the cake. Dip the knife in warm water to get clean cuts. Serve each slice chilled for the best taste. You can add fresh strawberries on top for a lovely touch. For a fun twist, pair it with whipped cream. For the complete recipe, check out the Full Recipe above! To create a delicious strawberry mousse cake, I covered key ingredients, step-by-step instructions, and useful tips. You now know how to prepare fresh strawberries, make a rich mousse, and bake a fluffy cake. Remember to chill your cake for the best flavor and texture. Explore variations, including vegan or chocolate options, to fit your diet. Store any leftovers carefully to keep them fresh longer. Enjoy making your cake, and don’t hesitate to share with friends. You’ll impress them with your skills and creativity.](https://therecipehatch.com/wp-content/uploads/2025/07/35b5ed4a-dcb2-4af6-9dff-5b7cd9ef6c38.webp)
If you’re craving a sweet treat that’s simple to make, I’ve got just the recipe for you! This Strawberry Mousse Cake is both delightful and easy, making it perfect for …