Double Decker Neapolitan Cheesecake Delightful Recipe

Are you ready to impress your friends and family with a treat that’s both beautiful and delicious? This Double Decker Neapolitan Cheesecake recipe combines creamy layers of rich flavors, making …

![To make the best Strawberry Whipped Cream Cake, start with fresh strawberries. Look for bright red berries that are firm and fragrant. Avoid any that are dull or mushy. Fresh strawberries add the best flavor and sweetness. If you need gluten-free options, use a gluten-free flour blend. For those who need dairy-free options, substitute buttermilk with almond milk and the butter with coconut oil. Using heavy cream is key for making the whipped cream. It whips up nice and thick, creating a rich texture. Avoid light cream, as it won’t hold its shape well. Here’s what you need for the cake: - 1 ½ cups all-purpose flour - 1 cup granulated sugar - 1 ½ teaspoons baking powder - ½ teaspoon baking soda - ¼ teaspoon salt - ½ cup unsalted butter, softened - 2 large eggs - 1 teaspoon vanilla extract - ½ cup buttermilk - 1 cup fresh strawberries, diced - 1 ½ cups heavy cream - 2 tablespoons powdered sugar - 1 teaspoon vanilla extract (for whipped cream) - Additional strawberries for garnish For the full recipe, check out the complete guide to create this tasty dessert! First, preheat your oven to 350°F (175°C). Greasing your cake pan is key. Use butter or non-stick spray to coat the bottom and sides of a 9-inch round cake pan. This keeps the cake from sticking. In a large bowl, mix the dry ingredients. Combine 1 ½ cups of all-purpose flour, 1 cup of granulated sugar, 1 ½ teaspoons of baking powder, ½ teaspoon of baking soda, and ¼ teaspoon of salt. Whisk them together well. Now, it's time to add the wet ingredients. Add ½ cup of softened butter, 2 large eggs, 1 teaspoon of vanilla extract, and ½ cup of buttermilk to the dry mix. Use an electric mixer on medium speed. Mix until the batter is smooth. Next, gently fold in 1 cup of diced fresh strawberries. This adds flavor and makes the cake fruity. Pour the cake batter into your prepared pan. Spread it out evenly. Bake for 25-30 minutes. Check if it's done by inserting a toothpick into the center. If it comes out clean, the cake is ready. Once baked, let the cake cool in the pan for about 10 minutes. This step is important. It allows the cake to set and makes it easier to remove from the pan. After that, transfer it to a wire rack to cool completely. While the cake cools, prepare the whipped cream. In a large bowl, add 1 ½ cups of heavy cream, 2 tablespoons of powdered sugar, and 1 teaspoon of vanilla extract for flavor. Whip the cream using a hand mixer. Start on medium-high speed until you see stiff peaks form. This means the cream holds its shape well. Be careful not to over-mix; it can turn into butter if you whip too long. Once the cake is cool, slice it into two equal layers. Place one layer on a serving plate. Spread a generous amount of whipped cream on top and layer with fresh strawberries. Place the second layer on top and repeat the process. Finish by covering the cake with whipped cream and adding more strawberries for decoration. For the complete instructions, check out the Full Recipe. To ensure your cake is moist, use room temperature ingredients. Cold butter or eggs can lead to a dry cake. Mix the batter gently, and don’t over-mix it. This keeps air in, making the cake light and fluffy. When layering whipped cream and strawberries, start with a smooth layer of cream on the first cake layer. Place diced strawberries evenly on top. Repeat this with the second layer, adding more cream and strawberries. This creates a lovely contrast and bursts of flavor in each slice. For decorating, spread whipped cream smoothly on the top and sides. Add fresh strawberries on top for a pop of color. You can also drizzle strawberry sauce around the plate for extra flair. Mint leaves add a fresh touch. If your cake turns out dense, check your measurements. Too much flour can weigh it down. Make sure to sift your flour and measure it accurately. Also, avoid over-mixing the batter; this can create a heavy texture. If your whipped cream won't whip, check the cream's temperature. It needs to be very cold. Use a clean bowl and beaters to avoid any residue. Start whipping slowly, then increase the speed. This will help create the stiff peaks you want. For the full recipe, see the [Full Recipe]. {{image_2}} You can change up the flavor of your cake with a few simple tweaks. Adding lemon zest gives a bright taste. Just a teaspoon can make a big difference. You can also use a vanilla bean. It adds a rich and warm flavor that pairs well with strawberries. If you love chocolate, try adding cocoa powder. Just mix in 1/4 cup into the dry ingredients. You can also top the cake with chocolate shavings. This will give your cake a fun twist and a rich taste. Don't be afraid to get creative with fruits! Blueberries and raspberries can be great additions. Just fold in one cup of your chosen fruit with the strawberries. This adds more color and flavor to your cake. For extra texture, consider nuts. Chopped almonds or walnuts can add a nice crunch. Coconut flakes can also work well, giving a tropical vibe. Mix in 1/2 cup of either into your batter. These variations can elevate your Strawberry Dream Whipped Cream Cake. Check out the Full Recipe for more tips! To keep your Strawberry Whipped Cream Cake fresh, store it in the fridge. Place the cake in an airtight container. If you do not have one, cover it tightly with plastic wrap. This keeps moisture in and prevents it from drying out. The cake stays fresh for about 3 to 4 days in the fridge. The whipped cream may start to lose its texture after this time. For longer storage, freeze individual pieces. Wrap each piece in plastic wrap, then place them in a freezer bag. If you have leftover cake, you can refresh it. Take the cake out of the fridge and let it sit for about 15 minutes. This brings back some of its original flavor and texture. You can also add a new layer of whipped cream or fresh strawberries on top for a bright look. For frozen pieces, thaw them in the fridge overnight. This keeps the cake moist. You can warm them slightly in the microwave before serving. This way, the flavors of the strawberries shine through. If you want, add a dollop of fresh whipped cream to each slice. For the full recipe, check out the details above. Can I use frozen strawberries instead of fresh? Yes, you can use frozen strawberries. Just thaw them first. Drain any excess juice to keep the cake from getting soggy. Fresh strawberries bring a bright taste, but frozen works well too. How can I make this cake ahead of time? You can bake the cake a day in advance. Cool it completely, then wrap it well in plastic wrap. Store it in the fridge. You can also whip the cream ahead of time. Just keep it in the fridge until you're ready to layer. What’s the best way to serve the cake? Slice the cake into wedges and serve it chilled. Garnish each slice with extra strawberries. For a fun twist, drizzle some strawberry sauce on the plate before placing the cake slice. This adds a nice touch and makes it look fancy! - Calories and serving size breakdown: Each slice has about 250 calories. This is based on a serving size of 1/10 of the cake. - Any dietary concerns (sugar content, allergens): The cake contains sugar and gluten. If you have allergies, consider using gluten-free flour and a sugar substitute. Always check labels for allergens. For the full recipe, refer to the section above. In this article, we explored how to make a delicious strawberry whipped cream cake. We discussed choosing fresh ingredients, like strawberries and heavy cream, and shared simple steps for baking and decorating. You learned tips to keep your cake moist and how to troubleshoot issues, like a dense cake or whipped cream that won’t whip. Finally, we looked at storage and serving tips to keep your cake fresh. With these ideas, creating your perfect cake is easy and fun. A yummy strawberry whipped cream cake awaits you!](https://therecipehatch.com/wp-content/uploads/2025/07/81893a91-c810-411f-a91c-4da14d03f7a1.webp)


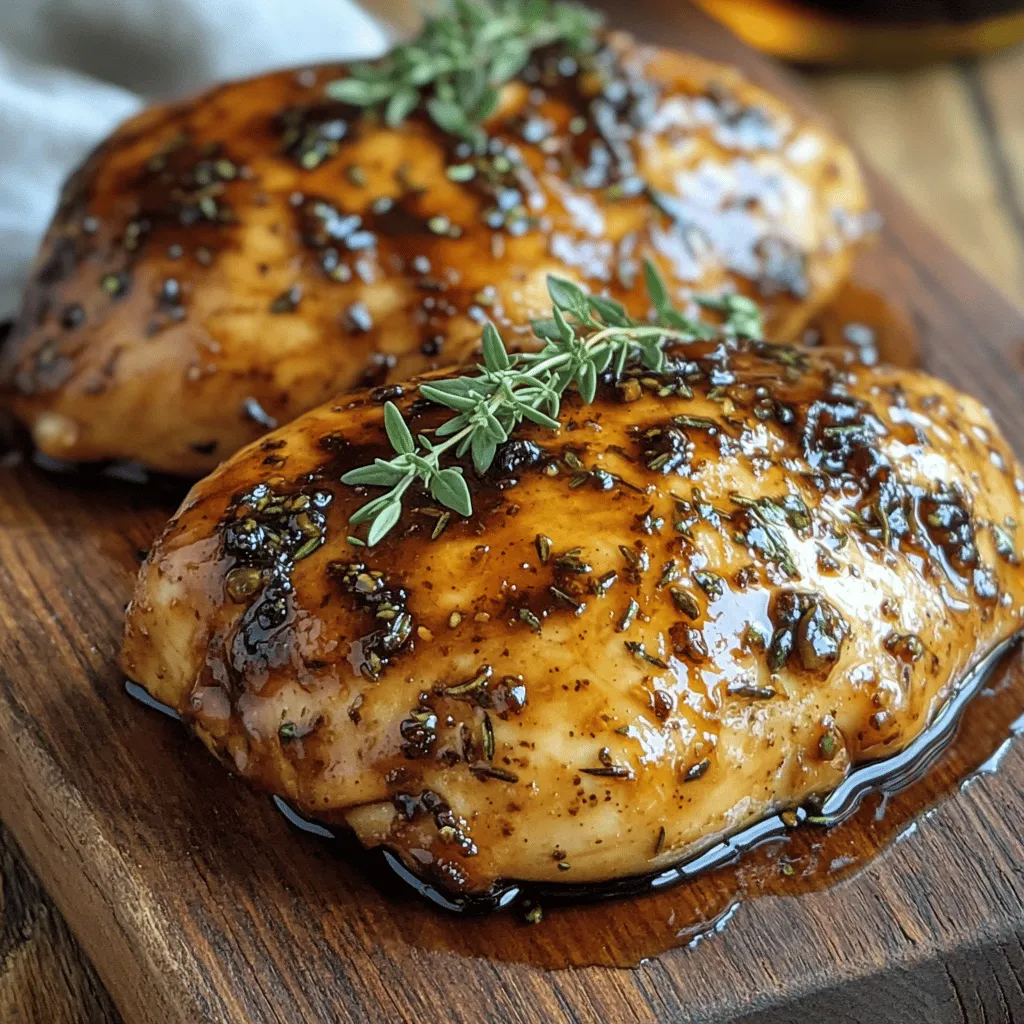
![For this flavorful balsamic chicken caprese salad, you'll need: - 2 boneless, skinless chicken breasts - 1 cup cherry tomatoes, halved - 1 cup fresh mozzarella balls - 2 cups fresh basil leaves These main ingredients create a colorful and tasty dish. The chicken adds protein, while the tomatoes and mozzarella bring freshness. The basil leaves add a fragrant touch. To dress the salad, gather: - 3 tablespoons balsamic vinegar - 2 tablespoons olive oil - Salt and pepper to taste This dressing ties the salad together with a tangy and rich flavor. Balsamic vinegar provides a nice zing, while olive oil adds smoothness. For seasoning, you will need: - 1 teaspoon garlic powder - 1 teaspoon dried oregano These spices enhance the chicken's taste. Garlic powder gives a savory depth, and oregano adds a classic Italian flavor. You can find the full recipe for extra details and specific steps. Start by marinating the chicken. This step adds flavor and keeps the meat juicy. Season the chicken breasts with: - 1 teaspoon garlic powder - 1 teaspoon dried oregano - Salt and pepper to taste Mix these spices together. Rub this mixture over the chicken. Let it sit for at least 15 minutes. This allows the flavors to soak in. For cooking, I prefer a skillet. Heat 1 tablespoon of olive oil in a large skillet over medium heat. Once the oil is hot, add the seasoned chicken. Cook it for about 6-7 minutes on each side. The chicken should reach an internal temperature of 165°F (75°C). To check for doneness, use a meat thermometer or cut the chicken to see if the juices run clear. Once done, remove the chicken from the skillet and let it rest for a few minutes. This helps keep it tender when you slice it. Now, it’s time to combine the salad ingredients. In a large bowl, mix together: - 1 cup cherry tomatoes, halved - 1 cup fresh mozzarella balls - 2 cups fresh basil leaves Next, make the dressing. In a small bowl, whisk together: - 3 tablespoons balsamic vinegar - 2 tablespoons olive oil - Salt and pepper to taste Now, slice the rested chicken and add it to the salad bowl. Drizzle the balsamic dressing over everything. Gently toss to mix all the ingredients. Your flavorful balsamic chicken caprese salad is now ready to serve! Enjoy it fresh and colorful. For further details, check the Full Recipe. To make your chicken juicy, start with good seasoning. I use garlic powder and dried oregano. After seasoning, heat olive oil in a skillet. Cook the chicken on medium heat. This usually takes about 6-7 minutes on each side. Always check the internal temperature. It should reach 165°F (75°C). This ensures that the chicken is safe and juicy. Let it rest for a few minutes. This keeps the juices locked inside. When mixing your salad, add the chicken last. This way, you keep the tomatoes and mozzarella intact. Gently toss the ingredients to avoid mashing them. To enhance flavors, use fresh basil leaves. They add a nice aroma and taste. You can also sprinkle a bit of salt over the salad just before serving. This makes everything pop. You can make your balsamic dressing with just two ingredients: balsamic vinegar and olive oil. If you want something richer, try adding a bit of honey or mustard. Homemade dressing usually tastes better, but store-bought can save time. Just check the label for quality. High-quality ingredients make a big difference. For the full recipe, check the link. {{image_2}} You can easily change the protein in this salad. If you want a lighter option, use tofu. Tofu absorbs flavors well and can make the dish vegan. Shrimp is another tasty choice. It cooks quickly and pairs nicely with the salad. For cheese, fresh mozzarella is classic. However, you can try feta or goat cheese for a tangy flavor. These cheeses add a unique twist and change the taste profile. Seasonal produce can elevate this dish. In summer, use ripe peaches or strawberries for a sweet touch. In fall, add roasted butternut squash or apples for warmth. These fruits bring freshness and color to the salad. You can also adapt this salad for special occasions. For a festive touch, add pomegranate seeds during the holidays. They add crunch and a burst of flavor. If you need a gluten-free dish, this salad is perfect as is. All ingredients are naturally gluten-free. Just double-check your balsamic vinegar for any hidden gluten. For a vegan version, swap the chicken for chickpeas or lentils. Both add protein and texture. Omit the mozzarella or use a plant-based cheese. These changes keep the salad delicious while meeting dietary needs. With these variations, you can make the flavorful balsamic chicken caprese salad suit any taste or occasion. Don’t forget to check the Full Recipe for detailed steps! To keep your Flavorful Balsamic Chicken Caprese Salad fresh, refrigerate it within two hours of serving. Use an airtight container to prevent moisture loss. Glass containers work well. They keep the salad fresh and let you see the colorful layers. You can freeze the salad, but it’s best to freeze the chicken alone. This will help maintain the quality of the other ingredients. Cut the chicken into pieces and place it in a freezer-safe bag. Remove as much air as possible before sealing. For reheating, thaw the chicken overnight in the fridge. Warm it in a skillet on low heat. Avoid microwaving, as it can dry out the chicken. In the fridge, your salad can last about three days. After that, the ingredients may begin to spoil. Look for signs like a sour smell or slimy texture. If the basil turns brown or the mozzarella looks off, it’s time to toss it. Enjoy your salad while it’s still fresh for the best flavor! For the complete recipe, check out the [Full Recipe]. To make chicken tasty, start with a good marinade. Use balsamic vinegar, olive oil, and spices. Let the chicken soak for at least 30 minutes. Garlic powder and dried oregano add great flavor. Salt and pepper are key too. Rub the spices directly on the chicken for more taste. Cooking the chicken on medium heat helps keep it juicy. Yes, you can prepare this salad ahead. Chop the chicken and veggies, then store them separately. Keep the balsamic dressing in a jar. When you’re ready to eat, mix everything. This keeps the salad fresh and crunchy. You can store the salad in the fridge for up to two days. This salad pairs well with many dishes. Try serving it with crusty bread or garlic knots for a filling meal. A side of roasted vegetables is great too. You can also serve it alongside a light soup. These sides complement the flavors of the salad nicely. For a drink, a glass of iced tea or sparkling water works well. For the full recipe, check out the detailed instructions above. This balsamic chicken Caprese salad is a crowd-pleaser. You learned about key ingredients like chicken and fresh basil. I shared step-by-step instructions for marinating and cooking the chicken. After that, we assembled our salad with flavor-packed dressing. Perfectly cooking chicken keeps it juicy. Don’t forget to store leftovers correctly, so they last longer. You can even swap ingredients based on the season or diet needs. This salad is easy to customize and fun to make. Enjoy creating your own version!](https://therecipehatch.com/wp-content/uploads/2025/07/7b5560e7-176e-4518-8dfe-8aa07bd72463.webp)