Skip to content
The Recipe Hatch
  • Home
  • Appetizers
  • Desserts
  • Salads
  • Breakfast
  • Dinner
  • Privacy Policy
  • Contact
  • About

Chef Owen

Million Dollar Chicken Casserole Easy Comfort Meal

November 11, 2025July 15, 2025 by Chef Owen
- 3 cups cooked chicken, shredded - 1 cup white rice, uncooked - 1 can (10.5 oz) cream of chicken soup - 1 cup sour cream - 1 cup shredded cheddar cheese - 1 cup frozen mixed vegetables (peas, carrots, corn) The key to a great Million Dollar Chicken Casserole is using quality ingredients. The cooked chicken gives the dish its heartiness. I recommend shredding the chicken to mix well with the rice and sauce. The white rice absorbs flavors and adds texture. The cream of chicken soup and sour cream create a rich and creamy base. They bind everything together. Cheddar cheese is a must for that cheesy finish. Don't forget the frozen mixed veggies to add color and nutrition. - 1 tablespoon garlic powder - 1 teaspoon onion powder - 1 teaspoon dried thyme - Salt and pepper to taste - 1 cup panko breadcrumbs - 2 tablespoons melted butter Seasoning is vital for flavor. Garlic powder, onion powder, and thyme bring warmth and depth. Salt and pepper add balance. The panko breadcrumbs create a crispy topping. Mixing them with melted butter ensures they brown nicely in the oven. This crunchy layer makes the casserole even more enjoyable. For serving, I like to pair this casserole with a light green salad. A simple salad with vinaigrette complements the richness of the dish. For a pop of color, sprinkle fresh parsley on top before serving. This adds freshness and makes the dish look appealing. You may also serve it with crusty bread for a complete meal. {{ingredient_image_1}} 1. Preheat your oven to 350°F (175°C). This sets the stage for even cooking and helps the casserole bubble nicely. 2. Mix the ingredients in a large bowl. Start by adding 3 cups of shredded cooked chicken, 1 cup of uncooked white rice, 1 can of cream of chicken soup, and 1 cup of sour cream. 3. Next, add half of the shredded cheddar cheese to the bowl. Then stir in 1 cup of frozen mixed vegetables. This mix adds color and nutrition. 4. Season the mixture with 1 tablespoon of garlic powder, 1 teaspoon each of onion powder and dried thyme. Don’t forget to add salt and pepper to taste. Mix everything well until it looks creamy and combined. 1. Layer the mixture in a greased 9x13-inch baking dish. Spread it out evenly so it cooks evenly. 2. Cover and bake the dish with aluminum foil. Bake it for 25 minutes to let the flavors meld. 3. After 25 minutes, remove the foil. Bake for an additional 15-20 minutes. This helps the top get golden brown and crispy. 1. To brown the topping, sprinkle the buttered panko breadcrumbs over the chicken mix before the final bake. This gives a nice crunch. 2. Let the casserole cool for about 5 minutes before serving. This helps it set and makes it easier to serve. Enjoy this delicious meal that brings comfort and warmth to any table! Ensuring the rice cooks properly To get the rice just right, use long-grain white rice. It cooks well in the oven. The rice will absorb the moisture from the soup and sour cream. This helps it become tender. Make sure to mix the rice with the other ingredients before baking. This way, the rice cooks evenly. Achieving a creamy texture For a creamy dish, use good-quality cream of chicken soup. The sour cream adds extra creaminess, too. Mixing these well with your other ingredients keeps everything smooth. Don't skimp on the cheese; it melts beautifully and adds richness. Best ways to present the casserole Serve your casserole hot from the oven. A sprinkle of fresh parsley adds a nice touch. It brightens up the look and adds some color. Use a large spoon to serve and show off those layers. Recommendations for side dishes A light green salad pairs well with this casserole. Try a simple mix of lettuce, cucumber, and a light vinaigrette. Steamed veggies also make a great side. They keep the meal balanced and fresh. Prepping chicken ahead of time Cooked chicken makes this dish quick. You can use leftover chicken or rotisserie chicken. Shred it and store it in the fridge until ready to use. This saves time and makes cooking easier. Make-ahead options You can prepare the casserole ahead of time. Assemble it and cover it tightly. Store it in the fridge for up to 24 hours. When ready to bake, just pop it in the oven. If frozen, thaw it overnight before cooking. Pro Tips Use Leftover Chicken: This casserole is a great way to utilize leftover rotisserie or cooked chicken, saving time and reducing waste. Customize Vegetables: Feel free to swap in your favorite vegetables or whatever you have on hand, such as broccoli or bell peppers, to add variety. Make Ahead: Prepare the casserole a day in advance, cover it, and refrigerate. Just bake it when you're ready to serve for a quick dinner. Cheese Variations: Experiment with different types of cheese like Monterey Jack or mozzarella for a unique flavor profile that complements the dish. {{image_2}} You can easily swap out ingredients in this casserole. If you want to use turkey, it works great. Just shred it like the chicken. You can also use veggies like mushrooms or zucchini for a meat-free dish. If you need a dairy-free version, try using plain Greek yogurt instead of sour cream. Nutritional yeast can replace cheese for a cheesy taste without dairy. To amp up the flavor, think about adding herbs or spices. Fresh herbs like parsley or basil are nice. You can also try adding paprika or cayenne for a kick. Incorporating more veggies is a smart move, too. Bell peppers, broccoli, or spinach add color and nutrients. Just chop them small so they mix well with the other ingredients. You can cook this casserole in different ways. For a slow cooker version, mix all the ingredients, then cook on low for 4-6 hours. This makes the chicken super tender. If you're short on time, use an Instant Pot. Cook the mixture under pressure for 10 minutes. Just remember to do a quick release to avoid sogginess. These variations can help you make the casserole fit your taste and time! To keep your Million Dollar Chicken Casserole fresh, store it in the fridge. Use an airtight container for the best results. Glass or plastic containers both work well. Make sure to let it cool before sealing it. This helps prevent moisture buildup inside the container. If you want to freeze your casserole, let it cool completely first. Then, wrap it tightly in plastic wrap or aluminum foil. A freezer-safe container is also a good option. Label the container with the date. When you are ready to eat it, thaw it in the fridge overnight. To reheat, bake it in the oven at 350°F (175°C) until it’s hot. In the fridge, your casserole lasts about 3 to 4 days. If you freeze it, it can last up to 3 months. Always check for signs of spoilage before eating. If it smells off or looks strange, it's best to toss it. Can I make Million Dollar Chicken Casserole ahead of time? Yes, you can make this casserole ahead. Prepare it up to the baking step. Cover and store it in the fridge for a day. When ready, just bake it as directed. How do I know when the casserole is fully cooked? Check the casserole for a bubbly filling and a golden top. Use a food thermometer; it should reach 165°F (74°C) in the center. What can I substitute for cream of chicken soup? You can use homemade cream of chicken soup or a can of cream of mushroom soup. For a lighter option, try a mix of plain yogurt and chicken broth. Is this recipe gluten-free? The recipe as it is not gluten-free due to panko breadcrumbs. You can swap them for gluten-free breadcrumbs to make it safe for gluten-free diets. Can I make it dairy-free? Absolutely! Use dairy-free sour cream and cheese. There are many brands available. Just ensure all your ingredients are dairy-free. Why is my casserole dry? A dry casserole can happen if you cook it too long. Make sure to follow baking times closely. The rice also needs enough liquid, so check your ratios. How can I prevent the topping from burning? To avoid burning, cover the dish with foil for the first part of baking. Remove the foil in the last 15 minutes to allow the top to brown. This blog post covers everything you need for a creamy Million Dollar Chicken Casserole. We explored the key ingredients, including chicken, rice, and cheese. Then, I shared step-by-step instructions for perfect baking. You also learned tips for serving and variations to mix things up. Finally, we addressed common questions to make cooking easier. Enjoy crafting this dish that’s sure to impress everyone at your table!

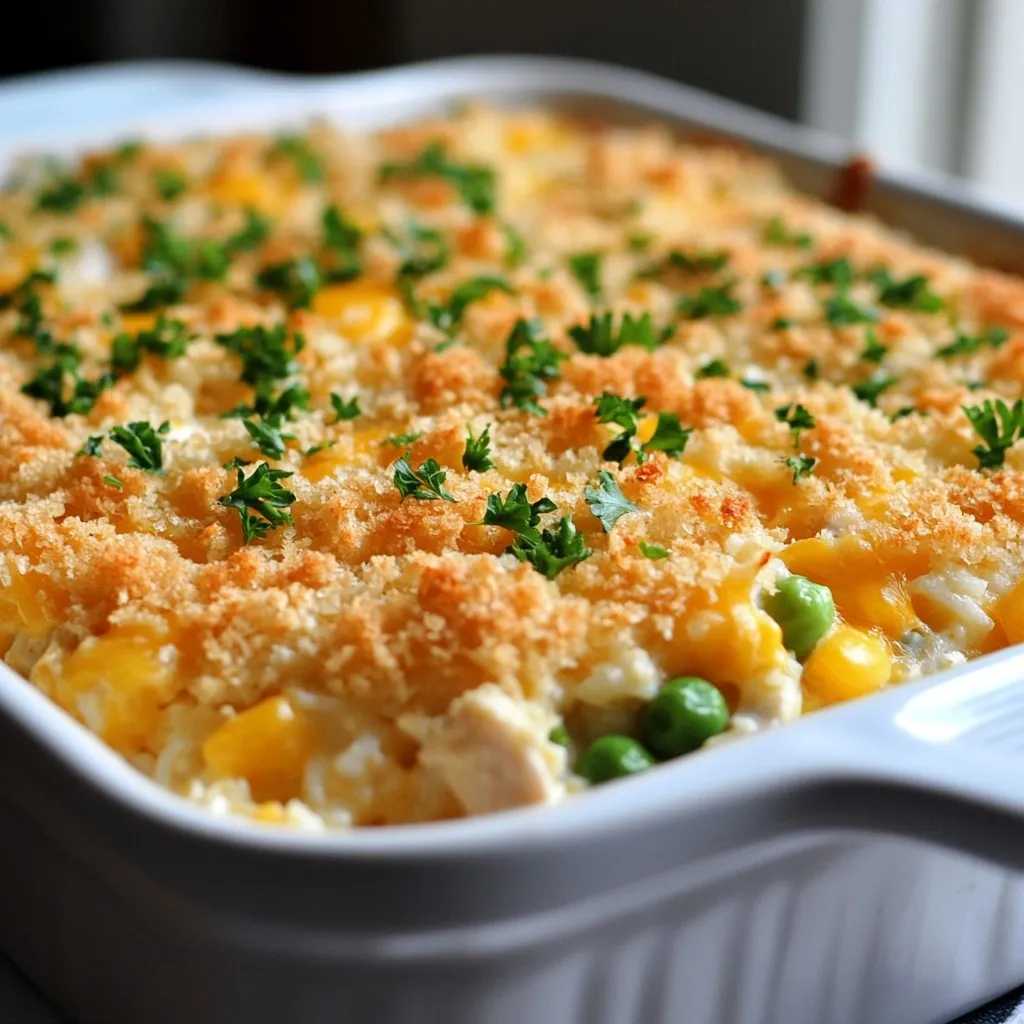
Ready for a cozy meal that’s both easy and delicious? The Million Dollar Chicken Casserole is perfect for busy nights when comfort food is a must. With simple ingredients like …

Read more

Categories Dinner

Incredible Hot Honey Chicken Wings Tasty and Simple

July 15, 2025 by Chef Owen
To make Incredible Hot Honey Chicken Wings, you need these simple items: - 2 lbs chicken wings - 1 tablespoon olive oil - 1 teaspoon garlic powder - 1 teaspoon onion powder - 1 teaspoon smoked paprika - ½ teaspoon cayenne pepper (adjust for heat level) - Salt and pepper to taste - ½ cup honey - 2 tablespoons apple cider vinegar - 1 tablespoon sriracha (optional, for added heat) - Fresh parsley, chopped (for garnish) You can swap some ingredients to fit your taste or what's in your pantry: - Chicken wings: Drumsticks or thighs work too. - Olive oil: Use vegetable oil or melted butter for a different flavor. - Honey: Try maple syrup or agave for a unique twist. - Apple cider vinegar: White vinegar or lemon juice can substitute here. - Sriracha: Use any hot sauce you like for heat. Quality ingredients make a difference in taste. Here are some quick tips: - Chicken: Choose fresh, organic wings if possible. They taste better. - Spices: Use fresh spices; they have more flavor than old ones. - Honey: Look for pure honey with no additives. It’s sweeter and richer. - Vinegar: Opt for raw apple cider vinegar for added health benefits. These tips will help you create wings that burst with flavor. For the complete recipe, refer to the Full Recipe. First, preheat your oven to 425°F (220°C). This step is key for crispy wings. Next, take 2 lbs of chicken wings and pat them dry using paper towels. This helps them crisp up nicely. Place the wings in a large bowl. Now, drizzle them with 1 tablespoon of olive oil. Sprinkle in 1 teaspoon each of garlic powder and onion powder. Add 1 teaspoon of smoked paprika and ½ teaspoon of cayenne pepper. Adjust the cayenne if you want less heat. Finally, add salt and pepper to taste. Mix everything well so the wings are fully coated. Line a baking sheet with foil for easy cleanup. Then, place a wire rack on top of the sheet. This rack allows air to flow around the wings. Arrange the coated wings in a single layer on the rack. Bake them in the preheated oven for about 40-45 minutes. Turn the wings halfway through to ensure even cooking. You will know they are done when they are golden brown and crispy. While the wings bake, start the hot honey sauce. In a small saucepan over medium heat, combine ½ cup of honey, 2 tablespoons of apple cider vinegar, and 1 tablespoon of sriracha if you want some extra heat. Stir the mix until it is well combined. Let it simmer for about 5 minutes. The sauce should thicken slightly. Once ready, remove it from the heat and set it aside. This step is crucial as the hot honey sauce adds a sweet and spicy kick to the wings. When the wings are done, toss them in this delicious sauce. Enjoy your Incredible Hot Honey Chicken Wings! For the full recipe, check the section above. To get those wings crispy, you need to dry them well. After washing, use paper towels to pat them dry. This step helps remove moisture that can make wings soggy. Next, coat the wings with olive oil and seasoning. This adds flavor while helping them crisp in the oven. Use a wire rack for baking. This allows hot air to circulate around the wings. Bake at 425°F (220°C) for 40-45 minutes. Flip them halfway for even cooking. Enhancing flavor is simple. Start with good spices like garlic powder and smoked paprika. You can also add cayenne for heat. Adjust this to your taste. For the hot honey sauce, mix honey with apple cider vinegar. This combo brings sweetness and tang. If you like heat, include sriracha. Let it simmer to thicken. This step intensifies the flavor. One common mistake is overcrowding the baking sheet. Wings need space to crisp up. If they touch, they will steam instead. Another mistake is not preheating the oven. An oven that isn’t hot enough won’t cook the wings well. Lastly, don’t skip the drying step. Moisture is the enemy of crispy wings. Follow these tips for a tasty and crispy result. For the full recipe, check out the Incredible Hot Honey Chicken Wings section. {{image_2}} To make BBQ hot honey chicken wings, start with the same base recipe. Use your favorite BBQ sauce mixed with honey for a sweet and smoky flavor. Just blend ½ cup of BBQ sauce with ½ cup of honey. Coat the wings in this mix before baking. The BBQ adds a nice twist to the sweet heat. For spicy garlic honey wings, add more garlic and some chili flakes. Mix 1 tablespoon of minced garlic into the hot honey sauce. You can also add 1 teaspoon of chili flakes for extra heat. This version gives you a robust garlic flavor with a spicy kick. It's perfect for garlic lovers! You can cook these wings in different ways. Baking is easy and healthier. It gives you crispy wings without much oil. Frying makes them extra crispy and is faster. If you fry, heat oil to 375°F (190°C) and cook wings for about 8-10 minutes. Both methods work great, so choose what you like best! For the full recipe, check out the Incredible Hot Honey Chicken Wings section. To store leftover wings, let them cool down first. Place the wings in an airtight container. You can also wrap them tightly in foil or plastic wrap. This keeps them fresh. Store the container in the fridge for up to four days. If you want to keep them longer, freezing is a good option. When it's time to eat the wings again, you can reheat them easily. The best way is in the oven. Preheat your oven to 375°F (190°C). Place the wings on a baking sheet. Heat them for about 15-20 minutes. This method helps them stay crispy. You can also use a microwave, but the wings may not be as crispy. If you use the microwave, heat them in short bursts. Check every minute until hot. If you wish to store wings for a long time, freezing is perfect. First, let the wings cool completely. Then, place them in a freezer-safe bag. Remove as much air as possible before sealing. Label the bag with the date. You can freeze them for up to three months. When ready to enjoy, thaw them in the fridge overnight. Then, reheat as described above. This keeps the wings tasty and ready to eat anytime. For the full recipe, check out the previous section! The best temperature to bake chicken wings is 425°F (220°C). This high heat helps wings become crispy on the outside while staying juicy inside. I find this temperature perfect for achieving that ideal texture. Just make sure to flip the wings halfway for even cooking. Yes, you can make the hot honey sauce in advance. Just store it in an airtight container in the fridge for up to a week. When you're ready to use it, heat it gently on the stove. This way, you save time on game day or dinner night. Several sides go great with hot honey chicken wings. Here are a few ideas: - Celery sticks - Carrot sticks - Blue cheese or ranch dressing for dipping - French fries - Cornbread These sides add a nice balance to the sweet and spicy flavors of the wings. You can mix and match based on what you enjoy! For the full recipe, check [Full Recipe]. This article covered how to make delicious hot honey chicken wings. We discussed ingredient lists, substitutions, and tips for quality. You learned step-by-step instructions for preparation, baking, and making the hot honey sauce. I shared tricks for crispy wings and flavor boosts while avoiding common mistakes. We explored tasty variations, storage, and reheating methods. Enjoy your cooking adventure with hot honey wings. With these tips, you’ll impress your family and friends!

Are you ready to spice up your game day or dinner table? These Incredible Hot Honey Chicken Wings offer a perfect mix of heat and sweetness, making them a crowd …

Read more

Categories Appetizers

No Bake Chocolate Eclair Icebox Cake Delight

July 15, 2025 by Chef Owen
To create the No Bake Chocolate Eclair Icebox Cake, you will need the following ingredients: - 2 cups heavy whipping cream - 1 cup powdered sugar - 1 teaspoon vanilla extract - 1 box (14 oz) graham crackers - 1 package (3.4 oz) instant vanilla pudding mix - 2 ½ cups milk - 1 container (8 oz) whipped topping (thawed) - 1 cup semi-sweet chocolate chips - 2 tablespoons unsweetened cocoa powder - 1 tablespoon butter These ingredients come together to form a delicious dessert. The heavy whipping cream gives it a rich texture. The powdered sugar adds sweetness. Vanilla extract brings in a lovely flavor. The graham crackers provide a nice crunch. Instant vanilla pudding mix makes it easy to achieve a creamy layer. Milk helps the pudding set just right. Whipped topping adds lightness. The chocolate chips and cocoa powder create a rich ganache. Finally, butter helps in melting the chocolate smoothly. You can find the Full Recipe in the next section to guide you step-by-step. Enjoy making this delightful cake! To start, grab a large bowl. Pour in 2 cups of heavy whipping cream. Whip it until it thickens. Next, add 1 cup of powdered sugar and 1 teaspoon of vanilla extract. Keep whipping until you see stiff peaks form. This means your cream is ready. Set it aside for now. In another bowl, combine 1 package of instant vanilla pudding mix with 2 ½ cups of milk. Whisk this mixture until it is smooth. Let it sit for about 5 minutes to thicken. This will help create a creamy texture that blends well with the whipped cream. Now, it’s time to layer your cake. Start with a 9x13 inch dish. Place a layer of graham crackers at the bottom. Spread half of the pudding mixture over the crackers. Smooth it out evenly. Add another layer of graham crackers on top of the pudding. Then, spread the remaining pudding mixture over this layer. Finish with one last layer of graham crackers. Cover the dish with plastic wrap. Refrigerate for at least 4 hours, or even overnight if you can wait. This helps the layers set up nicely. While your cake chills, prepare the chocolate ganache. Melt 1 tablespoon of butter in a small saucepan over medium heat. Add 1 cup of semi-sweet chocolate chips. Stir until it becomes smooth. Remove from heat and whisk in 2 tablespoons of unsweetened cocoa powder. Let it cool slightly. After the icebox cake is set, pour the chocolate ganache over the top. Spread it evenly to cover the surface. Return it to the fridge for another 30 minutes. This will let the ganache firm up before you slice and serve. Enjoy your No Bake Chocolate Éclair Icebox Cake! For the full recipe, check the section above. To achieve perfect stiff peaks, start with cold cream. Cold cream whips better and faster. Use a large bowl to give the cream space to expand. Whip the cream on medium speed until it thickens. When it starts to hold shape, slowly add powdered sugar. This helps stabilize the cream. Be careful not to over-whip it. Over-whipping makes the cream grainy and difficult to spread. Even distribution is key to a great icebox cake. Use a spatula to smooth the pudding mixture over the graham crackers. Make sure you cover every corner. This ensures each bite has the same flavor and texture. To prevent soggy layers, let the pudding sit for a moment. This lets it thicken before you spread it on the crackers. The longer the layers sit, the better they hold together. For presentation, serve slices on dessert plates. A sprinkle of cocoa powder adds visual appeal. You can also add a fresh berry, like raspberries, for a pop of color. If you want a creamier look, garnish with a dollop of whipped cream. Pair this cake with coffee or milk. Both drinks complement the chocolate flavor well. For a fun twist, try serving it with a scoop of vanilla ice cream. Enjoy your delicious creation! {{image_2}} You can change up the flavors in your No Bake Chocolate Eclair Icebox Cake. One easy way is to swap the chocolate pudding for a different flavor. Try using butterscotch or strawberry pudding. Each choice brings a new twist to the classic taste. You can also add fruit layers. Fresh strawberries, bananas, or raspberries work great. Just slice the fruit and layer it between the graham crackers and pudding. This adds freshness and color to your cake. If you need dairy-free options, you can use coconut cream instead of heavy whipping cream. It gives a nice flavor and texture. Use almond milk or oat milk in place of regular milk. For the pudding mix, choose a dairy-free brand. For gluten-free options, make sure to pick gluten-free graham crackers. Many brands offer these, so you won’t miss out on the crunch. You can also check the pudding mix for gluten-free labels. Want to serve fewer people? You can scale the recipe down easily. Just use smaller amounts of each ingredient. A 9x9 inch dish works well for a smaller cake. You can also make mini dessert variations. Use small cups or jars to create individual servings. Layer the ingredients just like the full-size cake. This makes it fun and easy to share. Remember, these variations help you make the cake your own. Check the Full Recipe for all the details! You can store No Bake Chocolate Eclair Icebox Cake in the fridge for up to 4 days. Make sure to cover it tightly with plastic wrap. This helps keep it fresh and moist. Check for any signs of spoilage before serving, like off smells or a change in texture. If you want to keep it longer, consider freezing it. Yes, you can freeze No Bake Chocolate Eclair Icebox Cake! To freeze it, wrap the cake tightly in plastic wrap, then foil. This prevents freezer burn. It can stay frozen for about 2 months. When you're ready to enjoy it, move it to the fridge to thaw overnight. Serve it chilled for the best taste. A No Bake Chocolate Eclair Icebox Cake is a layered dessert. It uses graham crackers, pudding, and whipped cream. The layers create a creamy and rich treat that is easy to make. You don’t need an oven, making it simple for anyone. The chocolate ganache on top adds a sweet finish. This cake needs time to set in the fridge. It should chill for at least 4 hours. For the best results, let it sit overnight. This helps the layers blend well and firm up. Yes, you can use different chocolates for the ganache. Dark chocolate can give a richer taste. Milk chocolate will make it sweeter. You can also try white chocolate if you want a lighter flavor. Each type will change the cake's taste slightly. You will know the cake is ready when it is firm. The layers should hold together when sliced. The ganache should also be set on top. If it feels soft or wobbly, let it chill longer. If you need a substitute for heavy whipping cream, use coconut cream. Almond milk can also work, but it won’t whip. Another option is to use a store-bought whipped topping. Just make sure it is thawed before using. The No Bake Chocolate Eclair Icebox Cake brings simple ingredients and steps together. We looked at whipping cream, pudding, and chocolate ganache. Plus, I shared tips for perfect layers and presentation. You can also explore fun flavor changes and ways to adapt for diets. In the end, this dessert is easy and versatile. Whether you’re a pro or a beginner, you can create something delicious. Enjoy making this cake for friends and family. They will love it!

Indulge in the creamy, dreamy world of dessert with my No Bake Chocolate Eclair Icebox Cake Delight! If you’re looking for a sweet treat that’s simple to make and requires …

Read more

Categories Desserts

Baguette Caprese Salad Fresh and Flavorful Delight

July 15, 2025 by Chef Owen
- Fresh tomatoes - Mozzarella cheese - Baguette - Fresh basil leaves The heart of a Baguette Caprese Salad lies in its essential ingredients. You need fresh tomatoes for that juicy burst of flavor. Choose ripe, firm ones for the best results. Mozzarella cheese adds creaminess, while a good baguette provides crunch. Fresh basil leaves bring a wonderful aroma and taste. Each ingredient plays a key role. - Balsamic glaze - Extra virgin olive oil - Salt and pepper For added depth, you can use balsamic glaze. It adds sweetness and tang. Extra virgin olive oil enhances flavor and richness. Don't forget salt and pepper! These simple seasonings boost the dish's taste. They work to bring out the best in each ingredient. - Baking sheet - Knife and cutting board - Oven To make this dish, you’ll need a few tools. A baking sheet helps toast the baguette slices evenly. A knife and cutting board are essential for slicing the tomatoes and cheese. Lastly, preheat your oven to bake those baguette pieces to perfection. These tools make your cooking process smooth and easy. For the full recipe, be sure to check out the details provided. Start by preheating your oven to 375°F (190°C). This is the perfect temperature to get your bread nice and crispy. While your oven warms up, slice your baguette into 1-inch thick pieces. Make sure the slices are even for the best results. Next, arrange the sliced baguette on a baking sheet. Grab some extra virgin olive oil and lightly brush each side of the slices. This will give them a lovely, rich flavor and help them crisp up nicely. Bake the baguette slices in the oven for about 5 to 7 minutes. Look for a golden color and a crispy texture. Once done, take them out and let them cool for a minute. Now comes the fun part—assembling your salad! On each toasted baguette slice, place a slice of ripe tomato. Follow that with a slice of fresh mozzarella cheese. Tuck a basil leaf under each cheese slice for a burst of flavor. Finally, drizzle balsamic glaze over the assembled pieces. A pinch of salt and pepper will really bring the flavors together. Serve this fresh and colorful dish right away for the best taste. For more details, refer to the Full Recipe. Choosing the right tomatoes Use ripe, juicy tomatoes. I love vine-ripened or heirloom tomatoes for flavor. They add sweetness and a nice texture. Look for firm tomatoes that yield slightly when you press them. The color should be vibrant, with no blemishes. These tomatoes will elevate your salad. Selecting the best mozzarella Fresh mozzarella is key. Choose mozzarella packed in water for the creamiest taste. It should be soft and slightly springy. Avoid the pre-shredded types; they lack flavor. If you can, buy mozzarella from a local cheese shop or farmers' market. This option often tastes better and supports local farms. Plating ideas for serving Arrange the toasted baguette slices on a large platter. Alternate tomato and mozzarella layers for a colorful look. You can stack them like mini sandwiches for fun. This way, guests can grab their own portions easily. Garnishing suggestions Add fresh basil leaves on top for a pop of green. You can also sprinkle some sea salt and cracked pepper. A light drizzle of extra virgin olive oil adds shine and flavor. These small touches make the dish look and taste gourmet. Balancing balsamic glaze Balsamic glaze should be sweet yet tangy. Drizzle it over the salad just before serving. If you want extra depth, reduce balsamic vinegar on the stove until it thickens. This gives you a rich glaze that coats the salad beautifully. Adding herbs and spices Fresh herbs boost flavor. I like to add a pinch of oregano or thyme for earthiness. Experiment with crushed red pepper flakes for heat. These simple additions can transform your dish and make it unforgettable. For a fresh twist, try adding arugula or mint. {{image_2}} Changing up the cheese can add fun flavors. Try goat cheese or feta for a twist. These cheeses add creaminess and a different taste. You can also use vegan cheese for a dairy-free option. Adding vegetables can boost the salad's crunch. Consider sliced cucumbers or roasted peppers. These veggies bring color and texture. You can also try arugula for a peppery kick. A homemade balsamic vinaigrette will enhance the salad. Mix balsamic vinegar, olive oil, and a bit of honey. This dressing adds a sweet and tangy flair. You can also try a lemon vinaigrette for brightness. For a creamier option, use ranch dressing. It gives a rich flavor that pairs well. You can even add pesto for an herby touch. Pair this salad with a light soup or grilled chicken. It makes a great lunch or dinner. For a complete meal, serve it with a side of roasted vegetables. You can also make it a sandwich! Layer the salad ingredients between two baguette slices. This way, you get all the flavors in every bite. For the full recipe, check out the earlier section. To store uneaten salad, place it in an airtight container. This helps keep the salad fresh. Make sure to separate the baguette slices from the other ingredients. This way, the bread stays crispy. For storage containers, use glass or plastic with a tight lid. These containers prevent air from getting in. You can also use reusable silicone bags for a great option. Tomatoes and mozzarella are best when fresh. Ripe tomatoes last about three days in the fridge. Fresh mozzarella can stay good for about five days. The salad itself lasts about two days in the fridge. After that, the bread may get soggy, and the flavors may fade. You can reheat baguette slices, but do it carefully. The best method is to use an oven or toaster oven. Heat them at 350°F for about five minutes. Avoid using a microwave, as it makes the bread chewy. You want to keep that nice, crispy texture. A Baguette Caprese Salad is a fresh dish that combines classic Italian flavors. It features slices of toasted baguette topped with juicy tomatoes, creamy mozzarella, and fragrant basil. The key components are simple yet delicious: - Baguette - Ripe tomatoes - Fresh mozzarella cheese - Basil leaves - Balsamic glaze - Olive oil - Salt and pepper This salad is colorful and perfect for any meal. Yes, you can prepare parts of this salad ahead of time. Here are some tips for meal prep: - Slice the baguette and store it in an airtight container. - Prepare the tomatoes and mozzarella, then keep them separate in the fridge. - Assemble the salad just before serving to keep the bread crispy. This way, you save time and enjoy a fresh dish. You can easily modify this salad for different diets. Here are some options: - For gluten-free, use gluten-free bread. - For dairy-free, swap mozzarella with avocado or a dairy-free cheese. These changes still keep the salad tasty and satisfying. Scaling this recipe for a party is easy. Just follow these steps: - Double or triple the ingredients based on the number of guests. - Prepare extra baguette slices and toppings. - Arrange everything on a large platter for easy serving. This way, everyone can enjoy the salad! Yes, stale baguette works well for this salad. Here’s how to use it: - Cut stale baguette into slices. - Brush with olive oil and toast until crispy. - The crunch adds texture and flavor to the salad. Using stale bread helps reduce waste while keeping the dish delightful. You learned how to create a delicious Baguette Caprese Salad. We discussed essential ingredients like fresh tomatoes and mozzarella, and the importance of quality olive oil. I shared tips for prepping, baking, and assembling the salad for best flavor. Don’t forget variations and serving suggestions to customize your dish. This salad is easy to make, full of flavor, and perfect for any occasion. Now, gather your ingredients and enjoy your tasty creation!

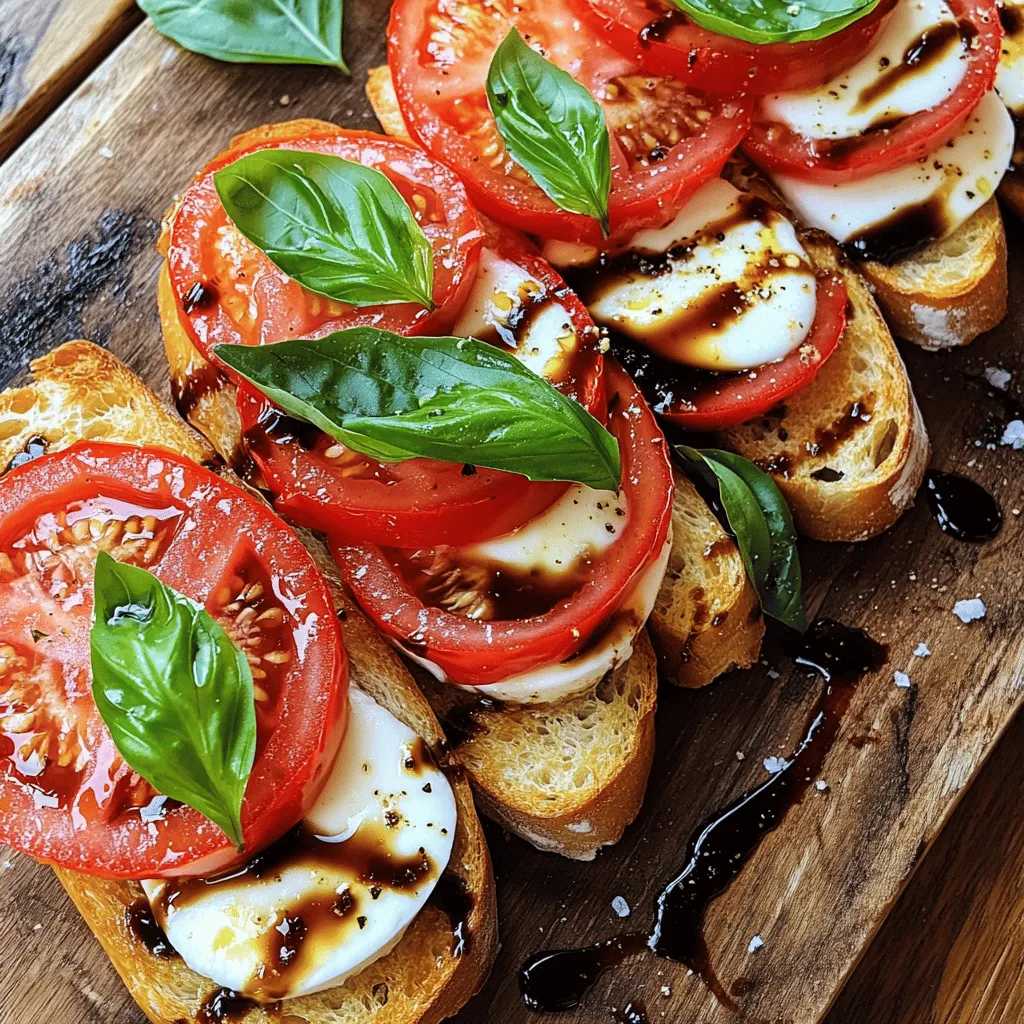
Looking for a fresh and tasty dish? Try my Baguette Caprese Salad! With juicy tomatoes, creamy mozzarella, and fragrant basil, this salad bursts with flavor. You’ll love how easy it …

Read more

Categories Appetizers

Keto Beef and Broccoli Flavor-Packed Low-Carb Meal

July 15, 2025 by Chef Owen
- 1 lb (450g) flank steak, thinly sliced against the grain - 2 cups broccoli florets - 3 tablespoons soy sauce (or coconut aminos for a keto-friendly option) - 1 tablespoon sesame oil - 1 tablespoon olive oil - 1 tablespoon fresh ginger, minced - 2 cloves garlic, minced - 1 teaspoon erythritol or other low-carb sweeteners - Sesame seeds for garnish For this recipe, I use flank steak because it is tender and flavorful. You can find it at most grocery stores. Broccoli florets add a nice crunch and color. I prefer to use soy sauce, but coconut aminos work well for a keto twist. The sesame oil gives the dish a rich, nutty taste. Olive oil helps with cooking and adds healthy fats. Fresh ginger and garlic bring fresh notes to the dish, making it even more delicious. For a touch of sweetness, I sometimes add erythritol. It balances the flavors without adding carbs. Sesame seeds are a fun garnish that adds a little crunch on top. You can find the full recipe for this tasty meal in the section above. To make the beef tender and full of flavor, you need to marinate it. Start by preparing the marinade. In a bowl, mix together soy sauce, sesame oil, minced ginger, minced garlic, and erythritol if you want some sweetness. This mix adds great taste to the beef. Once you have the marinade ready, add the thinly sliced flank steak. Make sure all pieces are well-coated. Let the beef marinate for at least 15 minutes. This time helps the flavors soak in. Next, we need to cook the beef. Heat olive oil in a large skillet over medium-high heat. You want the pan hot but not smoking. Once ready, add the marinated beef in a single layer. This helps it to sear properly. Sear the beef for 2-3 minutes on each side. Look for a nice brown color but don’t cook it all the way through. Remove the beef from the pan and set it aside. This keeps it juicy and tender. Now it’s time for the broccoli. In the same skillet, add the broccoli florets. Stir-fry them for about 3-4 minutes. You want them bright green and tender-crisp. This quick cooking keeps their nutrients intact. Once the broccoli is ready, return the beef to the skillet. Mix everything well. Cook for an additional 2-3 minutes until the beef is fully cooked. This last step lets all the flavors meld together. For the full recipe, check out the details above. To make your meal even better, try adding spices. - Red pepper flakes can give it a nice kick. - A dash of black pepper adds depth. - Garlic powder brings out rich, savory notes. For serving, you can try some fresh herbs. - Chopped green onions add a fresh crunch. - A squeeze of lime juice brightens the dish. These little touches can transform your meal. Batch cooking works great for this dish. - You can slice all beef in advance. - Prep broccoli florets and store them in the fridge. For storage, use airtight containers. - Keep leftovers in the fridge for up to three days. - For longer storage, freeze the cooked dish. This keeps your meals quick and easy. One mistake is overcooking the broccoli. - Cook it just until bright green and tender-crisp. - This keeps it fresh and crunchy. Another error is incorrect marinating time. - Marinate beef for at least 15 minutes. - Longer marinating can make it even tastier. By avoiding these pitfalls, you’ll enhance your dish. {{image_2}} You can switch out the beef for chicken or shrimp. Both options taste great in this dish. Chicken breast or thigh works well. Shrimp adds a nice touch and cooks fast. For a vegan version, use tofu or tempeh. These options soak up flavor and give a good texture. Try different sauces to change the flavor. You can use teriyaki or a spicy chili sauce. Low-carb sauces like tamari or liquid aminos also work. Adjust the sweetness by adding or removing sweeteners. Mix in some lime juice for a fresh twist or add peanut sauce for a unique taste. Pair your beef and broccoli with cauliflower rice or zoodles. They provide a nice low-carb base and soak up all the sauce. You could also serve it with a side salad for extra crunch. Steamed asparagus or sautéed green beans can add color and nutrition to your meal. These sides make your plate look great while keeping it healthy. For the full recipe, check out the link above. To keep your Keto Beef and Broccoli fresh, store it in an airtight container. This helps prevent air from getting in and keeps the dish tasty. Place it in the fridge within two hours of cooking. It stays good for up to three days. For long-term storage, freeze the leftovers. Use freezer-safe containers or bags. Make sure to remove as much air as possible to avoid freezer burn. Frozen meals can last for about three months. When it's time to eat again, reheating is easy. You can use a microwave or stovetop. For the microwave, heat in 30-second bursts until warm. Stir in between to ensure even heating. If using a stovetop, add a splash of water to keep the meal moist. Reheat on low heat and stir often. To freshen up flavors, squeeze in a bit of fresh lemon juice or add a dash of soy sauce. In the fridge, your Keto Beef and Broccoli will last for three days. If you freeze it, it can stay fresh for about three months. Always check for signs of spoilage. If it looks off, smells bad, or has an unusual texture, it’s best to throw it away. Enjoy your meal safely! Yes, Keto Beef and Broccoli is a healthy dish. It is low in carbs and high in protein. The flank steak provides essential nutrients like iron and zinc. Broccoli is full of vitamins A, C, and K, plus fiber. This meal supports weight loss and muscle health. It also promotes energy and helps keep blood sugar stable. Yes, you can prep this dish ahead of time. To save time, slice the beef and broccoli in advance. Marinate the beef a few hours before cooking for richer flavor. You can also cook the dish and store it in the fridge. Just reheat it gently when ready to eat. This meal still tastes great even after a day or two. If you want a soy sauce alternative, try coconut aminos. It has a similar flavor and is low in carbs. You can also use tamari sauce, which is gluten-free. For a fresh twist, consider using a mix of broth and spices. Each option gives you a tasty flavor without the added carbs. Keto Beef and Broccoli is a tasty, healthy dish. We discussed key ingredients like flank steak, broccoli, and sauces. Marinating the beef and cooking it right brings out great flavor. Avoid mistakes like overcooking broccoli for the best results. Try different proteins or sauces to keep things exciting. Store leftovers well to enjoy later. Overall, this dish is easy to prepare and fit for a low-carb diet. Enjoy exploring this recipe and making it your own!

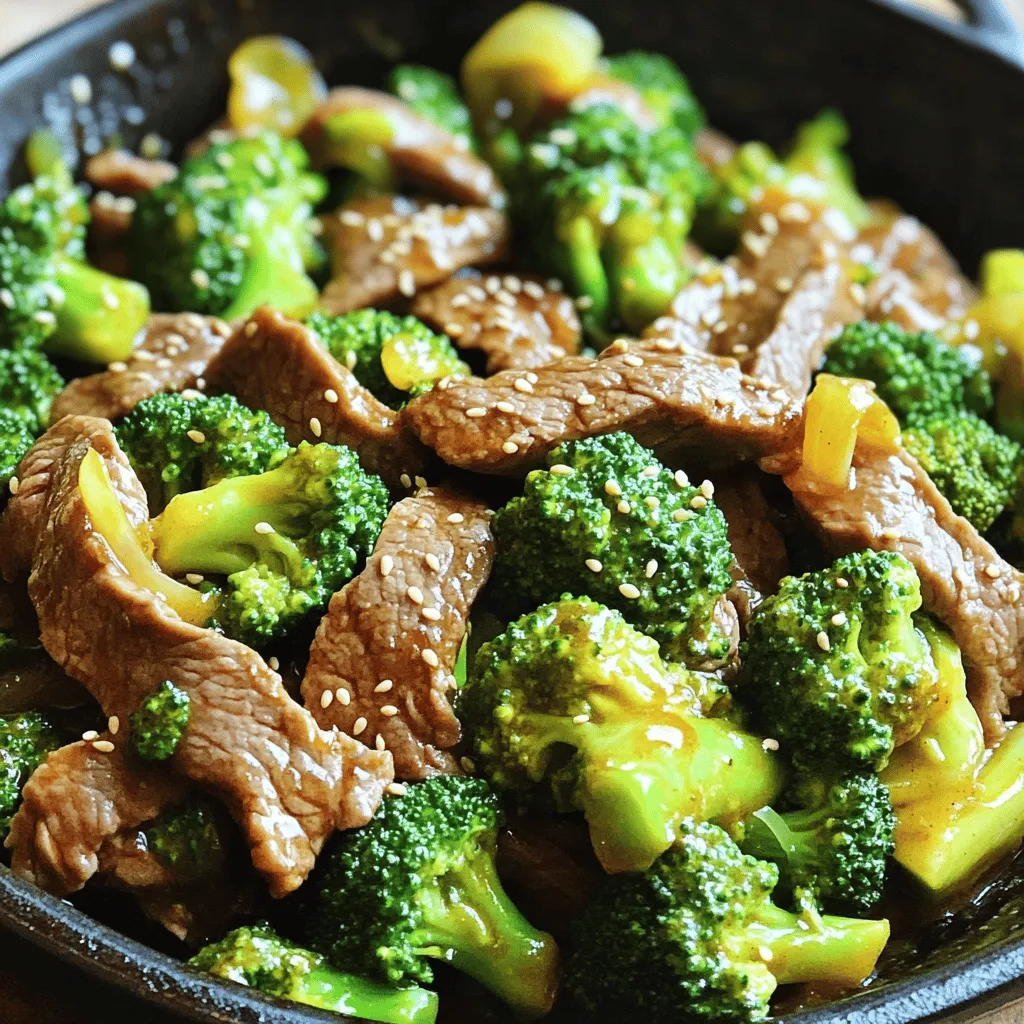
Looking for a tasty low-carb meal? You’ve come to the right place! Keto Beef and Broccoli offers a flavor-packed punch while keeping your carb count in check. With juicy flank …

Read more

Categories Dinner

Vibrant Chimichurri Chicken Flavorful Grilling Recipe

July 15, 2025 by Chef Owen
- 4 boneless, skinless chicken breasts - 1 cup fresh parsley, chopped - 1/2 cup fresh cilantro, chopped - 4 cloves garlic, minced - 1/2 cup olive oil - 2 tablespoons red wine vinegar (or apple cider vinegar as a substitute) Chimichurri sauce is the star here. It adds bright flavors to your chicken. Fresh parsley and cilantro give it a nice green color. Garlic adds depth, while olive oil makes it rich. The vinegar brings acidity, balancing the dish perfectly. - 1 teaspoon red pepper flakes - Zest and juice of 1 lemon - Salt and pepper to taste Red pepper flakes add a bit of heat. Use lemon zest and juice for freshness. Don't forget to season with salt and pepper. These simple ingredients make your dish sing! - Grill or stovetop grill pan - Mixing bowl and whisk - Resealable plastic bag or shallow dish Using the right tools is key. A grill or pan gives your chicken those lovely grill marks. A mixing bowl helps in making the chimichurri sauce. A resealable bag or dish is perfect for marinating. You can find the full recipe to guide you through making this dish. To start, grab a medium bowl. Add the following ingredients: - 1 cup fresh parsley, chopped - 1/2 cup fresh cilantro, chopped - 4 cloves garlic, minced - 1/2 cup olive oil - 2 tablespoons red wine vinegar - 1 teaspoon red pepper flakes - Zest and juice of 1 lemon - Salt and pepper to taste Mix all these together well. You want a bright green sauce that smells amazing. Taste it and adjust the salt and pepper if needed. This sauce packs a punch! Next, take the chicken breasts. Place them in a large resealable plastic bag or a shallow dish. Pour half of your chimichurri sauce over the chicken. Make sure each piece is well-coated. Seal the bag or cover the dish. For the best flavor, marinate the chicken for at least 30 minutes. If you have time, let it marinate for up to 2 hours. This gives the chicken a deep taste. When you're ready to cook, preheat your grill to medium-high heat. This step is key for nice grill marks. Take the chicken out of the marinade and throw away the leftover marinade. Grill the chicken for about 6-7 minutes on each side. You want it to reach an internal temperature of 165°F (75°C) to be safe to eat. Once cooked, place the chicken on a serving platter. Drizzle the remaining chimichurri sauce over the top for a vibrant finish. Enjoy your meal! To make your Vibrant Chimichurri Chicken shine, marination is key. Use half of your chimichurri sauce to coat the chicken. Seal it in a bag or dish. Let it marinate for at least 30 minutes. For the best flavor, aim for 2 hours. This allows the herbs and spices to soak in deeply. When cooking, keep an eye on the time. Grill each side for 6-7 minutes. You want juicy chicken, so check the internal temp. It should reach 165°F (75°C) for safety. A vibrant dish delights the eyes. After cooking, transfer the chicken to a platter. Drizzle the remaining chimichurri sauce over the top. This adds color and flavor. For an extra touch, sprinkle chopped parsley or cilantro on top. It brightens the dish and enhances the fresh taste. Serve with colorful sides like grilled vegetables or a fresh salad for a stunning meal. One mistake is over-marinating. If you let the chicken sit too long, it can become mushy. Stick to the recommended marination time for the best texture. Another common error is not checking the chicken's internal temperature. This step is crucial. If undercooked, chicken can be unsafe to eat. Use a meat thermometer to ensure it’s done right. Enjoy your delicious and safe meal! {{image_2}} You can swap herbs in this chimichurri recipe. For a twist, use oregano or basil instead of parsley and cilantro. These herbs will change the flavor while still keeping it fresh. You might even like the new taste! You can also try different proteins. Steak is a great choice if you want a rich flavor. Shrimp can add a nice seafood touch and cooks quickly. Both options are delicious and pair well with chimichurri. Spice it up with different seasonings in your chimichurri sauce. Add chili powder or cayenne for heat. You can also play with citrus flavors. Try using lime or orange juice instead of lemon. Each change can brighten the dish in a new way. You can cook this chicken in different ways. Grilling gives it a smoky flavor. However, you can also oven-bake it if you prefer. Just preheat the oven to 400°F (200°C) and bake for about 25-30 minutes. Air frying is another good option. This method can make the chicken crispy without much oil. It’s a great way to enjoy a healthy meal while keeping the flavors intact. For the complete recipe, check out the Full Recipe section! To keep your Vibrant Chimichurri Chicken fresh, store it in the fridge. Place leftover chicken and chimichurri sauce in airtight containers. This helps prevent drying out. Use shallow containers for faster cooling. Let the chicken cool to room temperature before sealing. This ensures it cools evenly. You can freeze leftover chicken and chimichurri for later use. First, slice the chicken into pieces for easy use. Place the chicken in freezer bags. Make sure to remove as much air as possible. For chimichurri, transfer it to a separate container. Label the bags with the date. For best quality, use them within three months. To thaw, place them in the fridge overnight. This method keeps flavors intact. Reheat your chicken carefully to keep it juicy. You can use an oven or stovetop. Preheat the oven to 350°F (175°C). Place the chicken on a baking sheet and cover it with foil. Heat for about 15-20 minutes. On the stovetop, use a skillet on medium heat. Add a splash of water or broth to keep moisture. Heat until warm, about 5-7 minutes. Aim for an internal temperature of 165°F (75°C) for safety. Enjoy the flavors of your chimichurri chicken again! You can find the full recipe [here](#). Yes, you can use chicken thighs. Thighs have more fat, making them juicier. They also take a bit longer to cook. Grill them for about 8-9 minutes per side. The internal temperature should still reach 165°F. This will ensure they are safe to eat while remaining tender. You can marinate the chicken for 30 minutes to 2 hours. If you want a strong flavor, go for the longer time. The marinade infuses the chicken with vibrant taste. Just don't exceed 2 hours; it can become mushy. For a balanced meal, serve with: - Grilled vegetables like zucchini and bell peppers - A fresh salad with mixed greens - Quinoa or rice for a hearty side These options complement the flavors of the chicken well. If you want to skip vinegar, try using lemon juice or lime juice instead. You can also use yogurt for creaminess. Mix these options with the herbs and oil. This gives the sauce a nice tang and depth. Yes, you can prepare the chimichurri sauce ahead of time. Store it in the fridge for up to three days. Marinate the chicken the night before. Just remember to grill it fresh for the best taste. This blog post covered the key ingredients, tools, and methods to create Vibrant Chimichurri Chicken. You learned about the marination process, cooking tips, and variations to try. Don't forget to store leftovers properly and reheat them well for the best taste. Exploring this dish can bring fresh flavors to your table. Embrace the endless ways to customize it. Your kitchen adventures await!

Ready to spice up your grilling routine? This Vibrant Chimichurri Chicken recipe is the answer! With fresh herbs, zesty flavors, and simple steps, you’ll create a dish that excites your …

Read more

Categories Dinner

Classic Decadent Strawberry Cake Simple and Delicious

July 15, 2025 by Chef Owen
- 2 cups all-purpose flour - 1 ½ cups granulated sugar - 1 cup unsalted butter, softened - 4 large eggs To make a classic decadent strawberry cake, you need some key ingredients. First, the all-purpose flour gives the cake structure. The granulated sugar adds sweetness and helps with texture. Softened unsalted butter creates a rich flavor and makes the cake moist. Finally, the large eggs bind everything together, adding richness and stability. - Fresh strawberries for decoration - Mint leaves for garnish While the essential ingredients make a solid cake, optional add-ins can elevate it. Fresh strawberries not only look beautiful but also add a burst of flavor. Mint leaves can provide a fresh touch, making your cake even more inviting. - Mixing bowls - Measuring cups and spoons - Electric mixer - 9-inch round cake pans Having the right tools is key to success. Mixing bowls help combine your ingredients easily. Measuring cups and spoons ensure you get the right amounts. An electric mixer saves time and effort when mixing the batter. Finally, 9-inch round cake pans help your cake bake evenly, leading to a perfect texture. For the full recipe, check out the section above. - Preheat the oven to 350°F (175°C). - In a large mixing bowl, cream together the softened butter and granulated sugar. Mix until it feels light and fluffy. This step is key for a soft cake. After mixing, add in four large eggs one by one. Stir in one teaspoon of vanilla extract for flavor. In another bowl, whisk together two cups of all-purpose flour, one tablespoon of baking powder, and half a teaspoon of salt. Gradually add the dry mix to the wet mix, alternating with half a cup of whole milk. Start and end with the flour mix. Mix until just combined. Finally, fold in two cups of sliced fresh strawberries gently. Now it’s time to bake! Divide the batter evenly into two greased and floured 9-inch round cake pans. Bake for 25-30 minutes. To check if they’re done, insert a toothpick into the center. If it comes out clean, the cakes are ready. Once baked, let the cakes rest in the pans for 10 minutes. Then, transfer them to a wire rack to cool completely. This cooling time is crucial for easy frosting later. After cooling, it’s time to assemble. Place one layer of cake on a serving platter. Spread a generous amount of whipped cream on top, then layer with sliced strawberries. Next, carefully place the second layer on top. Frost the top and sides of the cake with the remaining whipped cream. For an extra touch, garnish with fresh strawberries and mint leaves. This adds color and makes the cake look beautiful. Enjoy making this delightful Classic Decadent Strawberry Cake! For the full recipe, check the earlier section. To get a soft and fluffy cake, measuring your flour correctly is key. Spoon the flour into your measuring cup and level it off with a knife. Avoid scooping directly with the cup, as it packs the flour down. This can lead to a dry cake. Another important tip is not to overmix your batter. Mix just until you see no dry flour. Overmixing can make your cake tough. Gently fold in the strawberries at the end to keep them intact. For the best whipped cream, start with chilled beaters and a cold bowl. This helps the cream whip faster. Pour in the heavy cream and begin mixing on low speed. When soft peaks form, gradually add the powdered sugar. This method keeps the cream stable and prevents it from deflating. Keep whipping until you see stiff peaks. This makes your cake look and taste great! To store any leftover cake, place it in an airtight container. This keeps it moist and fresh. If you do not have a container, wrap the cake tightly in plastic wrap. Refrigerate the cake to maintain its freshness. It can stay good for about three days. If you want to keep it longer, consider freezing slices. This way, you can enjoy a piece whenever you like. For the complete recipe, check the Full Recipe. {{image_2}} You can switch things up with flavors. Adding lemon zest gives a nice, fresh kick. The bright citrus notes work well with strawberries. You might also try using white chocolate ganache. It adds a rich, creamy layer instead of whipped cream. Both choices add a fun twist to the classic cake. If you need a gluten-free version, it's easy to adapt. Just swap out all-purpose flour for a gluten-free blend. Make sure your blend includes binding agents like xanthan gum. Also, use certified gluten-free baking powder. This keeps the cake light and fluffy. For those who follow a vegan diet, you can make some changes. Replace eggs with flaxseed meal or applesauce. For butter, use coconut oil or vegan butter. You can also cut down on sugar. Using alternatives like stevia or erythritol can help. These options make the cake healthier without losing flavor. Feel free to explore these variations with the Full Recipe to create your perfect version of the classic decadent strawberry cake! To keep your classic decadent strawberry cake fresh, refrigerate it. Wrap the cake tightly in plastic wrap or place it in an airtight container. This helps prevent it from drying out. If you have leftover slices, you can freeze them. Wrap each slice in plastic wrap, then place them in a freezer bag. This method allows you to enjoy the cake later. You can store leftover cake in the fridge for about 3 to 5 days. After that, the quality may decline. If you freeze the slices, they can last up to 3 months. Check for signs that your cake has gone bad. If you see mold, or if it smells sour, it's time to toss it. If you want to enjoy slices warm, use the oven. Preheat it to 350°F (175°C). Place the slice on a baking sheet for about 10-15 minutes. This helps keep the cake soft and moist. You can also use the microwave. Heat the slice for about 15-20 seconds. Be careful not to overheat, as it can make the cake dry. Enjoy your cake warm, and it will taste just as good! A decadent cake is rich and moist. You achieve this through quality ingredients. Using unsalted butter adds creaminess. Granulated sugar provides sweetness and a tender crumb. Adding heavy cream in the frosting makes it luxurious. Fresh strawberries add a burst of flavor and moisture. The combination creates a cake that feels special. Yes, you can use frozen strawberries. They work well in a pinch. However, fresh strawberries taste better. Frozen strawberries may release extra juice, making the batter wetter. If using frozen, thaw and drain them first. This helps keep your cake from getting soggy. Fresh strawberries give a brighter flavor and a better texture. To boost flavor, try adding extracts. Almond or lemon extract can add a nice twist. You can also mix in chocolate chips for a fun surprise. Another idea is to layer in some jam between the cake layers. This adds sweetness and pairs well with strawberries. Experiment and find what you love! Yes, you can make this cake ahead of time. Bake the layers and let them cool completely. Wrap each layer tightly in plastic wrap. Store them at room temperature for a day or in the fridge for a few days. You can also freeze them for longer storage. Frost the cake just before serving. This keeps it fresh and beautiful. For the full recipe, check out the Classic Decadent Strawberry Cake. Now you have all you need for a classic strawberry cake. You learned about key ingredients, useful tools, and step-by-step instructions. I shared tips to make your cake perfect and discussed fun variations. Keep your cake fresh with proper storage and enjoy it longer. Whether you use fresh strawberries or add a twist, this cake will impress. Baking can be simple, fun, and delicious. Happy baking!

Are you ready to indulge in a slice of heaven? My Classic Decadent Strawberry Cake is simple and mouthwatering. With fresh strawberries and creamy frosting, this cake will impress everyone. …

Read more

Categories Desserts

Japanese Strawberry Shortcake Delightful and Easy Recipe

July 15, 2025 by Chef Owen
To make a great Japanese strawberry shortcake, you need the right ingredients. Here’s what you'll need: - 2 cups cake flour - 1 ½ teaspoons baking powder - ½ teaspoon baking soda - ½ teaspoon salt - 1 cup granulated sugar, divided - 4 large eggs - ½ cup whole milk - ½ cup unsalted butter, melted - 1 teaspoon vanilla extract - 2 cups heavy whipping cream - 2 tablespoons powdered sugar - 1 pound fresh strawberries, hulled and sliced These ingredients work together to create a light and fluffy cake with sweet strawberries. Choosing ripe strawberries is key. Here’s how to pick the best ones: - Look for bright red color. Avoid any green or white spots. - Check for firmness. They should feel solid and not mushy. - Smell them! Ripe strawberries have a sweet, fragrant smell. - Pick berries with green leaves. This shows they are fresh. Fresh strawberries make your dessert taste better and look prettier. If you don’t have some ingredients, here are some easy swaps: - Cake flour: You can use all-purpose flour, but the cake might be denser. - Unsalted butter: Use salted butter and skip the added salt in the recipe. - Heavy whipping cream: Use coconut cream for a dairy-free option. These substitutions help you make the cake even if you are missing some items from your pantry. For the full recipe, check the earlier sections. Start by preheating your oven to 350°F (175°C). Grease and flour two 8-inch round cake pans. This step helps the cakes come out easily. In a medium bowl, sift together the cake flour, baking powder, baking soda, and salt. Set this aside. In a large bowl, whisk together ¾ cup of the granulated sugar and the eggs. Whisk until the mix looks pale and thick, about 5 minutes. This adds air and helps your cake rise. Next, add the milk, melted butter, and vanilla extract. Whisk until everything is well mixed. Now, gradually add the dry mix to the wet mix. Fold gently until no flour pockets remain. This keeps your cake light. Divide the batter into the prepared pans. Smooth the tops with a spatula. Bake for 25 to 30 minutes. Check with a toothpick; it should come out clean. Once baked, let the cakes cool in the pans for 10 minutes. Then, move them to a wire rack to cool completely. While your cakes cool, let’s make the whipped cream. Use a chilled bowl for this step. Pour the heavy cream into the bowl. Start whipping it until soft peaks form. This means it should hold its shape but still be soft. Now, gradually add the powdered sugar. Continue whipping until medium peaks form. This makes the cream fluffy and sweet. Don’t over-whip; you want it smooth, not grainy. Once your cakes are cool, cut each cake in half horizontally. This creates four layers. Place one layer on a serving plate. Spread a layer of whipped cream on top, then add a layer of sliced strawberries. Repeat this process with the second and third layers. Finish with the last cake layer on top. Now, frost the top and sides of the cake with the remaining whipped cream. For the final touch, decorate the top with extra strawberries. Arrange them in a pretty pattern. Enjoy your delicious Japanese Strawberry Shortcake! For the complete recipe, check the Full Recipe section. To get a fluffy sponge cake, use room temperature eggs. They mix better and create air. Sift your dry ingredients well. This helps the cake rise evenly. When mixing the batter, fold gently. This keeps the air in, making the cake light. Bake until golden brown, but do not overbake. Check with a toothpick for doneness. Start with cold cream and a chilled bowl. This helps the cream whip faster. Use heavy whipping cream for the best texture. Whip until soft peaks form, then add powdered sugar. This adds sweetness and stability. Avoid overwhipping, or your cream may turn to butter. Use the whipped cream right away for the best results. Serve your cake chilled for a refreshing treat. Slice it carefully with a sharp knife. Wipe the knife between cuts for neat slices. Decorate the top with fresh strawberries. Arrange them in a fun pattern for a pop of color. Garnish each slice with a mint sprig for freshness. For a full guide on making this lovely dessert, check out the Full Recipe. {{image_2}} You can add fun flavors to your Japanese strawberry shortcake. Try using different fruits like mango or kiwi. You can also mix in a hint of matcha powder for a green tea twist. Another option is to use lemon zest in the whipped cream for a bright taste. These changes give your cake a new look and flavor. Seasonal fruits can change your cake game. In spring, use fresh strawberries, but in summer, switch to peaches or blueberries. Fall brings apples and pears, while winter can feature pomegranates or citrus. Each fruit adds its unique taste and color to your cake. This keeps your dessert fresh and exciting all year long. If you need a gluten-free version, swap regular flour with almond or coconut flour. Use a gluten-free blend to keep it soft. For a dairy-free cake, replace milk and butter with almond milk and coconut oil. The cream can be made with coconut cream, which whips up beautifully. These swaps allow everyone to enjoy this delightful dessert. You can find the full recipe to guide you through these changes. To keep your Japanese strawberry shortcake fresh, store it in the fridge. Use an airtight container or cover it tightly with plastic wrap. This keeps the cake moist and prevents it from absorbing other smells. Always keep the cake chilled until you are ready to serve. You can enjoy your cake for up to three days in the fridge. After that, the strawberries may start to lose their freshness. If you notice any signs of spoilage, like a change in color or smell, it’s best to discard the cake. Trust your senses to guide you. If you have leftovers, freezing is a great option. Wrap individual slices tightly in plastic wrap, then place them in a freezer bag. This keeps the cake fresh for up to three months. When you’re ready to eat, thaw the slices in the fridge overnight. Enjoy your Japanese strawberry shortcake even after some time has passed! For the full recipe, refer to the previous sections. Japanese Strawberry Shortcake has roots in Western baking. It became popular in Japan after World War II. The dessert combines a light sponge cake with fresh strawberries and whipped cream. The Japanese version is less sweet than American cakes. It focuses on the natural flavors of strawberries. This cake is often served during celebrations, like birthdays and holidays. Yes, you can make this dessert a day ahead. Prepare the cake layers and whipped cream, then store them separately. Keep the cake in an airtight container to keep it fresh. For the whipped cream, store it in the fridge. Assemble the cake just before serving to keep it looking nice. You can serve Japanese Strawberry Shortcake with a cup of green tea. Matcha tea pairs well with the cake's sweetness. You might also consider serving fresh fruit on the side. Other options include a scoop of vanilla ice cream or a drizzle of chocolate sauce. For a festive touch, add mint leaves as a garnish. Japanese strawberry shortcake is a delightful treat with fresh flavors. You learned about the key ingredients and how to choose the best strawberries. I shared easy steps for making the cake, whipping cream, and putting it all together. You also found tips for a perfect texture and lovely presentation. Variations let you explore new flavors, and proper storage keeps your cake fresh. Enjoy this sweet dessert, whether it's a special occasion or just a treat for yourself. With these tips, you’re ready to create a delicious masterpiece.

Looking to impress with a delightful dessert? Japanese Strawberry Shortcake is the perfect choice! This light, fluffy cake combines layers of airy sponge and fresh strawberries, topped with clouds of …

Read more

Categories Desserts

One-Pot Rosemary Garlic Chicken Easy Weeknight Meal

July 15, 2025 by Chef Owen
One-Pot Rosemary Garlic Chicken is a simple dish that packs big flavor. You can make it in about 50 minutes. This meal serves four and is perfect for busy weeknights. - 4 chicken thighs, bone-in and skin-on - 2 tablespoons olive oil - 4 cloves garlic, minced - 1 tablespoon fresh rosemary, chopped - 1 teaspoon paprika - Salt and pepper to taste - 1 cup chicken broth - 1 lemon, zested and juiced - 1 cup baby potatoes, halved - 1 cup green beans, trimmed - Fresh rosemary sprigs for garnish These ingredients come together to create a warm and tasty meal. The chicken thighs give you juicy meat, while the potatoes and green beans add a nice crunch. Feel free to mix things up! You can add your favorite veggies. Carrots or bell peppers work well. If you want more spice, add red pepper flakes. For a creamy twist, stir in some heavy cream at the end. This dish is all about making it your own! Start by gathering all your ingredients. This makes cooking easier and faster. Heat 2 tablespoons of olive oil in a large pot over medium-high heat. Season the chicken thighs with salt, pepper, and paprika. Place the thighs skin-side down in the pot. Sear the chicken for about 5-7 minutes. This makes the skin golden and crispy. Flip the chicken and cook for 3-4 more minutes. Then, take the chicken out and set it aside. Next, add 4 cloves of minced garlic and 1 tablespoon of chopped rosemary to the pot. Sauté for about 30 seconds until it smells great. Now pour in 1 cup of chicken broth, along with the zest and juice of 1 lemon. Use a wooden spoon to scrape up any browned bits from the bottom. This adds flavor. Return the chicken to the pot. Nestle 1 cup of halved baby potatoes around the chicken. Bring the liquid to a gentle simmer. Cover the pot and place it in the oven preheated to 400°F (200°C). Bake for 20 minutes. After that, take the pot out and add 1 cup of trimmed green beans. Stir gently, cover again, and return to the oven for another 15-20 minutes. The chicken should be cooked through, and the veggies tender. Finally, take the pot out of the oven. Let it rest for a few minutes. Garnish with fresh rosemary sprigs before serving. Enjoy your one-pot meal! To get that perfect sear, make sure your pot is hot. The oil should shimmer but not smoke. Place the chicken skin-side down and don’t move it around. Let it sit for those few minutes. This helps the skin crisp up nicely. If the chicken sticks, it’s not ready to flip. Also, remember to season well. Salt and pepper are key to great flavor. Roasting veggies is easy in one pot. Cut them into similar sizes for even cooking. Add them at the right time. For this dish, add the green beans after 20 minutes of cooking the chicken. This way, they stay crisp. Toss them gently with the other ingredients. This allows them to soak up flavors without getting mushy. The goal is tender but firm veggies that add color and taste to your meal. One-pot meals save time and clean-up. Here are some tips to make it easier: - Prep Ingredients First: Chop all veggies and season the chicken before you start cooking. - Use a Large Pot: A wider pot gives more space for browning and cooking. - Layer Ingredients: Place harder vegetables, like potatoes, at the bottom. They need more time to cook. - Don’t Overcrowd the Pot: Give each piece of chicken space. This helps them brown better and cook evenly. Herbs make your dish shine. Here are ways to use them: - Fresh Over Dried: Fresh rosemary is best for flavor. Chop it finely and mix it with garlic. - Add at Different Stages: Some herbs, like rosemary, can go in early. Others, like parsley, are best added at the end. - Experiment with Combinations: Try pairing rosemary with thyme or basil. This can add depth to your dish. - Use the Whole Plant: You can use both the leaves and stems for extra flavor. Just chop them finely. Avoid these pitfalls for a perfect meal: - Skipping the Sear: Don’t skip searing the chicken. This builds flavor and texture. - Neglecting Seasoning: Season generously with salt and pepper. It brings out the dish's best flavors. - Not Monitoring Cooking Time: Keep an eye on the clock. Overcooking can dry out the chicken. - Ignoring Leftovers: This dish tastes even better the next day. Store it properly to enjoy later. For the full recipe, check out the One-Pot Rosemary Garlic Chicken. {{image_2}} You can swap out some ingredients in this recipe to fit your taste. For instance, use chicken breasts instead of thighs. They cook quicker but stay juicy when cooked right. You can also replace rosemary with thyme for a different flavor. If you do not have baby potatoes, regular potatoes work too. Just cut them smaller for even cooking. For a bit of heat, add red pepper flakes or paprika. If you want a vegetarian meal, you can still enjoy this dish. Replace chicken with hearty vegetables like eggplant, mushrooms, or chickpeas. Use vegetable broth in place of chicken broth. Toss in more green beans and add some bell peppers for color. You can also include tofu for protein. Cook the veggies until tender, then mix in the same herbs and spices for flavor. You can make this dish in more ways than one. For stovetop cooking, follow the same steps but simmer on low. This will take about 30 minutes. If you choose a slow cooker, brown the chicken first. Then, place it in the slow cooker with the other ingredients. Cook on low for 6-8 hours or high for 3-4 hours. Every method keeps the flavors bright and fresh. For the full recipe, check out the detailed instructions above. After enjoying your One-Pot Rosemary Garlic Chicken, let it cool down. Store any leftovers in an airtight container. Place it in the fridge. It will stay fresh for up to three days. If you want to keep it longer, consider freezing. For freezing, first ensure the chicken is cool. Place the chicken and veggies in a freezer-safe container. Be sure to use a container that seals well. You can freeze it for up to three months. Label the container with the date. This helps you keep track of freshness. To reheat, first thaw your chicken in the fridge overnight. You can also use the microwave for quick defrosting. Once thawed, place it in a pot on low heat. Add a splash of chicken broth to keep it moist. Stir occasionally until heated through. This helps maintain great flavor and texture. The best way to season chicken is simple. Use salt, pepper, and herbs. For this recipe, I love using fresh rosemary. It adds a nice flavor. Paprika also brings warmth and color. Always season both sides of the chicken. This ensures every bite tastes great. One-pot meals can take about 45 to 60 minutes. This includes prep and cooking time. For our One-Pot Rosemary Garlic Chicken, it takes about 50 minutes total. The chicken cooks in the oven for around 35 minutes. Each step helps build flavors, so be patient. Yes, you can use boneless chicken. It cooks faster than bone-in chicken. Just check the internal temperature to ensure it's safe. Boneless chicken may need about 20 to 25 minutes in the oven. Adjust the cooking time for the best results. This blog post covered key aspects of making a tasty one-pot meal. We discussed ingredients, step-by-step cooking, and tips to avoid mistakes. You learned how to customize your dish and store your leftovers properly. Remember, with just a few tweaks, you can make this recipe your own. Keep experimenting, and always enjoy the cooking process. Good food brings joy, so have fun in the kitchen!

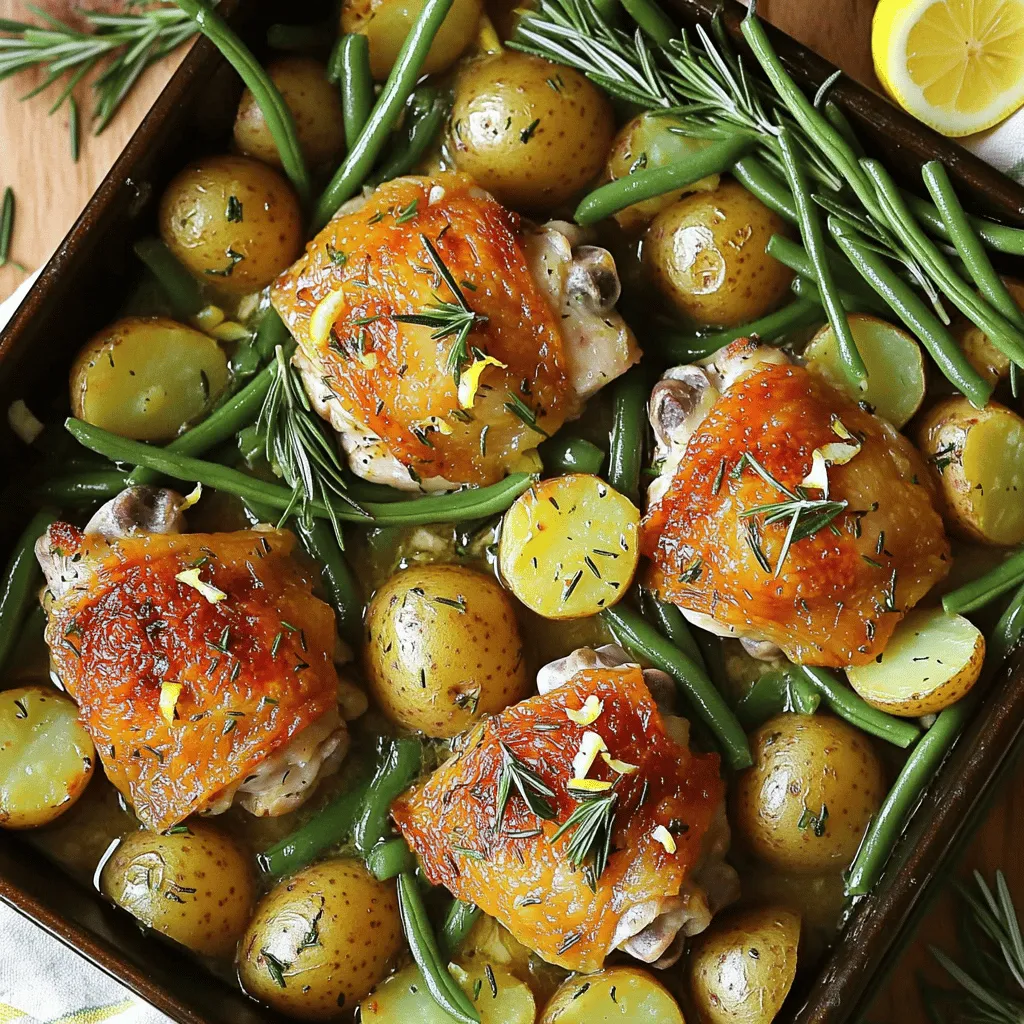
Looking for a delicious meal that’s quick and easy? You’re in the right place! This One-Pot Rosemary Garlic Chicken is a perfect weeknight dish that will fill your home with …

Read more

Categories Dinner

Kale Salad with Roasted Beets Fresh and Flavorful Dish

July 14, 2025 by Chef Owen
- 4 cups kale, stems removed and chopped - 2 medium beets, peeled and diced - 1 medium carrot, grated - 1/2 cup feta cheese, crumbled - 1/4 cup walnuts, toasted and roughly chopped - 1/4 cup dried cranberries - 1/4 cup extra virgin olive oil - 2 tablespoons balsamic vinegar - 1 teaspoon honey - Salt and pepper to taste When making this kale salad, using fresh and quality ingredients is key. I always choose the best kale I can find. Look for kale that is bright green and has firm leaves. Avoid wilted or yellowing kale. Fresh kale adds a crisp bite to the salad. Beets bring sweetness and color to your dish. I prefer medium-sized beets because they roast evenly. When picking beets, choose ones that are firm and smooth. The skin should be free from blemishes. For carrots, select vibrant orange ones that are firm and crunchy. They add a nice crunch to the salad. Feta cheese should be creamy and crumbly. I love using a high-quality feta for its rich flavor. Walnuts can add a lovely crunch. Toast them lightly to enhance their taste. Dried cranberries bring a sweet contrast to the savory flavors in this dish. When it comes to olive oil and balsamic vinegar, quality matters. Use extra virgin olive oil for a rich flavor. Choose a good balsamic vinegar for a tangy kick. Honey adds a touch of sweetness to balance the salad. Lastly, salt and pepper enhance all the flavors. - Selecting the best kale: Look for vibrant, crisp leaves with no brown spots. - Choosing the right beets: Pick firm, smooth beets that feel heavy for their size. - Organic vs. conventional produce: Organic options often have better flavor and fewer pesticides. First, preheat your oven to 400°F (200°C). This temperature ensures the beets roast well. Next, prepare a baking sheet by lining it with parchment paper. This helps with easy cleanup. Now, take your diced beets and place them on the sheet. Drizzle them with 1 tablespoon of olive oil. Sprinkle a pinch of salt and pepper over the beets. This simple seasoning brings out their natural sweetness. Roast the beets for 25-30 minutes. Be sure to stir them halfway through. Once they are tender, remove them from the oven and set them aside to cool. In a large bowl, combine the chopped kale, grated carrot, roasted beets, feta cheese, walnuts, and dried cranberries. Each ingredient adds a unique flavor and texture. For the dressing, whisk together the remaining olive oil, balsamic vinegar, honey, and a dash of salt and pepper in a small bowl. This dressing balances the earthy flavors of the beets and the bitterness of the kale. Drizzle the dressing over the salad mixture. Toss gently to coat everything well. This step ensures each bite is flavorful. Let your salad sit for about 10 minutes. This resting time helps the flavors meld together. Taste the salad and adjust the seasoning if needed. For a beautiful presentation, serve the salad in a large wooden bowl. Garnish with extra walnuts and feta on top. This adds visual appeal and makes the dish inviting. You can also plate individual servings with a slice of lemon on the side for a pop of color. For the complete recipe, check out the Full Recipe. To get even cooking for your beets, cut them into similar sizes. This helps them roast at the same rate. Spread them out in a single layer on the baking sheet. Give them space so they can roast, not steam. If you want to save time, consider using pre-cooked beets. They are easy to find in stores and save you roasting time. Just slice them and add them to your salad. Don't be afraid to try different dressings. A simple lemon vinaigrette can brighten the flavors. You can also switch balsamic for apple cider vinegar for a fruity twist. For added flavor, try mixing in fresh herbs like parsley or dill. They can take your salad from good to great. Adding protein boosts the salad's nutrition. Grilled chicken, chickpeas, or quinoa are great options. You can also increase fiber by adding more veggies like bell peppers or avocado. These simple changes make your salad not only tasty but also filling. For the full recipe, check the [Full Recipe] section. {{image_2}} You can change up this salad based on what’s fresh. Try adding: - Roasted sweet potatoes for a sweet touch. - Shredded Brussels sprouts for a crunchy bite. - Sliced apples for a crisp flavor. Dressing can also vary with the seasons. Use a lemon vinaigrette in spring. For fall, try a maple mustard dressing. If you want a vegan salad, swap feta cheese for avocado. Creamy avocado gives a rich texture. You can also use nutritional yeast for a cheesy flavor. For dressings without honey, try maple syrup or agave nectar. These options keep the sweetness but stay plant-based. Adding grains like quinoa or farro makes the salad heartier. They give extra protein and fiber, making it more filling. Quinoa cooks quickly and adds a nutty flavor. Farro has a chewy texture and enhances the salad's depth. Both grains boost nutrition and make the dish more satisfying. Store any leftover salad in an airtight container. This keeps it fresh and crisp. Place it in your refrigerator. The salad stays good for about 2-3 days. After this, the kale may wilt. The beets can lose their texture, too. You can make this salad ahead of time. Just store each part separately. Keep the kale, beets, and dressing in different containers. This helps keep everything fresh. Use glass containers for best results. They help prevent odors and stains. You might wonder if you can reheat the salad. I recommend against it. The salad is best when fresh and cool. If you want a warm dish, try warming the beets before mixing. Just heat them gently in a pan and add to your salad. Remember to check out the Full Recipe for more tips! To reduce the bitterness of kale, try massaging it. Take the chopped kale and drizzle a little olive oil on it. Use your hands to gently rub the leaves for a few minutes. This softens the leaves and makes them taste sweeter. You can also add a bit of salt or lemon juice while massaging. Both help to cut the bitterness. Yes, you can use frozen beets! They are often already cooked and ready to use. Thaw them before adding to your salad. If they are not pre-cooked, steam or boil them for a few minutes until they are tender. Using frozen beets can save time and add convenience to your cooking. Feel free to get creative with your salad! You can add sliced apples for sweetness or avocado for creaminess. Adding chickpeas or grilled chicken boosts the protein. You can also toss in seeds like pumpkin or sunflower for a crunchy texture. Experiment with your favorite flavors! For the full recipe, check out the vibrant Kale Salad with Roasted Beets. In this blog post, we explored a tasty salad packed with fresh ingredients like kale, beets, and walnuts. We covered roasting the beets, assembling the salad, and enhancing its flavor. You learned tips for perfecting your beets and tried different dressings. Remember, you can swap in seasonal veggies or grains to keep it exciting. With the right storage and prep tips, you can enjoy this healthy dish several times. Now, it's time to enjoy your delicious salad and feel good about what you eat.

Welcome to your new favorite dish: Kale Salad with Roasted Beets! This vibrant salad is not just colorful; it’s full of flavor and nutrients. I will guide you through the …

Read more

Categories Salads
Older posts
Newer posts
← Previous Page1 … Page72 Page73 Page74 … Page125 Next →

THE RECIPE HATCH

Where tasty ideas take flight! 🚀🐣 Fresh, easy recipes hatched daily to make cooking simple and flavorful.

PAGES

Home About Contact Privacy Policy Terms & Conditions Cookie Policy GDPR Policy Copyright Policy Disclaimer

CATEGORIES

Appetizers Desserts Salads Breakfast Dinner

Contact

  • Pinterest
  • Mail
Copyright © 2026 The Recipe Hatch. All rights reserved.