Asian Chicken Crunch Salad Flavorful and Crisp Meal
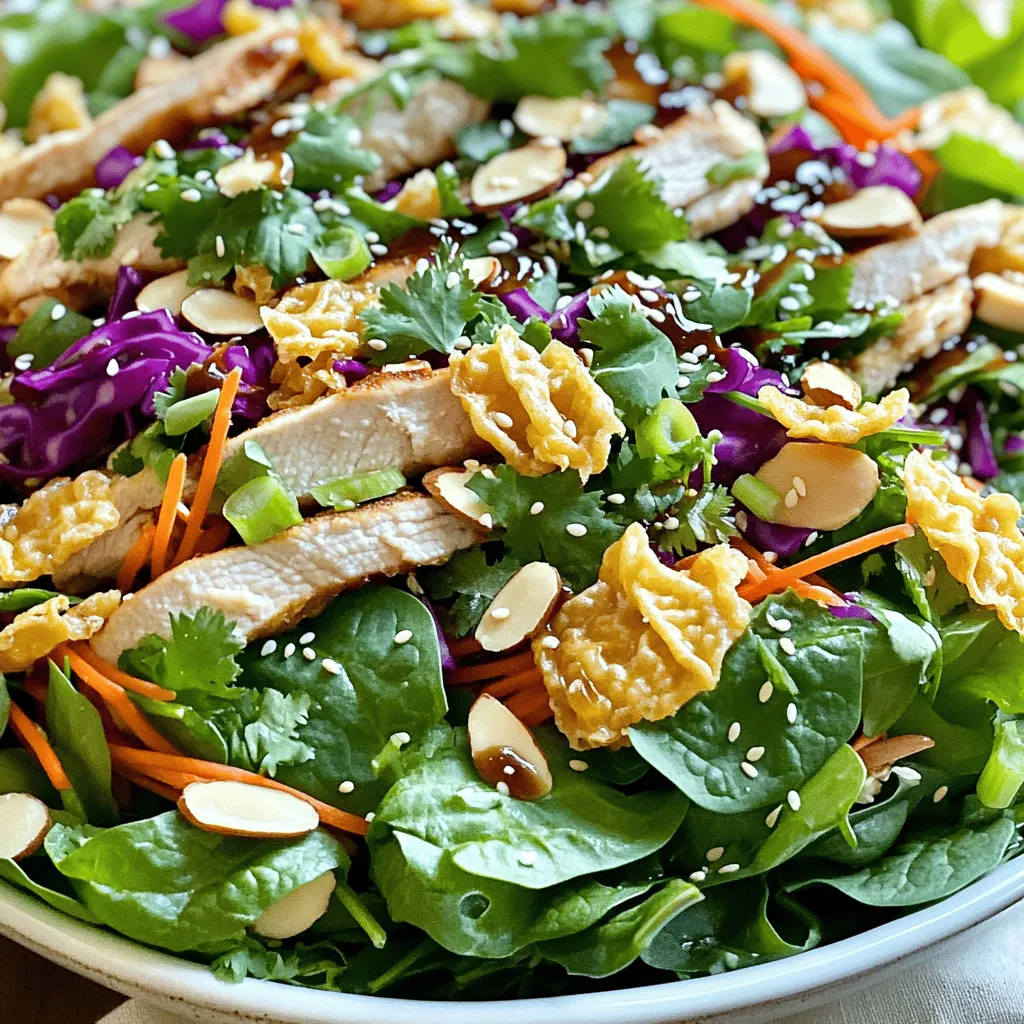
Are you ready to enjoy a bright and crunchy Asian Chicken Crunch Salad? This meal bursts with fresh flavors and textures that will make your taste buds dance. In just …
Are you ready to enjoy a bright and crunchy Asian Chicken Crunch Salad? This meal bursts with fresh flavors and textures that will make your taste buds dance. In just …
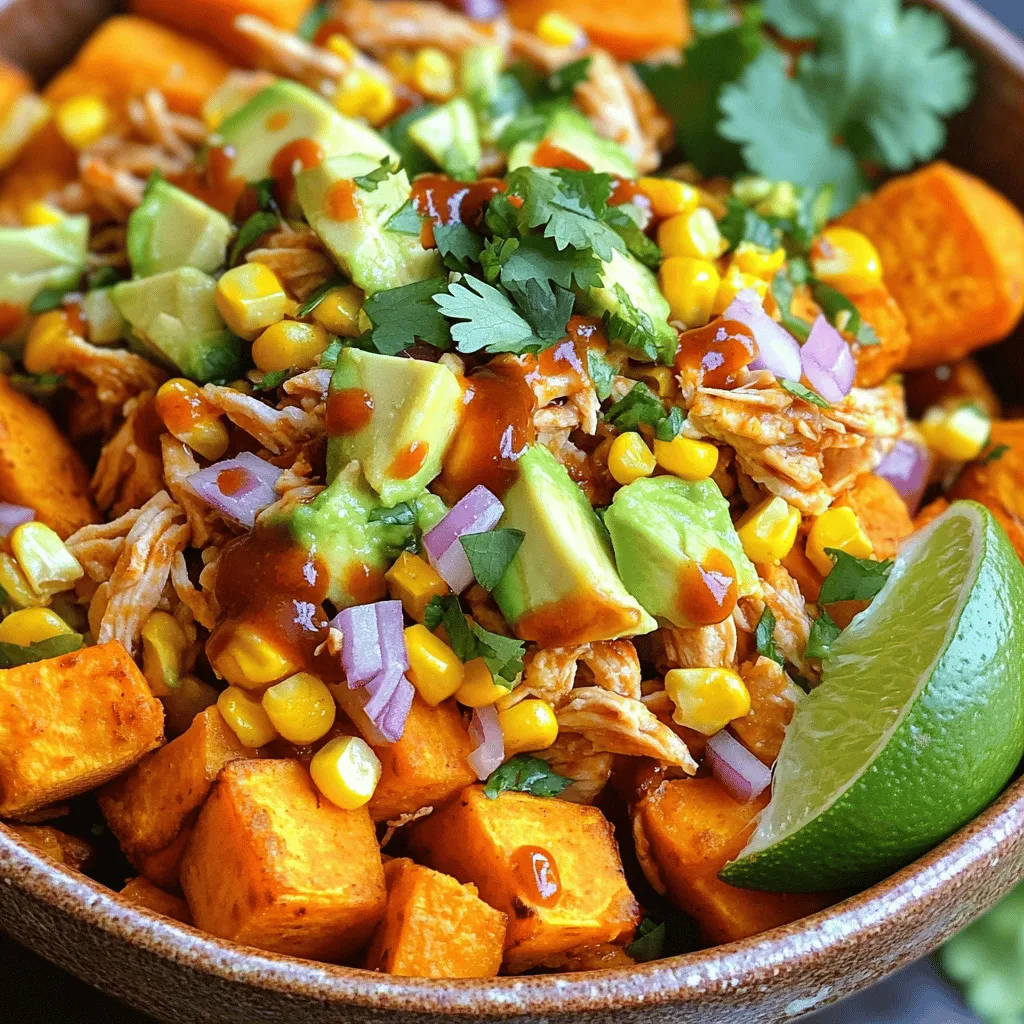
Looking for a tasty and healthy meal prep idea? The BBQ Chicken Sweet Potato Bowl is just what you need! This dish combines tender chicken, sweet potatoes, and zesty BBQ …
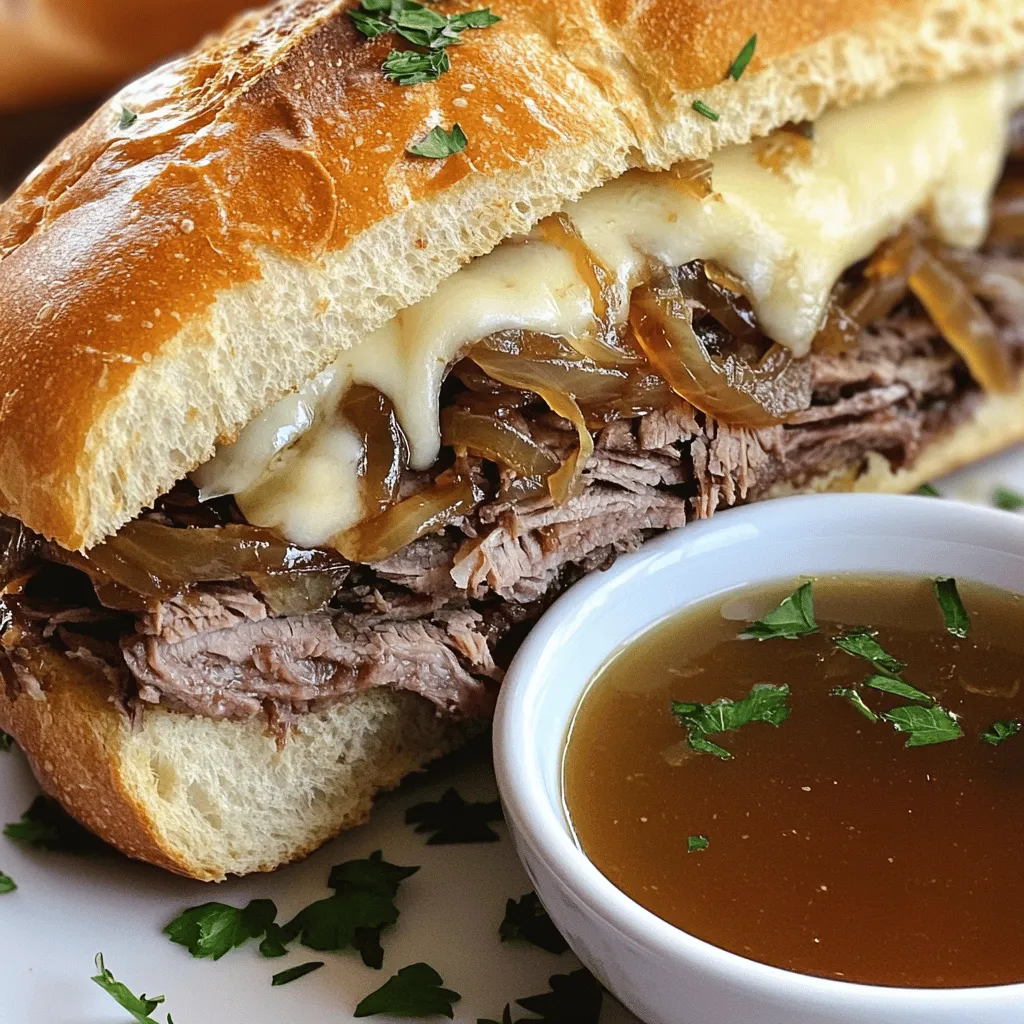
Craving a hearty French dip sandwich but want to skip the restaurant? You’re in the right place! In this guide, I’ll show you how to make delicious French dip sandwiches …

Looking to spice up your dinner routine? These Air Fryer Chicken Mozzarella Wraps are both tasty and simple to make! With just a few fresh ingredients and your air fryer, …
![- 4 boneless chicken thighs - 2 tablespoons olive oil - Juice of 2 limes - 4 cloves garlic, minced - 1 tablespoon ground cumin - 1 tablespoon paprika - 1 cup fresh cilantro leaves - 1 jalapeño, seeds removed - 1/2 cup mayonnaise - 1/4 cup plain Greek yogurt - 1 tablespoon lime juice To create the best Peruvian grilled chicken, we start with these key ingredients. The chicken thighs provide a juicy base. I love using boneless thighs for ease and flavor. Olive oil adds richness, while lime juice brings a bright zest. Next, we have the marinade components. Garlic gives depth, and ground cumin adds warmth. Paprika adds a smoky touch, making the chicken truly special. These flavors blend to create a perfect marinade. For the creamy green sauce, fresh cilantro is a must. It brings a fresh taste that pairs beautifully with the chicken. The jalapeño adds heat, but you can adjust it based on your preference. Mayonnaise and Greek yogurt create a rich, creamy texture. Lime juice brightens up the sauce, adding a delightful zing. You can find the full recipe in the article for more details on how to put these ingredients together. Enjoy the process of making this dish as much as the flavor! - In a bowl, mix olive oil, lime juice, minced garlic, cumin, paprika, salt, and pepper. - Whisk until everything blends well. - Place the chicken thighs in a plastic bag or dish. - Pour the marinade over the chicken. - Ensure the chicken is well coated. - Marinate for at least 2 hours, or overnight for the best flavor. - In a blender, combine cilantro, jalapeño, mayonnaise, Greek yogurt, and lime juice. - Blend until the mixture is smooth. - Taste the sauce and adjust seasoning with salt if needed. - Preheat your grill to medium-high heat. - Remove the chicken from the marinade, letting the excess drip off. - Grill the chicken thighs for about 6-7 minutes on each side. - Cook until they reach an internal temperature of 165°F (75°C). - Once cooked, take the chicken off the grill. - Let it rest for 5 minutes to keep it juicy. - Slice the chicken and serve warm, drizzling the creamy green sauce on top. For more details, check the Full Recipe. To get that true Peruvian taste, I always marinate my chicken overnight. This step allows the flavors to soak in deeply. For the marinade, use high-quality olive oil and fresh lime juice. These two ingredients really make a difference. They add richness and brightness to the dish. Before you start grilling, preheat your grill to medium-high heat. This ensures you get nice grill marks and a good sear on the chicken. Once you grill the chicken, let it rest for about five minutes after cooking. Resting helps keep the chicken juicy and tender. When serving, use a large platter to showcase your chicken. Arrange lime wedges around the chicken to add color and a fresh touch. You can also garnish with more cilantro for a lovely finish. This not only looks great but enhances the dish's flavor too. For the full recipe, check out the complete guide. {{image_2}} You can switch up the sauce for a new taste. A spicy avocado sauce adds a smooth kick. Just blend ripe avocados with lime juice, garlic, and a bit of salt. Another great option is the traditional aji verde. This green sauce uses fresh herbs and jalapeños. It has a tangy kick that pairs well with grilled chicken. Do you want to try something different? Substitute chicken with tofu or fish. Tofu absorbs flavors well and becomes crispy when grilled. Fish like salmon or tilapia also work great. Just adjust the cooking time to avoid drying them out. You can even explore variations with pork or beef. Each will bring a unique twist to this dish. For the perfect meal, consider some side dishes. A Peruvian potato salad adds a creamy and tangy touch. It complements the grilled chicken well. You can also serve grilled vegetables like zucchini and bell peppers. They add color and flavor to your plate. Rice is another solid choice. It soaks up the sauce and rounds out your meal nicely. For the full recipe, check out the [Full Recipe]. Store leftover grilled chicken in an airtight container. This keeps it fresh for up to four days. Always keep the creamy green sauce separate. This helps maintain its zesty flavor and creamy texture. You can freeze the marinated chicken before grilling. This way, you can enjoy it later with full flavor. The creamy green sauce also freezes well for future use. Just store it in a freezer-safe container. To reheat the chicken, use a microwave or grill. This brings back the juicy texture. If you thaw the sauce, blend it again to restore its smoothness. This step makes it just as tasty as fresh. To get the best flavor, marinate for at least 2 hours. Overnight is even better. This allows the spices and acids to soak in. When the chicken absorbs the marinade, it becomes tender and tasty. Always cover the chicken and keep it in the fridge while marinating. This keeps it safe and fresh. Yes, you can use chicken breast if you like. However, chicken thighs give a juicier bite. They have more fat, which helps keep them moist. If you choose breasts, adjust the cooking time. They may cook faster than thighs. Always check for doneness with a meat thermometer. Use a meat thermometer to check the chicken. The inside should reach 165°F (75°C). This temperature ensures the chicken is safe to eat. Insert the thermometer into the thickest part of the meat for the best reading. Let the chicken rest for a few minutes before serving. This helps keep it juicy. For the full recipe, check the earlier section. This blog post shared a simple way to make tasty grilled chicken with a creamy green sauce. We discussed how to marinate the chicken, prepare the sauce, and grill the meat to perfection. By following these steps, you can enjoy a flavorful meal. Use the tips for great results and explore variations to suit your taste. Whether you stick with chicken or try other proteins, this dish is sure to impress. Enjoy your cooking journey and share this recipe with friends!](https://therecipehatch.com/wp-content/uploads/2025/07/b35fe2fa-df7b-41bc-8d66-3bc26f9c1147.webp)
Experience the vibrant flavors of Peru with my recipe for Peruvian Grilled Chicken with Creamy Green Sauce. This dish features juicy chicken thighs marinated in zesty spices, paired with a …
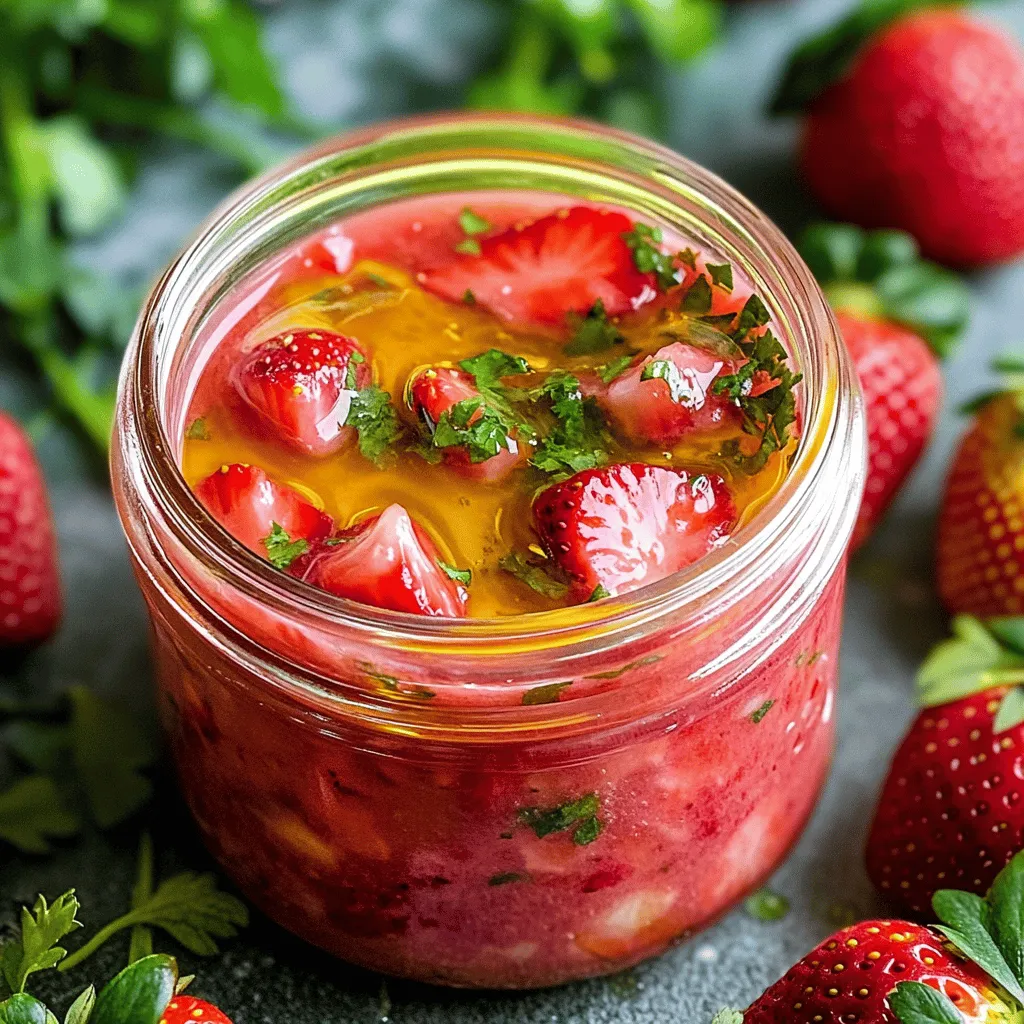
Are you ready to elevate your salads with a burst of fresh flavor? This Homemade Strawberry Vinaigrette is simple, delicious, and made with just a few fresh ingredients. I’ll guide …
![- 1 lb ground turkey - 1 cup fresh spinach, chopped - 1/2 cup breadcrumbs - 1/4 cup grated Parmesan cheese - 1/4 cup cream cheese, softened - 1 cup heavy cream - 1 egg - 3 cloves garlic, minced - 1/2 cup chicken broth - 2 tablespoons olive oil - Seasonings: - 1 teaspoon onion powder - 1 teaspoon Italian seasoning - Salt and pepper to taste When I create my creamy spinach turkey meatballs, I focus on fresh, simple ingredients. Ground turkey is lean and full of protein. The fresh spinach adds color and nutrients. Breadcrumbs give the meatballs a nice texture. For the creamy part, I use Parmesan and cream cheese. These add depth and flavor. Heavy cream makes the sauce rich and satisfying. You can really taste the creaminess! Next, I add an egg to bind everything together. Garlic gives a nice kick. Chicken broth adds moisture and flavor. Olive oil helps with cooking too. The seasonings are key. Onion powder and Italian seasoning give a lovely aroma. Salt and pepper enhance all the flavors. These ingredients combine to create a dish that is both tasty and easy to make. If you want the full recipe, just click here. - Preheat oven to 400°F (200°C). - Line a baking sheet with parchment paper. In a large mixing bowl, combine the ground turkey, chopped spinach, breadcrumbs, Parmesan cheese, cream cheese, egg, minced garlic, onion powder, Italian seasoning, salt, and pepper. I often use my hands to mix. This way, I ensure an even consistency. You want every bite to be flavorful and moist. Shape the mixture into meatballs, about 1-2 inches wide. Place them on the baking sheet, leaving space between each one. Bake the meatballs for 20 to 25 minutes. They should turn golden brown and be fully cooked. While the meatballs bake, heat olive oil in a large skillet over medium heat. Add the heavy cream and chicken broth. Stir continuously until it simmers. Let it bubble gently for about 5 minutes. This step makes the sauce rich and creamy. Once the meatballs are done, add them to the skillet with the cream sauce. Gently stir to ensure each meatball is coated well in the sauce. This makes every bite rich and tasty. Let the meatballs simmer in the sauce for about 5 minutes. This helps the flavors mix. Taste the sauce and adjust the seasoning with salt and pepper if needed. You can garnish the dish with fresh parsley for an extra touch. You can find the full recipe for Creamy Spinach Turkey Meatballs to guide you through these steps! To make moist meatballs, you must mix well. When you blend the ingredients, it helps them stick together. Use your hands to combine everything, but don’t overdo it. If you mix too much, your meatballs may become tough. Avoiding overcooking is key. Bake the meatballs at 400°F (200°C) for 20-25 minutes. Check for a golden brown color. If you cook them too long, they can dry out. Keep an eye on them as they bake. To boost flavor, try adding spices. Some great options are garlic powder and paprika. These spices add depth and warmth to your meatballs. You can also sprinkle in some red pepper flakes for a little heat. Using fresh herbs for garnish makes a big difference. Chopped parsley looks nice and adds a fresh taste. You can even mix in chopped basil or oregano into the meatball mixture for extra flavor. Plating your meatballs can be fun. Place them on a colorful plate and drizzle the cream sauce over the top. You can also add a sprinkle of fresh herbs to make it pop. For side dish pairings, consider serving with pasta or rice. A simple salad works well too. These sides balance the rich meatballs and make your meal complete. For the full recipe, check out the Creamy Spinach Turkey Meatballs 🥩 recipe above. {{image_2}} You can easily change the flavor of your meatballs. Adding different herbs can make a big difference. Try fresh basil, thyme, or parsley for a new taste. You can also mix in some dried herbs like oregano or rosemary. When it comes to cheese, feel free to experiment. Instead of Parmesan cheese, you can use feta or mozzarella. Each cheese adds its own unique flavor and texture to the dish. For a healthier twist, you can substitute ground turkey with ground chicken. This keeps the meatballs light and tasty. If you want a vegetarian option, use lentils or chickpeas instead of meat. Using whole grain breadcrumbs is another great swap. They add fiber and give the meatballs a nice crunch. You can switch up the sauce too. If you want a lighter option, swap heavy cream for coconut milk. This gives a creamy texture with a hint of sweetness. Another great idea is to add marinara sauce instead of creamy sauce. It adds a rich flavor and pairs well with meatballs. You can even mix both sauces for a unique taste. For the full recipe, check out the complete dish details to make your own creamy spinach turkey meatballs. To keep your creamy spinach turkey meatballs fresh, follow these steps: - Refrigeration: Place leftovers in an airtight container. Store in the fridge for up to three days. - Freezing: For longer storage, freeze the meatballs. Wrap each one in plastic wrap, then place in a freezer bag. They can last up to three months in the freezer. When you’re ready to enjoy leftovers, reheating is easy. Here’s how: - Microwave: Place meatballs on a microwave-safe plate. Cover with a damp paper towel. Heat for 1-2 minutes until warm. - Stovetop: In a skillet, add a splash of water. Heat meatballs over medium heat, stirring gently for about 5 minutes. This keeps them moist. Knowing how long leftovers last is important: - Refrigerated leftovers usually stay good for 3 days. - Frozen meatballs can last for up to 3 months. - Signs of spoilage include a sour smell or changes in color. If you notice these, it's best to throw them away. For the full recipe and more, check out the [Full Recipe]. Yes, you can make these meatballs ahead. First, prepare the meatball mixture as per the recipe. Form the meatballs and place them on a baking sheet. Cover and store them in the fridge for up to 24 hours. When ready to cook, follow the baking instructions. You can also freeze the raw meatballs. Just place them in a single layer on a baking sheet and freeze them. Once frozen, transfer them to a freezer bag. They will last for up to 3 months. To cook, bake them from frozen, adding a few extra minutes to the cooking time. Yes, but you need to make a small change. Use gluten-free breadcrumbs instead of regular ones. You can find these at most grocery stores. If you want to make your own, you can blend gluten-free bread into crumbs. This will keep your meatballs tasty and safe for those avoiding gluten. To make these meatballs dairy-free, swap out the cheese and cream. Use dairy-free cream cheese and a plant-based cream. Almond or coconut cream works well. Nutritional yeast can also add a cheesy flavor. This way, you keep the creamy taste without dairy. These meatballs pair well with many dishes. Serve them over pasta or rice for a filling meal. You can also try them with mashed potatoes or a fresh salad. Roasted vegetables also make a great side. The options are endless, so get creative! Yes, baking is a great option! Baking these meatballs is easy and healthier. It reduces the amount of oil needed. Baking also makes them golden brown and keeps them moist. Follow the baking instructions in the recipe for the best results. In this post, we covered how to make creamy spinach turkey meatballs, from ingredients to serving. You learned about key items like ground turkey, fresh spinach, and dairy ingredients. We provided step-by-step instructions that guide you through making the meatball mixture and the cream sauce. Remember to experiment with variations and keep your meatballs moist. Enjoy your meal with perfect pairings. These meatballs are not just tasty; they’re easy to prepare and a hit at any dinner table. Try making them soon!](https://therecipehatch.com/wp-content/uploads/2025/07/6e39e989-a206-4e05-acf2-4b24be810a5b.webp)
If you’re looking for a healthy, tasty dish, Creamy Spinach Turkey Meatballs are the answer. Packed with nutrients, these meatballs blend fresh spinach and lean turkey for a delight that …

Craving a sweet treat that impresses without the fuss? You’re in the right place! My Neapolitan Ice Cream Cake is a delightful mix of chocolate, vanilla, and strawberry that’s easy …
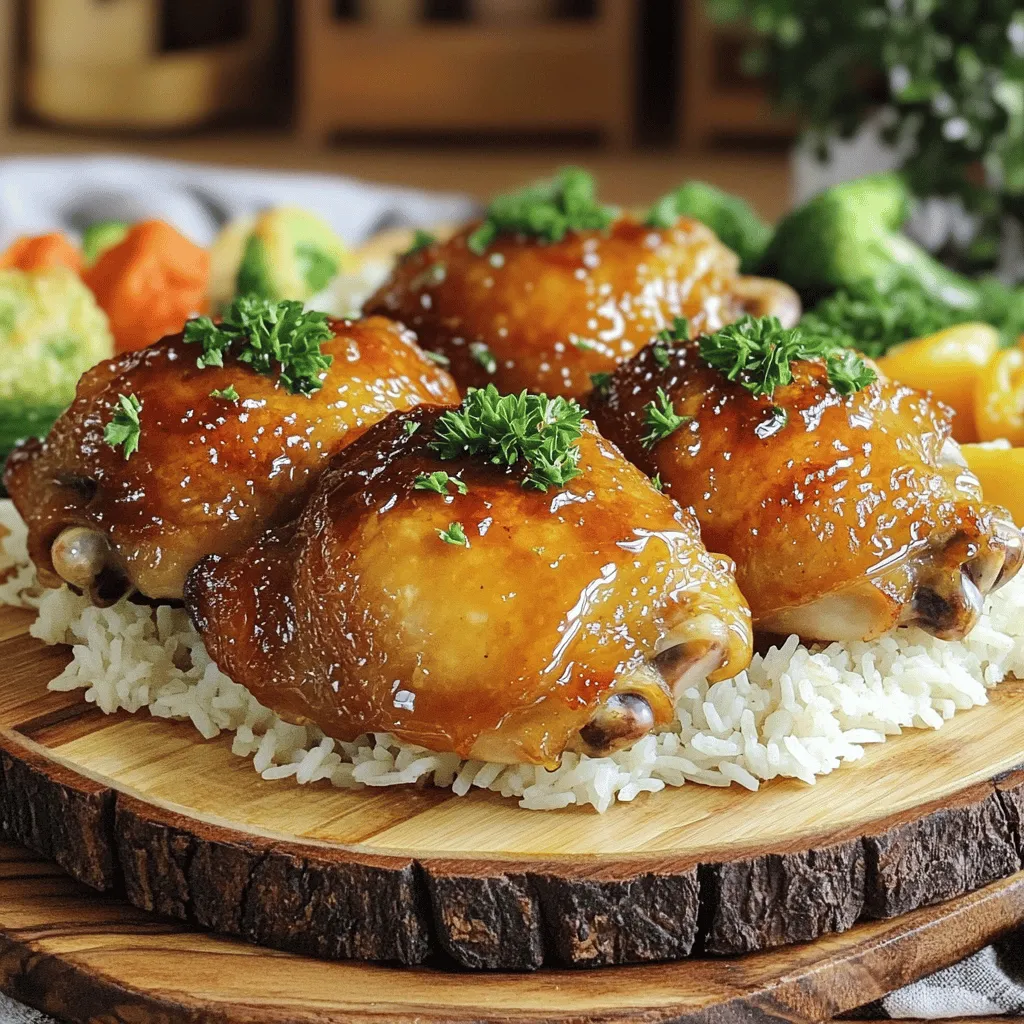
Are you ready to enjoy a meal that feels like a warm hug? In this recipe for Melt-in-Your-Mouth Chicken, you’ll cook tender, juicy chicken thighs that burst with flavor. This …

If you think zucchini and cake don’t mix, think again! This Chocolate Zucchini Cake is a rich and moist delight you won’t want to miss. Packed with flavor and a …