Figs in a Blanket Tasty and Simple Appetizer Delight

Looking for a simple yet delicious appetizer? Figs in a Blanket is your go-to choice! This tasty treat combines sweet figs with savory flavors, making it perfect for any gathering. …
Looking for a simple yet delicious appetizer? Figs in a Blanket is your go-to choice! This tasty treat combines sweet figs with savory flavors, making it perfect for any gathering. …
![To make the best Crock Pot cubed steak, you need simple and fresh ingredients. Here’s what you will need: - 4 cubed steaks (about 1 inch thick) - 1 cup beef broth - 1 medium onion, sliced - 1 cup sliced mushrooms - 2 cloves garlic, minced - 1 teaspoon Worcestershire sauce - 1 teaspoon onion powder - 1 teaspoon garlic powder - 1/2 teaspoon smoked paprika - Salt and pepper to taste - 2 tablespoons olive oil - Fresh parsley for garnish These ingredients work together to create a rich and tasty dish. The cubed steaks give a nice texture, while the broth adds moisture. The onions and mushrooms bring out sweet, earthy notes. Seasoning like Worcestershire sauce and smoked paprika adds depth. Each bite bursts with flavor, making it a family favorite. You can find the full recipe at the end. Start by searing the steaks in a skillet. Heat 2 tablespoons of olive oil over medium-high heat. Season both sides of the cubed steaks with salt, pepper, onion powder, garlic powder, and smoked paprika. Sear the steaks for 2-3 minutes on each side until they are browned. This step locks in flavor and adds a nice crust. Remove the steaks from the skillet and set them aside. Next, we will cook the vegetables. In the same skillet, add the sliced onions and mushrooms. Sauté them for about 5 minutes until they soften and caramelize. This step enhances their natural sweetness. After that, add 2 cloves of minced garlic and sauté for another minute. Garlic adds a rich flavor that complements the dish. Now, it’s time to assemble everything in the crock pot. Start by layering the seared cubed steaks at the bottom. This helps them soak up all the flavors. Next, pour the sautéed onions and mushrooms over the steaks. In a separate bowl, mix 1 cup of beef broth with 1 teaspoon of Worcestershire sauce. Pour this mixture over the meat and vegetables in the crock pot. To cook the cubed steak, cover the crock pot and set it to low heat. Let it cook for 6-8 hours. This slow cooking method makes the steak tender and allows the flavors to blend beautifully. You can check it after 6 hours, but it’s best to let it go the full time for the best taste. Searing the meat is key for great flavor. It locks in the juices and creates a tasty crust. I recommend using a high heat and a bit of olive oil. Season each steak well with salt, pepper, onion powder, garlic powder, and smoked paprika. This blend adds depth to the dish. For spices, I love using garlic powder and Worcestershire sauce. They enhance the beef's taste beautifully. You can also add herbs like thyme or rosemary for extra aroma. Be sure to adjust spices to your liking. Pair your cubed steak with sides like mashed potatoes or rice. They soak up the rich gravy well. You might also serve it with buttery noodles or a fresh salad for balance. For presentation, place the cubed steak on a nice plate. Spoon the gravy and vegetables over it. A sprinkle of fresh parsley adds a pop of color and freshness. One common mistake is overcooking the steak. Keep an eye on the cooking time. Low and slow is the way to go, but don’t exceed 8 hours. Also, watch your ingredient substitutions. If you use less beef broth, the dish may lack flavor. You can swap vegetables, but keep the essential ones like onions and mushrooms for best results. For the full recipe, check out [Full Recipe]. {{image_2}} You can change up your crock pot cubed steak by adding more veggies. Carrots, bell peppers, and peas work great. Just chop them into bite-sized pieces. Toss them in with the steak and onions. You can also try sweet potatoes for a twist. They add a nice sweetness to the dish. For flavor, consider adding some herbs like thyme or rosemary. These herbs add depth and aroma. A splash of balsamic vinegar can also brighten the dish. Don't be afraid to experiment with flavors you love. If you need a gluten-free option, just use gluten-free broth. Many brands offer gluten-free beef broth. This keeps the dish safe for gluten-sensitive eaters. You can also lower the sodium by using low-sodium broth. This way, you can control the salt in the meal. Just taste as you go to find the right balance. Using fresh herbs can also help you add flavor without extra salt. You can make this dish in an Instant Pot or on the stove. If using an Instant Pot, cook on high pressure for about 30 minutes. This method keeps the meat tender and juicy. If cooking on the stove, sear the meat first. Then, simmer everything in a pot. This takes about one hour. The meat will be just as tasty but may have a different texture. Each method brings out unique flavors, so choose what fits your time best. For the full recipe, check out the [Full Recipe]. To store leftovers, place the cubed steak in an airtight container. Make sure it cools down first. You can keep it in the fridge for up to three days. This keeps the meat fresh and safe to eat. When you're ready, reheat only what you need. If you want to freeze the dish, let it cool completely first. Then, use a freezer-safe container or bag. It can last for up to three months in the freezer. To thaw, place it in the fridge overnight. For quick thawing, you can use the microwave on the defrost setting. When reheating, use low heat to keep the meat tender. You can use a skillet or a microwave. Stir it gently to avoid overcooking. If using a skillet, add a splash of beef broth to keep it moist. This will help bring back that delicious flavor from the first time you cooked it. It takes about 6 to 8 hours to cook cubed steak on low heat. Cooking it longer makes it tender and full of flavor. The key is to let the meat soak in the broth and seasonings. Check it after 6 hours to see if it's soft enough. Yes, you can cook frozen cubed steak in a crock pot. However, it may take longer to reach a safe temperature. I recommend adding an extra hour to your cooking time. Also, make sure to check the meat's internal temperature before serving. While not required, searing cubed steak adds great flavor. The browning process creates a nice crust that enhances taste. It also locks in juices. If you have time, I suggest searing the steaks first for the best results. Crock pot cubed steak goes well with many sides. I love pairing it with mashed potatoes or rice. The gravy from the meat complements these sides perfectly. You can also serve it with steamed veggies or crusty bread to soak up the sauce. Cubed steak is done when it's tender and easy to shred with a fork. Use a meat thermometer to check if it reaches 145°F (63°C). This ensures it's safe to eat. If the meat is still tough, let it cook longer. Yes, you can use other meats in this recipe. Chuck roast, sirloin, or even pork can work well. Just remember to adjust the cooking time based on the type of meat. Each meat has its own texture and flavor, which can create a fun twist on the dish. For the full recipe, check out the link. In this blog post, we explored a tasty crock pot cubed steak recipe. We covered the key ingredients, step-by-step instructions, and helpful tips. You learned about cooking times and serving suggestions to make the dish shine. Always remember to season well and avoid overcooking for tender meat. Embrace variations to suit your tastes and dietary needs. Enjoy experimenting with this dish, and you'll surely impress your family and friends. Cooking should be fun, so get started today and enjoy every flavorful bite!](https://therecipehatch.com/wp-content/uploads/2025/07/a28b23aa-3f28-44cb-a835-ed1feb03a001.webp)
Are you ready to transform a simple cubed steak into a delicious, hearty meal? In my “Crock Pot Cubed Steak Easy and Flavorful Recipe,” I’ll show you how to create …
Looking for a delightful treat that’s both moist and flavorful? You’re in the right place! This Zucchini Cake recipe blends grated zucchini with sugars for a sweet surprise. Topped with …
![To make tasty honey garlic chicken skewers, you need the following key ingredients: - 1 lb (450g) boneless, skinless chicken breast, cut into 1-inch cubes - 1/4 cup honey - 1/4 cup soy sauce (low sodium recommended) - 3 cloves garlic, minced - 1 tablespoon fresh ginger, grated - 1 tablespoon sesame oil - 1 tablespoon rice vinegar - 1/2 teaspoon black pepper - 1/2 teaspoon red pepper flakes (optional, for heat) - 1 bell pepper (any color), cut into 1-inch pieces - 1 small zucchini, sliced into half-moons - 1 small red onion, cut into wedges - Skewers (soaked in water for 30 minutes if using wooden skewers) These ingredients combine to create a sweet and savory flavor that makes every bite delightful. You can change up the recipe with these optional ingredients: - Pineapple chunks for sweetness - Mushrooms for an earthy taste - Cherry tomatoes for a pop of color - Different herbs like cilantro or parsley These options let you customize your skewers to fit your taste. If you don’t have some ingredients, here are easy substitutions: - Maple syrup instead of honey - Tamari for a gluten-free soy sauce - Garlic powder instead of fresh garlic - Coconut aminos for a soy-free alternative Substituting ingredients can still give you that amazing honey garlic flavor. For the full recipe, check out the details above. To start, we need to marinate the chicken. This step is key for great flavor. Take a bowl, and whisk together the honey, soy sauce, minced garlic, grated ginger, sesame oil, rice vinegar, black pepper, and red pepper flakes. This mix brings out a sweet and savory taste. Now, add the chicken cubes. Make sure each piece gets covered well. Cover the bowl and put it in the fridge for at least 30 minutes. For even more flavor, let it marinate for up to 2 hours. While the chicken marinates, let’s prepare the veggies. You can use any vegetables that grill nicely. I like to use bell peppers, zucchini, and red onions. Cut the bell pepper into 1-inch pieces, slice the zucchini into half-moons, and cut the red onion into wedges. Set these aside on a plate. This colorful mix will add crunch and flavor to the skewers. Once the chicken has marinated, it’s time to assemble the skewers. Start by threading the chicken cubes onto the skewers. Alternate between chicken and veggies for a nice look. This makes each bite tasty and colorful. Next, preheat your grill to medium-high heat. To stop the skewers from sticking, lightly oil the grill grates. Now, place the skewers on the grill. Cook them for about 10 to 12 minutes. Make sure to turn them occasionally. You want the chicken to be cooked through and have nice grill marks. The chicken should reach an internal temperature of 165°F (74°C). In the last few minutes of grilling, brush any leftover marinade over the skewers. This will caramelize and add even more flavor. Once done, remove the skewers from the grill and let them rest for a few minutes before serving. Enjoy your delicious Honey Garlic Chicken Skewers! For the full recipe, check out the section above. Marinating is key to great flavor. Use a bowl to mix honey, soy sauce, garlic, ginger, sesame oil, rice vinegar, black pepper, and red pepper flakes. Add the chicken cubes and stir well to coat. Cover the bowl and chill in the fridge for at least 30 minutes. For more flavor, marinate for up to 2 hours. The longer you marinate, the better the taste! Preheat your grill to medium-high heat. This helps cook the chicken evenly. Lightly oil the grill grates to stop the skewers from sticking. When grilling, place the skewers on the grill and cook for about 10-12 minutes. Turn them often to get nice grill marks. Always check the chicken's internal temperature; it should reach 165°F (74°C). Glaze the skewers with leftover marinade in the last few minutes of grilling to add extra flavor. Serve these honey garlic chicken skewers hot off the grill. They look great on a platter with colorful veggies. Pair them with rice or a fresh salad for a fuller meal. You can also serve them with a dipping sauce for extra fun. Try a sweet chili sauce or a tangy yogurt dip. These options make the meal even more exciting! For the full recipe, check back to the earlier section. {{image_2}} You can switch the chicken for other proteins. Try using shrimp, beef, or pork. Each protein changes the taste and texture. Shrimp cooks fast and adds a sweet bite. Beef gives a rich flavor, while pork can be very juicy. Adjust the marinating time based on the protein you choose. For shrimp, about 15-20 minutes is enough. For beef or pork, stick with 30 minutes to 2 hours for best flavor. If you want a meat-free option, try tofu or tempeh. Both soak up flavors well. Cut tofu into cubes and press it to remove excess moisture. Marinate it just like chicken for great taste. You can also use mushrooms or eggplant. These veggies grill nicely and add depth. Remember to cut them into even pieces for even cooking. Want to add a kick? Try adding more red pepper flakes or some sriracha to the marinade. For a fresh twist, add citrus juice like lime or lemon. This will brighten up the dish and add zing. You can also use different types of honey, like orange blossom or clover, to change the sweetness. Experiment with herbs like cilantro or basil for a unique touch. Each flavor change can make a simple recipe feel new and exciting. For the complete recipe, check out the [Full Recipe]. After your meal, let leftover skewers cool down. Place them in a clean, airtight container. This helps keep them fresh. Store the container in the fridge. Leftover skewers can last 3 to 4 days in the fridge. Make sure to label the container with the date. This way, you know when to eat them. To reheat your skewers, you have a few options. You can use the microwave, oven, or grill. For the microwave, place the skewers on a microwave-safe plate. Heat them for 1 to 2 minutes. Check if they are warm enough. If not, heat for an extra 30 seconds. For the oven, preheat it to 350°F (175°C). Place the skewers on a baking sheet. Heat for about 10 minutes or until warm. If you want that grilled taste, you can reheat them on the grill. Just grill for 3 to 5 minutes, turning often. If you want to keep skewers for longer, freezing is a great option. Before freezing, it’s best to separate the chicken from the veggies. This helps them freeze better. Wrap each skewer tightly in plastic wrap. Then, place them in a freezer-safe bag. Try to remove as much air as possible. Frozen skewers can last up to 3 months. When you are ready to eat, thaw them in the fridge overnight. After that, you can grill or reheat them as mentioned above. For the full recipe, check out the complete guide. To keep chicken juicy, marinate it well. Use a mix of honey, soy sauce, garlic, and ginger. Let it soak for at least 30 minutes. The longer you marinate, the better it tastes. When grilling, cook on medium heat. Avoid high heat, which can dry out the chicken. Turn the skewers often for even cooking. Aim for an internal temperature of 165°F (74°C). This ensures juicy chicken every time. Yes, you can. Preheat your oven to 400°F (200°C). Line a baking sheet with foil for easy cleanup. Place the skewers on the sheet, making sure they don’t touch. Bake for about 15-20 minutes. Flip the skewers halfway through for even cooking. Brush with the leftover marinade during the last few minutes. This adds extra flavor and a nice glaze. These skewers pair well with many sides. Here are some ideas: - Steamed rice or jasmine rice - Quinoa salad with veggies - Grilled corn on the cob - Fresh cucumber and tomato salad - Roasted sweet potatoes Try different sides to find your favorite combo. For the Full Recipe, check the main article. Honey Garlic Chicken Skewers are simple and fun to make. We covered key ingredients, marinating, grilling, and storage. You now have tips for perfect skewers and tasty variations. Explore different proteins and spices to suit your taste. With the right techniques, anyone can create delicious skewers at home. Enjoy your cooking, and don't forget the side dishes that complement this meal. Savor each bite, and share your creations with family and friends!](https://therecipehatch.com/wp-content/uploads/2025/07/27bcfbe9-6790-4735-adca-be964f4f2263.webp)
Get ready to savor the deliciousness of Honey Garlic Chicken Skewers! This easy recipe combines sweet and savory flavors, perfect for dinner or a party. With just a few key …
![- 2 cups grated zucchini - 1 and 3/4 cups all-purpose flour - 1 cup granulated sugar - 1/2 cup unsweetened cocoa powder - 1 teaspoon baking powder - 1/2 teaspoon baking soda - 1/2 teaspoon salt - 1 teaspoon ground cinnamon - 1/2 cup vegetable oil - 2 large eggs - 1 teaspoon vanilla extract - 1 cup semi-sweet chocolate chips - 1/2 cup chopped walnuts or pecans (optional) Gather these ingredients to create the best chocolate zucchini cake. The zucchini keeps the cake moist and adds a healthy twist. You can use two medium zucchinis for the grated amount needed. You may wonder why zucchini is in a cake. The answer is simple. Zucchini adds moisture without a strong flavor. This allows the rich chocolate taste to shine. When you mix these ingredients, you create a balance of sweet and rich. The cocoa powder gives depth, while cinnamon adds warmth. If you want a nutty crunch, add walnuts or pecans. For the full recipe, follow the next section for a step-by-step guide. Enjoy baking! - Preheat your oven to 350°F (175°C). - Grease and flour a 9x13-inch baking pan or line it with parchment paper. - In a medium bowl, mix together the flour, cocoa powder, baking powder, baking soda, salt, and cinnamon. Set this aside. - In a large mixing bowl, combine the grated zucchini, sugar, vegetable oil, eggs, and vanilla extract. Mix until all the ingredients are well blended. - Gradually add the dry mixture into the wet mixture. Stir until just combined. Avoid overmixing to keep the cake light. - Gently fold in the chocolate chips and chopped nuts, if you want to use them. - Pour the batter into the prepared pan and smooth the top evenly with a spatula. - Bake for 30-35 minutes. Check for doneness by inserting a toothpick into the center. It should come out clean. The Best Chocolate Zucchini Cake is now ready for you to enjoy! For the complete recipe, refer to [Full Recipe]. - Avoid overmixing the batter: When mixing, stop when you see no dry flour. This helps keep the cake soft and moist. Overmixing can make it tough. - How to know when the cake is done: Stick a toothpick in the center. If it comes out clean, the cake is ready. Remember, it may still look soft. - Presentation ideas for serving the cake: Dust the top with powdered sugar for a nice look. You can also serve slices warm with vanilla ice cream. This adds a creamy touch that pairs well with the cake. - Pairing options that enhance flavor: Consider serving with fresh berries. They add a splash of color and a tart taste that balances the sweetness. Whipped cream is another great option. - Substitute sugars or oils for healthier options: You can use applesauce instead of oil for a lower-fat choice. This keeps the cake moist. Try coconut sugar instead of granulated sugar for a more natural sweet. - Gluten-free variations using alternative flours: Swap out all-purpose flour for almond or coconut flour. This makes the cake gluten-free and adds a unique flavor. Just make sure to adjust the liquid in the recipe. For the full recipe, check out the detailed steps above. Enjoy your baking! {{image_2}} You can make this cake even more fun. Try adding spices like nutmeg or cloves for warmth. These spices create a cozy flavor that blends well with chocolate. You can also mix in fruits like raspberries or cherries. They add a tart taste that contrasts the sweet chocolate. If you want crunch, add some nuts like walnuts or pecans. They give a nice texture and extra flavor. Lastly, swap out semi-sweet chocolate chips for dark or white chocolate for a new twist. Frosting can take your cake to the next level. A rich chocolate ganache works nicely. It adds a smooth, glossy finish. You can also use a cream cheese frosting for a tangy kick. If you want something light, serve the cake with whipped cream. Ice cream is another great option. A scoop of vanilla or mint chocolate chip pairs perfectly with this cake. You can make this cake fit your diet needs. For a vegan version, use flax eggs instead of regular eggs. Simply mix 1 tablespoon of flaxseed meal with 2.5 tablespoons of water. Let it sit for a few minutes to thicken. Swap out dairy milk for almond or oat milk. To make it low-carb, use almond flour instead of all-purpose flour. You can also replace sugar with a low-carb sweetener. This way, everyone can enjoy a slice of delicious chocolate zucchini cake. For the full recipe, check out the details! To keep your chocolate zucchini cake fresh, store it in an airtight container. This helps seal in moisture and flavor. A glass or plastic container works well for this. Make sure to keep the cake at room temperature. If your kitchen is warm, you might want to refrigerate it. Just remember, cold air can dry out the cake. Freezing is a great option for later enjoyment. Before you freeze, cut the cake into slices. Wrap each slice tightly in plastic wrap to avoid freezer burn. After that, place the slices in a freezer bag. You can store the cake for up to three months. When you’re ready to eat, take out a slice and let it thaw in the fridge overnight. For a quick thaw, leave it at room temperature for about an hour. At room temperature, the chocolate zucchini cake stays fresh for about three to four days. Look for signs of spoilage. If you see mold or an off smell, it’s time to toss it. The cake can dry out or become hard if stored too long. Enjoy it when it’s fresh for the best taste. For the full recipe, check out the details above. Can I make this cake ahead of time? Yes, you can make this cake a day ahead. It tastes great after resting. Just store it in an airtight container. This helps keep it moist and yummy. Why use zucchini in a chocolate cake? Zucchini adds moisture and keeps the cake soft. You won't taste it, but it gives a nice texture. Plus, it boosts the nutrition in the cake without changing the flavor. What can I substitute for eggs? You can use applesauce, mashed bananas, or flaxseed meal. For one egg, use 1/4 cup of applesauce or 1/4 cup of mashed banana. For flaxseed, mix 1 tablespoon of flaxseed meal with 3 tablespoons of water. Let it sit for a few minutes before use. How do I make the cake more chocolatey? To amp up the chocolate flavor, add more cocoa powder or use dark chocolate chips. You can also mix in chocolate syrup. This makes the cake richer and more decadent. Is chocolate zucchini cake healthy? Yes, it can be healthy! The zucchini adds fiber and vitamins. You can reduce sugar or use whole wheat flour for a healthier option. Just enjoy it in moderation! Can I omit the nuts if I have allergies? Absolutely! If you have nut allergies, just skip the nuts. The cake will still be delicious and moist without them. You can add extra chocolate chips for more flavor. Zucchini chocolate cake combines taste and health. We covered the main and extra ingredients, ensuring a rich flavor. The step-by-step guide makes baking easy, and tips help prevent common mistakes. Variations let you play with flavors, and storage advice keeps your cake fresh. In the end, this cake is a fun way to enjoy veggies. Try it for dessert or a snack. You’ll love how simple and tasty it is. Enjoy your baking journey!](https://therecipehatch.com/wp-content/uploads/2025/07/008305b3-bfa2-4ae6-8fcd-319457ca2015.webp)
If you love chocolate and want a sneak peek at a healthier dessert, this is for you! I’ll show you how to make the best chocolate zucchini cake—moist, rich, and …
![- 1 pint of vanilla ice cream, softened - 1 pint of chocolate ice cream, softened - 1 package (15 oz) chocolate wafer cookies - 1 cup heavy whipping cream - 1/4 cup powdered sugar - 1 teaspoon vanilla extract - 1 cup chocolate fudge sauce - Sprinkles for decoration When making a classic ice cream cake, you need simple yet tasty ingredients. The first two items are ice creams. I always choose vanilla and chocolate for a classic flavor. Make sure they are softened. This helps with spreading them later. Next, grab a package of chocolate wafer cookies. These cookies serve as the base and layers. Their crunch pairs well with the creamy ice cream. Heavy whipping cream is key. It helps create a light and fluffy topping. You’ll also need powdered sugar and vanilla extract. These add sweetness and flavor to the whipped cream. Chocolate fudge sauce brings a rich taste. It adds a lovely surprise between the ice cream layers. Finally, don’t forget sprinkles! They make the cake look festive and fun. With these ingredients, you can create a delightful ice cream cake. For the full recipe, check the first section. To start, grab a springform pan. This pan helps us create beautiful layers. First, take half of the chocolate wafer cookies. Place them in the bottom of the pan. If some cookies are big, break them to fit snugly. This layer will be the solid base for our cake. Next, we need to add ice cream. Take your softened vanilla ice cream and spread it over the cookies. Make it smooth and even. It’s important to freeze this layer for about 30 minutes. This helps it harden a bit. After that, drizzle half of the chocolate fudge sauce over the vanilla ice cream. Now, it’s time for the chocolate ice cream. Spread it out over the fudge sauce, smoothing it carefully. Now, we add another layer of cookies on top of the chocolate ice cream. Press gently to make them stick. Then, we will make whipped cream. In a bowl, whip heavy cream, powdered sugar, and vanilla extract together until soft peaks form. Spread this whipped cream over the top layer of cookies. Finally, cover the cake with plastic wrap. Freeze it for at least 4 hours. For best texture, let it freeze overnight. When you’re ready to serve, remove the sides of the pan. Drizzle the remaining fudge sauce on top and add some sprinkles for fun. Enjoy your delicious creation! For the full recipe, check the section above. To make a great ice cream cake, focus on the ice cream’s texture. - Use softened ice cream: Let your ice cream sit out for about 10 minutes. This helps it spread easily and evenly. - Freeze between layers: After spreading each ice cream layer, freeze for about 30 minutes. This prevents mixing between layers. Keep your ice cream cake from melting while you prepare it. - Work quickly: Have all your tools ready before you start. This helps you finish faster. - Use a cold pan: Start with a chilled springform pan. This helps keep the ice cream firm while you work. Decorating your ice cream cake can be fun and creative! - Sprinkles and toppings: Use colorful sprinkles, chocolate chips, or crushed cookies. They add a fun look and taste. - Creative serving: Serve slices on chilled plates. Drizzle extra fudge sauce on each slice for a special touch. Try different decorations to match the occasion. You can use fresh fruit or whipped cream for a fresh twist! Enjoy your delicious creation! {{image_2}} You can change flavors for your classic ice cream cake. Instead of vanilla and chocolate, try strawberry or mint chocolate. These fruity and fresh choices add a new twist. You can mix and match flavors based on what you love. If you want a colorful look, use different flavors in each layer. For cookies, don't feel stuck with just chocolate wafers. You can use graham crackers or Oreos for a fun crunch. Different cookies can bring new flavors and textures. Just be sure to crush them into small pieces to fit your cake well. If you have dietary needs, you can still enjoy this cake. For gluten-free options, look for gluten-free chocolate cookies. Many brands make great choices that taste just as good. You can also use gluten-free graham crackers for a tasty base. For those who need dairy-free options, use non-dairy ice cream. There are many flavors, like coconut or almond milk ice cream. You can also swap heavy cream with coconut cream for the whipped topping. This keeps the cake creamy while meeting your needs. For the complete recipe, check out the [Full Recipe]. To keep your ice cream cake fresh, wrap it well. Use plastic wrap or foil. This keeps ice crystals away and protects the cake from freezer odors. Place the wrapped cake in an airtight container for extra protection. For best flavor, store the cake in the freezer for up to 2 weeks. After this time, the taste may fade. If you plan to keep it longer, consider dividing it into smaller slices. This way, you can enjoy a slice whenever you want! You can slice the cake straight from the freezer. Use a sharp knife for clean cuts. Run the knife under warm water before cutting for easier slicing. To slightly soften the cake, let it sit at room temperature for about 10 minutes. This makes it easier to serve. If you prefer a softer texture, place it in the fridge for about 20 minutes before serving. Enjoy your delicious classic ice cream cake! Don't forget to check the Full Recipe for more details. Ice cream cake can last up to two weeks in the freezer. After that, the taste may change. For best quality, cover it well with plastic wrap. This keeps the ice cream from getting freezer burn. If you notice any ice crystals, it’s still safe to eat but may not taste as good. Yes, you can use homemade ice cream for this cake. Using your own ice cream adds a personal touch. Just make sure it is softened enough to spread easily. Store-bought ice cream works great too and saves time. Both options yield a tasty cake, so choose what suits you best. Classic ice cream cake is perfect for many events. Birthdays are the most popular choice. It’s a fun treat for kids and adults alike. You can also serve it at summer parties or family gatherings. Any celebration with friends or family works well. Just remember to keep it frozen until serving! You now have a complete guide to making a classic ice cream cake. We discussed key ingredients, step-by-step instructions, and tips for success. Remember, the right layers and textures make all the difference. Don’t be afraid to get creative with flavors or decorations! This cake is perfect for any fun occasion. Enjoy making it, and share it with friends and family. You’ll impress everyone with your delicious creation!](https://therecipehatch.com/wp-content/uploads/2025/07/db82baf3-7664-4969-925d-29951186330b.webp)
Are you ready to create a dessert that’s both fun and delicious? This Classic Ice Cream Cake is your go-to treat for any celebration! With layers of creamy ice cream, …
. - Rinse and slice cucumbers and radishes - Using a mandoline or knife for thin slicing Start by rinsing your cucumbers and radishes under cold water. This helps remove any dirt. Next, use a mandoline or a sharp knife to slice the cucumbers and radishes thinly. Thin slices make the salad crunchy and refreshing. Aim for even slices to ensure a great texture. - Combine sliced vegetables in a large bowl - Toss gently to mix In a large bowl, add the sliced cucumbers and radishes. Make sure to combine them well. Toss them together gently until they mix evenly. This step is simple but essential for flavor. - Whisk together dressing components in a separate bowl - Ensure a well-combined mixture In a separate bowl, whisk together sesame oil, rice vinegar, soy sauce, honey (or maple syrup), and grated ginger. Mix well until all the ingredients blend smoothly. A good dressing makes the salad shine. - Pour dressing over vegetables and coat well - Add seasoning and garnishes Now, pour the dressing over the vegetables. Coat them well to ensure every bite is tasty. Add salt to taste, along with toasted sesame seeds and chopped green onion. Toss everything lightly to incorporate these extras. - Let the salad rest for 10-15 minutes - Serve chilled or at room temperature Allow the salad to rest for about 10-15 minutes. This lets the flavors meld together. Serve it chilled or at room temperature for a delightful side dish. You can find the Full Recipe for more details. Thin slices make a big difference in this salad. They create a crunchy texture and help flavors blend. Using a mandoline makes this easy and effective. A sharp knife works too, but you must be careful. Always cut away from your fingers to stay safe. You can change up your dressing easily! Try using agave syrup instead of honey for a vegan option. If you want less sweetness, reduce the honey or syrup. For a tangy kick, add a splash of lime juice. Tasting as you go helps find the right balance for your palate. This salad pairs well with grilled chicken or fish. It also complements spicy Asian dishes nicely. For a beautiful touch, serve it in a clear bowl. This way, the vibrant colors pop! You can sprinkle extra sesame seeds on top to catch the eye. For the full recipe, check out the [Full Recipe]. {{image_2}} You can make this salad heartier by adding protein. Chicken is a great choice. Simply grill or roast it and slice it thinly. Toss the chicken in with the cucumbers and radishes. If you prefer a plant-based option, tofu works well too. Press the tofu to remove excess water, then sauté or grill it. Cube the tofu and mix it into your salad for a filling meal. Want to spice things up? Add chili flakes for a kick. Just sprinkle a little on top before serving. You can also bring in fresh herbs like cilantro or mint. These herbs add a bright flavor and make the dish feel fresh. Chop them finely and mix them in right before you serve. This salad can change with the seasons. In spring or summer, add colorful bell peppers for crunch. In the fall, consider shredded carrots for sweetness. Feel free to swap out the dressing too. Try adding citrus juice or yogurt for a different taste. This keeps your salad exciting all year long! For more on how to make this delicious dish, check out the full recipe. To keep your Asian Cucumber Radish Salad fresh, store leftovers in the fridge. Use an airtight container to keep moisture out. This helps maintain that crunchy texture. Always cool the salad to room temperature before sealing it. This prevents condensation inside the container. The salad stays fresh for about 2-3 days in the fridge. After this time, the vegetables might lose their crunch. Look for signs of spoilage, like a slimy texture or off smells. If you notice any of these, it’s best to throw the salad away. Prep your salad a day in advance for easy meals. Slice cucumbers and radishes, but store them separately. This keeps them crisp until serving time. Make the dressing ahead and keep it in a small jar. Just mix everything together right before you eat. Enjoy your fresh salad with a burst of flavor! Yes, you can prep this salad ahead of time. To do this, slice the cucumbers and radishes and store them in an airtight container. Keep the dressing in a separate bowl. Combine everything just before serving. This way, the salad stays crunchy and fresh. Yes, this salad can be gluten-free. Use gluten-free soy sauce or tamari instead of regular soy sauce. This small change makes it safe for those with gluten intolerance. This salad pairs well with grilled chicken or fish. It also goes nicely with rice dishes or stir-fries. You can even serve it as a fresh side with tacos or burgers for a tasty twist. To add heat, you can include sliced jalapeños or red chili flakes. Another option is to add a dash of sriracha or chili oil to the dressing. Adjust the amount based on your spice level preference. For the full recipe, check out the detailed instructions and ingredients list. This blog post details how to make a fresh, tasty Asian cucumber radish salad. We focused on choosing the best ingredients, preparing them correctly, and mixing them well. I shared tips for different flavors and storage, so you can enjoy this salad at its best. In conclusion, this salad is a simple, healthy dish with many options. Enjoy trying new variations or serving ideas to suit your tastes!](https://therecipehatch.com/wp-content/uploads/2025/07/d88546ac-fbcf-4396-9044-bf00f9d69b5c.webp)
Looking for a bright, refreshing dish that’s easy to make? This Asian Cucumber Radish Salad combines crisp cucumbers and zesty radishes with a flavorful dressing. It’s perfect for summer or …

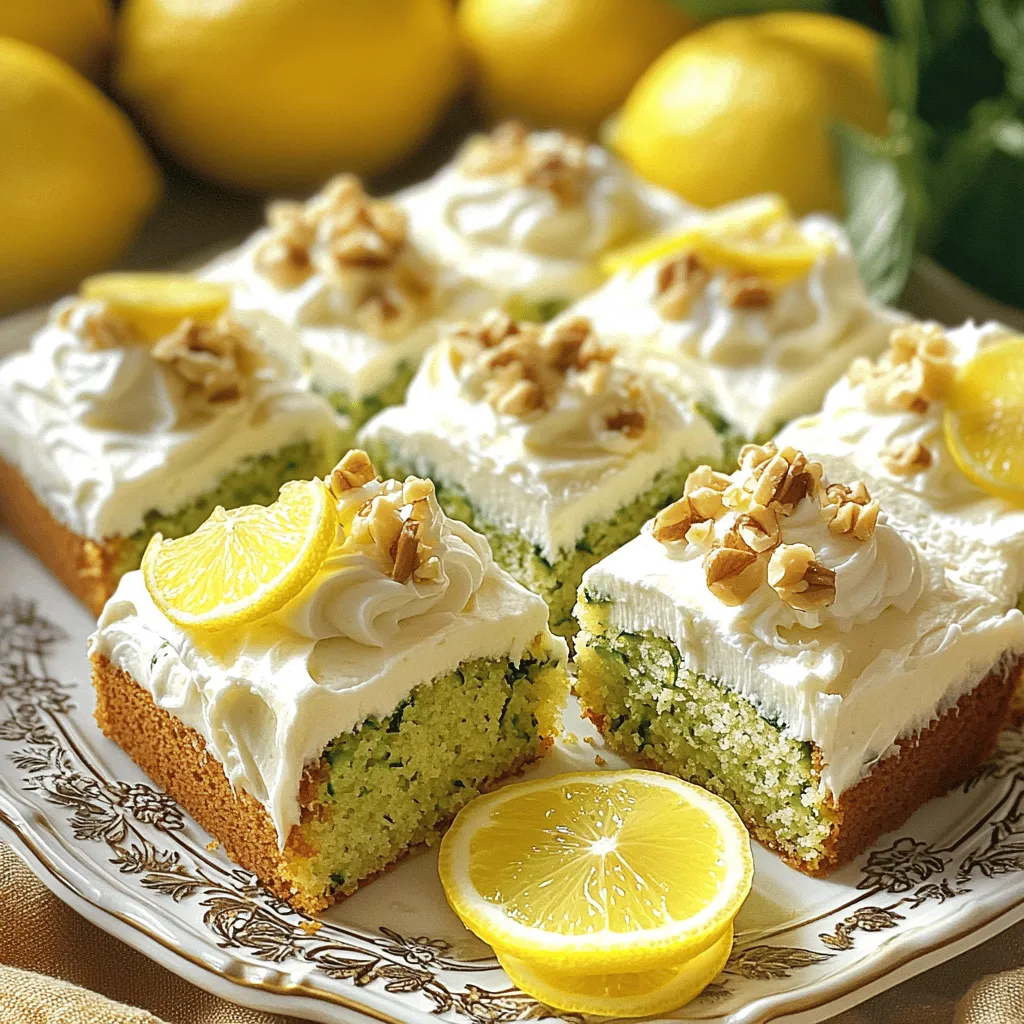
Are you ready to bake a cake that’s both easy and delicious? This Oat Flour Chocolate Zucchini Cake is the perfect treat for anyone craving a sweet chocolate fix. It …
![For this delightful strawberry mousse cake, gather these fresh ingredients: - 1 ½ cups fresh strawberries, hulled and sliced - 1 tablespoon sugar (for strawberries) - 1 ½ cups heavy whipping cream - ½ cup powdered sugar - 1 teaspoon vanilla extract - 1 teaspoon gelatin powder - 2 tablespoons cold water - 1 ½ cups crushed graham crackers - 6 tablespoons unsalted butter, melted - Fresh mint leaves for garnish Each ingredient plays a key role in the texture and taste of the cake. The strawberries bring sweetness and a vibrant color. The heavy cream provides that rich, fluffy mousse texture. The graham cracker crust adds a nice crunch. You can swap some ingredients if needed. Here are a few ideas: - Use frozen strawberries instead of fresh ones. Just thaw and drain them first. - If you want a lighter option, use light whipped cream instead of heavy cream. - For the crust, you can use digestive biscuits or any favorite cookies instead of graham crackers. - If you are vegan, try using coconut cream and a plant-based gelatin. These substitutions help you customize the cake to your taste or dietary needs. Using high-quality ingredients can elevate your cake. Here are my top picks: - Choose ripe, organic strawberries for the best flavor. - Use pure vanilla extract for a more rich taste compared to artificial vanilla. - Opt for high-fat heavy cream, as it whips better and gives a creamier mousse. - Select unsalted butter for the crust to control the saltiness. These choices ensure that your strawberry mousse cake is not only tasty but also looks and feels gourmet. For the complete recipe, check out the Full Recipe section! Start by washing your fresh strawberries. Cut off the green tops and slice them. Place the sliced strawberries in a bowl and add 1 tablespoon of sugar. Let them sit for about 20 minutes. This will help the strawberries release their sweet juice. You want them juicy for the mousse. In a small bowl, sprinkle 1 teaspoon of gelatin over 2 tablespoons of cold water. Wait for 5 minutes. This step is called blooming. After that, heat it in the microwave for about 10 seconds. It should dissolve completely. In a large bowl, whip 1 ½ cups of heavy cream until you see soft peaks. Gradually add ½ cup of powdered sugar and 1 teaspoon of vanilla extract. Keep whipping until the peaks are stiff. Now, gently fold in your dissolved gelatin. Carefully add the macerated strawberries, mixing until everything is combined. For the crust, mix 1 ½ cups of crushed graham crackers with 6 tablespoons of melted butter in a bowl. Press this mixture into the bottom of a 9-inch springform pan to form a crust. Pour your strawberry mousse over the crust, smoothing the top with a spatula. Cover the pan and refrigerate for at least 4 hours. After chilling, remove the springform pan. Slice the cake and serve it cold. You can add fresh mint leaves and extra strawberry slices for a nice touch. For the full recipe, check the earlier section. To get the best whipping cream, start with a cold bowl. A metal bowl works great. Use heavy whipping cream for a rich texture. Whip it on medium speed. As it thickens, add powdered sugar slowly. This helps sweeten it evenly. Whip until stiff peaks form, but don’t overwhip. Overwhipped cream can turn grainy. One big mistake is not chilling your tools. If your bowl and beaters are warm, the cream won’t whip well. Another mistake is adding the gelatin too late. It should go in the mousse before it sets. Be careful not to fold too hard. Gentle folding keeps air in the mix, which makes it light and fluffy. Serve your cake chilled for the best taste. Garnish with fresh strawberries and mint leaves. This adds color and freshness. You can also drizzle a bit of chocolate sauce on top. For a fun twist, try adding crushed nuts for texture. Pair it with a scoop of vanilla ice cream for a delightful treat. For more tips, check out the Full Recipe for detailed steps. {{image_2}} You can switch out strawberries for other fruits. Raspberries, blueberries, or mangoes work great. Each fruit gives a new taste. For example, mango adds a tropical touch. Just make sure to adjust sugar based on the fruit's sweetness. While graham crackers are classic, you can try other crusts. For a nutty flavor, use crushed almonds or pecans. You can also make a cookie crust with chocolate wafers for a richer taste. Each crust adds its own twist to the dessert. You can make this cake vegan by replacing heavy cream with coconut cream. Use agave syrup instead of sugar for sweetness. For a gluten-free crust, use gluten-free cookies or almond flour. These options keep the cake delicious for all diets. For the full recipe, check the [Full Recipe]. To keep your strawberry mousse cake fresh, cover it tightly. Use plastic wrap or foil. Store it in the fridge. This helps keep the mousse fluffy and delicious. It’s best to eat it within three days for the best taste. If you have leftovers, you can freeze them. First, slice the cake into pieces. Wrap each slice in plastic wrap. Then, put the slices in an airtight container. This keeps them safe from freezer burn. When you want to eat a slice, thaw it in the fridge overnight. The shelf life of your strawberry mousse cake depends on how you store it. In the fridge, it lasts about three days. If you freeze it, it can last up to two months. Always check for any signs of spoilage before eating. Enjoy your cake while it’s fresh for the best flavor! Yes, you can use frozen strawberries. They will work well in the mousse. Just remember to thaw them first. Drain any excess juice to avoid a watery mousse. This way, you still get great strawberry flavor, even in winter. The mousse is set when it feels firm to the touch. You can gently press the top with your finger. If it holds its shape, it is ready. Also, it should not jiggle when you move the pan. Chill it for at least four hours to ensure it sets properly. Absolutely! Making the cake a day ahead is a great idea. This allows the flavors to meld together. Just keep it covered in the fridge. It will taste even better the next day. Plus, it saves you time on the day of your event. For the full recipe, check the earlier section. You've learned the key steps to make a delicious strawberry mousse cake. We covered the important ingredients, offered helpful tips, and shared tasty variations. Remember to choose high-quality ingredients for the best flavor. Avoid common mistakes and try different crust options to suit your taste. Store any leftovers properly to keep them fresh. Now, you are ready to impress your friends and family with this delightful dessert. Enjoy your baking adventure!](https://therecipehatch.com/wp-content/uploads/2025/07/602b32dc-f332-4009-981d-cd5b4c034041.webp)
Craving a sweet treat that’s both light and delicious? Let me introduce you to the irresistible Strawberry Mousse Cake. This dessert is easy to whip up and perfect for any …
![To make the Layered Chocolate-Pistachio Cookie Cake, gather these simple ingredients: - 1 cup unsalted butter, softened - 1 cup granulated sugar - 1 cup brown sugar, packed - 2 large eggs - 1 teaspoon vanilla extract - 3 cups all-purpose flour - 1 teaspoon baking soda - 1/2 teaspoon salt - 1 cup semi-sweet chocolate chips - 1 cup chopped pistachios (shelled and unsalted) - 1 cup chocolate frosting (store-bought or homemade) - Extra chopped pistachios for garnish Using fresh ingredients is key. I love the creamy texture of softened butter. It helps the cake rise well. The mix of granulated and brown sugar gives a rich flavor. The eggs add moisture and a fluffy texture. Don’t skip the vanilla extract; it brings warmth to the cake. For the dry mix, whisk flour, baking soda, and salt. This ensures even mixing. Finally, the chocolate chips and chopped pistachios add delightful crunch and flavor. If you want the full recipe, check out the Full Recipe section. Happy baking! - Preheat the oven to 350°F (175°C). - Grease and line three 9-inch round cake pans with parchment paper. Start with the oven. Preheating ensures the cake bakes evenly. Next, prepare your pans. Greasing keeps the cake from sticking. Lining with parchment paper makes it easier to remove. - Cream the butter and sugars. - Add eggs and vanilla extract. - Combine dry ingredients. In a large bowl, beat the softened butter with granulated and brown sugars. Mix until the mix is light and fluffy. This takes about 3 to 4 minutes. Then, add the eggs one at a time. Make sure to mix well after each egg. Stir in the vanilla extract for extra flavor. In another bowl, whisk together flour, baking soda, and salt. Gradually add this mix to the butter mix. Stir until just combined. - Fold in chocolate chips and pistachios. - Divide and spread batter in pans. - Bake and cool the cakes. Gently fold in the semi-sweet chocolate chips and chopped pistachios. This adds a nice crunch. Next, divide the batter evenly among your prepared pans. Smooth out the tops. Bake in the oven for 20 to 25 minutes. Check with a toothpick to see if it is done. Then, let the cakes cool in the pans for about 10 minutes. Finally, transfer them to wire racks to cool completely. - Layering with frosting. - Frosting the sides and top. - Garnishing for presentation. Once the cakes are cool, place one layer on a serving platter. Spread a layer of chocolate frosting on top. Add the second cake layer and repeat the frosting. Place the third layer on top. Now, frost the top and sides of the entire cake. For a beautiful finish, sprinkle extra chopped pistachios on top. This adds color and crunch. For the full recipe, check the complete article. - Ensuring even baking: Use an oven thermometer to check the temperature. Rotate the pans halfway through baking for even heat. - Checking for doneness: Insert a toothpick in the center. It should come out clean or with just a few crumbs. - Cooling recommendations: Let the cakes cool in the pans for 10 minutes. Then, move them to wire racks to cool completely. This helps avoid soggy bottoms. - How to achieve a smooth finish: Use room temperature frosting. Apply a thin layer first to seal crumbs, then frost again for a smooth look. - Tips for layering frosting: Use an offset spatula to spread frosting evenly. Start from the center and work your way out. - Pairing with beverages: This cake pairs well with coffee or milk. The flavors blend nicely with these drinks. - Presentation ideas: Serve on a cake stand. Drizzle melted chocolate on top for a fancy touch. Sprinkle chopped pistachios on the sides for a pop of color and crunch. {{image_2}} You can easily change the flavor of your Layered Chocolate-Pistachio Cookie Cake. A simple way is to add orange zest. This brightens the cake and adds a fresh taste. You can also use almond extract instead of vanilla. This gives a nice nutty flavor that pairs well with chocolate. Trying different nuts can also change the cake’s taste. Instead of pistachios, use walnuts or hazelnuts. Both add a unique twist. If you want more chocolate, swap semi-sweet chocolate chips for dark chocolate. This makes the cake richer and deeper in flavor. If you need gluten-free options, substitute all-purpose flour with a gluten-free blend. Make sure it is suitable for baking. You can also use almond flour for a nutty flavor. This keeps the cake moist and delicious. For vegan substitutions, replace eggs with flax eggs or applesauce. Use dairy-free butter and plant-based chocolate chips. This keeps the cake vegan and still tasty. You won’t miss the eggs or dairy at all. If you want smaller portions, try making mini cakes. Use a muffin tin to create bite-sized versions. This makes them great for parties or gatherings. You can also serve them as individual desserts. Bite-sized desserts make for fun treats. Cut the layered cake into small squares. This way, everyone can enjoy a piece without feeling too full. They are perfect for sharing at events or as a sweet snack. For the full recipe, check out the details above. To keep your cake fresh, store it in an airtight container. You can use a cake dome or a large food storage container. This method prevents the cake from drying out. If you have leftover slices, place parchment paper between layers. This helps keep the frosting intact. Store the cake at room temperature for up to three days. If it’s hot or humid, refrigerate it. Always allow it to return to room temperature before serving. You can freeze the cake layers or the whole frosted cake. For unassembled layers, wrap each layer tightly in plastic wrap. Then, place them in a freezer bag or container. This keeps them fresh for up to three months. If you freeze the frosted cake, make sure it’s fully set. Wrap it well to prevent freezer burn. For thawing, take the cake out of the freezer and place it in the fridge overnight. If you need it faster, you can leave it at room temperature for a few hours. Avoid microwaving, as this can ruin the texture. Enjoy your delicious Layered Chocolate-Pistachio Cookie Cake again! For the complete recipe, check out the [Full Recipe]. You can use applesauce or mashed bananas. Use 1/4 cup for each egg. This keeps the cake moist and adds a bit of sweetness. Flaxseed meal is another option. Mix 1 tablespoon of flaxseed with 2.5 tablespoons of water. Let it sit for five minutes. This will help bind the ingredients together. Yes, you can use walnuts or almonds instead of pistachios. They will change the flavor a bit but will still taste great. Just make sure to chop them up before adding. You can also skip nuts if you're allergic. The cake can last 3 to 4 days at room temperature. Make sure to cover it well with plastic wrap or keep it in an airtight container. This keeps it fresh and moist. If it gets too warm, you can refrigerate it. Just remember to bring it back to room temperature before serving. Yes, you can use a square or rectangular baking dish. Just adjust the baking time as needed. A larger dish may require a shorter baking time, while a smaller dish may need longer. Keep an eye on it while baking. Use a toothpick to check for doneness. Absolutely! You can bake the cake a day or two before your event. Just store it in an airtight container. You can frost it the day of the event. This way, it stays fresh and looks beautiful. Yes, you can add more chocolate chips to the batter. You can also drizzle melted chocolate over the top after frosting. For a richer flavor, try using dark chocolate instead of semi-sweet. This will make the cake even more decadent. For the full recipe, check out the Layered Chocolate-Pistachio Cookie Cake section. This article shared a complete guide for baking a delicious layered cake. We covered ingredients, step-by-step instructions, and ways to customize your cake. I shared smart tips for baking, frosting, and serving, plus how to store or freeze leftovers. Now, you can enjoy baking confidently and impress others with your creation. I hope these ideas inspire you to explore and have fun in the kitchen!](https://therecipehatch.com/wp-content/uploads/2025/07/6a37a53b-ea1b-4771-8763-1f7e3c74b1ac.webp)
Welcome to the world of sweet indulgence! Today, I’m excited to share my Layered Chocolate-Pistachio Cookie Cake Delight. This treat is a perfect mix of rich chocolate and nutty pistachios, …