Black Velvet Halloween Cake Deliciously Spooky Treat
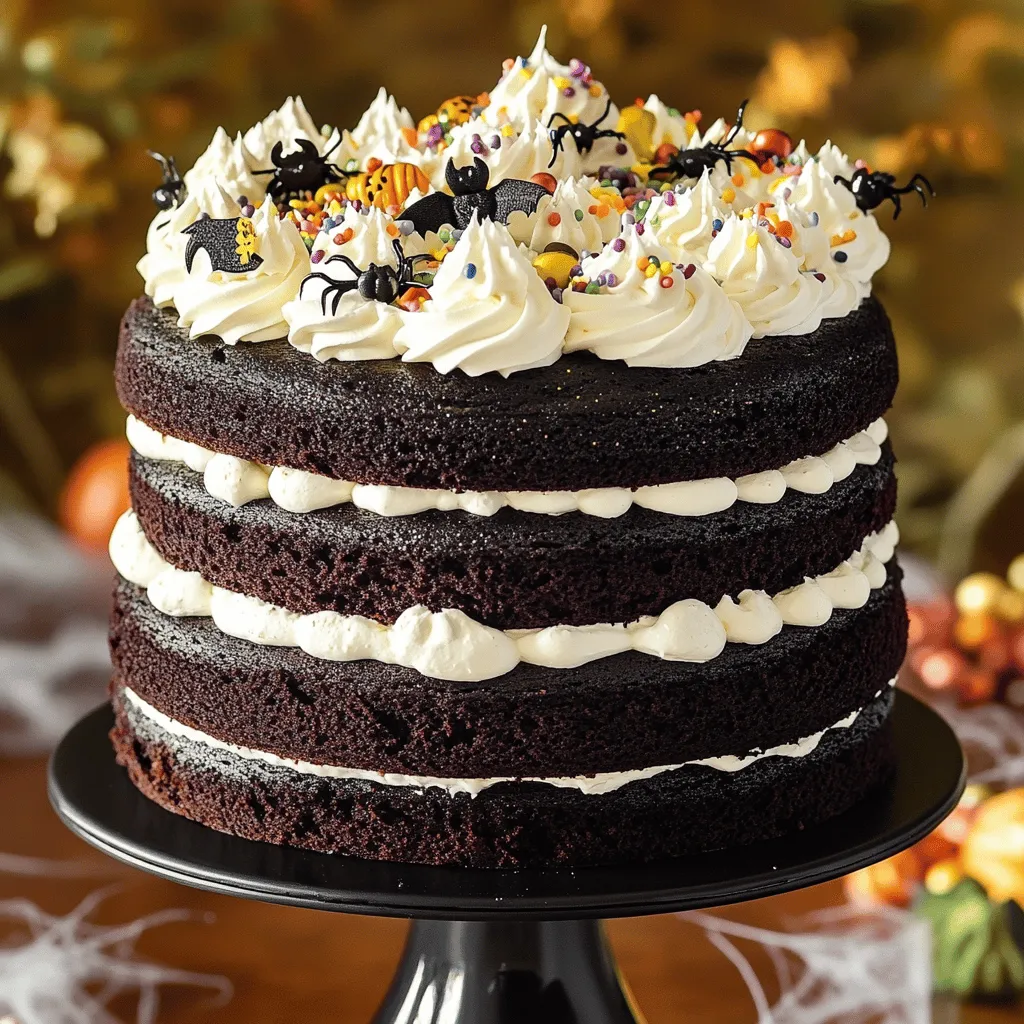
Ready to add a spooky twist to your Halloween treats? This Black Velvet Halloween Cake is both delicious and strikingly dark. I’ll guide you through the steps to create this …
Ready to add a spooky twist to your Halloween treats? This Black Velvet Halloween Cake is both delicious and strikingly dark. I’ll guide you through the steps to create this …

Fall is the perfect time for cozy treats, and this Apple Cider Cheesecake is a standout! It combines sweet apples and warm spices for a dessert that’s rich and creamy. …
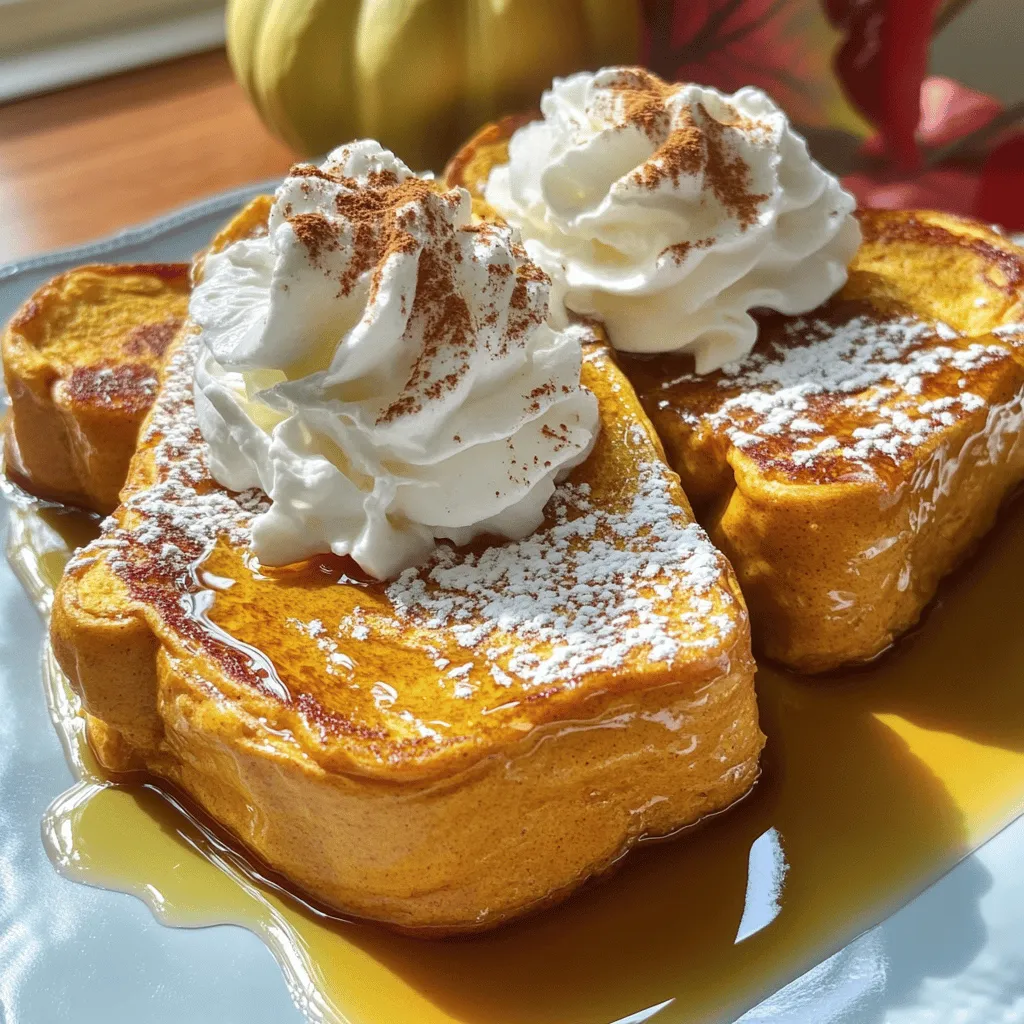
Start your day with a cozy, fall-inspired treat: Pumpkin French Toast! This breakfast delight combines the warm flavors of pumpkin and spices with soft, thick bread for a hearty meal. …
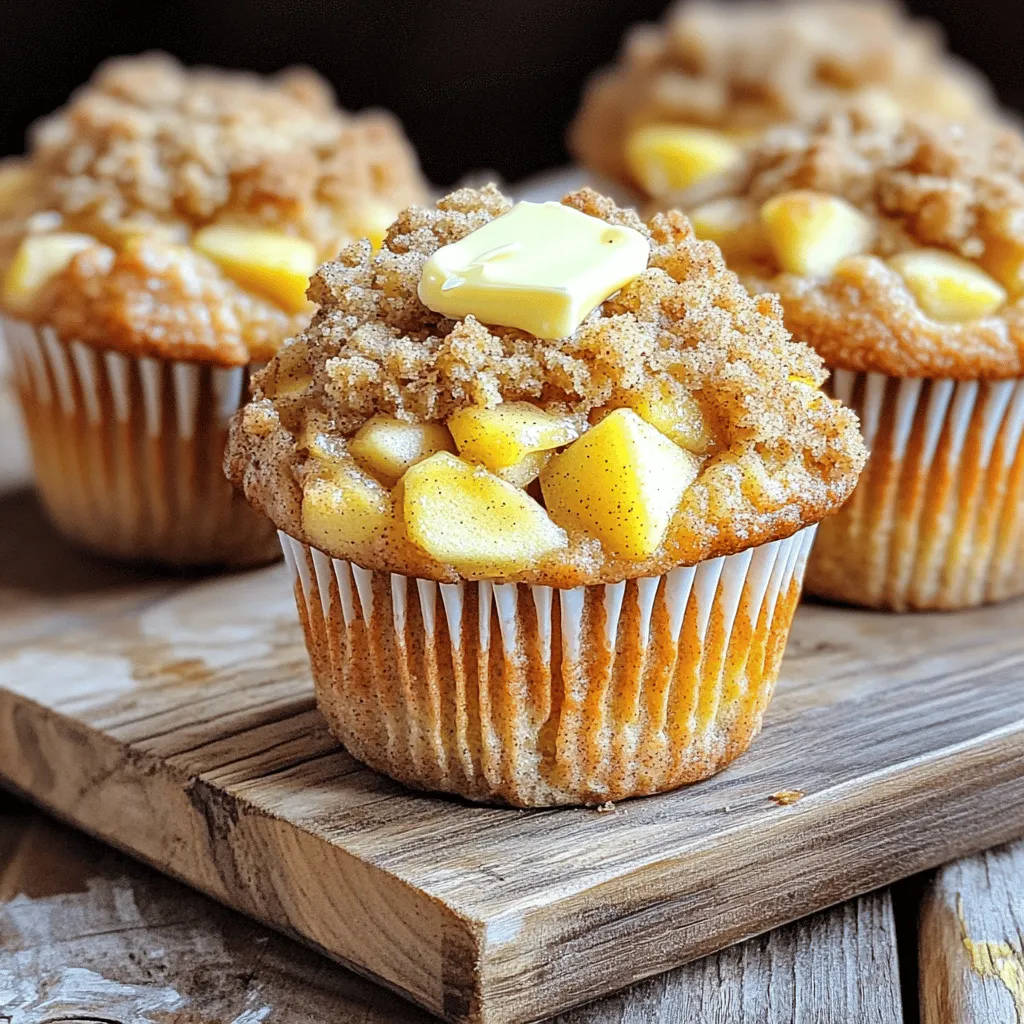
Craving a delightful treat that’s both easy to bake and satisfying to eat? Look no further than these Apple Muffins with Crumb Topping! You’ll love the blend of sweet apples …
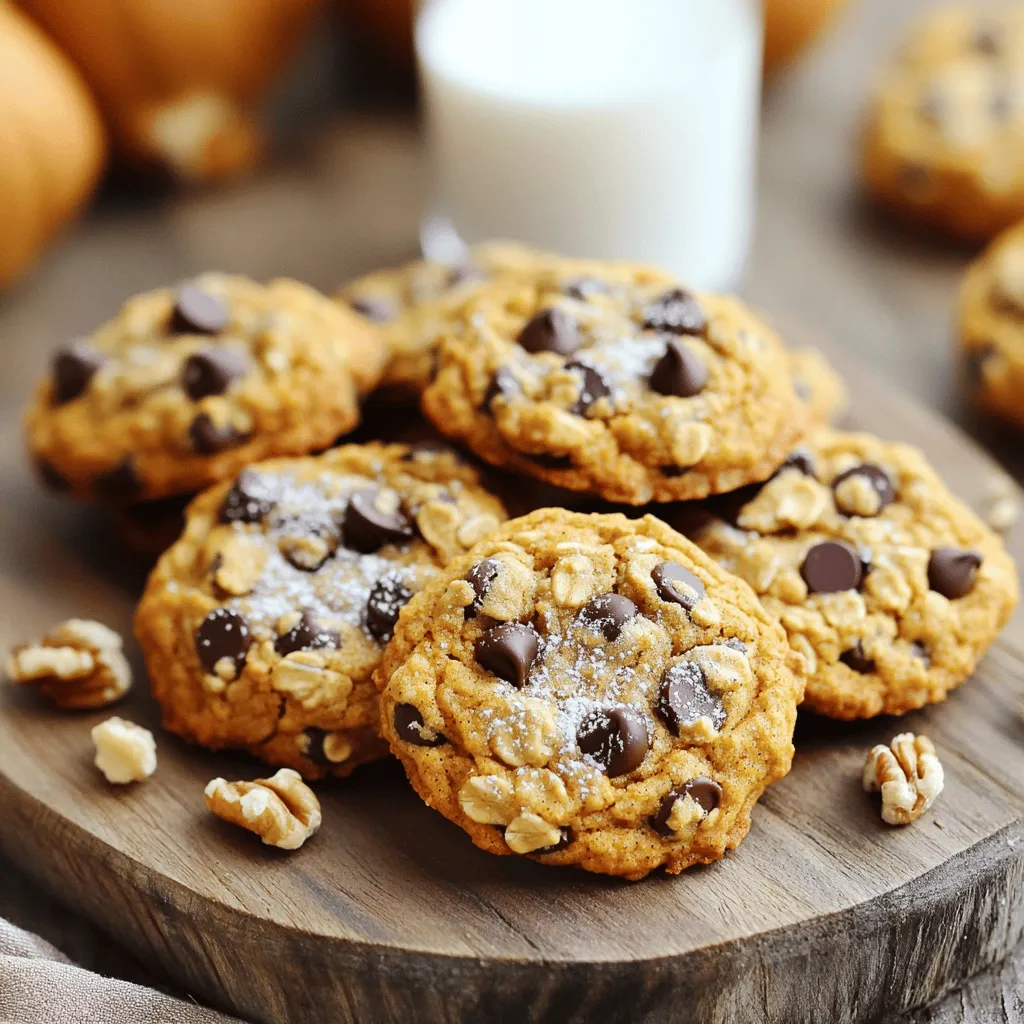
If you love the warm, cozy flavors of fall, you’ll adore my Brown Butter Pumpkin Oatmeal Cookies. They blend rich brown butter, pumpkin puree, and hearty oats into a treat …
![For the dry mix, gather these items: - 1 ½ cups all-purpose flour - 1 cup granulated sugar - ½ cup light brown sugar, packed - 1 tsp baking powder - ½ tsp baking soda - ½ tsp salt - 1 tsp ground cinnamon - ½ tsp ground ginger - ¼ tsp ground nutmeg - ¼ tsp ground cloves These dry ingredients create a warm and inviting base for the cupcakes. The spices bring a lovely chai flavor that pairs perfectly with pumpkin. Next, we need the wet ingredients: - 2 large eggs - ½ cup vegetable oil - ¾ cup pumpkin puree - ½ cup brewed chai tea, cooled - 2 tsp vanilla extract These wet ingredients help to keep the cupcakes moist and fluffy. The pumpkin puree adds richness, while the chai tea infuses each bite with cozy warmth. For the frosting, we will use: - 1 cup powdered sugar - 4 oz cream cheese, softened - 2 tbsp brewed chai tea - Ground cinnamon, for garnish This frosting is smooth and creamy. The cream cheese gives it a tangy flavor that complements the sweetness of the cupcakes. A sprinkle of cinnamon on top adds a nice touch. For the complete recipe with instructions, check out the Full Recipe. First, preheat your oven to 350°F (175°C). This step is key for baking. While the oven heats, line a muffin tin with cupcake liners. This makes for easy cleanup and adds a nice touch. In a large bowl, mix your dry ingredients. Combine 1 ½ cups of all-purpose flour, 1 cup of granulated sugar, and ½ cup of light brown sugar. Add 1 teaspoon of baking powder, ½ teaspoon of baking soda, and ½ teaspoon of salt. Then, mix in 1 teaspoon of ground cinnamon, ½ teaspoon of ground ginger, ¼ teaspoon of ground nutmeg, and ¼ teaspoon of ground cloves. Whisk these together until they are well combined. Now, grab another bowl. In this bowl, whisk 2 large eggs. Add ½ cup of vegetable oil and ¾ cup of pumpkin puree. Pour in ½ cup of cooled brewed chai tea and 2 teaspoons of vanilla extract. Mix these until smooth. This mixture will bring moisture and flavor to your cupcakes. Gradually add your wet mixture to the dry ingredients. Stir gently until just combined. Be careful not to stir too much. This keeps the cupcakes light and fluffy. Next, divide the batter among the cupcake liners. Fill each one about 2/3 full. Bake in your preheated oven for 18 to 20 minutes. Check for doneness by inserting a toothpick into the center. If it comes out clean, they are ready. Let them cool in the pan for 5 minutes, then move them to a wire rack to cool completely. While the cupcakes cool, prepare the frosting. In a mixing bowl, combine 4 ounces of softened cream cheese with 1 cup of powdered sugar. Add 2 tablespoons of brewed chai tea. Mix this until it is smooth and fluffy. This creamy frosting adds a wonderful chai flavor to each bite. Once the cupcakes are cool, it’s time to frost them. Use a generous amount of the chai cream cheese frosting on each cupcake. For an extra touch, sprinkle a small pinch of ground cinnamon on top. This adds flavor and makes them look beautiful. For the full recipe, check out the details. Enjoy your baking adventure! To make your cupcakes light and fluffy, mixing is key. Gently combine wet and dry ingredients. Stop mixing as soon as they blend. Overmixing can lead to dense cupcakes. The right texture will make each bite a joy. One common mistake is using cold ingredients. Always use room temperature eggs and pumpkin. This helps the batter mix better and rise nicely. Another mistake is not measuring flour correctly. Spoon flour into your measuring cup and level it off. This small step can change your cupcake’s texture. Use a good mixing bowl and a whisk for blending. A rubber spatula is great for folding ingredients. Cupcake liners help with easy removal after baking. An oven thermometer ensures your oven heats correctly. A toothpick is handy for testing if your cupcakes are done. Invest in these tools for the best results. For the full recipe, check out the detailed instructions in the [Full Recipe]. {{image_2}} You can easily make these cupcakes dairy-free. Instead of cream cheese, use a dairy-free cream cheese. Use almond milk or coconut milk instead of regular milk. These swaps keep the flavor rich and creamy without dairy. To make these cupcakes gluten-free, swap the all-purpose flour for a gluten-free blend. Many blends work well in baking. Just check the mix for xantham gum; it helps the texture. Using gluten-free flour gives you soft, tasty cupcakes. Want to boost the flavor? Add a dash of cardamom or nutmeg for a warm twist. You can also stir in chocolate chips or chopped nuts for texture. A drizzle of caramel sauce on top adds sweetness and fun. For an extra chai kick, use more brewed chai in the frosting. For the full recipe, check the link above. Enjoy making these delightful cupcakes! Store your leftover vanilla chai pumpkin spice latte cupcakes in an airtight container. Keep them at room temperature for up to three days. For longer storage, place them in the fridge. Just remember, the frosting may lose some texture in the fridge. Always let them come back to room temperature before enjoying. You can freeze these cupcakes for up to three months. First, let them cool completely. Wrap each cupcake tightly in plastic wrap. Then, place them in a freezer-safe bag or container. Label with the date for easy tracking. This helps keep them fresh and tasty. To enjoy frozen cupcakes, take them out of the freezer. Unwrap them and place them on a plate. Let them thaw at room temperature for about an hour. If you want to freshen them up, warm them in a microwave for about 10 seconds. This makes them soft and delightful again. For extra flavor, add fresh frosting or a sprinkle of cinnamon before serving. For the full recipe, check out the instructions above! Yes, you can make these cupcakes ahead. Bake them, cool them, and store them in an airtight container. They stay fresh for up to three days at room temperature. For longer storage, freeze them for up to three months. Just thaw and frost them when you're ready to serve. If you can't find pumpkin puree, you can use sweet potato puree or butternut squash puree as a great alternative. Both have a similar texture and flavor. Applesauce is also an option, but it will change the spice flavor of the cupcake. To boost the chai flavor, use extra brewed chai tea in both the batter and frosting. You can also add more spices like cardamom or black pepper to enhance the taste. Another option is to steep the tea longer for a bolder flavor. Yes, you can create a vegan version by using flax eggs instead of regular eggs. Mix 1 tablespoon of ground flaxseed with 3 tablespoons of water for each egg. Use a plant-based oil and non-dairy milk instead of chai tea. For the frosting, swap cream cheese for a vegan cream cheese alternative. Check the Full Recipe for ingredient ratios. You’ve learned how to make amazing cupcakes, from choosing ingredients to baking. You know the right steps to mix well, bake, and frost. With tips to improve texture and avoid common mistakes, your cupcakes will impress everyone. Embrace variations for different diets and fun flavors. Remember to store them properly to keep them fresh. Now, it's time to put your new skills to the test and enjoy your delicious creations! Happy baking!](https://therecipehatch.com/wp-content/uploads/2025/07/947cce49-48cd-4b82-99b4-2d9cfaca563e.webp)
Fall brings warm flavors and cozy treats, and nothing beats a Vanilla Chai Pumpkin Spice Latte Cupcake. I’ll guide you through a step-by-step process to create these delicious cupcakes that …
![- 6 medium apples (Granny Smith or Honeycrisp) - 1/4 cup brown sugar - 2 teaspoons ground cinnamon - 1/8 teaspoon ground nutmeg - 1 tablespoon lemon juice - 1/2 cup water - 1 tablespoon butter (optional) - 1/4 cup raisins or walnuts (optional) - Vanilla ice cream (for serving, optional) To make Instant Pot cinnamon apples, you need fresh apples. Granny Smith or Honeycrisp works best for a nice balance of flavor. They hold up well during cooking, giving you that perfect bite. The brown sugar adds sweetness. Ground cinnamon gives the dish its warm flavor, while nutmeg adds a touch of spice. A splash of lemon juice brightens the taste. You can add water to create steam in the pot. Butter is optional, but it adds a rich flavor. If you like textures, toss in some raisins or walnuts for crunch. Top your apples with vanilla ice cream for a sweet finish. - Alternative sweeteners like honey or maple syrup - Different types of apples for unique flavors - Other spices such as cloves or allspice for added warmth You can swap sweeteners if you want something different. Each type of apple will change the taste. Try using different spices to make it your own. These variations keep your dish fresh and exciting. For a full list of ingredients and recipe details, check the Full Recipe. Start by peeling the apples. Use a sharp knife to remove the skin. Next, core the apples to remove the seeds. Finally, slice the apples into thick wedges. Aim for about one-inch pieces. This thickness helps them hold up during cooking. In a large bowl, combine the apple slices with brown sugar, cinnamon, nutmeg, and lemon juice. Toss the mixture well. Make sure each apple wedge gets coated. The lemon juice adds brightness and balances the sweetness. Add half a cup of water and one tablespoon of butter to the Instant Pot. The butter adds a rich taste, but it’s optional. Next, layer the seasoned apples evenly in the pot. If you want, sprinkle in raisins or walnuts for extra texture. Close the Instant Pot lid and set the valve to sealing. Select the Manual or Pressure Cook setting. Cook on high pressure for six minutes. After cooking, let the pressure release naturally for five minutes. Then, switch to quick release to let out any remaining pressure. Carefully open the lid. The apples should be soft yet firm. Serve them warm. For a delightful treat, top with vanilla ice cream. For the full recipe, check the details above. - Tips for slicing apples: Slice your apples into thick wedges. This helps them stay firm during cooking. Thin slices may turn mushy. Choose apples like Granny Smith or Honeycrisp for a good mix of tart and sweet. - Best practices for releasing pressure: After cooking, let the pressure release naturally for 5 minutes. This gives the apples time to settle. Then switch to quick release to let out any remaining steam. This method keeps your apples tender and intact. - Adding vanilla extract for extra richness: A splash of vanilla extract can greatly enhance the flavor. Stir it in just before cooking. It adds a warm, sweet aroma that pairs well with cinnamon. - Suggestions for garnishes: Top your cinnamon apples with a scoop of vanilla ice cream or whipped cream. Chopped nuts like walnuts or pecans can add crunch. You can also sprinkle extra cinnamon on top for a nice touch. - Overcooking the apples: Cooking apples for too long can lead to mushiness. Stick to the 6-minute cook time. Check them after cooking to ensure they stay firm. - Not sealing the pot correctly: Make sure the lid is locked and the valve is set to sealing. If it’s not sealed, the Instant Pot won’t build pressure. This can ruin your dish and lead to uneven cooking. {{image_2}} You can change the flavor of your Instant Pot cinnamon apples easily. One great option is to add caramel sauce. This will boost the sweetness and add a rich flavor. Simply drizzle it on top before serving. Another fun choice is using a splash of bourbon. This adds depth and warmth to the dish. Just a little goes a long way, so try it out if you enjoy a hint of something special. Want a different texture? You can add oats to your apples. This gives a nice crumble effect. Mix in 1/4 cup of oats before cooking. Another option is to add chopped nuts or seeds. Walnuts or pecans work well and add crunch. Toss them in with the apple mixture for extra bite. How you serve your cinnamon apples can change the whole experience. Pair them with yogurt or whipped cream for a creamy contrast. This adds richness and balances the sweetness. You can also serve the apples as a topping for pancakes or waffles. This turns a simple breakfast into a delicious treat. Just spoon the warm apples over your stack and enjoy! For the full recipe, check [Full Recipe]. To store your leftover cinnamon apples, place them in an airtight container. Make sure they cool down first. This will keep them fresh. You can store them in the fridge for up to five days. When you’re ready to eat, just heat them up in the microwave or on the stove. If you want to freeze your cooked cinnamon apples, follow these steps: - Allow the apples to cool completely. - Place them in a freezer-safe bag or container. - Remove as much air as possible to prevent freezer burn. - Label the bag with the date for easy tracking. To reheat, simply thaw in the fridge overnight. Then, warm them gently on the stove or microwave. This keeps the flavor and texture nice. In the refrigerator, these apples last about five days. If you freeze them, they can last up to three months. Just remember, the sooner you eat them, the better the taste! Yes, you can use frozen apples. They work well in this recipe, but the texture may change. Frozen apples are softer, so they may cook faster. If you use frozen apples, cut the cooking time to about 4 minutes. This helps prevent mushiness. If you want to switch from cinnamon, consider these options: - Nutmeg adds warmth and depth. - Cloves give a spicy kick. - Allspice offers a complex flavor blend. - Ginger adds a fresh zing. Try mixing different spices for fun flavors. Different apple types have varying firmness. For firmer apples like Honeycrisp, stick to 6 minutes. For softer apples like McIntosh, reduce cooking time to about 4 minutes. Always check for tenderness after cooking. You want them soft but not mushy. This recipe for Instant Pot cinnamon apples is easy and fun. You need just a few simple ingredients, like apples, sugar, and spices. I shared tips to get the best texture and flavor. You can also mix in optional ingredients for fun twists. Don’t forget about storage options to keep your treats fresh! Enjoy this warm dish on its own or with ice cream. Just follow these steps, and you'll create something tasty. Happy cooking!](https://therecipehatch.com/wp-content/uploads/2025/07/1776c762-7f0b-4052-869a-6dc8aa3d77d5.webp)
Craving a warm and sweet treat? Let me show you how to make Instant Pot Cinnamon Apples! This simple recipe transforms fresh apples into a cozy dessert in no time. …
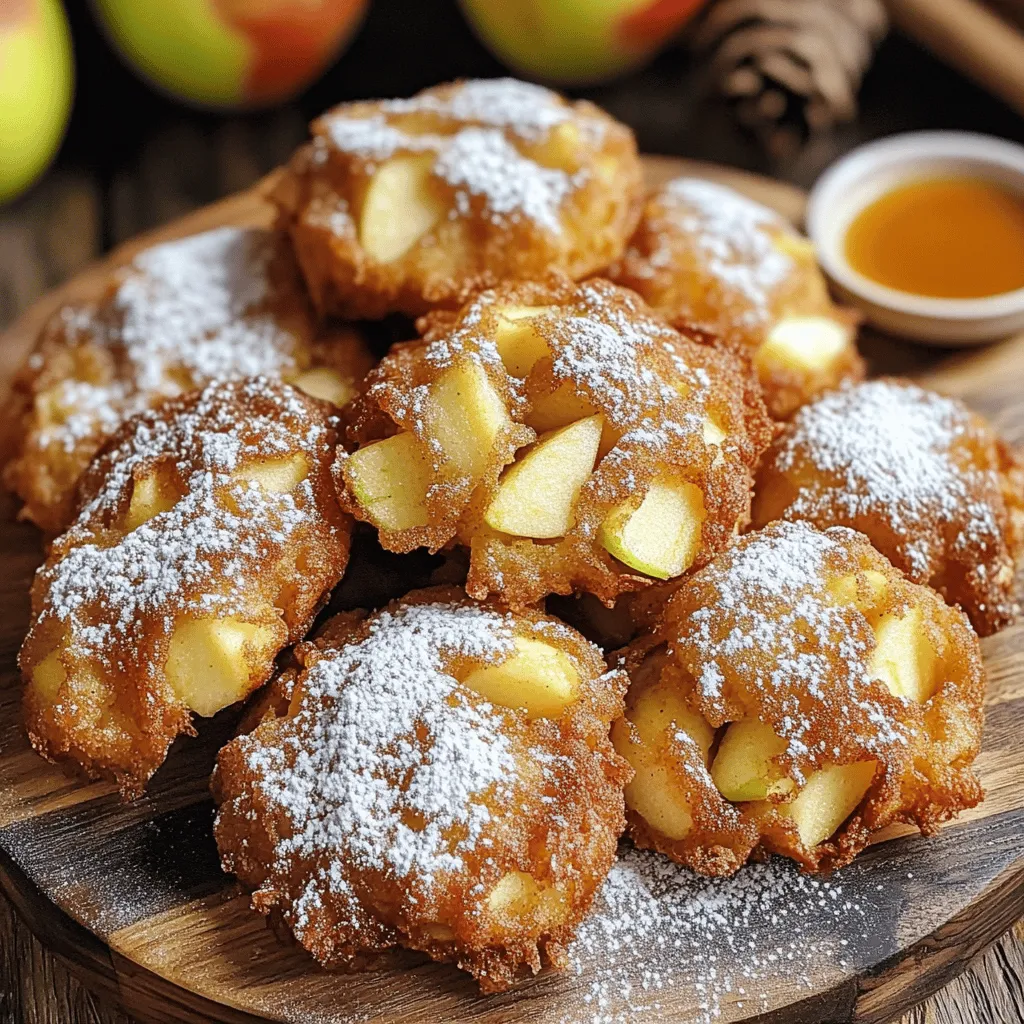
If you crave a tasty treat that won’t derail your diet, you’ll love these Gluten-Free Air Fryer Apple Fritters! They’re easy to make and packed with flavor. Whether you’re enjoying …
![Making pancake mini muffins is easy and fun. You need these key ingredients: - 1 cup all-purpose flour - 1 tablespoon baking powder - 1/2 teaspoon salt - 1 tablespoon sugar - 1 cup milk - 1 large egg - 2 tablespoons melted butter - 1 teaspoon vanilla extract - 1/2 cup chocolate chips (or blueberries for a fruity twist) - Maple syrup for drizzling These ingredients create a fluffy and tasty muffin. You can also add some optional mix-ins or toppings to make them your own. Consider: - Chopped nuts for crunch - Cinnamon for warmth - Fresh fruit for a burst of flavor - Whipped cream for a sweet treat Using the Full Recipe, you can create these delightful bites that please everyone. The fun part is mixing and matching flavors. Enjoy the process, and let your creativity shine! 1. Preheat the oven and prepare the muffin tin: Start by preheating your oven to 350°F (175°C). This ensures even baking. Line a mini muffin tin with paper liners or grease it well to prevent sticking. 2. Mixing dry ingredients: In a large mixing bowl, add 1 cup of all-purpose flour, 1 tablespoon of baking powder, 1/2 teaspoon of salt, and 1 tablespoon of sugar. Whisk them together until they blend well. This step helps to evenly distribute the baking powder and salt. 3. Preparing wet ingredients: In another bowl, combine 1 cup of milk, 1 large egg, 2 tablespoons of melted butter, and 1 teaspoon of vanilla extract. Whisk until the mixture is smooth. This mix adds moisture and flavor to the muffins. 4. Combining ingredients: Pour the wet mixture into the dry ingredients. Stir gently until just combined. It’s okay if there are a few lumps; don't overmix. This keeps your muffins light and fluffy. 1. Filling the muffin cups: Using a small scoop or spoon, fill each mini muffin cup about 2/3 full with the batter. This gives them room to rise without overflowing. 2. Baking time and temperature guidance: Place the muffin tin in the preheated oven. Bake for about 10-12 minutes. They are done when the tops are golden and a toothpick inserted in the center comes out clean. 3. Cooling the muffins: After baking, let the mini muffins cool in the tin for 5 minutes. Then, transfer them to a wire rack to cool completely. This helps them set and makes them easier to handle. For the full recipe, refer to the ingredients and instructions shared earlier. Enjoy your delicious pancake mini muffins! To achieve fluffy mini muffins, use a gentle touch. When mixing, stop as soon as you combine the wet and dry ingredients. Overmixing makes them tough. You want a few lumps in the batter. I love to experiment with flavor. Try adding spices like cinnamon or nutmeg. You can also swap in different mix-ins, like nuts or dried fruits. They add fun textures and tastes. For toppings, maple syrup is a classic choice. Drizzle it on warm muffins for a sweet treat. Fresh fruits like berries or bananas also work well. They add brightness and flavor. These mini muffins are great for breakfast or snacks. Pack them for lunch or enjoy them with coffee. They fit any time of day! For the full recipe, check out the details above. {{image_2}} You can easily switch up the flavors in pancake mini muffins. First, try adding different mix-ins. Chopped nuts like walnuts or pecans add crunch. Dried fruits such as raisins or cranberries bring sweetness. You can even add spices like cinnamon for warmth. If you want a gluten-free option, swap the all-purpose flour for a gluten-free blend. Many blends work well in baking, giving you light and fluffy muffins without gluten. Changing the season can inspire fun flavor twists. In the fall, try pumpkin spice mini muffins. Simply add pumpkin puree and pumpkin pie spice to the batter. This gives them a warm, cozy flavor. In summer, think fresh berries! Blueberries or strawberries work great. Just fold them into the batter before baking. These fruity mini muffins burst with flavor and freshness. For the full recipe and more details, check out the [Full Recipe]. To keep your pancake mini muffins fresh, store them in an airtight container. This helps maintain their soft texture. You can leave them at room temperature for up to three days. If you want to keep them longer, freezing is a great option. To freeze mini muffins, place them in a single layer on a baking sheet. Once frozen, transfer them to a freezer-safe bag. This method prevents them from sticking together. You can store them in the freezer for up to three months. When you're ready to enjoy your mini muffins again, reheating is easy. The best method is to use the oven. Preheat your oven to 350°F (175°C). Place the muffins on a baking sheet and heat them for about 5-7 minutes. This method brings back their warm, fresh taste. If you're short on time, you can use the microwave. Heat each muffin for about 15-20 seconds. However, the oven gives a better texture. Enjoy your pancake mini muffins warm for a delightful breakfast or snack! For the full recipe, check the previous section. Can I make pancake mini muffins ahead of time? Yes, you can make these muffins ahead of time. Just store them in an airtight container. They stay fresh for about three days. You can also freeze them for up to three months. Thaw them overnight in the fridge before serving. Are these muffins healthy? Pancake mini muffins can be a healthy option! They have simple ingredients like flour, milk, and eggs. You can make them healthier by adding fruit or using whole wheat flour. They provide energy for your day without too much sugar. How do I adjust the recipe for fewer servings? To make fewer muffins, you can easily cut the recipe in half. Use ½ cup of flour, ½ cup of milk, and adjust the other ingredients as needed. This keeps the taste and texture just right. What to do if the muffins are too dry? If your muffins turn out dry, they might have baked too long. Next time, check them a bit earlier. You can also add more milk or melted butter to the batter. This helps keep them moist and tasty. How to avoid sticky muffin liners? To avoid sticky muffin liners, grease them lightly or use non-stick liners. This makes it easier to remove the muffins without tearing them. You can also try baking them without liners, just greasing the muffin tin well. Pancake mini muffins are a fun and flexible treat. We covered the key ingredients, step-by-step instructions, and many tips. I shared ways to enhance flavor and texture and suggested storage options. Experimenting with different mix-ins keeps them exciting. Remember, these muffins are quick to make and great for any meal. With just a few simple steps, you can create a tasty snack your friends and family will love. Now, it’s time to bake and enjoy!](https://therecipehatch.com/wp-content/uploads/2025/07/53bae01b-61fa-488c-ae21-a36a8e93f96a.webp)
Looking for a quick and tasty breakfast? Pancake mini muffins are here to save your mornings! These bite-sized treats are easy to make, fun to eat, and perfect for busy …
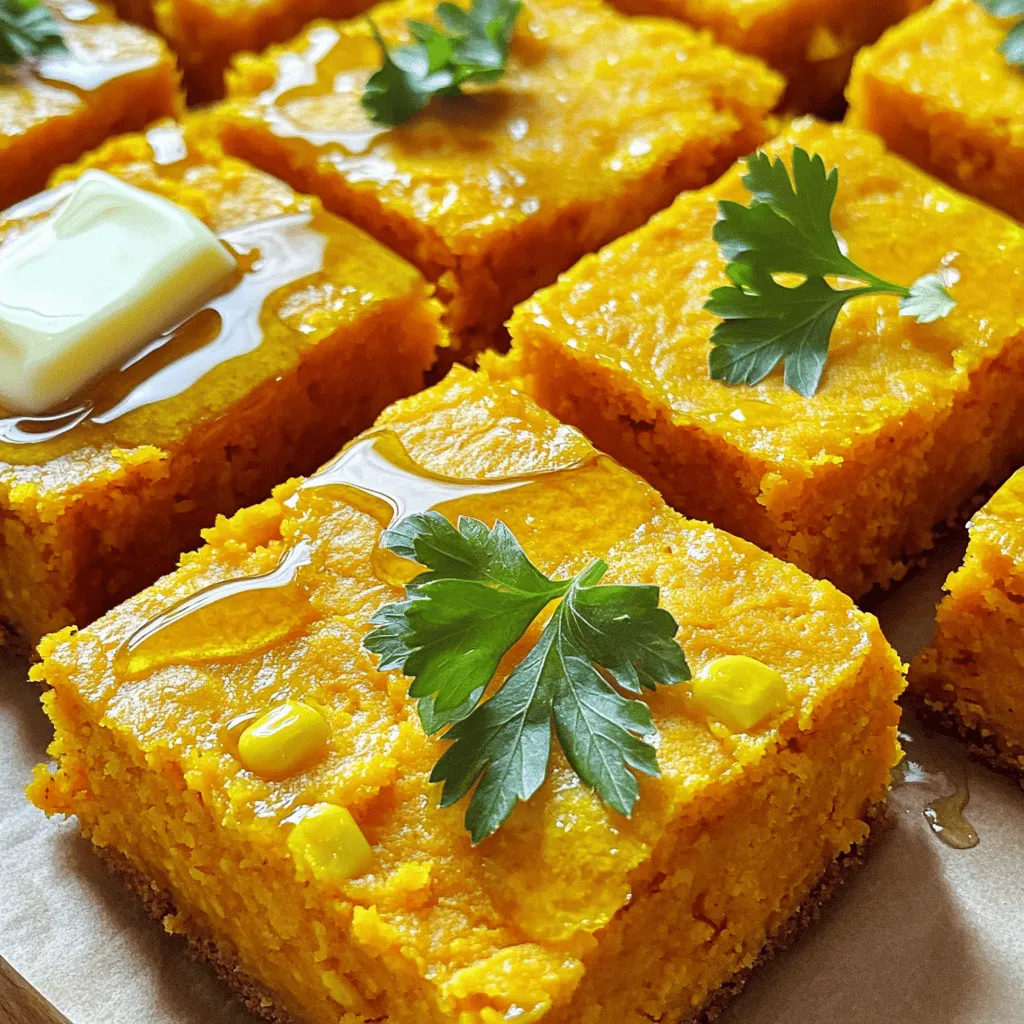
Are you ready to enjoy a warm, fluffy treat? My Sweet Potato Cornbread is the perfect blend of sweet and savory. This recipe is easy, delicious, and perfect for any …