Honey Roasted Sweet Potatoes Flavorful and Simple Dish
. When picking sweet potatoes, look for ones that are firm and smooth. Avoid any with soft spots or blemishes. Size matters too. Medium sweet potatoes are best for even cooking. They should fit nicely in your hands. You can find both organic and conventional options. Organic sweet potatoes may cost more but often taste sweeter. Choose what fits your budget and values. For even cooking, cut your sweet potatoes into uniform 1-inch cubes. This helps them roast at the same rate. Spread them out on the baking sheet. Leave space between the pieces to allow steam to escape. To achieve that lovely caramelization, roast them at a high temperature, like 425°F (220°C). Don't forget to turn them halfway through cooking. This ensures all sides get golden and crispy. You can easily switch up the flavors in this dish. Try adding spices like paprika or cayenne for some heat. A sprinkle of garlic powder can bring a savory twist. If you like it sweeter, drizzle in more honey or maple syrup. You can also add a splash of orange juice for a fruity boost. Customize it to fit your taste! For the full recipe, don't forget to check it out. {{image_2}} You can change the sweetener in this dish. If you want a different taste, try maple syrup instead of honey. Maple syrup adds a rich flavor that works well with sweet potatoes. If you prefer a vegan option, use agave nectar. Agave gives a sweet touch without using honey. Both choices are easy and tasty. To make your honey roasted sweet potatoes even better, think about adding herbs. Fresh thyme or sage can bring a new vibe to the dish. You can also add citrus zest, like lemon or orange. This extra step gives a bright flavor that balances the sweetness. Honey roasted sweet potatoes pair well with many proteins. Try them with grilled chicken or salmon for a complete meal. They also work great in salads. Mix them with greens, nuts, and a light dressing for a fresh and filling dish. If you want the full recipe for honey roasted sweet potatoes, check out the complete guide! To keep your honey roasted sweet potatoes fresh, store them in the fridge. Place them in an airtight container. This will help keep them from drying out. They will last about 3 to 5 days in the fridge. If you want to save them longer, freezing is a great option. - Freezing Options: - Let the sweet potatoes cool completely. - Spread them out on a baking sheet and freeze for 2 hours. - Once frozen, transfer them to a freezer-safe bag. - Label the bag with the date. They can last up to 3 months in the freezer. Reheating honey roasted sweet potatoes can be easy. You want to keep them moist and flavorful. Here are some ways to reheat them without drying out. - Methods for Reheating: - Oven: Preheat your oven to 350°F (175°C). Spread the sweet potatoes on a baking sheet. Cover with foil to lock in moisture. Heat for about 10-15 minutes. - Microwave: Place sweet potatoes in a microwave-safe bowl. Add a splash of water. Cover and heat in 30-second intervals until warmed through. - Suggestions for Using Leftovers: - Toss them in a salad with greens and feta for a tasty meal. - Mix them with eggs for a breakfast hash. - Add them to grain bowls with your favorite toppings. This way, you can enjoy this simple dish in different ways throughout the week. Yes, you can use other types of potatoes. Yukon gold and purple potatoes are great options. They have different flavors and textures. Yukon gold has a creamy taste, while purple potatoes are nutty and earthy. Both can work well with honey and spices. Just cut them into 1-inch cubes like sweet potatoes. Roasting times might vary, so keep an eye on them. Honey roasted sweet potatoes are indeed healthy. They offer many nutrients. Sweet potatoes are high in fiber and vitamins like A and C. One medium sweet potato has about 100 calories. The honey adds natural sweetness, but keep in mind it adds calories too. Overall, this dish is a nutritious choice for any meal. Honey roasted sweet potatoes can last 3 to 5 days in the fridge. Store them in an airtight container. Make sure they cool completely before putting them in the fridge. If you want to keep them longer, you can freeze them. They can last up to 3 months in the freezer. Just remember to reheat them well when you eat them later. Yes, you can prepare honey roasted sweet potatoes ahead of time. You can cut the sweet potatoes and mix the honey mixture in advance. Just keep them in the fridge until you are ready to cook. You can also cook them and store them in the fridge. When it’s time to eat, reheat them in the oven for best results. It’s a great way to save time on busy days. For the full recipe, check out the detailed instructions. You now have a clear guide for making delicious honey roasted sweet potatoes. We covered ingredients, step-by-step instructions, and tips for selecting and storing sweet potatoes. Consider trying different sweeteners or flavor additions for a unique twist. These roasted sweet potatoes make a great side or snack. Enjoy experimenting and savoring this tasty, healthy dish!](https://therecipehatch.com/wp-content/uploads/2025/07/cf32faf6-ac7d-46d3-b7ff-3ee4b40c29e4.webp)
Are you ready to enjoy a dish that’s both tasty and easy to make? Honey roasted sweet potatoes are simple to prepare and packed with flavor. With just a few …
Are you ready to enjoy a dish that’s both tasty and easy to make? Honey roasted sweet potatoes are simple to prepare and packed with flavor. With just a few …
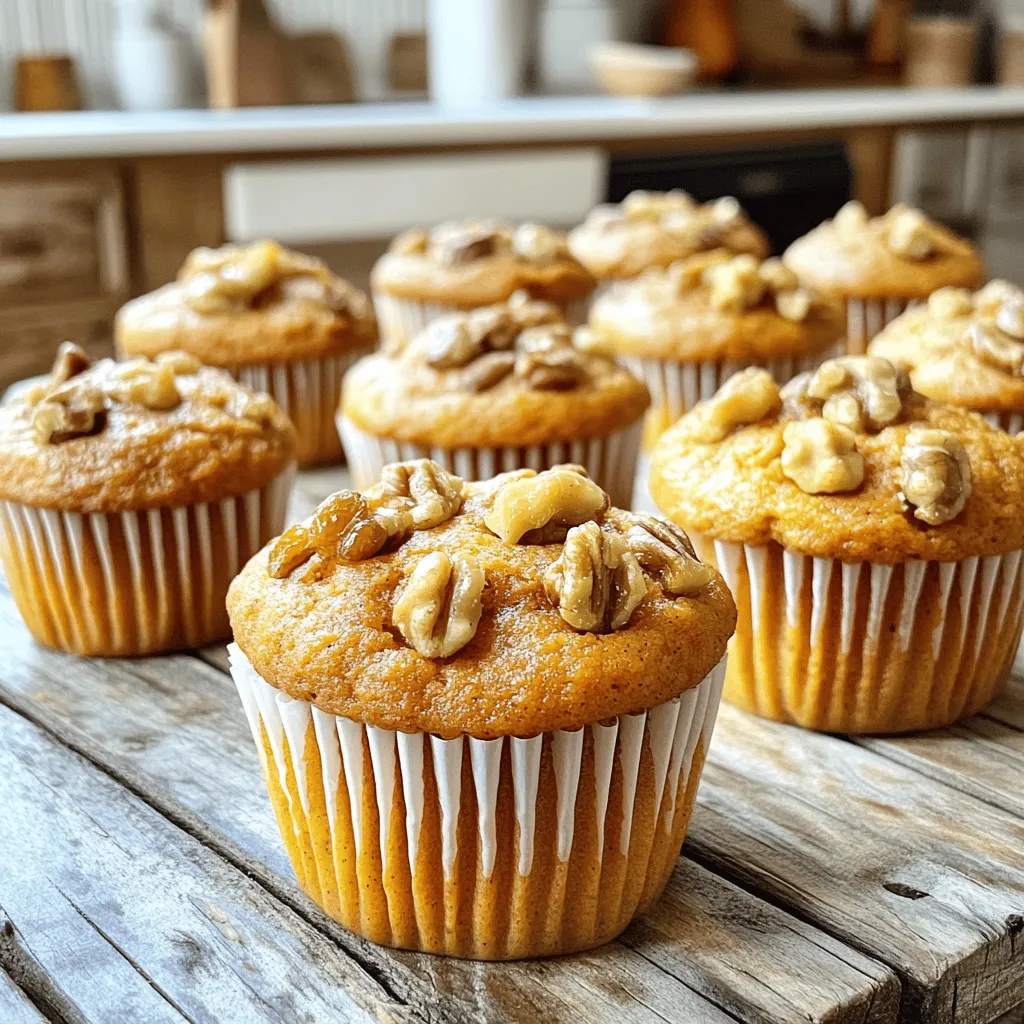
![To make the best pumpkin muffins, you need a few key ingredients. Each one plays a big role in flavor and texture. - All-purpose flour: This gives muffins their shape and structure. - Whole wheat flour: Adds a nutty taste and makes muffins heartier. - Baking powder and baking soda: These help the muffins rise and become fluffy. - Spices: Use a mix of cinnamon, nutmeg, and ginger for warm, cozy flavors. - Sugars: Granulated sugar sweetens the muffins. Brown sugar adds moisture and depth. - Wet ingredients: Vegetable oil keeps them moist. Eggs bind everything together. Pumpkin puree gives them their signature taste. Vanilla adds a hint of sweetness. - Optional mix-ins: You can add walnuts, pecans, or chocolate chips for extra crunch and flavor. These ingredients come together in a delightful way. They create a muffin that's soft, moist, and packed with pumpkin goodness. Check out the full recipe for more details! - Preheat the oven to 350°F (175°C). - Prepare the muffin tin with liners or cooking spray. - In a medium bowl, whisk together: - 1 cup all-purpose flour - 1/2 cup whole wheat flour - 1 teaspoon baking powder - 1/2 teaspoon baking soda - 1 teaspoon ground cinnamon - 1/2 teaspoon ground nutmeg - 1/4 teaspoon ground ginger - 1/4 teaspoon salt - In a large bowl, mix together: - 1/2 cup granulated sugar - 1/4 cup brown sugar, packed - 1/2 cup vegetable oil or melted coconut oil. - Add: - 2 large eggs - 1 cup pumpkin puree - 1 teaspoon vanilla extract. - Whisk until creamy and smooth. - Gradually fold in the dry mix to the wet mix. - Be gentle and do not overmix. - If you want, add in: - 1/2 cup chopped walnuts or pecans - 1/2 cup chocolate chips. - Fill each muffin cup about two-thirds full with batter. - Bake for 18–20 minutes. - Check if a toothpick comes out clean; then they are done. - Let them cool in the pan for 5 minutes, then transfer to a wire rack. You can find the full recipe with more details and tips for these delightful pumpkin muffins! To get the best pumpkin muffins, avoid overmixing your batter. If you mix too much, the muffins can turn dense and heavy. Mix just until the dry ingredients blend with the wet ones. This helps keep them light and fluffy. Also, use room temperature ingredients. It helps them mix better, making your muffins rise nicely. You can add a splash of maple syrup to your mix. This gives your muffins a warm, sweet flavor that pairs well with pumpkin. Don't be afraid to experiment with spices too. Try adding more cinnamon, or even some cloves. Nuts like walnuts or pecans can add a nice crunch. Chocolate chips are a fun touch if you want a sweet surprise. Once your muffins are baked, dust them with powdered sugar. The light coating looks pretty and adds sweetness. You can also serve them with whipped cream on the side. This makes for a fun treat! Pair your muffins with coffee or tea. The rich flavors of pumpkin go great with warm drinks. {{image_2}} You can make these pumpkin muffins a bit better for you. Here are some great swaps: - Use whole grain flour or gluten-free flour for a healthier base. - Replace refined sugar with natural sweeteners like honey or maple syrup. These changes keep the muffins delicious while cutting down on some sugars and gluten. You won’t lose any taste! Adding new flavors can make your pumpkin muffins exciting. Consider these fun ideas: - Mix in chocolate chips for a sweet surprise. - Toss in cranberries or dried fruits for a chewy texture. These little changes can give your muffins a whole new life. They can be a treat for any time! Fall brings many flavors that can boost your muffins. Try these additions: - Add apple chunks or pear pieces for a fruity twist. - For a rich touch, include a cream cheese filling inside. These seasonal additions make each bite feel special and festive. You can enjoy them year-round with these fun twists! For the full recipe, check out the [Full Recipe]. To keep your pumpkin muffins fresh, store them in an airtight container at room temperature. This simple step helps keep them soft and moist. If you want to enjoy them longer, refrigerate the muffins. This will extend their shelf life and keep them tasting great. If you want to save some muffins for later, freezing is a great option. Here’s how to do it properly: - Cool the muffins completely before freezing. This prevents ice crystals from forming. - Wrap each muffin tightly in plastic wrap or aluminum foil. This keeps out air and moisture. - Place wrapped muffins in a freezer bag or container. Label it with the date for easy tracking. When you’re ready to enjoy them, follow these thawing and reheating tips: - Thaw muffins in the fridge overnight for best results. - If you need them fast, microwave them for 15-30 seconds. This warms them up nicely. - For a crispy top, reheat muffins in an oven at 350°F (175°C) for about 5-10 minutes. This way, you can always have a tasty pumpkin muffin ready to go! Check out the Full Recipe for more delicious details. To make the muffins moist, add a bit more oil. You can increase the oil to 3/4 cup. Another trick is to add 1/4 cup of applesauce. This replaces some oil and adds moisture. Yes, you can use fresh pumpkin. To make fresh puree, cook the pumpkin until soft. Then, mash it well. Use the same amount of fresh puree as canned. Fresh pumpkin gives a nice flavor and texture. Sinking muffins often happen due to too much batter or too little baking soda. Make sure to measure all ingredients carefully. Also, do not open the oven door too soon. Wait until they bake for at least 15 minutes. Pumpkin muffins last about 3 days at room temperature. You can store them in an airtight container. If you want them to last longer, refrigerate them for up to a week. You can also freeze them for up to 3 months. Yes! To make vegan pumpkin muffins, replace eggs with flax eggs. Mix 1 tablespoon of flaxseed meal with 2.5 tablespoons of water for each egg. Use almond milk or any plant milk instead of regular milk. This keeps your muffins fluffy and tasty. For the complete recipe, check out the Full Recipe. You now have all the tools to make delicious pumpkin muffins. We covered key ingredients to create rich flavors and perfect textures. Following the step-by-step instructions ensures success every time. Use the tips and tricks to customize your muffins and store them properly. Whether you prefer a classic recipe or a unique twist, these muffins can satisfy any craving. Enjoy baking and sharing your treats!](https://therecipehatch.com/wp-content/uploads/2025/07/ec16d8f3-4f5d-4966-a217-da8b1a452e64.webp)
Are you ready to bake the best pumpkin muffins ever? In this guide, I’ll share my secret ingredients and easy steps to help you create flavorful treats that will have …
![To make Easy Fiesta Roll Ups, gather the following items: - 4 large flour tortillas - 1 cup cream cheese, softened - 1 teaspoon taco seasoning - 1 cup shredded cheddar cheese - 1 cup cooked black beans, drained and rinsed - 1 medium bell pepper, finely chopped - 1 cup fresh spinach, chopped - ½ cup salsa - Fresh cilantro leaves for garnish These ingredients create a tasty blend. The cream cheese adds smoothness, while the taco seasoning gives it a fun twist. The black beans and veggies boost the nutrition. You can use any bell pepper color you like. Fresh spinach adds a nice crunch. The salsa ties everything together with flavor. For a complete guide, check the [Full Recipe]. This mix of flavors makes every bite enjoyable. - In a bowl, combine the softened cream cheese and taco seasoning. Mix until smooth. - Spread an even layer of the cream cheese mixture over each flour tortilla. - Sprinkle shredded cheddar cheese on top of the cream cheese on each tortilla. - Layer cooked black beans, chopped bell pepper, and fresh spinach over the cheese. - Drizzle salsa over the fillings on each tortilla, spreading it out slightly. - Carefully roll each tortilla tightly from one end to the other. Make sure the fillings stay inside. - Once rolled, place them seam-side down and wrap each in plastic wrap. Chill in the refrigerator for at least 30 minutes to set. - After chilling, unwrap the roll-ups and slice them into bite-sized pieces, about 1-2 inches wide. - Arrange on a serving platter and garnish with fresh cilantro leaves before serving. This simple method makes your Easy Fiesta Roll Ups a fun snack. Enjoy making these with family! For the full recipe, refer to the earlier section. - Pair with fresh salsa or guacamole. - Serve with tortilla chips for added crunch. These roll-ups shine when you add some dips. Fresh salsa adds zest. Guacamole gives a creamy touch. Tortilla chips bring in a nice crunch. Each bite gets even better! - Substitute ingredients for dietary needs (e.g., dairy-free cream cheese). - Use whole wheat or corn tortillas for variation. You can switch things up based on your diet. If you need a dairy-free option, use dairy-free cream cheese. Whole wheat or corn tortillas can add unique flavors. Experiment and find what you love best! {{image_2}} You can make your Easy Fiesta Roll Ups more exciting with a few tweaks. If you crave heat, add diced jalapeños. They give a nice kick to each bite. If you like cheese, switch to pepper jack. This cheese adds a creamy texture and a spicy flavor. Feel free to swap some ingredients for fun. Try hummus instead of cream cheese for a lighter option. Hummus adds flavor and keeps things fresh. You can also change up the veggies. Use zucchini or carrots to add crunch and color. These swaps let you customize your roll ups to fit your taste. To keep your Easy Fiesta Roll Ups fresh, store them in the fridge. Wrap each roll-up tightly in plastic wrap. This keeps them moist and tasty. Use an airtight container for added protection. This helps prevent any odors from other foods. Leftovers can last up to three days in the fridge. Just make sure they are sealed well. You can freeze your roll-ups if you have extra. First, wrap each roll-up in plastic wrap. Then, place them in a freezer-safe bag. Squeeze out as much air as you can. This helps prevent freezer burn. Your roll-ups will stay good for up to three months. When you are ready to eat them, take the roll-ups out of the freezer. Let them thaw in the fridge overnight. If you're in a hurry, you can also thaw them on the counter for a few hours. After thawing, you can eat them cold or warm them in the microwave. Just heat them for about 30 seconds to 1 minute. This makes them soft and tasty again. Enjoy your Easy Fiesta Roll Ups! To make these roll-ups healthier, you can swap some ingredients. Here are some easy changes: - Use whole wheat tortillas instead of regular flour tortillas. - Replace cream cheese with Greek yogurt for fewer calories. - Choose low-fat cheese or skip the cheese for a lighter option. - Add more veggies like zucchini or carrots for extra nutrients. These swaps keep the flavor while making the dish more nutritious. Yes, you can make Easy Fiesta Roll Ups ahead of time. Here’s how to do it: - Prepare the roll-ups and wrap each one tightly in plastic wrap. - Place them in the fridge for up to 24 hours before serving. - This helps the flavors blend and makes slicing easier. Just remember to slice them right before serving for the best look. You can serve many tasty dishes with Easy Fiesta Roll Ups. Here are some fun ideas: - Fresh salsa for dipping adds great flavor. - Guacamole gives a creamy contrast. - Tortilla chips add a nice crunch. - A light salad can balance the meal. - Refreshing drinks like lemonade or iced tea work well, too. These pairings will make your fiesta even more festive! You now have all you need to make tasty Easy Fiesta Roll Ups. We covered the ingredients, step-by-step instructions, helpful tips, and tasty variations. Remember, you can mix and match ingredients based on your taste. Store leftovers for later or freeze them for a quick snack. These roll-ups are fun for any gathering. Enjoy creating these simple and delicious treats! Share them with friends and family, and celebrate every bite.](https://therecipehatch.com/wp-content/uploads/2025/07/5398f719-de71-4cec-98de-c5615cb3248e.webp)
Are you ready to spice up snack time? These Easy Fiesta Roll Ups are a fun and tasty treat! With just a few simple ingredients, you can create a colorful …
If you’re searching for a warm, comforting treat, sweet potato muffins are the answer. These delightful bites pack flavor and nutrition into every bite. Loaded with vitamins, fiber, and a …
![- Apples: Use 2 large apples, ideally Honeycrisp or Granny Smith. These types are sweet and tart, perfect for fritters. - Dry ingredients: You need 1 cup all-purpose flour, 1 teaspoon baking powder, 1 teaspoon cinnamon, ¼ teaspoon nutmeg, and ¼ teaspoon salt. These spices give a warm flavor. - Wet ingredients: Include 1 large egg, ½ cup milk, 2 tablespoons melted unsalted butter, 1 teaspoon vanilla extract, and 1 tablespoon lemon juice. The lemon juice adds brightness and keeps apples fresh. Using quality ingredients makes a big difference. Choose apples that are firm and flavorful. Honeycrisp offers a sweet crunch, while Granny Smith adds a nice tartness. The spices bring warmth and depth, enhancing the overall taste. For the wet ingredients, make sure your butter is melted but not hot. This helps combine everything smoothly. The egg and milk give the fritters a wonderful texture. If you want a touch of sweetness, sprinkle powdered sugar on top after baking. This simple addition elevates the fritters, making them even more delightful. For the Full Recipe, follow the steps carefully to ensure your fritters turn out perfect every time. To prepare the apples for fritters, start by peeling, coring, and dicing them. I recommend using Honeycrisp or Granny Smith apples. They give the fritters a sweet and tart flavor. After dicing, add a tablespoon of lemon juice. This step is important. The lemon juice keeps the apples fresh and bright. It also enhances the overall flavor of your fritters. Next, you’ll mix the dry ingredients. In a large bowl, combine 1 cup of all-purpose flour, 1 teaspoon of baking powder, 1 teaspoon of cinnamon, ¼ teaspoon of nutmeg, ¼ teaspoon of salt, and ½ cup of granulated sugar. Whisk the ingredients together well. You know the dry mixture is ready when it looks uniform and there are no lumps. This ensures even flavor in every bite. Now it's time to combine the wet and dry ingredients. In a separate bowl, whisk together 1 large egg, ½ cup of milk, 2 tablespoons of melted butter, and 1 teaspoon of vanilla extract. Pour this mixture into the dry ingredients. Stir gently until just combined. Be careful not to overmix, as this can make the fritters tough. Finally, fold in the prepared apple mixture. Ensure the apples are evenly spread throughout the batter. Preheat your oven to 375°F (190°C) and line a baking sheet with parchment paper. Use a spoon or cookie scoop to drop dollops of the batter onto the baking sheet, leaving space between each fritter. Bake for 15 to 20 minutes. The fritters are done when they are golden brown. You can check for doneness by inserting a toothpick into the center. If it comes out clean, your fritters are ready to enjoy! To avoid dry fritters, focus on your mixing. Mix until the wet and dry ingredients just blend. Do not stir too much. Overmixing makes your fritters dense and dry. Aim for a slightly lumpy batter. This keeps them light and fluffy. Also, the right amount of liquid is key. Use the milk and melted butter as needed. They add moisture and help the fritters rise. Warm fritters taste best when served fresh. Pair them with cinnamon sugar for a sweet touch. You can drizzle caramel sauce on top for extra flavor. These fritters shine at breakfast or as a snack. They are also great for dessert. Serve them warm after baking. If you have leftovers, reheat them in the oven for a few minutes. One common mistake is overmixing the batter. This leads to tough fritters. Mix just until combined for the best texture. Another mistake is using the wrong baking temperature. Always preheat your oven to 375°F (190°C). A hot oven helps the fritters rise and get golden. Use an oven thermometer to check the heat if needed. {{image_2}} You can make your warm baked apple fritters even better. Try adding nuts or dried fruit. Chopped walnuts or pecans add a nice crunch. For a twist, mix in raisins or dried cranberries. These additions enhance the flavor and texture. You can also experiment with different spices. Ginger and cardamom bring a warm, spicy note. Just a pinch can change the whole taste. If you're looking for a healthier version, consider using whole wheat flour. It adds fiber and nutrients. You can also try almond or oat flour for different flavors. Reducing sugar is a good idea too. Use natural sweeteners like honey or maple syrup. These options keep your fritters tasty while cutting calories. You can serve fritters in various ways. Make fritter bites for a fun snack. Simply scoop smaller amounts of batter. These bite-sized treats are perfect for sharing. If you prefer larger fritters, use a bigger scoop. They’re great for breakfast or dessert. Mini fritters are also a hit for parties. Whatever size you choose, they will be delightful. For the full recipe, check out the details above. To keep your warm baked apple fritters fresh, use airtight containers. Glass or plastic containers work well. Place parchment paper between layers to avoid sticking. You can store them in the fridge for short-term use. For longer storage, freeze them in freezer bags. Make sure to remove as much air as possible. When you want to enjoy your fritters again, reheating is key. The best way is to use an oven or air fryer. Preheat your oven to 350°F (175°C). Place fritters on a baking sheet and warm for about 10 minutes. This method helps keep them crisp. Avoid the microwave, as it can make them soggy. In the fridge, fritters can last for about 3 to 5 days. After that, they may lose freshness. Look for signs of spoilage like an off smell or mold. If they feel dry or hard, it’s time to toss them. Fresh is always best when it comes to taste! Yes, you can make warm baked apple fritters ahead of time. Here’s how: - Prepare the batter ahead: You can mix the wet and dry ingredients and store them in the fridge for up to 24 hours. - Store the fritters: Once baked, let them cool. Store them in an airtight container for 2-3 days in the fridge. - Reheat before serving: When you're ready to enjoy them, warm the fritters in the oven at 350°F (175°C) for about 5-10 minutes. This way, you save time and still enjoy fresh fritters! You can tell when fritters are done by looking at a few signs: - Color: They should be golden brown on top. - Texture: The fritters should feel firm to the touch. - Toothpick test: Insert a toothpick into the center. If it comes out clean, they are done! These cues help ensure your fritters are perfectly baked. Sure, you can substitute some ingredients if needed. Here are common swaps: - Flour: Use whole wheat flour for a healthier option. - Milk: Almond or oat milk can replace regular milk. - Egg: Flaxseed meal mixed with water works as a great egg substitute. These substitutions help cater to dietary needs while keeping the flavor intact. For the full recipe, check out [Full Recipe]. In this post, we explored how to make tasty apple fritters. We covered key ingredients like apples and spices. I explained how to prep and mix the batter to avoid mistakes. Tips on serving and storing your fritters help you enjoy them longer. Remember, the secret to a great fritter lies in careful mixing and baking. With the right techniques, you can create sweet treats perfect for any occasion. Enjoy sharing your warm fritters with friends and family!](https://therecipehatch.com/wp-content/uploads/2025/07/e88f3f7b-5b1c-4d18-9505-627c88edb040.webp)
Are you ready to indulge in a warm, sweet treat that bursts with apple goodness? In this article, I’ll guide you through making delightful homemade warm baked apple fritters. With …
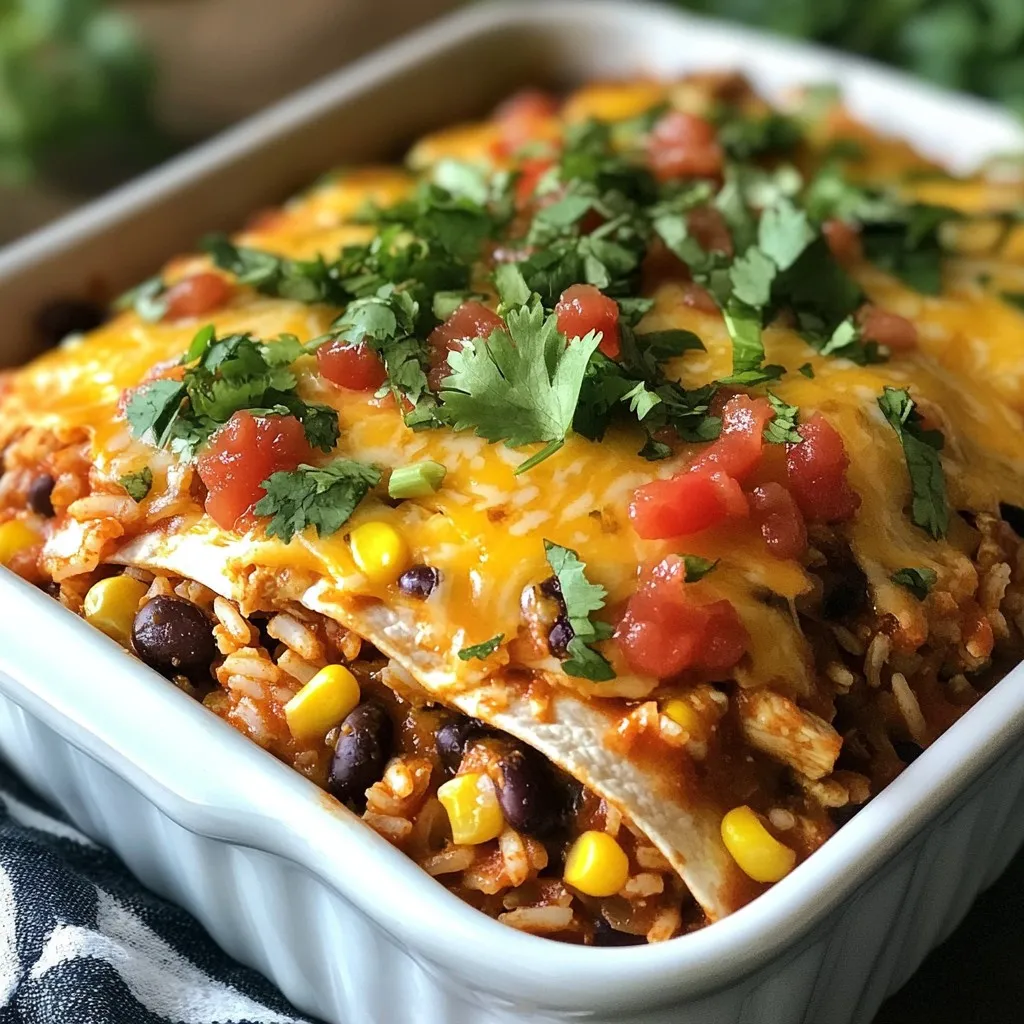
Looking for a meal that pleases the whole family? Try my Chicken Burrito Casserole! It’s a simple, tasty dish that combines juicy chicken, seasoned rice, beans, and cheese, all layered …
![- 1 cup cooked chicken, shredded - 1 cup pumpkin puree (canned or roasted) - 1 cup all-purpose flour - 1 teaspoon baking powder - 1/2 teaspoon salt - 1/4 teaspoon black pepper - 1/4 teaspoon ground ginger - 1/4 teaspoon garlic powder - 1/4 cup milk (or as needed) - Fresh parsley for garnish To make your chicken and pumpkin dumplings, start with the main ingredients. Shredded chicken adds protein and flavor. Pumpkin puree gives a sweet touch and a creamy texture. All-purpose flour binds everything together to form the dumpling dough. Next, we add seasonings to enhance the taste. Baking powder helps the dumplings rise and become fluffy. Salt and black pepper bring out the flavors. Ground ginger adds warmth, while garlic powder gives a savory kick. Don’t forget the milk! It helps create the right dough consistency. You may need to adjust the amount of milk based on how your dough feels. Lastly, fresh parsley makes for a lovely garnish and adds a pop of color. For the full recipe, check out the detailed instructions on how to prepare these delicious dumplings. Start by mixing the dry ingredients in a medium bowl. Combine 1 cup of all-purpose flour, 1 teaspoon of baking powder, 1/2 teaspoon of salt, 1/4 teaspoon of black pepper, 1/4 teaspoon of ground ginger, and 1/4 teaspoon of garlic powder. Stir them well until they blend completely. Next, in another bowl, combine 1 cup of shredded chicken and 1 cup of pumpkin puree. Mix these until they are fully incorporated. The pumpkin adds moisture and flavor. It also makes the dumplings light and fluffy. Now, gradually add the dry ingredients to the chicken and pumpkin mixture. Stir gently to combine everything. The mixture will start to thicken. Slowly pour in 1/4 cup of milk. Mix until the dough forms a soft, slightly sticky consistency. If the dough feels too dry, you can add a bit more milk. This step is key for texture. Bring a large pot of water to a gentle boil. Use a spoon to scoop out portions of the dumpling mixture. Roll them into balls about 1 inch in diameter. Carefully place the dumplings into the boiling water. Make sure not to overcrowd the pot. Cook the dumplings for about 6-8 minutes. They are done when they float to the top. This is a great sign they are cooked through. Using a slotted spoon, remove the dumplings and place them on a plate to drain excess water. Serve them hot, garnished with fresh chopped parsley. For the full recipe, check the earlier section. To make great dumpling dough, aim for a soft and slightly sticky texture. Start by mixing the dry ingredients well. Then, blend in the chicken and pumpkin. Gradually add milk. If the dough feels too sticky, sprinkle in a little flour. If it’s too dry, add more milk, a tablespoon at a time. This helps you find the perfect balance. When boiling dumplings, use a large pot with plenty of water. Bring the water to a gentle boil. Drop in the dumplings carefully to avoid splashing. Cook them for about 6 to 8 minutes. They are done when they float to the surface. Use a slotted spoon to lift them out. This keeps them intact and ready for serving. To serve chicken and pumpkin dumplings, think about color and texture. Place them in a bowl or on a plate. Add fresh herbs for a pop of green. Try serving them with a drizzle of soy sauce or a tangy yogurt sauce. Both pair nicely with the flavors of the dumplings. For more ideas, check out the [Full Recipe]. {{image_2}} You can switch the chicken for other proteins. Ground turkey or beef works well. For a twist, try diced shrimp or tofu. Each option adds its own flavor. You can also go meatless. Use mushrooms, sweet potatoes, or spinach for a veggie dumpling. These choices give you a colorful plate. They also make it fun to explore new tastes. Adding spices or herbs changes the taste. Try adding thyme, rosemary, or cumin. Each herb offers a new flavor journey. You can also add crushed red pepper for heat. When making the dough, mix in some cheese for richness. A little smoked paprika gives a nice depth. Feel free to experiment and find what you love most. Check the Full Recipe for more ideas. To store leftover dumplings, let them cool first. Place them in an airtight container. This keeps them fresh for up to three days. You can also wrap them tightly in plastic wrap. Make sure the seal is tight to avoid drying out. For reheating, use a pot of boiling water. Place the dumplings in for a few minutes. This method keeps them moist. You can also microwave them. Just add a splash of water and cover to steam. To freeze uncooked dumplings, first, prepare them as per the recipe. Line a baking sheet with parchment paper. Space the dumplings apart so they don’t stick. Freeze them for about an hour until firm. Then, transfer them to a freezer bag. They can last for up to three months. When you’re ready to cook frozen dumplings, don’t thaw them first. Just drop them into boiling water. Cook for about 8-10 minutes. They will float to the top when done. This method keeps them tasty and tender. Enjoy your dumplings straight from the freezer! Yes, you can use other meats. Turkey works well in this recipe. It has a similar texture and flavor. You can also try pork or beef. If you choose beef, make sure to cook it fully before mixing. Ground meat will blend easily with the pumpkin. For turkey or pork, shred it just like chicken. The cooking time for the dumplings stays the same. Dumplings are done when they float. This means they have cooked through. You should also touch one gently. It should feel soft but firm. The texture should not be gooey or sticky. If you notice any stickiness, they may need more time. After cooking, allow them to sit for a minute. This helps them firm up a bit more. These dumplings pair well with many side dishes. Try a fresh salad with greens and light dressing. A simple cucumber salad adds a nice crunch. You can also serve them with steamed vegetables. Carrots and broccoli work great here. A light broth or sauce complements the dumplings too. For a warm side, mashed potatoes are a tasty choice. They balance the dumpling's flavors nicely. Check out the Full Recipe for more ideas! In this post, we explored chicken and pumpkin dumplings from start to finish. You learned the key ingredients, the steps for making the dumplings, and some clever tips. Variations for different tastes showed how you can make this dish your own. Finally, we covered storage options to keep your dumplings fresh. Enjoy experimenting with this recipe. It’s a fun way to impress at meals!](https://therecipehatch.com/wp-content/uploads/2025/07/51c65a8d-e717-481f-9fdc-5ed33e14f09b.webp)
Looking for a cozy and easy meal? You’re in the right place! This Savory Chicken and Pumpkin Dumplings Easy Meal Guide shows you how to whip up delicious dumplings that …

Get ready to impress your friends with my Vegan Blueberry Ghost Hand Pies! These treats are flaky, sweet, and fun for any occasion. In this guide, I’ll show you how …
![- 3 cups rice Chex cereal - 2 cups corn Chex cereal - 1 cup pretzel twists I love starting with these main ingredients. Rice Chex and corn Chex give a great crunch. The pretzel twists add a nice salty bite. Together, they create a solid base for our mix. - 1 cup candy corn - 1 cup chocolate candies (M&M’s or similar) Now, let’s add some sweetness. Candy corn brings that classic Halloween flavor. The chocolate candies add a rich taste and fun colors. This mix of sweet and salty will keep you coming back for more. - 1/2 cup unsalted butter - 1/4 cup brown sugar - 1 teaspoon pumpkin spice - 1/2 teaspoon vanilla extract - 1/4 teaspoon sea salt These flavor enhancers tie everything together. Unsalted butter adds richness. Brown sugar gives it a lovely caramel note. Pumpkin spice brings that autumn warmth, while vanilla extract deepens the sweetness. A pinch of sea salt balances these flavors perfectly. For the full recipe, check out the section above. - Preheat your oven to 250°F. This low heat helps the mix bake evenly. - Line a baking sheet with parchment paper. This keeps the mix from sticking. - In a large bowl, mix the rice Chex, corn Chex, pretzel twists, candy corn, pumpkin seeds, and chocolate candies. - Make sure to toss gently. You want an even mix without breaking the cereal. - In a small saucepan, melt the unsalted butter over low heat. - Once melted, stir in the brown sugar, pumpkin spice, vanilla extract, and sea salt. - Cook this mix for 2-3 minutes. Stir constantly until it bubbles and becomes smooth. - Pour the melted butter mixture over your Chex blend. Mix well so every piece is coated. - Spread the mixture onto the prepared baking sheet in an even layer. - Bake in the preheated oven for 30 minutes. Stir every 10 minutes to keep it from burning. With these steps, you can create a tasty Halloween Harvest Hash Chex Mix. For the complete recipe, check the [Full Recipe]. To coat your Chex mix evenly, start by mixing the dry ingredients well. Use a large bowl to give enough space for tossing. Add the melted butter mixture slowly, pouring it over the dry mix. Stir gently but thoroughly. This helps ensure every piece gets coated. If you find some areas still dry, toss again until all pieces shine. Stirring the mix during baking is key. This step stops it from burning and helps it cook evenly. Aim to stir every ten minutes. Keep an eye on the color; it should turn a light golden brown when done. If it starts to smell nutty, it’s usually a good sign that it’s ready. For a festive touch, serve your Halloween Harvest Hash Chex Mix in bright bowls. Use bowls shaped like pumpkins or ghosts to match the theme. You can also sprinkle some extra candy corn on top for color. This makes the mix look even more inviting for guests. Try placing the bowls on a spooky tablecloth to enhance the fun! {{image_2}} You can change the nuts or seeds in this mix. Try almonds, walnuts, or sunflower seeds. Each nut adds a unique crunch and flavor. You can also swap in your favorite candy. Use gummy worms or spooky chocolate shapes for fun twists. For gluten-free options, check the labels on your Chex cereals. Many brands offer gluten-free rice and corn Chex. If you're vegan, replace the butter with coconut oil or a vegan butter substitute. You can also skip the chocolate candies or use dark chocolate chips. Make your mix seasonal by using flavors like apple or caramel. You can add colored candies to match Halloween themes. Think orange, black, and purple. Mixing in dried fruits can also bring extra color and taste. To keep your Halloween Harvest Hash Chex Mix fresh, use airtight containers. Glass jars work well. Zip-top bags are also a good choice. Make sure to seal them tightly after each use. This helps keep the mix crisp and tasty. At room temperature, your Chex Mix can last about two weeks. Keep it in a cool, dry place. Avoid direct sunlight, as heat can make it stale faster. If you notice any changes in texture or smell, it’s best to toss it. If your Chex Mix gets stale, don’t worry. You can bring back its crunch. Preheat your oven to 250°F (120°C). Spread the mix on a baking sheet. Bake it for about 10 minutes. This quick heat revives the crispiness without losing flavor. Enjoy this spellbinding treat once again! For the full recipe, check the details above. Yes, you can make this Chex mix a few days ahead. Just follow the full recipe. After baking, let it cool completely. Then, store it in an airtight container. This mix stays fresh for about a week. Making it early gives the flavors time to blend. You’ll have a tasty treat ready for Halloween fun! To keep your Chex mix fresh, use an airtight container. Glass jars or plastic bins work well. Store it at room temperature, away from light and heat. This helps maintain its crunch. Avoid leaving it out in the open, as air can make it stale. If sealed properly, it can last up to a week. Absolutely! You can change the sweetness or spice levels. If you want it sweeter, add more candy corn or chocolate. For more spice, increase the pumpkin spice or add a pinch of cinnamon. Taste as you mix to find your favorite balance. This recipe is flexible, and personal touches make it special! This blog post guided you through making a tasty Halloween Harvest Hash Chex Mix. You learned about the base ingredients, sweet additions, and flavor enhancers. I shared easy steps for mixing and baking, along with important tips for the best results. Don't forget, you can customize this mix to your taste and dietary needs. With proper storage, it stays fresh for weeks. I hope you enjoy making this fun treat as much as I do!](https://therecipehatch.com/wp-content/uploads/2025/07/0301b3d8-c8fc-4376-be39-1a7acddb5053.webp)
Get ready for a tasty treat that’s perfect for Halloween! My Halloween Harvest Hash Chex Mix combines crunchy Chex cereals, pretzel twists, and sweet surprises like candy corn and chocolate. …

If you love pizza and easy meals, you’re in for a treat! Pepperoni Pizza Quesadillas combine two classic favorites into a fun, quick dish. In this blog post, I’ll share …