Skip to content
The Recipe Hatch
  • Home
  • Appetizers
  • Desserts
  • Salads
  • Breakfast
  • Dinner
  • Privacy Policy
  • Contact
  • About

Chef Owen

Witches’ Brew Cheesecake Simple and Spooky Delight

July 28, 2025 by Chef Owen
To make the Witches' Brew Cheesecake, you will need the following ingredients: - 1 1/2 cups graham cracker crumbs - 1/4 cup unsweetened cocoa powder - 1/2 cup unsalted butter, melted - 2 cups cream cheese, softened - 1 cup granulated sugar - 3 large eggs - 1 teaspoon vanilla extract - 1 cup sour cream - 1/4 cup green food coloring - 1/2 teaspoon black food coloring (optional) - 1/2 cup chocolate chips (optional) - Edible glitter (for decoration) Each ingredient plays a key role. The graham cracker crumbs form a tasty crust. Cocoa powder adds depth and richness. Cream cheese gives the cheesecake its creamy texture. The sugar sweetens the mix, while eggs help it set. Vanilla extract adds a lovely flavor. Sour cream enriches the filling. Green food coloring creates the spooky look. The optional black food coloring can darken the hue. Chocolate chips add a fun twist. Finally, edible glitter brings a magical touch to your dessert. You can find the full recipe further down. Happy baking! - Preheat oven to 325°F (163°C) - Grease a 9-inch springform pan First, set your oven to 325°F (163°C). This helps the cheesecake bake evenly. Next, take your springform pan and grease it. Use butter or non-stick spray. This step keeps the cheesecake from sticking. - Combine graham cracker crumbs, cocoa powder, and melted butter - Press into the bottom of the pan - Bake for 10 minutes and allow to cool In a bowl, mix graham cracker crumbs, cocoa powder, and melted butter. Stir until it looks like wet sand. Press this mix firmly into the bottom of your springform pan. Bake it for 10 minutes. Let it cool while you make the filling. - Beat cream cheese and sugar until fluffy - Add eggs, vanilla extract, and sour cream - Mix until well combined In a large bowl, beat cream cheese and sugar together. Do this until it’s fluffy and smooth. Then, add the eggs one at a time. Mix well after each one. Next, stir in the vanilla extract and sour cream. Keep mixing until everything is smooth and creamy. - Gradually mix in green food coloring - Optional: Fold in black food coloring and chocolate chips Now comes the fun part! Gradually mix in green food coloring. Keep adding until you get a color you like. For a darker effect, add black food coloring drop by drop. If you want, fold in chocolate chips for extra texture and taste. - Pour filling over cooled crust - Bake for 55-60 minutes until set with slight jiggle Pour the cheesecake filling over the cooled crust. Smooth the top with a spatula. Bake it in the oven for 55 to 60 minutes. It should be set around the edges but still have a slight jiggle in the center. - Cool in the oven for an hour - Transfer to refrigerator for at least 4 hours Turn off the oven and let the cheesecake cool inside for about an hour. This helps it not crack. After that, put it in the fridge for at least 4 hours, or even better, overnight. - Remove from springform pan - Add edible glitter before serving When you’re ready to serve, carefully remove the cheesecake from the springform pan. For a magical touch, sprinkle edible glitter on top. Cut it into slices and enjoy your Witches’ Brew Cheesecake! For the full recipe, refer to the earlier section. To keep your cheesecake smooth, cool it in the oven. After baking, turn off the oven and crack the door. Let it sit for about an hour. This helps the cheesecake set slowly and reduces cracks. Another helpful method is using a water bath. Place your springform pan in a larger pan filled with water. This keeps the heat gentle and even, preventing the cheesecake from drying out. Start with room temperature ingredients. This means letting the cream cheese and eggs sit out for about 30 minutes. Mixing them well helps create a creamy texture. Be careful not to overmix the batter. Too much mixing can add air, leading to cracks. Mix just until combined for the best results. For theme fun, use spooky toppings. Try crushed cookies for a graveyard effect or gummy worms for a creepy touch. You can also add whipped cream ghosts or chocolate spiders. Serve slices on black plates for a chilling look. Consider using edible glitter to make it sparkle, adding to the magical theme. For a festive twist, use Halloween-themed cake stands or platters to display your cheesecake. {{image_2}} Creating different versions of Witches’ Brew Cheesecake is easy and fun. Let’s explore some tasty twists! For a deeper, richer taste, add more cocoa powder. This change gives the cheesecake a darker color and a bold chocolate flavor. You can use up to an extra 1/4 cup of cocoa powder. Mix it with the graham cracker crumbs for the crust. This adds a chocolatey base that pairs well with the creamy filling. If you need a gluten-free dessert, substitute graham crackers with gluten-free options. You can use gluten-free cookies or almond flour mixed with cocoa powder. Make sure the cookies are finely crushed to keep the crust firm. This way, everyone can enjoy this spooky treat! You can add fun flavors to make your cheesecake unique. Try mixing in mint extract for a refreshing taste. Orange zest will give it a citrus lift. For a coffee kick, add a teaspoon of instant coffee powder. These flavors can be added to the filling before you bake. Just make sure to mix well, so the taste spreads throughout. These variations keep the spirit of Witches' Brew Cheesecake alive while adding your personal touch. Check out the Full Recipe to start crafting your deliciously spooky dessert! To keep your Witches’ Brew Cheesecake fresh, refrigerate any leftovers. Cover the cheesecake tightly with plastic wrap or aluminum foil. This will help keep it moist and prevent it from absorbing other smells in your fridge. Make sure to store it in the coldest part of the fridge for best results. If you want to save some for later, you can freeze Witches’ Brew Cheesecake. First, let it cool completely in the fridge. Then, slice it into pieces. Wrap each slice in plastic wrap, then place them in an airtight container. When you're ready to enjoy it again, move a slice from the freezer to the fridge. Let it thaw overnight. This way, you can enjoy a spooky treat anytime! Refrigerated Witches’ Brew Cheesecake lasts about 4-5 days. If you freeze it, it can last up to 2-3 months. Just remember, the longer it is frozen, the more it may lose its original texture. So, eat it sooner rather than later for the best taste! Yes, you can make this cheesecake a day or two in advance. To store it, let it cool completely. Cover it with plastic wrap or foil. Keep it in the fridge until you are ready to serve. This cheesecake tastes even better after chilling overnight. It allows the flavors to mix well. You can swap some ingredients if needed. Here are a few common substitutions: - Use crushed cookies instead of graham cracker crumbs for a different taste. - Replace sour cream with Greek yogurt for a tangy twist. - Use dairy-free cream cheese for a vegan version. Each swap might change the texture or flavor, so keep that in mind. To check for doneness, look for these signs: - The edges should be set and firm. - The center should have a slight jiggle, like jello. - It should not look wet or shiny on top. If it meets all these signs, it is ready to cool! Pair this cheesecake with some fun treats and drinks. Here are my favorites: - Serve with fresh berries for a sweet contrast. - A scoop of vanilla ice cream adds creaminess. - Hot chocolate or pumpkin spice lattes make great drinks. These pairings will make your dessert table even more delightful! We explored how to make a delicious Witches' Brew Cheesecake. You learned about the needed ingredients and step-by-step instructions. With tips for texture and decoration, you can avoid cracks and impress guests. Remember, you can customize this recipe for various flavors and diets. Whether for Halloween or special occasions, this cheesecake stands out. Now, it’s your turn to create and enjoy this festive treat!

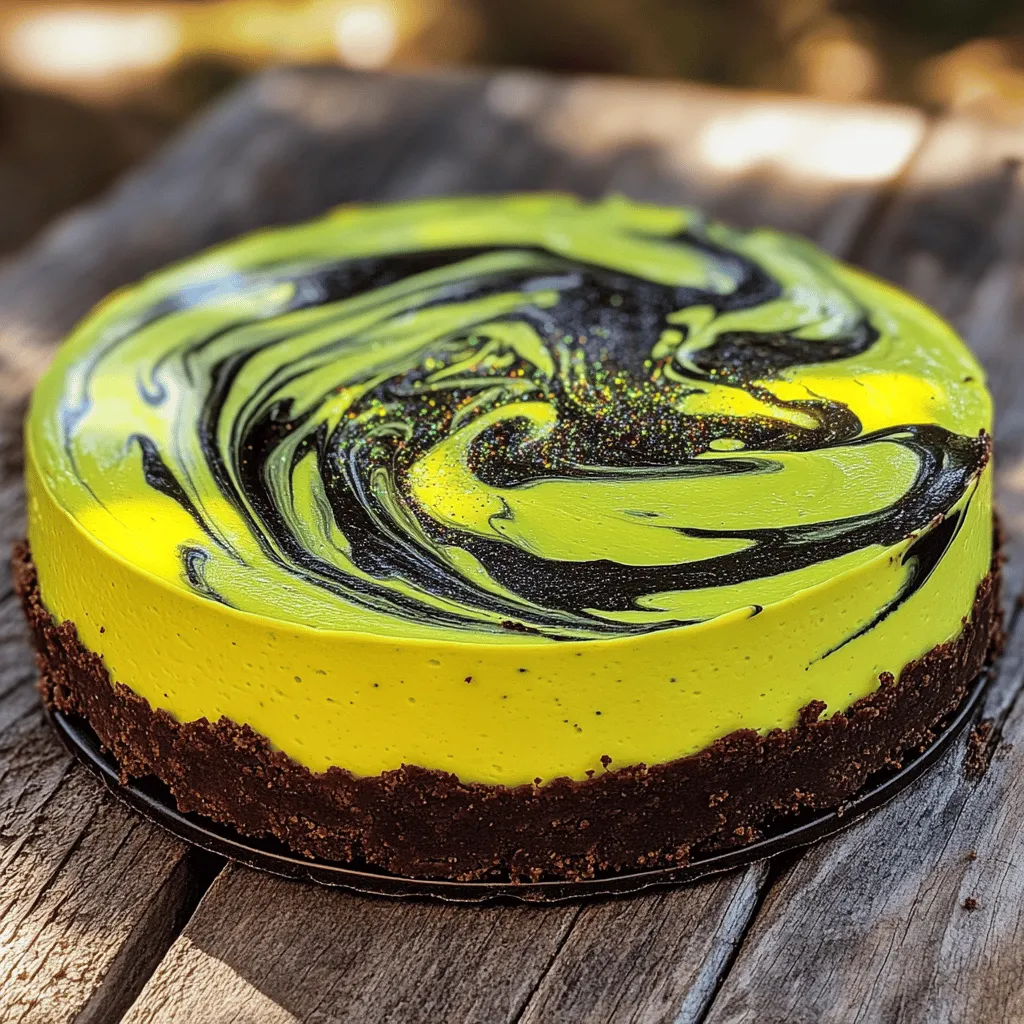
Embrace the spooky season with my Witches’ Brew Cheesecake! This delight combines rich flavors with a fun twist, perfect for Halloween parties or a cozy night in. With simple steps …

Read more

Categories Desserts

Salted Caramel Brûlée Latte Irresistible Flavor Boost

July 28, 2025 by Chef Owen
- 1 cup strong brewed coffee or espresso - 1 cup milk (whole, almond, or oat) - 2 tablespoons caramel sauce (plus extra for drizzle) To craft the perfect Salted Caramel Brûlée Latte, start with the right base. Strong coffee or espresso gives you that bold flavor. Milk adds creaminess. You can choose whole milk for richness or almond and oat for a lighter touch. The caramel sauce brings sweetness and depth. - 1 tablespoon sugar (for brûlée topping) - 1/4 teaspoon sea salt - Whipped cream (for topping) Toppings make this drink special. A sprinkle of sugar on whipped cream creates the brûlée effect. The sea salt enhances the caramel flavor. Whipped cream adds a fluffy texture that pairs well with the drink’s warmth. - Pinch of cinnamon or nutmeg For those who enjoy a twist, a pinch of cinnamon or nutmeg can elevate your latte. These spices add warmth and an inviting aroma. They mix well with the caramel and coffee, making each sip delightful. For the complete process, check the Full Recipe for all the steps to create this delicious drink. Brew a strong cup of coffee or espresso. Use fresh coffee beans for the best taste. Let it cool slightly before using. This step helps blend the flavors well. Next, heat the milk in a small saucepan. Whisk it constantly until it gets frothy. Aim for a warm, creamy texture without boiling. You can use whole, almond, or oat milk depending on your taste. Now, stir two tablespoons of caramel sauce and a pinch of sea salt into the warm milk. Make sure everything mixes well. Pour this caramel-infused milk into your brewed coffee or espresso. Gently stir to combine. Top with whipped cream and a drizzle of extra caramel sauce. For the brûlée topping, layer a tablespoon of sugar on the whipped cream. Use a kitchen torch to caramelize the sugar. Aim for a golden, crispy layer. If you don't have a torch, broil it for a few minutes. Watch closely to avoid burning. Enjoy this delightful blend of flavors in your Salted Caramel Brûlée Latte! For the complete recipe, check out the Full Recipe section. To make your Salted Caramel Brûlée Latte shine, focus on frothing. Use whole milk for a rich taste and thick foam. Almond milk is great too, as it adds a nutty twist. If you want a lighter option, oat milk works well and gives a creamy texture. Heat your milk slowly, whisking until it’s frothy but not boiling. This method helps get that perfect foam on top. Burnt sugar ruins the fun of caramelization. To avoid this, keep a close eye on the sugar as it melts. Use low heat and stir often. If the sugar burns, it tastes bitter. For mixing, pour the caramel milk into the coffee slowly, ensuring they blend well. This step keeps the flavors even throughout your drink. Enjoy your latte with a sweet treat. Cookies or brownies match perfectly. If you want something lighter, a piece of fruit can work too. This latte is best in the morning or as a cozy afternoon pick-me-up. For the full recipe, check out the Salted Caramel Brûlée Latte section above. {{image_2}} You can change up the flavors in your Salted Caramel Brûlée Latte. Adding different syrups makes it fun. Try vanilla or hazelnut syrup for a twist. You can also create an iced version. Just brew your coffee, let it cool, and pour it over ice. Froth your milk separately and mix it in. The result is a refreshing take on this classic drink. If you want a lighter option, you can use sugar substitutes for the brûlée topping. Sweeteners like stevia or monk fruit can work well. They cut calories but keep the sweet taste. You can also switch to non-dairy milk. Almond, oat, or coconut milk add unique flavors. They are lower in calories and great for those who avoid dairy. Seasonal flavors can elevate your latte. For fall, consider adding pumpkin spice. Just stir it into your milk before mixing. For winter, peppermint syrup gives a festive touch. These flavors bring warmth and joy to your drink. Customize your Salted Caramel Brûlée Latte for every season and keep it exciting! For the full recipe, check out the Salted Caramel Brûlée Latte section above. To store leftover caramel sauce, place it in an airtight container. Keep it in the fridge. It will stay fresh for about two weeks. If you want to save it longer, you can freeze it. Just pour it into ice cube trays. This way, you can use small amounts later. Yes, you can pre-make some parts of this latte. Brew your coffee or espresso ahead of time. Store it in the fridge for up to three days. For the milk, you can heat and froth it in advance, too. Just reheat it gently before mixing it with coffee. This will save you time on busy mornings. For best taste, use fresh coffee beans. Once ground, use them within two weeks. Milk should be used by the date on the carton. Store it in the coldest part of your fridge. Caramel sauce, if homemade, should be used within two weeks. If you buy it, check the label for the best-by date. To make this latte, first brew a strong cup of coffee or espresso. Then, heat one cup of your choice of milk in a small pot. Whisk it until it’s warm and frothy. Stir in two tablespoons of caramel sauce and a pinch of sea salt. In a serving cup, combine the brewed coffee and caramel-infused milk. Top with whipped cream. For the brûlée topping, sprinkle sugar on the cream. Use a kitchen torch to caramelize the sugar until golden. If you don’t have a torch, broil it in the oven. Drizzle extra caramel sauce and finish with sea salt. Enjoy your drink warm! You can find a Salted Caramel Brûlée Latte at many popular coffee shops. Chains like Starbucks and Dunkin' often have this drink on their menu. Local cafes may also feature this tasty treat, especially in the fall and winter months. Check your neighborhood coffee shop for seasonal offerings. Yes, you can make this recipe fit many dietary needs. For a vegan option, use almond or oat milk instead of regular milk. Replace sugar with a sugar substitute for a low-sugar version. You can also skip the whipped cream or use a vegan whipped cream alternative. Always check labels to ensure all ingredients meet your dietary needs. Making this latte takes about 10 minutes. You will spend 5 minutes brewing coffee and heating milk. Mixing and topping the drink takes another 5 minutes. In total, you can enjoy this delicious latte in just 15 minutes. If you don't have a kitchen torch, you can caramelize sugar using your oven's broiler. After adding sugar to the whipped cream, place the cup in the oven. Keep a close eye on it to prevent burning. The sugar will melt and turn golden brown in just a few minutes. This method works well when you want a crispy topping without a torch. This guide covered how to make a delicious Salted Caramel Brûlée Latte. We explored the key ingredients, step-by-step instructions, and tips for success. Don't forget the fun variations you can try, along with proper storage tips. Now, you can enjoy this enjoyable drink any time you want. Happy brewing!

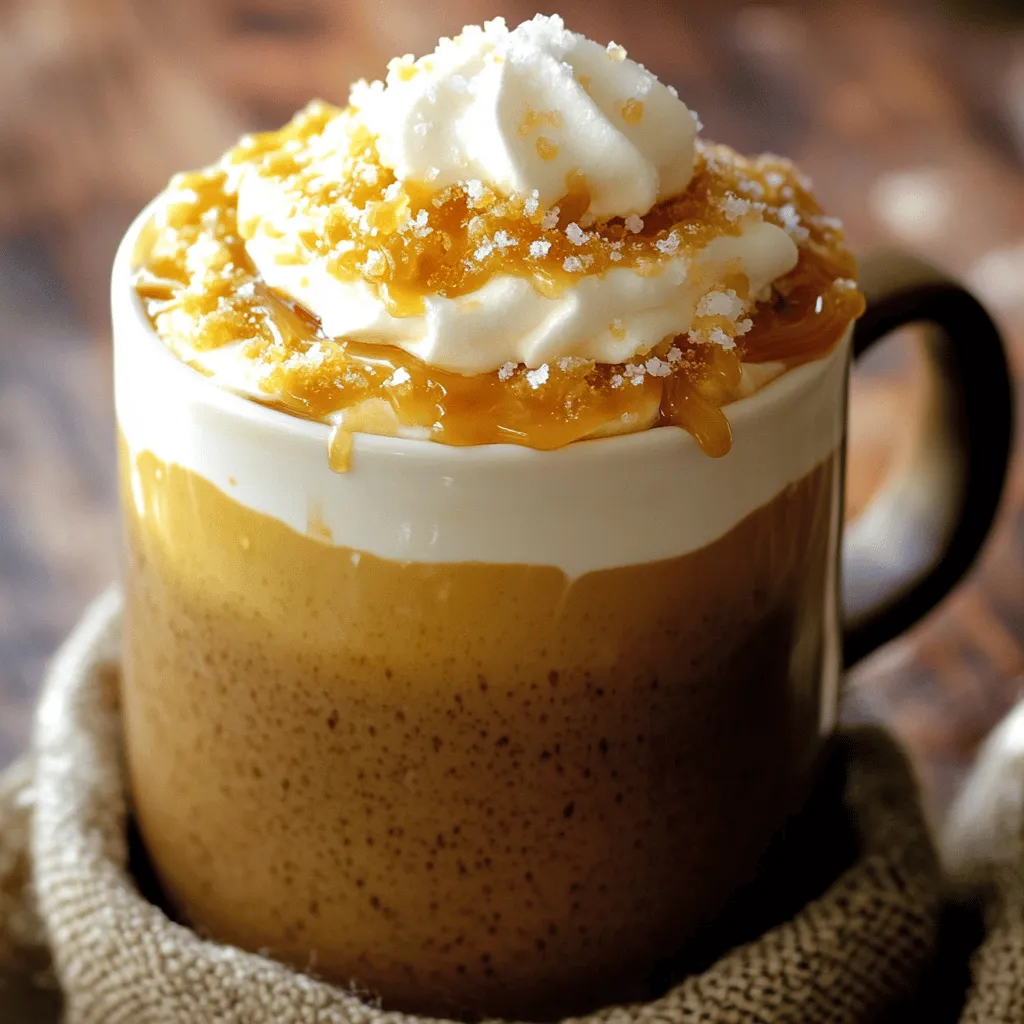
Are you ready to treat your taste buds? The Salted Caramel Brûlée Latte packs an amazing flavor punch. With rich coffee, creamy milk, and sweet caramel, it brings warmth to …

Read more

Categories Desserts

Egg and Cheese Breakfast Sandwich Easy and Tasty Meal

July 28, 2025 by Chef Owen
This recipe for a cheesy sunny-side-up delight is simple and tasty. You can whip it up in about 15 minutes. It uses fresh ingredients to create a filling breakfast. Plus, you can customize it to suit your taste. Here’s what you need for the perfect egg and cheese breakfast sandwich: - 2 large eggs - 2 slices of cheddar cheese - 1 English muffin, split in half - 1 slice of avocado - 1 tablespoon mayonnaise - Salt and pepper to taste - 1 teaspoon olive oil - Fresh arugula or spinach for garnish Each ingredient adds flavor and texture. The eggs provide protein. The cheese brings creaminess. The avocado adds healthy fats. Feel free to swap in your favorite items. You could use different cheese, like Swiss or pepper jack. For a spicy kick, add jalapeños or hot sauce. If you prefer a lighter option, skip the mayo or use Greek yogurt. You can even change the bread; try a bagel or a gluten-free option. These changes keep your breakfast exciting! First, I like to gather all my ingredients. This makes cooking easy and fun. You will need: - 2 large eggs - 2 slices of cheddar cheese - 1 English muffin, split in half - 1 slice of avocado - 1 tablespoon mayonnaise - Salt and pepper to taste - 1 teaspoon olive oil - Fresh arugula or spinach for garnish Next, toast the English muffin halves until they turn a lovely golden brown. This gives your sandwich a nice crunch. Now it’s time to cook the eggs. Grab a non-stick skillet and heat the olive oil over medium heat. Crack the eggs gently into the skillet. Be careful not to break the yolks. Season the eggs with a pinch of salt and pepper. Watch closely as the egg whites start to set. This takes about 2-3 minutes. When they look almost firm, lay one slice of cheddar cheese on each egg. Cover the skillet with a lid. This helps the cheese melt while the yolks cook to your liking. Now, let’s put your sandwich together. Spread a layer of mayonnaise on the toasted side of each muffin half. On the bottom half, add a slice of avocado. Then, place the cheesy egg on top. Finally, sprinkle fresh arugula or spinach over the egg. Place the top half of the muffin on your sandwich. Press down gently to compact the layers. You can now enjoy your delicious egg and cheese breakfast sandwich! For a detailed list of steps, check out the Full Recipe. To get the best yolk, cook your eggs over low heat. This slow cooking keeps the whites tender and the yolk runny. After cracking the eggs, let them sit for a minute. This helps the whites settle. You want the whites to be firm but the yolk soft. If you like it more cooked, cover the pan for a bit. This will steam the yolk just enough to set it. Seasoning can make or break your sandwich. Start with a pinch of salt and fresh ground pepper. You can also add a sprinkle of paprika or garlic powder for extra flavor. If you want some heat, a dash of hot sauce works great. Don't forget about fresh herbs like chives or parsley. They add a fresh taste that brightens the egg and cheese. Keeping your sandwich warm after making it is key. Wrap it in foil to trap heat. You can also place it on a warm plate. If you make extra sandwiches, use an oven set to low heat. Just place them inside, covered with foil, until you’re ready to eat. This way, every bite stays warm and tasty. {{image_2}} If you want a meat-free breakfast, there are many tasty swaps. Try adding sautéed mushrooms or roasted red peppers. These veggies add flavor and texture. You can also include fresh spinach or kale for extra nutrition. Instead of mayo, use hummus for a creamy spread. This makes your sandwich colorful and healthy. Love some spice? You can make your sandwich extra zesty. Add sliced jalapeños for a kick. You could also use hot sauce, like sriracha or chipotle. Just a few drops can change the whole taste. For a smoky flavor, try adding a sprinkle of smoked paprika. It gives a nice depth to your sandwich. Cheese is key to a great sandwich. While cheddar is classic, many cheeses work well. Try pepper jack for a spicy twist. Swiss cheese melts beautifully and adds a mild flavor. If you want something sharp, go for aged gouda. Each type of cheese adds a unique taste to your meal. Mix and match to find your favorite combo. For more ideas, check out the Full Recipe. To keep your egg and cheese breakfast sandwich fresh, store it in an airtight container. This helps prevent moisture loss and keeps the flavors intact. If you have leftover ingredients, like cheese or eggs, store them separately. Use them within two days for the best taste. When reheating, I recommend using a skillet. Heat it over medium-low heat. Place your sandwich in the skillet and cover it with a lid. This method warms the sandwich evenly and keeps the cheese melty. It takes about 5 minutes to heat through. You can also use a microwave. Place the sandwich on a microwave-safe plate, cover it, and heat for 30 seconds. Check it and heat more if needed. You can freeze the sandwich for quick meals later. Wrap it tightly in foil or plastic wrap. Place it in a freezer bag and remove as much air as possible. It keeps well for about a month. To enjoy, thaw it overnight in the fridge. Then, reheat it in a skillet or microwave. This keeps the taste fresh and delicious. Enjoy every bite! If you want the full recipe, check out the Cheesy Sunny-Side-Up Delight. Yes, you can prepare the parts of this sandwich ahead of time. Cook the eggs and store them in the fridge. You can also toast the muffin and keep it warm. When you are ready to eat, just assemble the sandwich. This saves time and makes mornings easier. I recommend using an English muffin for this sandwich. It has the perfect size and texture. The muffin gets crispy when toasted. You can also try bagels or sourdough bread if you want a different taste. Just pick what you enjoy most! You can easily adjust this recipe to fit your needs. For a dairy-free option, use vegan cheese. If you follow a gluten-free diet, choose gluten-free bread. You can also swap the eggs for tofu or chickpea scramble for a plant-based choice. Be creative and make it your own! Check out the Full Recipe for more tasty ideas! This blog post covered everything you need to create a great egg and cheese sandwich. You learned about key ingredients and various tasty options. Step-by-step instructions will help you cook the perfect sandwich. I shared tips to enhance flavor and keep your sandwich warm. You now know ways to store leftovers and even freeze them for meal prep. With these details, you can make a delicious and customized breakfast sandwich every time. Enjoy cooking!

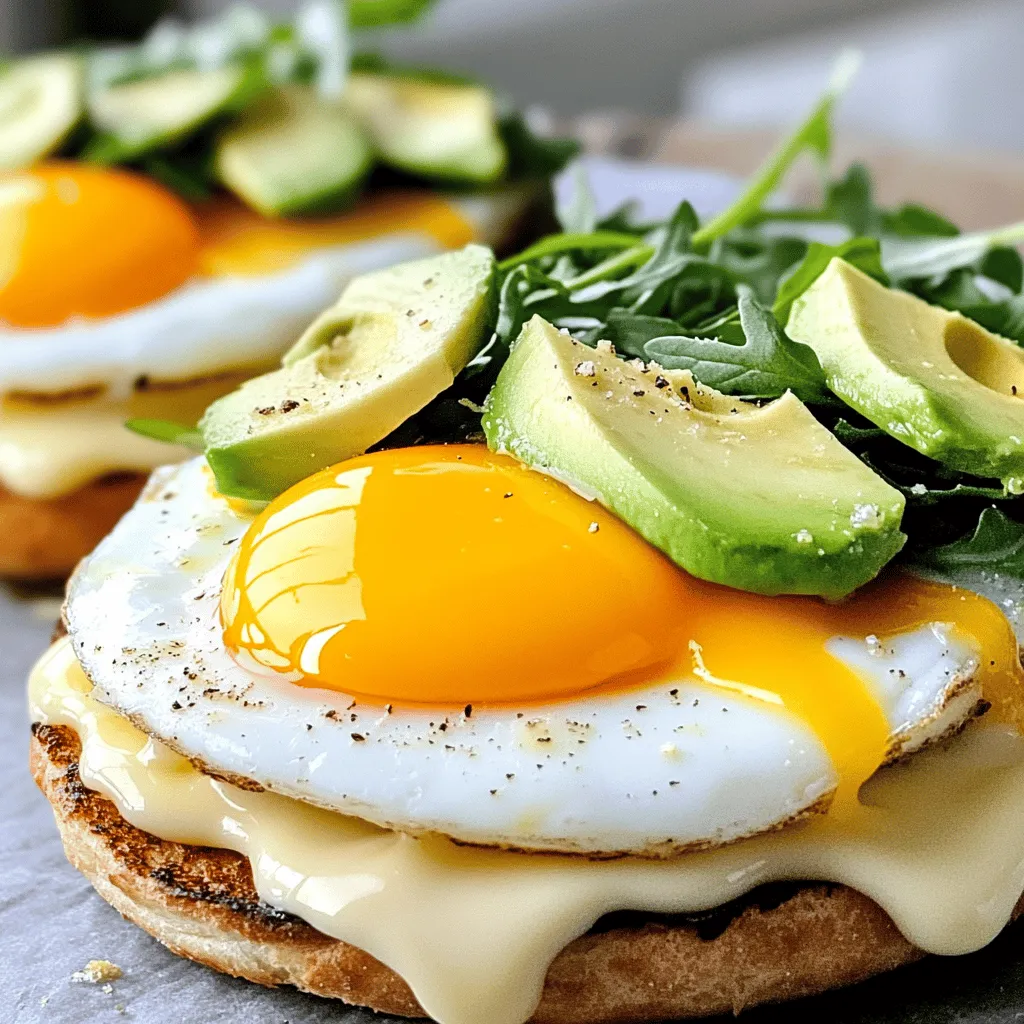
If you’re looking for a quick and tasty breakfast, the Egg and Cheese Breakfast Sandwich is your go-to! In this post, I’ll show you how to make a sandwich that’s …

Read more

Categories Breakfast

Neapolitan Millionaire Cake Delightful and Decadent Dessert

July 28, 2025 by Chef Owen
To make Neapolitan Millionaire Cake, you need the following: - 200g (7 oz) digestive biscuits, crushed - 100g (3.5 oz) unsalted butter, melted - 300g (10.5 oz) cream cheese, softened - 200g (7 oz) powdered sugar - 1 teaspoon vanilla extract - 200ml (7 fl oz) heavy cream, whipped - 150g (5.3 oz) dark chocolate, melted and cooled - 150g (5.3 oz) white chocolate, melted and cooled - 150g (5.3 oz) strawberry puree (fresh or store-bought) - Fresh strawberries for garnish - Chocolate shavings for decoration When choosing ingredients, quality matters. Opt for unsalted butter for better control of salt levels. Use full-fat cream cheese for a rich taste. Fresh strawberries enhance flavor and look. Choose high-quality chocolate for better melting and taste. These small choices make a big impact on your cake. For the best results, follow the ingredient list in the Full Recipe. To start, grab a mixing bowl. Combine 200g of crushed digestive biscuits with 100g of melted unsalted butter. Mix this together until the crumbs are fully coated. This step is key for a strong base. Next, press the mixture firmly into a 9-inch springform cake tin. Make sure to create an even layer. Use a flat-bottomed cup or your hands to help press down. Place this tin in the fridge for about 30 minutes to set. Now, let’s make the filling. Take another bowl and add 300g of softened cream cheese. Beat it until it’s smooth. Slowly add 200g of powdered sugar and 1 teaspoon of vanilla extract. Mix until everything blends well. Consistent mixing is very important here. Finally, gently fold in 200ml of whipped heavy cream. This will give your filling a light and fluffy texture. Time to add some flavor! Divide the cream cheese mixture into three equal parts. In one part, fold in 150g of melted dark chocolate. In the second part, add 150g of melted white chocolate. In the last part, mix in 150g of strawberry puree. Mixing carefully ensures each layer keeps its unique flavor. This layering creates a beautiful look and taste. Let’s put it all together! Remove the springform tin from the fridge. Start with the dark chocolate layer. Pour it in and spread it evenly. Next, add the white chocolate layer, followed by the strawberry layer. Smooth the tops with a spatula for a nice finish. Cover the cake with cling film and chill it in the fridge for at least 4 hours. Chilling overnight is even better. This helps all the flavors blend and sets the cake perfectly. Many people mess up the base. They don't press it hard enough. This makes the crust too crumbly. To fix this, press the crumbs firmly into the tin. Use the back of a measuring cup for even pressure. Another common mistake is under-mixing the cream cheese. This leads to lumps in the filling. Make sure to beat it until it's very smooth. If you see lumps, keep mixing. Lastly, some forget to chill the cake long enough. It needs at least four hours to set. If you skip this, it won't hold its shape. Always chill overnight for the best results. For a creamy cheesecake, use room-temperature cream cheese. Cold cream cheese makes it hard to mix. If it’s warm, it blends easily and gets fluffy. When you add the whipped cream, fold it in gently. This keeps the mixture light and airy. Over-mixing can make it dense. If you want a different look, try layering in a glass dish. This makes for a pretty presentation. You can see the colors and layers clearly. Garnish your Neapolitan Millionaire Cake with fresh strawberries. They add color and taste. Chocolate shavings also look great on top. For drinks, serve with coffee or a sweet dessert wine. Both pair well with the cake's rich flavors. You can also add a dollop of whipped cream on the side. This extra creaminess will make each bite even better. For the full recipe, check out the detailed steps provided. {{image_2}} You can change the flavors of your Neapolitan Millionaire Cake easily. Try using different fruit purees like mango, raspberry, or peach. Each fruit brings a new taste and color. For chocolate layers, swap dark chocolate with milk chocolate or even white chocolate for a sweeter twist. If you or your guests need gluten-free options, use gluten-free biscuits instead of regular ones. This keeps the base tasty and safe for all. To cut down on sugar, choose a sugar substitute in the cream cheese filling. You can also use low-fat cream cheese to reduce calories without losing flavor. To keep your Neapolitan Millionaire Cake fresh, wrap it well. Use plastic wrap or foil. This will help keep the moisture in and prevent it from drying out. Store it in the fridge for up to five days. If you want to enjoy it later, freezing is a great option. To freeze leftovers, first cut the cake into slices. Place each slice in an airtight container. You can also use freezer bags. Make sure to remove as much air as possible. This helps to prevent freezer burn. The cake can last up to three months in the freezer. When you're ready to eat, simply take out a slice. Let it thaw in the fridge for several hours. For a quicker option, you can leave it at room temperature for about an hour. Avoid using the microwave, as it can change the texture. Enjoy your delicious cake as if it were fresh! Neapolitan Millionaire Cake is a layered dessert that mixes chocolate, strawberry, and cream flavors. This cake has roots in Italy, where it celebrates the rich tastes of the region. It combines crunchy biscuits, creamy layers, and fruity puree. The cake is a feast for the eyes and the palate, making it a popular choice for special occasions. Yes, you can prepare this cake ahead of time. It actually tastes better when chilled overnight. I recommend making it a day before your event. This gives the flavors time to meld together. Just store it in the fridge, covered with cling film. You can enjoy the cake fresh and ready to serve the next day. To check if the cake is set, gently press the center with your finger. It should feel firm but springy. If it wobbles too much, it needs more time. Refrigerate it longer if needed. After chilling, the slices will hold their shape, and the flavors will be rich and delightful. You can use low-fat cream cheese or a dairy-free option. Both can work well in this recipe. Just ensure the cream cheese is soft for easy mixing. This way, your cake will still have a creamy texture. Experimenting can lead to fun new flavors. You now know how to make a Neapolitan Millionaire Cake from start to finish. We explored the key ingredients, step-by-step instructions, and common mistakes to avoid. I shared tips for perfect texture and helpful serving suggestions. Variations gave you ways to customize the cake for dietary needs or personal taste. Finally, we covered storage and freezing methods to keep your cake fresh. Enjoy creating this delightful dessert, and impress your friends with your skills. Remember, practice makes perfect!

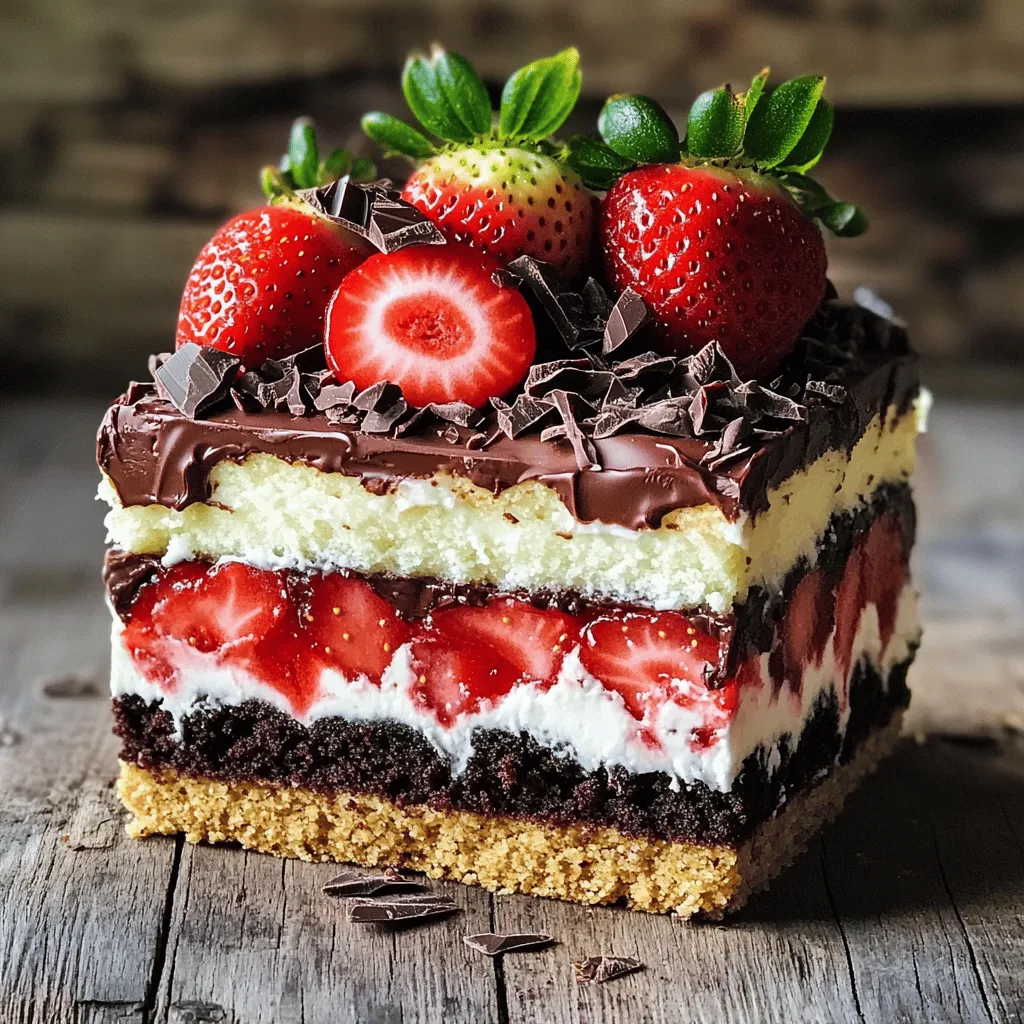
If you crave a dessert that sounds fancy but is easy to make, you’ve found it. The Neapolitan Millionaire Cake combines rich flavors and creamy textures that will impress anyone. …

Read more

Categories Desserts

Greek Yogurt Pumpkin Muffins Flavorful and Easy Recipe

July 28, 2025 by Chef Owen
- 1 cup canned pumpkin puree - 3/4 cup Greek yogurt - 1/2 cup brown sugar - 1/4 cup maple syrup - 2 large eggs - 1 1/2 cups all-purpose flour - 1 teaspoon baking soda - 1 teaspoon baking powder - 1 teaspoon pumpkin pie spice - 1/2 teaspoon salt - 1/2 cup chopped walnuts (or pecans) - Optional: pumpkin seeds for topping In this recipe, the pumpkin puree gives the muffins moisture and flavor. Using Greek yogurt makes the muffins soft and adds protein. Brown sugar and maple syrup give the muffins a warm, sweet taste. The dry ingredients are just as important. All-purpose flour provides structure. Baking soda and baking powder help the muffins rise. Pumpkin pie spice brings in all those cozy fall flavors. The salt balances the sweetness. For some crunch, you can add chopped walnuts or pecans. They add a nice texture. If you like, sprinkle some pumpkin seeds on top for extra fun. This mix of ingredients creates a muffin that is soft, fluffy, and bursting with flavor. For the full recipe, check out the complete instructions on how to make these delightful muffins. 1. Preheat your oven to 350°F (175°C). Line a muffin tin with paper liners or grease it lightly. 2. In a large mixing bowl, add the canned pumpkin puree, Greek yogurt, brown sugar, maple syrup, eggs, and vanilla extract. Mix these until smooth and creamy. 3. In another bowl, whisk together the flour, baking soda, baking powder, pumpkin pie spice, and salt. This helps combine the dry ingredients well. 1. Gradually add the dry mixture to the wet ingredients. Stir gently until just combined. Be careful not to overmix; this keeps the muffins light. 2. Fold in the chopped walnuts or pecans. These add a nice crunch. You can also add pumpkin seeds on top if you like. 1. Scoop the batter into the prepared muffin liners, filling each about two-thirds full. 2. Bake in your preheated oven for 18-20 minutes. Check doneness by inserting a toothpick into the center. If it comes out clean, they’re ready! To make great Greek yogurt pumpkin muffins, avoid overmixing. Mix the wet and dry ingredients until just combined. Overmixing can lead to tough muffins. For even baking, use a light-colored muffin pan. Dark pans can cause the muffins to brown too quickly. Also, rotate the pan halfway through baking. This helps all muffins bake evenly. Serve your muffins warm for a cozy touch. Place them on a colorful platter to catch the eye. You can drizzle honey on top for added sweetness. For garnishes, sprinkle some pumpkin seeds on each muffin. This adds a nice crunch and looks appealing. A dollop of cream cheese can also enhance the flavor. If your muffins turn out too dry, try adding a bit more Greek yogurt. This will add moisture. If they are too moist, bake them a few minutes longer. For high altitude adjustments, add a little more flour. You might also need to reduce liquid slightly. Humidity can affect the batter too. On humid days, use a bit less liquid to keep the right texture. For the full recipe, check back to make sure you follow the steps closely! {{image_2}} You can easily play with flavors in Greek yogurt pumpkin muffins. One fun option is to add chocolate chips. They bring a sweet touch that pairs nicely with pumpkin. Another great choice is dried cranberries. Their tartness gives a nice contrast to the muffin's sweetness. You can also try spice variations. Adding a bit more cinnamon or nutmeg can enhance the warm, cozy flavor. If you want a bolder taste, consider mixing in some ginger or allspice. Each of these options can turn your muffins into a unique treat. If you're looking for healthier options, you can make a few simple swaps. For lower sugar, consider using applesauce or mashed bananas instead of some brown sugar. You can also use maple syrup or honey to sweeten without adding too much sugar. For gluten-free muffins, substitute all-purpose flour with almond flour or oat flour. These flours keep the muffins moist while adding a different flavor. If you want to cut calories, use a sugar substitute like stevia or monk fruit sweetener. These alternatives can help you enjoy your muffins without the extra sugar. Seasonal ingredients can add exciting flavors to your Greek yogurt pumpkin muffins. In fall, try mixing in chopped apples or pears for a fruity twist. You can also fold in cranberries for a festive touch. For the holidays, consider adding peppermint extract for a refreshing flavor. Or, swap pumpkin pie spice for apple pie spice to change things up. By adapting the recipe this way, you can enjoy your muffins year-round with different flavors. Check out the Full Recipe for detailed instructions and tips. To keep your Greek yogurt pumpkin muffins fresh, store them at room temperature. Place them in an airtight container. This method works well for up to three days. If you want to keep them longer, freezing is your best option. Wrap each muffin tightly in plastic wrap. Then, place them in a freezer-safe bag. This way, they can last for up to three months. When you're ready to enjoy your muffins again, reheating is simple. The best method is to use your oven. Preheat it to 350°F (175°C). Place the muffins on a baking sheet for about 10 minutes. This warms them up and keeps them soft. If your muffins are frozen, let them thaw in the fridge overnight. Then, reheat them in the oven as mentioned. In an airtight container at room temperature, muffins last about three days. If stored in the fridge, they last up to a week. In the freezer, they can last for three months. Check for signs of spoilage like a sour smell or mold. If you notice these, it’s best to toss the muffins. Remember, fresh muffins taste the best! For the full recipe, check out the details above. Yes, you can use homemade pumpkin puree. It gives a fresh taste. However, canned pumpkin is more consistent in texture and flavor. Homemade may be a bit thinner, so you might need to adjust the liquid in the recipe. Both options are healthy and tasty. Just make sure the puree is smooth. Absolutely! If you have nut allergies, leave them out. You can replace nuts with seeds, like sunflower seeds or pumpkin seeds. You can also add chocolate chips for some sweetness. This way, you keep the texture and flavor without the nuts. To get fluffy muffins, do not overmix the batter. Mix until just combined for a light texture. Use fresh baking powder and baking soda. They help the muffins rise well. Also, fill the muffin cups about two-thirds full. This gives room for the muffins to expand. To make dairy-free muffins, swap Greek yogurt with a non-dairy yogurt. Coconut yogurt works great. You can also use almond milk or oat milk instead of regular milk. This way, you keep the moisture and flavor without dairy. To boost the pumpkin flavor, use pure pumpkin puree with no added spices. Adding a bit more pumpkin pie spice can help too. You may mix in some cinnamon or nutmeg for depth. These small changes make a big difference in taste. For the best results, check the [Full Recipe]. You now have a clear path to bake delicious pumpkin muffins. We covered essential and optional ingredients, step-by-step instructions, and helpful tips. Variations let you explore different flavors, so try them out! Proper storage and reheating keep your muffins fresh and tasty. Remember, adjusting for allergies or dietary needs is easy. With practice, you'll create delightful treats that everyone will enjoy. Keep experimenting, and happy baking!

Looking for a tasty and easy treat that captures the fall spirit? These Greek Yogurt Pumpkin Muffins are your answer! Packed with flavor and made with simple ingredients like pumpkin …

Read more

Categories Desserts

Healthy Chicken Wraps Easy to Make and Enjoy

July 28, 2025 by Chef Owen
To make healthy chicken wraps, you need these key ingredients: - 2 large whole wheat tortillas - 1 cup cooked chicken breast, shredded - 1 ripe avocado, mashed - 1 small cucumber, thinly sliced - 1/2 red bell pepper, julienned - 1/4 cup Greek yogurt These ingredients create a tasty base. The tortillas are soft and hold everything together. Chicken adds protein, while avocado gives healthy fats. Cucumber and red bell pepper add crunch and color. To elevate your chicken wraps, don’t forget these seasonings: - 1 tablespoon lime juice - 1 teaspoon garlic powder - 1 teaspoon paprika - Salt and pepper to taste These flavors bring life to your wraps. The lime juice adds zest. Garlic powder gives depth, and paprika adds a subtle warmth. Salt and pepper enhance everything, making your wrap delicious. Want to jazz up your wraps? Consider these add-ins: - Fresh cilantro leaves for garnish - Spinach or kale for extra greens - Diced tomatoes for added juiciness These options make your wraps unique. Fresh cilantro gives a burst of flavor. Greens add nutrition, while tomatoes bring freshness. You can mix and match these add-ins based on your taste and mood. For the complete recipe, check out the Full Recipe section. First, grab a medium bowl. Add the shredded chicken, Greek yogurt, lime juice, garlic powder, paprika, salt, and pepper. Mix it all together until the chicken is well-coated. This step is key to adding flavor to your wraps. You want the chicken to taste zesty and fresh. Now, lay one whole wheat tortilla flat on your counter. Spread half of the mashed avocado on it. This adds a creamy texture. On one side, place half of the chicken mixture. Next, add the sliced cucumber, julienned red bell pepper, and a few cilantro leaves for that fresh kick. To roll, start from the side with the filling. Tuck in the sides as you roll away from you. This keeps everything inside. Once rolled, slice the wrap in half diagonally. It looks great and is easy to eat. Serve these wraps right away or wrap them in parchment for lunch later. For the full recipe, check out the details above! Pick a tortilla that fits your taste and needs. Whole wheat tortillas add fiber. You can also try corn or spinach tortillas for a twist. Make sure they are soft and fresh. This helps them roll better and taste great. If you have leftover wraps, store them in the fridge. Wrap them in plastic wrap or foil to keep them fresh. They can stay good for up to three days. To reheat, use a skillet on low heat. This keeps the tortilla soft. You can also enjoy them cold for a quick snack. Make these wraps your own! If you're vegan, swap chicken for chickpeas or tofu. Use dairy-free yogurt instead of Greek yogurt. For low-carb options, try lettuce wraps instead of tortillas. This way, you can enjoy a meal that fits your diet. Feel free to add your favorite veggies or sauces to mix things up. {{image_2}} You can enjoy healthy chicken wraps even if you're gluten-free. Use gluten-free tortillas made from rice or corn. They taste great and hold the filling well. You can also use lettuce leaves as a wrap. This cuts carbs and adds a fresh crunch. If you want to cut carbs, try using low-carb tortillas. Many brands now make wraps with fewer carbs. You can also use cauliflower wraps. They add flavor and keep things light. These options make your wraps tasty and healthy. You can change the flavors in your wraps to keep them fun. For a spicy kick, add jalapeños or hot sauce. For a Mediterranean twist, use feta cheese, olives, and hummus. These flavors make your wraps exciting and unique. Try mixing and matching ingredients for endless options. For more ideas, check out the Full Recipe for Zesty Avocado Chicken Wraps. To keep your chicken wraps fresh, store them in the fridge. Wrap each one in plastic wrap or foil. This keeps moisture in and air out. They taste best when eaten within two days. If you have leftovers, be sure to check them for any signs of spoilage. If they smell off, it’s best to toss them. You can freeze chicken wraps, but it’s best to do it before adding fresh veggies. Wrap each one tightly in plastic wrap, then place them in a freezer bag. This helps prevent freezer burn. They can stay good for up to three months. When you are ready to eat, thaw them in the fridge overnight. Reheat your wraps in the microwave for about 30 seconds. This warms them up without making them soggy. You can also use a skillet. Heat it over medium heat and cook the wrap for about 2-3 minutes on each side. This gives it a nice crispness. Enjoy your tasty Zesty Avocado Chicken Wraps from the Full Recipe! To make chicken wraps healthier, start with whole wheat tortillas. They add fiber and nutrients. Use lean chicken breast and reduce sauces. Fresh veggies like spinach and tomatoes boost vitamins. You can also swap out cheese for avocado for healthy fats. Yes, you can make chicken wraps ahead of time. Prepare the filling and store it in the fridge. Assemble the wraps just before eating. This keeps the tortillas fresh and prevents them from getting soggy. If you don’t have Greek yogurt, try cottage cheese or sour cream. You can also use mashed avocado for a creamy texture. These options keep the wraps tasty while adding health benefits. Yes, these wraps are great for meal prep. You can make several wraps and store them in the fridge. Just wrap them in parchment paper to keep them fresh. They last up to three days, making them perfect for busy weeks. To keep wraps from getting soggy, add moisture last. Spread creamy ingredients like avocado or yogurt close to the center. Layer dry ingredients, like veggies, first. Wrap tightly to reduce air exposure, and store in a cool place. For the full recipe, check out the Zesty Avocado Chicken Wraps. In this post, I covered how to make healthy chicken wraps. We discussed the key ingredients and flavors that make wraps yummy. You learned easy steps to prepare, assemble, and serve your wraps. I shared tips for choosing tortillas and storing leftovers. We explored variations for gluten-free and low-carb options. Finally, I answered common questions about making wraps healthier and meal prepping. With these insights, you can enjoy delicious, healthy wraps any time. Get creative and have fun with your wraps!

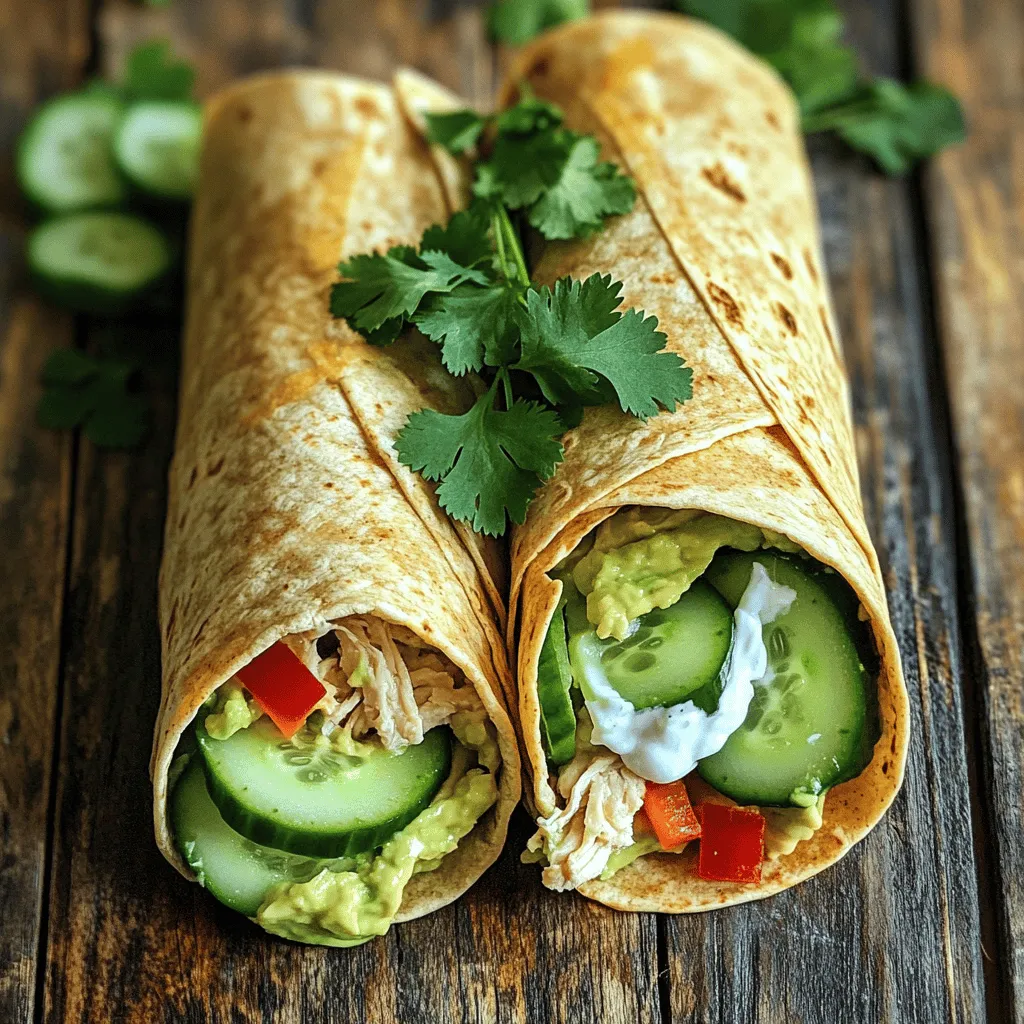
Looking for a tasty way to enjoy chicken? These Healthy Chicken Wraps are simple to make and great for any meal. Packed with nutrients and flavor, you can customize them …

Read more

Categories Dinner

Loaded Potato Soup Comforting and Hearty Delight

January 5, 2026July 27, 2025 by Chef Owen
- 4 large russet potatoes - 1 medium onion - 3 cloves garlic - 4 cups vegetable broth The main ingredients are the heart of this soup. Russet potatoes work best for their creamy texture. Dice the potatoes into even cubes for even cooking. The onion adds sweetness, while garlic brings depth. The vegetable broth serves as a flavorful base, making each bite rich and savory. - 1 cup heavy cream - 1 cup sharp cheddar cheese - ½ cup sour cream Dairy ingredients create that luxurious creaminess. Heavy cream makes the soup silky and rich. Sharp cheddar cheese adds a kick of flavor that blends well. Sour cream gives a tangy finish, balancing the richness perfectly. - 1 teaspoon smoked paprika - 1 teaspoon dried thyme - ¼ cup green onions - Salt and pepper Seasonings elevate the soup's flavor. Smoked paprika adds warmth and depth, while dried thyme introduces an earthy note. Don’t forget salt and pepper; they enhance all the flavors. Green onions on top add a fresh, crunchy garnish that brightens the dish. {{ingredient_image_2}} Start by heating a splash of olive oil in a large pot over medium heat. Once the oil shines, add the finely diced onion. Sauté the onion for about 5 minutes until it softens and turns clear. Then, add the minced garlic and cook for one more minute. Stir it well to release its lovely aroma. Next, toss in the cubed russet potatoes. Pour in the vegetable broth and bring the mix to a strong boil. Once it boils, lower the heat and cover the pot. Let it simmer for 15 to 20 minutes until the potatoes are tender and easy to pierce with a fork. After the potatoes are cooked, it’s time to blend. Use an immersion blender to puree the soup. Blend until it’s smooth and creamy. If you prefer some texture, blend just half of it. This keeps some potato chunks, which adds heartiness to the dish. Once blended, stir in the heavy cream, grated sharp cheddar cheese, and sour cream. Add the smoked paprika, dried thyme, salt, and freshly ground black pepper. Heat the soup gently for about 5 minutes. This allows the cheese to melt and flavors to mix. Finally, fold in the crumbled turkey bacon. Taste the soup and adjust the seasoning if needed. Ladle the creamy soup into bowls. For a nice touch, sprinkle chopped green onions on top and add a bit more cheese if you like. Enjoy your warm, comforting loaded potato soup! To make your soup creamy, choose the right blending method. I like to use an immersion blender. It gives a smooth texture without transferring hot soup to a blender. Blend until you see a velvety finish. If you prefer some chunks, blend only half the soup. You can adjust the creaminess by adding more heavy cream. Start with one cup, then taste. Add more if you want it richer. Balancing flavors is key to a great soup. Use smoked paprika and dried thyme to add depth. Start with one teaspoon of each. Taste your soup after adding these spices. If it needs more kick, add salt and pepper. Always taste as you go. This helps you find the perfect balance for your taste. How you serve your soup can make it even more appealing. Garnish with chopped green onions for color and crunch. Drizzle sour cream on top for a creamy finish. You can also add extra cheese for a rich touch. These small details make your soup look great and taste even better. Pro Tips Choose the Right Potatoes: For the best texture, use russet potatoes as they become fluffy and creamy when cooked. Season Gradually: Taste the soup as you go and adjust the seasoning in stages to achieve a well-balanced flavor. Texture Preference: If you prefer a chunkier soup, reserve some potato cubes before blending and add them back in after pureeing. Garnish Creatively: Elevate presentation by adding a swirl of sour cream and a sprinkle of fresh herbs or additional cheese on top before serving. {{image_4}} You can make this soup without meat. Use vegetable broth instead of chicken broth. Replace turkey bacon with a plant-based option. This keeps the soup tasty and hearty. For a vegan version, swap the heavy cream and sour cream with coconut milk or cashew cream. Nutritional yeast can add a cheesy flavor too. Want to boost flavor? Add fresh herbs like parsley or chives. They add a bright touch to the soup. You can also mix in different cheeses. Try gouda, mozzarella, or pepper jack for unique tastes. Each cheese brings a different creaminess and flavor profile. If you like heat, spice up your soup. You can add red pepper flakes or cayenne for extra kick. For a smoky flavor, use smoked paprika instead of regular paprika. This gives the soup warmth and depth. Adjust the spice to your taste for a comforting bowl. Loaded potato soup keeps well in the fridge for about 3 to 4 days. Store it in airtight containers to keep it fresh. Make sure the soup cools before sealing. This helps avoid extra moisture inside the container. You can also divide the soup into smaller portions for easy reheating. To freeze loaded potato soup, let it cool completely. Then, pour the soup into freezer-safe bags or containers. Make sure to leave space for expansion. The soup can last for up to 3 months in the freezer. When you're ready to eat, thaw it in the fridge overnight. For quicker thawing, place the bag in cold water. You can reheat the soup on the stove or in the microwave. For the stove, heat it gently over medium-low. Stir often to avoid sticking. In the microwave, use a microwave-safe bowl. Heat in short bursts, stirring in between. This helps keep the texture and flavor. If the soup thickens too much, add a splash of broth or cream. Yes, you can make Loaded Potato Soup ahead of time. This soup tastes even better the next day. To prep, follow these tips: - Cook the soup and cool it down. - Store it in an airtight container in the fridge for up to three days. - When ready to serve, reheat the soup on low heat. Stir often to keep it smooth. - You may need to add a splash of broth or cream for the best texture. Absolutely! You can use various potatoes for this soup. Here are some options: - Yukon Gold: Creamy and buttery taste. - Red Potatoes: Slightly sweet and hold their shape well. - Fingerling Potatoes: Unique shape and flavor, great for a twist. Each potato brings a different taste and texture to the soup. Experiment to find what you love best! Yes, Loaded Potato Soup can be gluten-free. Here’s what to check: - Vegetable broth: Ensure it is labeled gluten-free. - Cheese and sour cream: Most are gluten-free, but always check the labels. - Bacon: Most bacon is gluten-free, but some may have fillers. This soup can be safe for those with gluten allergies or sensitivities. Always read labels to be sure! You now have a clear recipe for making Loaded Potato Soup. We covered the main ingredients, steps, and customization options. I shared tips for making it creamy and flavorful while also offering ways to store it. Whether you want a classic version or a vegan twist, this soup can fit any need. Enjoy creating a warm bowl that brings comfort and joy to your table today.

If you’re craving a warm, hearty meal, look no further than loaded potato soup. This creamy delight combines simple ingredients to create a comforting bowl of goodness. Imagine rich flavors …

Read more

Categories Dinner

Amish Pumpkin Whoopie Pies Irresistible Fall Delight

July 27, 2025 by Chef Owen
- 2 cups all-purpose flour - 1 teaspoon baking powder - 1 teaspoon baking soda - 1 teaspoon ground cinnamon - ½ teaspoon ground nutmeg - ½ teaspoon ground ginger - ½ teaspoon salt - 1 cup sugar - ½ cup brown sugar, packed - 1 cup vegetable oil - 1 cup canned pumpkin puree - 2 large eggs - 1 teaspoon vanilla extract When I make Amish Pumpkin Whoopie Pies, I find that the right mix of ingredients is key. The flour gives structure, while the sugars add sweetness. The pumpkin puree makes them moist and flavorful. Each spice, like cinnamon and nutmeg, brings warmth that feels like fall. The oil keeps them soft, and the eggs help them rise. - 8 oz cream cheese, softened - ½ cup unsalted butter, softened - 2 cups powdered sugar - 1 teaspoon vanilla extract For the cream cheese filling, I use softened cream cheese and butter. They blend well and create a smooth texture. The powdered sugar adds sweetness, making each bite a treat. A touch of vanilla enhances the flavor, making it truly special. These ingredients come together to create a tasty dessert. You can find the full recipe in the article. Enjoy baking these delightful whoopie pies! - Preheat your oven to 350°F (175°C). - Line baking sheets with parchment paper. - In a medium bowl, whisk together: - 2 cups all-purpose flour - 1 teaspoon baking powder - 1 teaspoon baking soda - 1 teaspoon ground cinnamon - ½ teaspoon ground nutmeg - ½ teaspoon ground ginger - ½ teaspoon salt - Set aside the dry mixture. - In a large mixing bowl, blend together: - 1 cup sugar - ½ cup brown sugar, packed - 1 cup vegetable oil - Add to this mixture: - 1 cup canned pumpkin puree - 2 large eggs - 1 teaspoon vanilla extract - Beat until smooth and creamy. - Gradually mix in the dry ingredients until just combined. - Use a cookie scoop or a tablespoon to drop dollops of batter onto the prepared baking sheets. Leave about 2 inches between each dollop. - Bake for 12-15 minutes, or until the edges are firm. - Cool on racks after baking. Let them sit on the baking sheets for 5 minutes first. - In a bowl, beat together: - 8 oz cream cheese, softened - ½ cup unsalted butter, softened - Gradually add: - 2 cups powdered sugar - 1 teaspoon vanilla extract - Mix until smooth and creamy. - Take one cookie half and spread a generous amount of filling on the flat side. - Top with another cookie half. Press together gently. - Repeat until all cookies are filled. Follow these steps closely for the best Amish Pumpkin Whoopie Pies. For the complete recipe, check the Full Recipe section. - Always keep your ingredients at room temperature. This helps them mix better and creates a smoother batter. - Do not overmix the batter. This keeps your whoopie pies fluffy and light. Mix until just combined. - A sprinkle of cinnamon on top adds a nice touch. It looks pretty and enhances the flavor. - Arrange the whoopie pies on a festive platter. You can also wrap them in cellophane for a lovely gift. - Pair your whoopie pies with coffee or tea. This adds warmth and makes for a perfect snack. - These treats are great for gatherings. They also make thoughtful gifts for friends and family. Try making Amish Pumpkin Whoopie Pies using the Full Recipe. Enjoy the fall flavors! {{image_2}} You can easily adjust the flavor of your Amish pumpkin whoopie pies. For a sweet twist, add chocolate chips to the batter. This brings a rich, chocolaty goodness that pairs well with pumpkin. If you want some crunch, incorporate walnuts or pecans. The nuts add texture and a nice nutty taste that complements the spices. Feel free to get creative with the filling. You can experiment with flavored buttercream or even a marshmallow filling for a fun surprise. Each option adds a different layer of flavor and makes the pies even more special. If you crave something rich, try using a chocolate ganache. This adds a decadent twist that chocolate lovers will enjoy. For those with specific dietary needs, you can still enjoy these treats. To make a gluten-free version, simply substitute gluten-free flour in the recipe. This way, everyone can indulge without worry. If you want a healthier option, consider modifying sugars to natural sweeteners. This small change can make a big difference while keeping the pies delicious. For the full recipe, check out the detailed instructions that guide you through making these delightful treats. To keep your whoopie pies fresh, place them in an airtight container. This helps maintain their soft texture. If you use cream cheese filling, store them in the fridge for extra freshness. The cold helps prevent spoilage and keeps the filling creamy. If you want to save some for later, freezing is a great option. Wrap each pie in plastic wrap before placing them in a freezer bag. This keeps them safe from freezer burn. When ready to enjoy, thaw them at room temperature. This method helps retain their soft, moist texture. You should eat these delightful treats within 3-5 days for the best taste. If you freeze them, they can last up to 3 months. Just remember to label your containers with the date to keep track of freshness. Enjoying a whoopie pie should always be a tasty experience! Amish Pumpkin Whoopie Pies are a delightful dessert popular in Amish communities. These treats consist of two soft pumpkin cookies filled with a creamy filling. The cookies are moist and spiced, making them perfect for fall. Many families pass down this recipe through generations, celebrating their culture and traditions during harvest time. To make gluten-free Amish Pumpkin Whoopie Pies, substitute all-purpose flour with gluten-free flour. You can use a blend that mimics regular flour for the best texture. Ensure that your baking powder and baking soda are also gluten-free. This way, everyone can enjoy these tasty pies! Yes, you can use fresh pumpkin! To prepare fresh pumpkin puree, start by cutting the pumpkin in half. Scoop out the seeds and stringy bits. Roast it cut-side down on a baking sheet until soft, about 45 minutes. Once cooled, scoop the flesh and blend it until smooth. This fresh taste can make your whoopie pies even better! Whoopie pies differ from regular cookies in texture and filling. Cookies are usually crisp on the edges, while whoopie pies are soft and cake-like. The filling is what makes them special. It is a rich cream cheese mix that adds creaminess between the two cookie halves, creating a delightful treat. To make Amish Pumpkin Whoopie Pies in advance, bake the cookies ahead of time. Store them in an airtight container at room temperature for up to five days. You can also freeze the cookies for longer storage. When ready to serve, prepare the filling and assemble them just before enjoying. This keeps them fresh and tasty! In this post, we explored the delightful world of Amish Pumpkin Whoopie Pies, covering ingredients, steps, and tips. We learned how to create soft cookies filled with creamy goodness. Remember, you can personalize these pies with different flavors and fillings. Store them well to enjoy for days or even freeze for later. Happy baking! These treats are perfect for sharing or enjoying on your own. Enjoy every bite of your creation!

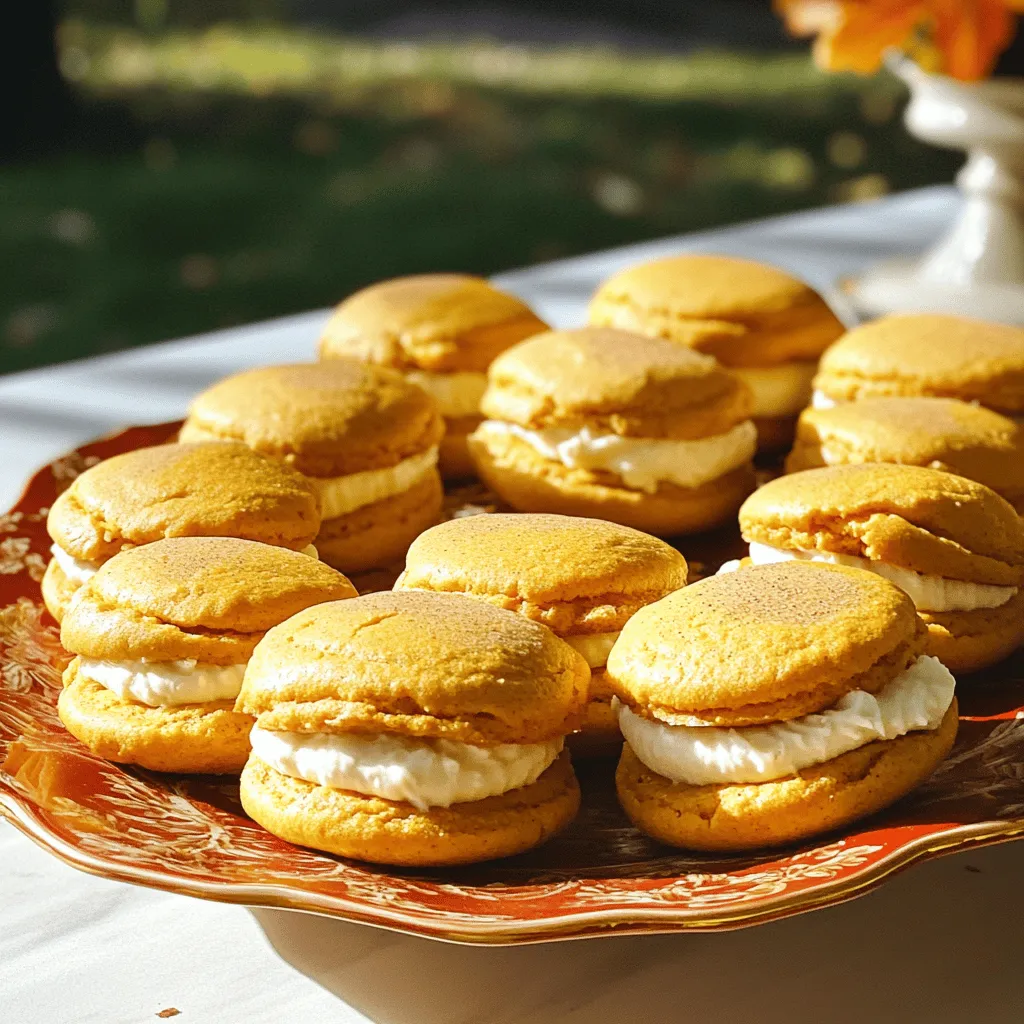
Fall is here, and nothing says cozy like Amish Pumpkin Whoopie Pies. These delightful treats, with their soft, cake-like cookies and creamy filling, offer the perfect taste of autumn. You’ll …

Read more

Categories Desserts

McGriddle Bites Flavorful Breakfast Delight Recipe

July 27, 2025 by Chef Owen
To make McGriddle Bites, you need simple yet tasty ingredients. Here’s what you’ll need: - 1 cup pancake mix - 1/2 cup milk - 1 large egg - 1/4 cup maple syrup - 1/2 teaspoon vanilla extract - 1/2 cup cooked sausage, crumbled - 1/4 cup shredded cheddar cheese - Cooking spray These ingredients blend well to make a sweet and savory bite that everyone will love. You can customize your McGriddle Bites with some fun add-ins. Try these options: - Sliced strawberries - Banana slices - Chocolate chips - Nuts These add-ins can add a twist to the flavor. You can mix and match based on what you like. Serving McGriddle Bites is easy and fun. Here are some ideas: - Drizzle extra maple syrup on top. - Serve with fresh fruit on the side. - Pair with yogurt for a creamy touch. - Add whipped cream for a sweet treat. Each serving can look great and taste even better. Enjoy your breakfast delight! For the complete recipe, check out the Full Recipe. First, gather all your ingredients. You need: - 1 cup pancake mix - 1/2 cup milk - 1 large egg - 1/4 cup maple syrup - 1/2 teaspoon vanilla extract - 1/2 cup cooked sausage, crumbled - 1/4 cup shredded cheddar cheese - Cooking spray - Optional: sliced strawberries or banana for serving In a mixing bowl, combine the pancake mix, milk, egg, maple syrup, and vanilla extract. Whisk until smooth. Make sure there are no lumps. Then, gently fold in the crumbled sausage and cheddar cheese. This adds great flavor. Next, heat a non-stick skillet over medium heat. Lightly spray it with cooking spray. Pour tablespoon-sized amounts of the batter onto the skillet. These should be small, bite-sized pancakes. Cook for 2-3 minutes until bubbles appear on the surface. Flip them and cook for another 2 minutes until golden brown. Keep them warm while cooking the rest. To make perfect McGriddle Bites, keep these tips in mind: - Use fresh ingredients for the best taste. - Don't overcrowd the skillet; give each bite space. - Adjust the heat if they cook too fast or slow. - Serve warm with extra maple syrup and fresh fruit. These small bites are fun and easy to enjoy! For more details, check the Full Recipe. To make perfect McGriddle Bites, follow these tips: - Use a non-stick skillet. This helps prevent sticking and makes flipping easy. - Preheat your skillet. This ensures even cooking and helps the bites rise. - Use a measuring spoon. Pour tablespoon-sized amounts for uniform size and even cooking. Many new cooks make the same mistakes. Here are some to watch out for: - Overmixing the batter. This makes the bites tough. Mix just until blended. - Not checking heat. If the skillet is too hot, the bites burn quickly. Start on medium heat. - Skipping the cooking spray. This can lead to sticking. Always grease the skillet lightly. Want to boost the flavor of your McGriddle Bites? Here are some ideas: - Add spices. A pinch of cinnamon gives a warm touch. - Experiment with cheese. Try pepper jack or gouda for a twist. - Top with fresh fruit. Sliced strawberries or bananas add a sweet touch. - Play with syrups. Use flavored syrups like blueberry or caramel for extra sweetness. With these tips, your McGriddle Bites will shine! For the full recipe, you can refer to the recipe section above. Enjoy your cooking! {{image_2}} You can easily make sweet McGriddle Bites. Just add berries like blueberries or strawberries. These fruits add a fresh, fruity taste. Try mixing in some chocolate chips for a treat. The melted chocolate brings a sweet twist to each bite. If you prefer savory flavors, add spices to your batter. A pinch of cayenne pepper gives a nice kick. You can also try using crumbled bacon instead of sausage. This adds a smoky flavor that pairs well with maple syrup. You might also sprinkle in some herbs like chives for extra zest. To make gluten-free McGriddle Bites, swap the pancake mix for a gluten-free blend. Many brands offer a mix that works well. Just check the label for the right ratio of liquid. This way, everyone can enjoy these bites, no matter their diet. For more details, you can check the Full Recipe. To keep your McGriddle Bites fresh, place them in an airtight container. Make sure they cool completely before sealing. Store them in the fridge for up to three days. This helps maintain their taste and texture. For longer storage, consider freezing them. When you are ready to enjoy your McGriddle Bites again, reheat them simply. You can use the microwave or a skillet. For the microwave, place them on a plate and heat for about 30 seconds. Check if they are warm enough. If using a skillet, heat on low for about two minutes, flipping halfway through. This keeps them soft and warm. To freeze McGriddle Bites, let them cool completely first. Place them in a single layer on a baking sheet. Freeze them for one hour. After that, transfer the bites to a freezer bag. Remove as much air as possible to prevent freezer burn. You can store them in the freezer for up to three months. When you want to eat them, thaw overnight in the fridge before reheating. For best results, enjoy them fresh! McGriddle Bites are small, sweet, and savory pancakes. They mix flavors of pancakes and maple syrup with sausage. Each bite is a tasty treat, perfect for breakfast or brunch. They are easy to make and fun to eat. You can skip the sausage for a meat-free version. Just use the pancake mix, milk, egg, maple syrup, and vanilla extract. Add different ingredients, like fruit or nuts, for extra flavor. Try blueberries or chocolate chips for a sweet twist. Yes, McGriddle Bites are usually available at fast-food places year-round. You can also make them at home anytime. With my recipe, you can enjoy them whenever you want. You can buy McGriddle Bites at many fast-food chains. They often serve them with breakfast meals. If you want to make them, you can find the ingredients at any grocery store. Homemade McGriddle Bites have about 200 calories per serving. This can vary based on the ingredients you use. For more details, check the Full Recipe for exact numbers. - 1 cup pancake mix - 1/2 cup milk - 1 large egg - 1/4 cup maple syrup - 1/2 teaspoon vanilla extract - 1/2 cup cooked sausage, crumbled - 1/4 cup shredded cheddar cheese - Cooking spray - Optional: sliced strawberries or banana for serving 1. Mix pancake mix, milk, egg, maple syrup, and vanilla in a bowl. Whisk until smooth. 2. Fold in the sausage and cheese. 3. Preheat a skillet over medium heat and spray it lightly. 4. Drop tablespoon-sized batter onto the skillet. Cook for 2-3 minutes until bubbles form. 5. Flip and cook for 2 more minutes until golden brown. 6. Keep warm while cooking the rest of the batter. Adjust heat to prevent burning. 7. Serve warm with extra maple syrup and optional fruit. McGriddle Bites shine when served warm. Top them with extra syrup for a sweet kick. Try adding sliced strawberries or bananas for freshness. You can also pair them with crispy bacon for a savory twist. A dollop of whipped cream or yogurt can enhance the fun, too. Enjoy these bites for breakfast or as a tasty snack any time! To sum up, we explored everything about McGriddle Bites. You learned the key ingredients, fun variations, and smart storage tips. Each step, from cooking to serving, helps you enjoy these bites. You can make them sweet or savory to suit your taste. Remember to avoid common mistakes for the best results. Now, you are ready to create delicious McGriddle Bites at home. Enjoy your cooking adventure!

Are you ready to transform your breakfast game? McGriddle Bites are a tasty twist on the classic McDonald’s favorite. In this post, I’ll share a simple recipe that brings together …

Read more

Categories Breakfast

Fresh Salsa Recipe Zesty and Flavorful Delight

July 27, 2025 by Chef Owen
- 4 ripe tomatoes, diced - 1 red bell pepper, finely chopped - 1 yellow bell pepper, finely chopped - 1 small red onion, finely chopped - 1 jalapeño, deseeded and minced - 1 cup fresh corn kernels (cooked) - 1/2 cup fresh cilantro, chopped - Juice of 2 limes - 1 teaspoon cumin - Salt and pepper to taste Fresh salsa is all about vibrant flavors. First, gather your fresh produce. Ripe tomatoes are key for sweetness. I love the contrast of red and yellow bell peppers. They add color and crunch. Don’t forget the red onion for some zing. Lastly, a jalapeño gives it that spicy kick. Next, let’s look at the additional ingredients. Fresh corn kernels bring a delightful sweetness. I always use cilantro for its fresh aroma. Lime juice brightens up the dish. A pinch of cumin adds depth. Salt and pepper tie everything together. You can find the full recipe above to get started! Using fresh ingredients makes a big difference. Fresh tomatoes, peppers, and herbs boost taste. They add bright colors and great crunch. Always pick ripe tomatoes for the best flavor. The right lime juice also helps. Adjust the lime juice to get the acidity just right. More lime adds zing, while less makes it mellow. You can choose how thick or thin you want your salsa. For a thick salsa, chop ingredients small and mix well. If you like it thin, add a bit of water or more lime juice. Want sweetness? Add more corn! Corn gives a nice pop and balances the spice. You can make your salsa mild, medium, or spicy. For mild salsa, skip the jalapeño or use less. For medium, keep one jalapeño with seeds. If you want it spicy, add two or three jalapeños. You can also try other peppers like serrano or poblano for different heat. Mix it up with different peppers. Try green bell peppers for a sweet touch. You can even add fruits like mango or pineapple. These fruits add sweetness and a tropical twist to your salsa. Get creative and find your perfect blend with the full recipe! To keep your fresh salsa tasty, store it in the fridge. Place it in an airtight container. It will last about 3 to 5 days. After that, it may lose flavor and freshness. Always check for any signs of spoilage. If it smells off or looks strange, it’s best to toss it. Freezing salsa is a great option too. Use freezer-safe bags or containers. Make sure to leave some space for expansion. Salsa can stay good in the freezer for about 2 to 3 months. When you're ready to eat it, thaw it in the fridge overnight. You can also use the microwave for a quick thaw. Don’t let any leftovers go to waste! You can use salsa in many ways. It works great as a topping for grilled meats or fish. Mix it into scrambled eggs or use it in quesadillas. You can even stir it into pasta for a zesty twist. Another fun idea is to use salsa as a salad dressing. Just mix it with a bit of olive oil. This adds a fresh taste to any salad. Remember, the goal is to enjoy your salsa and not let it sit in the fridge. Get creative and have fun with it! {{image_2}} Fresh salsa is packed with vitamins and minerals. Ripe tomatoes give you vitamin C and potassium. Bell peppers are rich in vitamin A and antioxidants. Red onions add flavor and contain quercetin, a health-boosting compound. Jalapeños offer vitamin B6 and capsaicin, which can boost metabolism. Corn brings fiber and energy. Overall, this salsa is a tasty way to get nutrients. Each serving of this zesty rainbow salsa has about 50 calories. It's light and perfect for snacks or meals. This salsa is low in fat and gluten-free. It fits well into many diets. You can enjoy it without worry. However, be mindful of possible allergens. The recipe includes jalapeños, which some may find spicy. Always check for sensitivities to any fresh ingredients. Enjoy the zesty flavor without stress! Homemade salsa lasts about 3 to 5 days in the fridge. Store it in an airtight container. After a few days, check for any changes in smell or color. If it looks or smells off, toss it out. Yes, you can make salsa in advance. Making it a few hours ahead allows flavors to blend. Just cover and chill it in the fridge. If you want to prep further ahead, try to keep ingredients separate, especially the tomatoes, to avoid sogginess. Fresh salsa pairs well with many dishes. You can serve it with tortilla chips for a snack. It also works great as a topping on tacos, grilled chicken, or fish. You can add it to salads for extra flavor, too. You can use canned ingredients, but fresh is best. Canned tomatoes can work in a pinch. Drain them well to reduce extra liquid. Canned peppers also add flavor, but fresh gives the salsa more crunch and brightness. The best type of tomato for salsa is a Roma tomato. They have fewer seeds and thick flesh. This makes the salsa less watery. If you can’t find Roma, any ripe, juicy tomato will work. Just make sure they are fresh for the best taste. For the full recipe, check out the Zesty Rainbow Salsa. In this blog post, we explored how to make fresh salsa. We covered the key ingredients, from ripe tomatoes to fragrant cilantro. I shared tips for preparation, mixing, and serving. Remember, using fresh produce brings the best flavor. You can customize the spice level to suit your taste. Storing salsa properly keeps it fresh longer, and you can easily use leftovers in other dishes. Enjoy making your salsa that is not only tasty but healthy, too. Dive into the world of fresh ingredients and create your perfect blend!

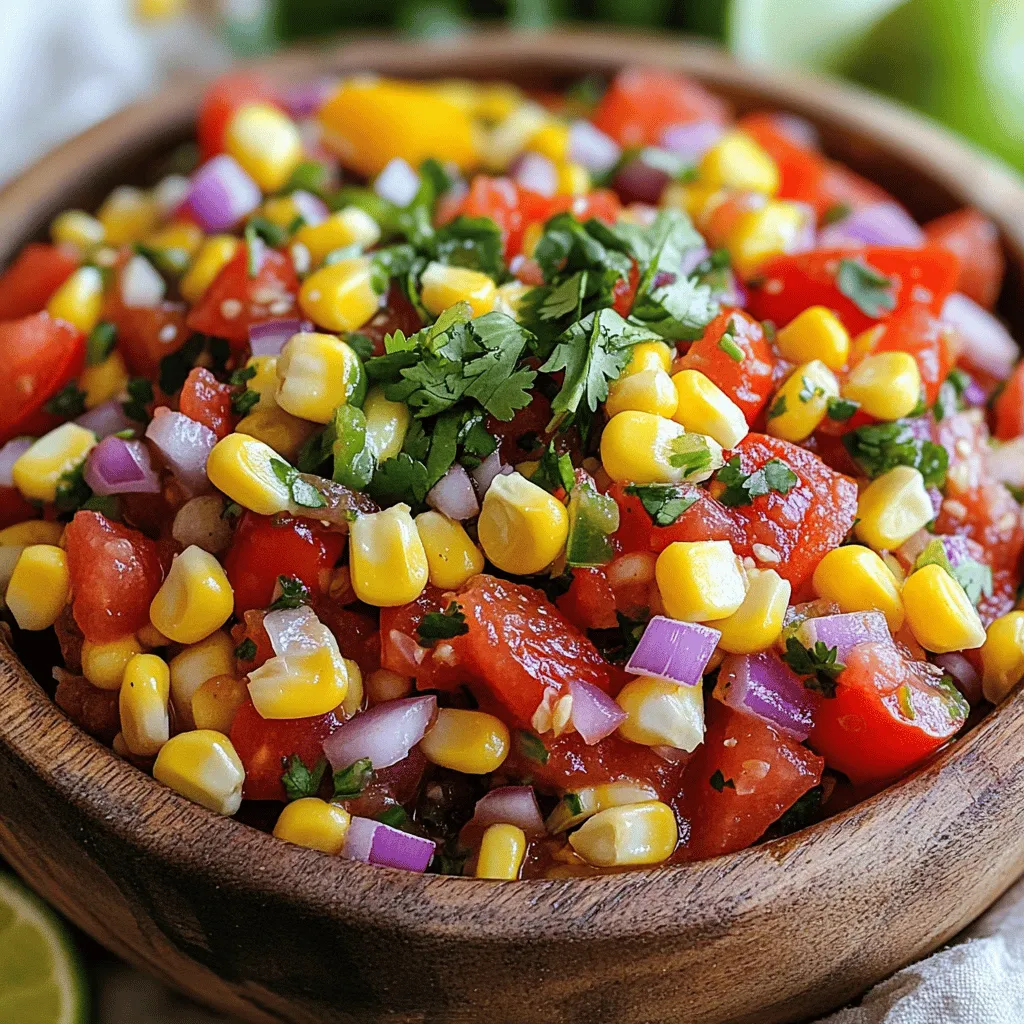
Are you ready to bring a burst of flavor to your meals? My fresh salsa recipe delivers a zesty and colorful delight that’s simple to make. With ripe tomatoes, crisp …

Read more

Categories Appetizers
Older posts
Newer posts
← Previous Page1 … Page61 Page62 Page63 … Page125 Next →

THE RECIPE HATCH

Where tasty ideas take flight! 🚀🐣 Fresh, easy recipes hatched daily to make cooking simple and flavorful.

PAGES

Home About Contact Privacy Policy Terms & Conditions Cookie Policy GDPR Policy Copyright Policy Disclaimer

CATEGORIES

Appetizers Desserts Salads Breakfast Dinner

Contact

  • Pinterest
  • Mail
Copyright © 2026 The Recipe Hatch. All rights reserved.