Iced Pumpkin Cream Chai Tea Delicious Fall Beverage
![To make a delightful Iced Pumpkin Cream Chai Tea, you will need: - 2 chai tea bags - 2 cups boiling water - 1 cup pumpkin puree - 1 cup milk (dairy or non-dairy) - 1/4 cup maple syrup (adjust to taste) - 1 tsp vanilla extract - 1/2 tsp pumpkin spice mix - Ice cubes - Whipped cream (for topping) - Cinnamon stick (for garnish, optional) These ingredients blend together to create a creamy, spiced drink that captures the essence of fall. You can elevate your drink with some tasty extras. Consider these options: - A sprinkle of nutmeg for more spice - A drizzle of caramel sauce for sweetness - Chocolate shavings for a rich twist - A dash of cayenne for heat These add-ins can personalize your chai tea, making it uniquely yours. Using high-quality ingredients makes a big difference. Here are some brands I trust: - Chai Tea: Look for brands like Tazo or Stash for robust flavors. - Pumpkin Puree: Libby’s is a classic choice for rich pumpkin taste. - Maple Syrup: Try Grade A maple syrup from Maple Grove Farms for a pure touch. - Milk: For dairy-free, choose Silk or Almond Breeze for creamy options. These brands ensure your iced pumpkin cream chai tea tastes great and feels special. For the full recipe, check [Full Recipe]. To start, you need to brew the chai tea. Boil 2 cups of water. Once it’s boiling, add 2 chai tea bags. Let them steep for about 5 minutes. This allows the tea to become strong and flavorful. After brewing, remove the tea bags. Set the tea aside to cool completely. Cooling is important to avoid melting the ice too quickly later. Next, we’ll blend the pumpkin cream mixture. In a bowl, add 1 cup of pumpkin puree. Pour in 1 cup of milk, which can be dairy or non-dairy. Then, add 1/4 cup of maple syrup. You can adjust this amount based on your taste. Also, include 1 tsp of vanilla extract and 1/2 tsp of pumpkin spice mix. Use a whisk to mix everything until it’s smooth. This blend will give your drink a rich and creamy texture. Now, it’s time to put the drink together. Grab a tall glass and fill it with ice cubes. Pour the cooled chai tea over the ice, filling the glass halfway. Next, gently pour the pumpkin cream mixture on top. This will create a beautiful layered look. For the finishing touch, add whipped cream on top and sprinkle with a pinch of cinnamon. If you like, you can also add a cinnamon stick for garnish. Stir gently before drinking to mix the flavors. Enjoy your Iced Pumpkin Cream Chai Tea! If you want to see the full recipe, check the section above. To get that smooth and creamy texture, whisk the pumpkin puree and milk well. This helps blend the flavors nicely. If you want it even creamier, try using full-fat coconut milk or heavy cream. These options add richness to your drink. Always mix until there are no lumps. This will ensure a delightful sip every time. Sweetness is key in this drink. Start with the 1/4 cup of maple syrup. Then, taste it. If you like it sweeter, add more syrup little by little. You can also swap maple syrup for honey or agave. These sweeteners can change the flavor a bit, so have fun experimenting. Just remember, you want the pumpkin and spices to shine through. Chilling your chai tea is important for the best flavor. After brewing the tea, let it cool at room temperature. Then, place it in the fridge for about 30 minutes. This will enhance the taste and keep your drink cold. For the best experience, serve it over fresh ice cubes. The cold temperature makes every sip refreshing and perfect for fall. Explore the [Full Recipe] for more details on making this tasty drink! {{image_2}} You can easily make this drink dairy-free. Just swap regular milk for almond, soy, or oat milk. Each option adds its own twist. Almond milk gives a nutty taste, while oat milk is creamier. For a vegan version, use maple syrup instead of honey. This way, everyone can enjoy this fall treat! Want to spice things up? Add a splash of caramel syrup for sweetness. You can also mix in a little nutmeg or ginger. These flavors pair well with pumpkin. Try using flavored chai tea, like vanilla or spiced chai. This will make your drink unique and tasty. If you prefer a warm drink, you can make a hot version. Just skip the ice and use hot chai tea. Mix your pumpkin cream as usual but heat it gently. Pour it into your favorite mug. Top with whipped cream and a sprinkle of cinnamon for that cozy feel. This hot drink is perfect for chilly days. For the full recipe, check out the section above! To store any leftover pumpkin cream, put it in an airtight container. This keeps it fresh. Place it in the fridge. Use it within three days for the best taste. If you want to save it longer, freeze it in small portions. Thaw it in the fridge when you want to use it again. If you have leftover chai tea, you can reheat it easily. Pour the tea into a small pot. Heat it on low until warm. Stir it gently to keep it smooth. You can also use the microwave. Heat it in short bursts of 30 seconds. Check it often to avoid burning. The shelf life of your pumpkin cream is about three to five days in the fridge. Always check for any off smells or changes in color. The chai tea can last up to a week if stored well. Keep it in a sealed container. For the best flavor, enjoy your iced pumpkin cream chai tea fresh. For full details on making this drink, check the full recipe. Yes, you can use different types of tea. While chai tea gives a warm spice, other teas work too. You might try black tea for a bold taste or green tea for a lighter flavor. Each tea adds its own twist to the drink. Experiment with herbal teas for a caffeine-free option. Just remember, the taste will change based on your choice. Yes, you can make this recipe sugar-free. Instead of maple syrup, use a sugar substitute like stevia or monk fruit. These options add sweetness without extra calories. Just be careful with the amounts, as some are sweeter than sugar. Taste as you mix until you find your perfect balance. The ingredients in iced pumpkin cream chai tea offer many health benefits. - Chai tea contains antioxidants that can help with digestion and boost immunity. - Pumpkin puree is full of vitamins A and C, which are good for your skin and eyes. - Maple syrup has minerals like zinc and manganese and can provide energy. - Milk adds calcium for strong bones and teeth, whether dairy or non-dairy. Each sip not only tastes great but also supports your health. Enjoy this drink knowing it’s both tasty and nutritious! In this post, we explored how to make delicious Iced Pumpkin Cream Chai Tea. We covered essential ingredients and optional add-ins to suit your taste. You learned step-by-step instructions for brewing the chai and blending the cream mixture. Tips helped you achieve the perfect texture and sweetness. You also discovered variations, storage tips, and answers to common questions. By following these steps, you can enjoy this delightful drink anytime. Enjoy experimenting with flavors and making it your own.](https://therecipehatch.com/wp-content/uploads/2025/07/792728b2-ea99-4f1f-bf9a-7ae782650262.webp)
Fall is here, and it’s time to enjoy a refreshing Iced Pumpkin Cream Chai Tea! This drink combines warm spices and pumpkin goodness, creating the perfect sip for chilly days. …
Fall is here, and it’s time to enjoy a refreshing Iced Pumpkin Cream Chai Tea! This drink combines warm spices and pumpkin goodness, creating the perfect sip for chilly days. …

Ready for a sweet treat that’s easy and fun to make? You’ll love these Sweet Churro Donut Bites! Crispy on the outside and soft on the inside, these bites are …

Looking for a quick and delicious snack? Let’s talk about Cheesy Pepperoni Roll-Ups! These tasty bites combine gooey cheese, savory pepperoni, and soft pizza dough into one mouthwatering treat. Perfect …
![To make the best blueberry muffins, you need a few simple ingredients. Here’s the full list: - 2 cups all-purpose flour - 1 cup granulated sugar - 1 tablespoon baking powder - 1/2 teaspoon baking soda - 1/2 teaspoon salt - 1/2 cup unsalted butter, melted - 2 large eggs - 1 teaspoon vanilla extract - 1 cup buttermilk (or milk + 1 tablespoon vinegar) - 2 cups fresh blueberries (or frozen, but thawed and drained) - Zest of 1 lemon (optional for flavor enhancement) These ingredients come together to create a soft and fluffy muffin bursting with blueberry flavor. If you need alternatives, don’t worry! Here are some options: - Dairy-Free: Use almond milk or oat milk instead of buttermilk. You can also swap butter for coconut oil. - Gluten-Free: Replace all-purpose flour with a gluten-free blend. Make sure it contains xanthan gum. - Lower Sugar: Reduce sugar to 3/4 cup or use a sugar substitute that measures cup-for-cup. These swaps can help you enjoy these muffins even if you have dietary needs. Fresh blueberries taste great. They have a juicy pop that adds a nice texture. However, frozen blueberries are also a good choice. They are often picked at peak ripeness and can be more affordable. When using frozen blueberries, remember to thaw and drain them first. This step helps keep the batter from turning purple. Both types work well, so choose what you have on hand! To make the best blueberry muffins, start with the ingredients. Gather your supplies and preheat your oven to 375°F (190°C). Line a 12-cup muffin tin with paper liners or grease it lightly. Next, mix your dry ingredients. In a large bowl, sift together 2 cups of all-purpose flour, 1 cup of granulated sugar, 1 tablespoon of baking powder, 1/2 teaspoon of baking soda, and 1/2 teaspoon of salt. This step helps to aerate the flour and mix the leavening agents evenly. Now, mix your wet ingredients. In another bowl, whisk together 1/2 cup of melted unsalted butter, 2 large eggs, 1 teaspoon of vanilla extract, and 1 cup of buttermilk. Make sure everything is well combined. Pour this mix into the dry ingredients. Use a spatula to gently fold them together. Be careful! Overmixing can make your muffins tough. A few flour pockets are okay. Add in the blueberries and optional lemon zest. Fold them in gently to keep the berries whole. Once mixed, scoop the batter into the muffin tin. Fill each cup about 2/3 full. Bake for 18-20 minutes. The muffins are done when a toothpick inserted in the center comes out clean. The tops should look golden brown. Let the muffins cool for 5 minutes in the pan. Then, move them to a wire rack to cool completely. - Prep Time: 15 minutes - Cooking Time: 18-20 minutes - Total Time: 35-40 minutes - Servings: This recipe makes 12 muffins. A visual guide helps you follow along. Look for images showing each step. This can include pictures of mixing the batter, filling the muffin cups, and the final baked muffins. Watching a video of the process can also guide you. It’s fun to see how the muffins rise and turn golden! Muffin baking can be tricky. Here are some mistakes to avoid: - Overmixing the batter: Mix just until wet. Small flour pockets are fine. - Not preheating the oven: Always preheat your oven. This helps muffins rise well. - Using old baking powder: Check the date. Fresh baking powder is key for fluff. Fluffiness is vital for great muffins. Here are my top tips: - Use room temperature ingredients: Eggs and buttermilk mix better when they’re warm. - Fold, don’t stir: Gently fold in dry and wet ingredients to keep air in the batter. - Add a splash of vinegar: A bit of vinegar with baking soda can boost fluffiness. Mixing well is crucial for tasty muffins. Follow these steps: - Sift dry ingredients: This adds air, making muffins light. - Combine wet and dry separately: Whisk wet and dry in separate bowls first. - Use a spatula: A spatula helps you fold gently without breaking blueberries. For more details, check the Full Recipe. {{image_2}} You can make blueberry muffins even better with a few tweaks. Adding lemon zest brightens the flavor. It gives a fresh and zesty kick. You can also try spices like cinnamon or nutmeg. These spices add warmth and depth to your muffins. Just a pinch can change everything! Want to mix things up? You can add more than just blueberries. Nuts like walnuts or pecans give a nice crunch. Chocolate chips are a fun choice, too. They melt and make the muffins extra sweet. You could even try coconut flakes for a tropical twist. The options are endless! You can change the recipe to fit your health goals. Use whole wheat flour instead of all-purpose flour. This adds fiber and nutrients. You can also lower the sugar by using a natural sweetener like honey or maple syrup. If you want to cut calories, try using applesauce instead of butter. These small changes keep the muffins tasty while making them healthier. For the full recipe, check here: [Full Recipe]. Once your blueberry muffins cool, store them in an airtight container. This keeps them fresh. Place parchment paper between layers to avoid sticking. You can also use a zip-top bag. Make sure to squeeze out as much air as possible. This method keeps your muffins soft and moist. Freezing is great for long-term storage. Muffins can last up to three months in the freezer. Wrap each muffin in plastic wrap, then place them in a freezer bag. This prevents freezer burn. Refrigerating muffins is okay but can dry them out. They last about one week in the fridge. If you want freshness, freezing is the best choice. To reheat muffins, use your oven for the best results. Preheat it to 350°F (175°C). Place muffins on a baking sheet for about 5-10 minutes. This brings back their warm, soft texture. If you’re in a hurry, use the microwave. Heat them for 15-20 seconds. Just be careful not to overheat, or they can become tough. Enjoy them warm for the best flavor! The best blueberry muffins are moist and fluffy. They have a perfect balance of sweetness and tartness. The secret lies in using fresh blueberries and good quality ingredients. Mixing wet and dry ingredients separately helps. This gives you a light texture. Adding lemon zest enhances the flavor. It adds a bright note that pairs well with blueberries. Yes, you can use other berries! Raspberries, blackberries, or strawberries work well. Just remember to adjust the amount slightly. Each berry has its own tartness and sweetness. Mixing different berries can give a fun twist to your muffins. Be sure to chop larger berries into smaller pieces for even baking. Check for a golden brown top. Insert a toothpick into the center. If it comes out clean, they are done. The muffins should spring back when lightly touched. If the toothpick has batter on it, bake for a few more minutes. Keep an eye on them to avoid overbaking. Each muffin has roughly 200 calories. They contain about 8 grams of fat. You will find around 30 grams of carbs and 3 grams of protein. The muffins also provide fiber, thanks to the blueberries. For exact numbers, it’s best to calculate based on the specific brands you use. In this article, we explored how to make the best blueberry muffins. We covered the key ingredients, baking steps, and useful tips to avoid common mistakes. You learned about storage options, healthy variations, and answers to frequently asked questions. Enjoy making these muffins with fresh or frozen berries. With the right approach, your muffins will be fluffy and delicious every time. Embrace your creativity and share your muffin masterpieces with others!](https://therecipehatch.com/wp-content/uploads/2025/07/5e21f498-af98-4649-bb50-dbc98ec91b7f.webp)
If you’re craving a delicious treat that’s easy to make, this blueberry muffin recipe is for you! Here, I’ll share my best tips and tricks to ensure your muffins are …
![To make small batch pumpkin cinnamon rolls, you need fresh and simple ingredients. Here’s the list to get you started: - 1 cup all-purpose flour - 1/4 cup canned pumpkin puree - 1/4 cup milk - 2 tablespoons sugar - 1 tablespoon unsalted butter, melted - 1/2 teaspoon baking powder - 1/4 teaspoon baking soda - 1/4 teaspoon salt - 1 teaspoon ground cinnamon - 1/4 teaspoon nutmeg - 1 tablespoon brown sugar (for filling) - 1 tablespoon unsalted butter, softened (for filling) - 1/2 cup powdered sugar (for frosting) - 1 tablespoon milk (for frosting) - 1/2 teaspoon vanilla extract (for frosting) Using these ingredients, you can create warm, soft rolls that are perfect for any time. The pumpkin gives a nice flavor and moistness. Plus, the spices add warmth. This recipe is great for a cozy morning or a sweet treat. For the full recipe, check out the details above. 1. Mixing dry ingredients: Start by taking a mixing bowl. Add 1 cup of all-purpose flour, 1/2 teaspoon baking powder, 1/4 teaspoon baking soda, 1/4 teaspoon salt, 1 teaspoon ground cinnamon, and 1/4 teaspoon nutmeg. Whisk these ingredients together until they blend well. This mix adds flavor and structure to your rolls. 2. Combining wet ingredients: In another bowl, mix 1/4 cup of canned pumpkin puree, 1/4 cup milk, 2 tablespoons sugar, and 1 tablespoon melted unsalted butter. Stir until this mixture is smooth. The pumpkin gives moisture and richness. 3. Forming the dough: Gradually add the dry mix to the wet mix. Stir until a dough forms. If it's too sticky, add a little more flour. Once mixed, transfer it to a floured surface. Knead gently until smooth. This step brings everything together. 1. Rolling out the dough: Roll the dough into a rectangle about 1/4 inch thick. Make sure to keep the shape even. This helps your rolls cook evenly and look nice. 2. Spreading butter and sugar mixture: Take 1 tablespoon softened unsalted butter. Spread it evenly over the dough. Then sprinkle 1 tablespoon brown sugar and a little extra cinnamon on top. This mixture will create that sweet filling. 1. Slicing the dough: Starting from one edge, tightly roll the dough into a log shape. Pinch the seam to seal it. Then, slice the rolled dough into 4-6 equal pieces. Place these in a greased small baking dish. 2. Baking the rolls: Preheat the oven to 350°F (175°C). Bake the rolls for 15-18 minutes, or until they turn lightly golden brown. Keep an eye on them; you want a nice color. 3. Making the frosting: While the rolls bake, whisk together 1/2 cup powdered sugar, 1 tablespoon milk, and 1/2 teaspoon vanilla extract in a bowl. Mix until smooth. This sweet topping adds the perfect finish. These steps make the small batch pumpkin cinnamon rolls fresh and soft. For more detailed instructions, check out the Full Recipe. To make great pumpkin cinnamon rolls, dough consistency is key. You want your dough to be soft but not sticky. If your dough feels too wet, add a little more flour. When rolling the dough, keep it even. Dust your surface with flour to prevent sticking. Roll from one edge to the other, using gentle pressure. This helps keep the filling inside. These rolls taste great on their own. You can also serve them with cream cheese or maple syrup. A sprinkle of nuts adds a nice crunch. Pair them with a warm drink like apple cider or coffee for a cozy treat. Using the right tools helps make the process easy. A rolling pin is essential for flattening the dough. A sharp knife or dental floss works well for slicing the rolls. A small baking dish keeps the rolls snug as they rise and bake. For the frosting, a whisk is perfect for achieving a smooth texture. For the complete recipe, check the Full Recipe. {{image_2}} You can easily change the flavors of your pumpkin cinnamon rolls. Here are a few fun ideas: - Adding nuts or raisins: Chopped nuts like pecans or walnuts add a nice crunch. If you prefer a sweet touch, toss in some raisins. Simply sprinkle them on the filling before you roll the dough. - Using different spices: While cinnamon and nutmeg are classic choices, you can try other spices. Ginger or allspice can give your rolls a warm twist. Mix and match to find your favorite blend! Want to make these rolls gluten-free? It’s simple! Just swap the all-purpose flour for a gluten-free flour blend. Make sure to choose one that works well for baking. This change keeps the rolls soft and tasty without gluten. If you’re looking for a vegan option, you can easily modify this recipe. - Dairy-free alternatives for ingredients: Use almond milk or soy milk instead of regular milk. For the butter, try coconut oil or a vegan butter substitute. The rolls will still taste great! These variations make your small batch pumpkin cinnamon rolls even more exciting. Enjoy experimenting with flavors that you love! For the complete recipe, check out the [Full Recipe]. To keep your small batch pumpkin cinnamon rolls fresh, you have a few options. First, let them cool completely before storing. You can place them in an airtight container. This will help them stay soft. If you want to keep them for longer, try freezing them. Wrap each roll tightly in plastic wrap. Then, place them in a freezer bag. This keeps out air and helps prevent freezer burn. When you're ready to eat, just thaw them in the fridge overnight. Warming up your cinnamon rolls is easy and quick. You can use a microwave for fast results. Just place one roll on a plate and heat it for about 15-20 seconds. If you prefer a crispy texture, use an oven. Preheat it to 350°F (175°C). Place the rolls on a baking sheet and heat them for about 5-10 minutes. This way, they will be warm and soft. These delightful rolls stay fresh for about 2-3 days at room temperature. If you store them in the fridge, they can last up to a week. However, for the best taste, enjoy them within the first few days. If you freeze them, they can last for up to 3 months. Just remember to check for any signs of freezer burn before eating. Don't forget to check the [Full Recipe] for more details! What can I substitute for pumpkin puree? If you don't have pumpkin puree, you can use mashed sweet potato. You can also use butternut squash puree. Both options give a similar taste and texture. Can I make the dough in advance? Yes, you can make the dough ahead of time. Wrap it tightly in plastic wrap and store it in the fridge. Use it within 24 hours for the best results. How do I know when the rolls are done? The rolls are done when they are lightly golden brown. A toothpick inserted into the center should come out clean. Can I use a different frosting? Absolutely! You can use cream cheese frosting for a richer taste. A simple glaze of milk and powdered sugar works well too. What drinks pair well with cinnamon rolls? Cinnamon rolls pair great with coffee or chai tea. You can also enjoy them with warm apple cider for a cozy treat. Why did my rolls not rise? If the rolls did not rise, your yeast might be old. Always check the expiration date. Make sure your dough is in a warm place to rise. What can I do if the dough is too sticky? If the dough is too sticky, add a little more flour, one tablespoon at a time. Knead it gently until it feels smooth and manageable. Making pumpkin cinnamon rolls is both fun and rewarding. We covered the key ingredients, from flour to spices. I shared step-by-step instructions to guide you through mixing, rolling, and baking. Helpful tips enhanced your baking skills, while variations let you customize your rolls. Remember to store them right to enjoy for days. Whether you want to tweak flavors or substitute ingredients, there are options for everyone. Dive into this treat and enjoy the delicious results you've created. Delicious rolls are just a bake away!](https://therecipehatch.com/wp-content/uploads/2025/07/bdf25746-fc3a-49db-8d43-dca916243040.webp)
Get ready to indulge in the cozy flavors of fall with these Small Batch Pumpkin Cinnamon Rolls! I’ll guide you through easy steps to create warm, soft rolls that are …
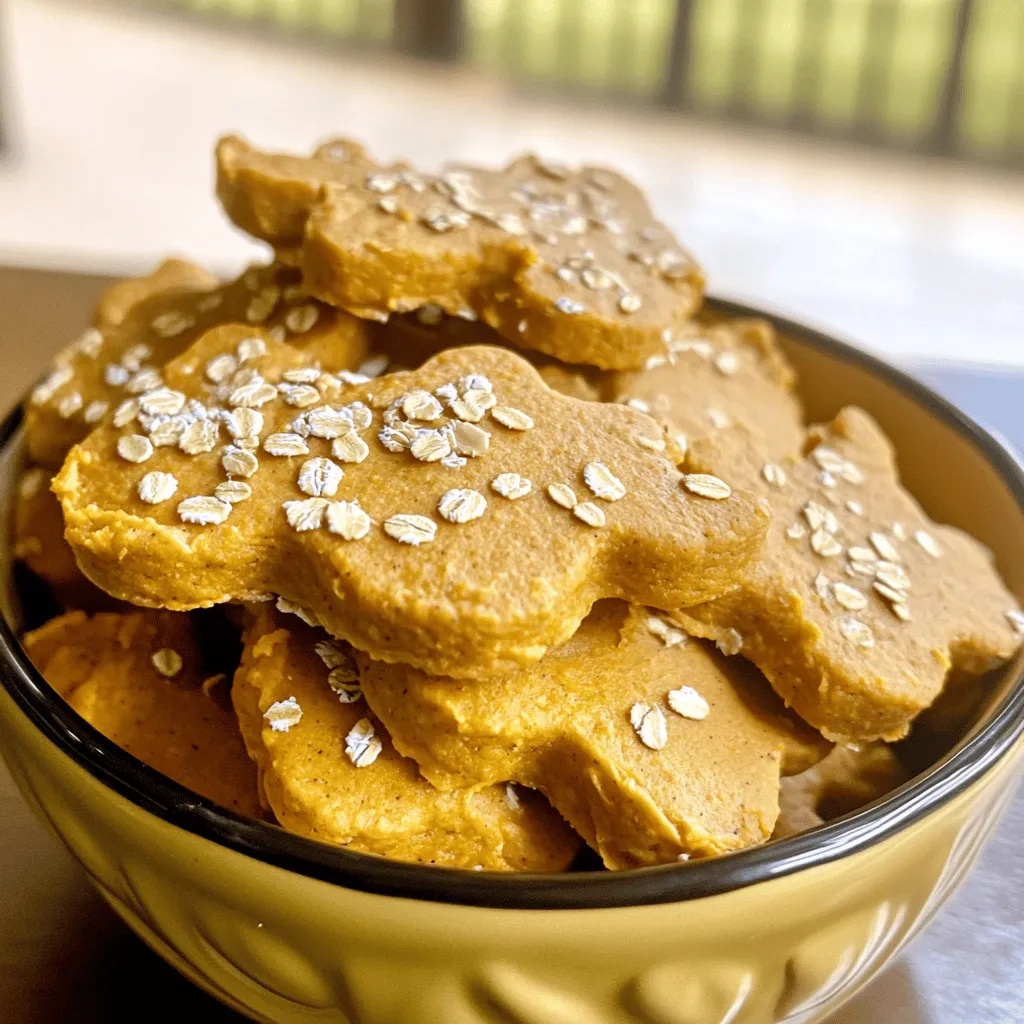
Are you ready to treat your furry friend to something special? These Easy Pumpkin No-Bake Treats for Dogs are tasty, simple to make, and packed with nutrition. You’ll only need …
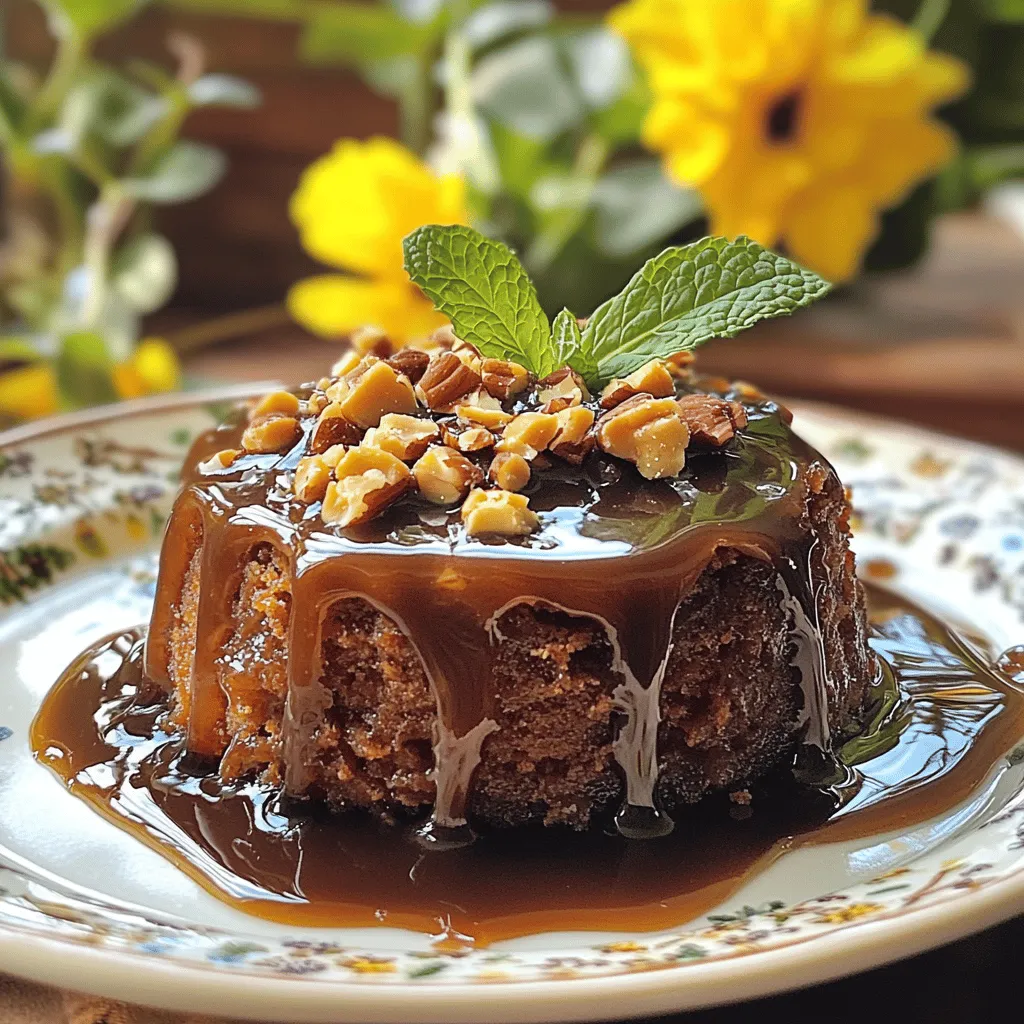
If you’ve never tasted sticky toffee pudding, you’re in for a treat! This warm, caramel-rich dessert is a classic that’s easy to make at home. With just a few simple …

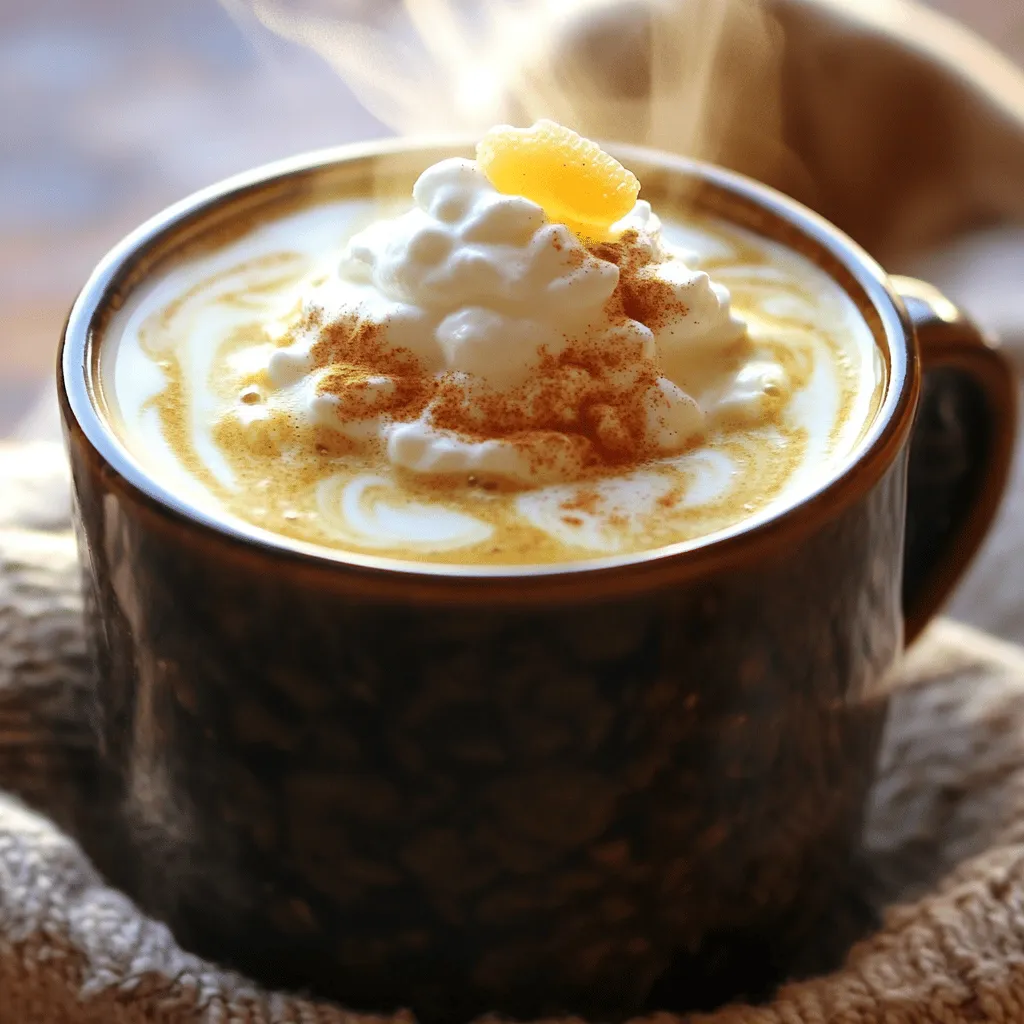
Are you ready to enjoy a delicious Iced Pumpkin Spice Latte? This creamy drink offers all the flavors of fall. I’ll guide you through the essential ingredients, easy steps, and …

Looking for a quick and fun snack? Cheesy Hot Dog Bites are perfect for any occasion! With just a few simple ingredients, you can whip up these mouthwatering treats that …
Looking for a boost to start your day? Ginger coffee combines the rich taste of coffee with the powerful benefits of ginger. Not only does it wake you up, but …