White Chocolate Pumpkin Snickerdoodles Irresistible Treat
![- 1 cup unsalted butter, softened - 1 cup granulated sugar - 1/2 cup packed brown sugar - 2 large eggs - 1 cup pumpkin puree (not pumpkin pie filling) - 3 1/2 cups all-purpose flour - 2 teaspoons cream of tartar - 1 teaspoon baking soda - 1/2 teaspoon salt - 1 tablespoon ground cinnamon - 1 teaspoon ground nutmeg - 1 teaspoon vanilla extract - 1 cup white chocolate chips - 1/4 cup granulated sugar (for rolling) - 1 tablespoon ground cinnamon (for rolling) Each ingredient plays a key role in the flavor and texture of the cookies. The unsalted butter gives a rich, creamy base. Using both granulated and brown sugar adds sweetness and depth. Brown sugar also helps keep the cookies soft. Eggs are crucial for binding the dough. Pumpkin puree adds moisture and a hint of fall flavor. When selecting pumpkin, remember to choose pure pumpkin puree, not the spiced pie filling. All-purpose flour gives structure to the cookies. Cream of tartar and baking soda work together to create a soft, chewy texture. I love using ground cinnamon and nutmeg for that warm, cozy taste. Don’t forget the white chocolate chips! They melt beautifully and add a sweet contrast to the pumpkin spice. Finally, rolling the cookies in cinnamon sugar gives them a lovely finish. For the complete recipe, check out the Full Recipe section. 1. Preheat the oven and prepare baking sheets: Start by preheating your oven to 350°F (175°C). This step is key for even baking. Line two baking sheets with parchment paper. This helps the cookies not stick and makes cleanup easy. 2. Cream the butter and sugars: In a large mixing bowl, add 1 cup of softened unsalted butter. Then, mix in 1 cup of granulated sugar and 1/2 cup of packed brown sugar. Use a hand mixer or a whisk to blend them until the mixture is light and fluffy. This takes about 3-4 minutes. Creaming adds air and makes your cookies soft. 1. Add eggs and pumpkin puree: Next, beat in 2 large eggs and 1 cup of pumpkin puree. Don't use pumpkin pie filling; it has extra sugars and spices. Also, add 1 teaspoon of vanilla extract. Mix until the mixture is smooth. This adds moisture and flavor to your dough. 2. Mix dry ingredients separately: In another bowl, whisk together 3 1/2 cups of all-purpose flour, 2 teaspoons of cream of tartar, 1 teaspoon of baking soda, 1/2 teaspoon of salt, 1 tablespoon of ground cinnamon, and 1 teaspoon of ground nutmeg. Mixing dry ingredients first helps distribute the baking soda evenly. 1. Combine wet and dry mixtures: Gradually add the dry mixture into the wet mixture. Mix gently until just combined. Be careful not to overmix; this keeps your cookies soft. Then, fold in 1 cup of white chocolate chips. 2. Prepare and roll the cookie dough: In a small bowl, mix 1/4 cup of granulated sugar with 1 tablespoon of ground cinnamon for rolling. Scoop tablespoon-sized portions of dough and roll them into balls. Roll each ball in the cinnamon sugar mixture until fully coated. 3. Bake and cool the cookies: Place the dough balls on the prepared baking sheets, leaving about 2 inches of space between them. Bake for 10-12 minutes, until the edges are lightly golden. Remove from the oven and let them cool on the baking sheets for about 5 minutes. Then, transfer the cookies to a cooling rack to cool completely. For the full recipe, visit [Full Recipe]. Enjoy these warm and delightful treats! To make your White Chocolate Pumpkin Snickerdoodles perfect, start with room temperature ingredients. This helps butter and sugar blend well, giving your cookies a soft texture. Cold butter can make your dough hard to mix and lead to uneven baking. Next, don't overmix the dough. Mix until just combined. Overmixing can make your cookies tough instead of soft and chewy. Remember, some lumps are okay! Check your cookies for doneness at 10 minutes. They should look slightly golden around the edges but still soft in the center. If the edges are too dark, your cookies may be overbaked. Once baked, cool the cookies on a wire rack. This lets air circulate around them, keeping them soft. If you leave them on the baking sheet too long, they may get soggy. Enjoy these tips and make the best snickerdoodles with the full recipe! {{image_2}} To make your White Chocolate Pumpkin Snickerdoodles even better, consider adding spices. A touch of ginger or cloves gives them a new twist. These spices blend well with pumpkin and add warmth to each bite. You can also add nuts for extra crunch. Chopped walnuts or pecans work nicely. They add texture and flavor, making your cookies even more delightful. Changing the type of chocolate can also alter the cookie's taste. If you prefer dark chocolate, swap out white chocolate chips. This change adds depth and richness. For those needing gluten-free options, try a gluten-free flour blend. It can yield similar results while accommodating dietary needs. Just ensure your blend includes xanthan gum for structure. These variations let you personalize your cookies. Check out the Full Recipe for all the steps to create these yummy treats! To keep your white chocolate pumpkin snickerdoodles fresh, store them in an airtight container. This will help lock in moisture and prevent them from becoming hard. If you want to keep them longer, consider refrigeration. Just make sure to wrap them well to avoid any fridge odors. You can also freeze these cookies. Place them in a freezer-safe bag with as much air removed as possible. They will last for up to three months in the freezer. At room temperature, these cookies last about five days. Store them in a cool, dry place to maintain their taste and texture. Look out for signs of spoilage, like a hard texture or off-smell. If they become dry or crumbly, it’s time to toss them. Always trust your senses; if they don’t smell or taste right, don’t eat them. Can I use pumpkin pie filling instead of puree? No, you should not use pumpkin pie filling. It has added sugar and spices. This will change the taste and texture of your cookies. Stick with pure pumpkin puree for the best results. What can I substitute for white chocolate chips? You can use dark chocolate chips or milk chocolate chips. If you want a fruity twist, try dried cranberries or raisins. These options will still taste great in your snickerdoodles. How do I make these cookies chewy vs. crispy? To make chewy cookies, use more brown sugar. This adds moisture. For crispy cookies, add a bit more flour. You can also bake them a little longer for a crunchy edge. Can I freeze the cookie dough? Yes, you can freeze the cookie dough. Just scoop the dough into balls and freeze them on a baking sheet. Once frozen, transfer them to a bag. They will last about three months in the freezer. What to do if the dough is too sticky or dry? If the dough is too sticky, add more flour, one tablespoon at a time. If it’s too dry, mix in a little more pumpkin puree or butter. Make sure to mix well after each addition. How to fix cookies that spread too much during baking? If your cookies spread too much, check your oven's temperature. It may be too hot. You can also chill the dough before baking. This helps the cookies hold their shape better in the oven. In this blog post, we explored how to make white chocolate pumpkin snickerdoodles from start to finish. We covered the key ingredients, step-by-step instructions, and helpful tips for the best results. Remember, using room temperature ingredients and not overmixing will help keep your cookies soft. Experiment with flavors and store them properly to enjoy every bite. Baking is fun and this recipe is sure to impress. Now, it's your turn to make delicious cookies that everyone will love!](https://therecipehatch.com/wp-content/uploads/2025/08/6c769cd4-eff4-4dc3-b55a-b08ae5c7b739.webp)
Are you ready to fall in love with a new cookie? Imagine soft, chewy Snickerdoodles infused with pumpkin and sweet white chocolate. In this blog post, I will guide you …
Are you ready to fall in love with a new cookie? Imagine soft, chewy Snickerdoodles infused with pumpkin and sweet white chocolate. In this blog post, I will guide you …

Looking for a fun snack that’s easy to make? Let’s dive into these Easy Mini Corn Dog Muffins! They’re tasty, kid-friendly, and perfect for any occasion. I will guide you …
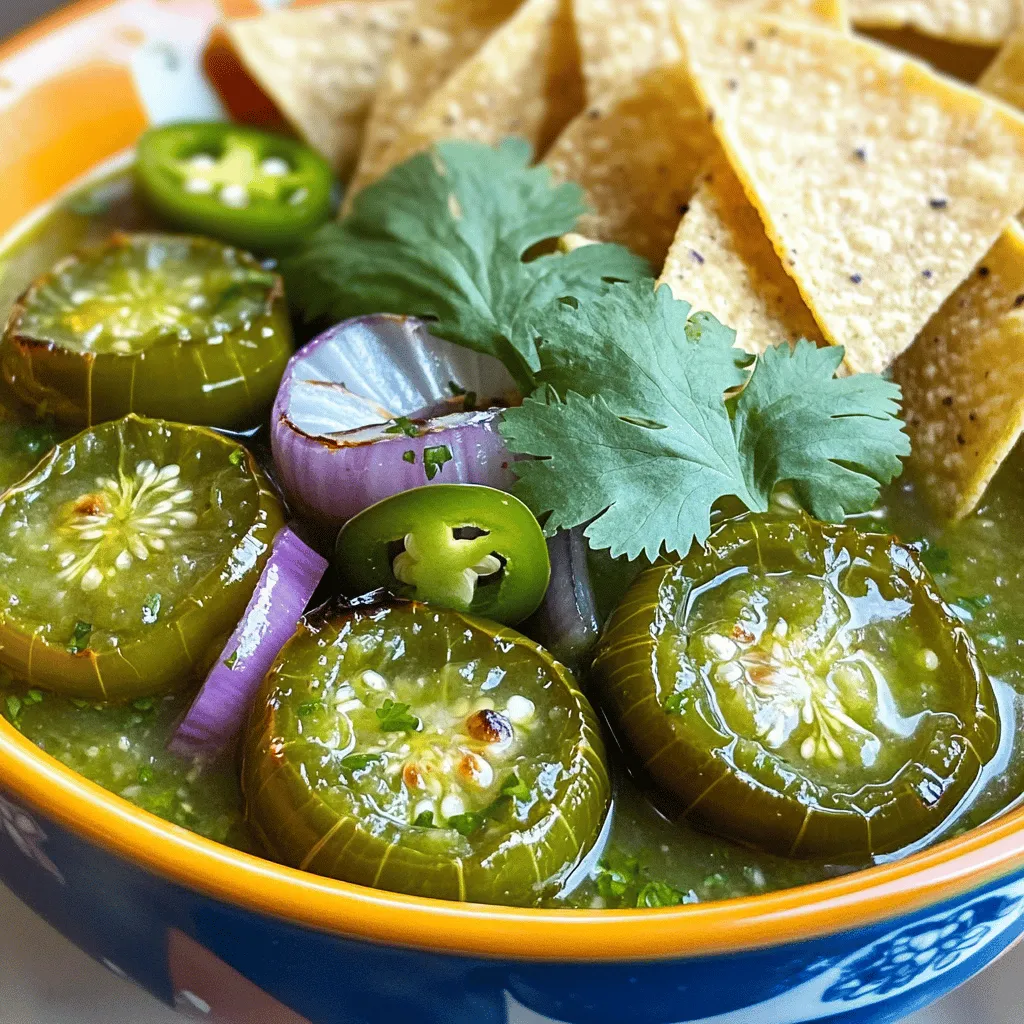
Are you ready to spice up your meals? In just 20 minutes, you can whip up a fresh, vibrant Roasted Tomatillo Salsa Verde that’ll elevate any dish. Imagine the tartness …

Are you ready to spice up your meal? Chicken quesadillas are a tasty treat everyone loves. In this post, I’ll share a flavorful recipe that fits all tastes. You’ll learn …
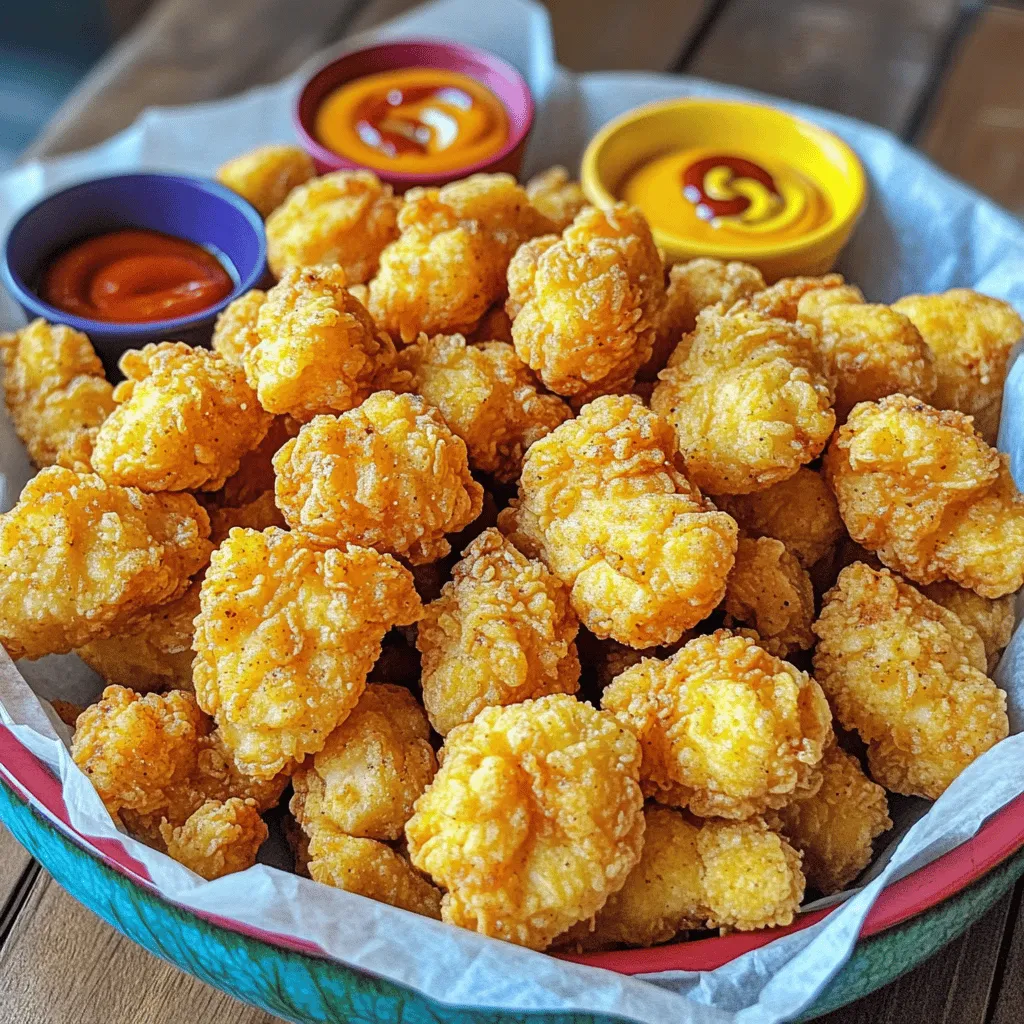
Ready to take your snacking game to the next level? In this guide, I’ll show you how to make crunchy and flavorful popcorn chicken that will wow your taste buds. …
![Black Tea Options: Assam vs. Darjeeling For a great masala chai, you need black tea. Assam tea gives a bold, strong flavor. It has a rich taste that blends well with spices. Darjeeling tea has a lighter, floral taste. It adds a unique twist to the chai. Both are good, so pick the one you like best. You can even mix them for a special flavor. Essential Spices: Cardamom, Cinnamon, Ginger, and Cloves Spices make masala chai truly special. Cardamom adds a sweet and spicy note. Use 4-5 green pods, crushed for full flavor. A cinnamon stick brings warmth and sweetness. Ginger gives a fresh, zesty kick. Slice a piece about one inch long. Cloves add depth with their strong, aromatic flavor. Use 2-3 whole cloves for balance. These spices together create a cozy blend. Sweeteners: Sugar Variations and Alternatives Sugar is the classic sweetener for masala chai. You can start with 1-2 tablespoons, adjusting to your taste. If you want to try something new, use honey or maple syrup. They add their own flavors and can be healthier. For a low-calorie option, consider stevia or agave. Sweeteners can change the taste, so choose what you enjoy most. For the full recipe, check out the Spiced Delight: Authentic Masala Chai. Boiling Water and Infusing Spices Start by boiling 2 cups of water in a saucepan. Bring the water to a rolling boil over medium heat. Once boiling, add the spices: crushed ginger, crushed cardamom pods, black peppercorns, cloves, and the cinnamon stick. Let this mixture simmer for about 5 minutes. This step helps release the warm, rich flavors of the spices. Brewing the Tea: Strength and Timing After the spices have simmered, it’s time to add the tea. Stir in 2 tablespoons of loose black tea, like Assam or Darjeeling. Allow it to brew for 2-3 minutes. You can adjust the brewing time based on how strong you like your chai. The longer you brew, the bolder the flavor. Incorporating Milk for Creaminess Next, gradually pour in 1 cup of milk. You can use whole milk or a non-dairy option, depending on your preference. Bring the mixture back to a gentle boil. This step gives the chai its creamy texture. Finally, stir in sugar to taste. Let it simmer for another 2-3 minutes, stirring occasionally. This will blend the flavors nicely. For a detailed recipe, check out the Full Recipe. Adjusting Spice Levels for Personal Preference You can make masala chai just how you like it. If you want more warmth, add more ginger. For a sweet touch, increase the sugar. You can also play with cardamom and cinnamon amounts. Taste as you go to find your perfect balance. Brewing Techniques for Enhanced Flavor To brew masala chai like a pro, let the spices simmer longer. I usually let them steep for five minutes. This step allows the flavors to blend well. Also, brewing the tea longer gives it a richer taste. Just remember to keep an eye on the time. Best Practices for Serving and Presentation Serving your masala chai can be fun! Pour it into clear glass cups to show off its color. You can also sprinkle some cinnamon on top for a nice look. Serve it with biscuits or snacks for a complete experience. Your guests will love it! For a detailed recipe, check out the Full Recipe. {{image_2}} You can enjoy masala chai in many fun ways. - Vegan and Non-Dairy Options: If you want a vegan chai, swap cow's milk for almond, oat, or soy milk. These options add a unique taste. They also make your drink creamy without dairy. - Iced Masala Chai: A Refreshing Alternative: On hot days, iced masala chai is a great choice. Start by making the hot chai as usual. Let it cool, then pour it over ice. Add a splash of milk or a sweetener for extra flavor. This drink is cool and tasty! - Flavor Infusions: Adding Mint or Vanilla: Get creative by adding fresh mint leaves or a splash of vanilla extract. Mint gives a fresh taste, while vanilla adds warmth. Both make your chai unique and delicious. These variations keep your masala chai exciting and full of flavor. Try them out and find your favorite way to enjoy this spiced delight! For the full recipe, check out the [Full Recipe]. If you have leftover chai, storing it properly helps keep the flavor great. Store your leftover chai in an airtight container. Place it in the fridge within two hours of making it. This keeps it fresh for up to three days. When reheating, pour the chai into a saucepan. Heat it gently over low heat. Stir it often to avoid burning. If it feels thick, add a splash of milk or water. This will bring back its creamy texture. Yes, you can freeze masala chai! Use a freezer-safe container. Leave some space at the top, as liquid expands when frozen. Chai can last about two months in the freezer. To enjoy, thaw it in the fridge overnight and reheat as mentioned above. For the complete method, check the Full Recipe for making this delightful drink! What is the best type of tea for masala chai? The best tea for masala chai is typically loose black tea. Assam and Darjeeling are great choices. Assam offers a strong flavor, while Darjeeling adds a light, floral note. Both teas create a rich and aromatic base for your brew. Can I make masala chai without milk? Yes, you can make masala chai without milk. Use just water and spices for a lighter version. You can also use plant-based milk like almond or oat milk for a creamy, dairy-free option. How do I adjust the recipe for a larger batch? To make a larger batch, simply multiply the ingredients. For example, if you want to make four cups, double the amounts listed in the Full Recipe. Adjust the spices to your taste, as they can become stronger in larger quantities. Where can I buy authentic masala chai products? You can find authentic masala chai products at Indian grocery stores or specialty tea shops. Many online retailers also sell high-quality ingredients, including spices and loose tea. Look for brands that focus on organic and fair-trade products for the best flavors. You now know how to make authentic masala chai. We explored key ingredients, like tea and spices, and steps for perfect brewing. With tips for personalizing your chai and variations to try, you can enjoy it your way. Remember to store leftovers for future enjoyment. Masala chai is more than just a drink; it's a comforting ritual. Now, it's time to brew a cup and savor each sip. Happy brewing!](https://therecipehatch.com/wp-content/uploads/2025/08/dddc290e-5994-45cf-8202-8524e3d26c6c.webp)
Do you crave a warm and spicy cup of authentic masala chai? I’ve got you covered! This flavorful brew combines rich black tea with vibrant spices, creating a cozy drink …
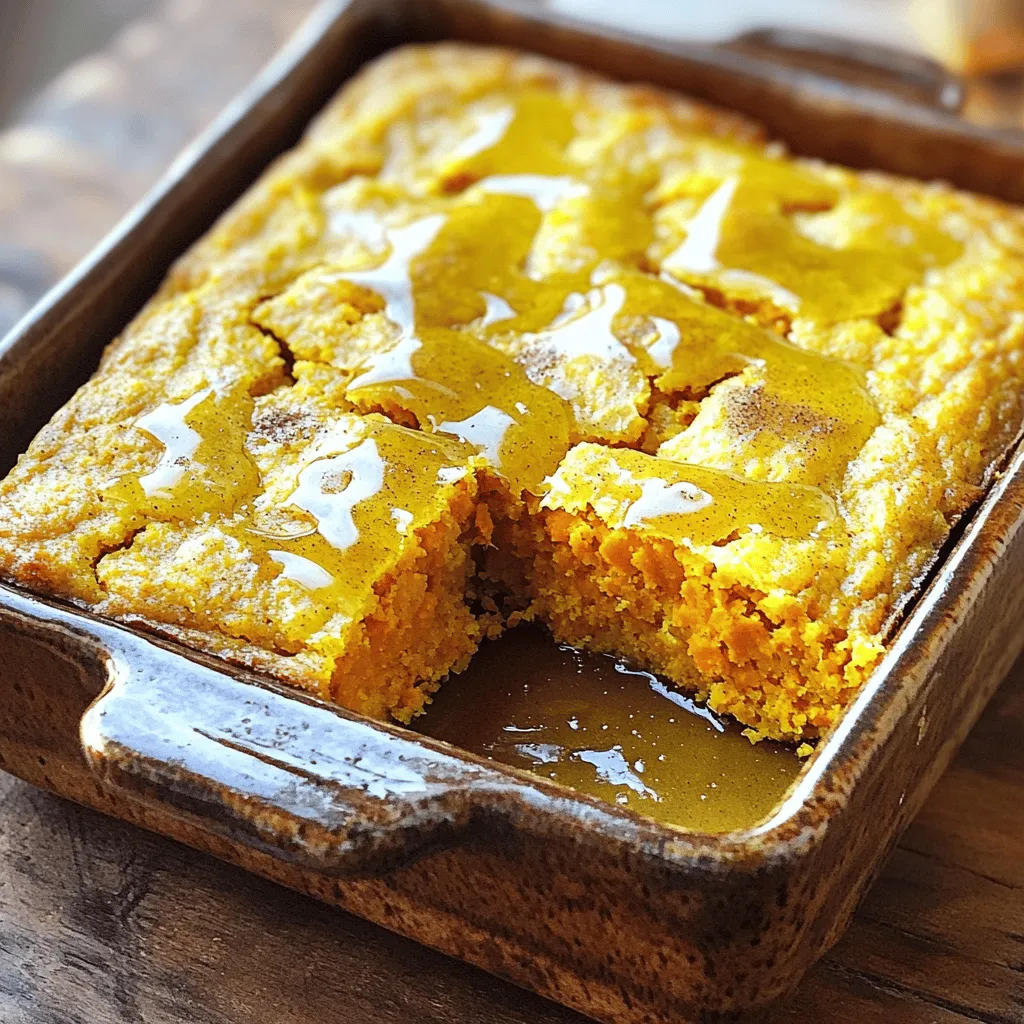
Are you ready to spice up your cornbread game? My Cinnamon Honey Butter Sweet Potato Cornbread Delight is the perfect mix of sweet and savory flavors that will impress your …
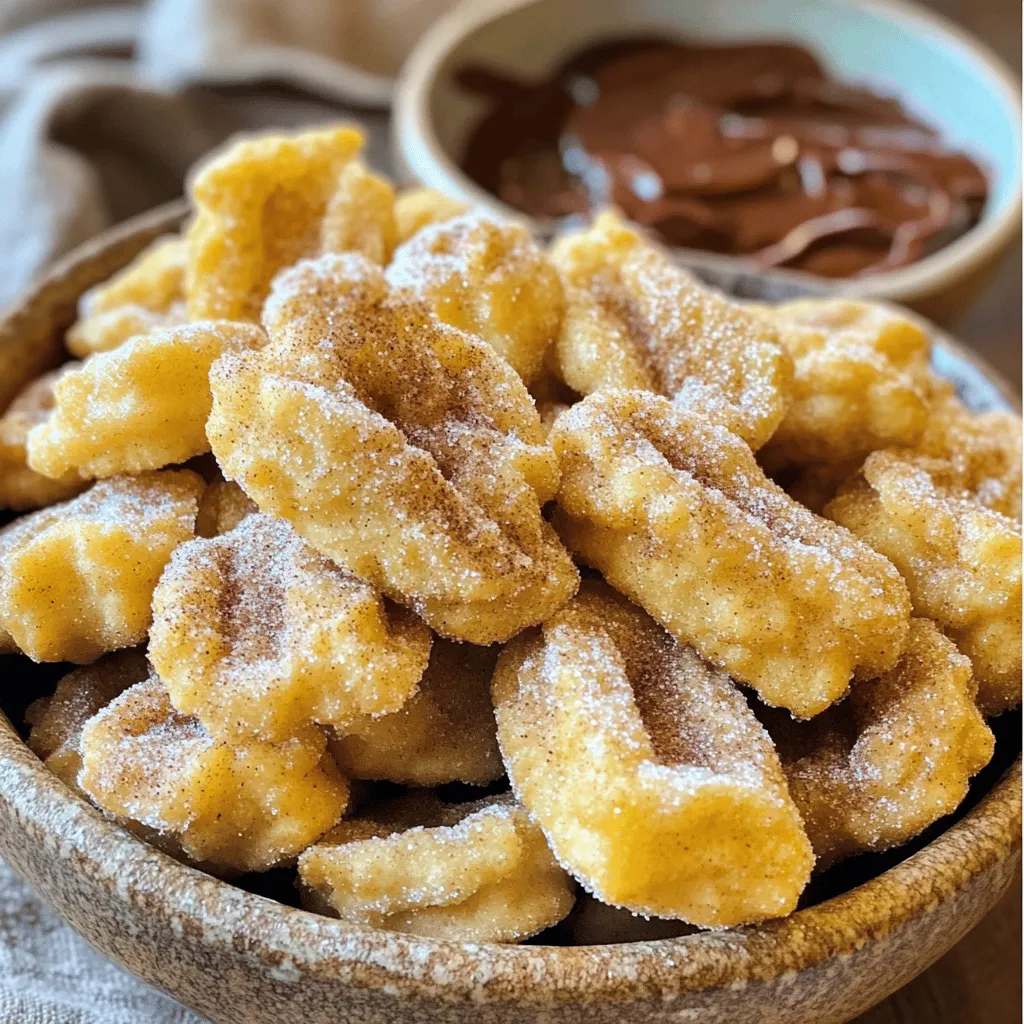
Craving a sweet treat? Look no further! These Easy Churro Bites with Nutella are a simple snack that will wow your taste buds. I’ll guide you through each step, from …
![- 2 cups all-purpose flour - 1 ½ teaspoons baking powder - 1 teaspoon baking soda - 1 teaspoon ground cinnamon - 1 teaspoon ground nutmeg - ½ teaspoon ground ginger - ½ teaspoon ground cloves - ½ teaspoon salt To start, you need the right dry ingredients. Flour is the base of the cake. I use all-purpose flour for a great texture. Baking powder and soda help the cake rise. The spices like cinnamon and nutmeg bring warmth and flavor. Ground ginger and cloves add a nice kick. Salt enhances all the flavors and balances the sweetness. - ¾ cup unsalted butter, softened - 1 cup brown sugar, packed - ½ cup granulated sugar - 3 large eggs - 1 teaspoon vanilla extract - 1 cup buttermilk Next, gather your wet ingredients. Softened butter makes it easy to cream with the sugars. Brown sugar gives a rich flavor, while granulated sugar adds sweetness. Eggs help bind everything together. Vanilla extract brings a lovely aroma. Buttermilk adds moisture and tang, making the cake tender. - 1 cup chopped walnuts or pecans If you like, add chopped nuts. Walnuts or pecans add crunch and flavor. They also make the cake more interesting. - 1 ½ cups powdered sugar - 2 tablespoons unsalted butter, softened - 3 tablespoons pure maple syrup - 1 tablespoon milk For the maple frosting, you need powdered sugar. It gives sweetness and a nice texture. Softened butter mixes well with the sugar. Pure maple syrup provides that classic flavor. Finally, milk helps achieve the right spreadable consistency. This recipe is packed with flavor and warmth. You can find the full recipe for the perfect Spice Cake Bundt with Maple Frosting to impress your friends and family. 1. Preheat the oven and prepare Bundt pan: Start by setting your oven to 350°F (175°C). Grease and flour your 10-cup Bundt pan. This step helps the cake release easily. 2. Mix dry ingredients and set aside: In a medium bowl, whisk together 2 cups of flour, 1 ½ teaspoons of baking powder, 1 teaspoon of baking soda, 1 teaspoon of cinnamon, 1 teaspoon of nutmeg, ½ teaspoon of ginger, ½ teaspoon of cloves, and ½ teaspoon of salt. This mix brings all the cozy spices together. 3. Cream butter and sugars until fluffy: In a large bowl, cream ¾ cup of softened unsalted butter, 1 cup of brown sugar, and ½ cup of granulated sugar. Use an electric mixer for about 3-4 minutes. You want it light and fluffy. 4. Add eggs and vanilla to the mixture: Add 3 large eggs, one at a time. Make sure to mix well after each egg. Then stir in 1 teaspoon of vanilla extract for extra flavor. 5. Gradually combine dry ingredients with buttermilk: Alternate adding the dry mix with 1 cup of buttermilk. Start and end with the dry mix. This keeps the batter smooth and well combined. 6. Fold in optional nuts, if desired: If you like, fold in 1 cup of chopped walnuts or pecans. This adds a nice crunch to your cake. 7. Pour batter into prepared pan and smooth: Pour the batter into your Bundt pan. Use a spatula to smooth the top. This helps it bake evenly. 8. Bake and check doneness with a toothpick: Bake your cake for 45-50 minutes. Insert a toothpick into the center. If it comes out clean, your cake is ready. 9. Cool cake in pan and then transfer to wire rack: Let the cake cool in the pan for about 10 minutes. Carefully invert it onto a wire rack to cool completely. 10. Prepare maple frosting ingredients and mix: In a medium bowl, mix 1 ½ cups of powdered sugar, 2 tablespoons of softened butter, 3 tablespoons of pure maple syrup, and 1 tablespoon of milk. Blend until smooth. Adjust the consistency if needed. 11. Drizzle or spread frosting over cooled cake: Once your cake is cool, drizzle or spread the maple frosting over the top. 12. Allow frosting to set before serving: Let the frosting set for a few minutes before you slice and serve. For the full recipe, check out the detailed instructions above. Enjoy this delightful spice cake with friends and family! Accurate measurements are key for your cake's success. Use dry measuring cups for flour. Spoon the flour into the cup, then level it with a knife. This way, you avoid packing it too tightly. To keep your cake moist, do not overmix the batter. Mix until just combined. Overmixing can make your cake dry and dense. Also, check for doneness in the oven. A toothpick should come out clean from the center. Adjust your frosting's thickness to your liking. If it's too thick, add a splash of milk. If it's too thin, add more powdered sugar. For a smooth finish, use a spatula or the back of a spoon. Start from the center and work your way out. This technique helps you cover the cake evenly. Garnish your cake for a stunning look. A sprinkle of ground cinnamon or a few chopped nuts adds charm. Place the cake on a decorative plate for a nice touch. To enhance flavor, serve your cake with whipped cream or ice cream. These add richness and balance the spice in the cake. Enjoy your beautifully presented treat! {{image_2}} You can bring new life to your spice cake by adding citrus zest. Lemon or orange zest adds a bright flavor. This contrast makes the cake even more enjoyable. You can also incorporate other spices like cardamom. Cardamom adds a warm, floral note. Mix it in with your other spices for a unique twist. If you need gluten-free options, try using almond flour or a gluten-free blend. These options keep your cake moist and tasty. For those who prefer vegan baking, there are simple swaps. Use flax eggs instead of regular eggs. Replace dairy with almond or coconut milk. These changes help everyone enjoy this delicious cake. While maple frosting is fantastic, there are other choices. Cream cheese frosting adds a tangy flavor that pairs well with spice cake. If you love chocolate, try a chocolate ganache. You can also jazz up the maple frosting. Add a splash of vanilla or almond extract for a deeper taste. This way, you can customize the cake to match your personal preference. For the complete recipe, check out the [Full Recipe]. To keep your spice cake fresh, wrap it tightly. Use plastic wrap or aluminum foil. This helps to lock in moisture. You can also store it in an airtight container. When slicing the cake, use a sharp knife. Cut even portions to avoid crumbling. Place any leftover slices in the container. If you want to save some cake, freezing works great. First, let the cake cool completely. Then, wrap it tightly in plastic wrap. For extra protection, add a layer of aluminum foil. Label it with the date. To reheat, let it thaw in the fridge overnight. You can warm it in the oven at 350°F for about 10 to 15 minutes. At room temperature, your cake stays fresh for about 3 to 4 days. Keep it away from direct sunlight or heat. If you see mold or an off smell, it's best to throw it away. Always check for signs of spoilage before enjoying your cake. To keep your cake moist, use the right ingredient ratios. The butter and sugars should be creamed well, as this adds air and moisture. Use room temperature ingredients for better mixing. Do not overmix when adding the dry ingredients. This can make the cake dense. Bake it for the right time. Check the cake at 45 minutes. A toothpick should come out clean. If it comes out wet, bake for a few more minutes. Yes, you can make this cake ahead of time. Bake the cake and let it cool completely. Wrap it tightly in plastic wrap. Store it in the fridge for up to three days. You can also freeze it for up to three months. Just remember to frost it after thawing. The frosting is best fresh, so make it on the day you serve the cake. If you don't have buttermilk, you can make your own. Mix one cup of milk with one tablespoon of vinegar or lemon juice. Let it sit for five minutes. You can also use yogurt or sour cream mixed with milk. These options keep the cake moist and add a nice flavor. You can tell when your cake is done by checking a few signs. First, look for a golden-brown color on top. The edges should pull away from the pan slightly. Insert a toothpick in the center; it should come out clean or with a few crumbs. If it comes out wet, give it a few more minutes in the oven. This blog post has covered how to make a delicious cake from scratch. We discussed the important dry and wet ingredients, unique add-ins, and how to create a tasty maple frosting. Following simple steps, you can bake, frost, and serve a delightful cake. Remember, measure your ingredients well and enjoy the process. Try variations like adding spices or nuts to make it your own. With proper storage, your cake will stay fresh for days. Enjoy sharing your homemade treat with friends and family!](https://therecipehatch.com/wp-content/uploads/2025/08/8e0ba9d4-0864-474f-b647-0c7c255705c0.webp)
Are you ready to indulge in a delicious Spice Cake Bundt with Maple Frosting? This recipe combines warm spices with a sweet maple touch that will delight your taste buds. …
![- 2 cups all-purpose flour - 1 teaspoon baking powder - 1/2 teaspoon baking soda - 1/2 teaspoon salt - 1 teaspoon ground cinnamon - 1/2 cup granulated sugar - 1/4 cup brown sugar, packed - 1/2 cup unsalted butter, softened - 1 cup unsweetened applesauce - 1 1/2 cups peeled, diced apples (about 2 medium apples) - 1/2 cup chopped pecans - 1/2 cup chopped pecans - 1/4 cup brown sugar, packed - 1/2 teaspoon ground cinnamon - 2 tablespoons unsalted butter, melted When I make this Apple Bread with Cinnamon Pecan Crunch, I focus on quality ingredients. The all-purpose flour gives the bread its nice structure. Baking powder and baking soda help it rise well, making it fluffy. I use both granulated sugar and brown sugar for a sweet touch and rich flavor. For flavor, I love adding diced apples and chopped pecans. They bring texture and taste. Applesauce keeps the bread moist, which is key for a great loaf. The topping is a star feature. I mix more chopped pecans, brown sugar, and cinnamon for crunch. The melted butter helps it stick together. You can even add chocolate chips or dried fruit if you want to play with flavors. Finding the right mix is important. Each ingredient plays a role in making this bread delightful. For the full recipe, check [Full Recipe]. - Preheat the oven: Start by preheating your oven to 350°F (175°C). This step is key for even baking. Grease a 9x5-inch loaf pan or line it with parchment paper. This makes for easy removal later. - Mix dry ingredients: In a medium bowl, whisk together 2 cups of all-purpose flour, 1 teaspoon of baking powder, 1/2 teaspoon of baking soda, 1/2 teaspoon of salt, and 1 teaspoon of ground cinnamon. Set this bowl aside for now. - Creaming butter and sugars: In a large bowl, beat together 1/2 cup of softened butter, 1/2 cup of granulated sugar, and 1/4 cup of brown sugar. Use an electric mixer and beat until the mixture is light and fluffy. This creates a great base for your bread. - Adding eggs and vanilla: Next, add 2 large eggs one at a time. Mix well after each egg. Then, blend in 1 teaspoon of vanilla extract. This adds wonderful flavor to your bread. - Mixing dry and wet ingredients: Gradually add the dry ingredient mixture to the wet mixture. Stir until just combined. Be careful not to overmix; this keeps the bread light and fluffy. - Incorporating apples and pecans: Gently fold in 1 1/2 cups of peeled, diced apples and 1/2 cup of chopped pecans. This adds texture and flavor to the bread. - Pouring batter and prepping the topping: Pour the batter into your prepared loaf pan. In a small bowl, mix 1/2 cup of chopped pecans, 1/4 cup of brown sugar, and 1/2 teaspoon of ground cinnamon. Drizzle in 2 tablespoons of melted butter and mix well. Sprinkle this topping over the batter. - Baking time and checking doneness: Bake in your preheated oven for 55-65 minutes. Check doneness by inserting a toothpick into the center. If it comes out clean, your bread is ready. The top should look golden brown and crunchy. For the complete recipe, check the [Full Recipe]. To get the best texture, avoid overmixing your batter. When you combine the wet and dry ingredients, stir gently. Mix just until you see no flour. Overmixing leads to a dense bread, which isn't what you want. Cooling is also key. Let the bread cool in the pan for about 10 minutes. Then, transfer it to a wire rack. This helps it firm up and keeps the crust nice. You can boost flavors with spices. Besides cinnamon, try adding nutmeg or allspice. These spices add warmth and depth. You can also use extracts like almond or maple for a twist. Choosing the right apples matters, too. I recommend using tart apples like Granny Smith. They add a nice contrast to the sweetness of the bread. You can also mix different apples for more flavor. If you don’t have a loaf pan, you have options. You can use a round cake pan or even a muffin tin. Just remember to adjust your baking time. For smaller pans, reduce the bake time. Check for doneness by inserting a toothpick. If it comes out clean, your bread is ready. This way, you can enjoy your apple bread in many forms! For the complete recipe, check out the Full Recipe. {{image_2}} You can make this apple bread even more special. Adding dried fruits or nuts brings new flavors. Try raisins or cranberries for a sweet twist. You can also mix in walnuts or almonds for extra crunch. If you like spices, consider adding nutmeg or allspice. These spices pair well with apples. They add warmth and depth to the bread. Don't be afraid to experiment! Each new flavor can create a unique treat. Some people have dietary needs. This recipe can fit those needs easily. For a gluten-free option, use a gluten-free flour blend. Make sure it includes xanthan gum for the best texture. You can also adapt this recipe for vegans. Replace eggs with mashed bananas or flaxseed meal. Use plant-based butter instead of regular butter. These simple swaps keep the bread tasty and fluffy. Pair your apple bread with delicious spreads. Cream cheese or butter works well. You can also try honey or maple syrup for a sweet touch. These spreads enhance the flavor and add creaminess. Consider how you serve your apple bread. It’s great for breakfast or as a snack. For special occasions, slice it and arrange it on a wooden board. Add a sprinkle of cinnamon on top for a lovely look. This makes it perfect for gatherings or brunch. For the full recipe, check out the [Full Recipe]. To keep your apple bread fresh, store it in the fridge. Wrap it tightly in plastic wrap or foil to prevent it from drying out. You can also place it in an airtight container. This way, the bread stays moist for about a week. If you want to save some for later, freezing is a great option. Slice the bread first. Then, wrap each slice in plastic wrap. Place the wrapped slices in a freezer bag. You can freeze apple bread for up to three months without losing flavor. When it's time to enjoy leftovers, reheating is simple. The best method is to use the oven. Preheat it to 350°F (175°C). Place the bread on a baking sheet and heat for about 10 minutes. This method helps keep the crust crunchy. If you are in a hurry, you can use the microwave. Heat individual slices for about 20-30 seconds. Keep an eye on it to avoid making the bread too soft. For the best taste, eat the apple bread within one week when stored in the fridge. If kept at room temperature, consume it within three days. Signs of spoilage include a dry texture, an off smell, or visible mold. If you notice any of these signs, it's best to discard it. For frozen bread, the quality remains good for three months. After this, the flavor may fade, but it is still safe to eat. To stop your apple bread from sinking, avoid overmixing the batter. Overmixing adds too much air, which can cause the bread to rise and then fall. Make sure to fold in the apples and pecans gently. Also, check your oven temperature with a thermometer. An oven that's too cool can lead to sinking bread. Yes, you can use other fruits! Bananas, pears, or even berries work well. Just make sure the fruits are ripe and chopped into small pieces. Adjust the sugar if your chosen fruit is sweeter or more tart than apples. To check if your bread is done, stick a toothpick into the center. If it comes out clean or with a few crumbs, it’s ready. The top should be golden brown. If the toothpick has wet batter, bake for a few more minutes. Absolutely! To make mini loaves, divide the batter into smaller pans. Bake them for about 25 to 30 minutes. Keep an eye on them since they’ll bake faster than a large loaf. Check with a toothpick to see if they’re done. This post covered all the essential steps for making delicious apple bread. We explored ingredients like apples, pecans, and spices. I shared tips for perfecting texture and flavor. You can even make variations to meet your needs. Remember, storing leftovers correctly keeps your bread fresh longer. With the right methods, you can enjoy this treat for days. Now you have all the tools to bake an amazing loaf. Get started, and enjoy your homemade apple bread!](https://therecipehatch.com/wp-content/uploads/2025/08/449cff70-5b63-4076-8396-1b8383bacad1.webp)
Are you ready to bake a delightful treat that warms the heart? My Apple Bread with Cinnamon Pecan Crunch is a must-try! This recipe combines fresh apples, crunchy pecans, and …