Easy Baked Potato Soup Creamy and Comforting Dish

Warm up with my Easy Baked Potato Soup, a creamy delight perfect for chilly nights. This dish fills your home with rich flavors and is simple to make. With just …
Warm up with my Easy Baked Potato Soup, a creamy delight perfect for chilly nights. This dish fills your home with rich flavors and is simple to make. With just …
![To make S'more Cookie Bars, gather these tasty ingredients: - 1 cup unsalted butter, softened - 1 cup brown sugar, packed - 1/2 cup granulated sugar - 2 large eggs - 1 teaspoon vanilla extract - 2 1/2 cups all-purpose flour - 1 teaspoon baking powder - 1/2 teaspoon baking soda - 1/4 teaspoon salt - 1 cup chocolate chips (milk or dark) - 1 cup mini marshmallows - 1/2 cup graham cracker crumbs (plus extra for topping) These ingredients work together to create a chewy, sweet treat. Each one plays a key role. The butter adds richness, while sugars bring sweetness and moisture. The eggs bind everything together. Chocolate and marshmallows create that classic s'more flavor. You can swap some ingredients for different flavors. Here are a few ideas: - Use coconut oil instead of butter for a dairy-free option. - Try brown rice syrup in place of granulated sugar for a unique taste. - Use white chocolate chips for a sweeter twist. - Add peanut butter chips for extra richness. These alternatives can change the bars' flavor while keeping them delicious. If you have dietary needs, these substitutions can help: - For gluten-free bars, use a gluten-free flour blend. - Replace eggs with flaxseed meal mixed with water. Use 1 tablespoon of flaxseed and 2.5 tablespoons of water per egg. - Use dairy-free chocolate chips for a vegan treat. - For a low-sugar option, try using a sugar substitute like stevia or monk fruit. These substitutions ensure that everyone can enjoy these tasty bars! For the full recipe, check the earlier section. To make these tasty S'more Cookie Bars, follow these easy steps: 1. Preheat your oven to 350°F (175°C). Grease a 9x13 inch baking pan or line it with parchment paper. This helps with easy removal. 2. Cream together 1 cup of softened butter, 1 cup of brown sugar, and 1/2 cup of granulated sugar. Mix until it’s light and fluffy, about 2-3 minutes. 3. Add 2 large eggs one at a time. Mix in 1 teaspoon of vanilla extract until combined. 4. In a separate bowl, whisk together 2 1/2 cups of all-purpose flour, 1 teaspoon of baking powder, 1/2 teaspoon of baking soda, and 1/4 teaspoon of salt. 5. Gradually mix the dry ingredients into the wet mixture. Stir until just combined. 6. Fold in 1 cup of chocolate chips, 1 cup of mini marshmallows, and 1/2 cup of graham cracker crumbs. Make sure they are evenly spread throughout the dough. 7. Spread half of the mixture into the baking pan. Press it down to create an even layer. 8. Sprinkle a layer of mini marshmallows and chocolate chips over this dough. Then, crumble the remaining cookie dough on top, covering everything. 9. Optional: Add more graham cracker crumbs on top for extra crunch. 10. Bake for 25-35 minutes. Look for golden brown edges and a set center. 11. Cool in the pan on a wire rack for about 20 minutes. Then, cut into bars. - Don’t skip greasing the pan. This helps prevent sticking. - Mix well but don’t overmix the dough. This keeps your bars chewy. - Check your bars at the lower end of the baking time. Ovens vary. - Let them cool before cutting. This helps them hold their shape. - Creaming Butter: It should look pale and fluffy. - Adding Dry Ingredients: Mix until just combined. You may still see some flour. - Layering: Make sure to press down the first layer firmly for a good base. - Baking: The edges should be golden, and the center should look set, not jiggly. Follow these steps, and you’ll have chewy, gooey S'more Cookie Bars that everyone will love. For the full recipe, check out the complete instructions above. Enjoy your baking adventure! One common mistake is overmixing the dough. This can make your bars tough. Mix until just combined for a softer bite. Another mistake is not measuring ingredients accurately. Use dry measuring cups for flour and graham crumbs. Too much flour can lead to dry bars. Also, watch the baking time closely. If you bake too long, the edges can burn. Check for a golden edge and a set center. Letting the bars cool too long in the pan can make them stick. Move them to a wire rack after 20 minutes. For the best results, preheat your oven properly. This helps your bars bake evenly. Use a timer to avoid overbaking. Start checking at 25 minutes. The bars should be golden and slightly soft in the middle. If you want gooier bars, you can underbake them a bit. They will firm up as they cool. If you like a crisp edge, bake until the edges are dark brown. Serve these bars warm for a gooey treat. Top them with more mini marshmallows and a drizzle of chocolate. A dollop of whipped cream adds a nice touch. For a campfire vibe, sprinkle graham cracker crumbs on top. Cut them into large squares for a fun treat. You can also serve them with ice cream for an extra special dessert. Try pairing with a glass of milk or hot cocoa. These ideas will make your s'more cookie bars a hit! For the full recipe, check the Full Recipe section above. {{image_2}} You can play with flavors in your S'more Cookie Bars. For a twist, try adding peanut butter chips. They blend well with chocolate and give a nutty taste. You might enjoy caramel bits too. They bring a rich, gooey texture. Mix in some coconut flakes for a tropical feel. Each change gives a unique spin to the classic treat. Making vegan S'more Cookie Bars is easy. Use coconut oil instead of butter. Replace eggs with flaxseed meal or applesauce. You can find egg substitutes at your local store. For a gluten-free version, swap all-purpose flour with almond flour or a gluten-free blend. Check if your chocolate chips are gluten-free. These tweaks keep the bars tasty and suitable for different diets. Seasonal changes can inspire new flavors. In fall, add pumpkin spice for a warm, cozy taste. You can fold in chopped apples or pear slices for a fruity kick. Winter is perfect for peppermint. Crush candy canes and mix them in for a fresh burst. In summer, fresh berries can replace some chocolate chips. Strawberries or raspberries add a nice tartness. Let the seasons guide your creativity. For the complete recipe, check out the [Full Recipe]. To keep your S'more Cookie Bars fresh, place them in an airtight container. This prevents air from drying them out. You can also wrap them in plastic wrap before putting them in the container. Store them at room temperature for up to five days. If you want them to last longer, consider refrigerating them. Just remember to bring them back to room temperature before serving for the best taste. When you have leftover S'more Cookie Bars, you might want to warm them up. To do this, preheat your oven to 350°F (175°C). Place the bars on a baking sheet and cover them with foil. Heat for about 10 minutes to keep them chewy. You can also use a microwave. Heat one bar at a time for about 15-20 seconds. This helps to melt the chocolate and marshmallows, making them gooey and delicious. If you want to save S'more Cookie Bars for later, freezing is a great option. First, let the bars cool completely. Then, cut them into squares. Wrap each square tightly in plastic wrap. After wrapping, place them all in a freezer-safe bag or container. They can last in the freezer for up to three months. When you’re ready to eat them, simply take them out and thaw at room temperature. You can also reheat them as mentioned earlier for that fresh-baked taste. If you don't have chocolate chips, don't worry! You can use chopped chocolate bars or even chocolate chunks. You can also try white chocolate or peanut butter chips for a fun twist. The key is to keep that sweet, melty goodness. Just make sure to use a similar amount, about one cup. Yes, you can make S'more Cookie Bars ahead of time! You can prepare the dough and store it in the fridge for up to three days. You can also bake the bars and keep them in an airtight container. They taste great for a few days after baking. Just warm them up a bit before serving for that fresh-baked taste. S'more Cookie Bars stay fresh for about five days at room temperature. After that, they may start to lose their chewy texture. You can also freeze them for up to three months. Just wrap them tightly in plastic wrap and then in foil. This way, you can enjoy these tasty bars later! S'more cookie bars bring fun and flavor to any gathering. We explored the best ingredients and steps to make them. You learned alternative suggestions for different diets. We also shared tips to avoid common mistakes and how to customize your bars. Remember, proper storage keeps them tasty for longer. Enjoy every bite and feel free to experiment with flavors! Your perfect treat is just a recipe away.](https://therecipehatch.com/wp-content/uploads/2025/08/d224ad5a-ed19-4c8a-8997-003a25c8578e.webp)
Get ready to indulge in a sweet treat that’s hard to resist! My S’more Cookie Bars are chewy, rich, and packed with classic flavors. With simple ingredients and easy steps, …
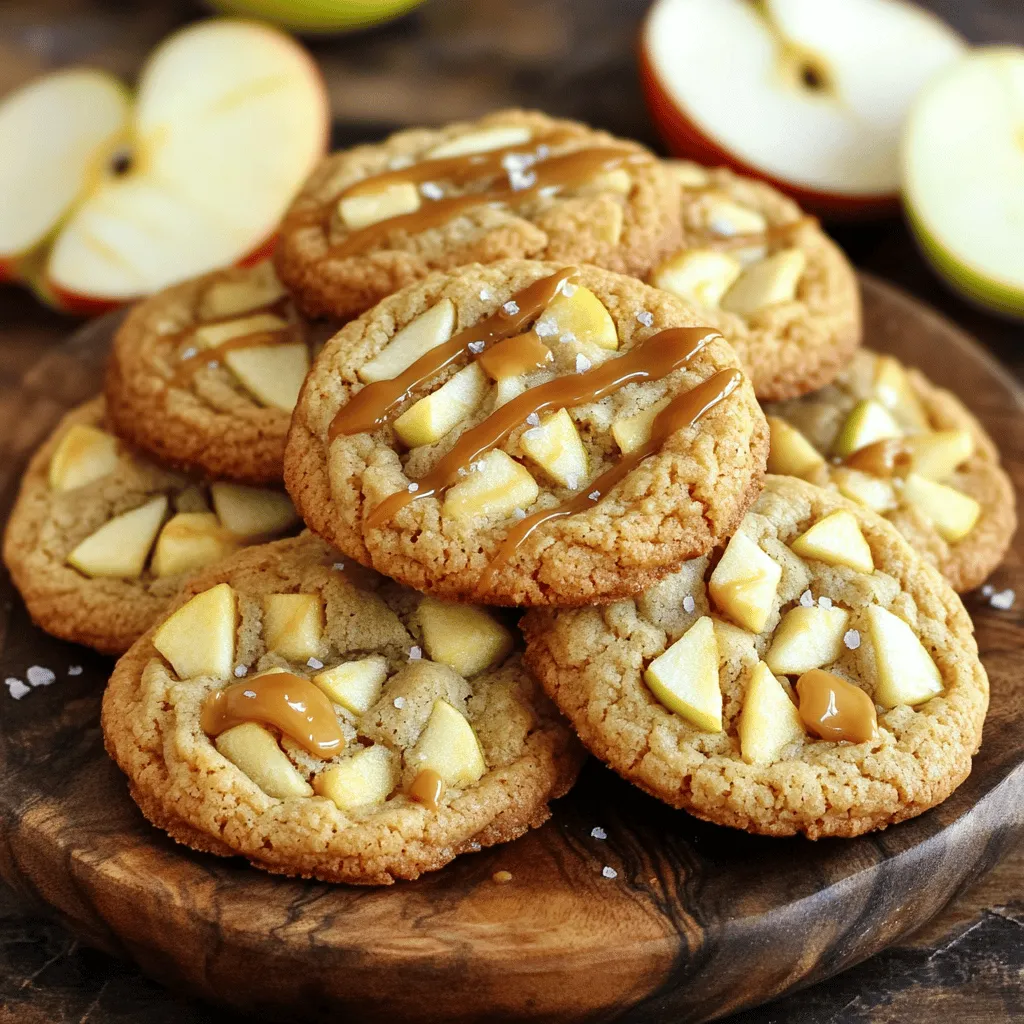
If you love the cozy taste of fall, you’re in for a treat with my Caramel Apple Cookies! These soft, chewy delights blend sweet caramel and tart apples for a …
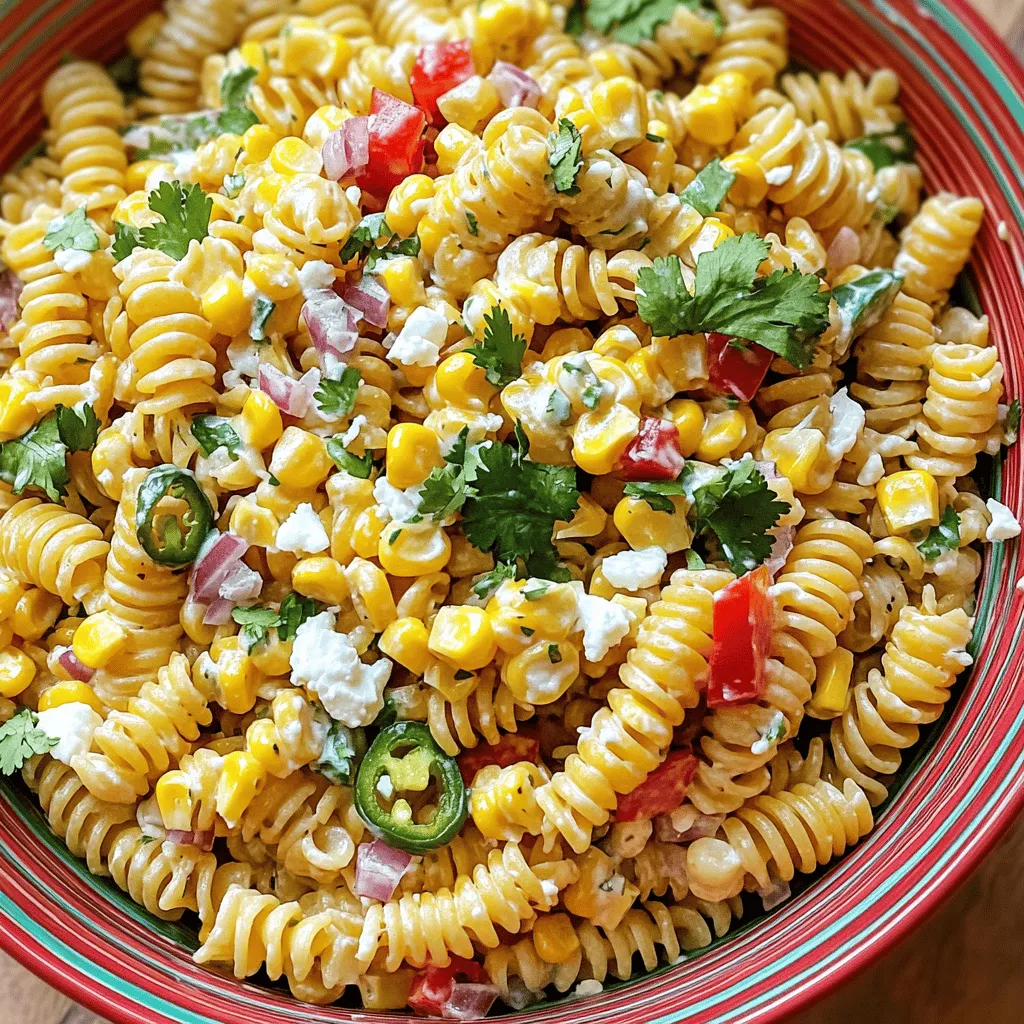
Looking for a refreshing dish that packs a punch? My Healthy Street Corn Pasta Salad is just what you need! With its vibrant flavors and simple ingredients, this dish is …
![Gathering the right ingredients is key to making a great Pumpkin Pie Crisp. Here’s what you need: - 2 cups pumpkin puree (fresh or canned) - 1 cup brown sugar - 1 teaspoon cinnamon - 1/2 teaspoon nutmeg - 1/2 teaspoon ginger powder - 1/4 teaspoon salt - 3 large eggs - 1 cup rolled oats - 1/2 cup all-purpose flour - 1/2 cup melted butter - 1/2 cup chopped pecans (optional) - Whipped cream (for serving) Feel free to customize your dish. You can swap out the pecans for walnuts or even omit them. You might also want to add a dash of cloves for extra spice. Each change can make your crisp unique. This recipe is simple and fun. You can get creative with flavors and textures. Just remember, the balance of spices is key to that warm, cozy taste. Enjoy the process of gathering and prepping your ingredients! 1. Preheat Your Oven: Set your oven to 350°F (175°C). This step is key for even baking. 2. Mix Pumpkin Ingredients: In a large bowl, whisk together: - 2 cups pumpkin puree - 1 cup brown sugar - 1 teaspoon cinnamon - 1/2 teaspoon nutmeg - 1/2 teaspoon ginger powder - 1/4 teaspoon salt - 3 large eggs Make sure it is smooth. You can use a mixer or whisk by hand. A photo of this step will help you see the right texture. 3. Prepare Oat Topping: In another bowl, mix: - 1 cup rolled oats - 1/2 cup all-purpose flour - 1/2 cup melted butter - 1/2 cup chopped pecans (optional) Stir until crumbly. A short video here could show how the mixture should look. 4. Assemble the Dish: Grease a 9x9-inch baking dish. Pour the pumpkin mixture into the dish and spread it evenly. 5. Add Oat Topping: Sprinkle the oat mixture over the pumpkin layer. Make sure it covers the pumpkin well. 6. Bake: Place the dish in the oven. Bake for 30-35 minutes. Look for a golden and crisp topping. 7. Cool Down: Once baked, let it cool for about 10 minutes. This helps the layers set. 8. Serve: Serve warm. Top each piece with a dollop of whipped cream. It adds a nice touch. Bake at 350°F (175°C) for 30-35 minutes. Make sure to check that the topping is golden and crisp. Enjoy the warm, comforting flavors of your Pumpkin Pie Crisp! For the complete recipe, check the Full Recipe section. To make the best pumpkin pie crisp, focus on texture and flavor. Here are my top tips: - Use fresh pumpkin puree for a richer taste. Roasting your pumpkin brings out its natural sweetness. - Mix your spices well. Make sure the cinnamon, nutmeg, and ginger blend evenly in the pumpkin mix. - Don’t over-mix the topping. Combine the oats and butter just until crumbly. This keeps it light and crispy. Common mistakes can ruin your dessert. Avoid these pitfalls: - Skipping the cooling time. Allowing the crisp to cool helps it set and makes it easier to serve. - Using too much sugar. The pumpkin already has natural sweetness. Balance it with the right amount of brown sugar. - Not checking for doneness. Bake until the topping is golden. A toothpick should come out clean from the center. Serving pumpkin pie crisp can be fun and creative. Here are my suggestions: - Top it with whipped cream. A dollop adds creaminess and pairs well with the spices. - Serve warm or at room temperature. Both options taste great and bring out the flavors. - Pair it with vanilla ice cream. The cold ice cream contrasts nicely with the warm crisp. Ideal accompaniments include: - A sprinkle of chopped nuts. Pecans or walnuts add crunch and flavor. - A drizzle of caramel sauce. This adds a sweet touch that many love. - A cup of hot cider or coffee. The warmth of the drink complements the pumpkin flavors. For the full recipe, check out the [Full Recipe] section. Enjoy making this delightful dessert! {{image_2}} You can easily adapt this pumpkin pie crisp to fit your needs. For gluten-free options, swap the all-purpose flour with a gluten-free flour blend. This change keeps the texture nice and crumbly. You can also use gluten-free oats to ensure the entire dish is safe for those with gluten sensitivities. If you're looking for vegan alternatives, replace the eggs with flaxseed meal. Mix one tablespoon of flaxseed meal with three tablespoons of water for each egg. Let it sit for a few minutes to thicken. Use coconut oil in place of melted butter. These swaps keep the dish tasty and friendly for a vegan diet. Feel free to get creative with the spices and sweeteners in your pumpkin pie crisp. Instead of cinnamon, nutmeg, and ginger, try adding cardamom or allspice for a fun twist. You can also play around with sweeteners. Maple syrup or honey works well if you want a different flavor profile. If you want a spicier kick, add a pinch of cayenne pepper. This small change adds a warm heat to the dish. Explore these options to make your pumpkin pie crisp unique and special. For the full recipe, check out the complete guide. To store your Pumpkin Pie Crisp, let it cool first. Once cooled, cover it tightly. You can use plastic wrap or aluminum foil. Keep it in the fridge for up to four days. For longer storage, freeze it. Place it in an airtight container or a freezer bag. It can last for up to three months in the freezer. Just remember to label it with the date. This way, you’ll know when to enjoy it again. When you want to enjoy your Pumpkin Pie Crisp again, reheating is easy. Preheat your oven to 350°F (175°C). Place the crisp in a baking dish and cover it with foil. Heat it for about 15-20 minutes. This helps warm it evenly without drying it out. You can also use a microwave. Heat it in short bursts of 30 seconds. This keeps the flavor and texture just right. Enjoy your warm, delicious dessert with a dollop of whipped cream! The main difference lies in the texture. Pumpkin pie has a smooth filling with a crust. Pumpkin pie crisp has a soft base and a crunchy topping. This crisp topping often includes oats and nuts. It gives you a mix of creamy and crispy in every bite. Yes, you can use fresh pumpkin. To do this, you need to cook and puree it first. Cut the pumpkin in half and remove the seeds. Roast it until soft, then scoop out the flesh. Blend it until smooth. This fresh pumpkin adds a nice flavor to your dish. You can prepare the pumpkin mixture and topping separately. Store them in the fridge overnight. When you are ready, just layer them in the baking dish and bake. You can also bake it a day before and reheat it when needed. Rolled oats work best for this recipe. They give a nice texture and crunch. Avoid quick oats, as they can become mushy. If you want a finer texture, you can pulse rolled oats in a blender. This adds a unique touch to your pumpkin pie crisp. You learned about making a delicious Pumpkin Pie Crisp. We covered ingredients, preparation, baking, and serving suggestions. I also shared tips to avoid mistakes and variations for different diets. Plus, I explained how to store leftovers and answered common questions. Now, you're ready to make your own tasty dessert. Enjoy this treat and impress your friends and family with your skills!](https://therecipehatch.com/wp-content/uploads/2025/08/5cef0574-e352-43f5-9574-3a33edca83e7.webp)
Get ready to enjoy an amazing fall dessert! In this Pumpkin Pie Crisp recipe guide, I’ll share everything you need to make this sweet treat. With layers of creamy pumpkin …

Get ready for a fun dinner with my Crockpot Taco Chicken Nachos! This easy recipe is perfect for the whole family. You’ll love how juicy the chicken gets in the …
![Making this Easy Caramel Apple Cheesecake is simple and fun. You will need basic ingredients, most of which you may already have at home. The cheesecake combines creamy textures with sweet apple flavors. Trust me; it’s a treat everyone will love. Check the full recipe for all the details. Here’s what you need to make this yummy cheesecake: - 1 ½ cups graham cracker crumbs - ½ cup unsalted butter, melted - 2 (8 oz) packages cream cheese, softened - 1 cup granulated sugar - 1 teaspoon vanilla extract - 2 large eggs - 1 cup sour cream - 2 cups diced apples (preferably Granny Smith or Honeycrisp) - 1 teaspoon cinnamon - ½ cup caramel sauce (store-bought or homemade) These ingredients will give you a rich, creamy cheesecake with a nice crunch from the crust. The apples add a fresh taste, and the caramel ties it all together. You can make your cheesecake even prettier with some garnishes. Here are a few ideas: - Extra diced apples - A drizzle of caramel sauce - A sprinkle of cinnamon These little touches will make your dessert look fancy and taste even better. You can mix and match these to suit your style! To start, gather your ingredients. You'll need graham cracker crumbs, butter, cream cheese, sugar, and more. First, preheat your oven to 325°F (160°C). This step is key for baking. Next, mix the graham cracker crumbs with melted butter in a bowl. Make sure the crumbs get fully coated. This mixture will form your crust. After mixing, press the crumb mixture into the bottom of a 9-inch springform pan. This creates a solid base for your cheesecake. Bake this crust for about 10 minutes. Once done, let it cool slightly before adding the filling. Now, in a large bowl, beat the softened cream cheese. Use an electric mixer for a smooth and creamy texture. Gradually mix in the sugar and vanilla extract. Keep mixing until everything is well combined. Then, add the eggs one at a time. Make sure to mix well after each egg. Next, stir in the sour cream until your mixture is smooth. In another bowl, toss the diced apples with cinnamon. Fold this apple mixture into the cream cheese batter gently. This adds lovely flavor and texture. Pour the cheesecake mixture over the cooled crust in the springform pan. Make sure it spreads evenly. Bake in your preheated oven for 50-60 minutes. Check if the center is set and slightly jiggly. This means it's done. Turn off the oven and leave the cheesecake inside for an hour. This gradual cooling helps prevent cracks. After an hour, take the cheesecake out. Let it cool at room temperature for a bit. Then, refrigerate it for at least 4 hours or overnight. Chilling is essential for the best taste. When ready to serve, drizzle caramel sauce over the top. You can garnish with extra diced apples too. This adds a nice touch! Check the [Full Recipe] for all the details you need. To get the best texture for your cheesecake, start with room temperature cream cheese. This helps it blend smoothly. Use a mixer for even mixing, and don’t overbeat the eggs. Just mix until combined. Overbeating can cause cracks in your cheesecake. After mixing, fold in the apples gently. This keeps the chunks intact and adds bite. One common mistake is skipping the cooling step. After baking, let the cheesecake cool slowly in the oven to avoid cracks. If you rush this, you may get a dense cheesecake. Another mistake is not chilling the cheesecake long enough. If you skip the chilling, the texture won't set properly. Always refrigerate for at least four hours, or overnight if possible. Serve your Easy Caramel Apple Cheesecake with a drizzle of caramel sauce on top. Add a sprinkle of cinnamon for extra flavor. You can also serve it with whipped cream or ice cream on the side. For a fun twist, add some crushed nuts for crunch. Enjoy each slice with a hot drink for a cozy touch. For the full recipe, see above. {{image_2}} You can easily change the taste of your Easy Caramel Apple Cheesecake. Here are a few ideas: - Nutmeg: Add a pinch of nutmeg for a warm spice flavor. - Maple Syrup: Swap caramel sauce with maple syrup for a unique twist. - Chocolate: Fold in chocolate chips for extra richness. These small changes can really brighten up the flavors. Experiment and find what you love best. If you have dietary needs, you can still enjoy this cheesecake. Here are some simple swaps: - Gluten-Free Crust: Use gluten-free graham cracker crumbs for a gluten-free option. - Dairy-Free Cream Cheese: Replace regular cream cheese with a dairy-free version. - Sugar Alternatives: Try using coconut sugar or a sugar substitute for a low-sugar option. These swaps help you keep the taste without sacrificing your diet. This cheesecake can fit any season. Here are some ideas for seasonal flair: - Fall: Use pumpkin pie spice instead of cinnamon for a fall vibe. - Winter: Add a layer of crushed peppermint candy for a festive touch. - Summer: Use fresh berries instead of apples for a light summer dessert. Feel free to get creative and match the cheesecake with the season! After making your Easy Caramel Apple Cheesecake, let it cool. Once it's cool, wrap it tightly in plastic wrap. Store it in the fridge. It lasts for about five days. The cool air keeps it fresh and tasty. Make sure to keep it away from strong-smelling foods. This helps keep its sweet apple flavor. You can freeze cheesecake too! First, let it cool completely. Then, slice it into pieces. Wrap each slice in plastic wrap. Place the wrapped slices in a freezer bag. You can freeze it for up to three months. When you're ready to eat, just take it out. Let it thaw in the fridge overnight. This keeps it creamy and delicious. Reheating cheesecake is easy. If you want it warm, place a slice on a microwave-safe plate. Heat it in the microwave for about 15 to 20 seconds. Check if it's warm enough. Be careful not to overheat, or it may become too soft. You can also enjoy it cold right from the fridge. Either way, it tastes great! For more details, check the Full Recipe. It takes about six hours to make this cheesecake. You spend 20 minutes prepping and 50 to 60 minutes baking. Then, you wait at least four hours for it to chill. This allows the flavors to meld and the texture to set. Yes, you can use other types of apples. I recommend Granny Smith or Honeycrisp for their tartness. Other good choices are Fuji, Gala, or Braeburn. These apples add sweetness and a nice crunch to the cheesecake. Serve the cheesecake chilled for the best flavor. Slice it into even pieces. Drizzle caramel sauce over each slice for added sweetness. You can also add a sprinkle of cinnamon for a touch of spice. For a fun twist, top with extra diced apples. You now have a complete guide to making Easy Caramel Apple Cheesecake. We covered the key ingredients and step-by-step instructions. You learned essential tips for the best texture and common mistakes to avoid. Also, we explored fun variations and how to store or reheat your cheesecake. Baking can be both simple and rewarding. With this recipe, you can impress anyone. Enjoy every bite of your delicious creation!](https://therecipehatch.com/wp-content/uploads/2025/08/b5a66139-8122-4b66-bceb-787948347b9c.webp)
Looking for a sweet treat that’s easy to make? You’ll love this Easy Caramel Apple Cheesecake! This dessert blends creamy cheesecake with the flavors of caramel and apples, creating a …

Craving a sandwich that warms your heart and fills your stomach? Look no further than this Crockpot French Dip recipe! With juicy, tender beef and a rich broth, every bite …
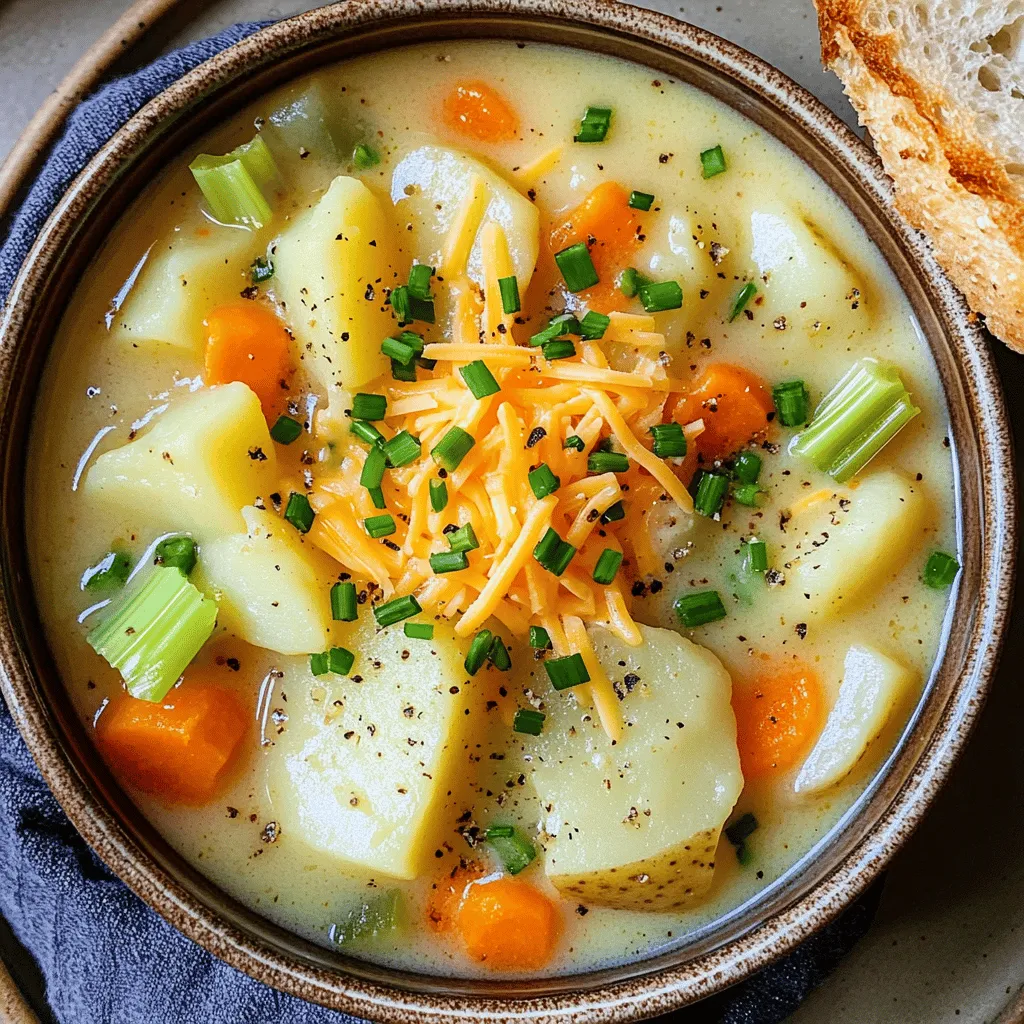
Looking for a warm, hearty meal that’s easy to make? My Crock Pot Potato Soup is the perfect solution! With just a few simple ingredients, you can create a dish …
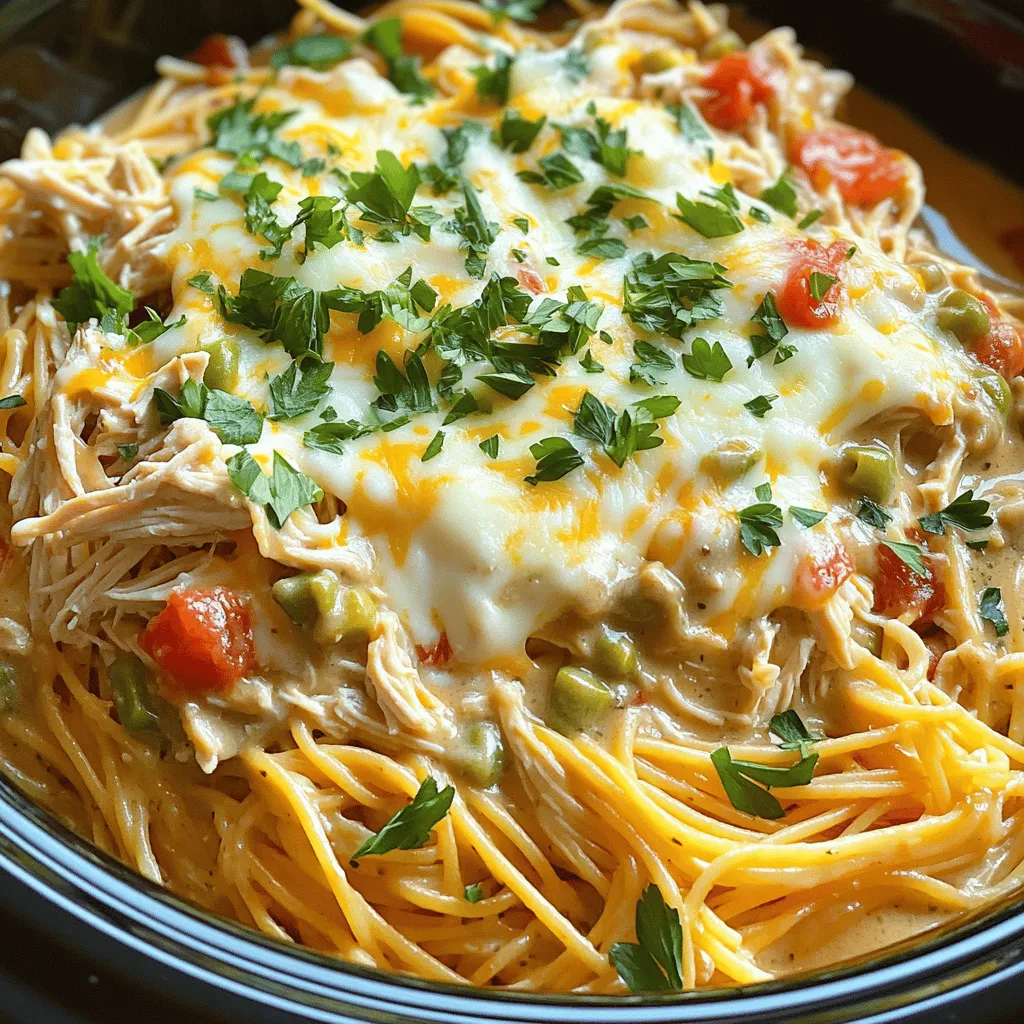
Are you looking for a warm and easy meal to impress your family? Look no further! My Easy CrockPot Chicken Spaghetti is the perfect comfort food that you can set …