Skip to content
The Recipe Hatch
  • Home
  • Appetizers
  • Desserts
  • Salads
  • Breakfast
  • Dinner
  • Privacy Policy
  • Contact
  • About

Chef Owen

Crispy Lemon Pepper Air Fryer Wings Recipe Delight

September 15, 2025 by Chef Owen
- 2 lbs chicken wings - 2 tablespoons baking powder - 1 tablespoon lemon pepper seasoning - 1 teaspoon garlic powder - 1 teaspoon onion powder - 1 teaspoon salt - ½ teaspoon black pepper - 1 tablespoon olive oil - Zest of 1 lemon - Fresh parsley, chopped (for garnish) The main ingredients for crispy lemon pepper air fryer wings are simple yet powerful. Chicken wings are the star of the dish. Baking powder helps create that crispy texture we all love. Lemon pepper seasoning adds bright flavor. Garlic and onion powders deepen the taste. Salt and black pepper enhance all the flavors. Olive oil gives moisture and helps the seasoning stick. Lemon zest adds a fresh kick. Finally, fresh parsley brightens the dish as a garnish. If you want to mix things up, there are great alternatives. - Alternative seasonings: You can use Cajun spice for a kick. Or try a simple blend of paprika, cayenne, and lemon zest. - Recommended oils: Instead of olive oil, you can use avocado oil. It has a high smoke point and works well in air fryers. These substitutions let you customize the flavor while keeping the wings crispy and delicious. First, you need to pat the chicken wings dry with paper towels. This step is key to getting that perfect crispiness. Removing excess moisture helps the skin become crunchy in the air fryer. If you skip this, your wings might turn out soggy. Next, let’s focus on the seasoning. In a large bowl, mix together the baking powder, lemon pepper seasoning, garlic powder, onion powder, salt, and black pepper. This blend gives the wings their amazing flavor. Then, add the chicken wings to the bowl. Drizzle them with olive oil and lemon zest. Toss everything well to coat the wings evenly. Every bite should burst with flavor! Now, it’s time to air fry your wings. Preheat your air fryer to 375°F (190°C) for about 5 minutes. This step ensures your wings cook evenly. Place the wings in a single layer in the air fryer basket. Avoid overcrowding, as this can affect crispiness. Cook the wings for 25 to 30 minutes. Make sure to flip them halfway through cooking. This helps both sides get that golden brown color. To make your wings super crispy, baking powder is key. It helps dry out the wings and adds crunch. Make sure to sprinkle it evenly during seasoning. This will make a big difference! Airflow is also important when using the air fryer. Arrange the wings in a single layer. If they overlap, they won’t crisp up. Give them space to breathe! Dipping sauces can elevate your crispy lemon pepper wings. Try ranch, blue cheese, or a spicy mayo. Each adds a tasty twist that complements the lemon flavor. For side dishes, consider celery sticks or a fresh salad. They balance the rich wings well. You can also serve with crispy fries or onion rings for a hearty meal. One common mistake is overcrowding the air fryer basket. This can lead to uneven cooking and soggy wings. Always ensure the wings have space. Another mistake is not patting the wings dry enough. Removing excess moisture is crucial for crispiness. Take a moment to dry them thoroughly with paper towels before seasoning. {{image_2}} You can spice up your crispy lemon pepper air fryer wings in fun ways. - Spicy Lemon Pepper Wings: Add heat with cayenne pepper or hot sauce. Mix it into your seasoning blend. This will give your wings a nice kick. - Garlic Parmesan Version: Swap lemon pepper for garlic and parmesan cheese. Toss cooked wings in melted butter, garlic, and parmesan for a rich flavor. Not everyone has an air fryer, and that's okay! - Oven-Baked Version for Crispy Wings: Preheat your oven to 425°F (220°C). Place wings on a baking tray lined with foil. Bake for 40-45 minutes, flipping halfway. This will give you crispy wings without an air fryer. - Grilling for a Smoky Flavor: Marinate wings with your seasoning and grill over medium heat. Cook for about 20-25 minutes, turning often. This adds a nice smoky flavor to your wings. You can easily adjust this recipe to fit your diet. - Gluten-Free Adjustments: Make sure your lemon pepper seasoning is gluten-free. Check labels to avoid hidden gluten in store-bought mixes. - Low-Carb Options: Use a low-carb seasoning blend. You can skip the baking powder if you're avoiding carbs. This keeps your wings tasty and fits your diet. After enjoying your crispy lemon pepper wings, let them cool down. This helps keep their texture. Place the wings in a shallow dish. Use airtight containers to keep them fresh. Glass or plastic containers work great. You can also use heavy-duty freezer bags. Just make sure to squeeze out air before sealing. To reheat, you have two choices: microwave or air fryer. The air fryer gives the wings a crispier texture. Preheat your air fryer to 350°F (175°C). Heat the wings for about 5-8 minutes. Flip them halfway for even heating. If you use a microwave, place the wings on a microwave-safe plate. Heat them for 1-2 minutes. Check to avoid overheating, which makes them tough. To freeze wings, wrap them tightly in plastic wrap. Then, put them in a freezer bag. Label the bag with the date. Frozen wings can last up to three months. To thaw, place them in the fridge overnight. For quick thawing, you can use the microwave. After thawing, reheat in the air fryer for best results. This keeps the wings crispy and tasty. To make air fryer wings crispy, start by drying them well. Moisture creates steam, which makes wings soggy. Use paper towels to pat them dry. Next, coat the wings with a mix of baking powder, salt, and seasonings. Baking powder helps crisp the skin. Avoid overcrowding the air fryer basket. Give each wing space to cook evenly. Flip the wings halfway through cooking. This ensures both sides get that golden crunch. Yes, you can use frozen chicken wings. However, there are a few adjustments. First, you must increase the cooking time. Instead of 25-30 minutes, cook for about 35-40 minutes. Also, do not thaw the wings before cooking. They can go straight from the freezer to the air fryer. This may affect the crispiness, so make sure to follow the same drying and seasoning steps. Lemon pepper wings go well with many sides. Try serving them with crispy fries or a fresh salad. Coleslaw adds a nice crunch and tang. You can also offer dipping sauces like ranch or blue cheese. These flavors complement the lemon pepper nicely. For a fun twist, add some celery and carrot sticks. They are perfect for dipping too! Cooked wings last about 3-4 days in the fridge. To store them, let them cool first. Place the wings in an airtight container or cover them tightly with plastic wrap. This keeps them fresh and prevents drying out. If you want to keep them longer, consider freezing them. Cooked wings can last up to 2-6 months in the freezer when stored properly. You can make perfect lemon pepper chicken wings with just a few steps. We covered essential ingredients, key preparation tips, and air frying methods to ensure crispiness. Remember to avoid common mistakes, like overcrowding the basket or skipping seasoning. Variations can keep your meals exciting, from spicy wings to gluten-free options. With proper storage tips, your leftovers will stay delicious. Enjoy experimenting with flavors and techniques for tasty results every time. Make your next gathering fun and flavorful with these wings!

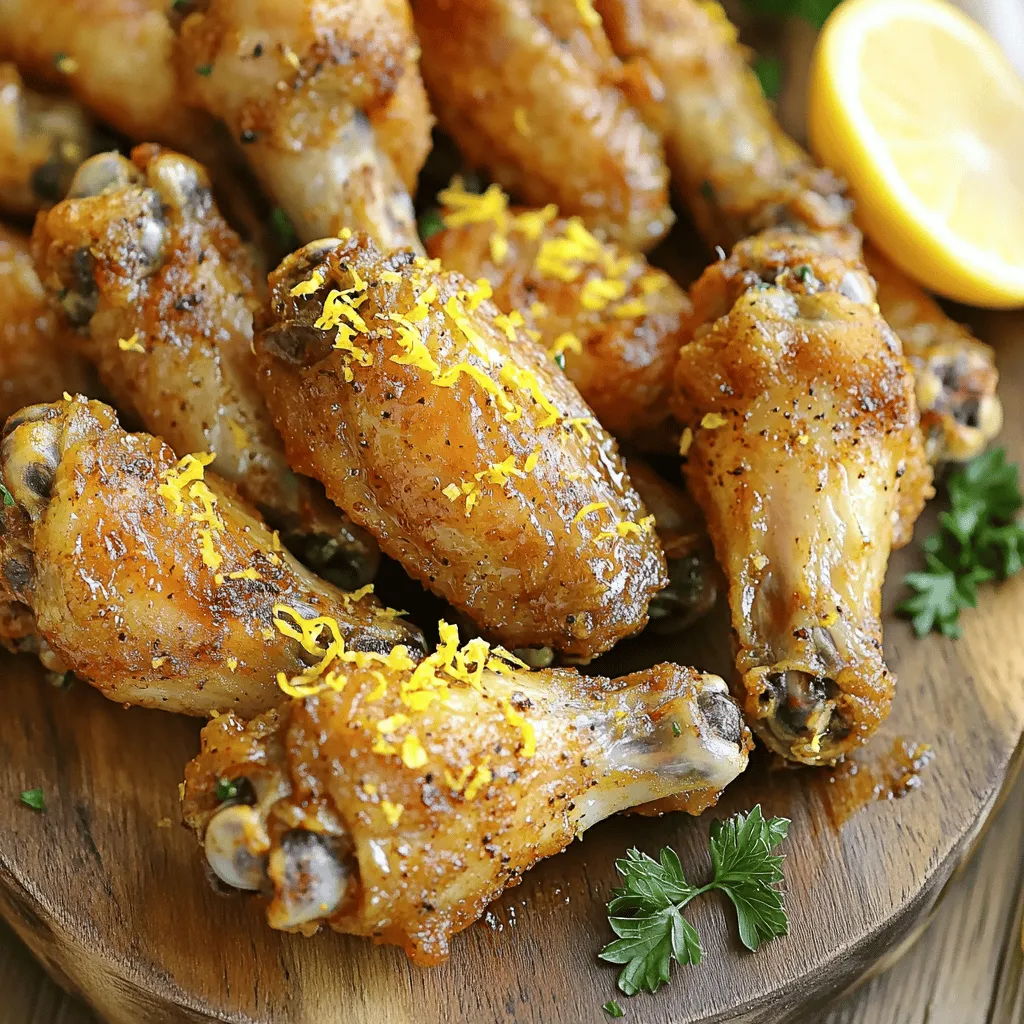
Are you ready to impress your friends with a finger-licking appetizer? In this blog post, I’ll guide you through making crispy lemon pepper air fryer wings that taste incredible. With …

Read more

Categories Appetizers

Maple Roasted Carrot & Farro Salad Fresh and Flavorful

September 15, 2025 by Chef Owen
- 1 cup farro - 4 large carrots, peeled and cut into sticks - 3 tablespoons olive oil, divided - 2 tablespoons pure maple syrup - 1 teaspoon ground cinnamon - Salt and pepper to taste - 1 cup baby spinach - 1/2 cup feta cheese, crumbled - 1/4 cup walnuts, roughly chopped - 1/4 cup dried cranberries - 2 tablespoons apple cider vinegar - Fresh parsley, chopped for garnish - Edible flowers for garnish - Lemon zest for brightness - Chopped green onions for a fresh kick - Sliced almonds for extra crunch - Farro: This grain is full of fiber and helps with digestion. - Carrots: They are rich in beta-carotene, which is good for your eyes. - Olive oil: A healthy fat that can lower heart disease risk. - Maple syrup: Offers a natural sweetness and contains antioxidants. - Cinnamon: Helps control blood sugar and adds a warm flavor. - Baby spinach: Packed with vitamins A and C, it boosts your immune system. - Feta cheese: Adds protein and calcium for strong bones. - Walnuts: These nuts provide omega-3 fatty acids, great for heart health. - Dried cranberries: They are high in antioxidants and add a sweet-tart flavor. - Apple cider vinegar: Can aid digestion and add tang to the salad. - Parsley: This herb is full of vitamins and adds a fresh taste. To start, I prepare the farro. First, I bring 4 cups of water to a boil in a medium pot. Once the water is boiling, I add 1 cup of farro and a pinch of salt. Then, I reduce the heat to low and let it simmer. I cook the farro for about 30 minutes. It should become tender but still have a nice bite. When it’s ready, I drain it and set it aside. This step forms the hearty base of our salad. Next, I turn my attention to the carrots. I preheat the oven to 400°F (200°C). On a baking sheet, I toss 4 large peeled and cut carrot sticks with 2 tablespoons of olive oil. I also add 2 tablespoons of pure maple syrup, 1 teaspoon of ground cinnamon, and a pinch of salt and pepper. I make sure each carrot stick is well coated. Then, I spread them out evenly on the baking sheet. I roast the carrots for 25-30 minutes. Halfway through, I stir them to ensure even cooking. They should come out tender and caramelized, bringing a sweet flavor to the dish. Now it’s time to bring it all together. In a large bowl, I mix the cooked farro with the roasted carrots. Next, I add 1 cup of baby spinach for freshness, followed by 1/2 cup of crumbled feta cheese for creaminess. To add crunch, I toss in 1/4 cup of roughly chopped walnuts. Finally, I include 1/4 cup of dried cranberries for a sweet touch. In a small bowl, I whisk the remaining 1 tablespoon of olive oil with 2 tablespoons of apple cider vinegar. I drizzle this over the salad and toss everything gently. I taste it and adjust the seasoning if needed. Before serving, I garnish with chopped parsley for a pop of color. Roasting carrots brings out their natural sweetness. Start with fresh, firm carrots. Peel and cut them into sticks for even cooking. Toss them in olive oil, maple syrup, cinnamon, salt, and pepper. This mix adds flavor and helps with caramelization. Spread them evenly on a baking sheet. Roast at 400°F for 25-30 minutes. Stir halfway to ensure even cooking. Look for a nice golden color. They should be tender but not mushy. You can swap ingredients based on your taste or what you have. If you don't have farro, use quinoa or barley instead. For a vegan option, replace feta with avocado or tofu. Want to skip walnuts? Try pecans or sunflower seeds for crunch. For a different sweetness, honey works well instead of maple syrup. You can also use any leafy green if baby spinach is not available. Serve your salad in a large, shallow bowl. This makes it easy to share and looks great. Arrange the roasted carrots on top for a colorful display. Fresh herbs like parsley add a nice touch. For extra flair, use edible flowers. They make your salad pop with color. Pair the salad with grilled chicken or fish for a full meal. Enjoy this fresh and vibrant dish at any gathering! {{image_2}} You can easily make this salad vegetarian or vegan. To keep it vegetarian, just use feta cheese. For a vegan option, replace the feta with avocado or a nut-based cheese. Both choices add creaminess and flavor. If you want to enhance the taste, try adding nutritional yeast for a cheesy flavor without dairy. This salad shines with seasonal vegetables. In spring, add fresh peas or radishes for a crisp bite. Summer versions can include cherry tomatoes or zucchini. In fall, try roasted sweet potatoes or butternut squash. Each vegetable brings its own taste and texture, keeping the salad exciting all year round. For a protein boost, consider chickpeas or grilled chicken. Chickpeas add a hearty texture and are great for plant-based diets. Simply toss a cup of drained chickpeas into the salad. If you prefer chicken, grill or roast it first. Slice it and mix it in before serving. Both options make the salad more filling and satisfying. Store any leftover salad in an airtight container. Keep it in the fridge for up to three days. This way, the flavors stay fresh. If you have extra roasted carrots, store them separately. They can lose their crispness in the salad. I don’t recommend freezing the salad. The textures can change when thawed. However, you can freeze the roasted carrots. Place them in a freezer-safe bag. When you’re ready to eat, let them thaw in the fridge. Reheat them in the oven at 350°F (175°C) for about 10 minutes. To keep your ingredients fresh, store the farro in a cool, dry place. Cooked farro should be in the fridge and eaten within five days. For fresh spinach, keep it in a bag with a paper towel to absorb moisture. This keeps it crisp. Feta cheese lasts longer when covered and stored in its brine. Farro is an ancient grain. It has a nutty flavor and chewy texture. To prepare it, start by rinsing 1 cup of farro under cold water. In a pot, bring 4 cups of water to a boil. Add a pinch of salt and the farro. Lower the heat and let it simmer for about 30 minutes. When done, drain the water and set the farro aside. It will add a hearty base to your salad. Yes, you can prepare the salad in advance. Cook the farro and roast the carrots ahead of time. Store them separately in the fridge. When ready to serve, mix the ingredients together. This salad tastes great chilled or at room temperature. Just add the dressing right before serving for the best flavor. This salad pairs well with many dishes. Try serving it with grilled chicken or fish for protein. It also complements roasted vegetables nicely. A light soup or a fresh bread makes a great side. You can enjoy this salad on its own too. The flavors are bright and satisfying, making it perfect for any meal! This post covered everything you need to make a tasty farro salad. We looked at the key ingredients and their benefits. I shared easy step-by-step instructions for preparation. You learned tips for roasting carrots and presenting your dish nicely. We also explored variations, including vegan options and how to add protein. Lastly, I provided storage tips to keep leftovers fresh. By following these steps, you can enjoy a healthy and delicious meal. Happy cooking!

Looking for a fresh and flavorful dish that bursts with taste? You’re in the right place! This Maple Roasted Carrot & Farro Salad combines sweet maple flavors with earthy farro …

Read more

Categories Salads

Sourdough Pumpkin Chocolate Chip Muffins Delight

September 15, 2025 by Chef Owen
- 1 cup sourdough starter (active) - 1 cup canned pumpkin puree - 1/2 cup brown sugar - 1/4 cup granulated sugar The sourdough starter gives these muffins a nice tang. It adds depth to the flavor. Canned pumpkin puree brings moisture and richness. The sugars add sweetness and help the muffins rise. - 2 large eggs - 1/2 cup vegetable oil - 2 cups all-purpose flour - 1 teaspoon baking soda - 1/2 teaspoon baking powder - 1 teaspoon ground cinnamon - 1/2 teaspoon ground nutmeg - 1/4 teaspoon ground ginger - 1/2 teaspoon salt Eggs bind everything together. They help the muffins rise. Vegetable oil keeps them moist and tender. The flour provides structure, while baking soda and baking powder help them rise. The spices add warmth and flavor. - Pumpkin seeds - Chocolate chip variations Adding pumpkin seeds on top gives a nice crunch. You can also use dark chocolate chips or white chocolate for a twist. These options make your muffins unique and fun! Start by mixing your wet ingredients. In a large bowl, add: - 1 cup sourdough starter (active) - 1 cup canned pumpkin puree - 1/2 cup brown sugar - 1/4 cup granulated sugar - 1/2 cup vegetable oil - 2 large eggs - 1 teaspoon vanilla extract Whisk these together until smooth. This helps blend flavors well. Next, prepare your dry ingredients in another bowl. Combine: - 2 cups all-purpose flour - 1 teaspoon baking soda - 1/2 teaspoon baking powder - 1 teaspoon ground cinnamon - 1/2 teaspoon ground nutmeg - 1/4 teaspoon ground ginger - 1/2 teaspoon salt Mix them well to ensure even distribution of spices and leavening agents. Now, combine the wet and dry mixtures. Gradually add the dry ingredients to the wet bowl. Stir gently until just combined. Avoid overmixing to keep the muffins light and airy. Once mixed, fold in the chocolate chips. Use 1 cup of semi-sweet chocolate chips. This adds a sweet surprise in every bite! Prepare your muffin tin. Fill each cup about two-thirds full with the batter. For added crunch, sprinkle some pumpkin seeds on top if you like. Bake in your preheated oven at 350°F (175°C) for 18-20 minutes. Check for doneness by inserting a toothpick into the center of a muffin. It should come out clean. After baking, let the muffins cool in the tin for 5 minutes. Then transfer them to a wire rack to cool completely. Enjoy these treats warm or at room temperature! Preventing overmixing Overmixing can ruin the texture of your muffins. It develops gluten, making muffins tough. Mix the wet and dry ingredients gently. Stop as soon as you see no dry flour. The importance of measuring ingredients accurately Accurate measurements are key. Use a kitchen scale for the flour and sugar. Spooning and leveling flour in a cup can lead to too much flour. This can cause dry muffins. Best practices for cooling muffins After baking, cool muffins in the tin for about 5 minutes. This helps keep them moist. Then, transfer them to a wire rack. This allows air to circulate, preventing sogginess. Serving ideas for maximum appeal Serve the muffins warm or at room temperature. A rustic wooden platter adds charm. Dust with powdered sugar for a nice touch. Pair them with whipped butter for a tasty treat. Addressing dry or dense muffins If your muffins turn out dry, check your oven’s temperature. An oven that’s too hot can dry them out. Ensure you use enough liquid, like pumpkin puree. This keeps them moist and fluffy. Managing muffin tops Muffins that do not rise well may need more leavening agents. Check the freshness of your baking powder and baking soda. Use the right amount of batter in each cup—two-thirds full is best. {{image_2}} You can make these muffins even more tasty. Adding nuts like walnuts or pecans gives a nice crunch. Dried fruits, such as raisins or cranberries, add sweetness and chewiness. You can also swap out semi-sweet chocolate chips for dark or white chocolate for a twist. If you need gluten-free options, use a gluten-free flour blend. This keeps the texture light and fluffy. For a vegan version, replace eggs with flax eggs. Mix one tablespoon of ground flaxseed with three tablespoons of water for each egg. You can also swap vegetable oil with coconut oil or applesauce for a healthier fat choice. To spice things up, try adding other seasonal spices. Cloves and allspice can give your muffins a warm flavor. You can also use holiday-themed ingredients. Think about adding cranberries for Thanksgiving or peppermint extract for winter. These small changes make your muffins special for any occasion. To keep your sourdough pumpkin chocolate chip muffins fresh, store them in an airtight container. This helps lock in moisture and flavor. You can use a plastic or glass container with a lid. If you want to save space, a resealable plastic bag also works well. Just make sure to squeeze out as much air as possible before sealing it. Freezing muffins is a great way to enjoy them later. To freeze, first let the muffins cool completely. Then, wrap each muffin in plastic wrap. Place them in a freezer bag or container. This way, they won't stick together. When you're ready to eat one, take it out and let it thaw at room temperature. You can also reheat it in the microwave for about 20-30 seconds. These muffins can last about 3 days at room temperature. Keep them in a cool, dry place. If you live in a humid area, it's best to refrigerate them. In the fridge, they can last up to a week. Just remember to let them cool before you store them. This helps prevent sogginess. Making a sourdough starter at home is simple. Start with equal parts flour and water. You can use all-purpose flour or whole wheat flour. Mix 1 cup of flour with 1 cup of warm water in a clean jar. Stir until smooth. Cover it loosely with a cloth and leave it at room temperature. Feed your starter daily. Add 1/2 cup of flour and 1/2 cup of water. Mix well each time you feed it. In about 5 to 7 days, you should see bubbles. This means your starter is active. It should smell pleasant and sour. You can now use it in your muffins! Yes, you can use fresh pumpkin! Using fresh pumpkin can give a different taste and texture. It may be a bit more work, but it’s worth it. To prepare fresh pumpkin, cut it in half and remove the seeds. Roast the halves in the oven until soft. This usually takes about 30 to 45 minutes at 400°F (200°C). After roasting, let it cool, then scoop out the flesh. Blend it until smooth. The downside is that fresh pumpkin can have more water content. This might affect your muffin's texture. You may need to adjust other ingredients to balance moisture. These muffins taste great with many things! Here are some ideas: - Spreads: Try butter, cream cheese, or pumpkin spice spread. - Beverages: Coffee, tea, or hot chocolate pair nicely. - Fruits: Fresh fruit or a fruit salad can add freshness. Serving them warm enhances their flavor. Enjoy your muffins fresh from the oven! In this post, we explored how to make sourdough pumpkin chocolate chip muffins. We covered key ingredients, from sourdough starter to spices. I shared step-by-step instructions for mixing and baking. You discovered helpful tips and variations to customize your muffins. Lastly, we discussed the best ways to store them. These muffins offer warmth and joy for any occasion. Enjoy baking and sharing them with others!

Craving a sweet treat that’s both cozy and unique? You’ll love these Sourdough Pumpkin Chocolate Chip Muffins! They blend the rich taste of pumpkin with the delightful tang of sourdough. …

Read more

Categories Breakfast

Caramel Apple Cinnamon Roll Bake Delightful Treat

September 15, 2025 by Chef Owen
To make this tasty Caramel Apple Cinnamon Roll Bake, you will need: - 2 cans (12.4 oz each) refrigerated cinnamon rolls - 2 large apples, peeled, cored, and diced - 1/2 cup packed brown sugar - 1/4 cup granulated sugar - 2 teaspoons ground cinnamon - 1/2 teaspoon nutmeg - 1/4 cup pecans or walnuts, chopped (optional) - 1 cup caramel sauce (store-bought or homemade) - 1 tablespoon butter, melted - 1/2 teaspoon vanilla extract - 1/4 teaspoon salt These ingredients come together to create a warm, gooey treat. Choosing the right apples makes a big difference. I recommend using: - Granny Smith: They are tart and hold their shape well. - Honeycrisp: They are sweet and crunchy, adding a nice balance. Both types work great in this dish. Feel free to mix things up! Here are some fun ideas: - Nuts: You can add chopped pecans or walnuts for a crunchy texture. - Dried fruit: Raisins or cranberries can add extra sweetness. - Spices: A pinch of ginger or allspice can give a warm flavor. These add-ins can enhance your bake, making it even more delightful. First, I preheat my oven to 350°F (175°C). This step warms the oven for even baking. Next, I lightly grease a 9x13 inch baking dish. This keeps my bake from sticking. In a large bowl, I combine the diced apples, brown sugar, granulated sugar, ground cinnamon, nutmeg, and chopped nuts, if I choose to use them. I mix these together until the apples are covered well. This mixture will add flavor and sweetness. Then, I open the cans of cinnamon rolls. I cut each roll into quarters. I place these pieces in my greased baking dish. This helps them bake nicely. I take my apple mixture and pour it evenly over the cinnamon rolls. I spread it out so every bite has apple goodness. In a separate small bowl, I mix melted butter, vanilla extract, and salt. I drizzle this mixture over the apple and cinnamon rolls. This adds rich flavor. Next, I drizzle half of the caramel sauce over the whole dish. I save the other half for later. Now, it’s time to bake! I place the dish in the oven for 25-30 minutes. I watch for the cinnamon rolls to become golden brown and the apples to soften. When the baking time is up, I take the dish out of the oven. I let it cool for a few minutes. Then, I drizzle the remaining caramel sauce over the top. To serve, I scoop out portions while it's still warm. For a special treat, I add a scoop of vanilla ice cream on the side. Enjoying this warm bake with ice cream is pure joy! To get the best results, follow these tips. First, preheat your oven to 350°F (175°C). This ensures even cooking. Next, use a 9x13 inch baking dish. Grease it well to prevent sticking. When mixing the apples, make sure they are coated well with sugar and spices. This adds flavor to every bite. Cut the cinnamon rolls into quarters for better distribution. Spread them evenly in the dish. Pour the apple mix over them, making sure to cover all rolls. Drizzle melted butter, vanilla, and salt on top. This adds richness. Half of the caramel sauce should go on before baking. Save the rest for serving. Avoid these common mistakes for a perfect bake. First, don’t skip greasing the pan. Your dish will stick and be hard to serve. Second, overbaking can dry out the rolls. Keep an eye on them around the 25-minute mark. Using the wrong apples can also affect taste. Stick with Granny Smith or Honeycrisp for the best flavor. If you skip the nuts, you lose nice crunch and depth. Lastly, don’t forget to let it cool for a few minutes. This helps the caramel set properly. Enhancing flavor can make this dish even better. Try adding a pinch of ginger or allspice to the apple mixture for warmth. You can also use maple syrup in place of some brown sugar. This adds a unique twist. For a richer topping, mix cream cheese into the caramel sauce. This makes it creamier and adds a touch of tang. Experiment with different nuts, like almonds or pecans, for added crunch. Lastly, serve it warm with a scoop of vanilla ice cream. This makes it a true delight! {{image_2}} If you want a gluten-free option, use gluten-free cinnamon rolls. Many stores sell these now. Just make sure to check the labels for hidden gluten. You can also use a gluten-free flour blend to make your own cinnamon rolls. This way, everyone can enjoy this tasty bake. You can change the toppings to fit your taste. Try using chopped pecans or walnuts for extra crunch. If you love chocolate, add chocolate chips on top. You can also sprinkle some shredded coconut for a tropical twist. These options let you make this dish your own. You can make this dish fit any season. In fall, add pumpkin spice to the apple mix for a warm flavor. For winter, consider adding cranberries for a tart kick. In spring, use fresh berries instead of apples for a light, fruity version. Each season brings new flavors and keeps this dish exciting. To keep your Caramel Apple Cinnamon Roll Bake fresh, store it in an airtight container. Let it cool completely before sealing. This prevents moisture build-up and keeps the rolls soft. You can store it in the fridge for up to three days. If you want to enjoy it later, freezing is a great option. To freeze your Caramel Apple Cinnamon Roll Bake, first, let it cool completely. Cut it into portions and wrap each piece tightly in plastic wrap. Then, place the wrapped pieces in a freezer-safe bag or container. This way, they will stay good for up to three months. When you're ready to eat, just take out a piece and thaw it in the fridge overnight. Reheat your leftovers in the oven for the best results. Preheat the oven to 350°F (175°C). Place the cinnamon roll bake in an oven-safe dish, cover it with foil, and heat for 15-20 minutes. This warms it through without making it dry. If you’re in a hurry, you can microwave a single portion for about 30 seconds to a minute. Just be careful not to overheat, as it can become tough. Enjoy your warm treat! Yes, you can prepare this dish ahead of time. You can assemble the ingredients in the baking dish and store it in the fridge. Just cover it tightly with plastic wrap. When you are ready to bake, let it sit for about 15 minutes at room temperature. This helps the cinnamon rolls rise and bake evenly. To check if your Caramel Apple Cinnamon Roll Bake is done, look for a golden-brown color on top. The apples should be tender, and you can insert a toothpick into the center. If it comes out clean, your dish is ready. Bake it for 25-30 minutes at 350°F (175°C). This treat pairs well with a scoop of vanilla ice cream. You can also serve it with whipped cream or extra caramel sauce. For a nice touch, add some chopped nuts on top for crunch. It’s perfect for brunch or a sweet dessert. This recipe guide detailed all you need for a Caramel Apple Cinnamon Roll Bake. First, we covered the essential ingredients and how to prep them. Then, I walked you through each step of baking, including tips for perfection. We also explored variations, storage, and answers to common questions. I hope you find joy in making this treat. With the right apples and a few tricks, you'll create a warm, tasty dessert. Enjoy every bite and share your success!

Looking for a sweet treat that’s perfect for any occasion? You’re in for a delight! My Caramel Apple Cinnamon Roll Bake combines warm, gooey cinnamon rolls with juicy apples and …

Read more

Categories Desserts

Cinnamon Apple Cake Delightful Recipe to Try Today

September 15, 2025 by Chef Owen
To make the Cinnamon Apple Cake, gather these key items: - 2 cups all-purpose flour - 1 ½ teaspoons baking powder - 1 teaspoon baking soda - ½ teaspoon salt - 1 teaspoon ground cinnamon - ½ teaspoon nutmeg - ¾ cup unsalted butter, softened - 1 cup brown sugar, packed - ½ cup granulated sugar - 3 large eggs - 1 teaspoon vanilla extract - 1 cup buttermilk - 2 cups apples, peeled, cored, and diced (about 2 medium apples) - 1 tablespoon lemon juice - ½ cup chopped walnuts or pecans (optional) - 1 tablespoon granulated sugar (for topping) You can add a few items for extra flavor or texture: - ½ cup chopped walnuts or pecans - A sprinkle of powdered sugar for garnish - A scoop of vanilla ice cream on the side If you have dietary needs, consider these swaps: - For a gluten-free option, use a gluten-free flour mix. - To make it dairy-free, swap buttermilk for almond or oat milk with a splash of vinegar. - For a vegan cake, replace eggs with flax eggs or applesauce and use plant-based butter. These choices help everyone enjoy this tasty cake! 1. First, preheat your oven to 350°F (175°C). Grease and flour a 9x13-inch baking pan. This helps the cake not stick. 2. In a medium bowl, mix the dry ingredients. Whisk together 2 cups of flour, 1 ½ teaspoons of baking powder, 1 teaspoon of baking soda, ½ teaspoon of salt, 1 teaspoon of cinnamon, and ½ teaspoon of nutmeg. Set this aside. 3. In a large bowl, cream together ¾ cup of softened butter, 1 cup of brown sugar, and ½ cup of granulated sugar. Mix until it is light and fluffy, about 3 to 4 minutes. 4. Add 3 large eggs one at a time to the mixture. Mix well after each egg. Stir in 1 teaspoon of vanilla extract. 5. Gradually add the dry ingredients to the butter mixture. Alternate with 1 cup of buttermilk. Start and end with the dry mix. Stir until just combined. 6. In another bowl, toss 2 cups of peeled, cored, and diced apples with 1 tablespoon of lemon juice. If you like, add ½ cup of chopped walnuts or pecans. Gently fold this apple mix into the batter. 7. Pour the cake batter into your prepared pan. Smooth the top with a spatula. 8. Sprinkle 1 tablespoon of granulated sugar on top of the batter. This will make a sweet crust. 9. Bake in the oven for 35 to 40 minutes. Check with a toothpick. If it comes out clean, the cake is done. 10. Once baked, take the cake out of the oven. Let it cool in the pan for about 10 minutes. 11. Carefully transfer the cake to a wire rack to cool completely. 12. Serve the cake warm or at room temperature. For a treat, dust it with powdered sugar or add a scoop of vanilla ice cream. To make your cake perfect, follow these tips: - Measure ingredients carefully. Use the right tools for dry and wet ingredients. - Room temperature eggs and butter mix better into the batter. Set them out before you start. - Don’t overmix the batter. Mix until just combined for a light cake. - Check your oven temperature. An oven thermometer can help ensure accurate baking. Avoid these common slip-ups for the best results: - Skipping the lemon juice. It helps keep apples fresh and bright. - Not greasing the pan well. This can cause your cake to stick. - Opening the oven door too soon. This lets out heat and can cause sinking. - Baking too long. Keep an eye on the cake. Use a toothpick to check doneness. Add these ideas to boost flavor: - Add a pinch of salt to balance the sweetness. It enhances all the flavors. - Try different spices. A bit of ginger or allspice can add depth. - Mix in some raisins or cranberries. They add a nice chew and sweetness. - Top with whipped cream or cream cheese frosting. It pairs well with the warm cake. {{image_2}} To make this cake gluten-free, swap out the all-purpose flour. Use a gluten-free flour blend instead. Many blends work well in baking. Just ensure it has xanthan gum for the right texture. Follow the same steps in the recipe. Your cake will still be moist and tasty! For a vegan version, you can replace the eggs. Use a flaxseed meal instead: combine 1 tablespoon of flaxseed with 2.5 tablespoons of water. Let it sit for a few minutes to thicken. Swap the buttermilk for almond milk or any plant milk. Use coconut oil instead of butter for a rich flavor. This cake will still rise beautifully. You can change the spices for new flavors. Try cardamom or ginger for a unique twist. Add cocoa powder for a chocolatey version. You can also mix in dried fruits like cranberries or raisins for added sweetness. Experiment with citrus zest to brighten up the taste. Each change gives a new twist to the classic cake! After your cake cools, store it in an airtight container. This keeps it fresh. You can also wrap it in plastic wrap, then in foil. Place it at room temperature for up to three days. For longer storage, move it to the fridge. It can last up to a week in the fridge. Just remember, it might get a bit dry over time. To enjoy your cake warm, preheat your oven to 350°F (175°C). Place slices on a baking sheet. Cover them loosely with foil to keep moisture. Heat for about 10-15 minutes. This keeps the cake soft and tasty. You can also use a microwave. Heat a slice for about 15-20 seconds. Check to ensure it doesn't get too hot. Freezing is a great option for longer storage. First, let the cake cool completely. Then, wrap slices in plastic wrap. After that, place them in a freezer bag. Remove as much air as possible to prevent freezer burn. You can freeze the cake for up to three months. When ready to eat, thaw it in the fridge overnight. Reheat as mentioned above for the best taste. Yes, you can use many apple types. Granny Smith apples add tartness, while Fuji apples bring sweetness. You can mix different apples for a unique taste. Experiment with your favorite apples to find the best flavor. Each type has its own texture, which can change how the cake turns out. If your cake is dry, you have options. First, check your baking time. Overbaking can dry out the cake. Next, add a simple syrup. Mix equal parts sugar and water, boil, and brush it on. You can also serve the cake with whipped cream or ice cream. This adds moisture and flavor. To make the cake healthier, consider these swaps. Use whole wheat flour instead of all-purpose flour. This adds fiber and nutrients. You can replace some butter with unsweetened applesauce. This keeps moisture and cuts fat. Lastly, reduce sugar by using a sugar substitute or less brown sugar. These changes help you enjoy a guilt-free treat! This blog post shared easy steps to make a delicious cinnamon apple cake. You learned about key ingredients, how to bake, and tips for great results. We also discussed fun variations for different diets and how to store your cake. As you bake, remember to enjoy the process. Each step leads to a warm, tasty treat. With this guide, you’ll impress family and friends with your baking skills. Now, it’s time to get started on your cake adventure!

If you love the warm, comforting flavor of cinnamon and apple, you’re in for a treat! This Cinnamon Apple Cake is moist, delicious, and easy to make. In this post, …

Read more

Categories Desserts

Pumpkin Spice Dump Cake Easy and Delicious Dessert

September 15, 2025 by Chef Owen
- 1 (15 oz) can of pumpkin puree - 1 (12 oz) can of evaporated milk - 3 large eggs - 1 cup sugar - 1 teaspoon vanilla extract - 2 teaspoons pumpkin pie spice - 1/2 teaspoon salt - 1 box yellow cake mix - 1 cup unsalted butter, melted - 1 cup chopped pecans (optional) - Whipped cream for serving (optional) To make the best pumpkin spice dump cake, gather these simple ingredients. The pumpkin puree gives it that rich flavor. The evaporated milk adds creaminess. The eggs bind everything together, while sugar brings sweetness. Vanilla extract adds a warm note. Pumpkin pie spice gives that cozy fall taste. The salt helps balance the flavors. The yellow cake mix makes it easy to prepare. Melted butter creates a golden top. If you like crunch, add chopped pecans. Whipped cream is a tasty way to serve it. This cake is a comfort dessert with easy steps. You can enjoy it warm or cold. 1. Preheat your oven to 350°F (175°C). This step is key. A hot oven helps the cake rise well. 2. In a large bowl, combine the pumpkin puree, evaporated milk, eggs, sugar, vanilla extract, pumpkin pie spice, and salt. Use a whisk to mix until smooth. This blend gives the cake its rich flavor. 1. Pour the pumpkin mixture into a greased 9x13 inch baking dish. Spread it evenly across the bottom. 2. Next, sprinkle the dry yellow cake mix over the pumpkin filling. Make sure to cover it fully. Do not stir! This keeps the layers intact. 3. Drizzle the melted butter evenly over the top of the cake mix. If you want extra crunch, add the chopped pecans on top of the butter. 1. Place the dish in the preheated oven. Bake for 50-60 minutes. The top should turn golden brown. 2. To check if it’s done, insert a toothpick into the center. If it comes out clean, the cake is ready. Let the cake cool a bit before serving. This cake is warm, comforting, and perfect for any fall gathering. - Ensuring proper bake time and temperature: Preheat your oven to 350°F (175°C). Bake for 50-60 minutes. Check for a golden top and clean toothpick. This means it's done! Adjust time as needed for your oven. - How to avoid a soggy bottom: Make sure to evenly sprinkle the cake mix over the pumpkin layer. Do not stir! This helps keep the bottom firm. Drizzle melted butter evenly. It creates a barrier against sogginess. - Presentation tips for serving: Cut the cake into squares for neat servings. Drizzle extra melted butter on top. A sprinkle of cinnamon or more pecans adds flair and flavor. Serve warm for the best taste! - Accompaniments such as whipped cream: A dollop of whipped cream makes this dessert shine. It adds creaminess and balances the spices. You can also use vanilla ice cream for a fun twist. - Not overmixing the layers: Remember, mixing is not your friend here! Overmixing can ruin the texture. Just whisk the pumpkin filling until smooth, then layer without stirring. - Using fresh pumpkin vs. canned: Canned pumpkin is best for this recipe. It has a smooth texture and blends well. Fresh pumpkin can be watery and may change the taste. If you use fresh, cook and drain it well first. {{image_2}} You can change the taste of your pumpkin spice dump cake easily. Try using different spices, like cinnamon or nutmeg, to add warmth. Each spice brings a new twist. If you love chocolate, toss in some chocolate chips. They melt and mix well with the pumpkin. For a sweet surprise, drizzle caramel over the top before baking. It makes every bite rich and indulgent. If you need gluten-free options, look for a gluten-free cake mix. Many brands make a mix that works great in this recipe. For those who want a vegan version, substitute eggs with flaxseed meal or applesauce. Use coconut milk instead of evaporated milk. These swaps keep the cake moist and tasty. Add a festive flair by mixing in some cranberries or nuts. Chopped pecans give a nice crunch and pair well with pumpkin. You can also transform this cake into a pumpkin dessert trifle. Layer the cake with whipped cream and extra pumpkin filling in a glass dish. This looks beautiful and tastes amazing! To keep your pumpkin spice dump cake fresh, store it in the fridge. Place it in an airtight container. This helps keep the cake moist. You can also cover it tightly with plastic wrap. It will stay good for about 3 to 5 days. If you want to save it longer, freezing is a great option. Cut the cake into squares. Wrap each piece in plastic wrap, then place them in a freezer bag. This way, you can enjoy it later. The cake can last up to 3 months in the freezer. Just remember to label the bag with the date. When it’s time to enjoy your cake again, reheating is easy. The best method is to use the oven. Preheat your oven to 350°F (175°C). Place a piece of cake on a baking sheet. Warm it for about 10-15 minutes. This keeps the cake soft and tasty. You can also use the microwave for quick reheating. Place a slice on a microwave-safe plate. Heat it for about 15-20 seconds. If you want it warm all the way through, check it after heating. For the best taste and texture, eat your pumpkin spice dump cake within a week. After that, it may lose some flavor. If frozen, the cake can taste great up to 3 months later. However, the sooner you eat it, the better it will be! A dump cake is a simple dessert. You layer ingredients in a pan without mixing. This method saves time and effort. You usually pour fruit or a filling in first. Then, you top it with dry cake mix. Finally, you drizzle butter on top. The cake bakes up into a sweet, gooey treat. It's perfect for busy cooks! Yes, you can use fresh pumpkin! Start by cooking the pumpkin. You can roast it in the oven or steam it. Once soft, scoop out the flesh and mash it. You need about 2 cups of fresh puree. Strain it to remove excess water. This keeps the cake from getting too soggy. Taste may vary slightly, but it will still be delicious! You can prep the pumpkin mixture a day early. Store it in the fridge in a sealed container. On baking day, pour it into the pan. Then, sprinkle the cake mix and butter on top. Bake as directed. You can also bake it completely and serve later. Just reheat it in the oven or microwave. Yes, you can make it gluten-free easily! Look for a gluten-free yellow cake mix. Many brands make great substitutes. Make sure to check labels for gluten-free certification. All other ingredients in this recipe are naturally gluten-free. This way, everyone can enjoy this tasty dessert! This blog post has covered all you need to make a tasty pumpkin spice dump cake. We discussed ingredients, step-by-step instructions, and tips to avoid common mistakes. I shared how to store your cake and even added some fun variations. In the end, feel free to explore your creativity with flavors and toppings. Enjoy every bite of your delicious creation while making it uniquely yours. Happy baking!

Fall is the perfect time to indulge in warm, cozy flavors, and there’s no better way to celebrate than with a Pumpkin Spice Dump Cake. This easy and delicious dessert …

Read more

Categories Desserts

Old-Fashioned Apple Cobbler Simple and Tasty Treat

September 15, 2025 by Chef Owen
To make a classic old-fashioned apple cobbler, gather these key ingredients: - 6 medium apples (like Granny Smith or Honeycrisp), peeled, cored, and sliced - 1 cup granulated sugar - 1 teaspoon cinnamon - 1/4 teaspoon nutmeg - 1 tablespoon lemon juice - 1 tablespoon all-purpose flour - 1 cup all-purpose flour (for the crust) - 1/2 cup unsalted butter, softened - 1/2 teaspoon baking powder - 1/4 teaspoon salt - 1/4 cup milk - 1 teaspoon vanilla extract You can personalize your cobbler with these options: - Add a pinch of ginger for extra warmth. - Use brown sugar instead of granulated sugar for a richer taste. - Toss in nuts like walnuts or pecans for crunch. - Mix in dried fruits like raisins or cranberries for added sweetness. If you have dietary restrictions, consider these swaps: - Use coconut oil instead of butter for a dairy-free option. - Replace all-purpose flour with almond or oat flour for gluten-free. - Use a sugar substitute for a low-sugar version. - Swap milk for almond or soy milk to keep it dairy-free. 1. Start by preheating your oven to 350°F (175°C). This step warms the oven for even baking. 2. Grab a large bowl and slice 6 medium apples. Use Granny Smith or Honeycrisp for the best taste. 3. Peel and core the apples before slicing. 4. Add 1 cup of granulated sugar, 1 teaspoon of cinnamon, and 1/4 teaspoon of nutmeg to the apples. 5. Squeeze in 1 tablespoon of lemon juice and mix in 1 tablespoon of flour. Toss until all slices are coated. 6. Pour the apple mixture into a greased 9x13 inch baking dish. Spread it out evenly. 1. In another bowl, mix 1 cup of all-purpose flour, 1/2 teaspoon of baking powder, and 1/4 teaspoon of salt. 2. Soften 1/2 cup of unsalted butter and blend it into the flour mix with your fingers. Aim for coarse crumbs. 3. Add 1/4 cup of milk and 1 teaspoon of vanilla extract. Stir until just combined. The batter should be thick but pourable. 4. Pour the batter over the apples in the baking dish. Spread it gently to cover the apples as much as you can. 5. Bake for 35-40 minutes. The top should turn golden brown. 1. Use a toothpick to check doneness. Insert it into the center of the cobbler. If it comes out clean, the cobbler is ready. 2. Look for a golden-brown top. This color means the crust is baked through. 3. Allow the cobbler to cool slightly before serving. This helps the flavors meld together. To boost the taste of your apple cobbler, use a mix of apples. I suggest Granny Smith for tartness and Honeycrisp for sweetness. This blend brings depth and balance to your dish. You can also add a pinch of brown sugar to give it a richer flavor. A splash of bourbon or rum in the apple mix adds warmth and a hint of spice. Finally, a sprinkle of sea salt on top before baking can enhance the sweetness of the apples. One common mistake is not peeling the apples. The skin can be tough and chewy. Always peel and core your apples for the best texture. Another mistake is overmixing the batter. Mix just until combined to keep the crust light. Lastly, don’t skip the cooling time. Letting the cobbler cool slightly before serving helps the flavors meld together. Serve your apple cobbler warm with a scoop of vanilla ice cream. The cold ice cream melts over the warm cobbler, creating a delightful contrast. You can also add a dollop of whipped cream for a creamy touch. For extra flair, dust the top with powdered sugar or add a sprinkle of cinnamon. Enjoy it as a comforting dessert after dinner or as a sweet treat anytime! {{image_2}} You can switch up apples for other fruits to make your cobbler unique. Try juicy peaches, sweet berries, or tart cherries. Each fruit brings its own flavor. You can mix fruits too! For example, combine apples with blueberries for a tasty twist. The key is to use fruits that can hold their shape while baking. If you need a gluten-free option, use gluten-free flour instead of regular flour. Many brands work well as a one-to-one substitute. You may also try almond flour or coconut flour for a different taste. Just remember, the texture may vary slightly. Add a bit more liquid if the batter seems too dry. To make a vegan cobbler, swap the butter for coconut oil or vegan butter. Use plant-based milk like almond or soy milk instead of regular milk. For eggs, you can use a flaxseed meal mix. Mix one tablespoon of flaxseed with three tablespoons of water. Let it sit for a few minutes to thicken. This mix will help bind the cobbler together. To keep your apple cobbler fresh, let it cool first. Cover it with plastic wrap or foil. You can also store it in an airtight container. Place it in the fridge for up to three days. The flavors will keep well, and you can enjoy it later. If you want to freeze your cobbler, first let it cool completely. Cut it into squares or leave it whole. Wrap the cobbler tightly in plastic wrap, then place it in a freezer bag. It can last for up to three months in the freezer. When you're ready to eat it, just thaw it in the fridge overnight. To reheat your cobbler, preheat the oven to 350°F (175°C). Place the cobbler in an oven-safe dish. Cover it with foil to prevent over-browning. Heat it for about 15 to 20 minutes. If you like it warm and crispy, remove the foil for the last few minutes. Enjoy your warm dessert with ice cream! You can tell the cobbler is done when the top turns golden brown. A toothpick test helps too. Insert a toothpick into the center. If it comes out clean, your cobbler is ready. It usually takes about 35 to 40 minutes in the oven. Let it cool slightly after baking to finish cooking. Yes, you can use canned apples if you are short on time. Choose those in juice or light syrup for a better taste. Drain the apples well to avoid extra liquid in your cobbler. This can help keep your cobbler from getting too soggy. Apple cobbler tastes great on its own, but you can add a few extras. A scoop of vanilla ice cream on top is a classic choice. You can also serve it with whipped cream for a creamy touch. For a fun twist, try it with caramel sauce or a sprinkle of nuts. In this post, we explored the key ingredients for making a great cobbler. We looked at optional ingredients to customize your recipe and substitutions for dietary needs. I shared step-by-step instructions, tips for enhancing flavors, and common mistakes to avoid. With a variety of fruit options and storage tips, you can enjoy your cobbler any time. Remember, great cobbler starts with good choices and care. Now, grab your ingredients and get baking!

Craving a warm, sweet treat that’s easy to make? Look no further! This Old-Fashioned Apple Cobbler is your perfect answer. You’ll love the simple ingredients and clear steps I share …

Read more

Categories Desserts

Pumpkin Chocolate Chip Oatmeal Muffins Delightful Treat

September 15, 2025 by Chef Owen
To make the best pumpkin chocolate chip oatmeal muffins, you need some key ingredients: - 1 cup rolled oats - 1 cup pumpkin puree (canned or homemade) - 1/2 cup brown sugar - 1/4 cup honey or maple syrup - 1/4 cup vegetable oil or melted coconut oil - 1 large egg - 1 teaspoon vanilla extract - 1 teaspoon baking powder - 1/2 teaspoon baking soda - 1 teaspoon ground cinnamon - 1/2 teaspoon ground nutmeg - 1/4 teaspoon salt - 1/2 cup semi-sweet chocolate chips These ingredients give the muffins their moist texture and sweet flavor. You can add extra flavor or texture with optional ingredients. Here are a few: - 1/4 cup chopped walnuts - Extra spices like ginger or cloves Adding walnuts gives a nice crunch. More spices can enhance the warm flavors. Sometimes, you may not have all the ingredients on hand. Here are some easy swaps: - Swap brown sugar for coconut sugar for a lower glycemic option. - Use applesauce instead of oil to reduce fat. - Replace the egg with a flax egg for a vegan version. These substitutions can change the texture and flavor slightly, but they work well. Enjoy experimenting to find your perfect muffin! Start by preheating your oven to 350°F (175°C). This helps bake the muffins evenly. While the oven heats, line your muffin tin with paper liners. You can also lightly grease the tin instead. This step makes it easy to remove the muffins later. In a large bowl, combine 1 cup of rolled oats and 1 cup of pumpkin puree. Add 1/2 cup of brown sugar, 1/4 cup of honey or maple syrup, and 1/4 cup of vegetable oil. Crack in 1 large egg and pour in 1 teaspoon of vanilla extract. Mix everything until smooth and well combined. This mixture will be moist and fragrant. In a separate bowl, whisk together dry ingredients. You need 1 teaspoon of baking powder, 1/2 teaspoon of baking soda, 1 teaspoon of ground cinnamon, 1/2 teaspoon of ground nutmeg, and 1/4 teaspoon of salt. Whisking helps air get in, which creates lighter muffins. Gradually add the dry mixture to the wet bowl. Stir until just mixed. Be careful not to overmix, or the muffins may turn tough. Gently fold in 1/2 cup of semi-sweet chocolate chips and, if you like, 1/4 cup of chopped walnuts. Divide the batter into the prepared muffin cups, filling each about two-thirds full. Bake for 18-22 minutes. Use a toothpick to check for doneness. If it comes out clean, the muffins are ready. After baking, let the muffins cool in the pan for about 5 minutes. Then, transfer them to a wire rack to cool completely. For a lovely touch, serve them on a rustic wooden board. A light dusting of powdered sugar on top adds a sweet finish. Enjoy them warm for the best taste! To get soft and fluffy muffins, pay attention to mixing. Combine wet and dry ingredients gently. Over-mixing can lead to tough muffins. Aim for a lumpy batter; it’s okay if you see some flour. Bake until a toothpick comes out clean. This ensures the muffins stay moist and soft. Accurate measuring is key for great muffins. Use dry measuring cups for oats and flour. For sticky items like honey, use a liquid measuring cup. Always level off the top of the cup with a knife. This avoids using too much or too little of an ingredient. Remember, baking is a science, and precision matters. Spices can take your muffins to the next level. Besides cinnamon and nutmeg, try adding ginger or allspice. A pinch of ground cloves adds warmth too. You can also mix in a splash of vanilla extract for extra depth. These little tweaks can make your muffins stand out, giving them a cozy and inviting flavor. {{image_2}} To make these muffins gluten-free, swap regular oats for certified gluten-free oats. This simple change keeps the texture intact while making the muffins safe for those with gluten sensitivities. You can also use almond flour or coconut flour instead of all-purpose flour. These options add unique flavors and keep the muffins moist. To create vegan pumpkin chocolate chip oatmeal muffins, replace the egg with a flax egg. Mix one tablespoon of flaxseed meal with three tablespoons of water and let it sit for five minutes. For the oil, use melted coconut oil or applesauce for moisture. Replace honey with maple syrup for a fully plant-based sweetener. These swaps keep the muffins light and fluffy. You can add cranberries for a tart twist in these muffins. They pair well with the sweetness of pumpkin and chocolate. Chopped pecans also work great. They add a nice crunch and earthy flavor. Feel free to use your favorite nuts or dried fruits. These seasonal add-ins bring variety and fun to your baking. You can store the muffins at room temperature. Use an airtight container to keep them fresh. They stay good for about three days. Place a paper towel inside the container to absorb moisture. This helps keep the muffins soft. To freeze your muffins, first let them cool completely. Wrap each muffin in plastic wrap. Then, place them in a freezer bag. They can last up to three months in the freezer. When you want one, just take it out and let it thaw at room temperature. Reheat muffins for the best taste. You can use the microwave or oven. If you use a microwave, heat for about 10-15 seconds. If you prefer the oven, preheat it to 350°F. Bake for about 5-7 minutes. This makes them warm and soft again. Enjoy your muffins fresh! You can keep the muffins fresh for about 3-5 days. Store them in an airtight container at room temperature. If you want them to last longer, freeze them. They can stay good for about 3 months in the freezer. Just let them thaw before you eat them. Yes, you can use fresh pumpkin! Just make sure to cook and puree it first. This will give your muffins a fresh taste. However, canned pumpkin is usually easier and saves time. You can use white sugar as a substitute. You can also mix white sugar with a bit of molasses to mimic brown sugar. This will give a similar taste and color. You could also try coconut sugar for a healthier option. Yes, feel free to get creative! You can use dark chocolate, white chocolate, or even peanut butter chips. If you like nuts, walnuts or pecans work great. Just make sure to chop them up a bit. Check the muffins with a toothpick. Insert it in the center of a muffin. If it comes out clean, they are done. If there’s batter on the toothpick, give them a few more minutes. They should be golden brown on top when ready. Pumpkin chocolate chip oatmeal muffins are easy and fun to make. We covered key ingredients, step-by-step instructions, and helpful tips to get perfect muffins every time. You can even try different variations to suit your taste. Whether you want a vegan option or need storage tips, there’s a solution for you. Experiment, enjoy each bite, and share with friends and family. Happy baking!

Are you ready to indulge in a warm, sweet treat that’s packed with flavor? These Pumpkin Chocolate Chip Oatmeal Muffins are not just any muffins—they’re a delightful mix of soft, …

Read more

Categories Desserts

Garlic Parmesan Chicken & Potatoes Quick and Easy Meal

January 4, 2026September 15, 2025 by Chef Owen
- 4 boneless, skinless chicken breasts - 1 lb baby potatoes, cut in half - 1/2 cup finely grated Parmesan cheese - 4 cloves of garlic, minced - 1/4 cup extra virgin olive oil - 1 teaspoon dried oregano - 1 teaspoon dried thyme - Salt and freshly ground black pepper to taste - Fresh parsley, chopped (for garnishing) Each ingredient plays a key role in the taste. The chicken gives protein, while potatoes add heartiness. Parmesan cheese brings creaminess and flavor. Garlic enhances the dish's aroma. Olive oil keeps everything moist. Oregano and thyme add warmth. Salt and pepper balance the flavors. To make this recipe, gather a few tools. You will need: - A large mixing bowl for mixing the ingredients. - A baking dish to cook the chicken and potatoes. - A spatula for spreading the cheese mixture. - A measuring cup and spoons for precise measurements. - A knife for cutting the potatoes and mincing garlic. - An oven for baking the dish to perfection. With these ingredients and tools, you are ready to create a tasty Garlic Parmesan Chicken and Potatoes meal! {{ingredient_image_2}} First, let's get everything ready. Preheat your oven to 400°F (200°C). This step makes sure your food cooks well. Next, grab a large bowl. In this bowl, add the halved baby potatoes. They should be fresh and firm. Then, add the minced garlic, olive oil, dried oregano, and dried thyme. Don't forget a good pinch of salt and pepper. Mix all these ingredients together until the potatoes are well coated. This is where the flavor begins! Now, let’s arrange the food in the baking dish. Spread the seasoned potatoes on one side of a large baking dish. Make sure they sit in a single layer. This helps them cook evenly. On the other side, place the chicken breasts. Season them with salt and pepper on all sides. This simple step brings out the chicken's natural flavor. In a small bowl, mix the grated Parmesan cheese with a bit of olive oil. Spread this cheesy mixture on top of each chicken breast. This will create a tasty crust as it bakes. It's time to bake! Place the dish in the preheated oven and set a timer for 25-30 minutes. The chicken should reach an internal temperature of 165°F (74°C). The potatoes will turn tender and golden brown. If you like a crispy top, turn on the broiler for 2-3 minutes. Keep an eye on it to prevent burning. Once everything is done, take the dish out and let it rest for a few minutes. This step helps keep the chicken juicy. Finally, sprinkle some fresh parsley on top. It adds a nice pop of color and flavor! To cook chicken well, start with the right size. Use boneless, skinless breasts. They cook faster and more evenly. Season your chicken with salt and pepper. This simple step adds great flavor. Cook the chicken until it reaches 165°F (74°C). You can check this with a meat thermometer. This ensures it is safe and juicy. If you want a crispy top, broil it for a few minutes. Watch it closely to prevent burning. Spices can really boost the taste of your dish. For Garlic Parmesan Chicken & Potatoes, I use dried oregano and thyme. These herbs add depth and freshness. You can also try adding a pinch of red pepper flakes for heat. Garlic is key in this recipe. It gives a strong, savory taste that pairs well with chicken. Don't forget to season the potatoes too. A little salt and pepper can make a big difference. To get that perfect Parmesan crust, blend the cheese with a bit of olive oil. This creates a smooth paste. Spread the mixture evenly over the chicken. Make sure to cover the tops well. This helps the cheese melt and crisp up nicely while baking. If you want extra crunch, broil the chicken for a few minutes at the end. This will give you a golden, delicious crust that is hard to resist. Pro Tips Rest the Chicken: Allowing the chicken to rest for a few minutes after baking helps the juices redistribute, resulting in a juicier and more flavorful dish. Use Fresh Herbs: For an extra burst of flavor, consider using fresh oregano and thyme instead of dried. They provide a more aromatic and vibrant taste. Adjust Cooking Time: Cooking times may vary based on the thickness of the chicken breasts. Use a meat thermometer to ensure they reach the safe internal temperature of 165°F (74°C). Make It a Meal: Add some seasonal vegetables like broccoli or carrots to the baking dish for a complete meal in one pan, enhancing both flavor and nutrition. {{image_4}} You can add vegetables to this dish for more color and nutrition. Try using carrots, bell peppers, or asparagus. Chop them into bite-sized pieces and toss them with the potatoes. This adds flavor and helps the meal feel more balanced. Just make sure the veggies are cut small enough to cook evenly with the chicken and potatoes. If you want to switch proteins, try using fish or pork. Salmon works well, and it cooks quickly. Chicken thighs are also a great option; they stay juicy and tender. Adjust your cooking time depending on the protein you choose. Always ensure the internal temperature is safe for the type of meat you use. Get creative with seasonings to make this dish your own! Instead of oregano and thyme, try rosemary or basil. You could also use a spice blend like Italian seasoning or lemon pepper. A touch of smoked paprika adds a nice kick. Adjust the salt and pepper to enhance the flavors further. Each variation can completely change the dish! After your meal, let the dish cool down. Place the leftovers into an airtight container. This helps keep the chicken and potatoes fresh. You can store them in the fridge for up to three days. To enjoy again, make sure to check for any off smells or changes in texture. To reheat, you can use the oven or the microwave. For the oven, preheat it to 350°F (175°C). Place the chicken and potatoes on a baking sheet. Cover with foil to keep them moist. Heat for about 15-20 minutes. If using a microwave, place the food on a microwave-safe plate. Heat in 30-second bursts until warm. If you want to save some for later, freezing works well! Let the dish cool completely. Place the chicken and potatoes in a freezer-safe container. Make sure to label it with the date. You can freeze it for up to three months. When you’re ready to eat, thaw it overnight in the fridge before reheating. I love serving Garlic Parmesan Chicken and Potatoes with a fresh salad. A simple green salad works well. You can add cherry tomatoes, cucumbers, and a light vinaigrette. Another great option is steamed vegetables. Broccoli or green beans add color and crunch. You could also pair it with crusty bread. This helps soak up all those tasty juices from the dish. Yes, you can use frozen chicken and potatoes. Just remember to adjust your cooking time. Frozen chicken may need an extra 10-15 minutes. Ensure it reaches 165°F (74°C) inside. Frozen potatoes can also work, but they might not brown as nicely. Thawing them first can help with even cooking. However, if you’re in a hurry, they can go straight from freezer to oven. To check if the chicken is done, use a meat thermometer. Insert it into the thickest part of the chicken breast. It should read 165°F (74°C). If you don’t have a thermometer, cut into the chicken. The juices should run clear, and the meat should not be pink. Another sign is if the chicken feels firm when pressed. These methods help ensure your chicken is safe and tasty. This blog post covered the key steps to create Garlic Parmesan Chicken & Potatoes. We explored ingredient lists, precise measurements, and the tools needed for success. I also shared clear preparation and cooking steps to make the dish shine. Plus, I included tips to enhance flavor and achieve a perfect crust. Remember, cooking is fun! You can switch up ingredients and use what you have. This dish is easy to store and reheat. Now you are ready to impress with a delicious meal! Happy cooking!

If you crave a simple yet delicious dinner, try my Garlic Parmesan Chicken & Potatoes! This quick meal is packed with flavor and easy to make. You need just a …

Read more

Categories Dinner

Oven Baked Chicken Parmesan Savory and Simple Meal

January 13, 2026September 12, 2025 by Chef Owen
For this dish, you will need the best ingredients to get great flavor. Here’s a list of what you need: - 4 boneless, skinless chicken breasts - 1 cup Italian-seasoned breadcrumbs - 1/2 cup freshly grated Parmesan cheese - 2 cups marinara sauce (homemade or store-bought) - 2 cups shredded mozzarella cheese - 2 large eggs, beaten - 1 teaspoon garlic powder - 1 teaspoon dried oregano - Salt and freshly ground black pepper, to taste - Fresh basil leaves, for garnish These items help create layers of flavor. The chicken serves as the main protein, while the cheeses add richness. The breadcrumbs give a nice crunch. You might not have some ingredients on hand. Here are some easy swaps: - Use chicken thighs instead of breasts for more flavor. - Swap the marinara sauce for any tomato sauce you like. - If you lack Italian-seasoned breadcrumbs, mix plain breadcrumbs with Italian herbs. - You can use nutritional yeast instead of Parmesan for a dairy-free option. These substitutes keep the dish tasty while making it easier for you. Want to make your dish even better? Consider adding these ingredients: - Red pepper flakes for spice - Fresh herbs like parsley or thyme for added freshness - A splash of lemon juice for brightness - Sliced mushrooms or spinach for extra veggies These optional ingredients can elevate your meal and cater to your taste. Feel free to get creative! {{ingredient_image_2}} First, set your oven to 375°F (190°C). This temperature helps the chicken cook evenly. While the oven heats, take a large baking dish. Lightly grease it with cooking spray or olive oil. This step keeps the chicken from sticking. Next, grab your chicken breasts. Place them on a clean cutting board. Season both sides with salt and freshly ground black pepper. Add garlic powder and dried oregano for extra flavor. Make sure each piece gets an even coating. Now it's time to prepare your dredging station. In a shallow bowl, beat the two large eggs until smooth. In another bowl, mix the Italian-seasoned breadcrumbs and grated Parmesan cheese. Combine them well for a uniform flavor. Take each chicken breast. Dip it into the egg mixture first. Let any extra egg drip off. Then, coat the chicken in the breadcrumb mix. Press gently to help the crumbs stick. Arrange the breaded chicken in your greased baking dish. Make sure they do not touch. This helps them cook evenly. Bake the chicken for 25-30 minutes. Check that the chicken reaches an internal temperature of 165°F (74°C). The coating should be golden brown and crispy. Carefully take the baking dish out of the oven. Spoon a generous amount of marinara sauce over each chicken breast. After that, sprinkle shredded mozzarella cheese on top. Return the dish to the oven for an extra 10-12 minutes. The cheese should be melted, bubbly, and lightly browned. Let the chicken rest for a few minutes before serving. Garnish with fresh basil leaves for added color and flavor. To get that perfect crispy coating, use Italian-seasoned breadcrumbs. These add flavor and texture. Mix them with freshly grated Parmesan cheese for extra crunch. Make sure to press the breadcrumbs onto the chicken. This helps the coating stick well during baking. Bake the chicken without overcrowding the pan. This allows hot air to circulate and crisp it up evenly. For juicy chicken, do not overbake it. Bake at 375°F (190°C) for 25-30 minutes. Use a meat thermometer to check that the inside reaches 165°F (74°C). Season the chicken breasts well with salt, pepper, garlic powder, and oregano. This adds flavor and keeps the moisture locked in. Let the chicken rest after baking. This helps retain juices before serving. Presentation matters! Serve the chicken on a large platter. Drizzle extra marinara sauce on top for color. Add a sprinkle of freshly grated Parmesan cheese. Finish with fresh basil leaves for a pop of green. This makes the dish look appealing and inviting. The vibrant colors will make your meal feel special and delicious. Pro Tips Choose the Right Chicken: For the juiciest results, opt for free-range or organic chicken breasts. They tend to have better flavor and texture. Make It Crispy: For an extra crispy coating, consider double-dipping the chicken in the egg and breadcrumb mixture. Homemade Marinara: If time permits, try making your own marinara sauce for a fresher flavor that elevates the dish. Rest Before Serving: Allow the chicken to rest for a few minutes after baking. This helps the juices redistribute, keeping the chicken moist. {{image_4}} You can easily make a gluten-free version of this dish. Use gluten-free breadcrumbs instead of regular ones. You may also want to check your marinara sauce for gluten. Most store-bought versions are safe, but it's good to read the label. This simple switch keeps the flavor while catering to those who need gluten-free meals. You don’t have to stick to just mozzarella. Try mixing cheeses for a new twist! Provolone, fontina, or gouda can add unique flavors. You can even blend different cheeses for a richer taste. Just ensure you use the same amount so the dish cooks the same. If you want a vegetarian option, swap chicken for eggplant. Slice the eggplant into rounds and follow the same steps as the chicken. The eggplant needs to be salted first and let sit for about 30 minutes. This removes excess moisture and bitterness. Coat it with the same breadcrumbs and cheese for a tasty meal. Serve it hot with marinara sauce and enjoy! To keep leftover chicken parmesan fresh, let it cool first. Then, place it in an airtight container. You can store it in the fridge for up to three days. If you want to enjoy it later, consider freezing it. To reheat chicken parmesan, preheat your oven to 350°F (175°C). Place the chicken in a baking dish. Cover it with foil to keep it moist. Heat for about 20 minutes, or until it’s warm and the cheese is melted. You can also use a microwave, but this may make the coating less crispy. For long-term storage, freeze the chicken parmesan in a freezer-safe container. Wrap each piece in plastic wrap before placing it in the container. It can last up to three months in the freezer. To enjoy, thaw it overnight in the fridge before reheating. This method helps keep the flavors intact and the chicken tender. Bake the chicken for 25-30 minutes at 375°F (190°C). Check that it reaches 165°F (74°C). The coating should turn golden and crisp. This ensures your chicken stays juicy and safe to eat. Yes, you can use frozen chicken breasts, but thaw them first. Thawing helps them cook evenly. You can place them in the fridge overnight. If you're short on time, use the microwave. Make sure they are fully thawed before seasoning. You can use pesto, Alfredo sauce, or even a homemade tomato sauce. Each sauce brings a unique flavor. Choose what you like best to match your taste. You can also mix sauces for a fun twist. To make it healthier, try using whole wheat breadcrumbs. You can also bake the chicken without cheese or use less cheese. Adding spinach or zucchini to the marinara sauce boosts nutrition. These small changes keep the flavor while reducing calories. Yes, you can prepare this dish ahead of time. Bread the chicken and store it in the fridge for up to 24 hours. You can also bake it, let it cool, and then store it. Just reheat it in the oven before serving for best results. Oven-baked chicken parmesan is easy and tasty. We covered key ingredients, simple steps, and helpful tips. You learned how to make it crispy and juicy, plus some fun variations. Remember, you can store and reheat leftovers easily. Feel free to experiment with flavors too. Enjoy the cooking process and share the dish with others. You might end up with a family favorite!

Are you ready to make a delicious Oven Baked Chicken Parmesan? This dish is savory, simple, and sure to impress. I’ll walk you through each step, from choosing the right …

Read more

Categories Dinner
Older posts
Newer posts
← Previous Page1 … Page28 Page29 Page30 … Page125 Next →

THE RECIPE HATCH

Where tasty ideas take flight! 🚀🐣 Fresh, easy recipes hatched daily to make cooking simple and flavorful.

PAGES

Home About Contact Privacy Policy Terms & Conditions Cookie Policy GDPR Policy Copyright Policy Disclaimer

CATEGORIES

Appetizers Desserts Salads Breakfast Dinner

Contact

  • Pinterest
  • Mail
Copyright © 2026 The Recipe Hatch. All rights reserved.